1
Car Racing Competition @ WCCI2008
Software Manual
TORCS is car racing simulator designed to let users develop and run their own programmed driverbots. This is usually done by (i) developing a C++ bot module following some TORCS guidelines and
(ii) compiling and installing it.
The Car Racing Competition software extends TORCS and simplifies the development of bots by
providing C++ and JAVA API easy to use for developing your own bot under your preferred OS. To this
purpose, the competition software provides a client-server architecture that separates the development of
the car controller from TORCS. Therefore, competitors just work on the client side using their preferred
programming language and do not need any understanding of TORCS itself.
The competition software consists of two main modules: a server-bot module and a client module.
The server-bot is a module for TORCS that provides the communication to the remote (client) controller
and implements the models for the car sensors and the controller actions models. It does not have any
intelligence. The client module provides to the competitors a representation of the current game status
(received by the server-bot) and an easy-to-use interface to control the server-bot actions.
This document is organized as follows. Section 1 explains how to install the server-bot module.
Section 2 provides a detailed description of the sensors and actions available to the controller which
you can use when developing your own bot. Section 3 explains how sensors and actions can be used by
the client module (i.e., what you need in practice to develop your entry to the competition). Finally,
Section 4 explains how to configure TORCS to run your own bot once you developed it.
1
Installing the server-bot module
To provide a very accessible interface to TORCS we developed two modules to run TORCS in a
client/server architecture. The server has been developed by providing two specific bot driver called
wcci2008competition and wcci2008trainer that, instead of having its own intelligence, sends the game
state to a client module and wait for a reply, i.e., an action to be performed by the controller. So to
begin the competition, we first need to install TORCS and the competition server-package provided in
this bundle.
1.1
1.1.1
Linux – from sources
Compiling TORCS
Download the “all-in-one Source Package for Linux and FreeBSD” from: http://torcs.sourceforge.net/.
Then configure, compile and install TORCS following the instructions in the README provided with
the TORCS source package. Additional information are available at http://www.berniw.org/ (TORCS
→ Installation – from left bar).
KNOWN ISSUE: depending on the distributin you are using, it could be necessary to run
./configure --x-libraries=/path/to/your/X11/lib (e.g. on OpenSUSE --x-libraries=/usr/X11R6/lib/).
1.1.2
Patching TORCS
To add some features to our client/server interface (e.g. the possibility of restarting the race directly
from the client) you need to slightly modify the TORCS sources. To this purpose, download from
the competition website the TORCS Patch for linux (linux v02.tgz package) and unpack it into your
base TORCS directory (i.e. where you run ./configure). This will create a new directory called
1
wcci2008patch. Enter the wcci2008patch directory and run the do patch.sh (run do unpatch.sh to
revert the modifications). You should be able to apply the patch with the following commands:
cp wcci2008patch.tgz /path/to/your/torcs/base/directory
cd /path/to/your/torcs/base/directory
tar xfz wcci2008patch.tgz
cd wcci2008patch
sh do_patch.sh [or do_unpatch.sh to revert changes]
Then rebuild torcs and re-install it:
make
make install (as root if necessary)
1.1.3
Installing server-bot
Now you need to install one (or both) of the server-bots provided, that are TORCS bost that would act
as a server for your competition entry. Download and unpack the Linux Server package (linux v02.tgz)
where you prefer. To compile and install it, you need to have TORCS installed and you have to set
properly the environment variables TORCS_BASE and MAKE_DEFAULT:
export TORCS_BASE=/path/to/your/torcs/base/directory
export MAKE_DEFAULT=$TORCS_BASE/Make-default.mk
Then, go in the directory where you unpacked the server-bot, compile and install it as follows:
make
make install (you might need to be root to run this command)
To check if the server-bot is properly installed, just run torcs and from the menu select:
Race → Quick Race → Configure Race → Accept.
If everything is installed correctly, you should find the wcci2008competition and/or wcci2008trainer bot
in the list of “Not Selected Player” on the right.
1.2
1.2.1
Windows – binaries
Installing TORCS
Download binary version of TORCS for Windows from http://torcs.sourceforge.net/ and install
it.
1.2.2
Patching TORCS
For Windows we provide binaries containing both the changes to TORCS engine and the server-bot.
Download the Windows Patch package (win-patch.tgz) from competition website and copy it in your
TORCS directory (i.e. where you installed the game). Unpack it in that directory (it should ask for
overwriting some files in that directory, answer always yes!). To check wether everything is properly
installed, just run wtorcs and from the menu select:
Race → Quick Race → Configure Race → Accept.
You should be able to find the wcci2008competition bot in the list of “Not Selected Player” on the right.
1.3
Mac OsX
Unfortunately we are not currently able to provide a reasonable support to Mac users, as the latest
version of TORCS seems to have problems under OsX. By the way all the client interfaces provided are
fully working under Mac, therefore it is possible for Mac users to develop their entries as long as they can
set up a windows or linux machine (either a virtual machine or a physical one) with a working server.
2
2
Sensors/Effectors Interface
In this section we describe the sensors end the effectors provided from our TORCS Competition Server.
2.1
Sensors Definition
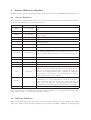
The sensors give several information about your own car and, in general, the current game state. Table 1
shows a detailed description of the available sensors.
Name
Range (unit)
Description
Angle between the car direction and the direction of the track
axis.
Time elapsed during current lap.
angle
[-π,+π] (rad)
curLapTime
[0,-] (s)
damage
[0,-] (point)
distFromStart
distRaced
[0,-] (m)
[0,-] (m)
Distance of the car from the start line along the track line.
Distance covered by the car from the beginning of the race
fuel
[0,-] (l)
gear
{-1,0,1,· · · 6}
lastLapTime
[0,-] (s)
Current fuel level.
Current gear: -1 is reverse, 0 is neutral and the gear from 1 to
6.
Time to complete the last lap
Current damage of the car (the higher is the value the higher
is the damage).
Vector of 18 sensors that detects the opponent distance in meters (range is [0,100]) within a specific 10 degrees sector: each
sensor covers 10 degrees, from -π/2 to +π/2 in front of the car.
opponents
[0,100] (m)
racePos
1,2,· · ·
Position in the race with to respect to other cars.
rpm
[2000-7000] (rpm)
Rumber of rotation per minute of the car engine.
speedX
- (km/h)
Speed of the car along the longitudinal axis of the car.
speedY
- (km/h)
Speed of the car along the transverse axis of the car.
track
[0,100] (m)
trackPos
-
wheelSpinVel
[0,-] (rad/s)
Vector of 19 range finder sensors: each sensors represents the
distance between the track edge and the car. Sensors are oriented every 10 degrees from -π/2 and +π/2 in front of the car.
Distance are in meters within a range of 100 meters. When the
car is outside of the track (i.e., pos is less than -1 or greater
than 1), these values are not reliable!
Distance between the car and the track axis. The value is
normalized w.r.t to the track width: it is 0 when car is on the
axis, -1 when the car is on the left edge of the track and +1
when it is on the right edge of the car. Values greater than 1
or smaller than -1 means that the car is outside of the track.
Vector of 4 sensors representing the rotation speed of wheels.
Table 1: Description of available sensors. Range is reported with the corresponding unit measure (where
it is possible). Symbol - means that range is not limited.
2.2
Effectors Definition
Effectors represent what action the client bot can perform and, therefore, how it can affect the current
game state. Table 2 shows a detailed description of the effectors available. While accel, brake, gear,
3
and steer effectors represents properly some control actions on the car. The effector meta is used to
affect the status of the game and was introduced to restart the current race.
Name
Range
accel
[0,1]
Description
Virtual gas pedal (0 means no gas, 1 full gas).
brake
[0,1]
Virtual brake pedal (0 means no brake, 1 full brake).
gear
-1,0,1,· · ·,6
steering
[-1,1]
meta
0,1
Gear value.
Steering value: -1 and +1 means respectively full left and right,
that corresponds to an angle of 0.785398 rad.
This is meta-control command: 0 do nothing, 1 ask competition
server to restart the race.
Table 2: Description of available effectors
3
3.1
The client module
The C++ client
The client is a stand-alone console applications provided with C++ sources. In this section we first
explain how it can be compiled and used and then we give some details about extending it to develop
your own bot.
3.2
Compiling and using the client
Linux and OS X. First, upack the client package in a directory. Than open a terminal in the directory
where you unpacked the client and type make to compile it. The compilation process should end without
any error or warning and you should now have an executable named client in you directory. Now, in
order to launch the client you have to type from the terminal:
./client <ip> <port> <id> [<maxEpisodes> <maxSteps>]
where <ip> is the IP address of the machine where TORCS with the server-bot is running; <port>
is the port on which the server-bot is listening (you must use 3001); <id> is your bot ID (you must
use wcci2008); [<maxEpisodes> <maxSteps>] are optional parameters to set respectively the maximum
number of learning episodes to perform and the maximum number of control steps in each episode.
Windows. First, upack the client package in a directory. The package is provided with a DevC++
project (http://www.bloodshed.net/devcpp.html) but of course you can use your preferred C++
development tool/IDE. To compile it under Windows, just uncomment the first two line of client.cpp
according to the instruction in the source file. In the package you find also the system library WS2_32.lib
necessary for using the WinSock functions. You should be able to compile the client without any error
or warning and build the client.exe executable. To launch the client open an MS-DOS console and
type:
client.exe <ip> <port> <id>
where <ip> is the IP address of the machine where TORCS with the server-bot is running; <port>
is the port on which the server-bot is listening (you must use 3001); <id> is your bot ID (you must
use wcci2008); [<maxEpisodes> <maxSteps>] are optional parameters to set respectively the maximum
number of learning episodes to perform and the maximum number of control steps in each episode.
4
3.3
Extending the client with your driver
To develop your own bot, you have to implement a C++ class that extends the BaseDriver class
provided. In particular, it is necessary to implement three functions:
• string drive(string sensors): where the input parameter sensors is a string representing the
current state of the game perceived by your agent and the function has to return a string with the
controls representation.
• void onShutdown(): this function is called at the end of the experiment (i.e. at the end of the
race) before the client terminates
• void onRestart(): this function is called when the race is restarted upon client request (this
function could be used to free memory, close files, saving solutions, etc.).
You are provided with an example of a very simple programmed controller: the SimpleDriver. The
SimpleDriver is used by default to build the client executable. Therefore, in order to build a client
executable to run your own driver:
• on Windows: uncomment the first lines of client.cpp and set properly the __DRIVER_CLASS__
and __DRIVER_INCLUDE__ to respectively the name of your implementation of the driver class and
to the header file of your driver class.
• on Linux and OS X: In the Makefile set properly the DRIVER_CLASS and DRIVER_INCLUDE
variables to respectively the name of your implementation of the driver class and to the header file
of your driver class.
3.4
Time Constraints
In the development of your driver, keep in mind that the server has a timeout when calling the drive()
function, to make it possible running the race in real time: your bot should be able to send back the
action in 10ms in order to keep in sync with the server. If your bot is slower, you would probably
loose the sync with the server and so it is up to you to find out how to avoid that this will happen. In
order to allow the application of computationally intensive techniques to develop the bots, we provide
an additional server bot, called wcci2008trainer, with a timeout of 10 seconds. Notice that the final
evaluation will be performed with the same time constraints required by wcci2008trainer.
3.5
The JAVA client
Details of the JAVA implementation of the client can be found in the JAVA package available at:
http://cig.dei.polimi.it/wp-content/uploads/2008/04/raceclient_v03.zip
4
Using and Configuring the Competition Server
Once you have installed TORCS and the server-bot provided (either Windows or Linux version), you
can start to develop your own bot extending one of the provided client modules. When you want to run
your own bot you have to launch TORCS and start a race, then you have to launch the client extended
with your own programmed bot and finally your driver bot will start to run in the race. In TORCS there
are several race modes available, however the client-server modules supports only two modes:
• the Practice mode that allows a single bot at once to race
• the Quick Race modes that allows multiple bots to race against
However, before starting a race with TORCS, you need to configure the following things:
• you have to select the track on which you want to run the race
• you need to add the wcci2008competition bot to race participants and eventually other bots you
want as opponents.
5
• you have to define how many laps or how many kilometers that race will last
• you might want to select the desired display mode
In TORCS, all the above options are stored in a set of XML configuration files (one for each race mode).
Under Linux configuration files are created after the game is launched for the first time and are located
in the following directory:
$HOME/.torcs/config/raceman/
where $HOME is your home directory. Under Windows instead the configuration files are located in
the .\config\raceman\ directory located under the directory where you installed TORCS. We provide
two standards XML files for the Practice (practice.xml) and Quick Race (quickrace.xml) modes. To
use them you simply have to copy them into your configuration directory (as explained above). However
you might want to change this configurations according to your needs and this can be done in two two
ways: through the graphical user interface (GUI) of the game or editing directly the XML configuration
files.
4.1
Configuring TORCS through GUI
The easiest way to configure the race options is using the TORCS GUI. Each race mode can be fully
configured selecting from the main menu of TORCS:
Race → Quick Race [or Practice] → Configure Race.
Once you change the configurations of a particular race mode, all the changes are stored automatically
by TORCS the corresponding configuration file.
Selecting track. In the first screen you can select any of the track available in the games and then
click on Accept to move to the next screen.
Selecting bots. The second screen allows the selections of bot that will participate to the race. Notice
that in the Practice mode only one bot is allowed, therefore in order to add a bot you have first to
deselect the currently selected one (if any). First of all you have to make sure that the server-bot,
wcci2008competition, is within the selected drivers, otherwise your own bot will not be in the race.
Then, in the Quick Race mode only, you can add other drivers to the race from the list on the right
(representing all the bot drivers provided with the game). When adding bots pay attention to the car
model they use: there are several types of car in TORCS with different features and you might want to
be sure that only drivers with the same cars will race against. Notice that wcci2008competition uses a
Mercedes CLK DTM and the others bot using the same car are:
• bt7 bt8
• olethros 7
• berniw two 8
• inferno 4
When you have selected all the drivers that will be in the race, you can click on Accept and move to the
next screen
Setting race length and display mode. In the final configuration screen you can set the race length
either as the distance to cover (in km) or as the number of laps to complete. Finally you can choose
between two display modes option: normal or results only. The normal mode allows you to see the race
either from the point of view of one bot driver or as an external spectator. In this display mode, the
time speed can be accelerated up to four times the normal speed, that is you can see 1 minute of race in
15s. In the results only mode instead you will not see the race but only the lap times (in Practice mode)
or the final result of the race (in Quick Race mode). However this mode allow you to run simulation
much faster: time speed can be accelerated up to 20 times (or even more), that is one minute of race
can be simulated within 3 seconds.
6
Enabling “results only” mode for “quick race”. By default, the Results Only display mode is
not available by default for the Quick Race (this is what make Practice mode really different from Quick
Race in TORCS). This features cannot be turned on from the TORCS GUI but requires a modification to
the configuration file quickrace.xml (as explained in a following section). However the quickrace.xml
example provided already has this modification and therefore you simply need to copy this file in your
configuration directory to enable the display mode control from the TORCS GUI.
4.2
Configuring TORCS through Configuration Files
All the race settings described above can be configured also editing directly a configuration file. In
TORCS each race type as its own XML configuration file. The settings of Practice are stored in
practice.xml while the settings of Quick Race are in quickrace.xml.
Selecting track. To select the track, find the “Tracks” section inside the XML file, that will contain
the following section:
<section name="1">
<attstr name="name" val="TRACK-NAME"/>
<attstr name="category" val="TRACK-CAT"/>
</section>
where you should (i) replace TRACK-ROAD with the category of desired track (i.e., road,oval or dirt);
(ii) replace TRACK-NAME with the name of desired track (e.g., aalborg). For a complete list of the
installed tracks in TORCS, you can see the list of all the directories organized under three main directories, tracks/road/,tracks/oval/ and tracks/dirt/, where TORCS is installed. Under Windows you find them in your main torcs directory, under linux the tracks directories could be found in
/usr/local/share/games/torcs/ or in different places depending on your distribution.
Selecting bots. To select bots you should modify the “Drivers” section inside the XML file. In
particular in this section you should be able to find a list of the following elements:
<section name="N">
<attnum name="idx" val="IDX"/>
<attstr name="module" val="NAME"/>
</section>
where N means you are editing the N th bots that will be in the race. The IDX is the index of the instance
of the bot you want to add: for some bots provided with the game there are several instances (e.g., bt bot
has several instances: bt 1, bt 2, · · ·); when a bot has only one instance (e.g., the wcci2008competition
bot) IDX should be set to 1). The NAME should be replaced with the name of bot you want to add without
the index of the instance (e.g., to add the bt 7 bot, you should use as NAME simply bt and 7 as IDX).
A list of available drivers can be found in the drivers/ directory located in the same place where you
have the tracks directory introduced before.
Setting race length and display mode. To change race length and display mode you have to modify
the “Quick Race” or “Practice” section (depending on which race type you want to setup). In particular
you should change the following lines:
...
<attnum name="distance" unit="km" val="DIST"/>
...
<attnum name="laps" val="LAPS"/>
...
<attstr name="display mode" val="MODE"/>
...
where DIST should be either the desired race length in km or 0 if the number of laps is used as race
length. Accordingly, LAPS should be either the desired number of laps or 0 if the distance is used as race
length. Finally MODE is either normal or results only.
7
Enabling “results only” mode for “quick race”. In order to enable results only mode on Quick
Race you need to do add following lines under the section “Options” inside the section “Configuration”:
<section name="2">
<attstr name="type" val="display mode"/>
</section>
4.3
Start to Race!
Once you configured properly TORCS you are ready to run your own bot. From the main menu of
TORCS select:
Race → Quick Race [or Practice] → New Race.
You should see that TORCS screen should stop reporting the line Initializing Driver wcci2008competition...
and the OS terminal should report Waiting for request on port 3001. This means that the serverbot wcci2008competition is waiting for your client to start the race. After the race is started, it can be
interrupted from the user by pressing ESC and then by selecting Abort Race from the menu. The end of
the race is notified to the client either if interrupted by user or if ended because the distance/lap limit is
reached. Please notice that choosing Quit Game instead of Abort Race to end race will not result in a
correct notification of the end of the race to the client and therefore the client will not be able to perform
a clean shutdown as expected.
8