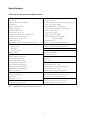
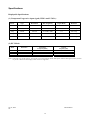
1
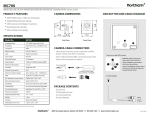
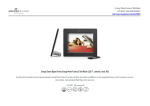
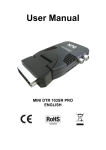
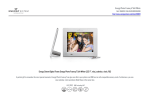
Safety Instructions
Power:
This set operates on a DC power adapter which connects to an AC mains supply. The voltage of the AC
mains supply is as indicated on the label on the back cover. In the event of thunderstorms or power-cuts,
please pull out the antenna and mains plugs.
Warning:
To prevent fire or shock hazard, do not expose the set to rain or moisture. Do not rub or strike the Active
Matrix LCD with anything hard as this may scratch, mar, or damage the Active Matrix LCD permanently.
TV Antenna:
Connect the antenna cable to the TV Antenna port. For the best reception, an outdoor antenna should be
used.
Location:
Position your set so that no bright light or sunlight falls directly onto the screen. Care should be taken not to
expose the set to any unnecessary vibration, moisture, dust or heat. Also ensure that the set is placed in a
position to allow a free flow of air. Do not cover the ventilation openings on the back cover.
Cleaning:
Unplug the set before cleaning the face of the LCD Screen. Dust the set by wiping the screen and the cabinet
with a soft, clean cloth. If the screen requires additional cleaning, use a clean, damp cloth. Do not use liquid
cleaners or aerosol cleaners.
Service:
Never remove the back cover of the set as this can expose you to very high voltage and other hazards. If the
set does not operate properly, unplug it and call your dealer.
Turning this TV on/off (stand-by mode)
Before turning on your TV, make sure the mains lead is properly plugged into an appropriate AC
wall socket.
1.
To turn on your TV, press the POWER button on the TV set or on the remote control.
2.
The LED indicator turns green (about 5 seconds) and this TV set turns on.
3.
While the TV set is on, it will turn the TV set into stand-by mode by pressing the POWER button
again, and the LED indicator will turn amber.
)
Do not leave your set in stand-by mode for a long period of time. If you will be away for long on
holiday, turn your set completely off by unplugging from the mains lead and antenna.
2
Contents
Safety Instructions ....................................................................................................................... 2
Turning this TV on/off (stand-by mode) ............................................................................ 2
Overview of this TV .................................................................................................................... 4
Accessories.......................................................................................................................... 4
Front View of this TV......................................................................................................... 4
Screen Vertical Tilting ........................................................................................................ 4
Rear View of this TV .......................................................................................................... 5
Remote Control ............................................................................................................................ 6
OSD Menu ................................................................................................................................... 7
OSD Main Menu................................................................................................................. 7
Choosing OSD Language.................................................................................................... 7
OSD Menu in SCART Mode (SCART AV, SCART S-Video and SCART RGB)............ 7
OSD Menu in Component Mode (YCbCr and YPbPr) ...................................................... 8
OSD Menu in PC DVI Mode.............................................................................................. 8
OSD Menu in TV Mode...................................................................................................... 9
Channel Settings in TV Mode.................................................................................................... 10
Auto-Search of TV Channels............................................................................................ 10
Manual-Search of TV Channels........................................................................................ 10
A. Fine-Tuning TV Channel Frequency .................................................................. 10
B. Deleting TV Channels ......................................................................................... 11
C. Changing the Name of TV Channels .................................................................. 11
Swapping the TV Channel ................................................................................................ 11
CANAL+ Function ........................................................................................................... 11
Basic Trouble-Shooting ............................................................................................................. 12
Specifications ............................................................................................................................. 13
Technical and Environmental Specifications.................................................................... 13
Displayable Specifications................................................................................................ 14
3
Overview of this TV
Accessories
•
•
•
•
Remote control x 1;
AC power cord x 1;
Power Adapter (12V, 5A) x 1;
This user manual.
Front View of this TV
Control buttons on the right side of this TV set have the same functions as of the same buttons on the remote
control. Basically, this operation manual provides a description based on operation with the remote control.
The Power indicator LED will become green when the TV set is on, amber when the TV set is in stand-by
mode.
Screen Vertically Tilting
The TV screen could vertically tilt up to 20 degree. Adjust the angle so that you could watch the program
picture playing on the TV screen most comfortably.
4
Overview of this TV
Rear View of this TV
(1) DC IN: connection to power adapter (DC 12V) (5A min.)
Use the supplied power adapter and power cord to do the connection.
(2) DVI input (29-pin):
Connect DVI cable between the TV and your PC. Connect the audio cable between the TV and your PC.
(3) HeadPhone: Plug the headphone mini-plug into the Headphone jack on the TV set.
Note: While the headphone is connected, the TV set’s built-in speakers will be automatically disabled.
(4) Component IN: for YCbCr/YPbPr input signals (auto-detection between YCbCr and YPbPr signals)
Connect the component video cables to each of the Y, Pb/Cb, Pr/Cr connectors on the TV and DVD.
Connect the component audio cables to “L“ (white) and “R” (red) on the TV and the DVD.
(5) ANTENNA: Connection for TV channel signal received from an antenna and/or cable television network.
(6) FULL SCART: auto-detection between SCART AV, SCART S-Video and SCART RGB
Connect the SCART cable between the SCART connector of the TV set and the external devices (DVD,
VCR, or VCD).
Note:
(1) Make sure you already select a correct source mode to receive input signals from different connections.
(2) Whenever you are making the connection, ensure that all devices (including this TV set) are switched off.
Refer to the documentation supplied with your external devices for detailed connection instructions and
associated safety precautions.
5
Remote Control
When using the Remote Control, aim it at the Remote Control sensor of this TV. Please make sure the
batteries are correctly installed in the remote control.
Power: switch the TV on (from stand-by mode) or off to standby mode
TV/SCART: switch between TV and SCART signal source
COMPONENT: change signal source to component YPbPr or
YCbCr
DVI: change signal source to DVI
RECALL: jump to the last TV channel visited
SLEEP: switch the TV auto-off after a certain period of time
DISP: display current input signal source
display the channel information (in TV mode)
MTS: select MTS mode (Mono, Stereo, SAP)
MUTE: switch the sound on or off
CH+/CH-: select the channel/menu item up/down
MENU: enter/exit OSD menu
VOL+: Volume up / increase the function value of OSD-menu
item / enter the sub-menu of selected menu-item
VOL-: Volume down / decrease the function value of OSDmenu item / enter the sub-menu of selected menu-item
Page Index Buttons: use the Red, Green, Yellow, and Blue
buttons to follow the page index instructions listed in
corresponding colors on the TeleText page
TELETEXT: enter or exit the TeleText pages
MIX: switch between the Mix and Text modes
ZOOM: zoom-out the current TeleText page
INDEX: get back to the main page of TeleText (page 100)
6
OSD Menu
OSD Main Menu
In each different source mode, press the Menu button on the remote control to activate OSD menu. Use
CH+/CH- (▲/▼) buttons to select items in the menu. Use VOL+/- (+/-) buttons to enter the sub-menu of
selected item. Use CH+/CH- (▲/▼) buttons to select items in the sub-menu, and use VOL-/VOL+ (+/-) to
change the function value of selected items. After adjusting, press the Menu button to exit current OSD
menu (sub-menu).
Choosing OSD Language
1.
2.
3.
4.
5.
Press Menu button to display OSD Main Menu.
Press CH+/CH- buttons to select System.
Press VOL+/- buttons to enter System sub-menu.
Press CH+/CH- buttons to select Language.
Press VOL+/- buttons to select between different languages (English/French/Spanish/German/Italian).
OSD Menu in SCART Mode (SCART AV, SCART S-Video and SCART RGB)
1. Video sub-menu:
-
-
-
Contrast: 0 ~ 100
Brightness: 0 ~ 100
Colour: -50 ~ 50
Video Mode: Normal, Natural, Cinema, Sport, Vivid
Sharpness:
- Sharpness: 0 ~ 100
- Border Effect (the sharpness of the shape of each object): 0~100
User RGB:
- Red: 0 ~ 100
- Green: 0 ~ 100
- Blue: 0 ~ 100
Reset (Factory Default setting): No, Yes
2. Audio sub-menu:
-
Volume: 0 ~ 100
Bass: 0 ~ 100
Treble: 0 ~ 100
Balance: -50 (Left) ~ 50 (Right)
Audio Mode: User (to recall your own setting), Preset (Factory Default setting), Soft (a softer setting)
Advanced:
- Auto Volume Control (This feature maintains an equal volume level; even if you change
channels/programs): Off, On
- Spatial Effect (surrounding effect): Off, On
- Speakers: Mono, Stereo
3. System sub-menu:
-
Language: English, French, Spanish, German, Italian
Colour System: Auto, PAL, SECAM, NTSC
SCART Auto (switch to SCART mode, whenever a SCART input signal is received): On, Off
Sleep Timer:
- Timer: 0~90 minutes
- Status: Off , On
7
OSD Menu in Component Mode (YCbCr and YPbPr)
1. Video sub-menu:
-
Contrast: 0 ~ 100
Brightness: 0 ~ 100
Colour: -50 ~ 50
Sharpness: 0 ~ 100
Video Mode: Normal, Natural, Cinema, Sport, Vivid
Reset (Factory Default setting): No, Yes
2. Audio sub-menu:
-
Volume: 0 ~ 100
Bass: 0 ~ 100
Treble: 0 ~ 100
Balance: -50 (Left) ~ 50 (Right)
Audio Mode: User (to recall your own setting), Preset (Factory Default setting), Soft (a softer setting)
Advanced:
- Auto Volume Control (This feature maintains an equal volume level; even if you change
channels/programs): Off, On
- Spatial Effect (surrounding effect): On, Off
- Speakers: Mono, Stereo
3. System sub-menu:
-
Language: English, French, Spanish, German, Italian
Colour System: Auto, PAL, SECAM, NTSC
SCART Auto (switch to SCART mode, whenever a SCART input signal is received): On, Off
Sleep Timer:
- Timer: 0~90 minutes
- Status: On, Off
OSD Menu in PC DVI Mode
1. Video sub-menu:
-
-
-
Contrast: 0 ~ 100
Brightness: 0 ~ 100
Sharpness: 0 ~ 100
Color Temperature: User, Cool, Natural, Warm, sRGB
User RGB:
- Red: 0 ~ 100
- Green: 0 ~ 100
- Blue: 0 ~ 100
Reset (Factory Default setting): No, Yes
2. Audio sub-menu:
-
Volume: 0 ~ 100
Bass: 0 ~ 100
Treble: 0 ~ 100
Balance: -50 (Left) ~ 50 (Right)
Audio Mode: User (to recall your own setting), Preset (Factory Default setting), Soft (a softer setting)
Advanced:
- Auto Volume Control (This feature maintains an equal volume level; even if you change
channels/programs): On, Off
- Spatial Effect (surrounding effect): Off, On
- Speakers: Mono, Stereo
8
3. System sub-menu:
-
-
Language: English, French, Spanish, German, Italian
Colour System: Auto, PAL, SECAM, NTSC
SCART Auto (switch to SCART mode, whenever a SCART input signal is received): On, Off
Sleep Timer:
- Timer: 0~90 minutes
- Status: On, Off
Timing: display the current timing information of PC DVI signal
OSD Menu in TV Mode
1. Video sub-menu:
-
-
-
Contrast: 0 ~ 100
Brightness: 0 ~ 100
Colour: -50 ~ 50
Video Mode: Normal, Natural, Cinema, Sport, Vivid
Sharpness:
- Sharpness: 0 ~ 100
- Border Effect (the sharpness of the shape of each object): 0~100
User RGB:
- Red: 0 ~ 100
- Green: 0 ~ 100
- Blue: 0 ~ 100
Reset (Factory Default setting): No, Yes
2. Audio sub-menu:
-
Volume: 0 ~ 100
Bass: 0 ~ 100
Treble: 0 ~ 100
Balance: -50 (Left) ~ 50 (Right)
Audio Mode: User (to recall your own setting), Preset (Factory Default setting), Soft (a softer setting)
MTS: Mono, Stereo, SAP
Advanced:
- Auto Volume Control (This feature maintains an equal volume level; even if you change
channels/programs): Off, On
- Spatial Effect (surrounding effect): Off, On
3. System sub-menu:
-
Language: English, French, Spanish, German, Italian
Colour System: Auto, PAL, SECAM, NTSC
SCART Auto (switch to SCART mode, whenever a SCART input signal is received): On, Off
Sleep Timer:
- Timer: 0~90 minutes
- Status: Off, On
4. Channel Settings: Please refer to “Channel Settings in TV Mode” starting from page 10.
9
Channel Settings in TV Mode
Auto-Search of TV Channels
Make sure that you have subscribed to the TV/CATV network in your area and have got your connection to
the network ready. This Auto-Search action perhaps lost some channel by first time, please re-scan to
complete searching.
This TV set supports PAL B/G, PAL I/I, PAL D/K and SECAM L/L TV systems. You don’t have to select
between these 4 different TV systems, this TV set will auto-detect the existing TV signals.
Now we can proceed with Auto-Search process.
1. Press TV/SCART button to switch your TV set to TV mode.
2. Press MENU button to activate the OSD menu.
3. Press CH+/CH- buttons to select Channel Settings.
4. Press VOL+/- buttons to enter Channel Settings sub-menu and press CH+/CH- buttons to select Auto
Search.
5. Press VOL+/- buttons to select Yes to start the Auto-Search process.
Note: If you want to interrupt the Auto-Search process, press VOL+/- buttons again.
6. When the Auto-Search process is completed, this TV set will automatically show the first TV channel
among all the channels which are searched. On the OSD menu, you can see in “CH Count” the total
channels which are received.
7. Press MENU button to exit the OSD menu and enjoy your TV programs.
Manual-Search of TV Channels
You can make use of Manual-Search function to adjust and/or fine-tune the TV channels which are received
during Auto-Search process.
1. In TV mode, select the TV channel which you want to adjust and/or fine-tune.
2. Press MENU button to activate the OSD menu.
3. Press CH+/CH- buttons to select Channel Settings.
4. Press VOL+/- buttons to enter Channel Settings sub-menu and press CH+/CH- buttons to select Manual
Search.
5. Press VOL+/- buttons to enter Manual Search sub-menu.
A. Fine-Tuning TV Channel Frequency
- Channel Number: the current TV channel number. You can press VOL+/- buttons to move to another
TV channel (and channel number)
- Frequency (MHz): the current frequency of the selected TV channel. If the current frequency is not
correct, press VOL+/- buttons to adjust the frequency.
- Launch Search: You can also use “Launch Search” function to adjust the current frequency of the
selected TV channel. Press CH+ (CH-) button to switch to a higher (lower) frequency which can be
received.
- System: You can see the current TV system. If the TV system is not correct, press VOL+/- button to
select a different TV system. (This TV set supports only PAL B/G, PAL I/I, PAL D/K and SECAM L/L
TV systems. Other TV system is not available.)
Note: After Fine-Tuning, please press MENU button and then CH+/CH- buttons to select Save, then press
VOL+/- buttons to select Yes to save the adjustment.
10
B. Deleting TV Channels
1. In TV mode, select the TV channel which you want to delete.
2. In Manual Search sub-menu, press CH+/CH- buttons to select Skip.
3. Press VOL+/- buttons to select Yes.
4. Press MENU button and then CH+/CH- buttons to select Save, then press VOL+/- buttons to select Yes to
save the deleting.
C. Changing the Name of TV Channels
1. In TV mode, select the TV channel which you want to change the name.
2. In Manual Search sub-menu, press CH+/CH- buttons to select Name.
3. Press VOL+/- buttons to enter Name sub-menu. You can input the new name of this TV channel with at
most 8 digits (0~9), alphabets (A~Z) or symbols (+, -).
4. Press MENU button and then CH+/CH- buttons to select Save, then press VOL+/- buttons to select Yes to
save the new name.
Swapping the TV Channel
1. In TV mode, select the TV channel which you want to swap to a different channel number.
2. Press MENU button to activate the OSD menu.
3. Press CH+/CH- buttons to select Channel Settings.
4. Press VOL+/- buttons to enter Channel Settings sub-menu and press CH+/CH- buttons to select Sort.
5. Press VOL+/- buttons to enter Sort sub-menu.
6. The current channel number is in green color (and the current channel name in pink color). If the current
channel is not the one you want to swap, press CH+/CH- buttons to switch to another channel (total 100
different channels).
7. Press VOL+ button to confirm the channel that you want to swap from. If this is still the wrong channel,
press VOL- button to cancel this confirmation.
8. Press CH+/CH- buttons to select the new channel number that you want to swap to.
9. Press VOL+ button to complete the channel swapping.
CANAL+ Function
1. Connect the CANAL+ Set-Top box to the SCART port of this TV set.
2. Turn on this TV set.
3. Turn on the CANAL+ Set-Top box.
4. This TV set will display the programs receiving from the CANAL+ Set-Top box. The channel and volume
are controlled by the CANAL+ Set-Top box.
Note: The “TV” description will be shown on the upper-left corner of the TV set. The OSD menu of this
TV set is the same as in SCART mode.
5. You will see snowy picture for 1~2 seconds, because the TV set is now decoding the CANAL+ signals.
11
Basic Trouble-Shooting
Before contacting the qualified after-sales service, perform the following simple checks. If you
cannot solve the problem using the instructions below, note the model and serial number of your
TV set and contact your local dealer.
No sound or picture
y
y
y
y
Check that the mains lead has been connected to a wall socket.
Check that you have pressed the POWER button.
Check the (VIDEO) for CONTRAST and BRIGHTNESS settings.
Check the volume.
Normal picture but no sound
y
y
Check the volume.
Check whether the MUTE button has been pressed on the remote control.
No picture or black and white picture
y
y
Adjust the VIDEO settings.
Check that the source mode selected is correct.
Sound and picture interference
y
Try to identify the electrical appliance that is affecting the set and move it
further away.
Plug your set into a different mains socket.
y
Blurred or snowy picture,
distorted sound
y
Check the direction, location and connections of your antenna. This
interference is often due to the use of an indoor antenna.
Remote control malfunctions
y
y
y
Replace the remote control batteries.
Clean the upper edge of the remote control (transmission window).
Check the battery terminals.
In PC (DVI) mode, screen is black and
power indicator LED is in amber
y
y
The TV is using its power management system.
Move the computer’s mouse or press a key on the keyboard.
In PC (DVI) mode, image is not stable y
and may appear to vibrate
y
Check that the display resolution and frequency from your computer or
video board is an available mode for your TV set. And please check the
following items on your computer: Control Panel, Display, and Settings.
If the setting is not correct, use your computer utility program to change
the display settings.
12
Specifications
Technical and Environmental Specifications
Basic Specifications:
Input Connector:
Screen Size: 20.1”
PC: DVI x 1, Audio-in x 1
Display Size: 408 mm (H) x 306 mm (V)
Audio input: RCA-pin type (L/R) x 1, SCART-pin type (L/R) x 1
Aspect Ratio: 4:3
Brightness (typical): 500 cd/m2
Audio: 1 Vp-p, 20 Hz ~ 20KHz
Component: YPbPr/YCbCr x 1 (auto-detection)
Contrast (typical): 500:1
Y: 1.0 Vp-p, 75 ohms, unbalanced, sync negative
Resolution: SVGA 800 x 600
Pb/Cb: 0.7 Vp-p, 75 ohms
Response Time: 16 ms (Tr + Tf)
Pr/Cr: 0.7 Vp-p, 75 ohms
PC Monitor support (DVI): up to SVGA 800 x 600
Audio: 1 Vp-p, 20 Hz ~ 20KHz
Pixel Pitch: 0.51 mm (H) x 0.51 mm (V)
Signal format: 480i, 480p, 576p (SDTV)
Viewing Angle: 80o / 80 o / 80 o / 80 o
720p, 1080i (HDTV)
Display Colors: 16.7 M
SCART: Full SCART x 1
OSD Languages: English, German, French, Italian, Spanish
TV Antenna: 75-ohm external terminal for VHF/UHF
TV System:
Output Connector:
PAL B/G, D/K, I
HeadPhone: Stereo mini jack, Impedance 160 ohms
SECAM L/L
Wall Mount: VESA standard
NTSC AV 3.58/4.43
Power Adapter:
TeleText: 10 pages
100 ~240 V AC (50Hz/60Hz)
Video:
Output: 12 V DC, 5A (min.)
Adaptive Color and Contrast (ACC)
Power Consumption:
Auto Color Management (ACM)
Working: 53W
High Performance 4H Comb Filter
Stand-by: < 2.5W
Luma Sharpness Enhancement (LSE)
Environmental Conditions:
Color Transient Improvement (CTI)
Operating Temperature: 0°C ~ 40°C
Dynamic Contrast Improvement (DCI)
Operating Humidity: 10% ~ 80% (non-condensing)
Dynamic Black Level Expander (BLE)
Storage Temperature: -20°C ~ 60°C
Flesh-tone Compensation
Storage Humidity: 5% ~ 95% (non-condensing)
Audio:
Physical Dimensions:
MTS / SAP / Stereo / Mono
580 mm (W) x 451 mm (H) x 180 mm (D) / 11.2 kg
Mute Function
22.83” (W) x 17.76” (H) x 7.09 (D) / 24.64 lbs
Audio Output: 5W + 5W
Packing Dimensions:
Certifications:
657 mm (W) x 538 mm (H) x 230 mm (D) / 16 kg
FCC-B, cUL, CE, TUV, CB, C-Tick
25.87” (W) x 21.18” (H) x 9.06” (D) / 35.2 lbs
Note:
Specifications are subject to change without notice.
13
Specifications
Displayable Specifications
(1) Component Progressive input signal (YPbPr and YCbCr):
Mode
Type
Resolution
H/V Frequency
Aspect Ratio
Remarks
480i
YCbCr
720x480
15.74kHz, 60Hz
4:3
640x480i
480p
YPbPr
720x480
31.45kHz, 60Hz
4:3
640x480p
576p
YPbPr
720x576
31.25kHz, 50Hz
4:3
720x576p
720p
YPbPr
1280x720
45kHz, 60Hz
4:3
800x600p
1080i
YPbPr
1920x1080
33.75kHz, 60Hz
4:3
800x600p
(2) DVI Mode:
Mode
Resolution
EGA
DOS
VGA
SVGA
640x350
640x400
640x480
800x600
Horizontal
Frequency(KHz)
31.468
31.469
31.469
37.879
Vertical
Frequency(Hz)
70.09
70.08
59.94
60.31
Note: Connect this TV set and your PC. Turn on this TV set first and wait till the LED power indicator turns green, before you turn
on your PC. Otherwise some display modes will not be supported.
July 15, 2005
AU
501012259001
14