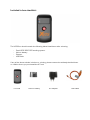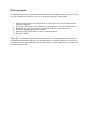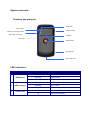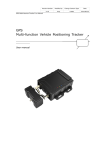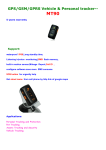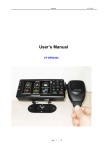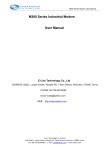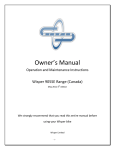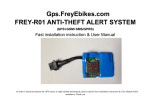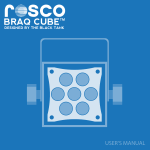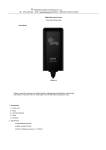
1
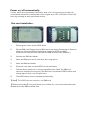
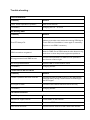
X-SOS 3000 Outdoor GPS tracking system with emergency button. Introduction : Thank you for buying the X-SOS outdoor GPS tracking system with emergency button. We take great pride in designing each of our products. Our goal is to provide high-end rugged products. We strive to improve our quality by using up-to-date high performance technology. At X-Systems we reinvest 100% of our earnings back into the company. This enables us to support research and development to ensure our reliability in the future. We advise you to read this manual carefully as we will guide you through the functions of the system. Instructions about the GPS tracking system will be given and in about 2 minutes you will enjoy the possibilities of this tracking product. Please read through the User’s Manual before using. When you use the product, we think you have read through this manual. The information provided in this manual, is as accurate as possible after being revised carefully. If any printing error or translating mistake occurred in the manual, our company would not bear the outcome due to such mistake or error. The X-SOS 3000 is hi-tech product, including operating system and the software provided by the third parties. The producer has fulfilled its obligation in the manufacturing of hardware and in the developing and applying of software to ensure the product works normally. If there is something wrong with the product, the producer will shoulder the repair responsibility against the Quality Warrant and will not make any compensation to the property and economy losses incurred from using the product. The ownership and copyright of the manual belong to our company. The manual is not allowed to replicate or translate in whole or in part for any commercial activity. Our company reserves the final explanation right to the manual contents. GPS navigating equipment works by receiving the signals from geostationary satellites for positioning. It may not receive the signals inside the room or in dense buildings, and the signals under viaduct may fade. When receiving signals from geostationary satellites, the GPS navigating equipment is corresponding to different satellites in different locations, which is called “ephemeris”. An ephemeris covers 300KMs at most. If an ephemeris is confirmed in Location A, you move over 300km with your X-SOS it will shut off, the X-SOS will be under another ephemeris. In high speed moving, it is a little difficult for GPS tracking system to search satellite. You’d better stop or slow down your vehicle to search satellite to determine your location. 【Relative information】The tracker supports three working modes: personal mode, smart mode and vehicle mode. • Please use personal mode if you want to tracking up to 15 hours standby time in an empty environment. • Please use smart mode if you want to track less than 14 hours or in crowded environment (with many building around) u • Please use vehicle mode when it working in the car, connect MINI USB cable with tracker and the car so it can track long time and keep in mind that it is better to hide it on a place with good GPS signal (example: under the windshield) Index : -‐ Included in box checklist -‐ First use guide -‐ System overview -‐ LED Indicators -‐ Technical specifications -‐ Change password -‐ Authorized number -‐ Monitoring function -‐ Two-way communication -‐ Real time tracking -‐ SOS emergency calling -‐ Tracking regularly by GPRS -‐ GPRS data logger -‐ Auto APN setting -‐ Three kinds of tracking mode -‐ Geo-fence -‐ Time zone setting -‐ Low battery alarm -‐ LED indication for battery level -‐ Power on/off automatically -‐ Sim card installation -‐ Trouble shooting -‐ User-friendly tips -‐ Maintenance record -‐ X-Track account activation Included in box checklist : The X-SOS box should contain the following below listed items after unboxing. -‐ -‐ -‐ -‐ One X-SOS 3000 GPS tracking system. Lithium battery Charger USB cable If any of the above articles is broken or missing, please contact immediately the distributor or retailer where you purchased the X-Track. Terminal Lithium battery AC adapter USB cable First use guide : This paragraph is important to read before using the X-SOS GPS tracking system. To make sure all functions are ready for use, you must go through the 6 steps below. 1. Open the packing box and check the items. If the items are not complete, please contact X-Systems. 2. Purchase a phone sim card. This may be a prepaid sim or sim-only contract card. 3. Install the sim card; see sim card installation guide for more information. 4. Install the emergency contact numbers. 5. Keep the X-SOS 3000 safe and on an accessible place. 6. Enjoy your X-SOS. 【Note】The installation repair should be made by our company authorized personnel or professional maintenance person from the distributor or retailer. Without our company’s permission, do not install, disassembly and assembly, or repair. Otherwise, you will lose the warranty service right. System overview : Function key and port GSM LED Power LED Power switch Battery checking button and Hang rope hole Speaker GPS LED SOS button Microphone Mini USB port LED indicators : ID 1 2 3 LED GSM (blue) GPS (orange) Power (red) Status Note Solid on GSM is invalid Blinking GSM is valid Standby Off Solid on GPS is invalid Blinking GPS is valid Standby Off On Connected 5V Off Not connect power Technical Specifications : Dimension Weight Operation Tempature Operation Voltage Operation Current Humidity GSM frequenties GPRS GPS Sensitivity Acquisition Sensitivity TTFF ( Open Sky ) Position Accuracy GSM/GPS Antenna LED Indicator Data Transmit Non-movement Detection Mileage report Emergency Detection 86(L) x 44 (W) x 22(H) mm 65 g with battery -20 C +55 C 1000mA battery 2mA (4.5v DC), 3mA (5.5V DC) 20% - 80% Quad GSM 850/900/1800/1900 MHz Class12 UDP -160dBm -144dBm Cold Start: < 27s Warm Start : < 12s Hot Start: < 2s 10m (2D RM) Built-in design GPS-orange, GSM-blue, Power-red TCP, SMS Movement alarm/tracking based on built-in 3D motion sensor Track by time/distance interval By built-in SOS panic button Change password : SMS Command: $SMS,******;W001,######;! Description: change user’s password Explain: ******: user password, the range of 6 digits, default password is 000000. Example: $SMS,000000;W001,123456;! 【Note】Please switch to English input method when you editing command by phone; Device will only accept commands from a user with the correct password. Command will be ignored if with wrong password. ######: new password, the range of 6 digits. Authorized number : Set the authorized number by SMS SMS Command: $SMS,000000;W010,NO.,Phone Number,ABC;! Description: Set authorized number and related functions. Explain: NO.: authorized number’s serial number, range of: 1~3. Phone Number: authorized number, range of: 0~19 characters. 1. A: switch for Geo-fence function, range of: 0~1(0 means disable this function, 1 means enable this function), default is 0. 2. B: switch for monitoring function, range of: 0~1(0 means disable this function, 1 means enable this function), default is 0. 3. C: switch for SOS emergency calling, range of: 0~1(0 means disable this function, 1 means enable this function), default is 0. For example: Set the 1st authorized number is 13800000000 and just enable monitoring function. $SMS,000000;W010,1,13800000000,010;! Easy authorized phone no. setup by calling Tracker only supports three authorized numbers. We can set the authorized number by phone call if authorized number is not full (Disable all functions). Set as follows: Any non-authorization number calls to the tracker over than 10 seconds, the tracker will cut off the line automatically and the Yellow Led will blink for 30 seconds. During this 30 second blinking, press SOS button less than 3 seconds, and then it set this call in number as a new authorization number and send SMS to that number to confirm the setting OK. Monitoring function : If enable this function, when the authorization number call in to the device, it will connect to the call and shut down the speaker, then the background voice of the device will be listened. 【Note】Please make sure the SIM card installed supports displaying caller ID. Two-way communication : If you turn the monitoring function off when set authorized number, use this authorized number call to tracker, bell will ring, at this time, press the SOS button (less than 3s) to answer the phone call, so you can speak each other. Press SOS button also can make a phone call to authorized number (see “SOS emergency calling”). Real time tracking : The tracker will reply a location message by SMS if any authorized number makes a phone call to it. SOS emergency calling : Press SOS button for 3 seconds or longer, the device will send SOS alarm to all authorization numbers by SMS. If the authorization number was set with the SOS emergency calling function, the device will make a call to authorized numbers one by one and it will stop to make a call if call is answered. Tracking regularly by GPRS : SMS Command: $SMS,000000;W002,APN,Username,Password;W003,IP,Port;W004,ID;W005,X;W009, Y;! Description: Enable this function. Explain: APN: server access port’s name, range of: 0~29 characters. Username: access port’ user name, range of: 0~29 characters. Password: access port’s password, range of: 0~29 characters. IP: server’ IP address, range of: 0~29 characters. Port: server’s port, range of: 0~65535. ID: tracker ID, range of: 0~15 characters. X: GPRS upload interval, range of: 0~65535, default is 0, unit is 30 seconds. (example: if X is 2 means 2*30 and interval as 60 seconds) Y: GPRS upload mode, range of: 0~2, default is 0. (0 means disable GPRS function, 1 means TCP connect, 2 means UDP connect) Example: $SMS,000000;W002, cmnet,,;W003,192.168.1.1,8088;W005,1;W009,1;! GPRS data logger : Tracker has build in 8M bytes memory for GPRS data save, when GPRS interval tracking can not upload to server, data will automatically stored in the memory. After that, once the GPRS connected, tracker will send the data to server again. 【Note】Real time data will be sending first, the priority of the stored data is low.) Auto APN setting : The APN list can be configured before delivery (default is China APN). When insert SIM card, tracker will automatically acquire APN in the APN list. If user already set APN, then the tracker will not acquire APN automatically. Three kinds of tracking mode : SMS Command: $SMS,000000;W016,X;! Description: set the tracking mode, there are three kinds of mode: personal mode, smart mode, vehicle mode. At personal mode, GPS always turn off whether tracker move or not; at smart mode, GPS will be off when tracker is no moving; at vehicle mode, GPS always turn on whether tracker move or not. --Please use personal mode if you want to tracking up to 15 hours standby time in an empty environment; --Please use smart mode if you want to track less than 14 hours in crowded environment (with many building around); --Please use vehicle mode when it working in the car, connect MINI USB cable with tracker and the car so it can track long time and keep in mind that it is better to hide it on a place with good GPS signal (example: under the windshield). Explain: X: tracker’s work mode. Range of: 0~2 (0 means personal mode, 1 means smart mode, 2 means vehicle mode). Default: 1. Example: $SMS,000000;W016,1;! Geo-fence : SMS Command: $SMS,000000;W018,NO.,name,lat,lng,radius;! Description: tracker will get the newest position automatically to be fence center if there is no available GPS position. Turn geo-fence alarm on, when the tracker moves in/out the preset geo-fence, it will send a SMS alarm to the authorized phone number (enable the Geo-fence function when you set the authorized number), and if GPRS is connected, tracker will send this alarm data to server via GPRS. Explain: NO.: the serial number for geo-fence must be 1 to 5. name: name of geo-fence, range of: 0-9 characters. lat: center latitude, range of: -90.00000000~90.00000000, unit: degrees. lng: center longitude, range of:-180.00000000~180.00000000, unit: degrees. Radius: geo-fence radius, range of: 0.0~1.79E+308, unit: meters. Example: $SMS,000000;W018,1,school,22.12345,114.12345,100;! $SMS,000000;W018,1,home,,,100;! 【Note】According to Preset longitude and latitude as the center of the circle, with the preset radius, we can define a circle.) Time zone setting : SMS Command:$SMS,000000;W020,X;! Description: Set the SMS time zone Explain: X: time zone’s value, range of:-720~780, default: 0, unit: minutes. (Example: 1 hour = 60 minutes, time zone+ 8 = 480 minutes) For example: $SMS,000000;W020,480;! Low battery alarm : When the battery level is lower than 15%, it will send SMS to all authorization numbers or send alarm data to server. LED indication for battery level : We can judge the battery level by LED indication when pressing the battery checking button. If there are three lights on (means the power level range is 50%~100%), or two lights on (means the power level range is 15%~49%), or just one light on (means the power level range is 0%~14%). Power on/off automatically : Tracker will be off automatically if the power level is 0%; during charging, tracker will automatically be switch on when power level is higher than 15%, and send a ‘Power ON’ warming message to each authorized number. Sim card installation : 1. Discharge the cover of the X-SOS device 2. Choose SIM card. Please insert a SIM card to the device. Please take X- Systems advice as reference (SIM card should be enabled to GPRS and SMS functions and make sure the PIN code the SIM card has been disabled.*) 3. Uncover the SIM card holder. 4. Insert the SIM card, see for reference the image above. 5. Insert the SIM card holder. 6. Place the cover back on the X-SOS and use the battery. 7. Take the device and put it on a easy accessible place; Note: The SIM card cannot be inserted in wrong way; The SIM card must be with GPRS function and enough deposit if you use a prepaid card. 8. The X-SOS device must be installed professionally. 【Note】The X-SOS can use normal or mini SIM card. 【Relative information】You could check your provider for more information about the disablement of the SIM card PIN code. Trouble shooting : - Cannot Switch On Possibility Solution Power switch operation’s problem Slide to the ON side Low battery Charging for 2.5 – 3 hours Not Sending SMS Possibility Solution Blue LED always On Make sure tracker can receive the strong GSM signal Check SIM card installation, insert again if necessary Replace a new SIM if necessary GSM connection congested Wait for SMS. Some GSM networks slow down during peak time or when they have equipment problems. Wrong password and SMS format Double check password or SMS format, password and format must be right Not enough SIM balance Replace SIM or Check balance value Low battery Charging tracker - Yellow Led 1S On and 1S Off Possibility Solution Tracker’s position has been covered Place the tracker to open area w/o any tall building, tree and heavy raining. Those can be as shielding to the GPS signal GPS signal is weak Place the GPS internal antenna face to the sky Low battery Charging tracker - No GPRS connection Possibility Solution SIM cannot support GPRS Enable SIM’s GPRS function GPRS function is disabled Enable the GPRS function Incorrect IP and Port Double check IP and Port, then restart the tracker GSM signal is weak Move the tracker to a place with strong GSM signal User-friendly tips : If you use a prepaid SIM card or have a low monthly data subscription service on your contract with your provider, then we advise the following settings. Please change the interval upload time to a different setting with more seconds between the upload times. For example set the interval to 30 or 60 seconds. Maintenance record : FIRST MAINTENANCE Unit: IMEI number: Date: Distributor or retailer: Unit exterior condition: (check on stone damage, mud or anything else that could make the GPS work less functional) Unit interior condition: (check on stone damage, moisture, dust or anything else that could make the GPS work less functional) Maintenance advisement: (Write the description of the maintenance advisement and supply this information to the client.) Fault statement: (Write the description of the fault and supply this information to X-Systems.) SECOND MAINTENANCE Unit: IMEI number: Date: Distributor or retailer: Unit exterior condition: (check on stone damage, mud or anything else that could make the GPS work less functional) Unit interior condition: (check on stone damage, moisture, dust or anything else that could make the GPS work less functional) Maintenance advisement: (Write the description of the maintenance advisement and supply this information to the client.) Fault statement: (Write the description of the fault and supply this information to X-Systems.) X-SOS account activation : In order to successfully use your X-SOS GPS tracking device we need the following below listed information to activate a account on your X-SOS. Please send this information to our support team by the online form on our website, they will active your personal account within 48 hours. First name (required): Second name (required): Your e-mail address (required): Phone number (from the SIM-card used in the X-SOS): Your provider: APN address: Requested username: Second option for username: Password: If some provider information isn’t supplied some functions of the X-SOS could be disabled. If you don’t request a personal username and password, the X-Systems support team will generate one username and password for you. Note: you can always change the password, the username is unchangeable after the account has been activated. The mobile account X-SOS platform could be visited on www.xmapsystems.com/login