1
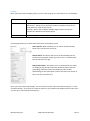
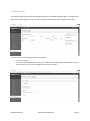
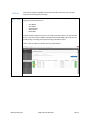
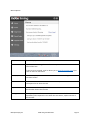
Timing System User Manual V1.1 30th March 2014 Mobii Systems (Pty) Ltd Mobii Timing User Manual V1.1 Page 1 Contents Getting Started:....................................................................................................................................... 3 Dashboard: .............................................................................................................................................. 4 Understanding the Hierarchical Race Structure: .................................................................................... 4 Adding a new Race: ................................................................................................................................. 5 Grouping: ................................................................................................................................................ 6 Race Overview: ....................................................................................................................................... 6 Race Settings: ...................................................................................................................................... 7 Race Courses ....................................................................................................................................... 8 Race Course Legs............................................................................................................................... 10 Course Participant Categories: ......................................................................................................... 11 Team Categories ............................................................................................................................... 12 View/Manage Participants assigned to a Race: ................................................................................ 12 Import Participants: .......................................................................................................................... 12 Mapping the CSV to your Race Setting Data Fields: ......................................................................... 13 Add Participant: ................................................................................................................................ 15 Displaying Results: ................................................................................................................................ 17 Display Layout: .................................................................................................................................. 17 Configuring result display fields: ....................................................................................................... 17 Display: .............................................................................................................................................. 18 System Administration .......................................................................................................................... 19 Readers ................................................................................................................................................. 20 Wallet .................................................................................................................................................... 22 Timing Credits ....................................................................................................................................... 23 Templates: ............................................................................................................................................ 24 SMS Templates: ................................................................................................................................ 24 Email Templates: ............................................................................................................................... 25 Utilities: ................................................................................................................................................. 26 Race Check-In .................................................................................................................................... 26 Countdown........................................................................................................................................ 27 Individual Start .................................................................................................................................. 27 Reports .................................................................................................................................................. 28 Top X per category (Road Running only) .......................................................................................... 28 Top X per Category............................................................................................................................ 28 Course Entry List ............................................................................................................................... 28 Mobii Systems (Pty) Ltd Mobii Timing User Manual V1.1 Page 2 Getting Started: Log into your profile at http://live.mobii.com or via your local host if you are working offline. Mobii Systems (Pty) Ltd Mobii Timing User Manual V1.1 Page 3 Dashboard: Once you have successfully logged in, the first landing page will be the Dashboard. This page displays an overview of your system profile, including: - the most recent new registrations future races past races participant numbers at recent events a calendar of upcoming events Understanding the Hierarchical Race Structure: When working with the Mobii Timing System, there is a hierarchical structure to race data in the following order (from highest level to lowest level): - Event (eg: the Summer Road Running Series which spans a season) Race (eg: race 1 of the series) Course (eg: 42km, 21km and 10km courses) Course Leg (eg: Course Leg 1 could be from start to first checkpoint 5km into the race) In order to begin working with the data in the registration system, you need to select (or create) an Event from the Event Selection Filter at the top left of the panel. Mobii Systems (Pty) Ltd Mobii Timing User Manual V1.1 Page 4 By selecting the Race menu option from the side menu you can see a list of all Races assigned to the event which you are working with. At the top right of the screen, there are options to - Edit the currently loaded Event Create a template based on the currently loaded Event Add a new Race to the currently loaded Event Adding a new Race: When you add a new Race to the currently loaded Event the following page is presented: Name Closed Start Date End Date Time Rounding Name of the race When this is enabled, the race is closed and no editing of race results can occur. (Unless a participants data is modified) For reporting purposes only, the start date of the race For reporting purposes only, the end date of the race The time rounding of results - Is Multi Stage? City Coordinates Country Group Sub Group Photo Finish Overlay Copy Race contents from Mobii Systems (Pty) Ltd To the next second To the 10th of a second To the 100th of a second To the 1000th of a second If the race contains courses which are linked in a multi-stage manner and results are calculated over these stages, then enable this checkbox. For example Mountain Biking, where a Race will contain a Race Course for each day of the Multi-stage race. For reporting purposes, the city where the Race takes place For reporting purposes, the GPS coordinates of where the Race takes place For reporting purposes, the Country where the Race takes place If you need to allocate participants to a group, this is the highest level Group If you need to allocate participants to a group, this is the lowest level Group When viewing web based photo finish results, this is the template overlay used on each photo. This can be changed at any time and will update photos automatically. If you would like to copy the race content from a previously created race Mobii Timing User Manual V1.1 Page 5 Grouping: This is a means to group participants along criteria that you specify. This is not to be confused with race category and race sub-category. For example: If you wanted to Group your participants by Union and Club, you would create a Group called “Union” and then create another Group called “Club”. When this is created, you can then Group your participants by both “Union” and “Club” and filter your results accordingly. You can use the Group feature to create variations of this depending on your needs. Race Overview: Once you have selected a race, the following page is displayed: At the top of this page you will see: Participants Teams Text Messages Emails Participants currently assigned to this race Teams currently assigned to this race SMS text messages that have been sent Emails that have been sent Each list item contains quick links to View/Manage that particular section. For example, if you want to quickly view all the current race participants, simply click on the “View/Manage” hyperlink next to Participants. Mobii Systems (Pty) Ltd Mobii Timing User Manual V1.1 Page 6 Race Settings: The Race Settings section allows you to create registration data entry fields unique to this race for each participant. For example: We want to capture the T-Shirt Size of each participant. We can create a race setting by selecting the “Add new race setting” button and select “Registration Select List” from the Type dropdown. In the Name field you can enter “TShirt Size” and then in the Options field you can enter the various T-Shirt Sizes separated by a comma “S,M,L,XL”. You can then also specify whether this field is required by checking the “Required” box. This will create a new capture field called “T-Shirt Size” which can be used at registration to enter the T-Shirt size of a participant, or when CSV data is imported, you can map to this newly created field. Race settings could include any participant data that you would like to capture, for example: - Medical conditions Food preferences Emergency contact information Organisational Number (CSA number, etc) There are various entry options available in the Type dropdown selection box: Registration Select List Auto race number across race Race Mode Registration Text Field Registration Yes/No Field Registration Email Field Mobii Systems (Pty) Ltd Creates a dropdown selection box. To create the various options, separate the values by a comma in the “Options” entry box. Eg: T-Shirt sizes can be entered as (S,M,L,XL). Allows the participant to enter any text. For example, the name could be “Medical Conditions” and if the Type is Registration Text Field, a blank text entry box will be displayed allowing any free text to be entered. Creates a “Yes/No” option for this data field. Created an entry field containing email validation Mobii Timing User Manual V1.1 Page 7 Race Courses Each Race must contain at least one Race Course. For example in a Road Running race you may have a Race with two Race Courses (42km and 21km) and results are generated for each Race Course. In a Multi-Stage Mountain Bike Race you would still have one Race but several Race Courses, each representing a different Stage. You can create a new Race Course for a Race by selecting the “Add New Race Course” button. A new page will be displayed with the following options: Name The name of the Race Course Distance When this value is entered, you can report on Average Speed Closed When this is enabled, the race course is closed and no editing of race results can occur. (Unless a participants data is modified) Team Mode This determines how team times are calculated in the results: - All must finish; Time based on the last participant - All must finish; Time based on the first participant - No all need to finish; Time based on the first participant Start Date For reporting purposes only, the start date of the race course Auto-Activate on first tag read When enabled, if a participant’s RFID tag is read by any Mobii Pod during the race (Start, Checkpoint, Finish, etc) and that participant has not been Activated, then that participant is automatically Activated so that his result is displayed. Auto Check-in on first tag read When enabled, if a participant’s RFID tag is read by any Mobii Pod during the race (Start, Checkpoint, Finish, etc) and that participant has not been Checked-In, then that participant is automatically Checked-In so that his result is displayed. Grouping Race Course Grouping: To prevent a participant from entering more than one course within a Race unintentionally, you can set the Race Course Group to the same number for each Race Course. If a participant is already registered for a Race Course and then that participant tried to enter another Race Course within that group, the system will not allow this to occur if both Race Courses have the same Group number. For example, you may be hosting a Trail Run that contains both a Long and Short course. To prevent a participant from being registered to both Mobii Systems (Pty) Ltd Mobii Timing User Manual V1.1 Page 8 However, in situations where you do want to allow a participant to register for multiple Race Courses within a Race, you can simply enter a different numerical value for each Race Course. For example a Multi-Stage MTB Race would have Race Courses spread over several days all belonging to one Race. In this scenario you can set each Race Course to a different number to allow the same participant to register for the different Race Courses representative for each stage. Once a Race Course has been created, you will see this entry displayed in the Race Course section of the Race page. To edit the Race Course, you can click on the edit icon at which point you will see all the Race Course options as before including two additional fields: Timing Start This is the actual Start Time of the Race Course. If want to start a race course in real time, you can press the “Now” button at the start of the race. Alternatively you enter in a race course start time before or after the race. This is a required field before results can be displayed for a Race Course. Note, even if batches are assigned to a Race Course containing their own Start Times, or Individual Starts are used (for example in a Time Trial), you still need to assign a Start Time for the Race Course which is earlier than any batch or individual start time. Timing End This is the actual End Time of the Race Course and creates a filter window based on the start time, by which results can be generated. This is a required field before results can be displayed for a Race Course. In a normal scenario you would set a race start time and then set the end time to a point at which all participants should have completed the Race Course. You can re-configure the end time of a race at any time. Mobii Systems (Pty) Ltd Mobii Timing User Manual V1.1 Page 9 Race Course Legs A Race Course Leg allows you to configure legs within your Course. You can, for example add a Course Leg that can be set as a Checkpoint and configure the Reader that will be used to time participants at this point. You can further configure a Course Leg to time the finish of your Race Course: There are many options available for how you setup your Race Course. Remember that each Course Leg needs to have an incremented “Order” number. In the above example, “Checkpoint” has an order of 0 and “Finish” and order of 1 as the “Checkpoint” will occur before the “Finish”. In another example, you could set the Course Leg to “Start Independently”, which means that you could set a Pod at the start and allow participants to start their race at any time by passing the Pod and that will calculate their race time from the point at which they passed the pod. When Lap Mode is configured, be sure to set the Threshold Seconds. This will prevent the participant from being lapped twice when they pass a timing pod. Mobii Systems (Pty) Ltd Mobii Timing User Manual V1.1 Page 10 Course Participant Categories: This is where you can create the various categories associated with a Race. The following options are displayed when creating a new Course Category: Name The category name (eg: Veteran) Abbreviation Abbreviation used on results pages (eg: VET) Rule Type Currently there are two options: - None (Manual) – you manually set the participant category - Age Group – when selected, you can automatically assign the participant to a category based on date of birth. From When an Age Group Rule is applied to this category, this is the age from which the rule will be applied To When an Age Group Rule is applied to this category, this is the age to which the rule will be applied Limit Gender Allows you to set the category to: - Mixed Gender (Male and Female) Male Only Female Only Limit Course When applied, this can restrict the category to a specific Race Course only. First Place Points Points which are automatically assigned to first place Points Change Per Position The points allocation for each successive finisher Mobii Systems (Pty) Ltd Mobii Timing User Manual V1.1 Page 11 Team Categories This section allows you to enter Team Categories and follows the exact same logic as entering normal Participant Categories. View/Manage Participants assigned to a Race: To View/Manage participants, you can navigate to: RACES > (SELECT RACE) > PARTICIPANTS VIEW/MANAGE There is a text entry field which will allow you to quickly filter and find participants based on: - Name Surname ID Number Race Number As you start typing the search box will begin returning matching results. If you need to enter new participant registration data to this Race, there are several options available. Import Participants Use this option if you want to import participants from a CSV file Add Participants Use this option to manually capture a new participant directly Add Existing Participant If the participant has entered into any of your previous races, this option will allow you to find that person and assign them to the current race Import Participants: The process of importing data from CSV involves: - First create all the Race Setting Data Fields relevant to your race prior to importing data from CSV (Please see race settings above) Load the CSV in the import screen Map the data fields of the CSV to the Race Setting Data Fields of your Race Initiate the data import Mobii Systems (Pty) Ltd Mobii Timing User Manual V1.1 Page 12 On the import screen, the following options are available: First row contains header names If the first row of your import contains header names for each column, then you can specify that here Use delimiter: Comma, Semi-Colon Select the type of delimiter used in the CSV file Choose File Select the file on your computer Upload Press to upload, note that this will not actually import any data until you have mapped the fields in the next steps Mapping the CSV to your Race Setting Data Fields: Once you have successfully loaded your CSV file, the mapping screen is displayed. On this screen, you will see each Column name of your CSV on the left, followed by a column showing the first data row of your CSV as example data. You are then able to specify which fields of your CSV are mapped to your Race Setting Data Fields. For example, if your CSV column represents “First Name”, then you can map this to the “First Name” Race Setting Data Field by selecting “First Name” from the dropdown selection box. You continue this for all the data which you would like to import. There is also a custom Rule Builder, which allows you to perform more advanced import options by selecting a Rule Type and a Rule Behaviour: Mobii Systems (Pty) Ltd Mobii Timing User Manual V1.1 Page 13 Rule Types: If [import value] equals [entered value] If [import value] contains [entered value] If [import value] does not equal [entered value] If [import value] is empty If [import value] is not empty Rule Behaviours: Map [import value] to selected field Map [custom value] to selected fields For example: In your CSV there is a team name called “falcons”, you may want to import this as “Mighty Falcons” instead and so use the Rule Builder to apply this to the import process. Once you have finished mapping the data fields of the CSV to your Race Setting Data Fields, you can save this mapping set as a template that can be used for future import where the structure of the CSV file remains the same. This means that in the future you can upload a CSV file and then “Apply saved import template” that automatically create the mapping and import rules. Once you are ready, you can click the Import button to initiate the import process. This may take some depending on the size of your file. Mobii Systems (Pty) Ltd Mobii Timing User Manual V1.1 Page 14 Add Participant: If you need to manually add a new participant, you can click on the “Add participant” button. The Add Participant screen contains four tabs: Participant Info Personal Information regarding each participant Custom Race Setting Data Fields they you have created are displayed below the default entry fields. Required Fields are marked with an * Course This section allows you to specify the - Race Category - Race Sub-Category (if created) - Race Number - Team - Group (in the example above, this could be “Union”) - Sub-Group (in the example above, this could be “Club”) You will need to add the participant to one, or a number of courses, by selecting the “Add Course” button. Here you can specify the: Course Batch Penalty Type Penalty Description Penalty Value Category Sub Category Race Number Start Order Points State Activated Specify a Race Course to assign to the participant Allocate the participant to a Course Batch (No Awards, Time Penalty or Lap Penalty) Notes on the penalty (eg: reason) Penalty Value (Time is represented in seconds) Race Category Race Sub Category Race Number If using Individual Starts, this is the start position Manual adding of points Registered: Registered for the race Checked-In: Checked-in and actually racing DNS: Did not start DNF: Did not finish Disqualified: Disqualified Out of Race: MTB Team Stage racing specific This will consume a timing credit and generate results for this participant. The participant will need to be checked-in” and “activated” for results to be displayed for this person. Note that whenever you make changes to a course, the fields are highlighted in Green which mean that they are now editable. You will need to save the course changes first by clicking on the save icon located at the right of each course. Vehicles Mobii Systems (Pty) Ltd If the user has multiple vehicles with different RFID Tags, then this section is used purely for reporting purposes. Mobii Timing User Manual V1.1 Page 15 Tags These are the RFID tags assigned to the user. You can add multiple tags to a participant. You can also set the state on tags that are not in use by marking their state to - Broken Missing Moved You can also specify which vehicle the tag is allocated to, for reporting purposes. If you add a tag that has a pre-assigned race number, this race number will display automatically in the course information for the participant. Mobii Systems (Pty) Ltd Mobii Timing User Manual V1.1 Page 16 Displaying Results: First create one or more individual Display Layouts and then link these Display Layouts to a Display. Display Layout: You are able to completely customise the styling of the display layout. Configuring result display fields: Select the data fields from the “Available Columns” that you would like to display on the results display layout. When you select a data field, a pop-up box will ask you to set the text for the Column Description, eg: “Course Position” could be abbreviated to “Course.Pos”. You can shift each column left or right, by clicking on the blue arrow next to each newly added data column. If you intend paging the results, you can specify the default number of rows applicable to this layout. By default this is set to “Display All”. Mobii Systems (Pty) Ltd Mobii Timing User Manual V1.1 Page 17 Display: Once you have created a Display Layout, you can now assign one or more layouts to a new Display. Name The name of this Display Mode Single – Displays one layout only Split Screen – Allows you to select more than one Display Layout on the same Display in a split screen format Rotating – Allows you to display multiple display layouts and set the rotation time between each display layout. Layout When adding a new Display Layout to a Display, select from this dropdown Each Display allows you to select filter options for each Display Layout. Filter Options: When enabled, you can select the data fields by which users can filter the results by. Default Filters: This will be the first set of data displayed in the results when displayed. Usually you can set this to a specific Race Course relevant to the day. Default Sort Orders: This allows you to customise how the results are displayed. Eg: Overall results may display by Course Position (Ascending), while live results may display by Time-of-Day (Descending) to each participant’s time at the top of the results as they come over the finish line. Once you have created your display, you can choose to either “Save and Preview Display” or “Save and Close Display”. If you want to create an iFrame on your website that displays these results, then you can opt to “Save and Preview Display”. Mobii Systems (Pty) Ltd Mobii Timing User Manual V1.1 Page 18 When this is selected, you can specify the display properties as well as whether the display should link to photo finish images of each participant and whether the results should auto-refresh to update in real time. At the bottom of this Preview page there are two buttons: Generate Quick Link: Creates a hyperlink to the results stored on your cloud service. Generate iFrame Link: Creates an iFrame link to the results stored on your cloud service which can be display directly in a web page that you create on your website. You can provide this to your web developer in order to seamlessly load results on your web page. System Administration The System Administration section allows you to control the Access Rights and Roles of Users. This allows you to control the structure of Users. Eg: You can have dedicated Data Capturers at registration and have their access rights set strictly for this purpose and at the same time have a select number of advanced Users that can create and edit race profile information by providing those users with more rights to the system. In the Role Admin section, you will see an overview of the Roles in the system which displays a summary of the Access Rights to Menu’s, Pages and Permissions available to each User Role as well as the actual number of Users assigned to each Role. When creating a new Role, you are presented with four tabs representing the following configurable permissions for this User Role: Details The name and rank of this Role Menu Items You can select which menu Items the User will be able to see when they log into the system Eg: You can prevent a Data Capturer from viewing your wallet and financial transactions by deselecting the Wallet and Timing Credit menu items from their User Role Mobii Systems (Pty) Ltd Mobii Timing User Manual V1.1 Page 19 Pages You can select the pages that the User will be able to see when they log into the system Permissions You can specify the permissions available to the User. Eg: You can prevent a User from making any changes to the Race profile by deselecting the permissions under the “Races” submenu option. You can now create a new User and assign a Role to this User. Remember that you can edit the Role of a User at any time. Readers Physical Readers include the Mobii Timing Pods which you have available and Virtual Readers include the Visual Coding Software. The Reader section allows you to list available physical and virtual readers employed in your timing profile. This becomes important when setting up your Course Legs in a Race Course, where you can specify the role of each Mobii Timing Pod or Visual Coder used in your Race. When setting up a Race Course, you may have several Mobii Timing Pods used on course, by defining the Readers in this section you are able to then specify how the timing pods will act when each participant passes by the Pod. For example, you may have a Mobii Timing Pod called “Mobii 1” in the Reader section. In the Race Course settings, you could add a Course Leg and set the Course Leg as a Checkpoint and include “Mobii 1” as the reader. This means that when the participants pass the “Mobii 1” timing pod during the race, it will create checkpoint data from their RFID tag reads. Similarly, by naming your timing pods you can specify which Pods would be used at the finish line. Mobii Systems (Pty) Ltd Mobii Timing User Manual V1.1 Page 20 Note, that you can also name Virtual Readers (Visual Coder Software) and use these in exactly the same way as the timing pods. Please see the Course Leg section for more information. Mobii Systems (Pty) Ltd Mobii Timing User Manual V1.1 Page 21 Wallet The Wallet is used to purchase Timing and SMS credits. If you are using the online entry system to process credit card transactions, then these payments will be added to your Wallet. The Wallet will show your available balance as well as a list of your transaction history. You can top up your wallet by clicking on the Top-up button and entering the amount with which you would like to top-up from a credit card. Once the transaction has been approved, the amount will reflect immediately in your Wallet. At any time you can transfer funds from the Wallet into your bank account. Mobii Systems (Pty) Ltd Mobii Timing User Manual V1.1 Page 22 Timing Credits The Timing Credits menu option will display the amount of available Timing Credits. It is important to keep track of this balance as if you run out of credits you will not be able to display race results. You can Top-Up with Timing Credits with two options: - From your wallet From a pre-purchased token (in case your wallet has no funds and you do not have access to the internet, you can call our support line to receive a token) Mobii Systems (Pty) Ltd Mobii Timing User Manual V1.1 Page 23 Templates: To communicate with your participants, you can use both SMS messaging (at a cost per SMS), or Email (Free). SMS Templates: Name In certain countries and with mobile operators that support this feature, a custom alphanumeric name can be entered which will be displayed on the participants phone as the sender of the message From Number In certain countries and with mobile operators that support this feature, a custom number can be displayed on the participants phone as the sender of the message Template Specify the message content and click on the “Fields” below to enter information derived from the Race Fields These are the auto-populated fields which can be added to the message template Warn when merges SMS greater than 1 SMS When enabled, this will alert you to when a message length of one SMS is exceeded. Even if your message template is within 160 characters, when sending it will calculate the length of the actual SMS based on the populated Fields and determine which messages will require more than one SMS credit. At this point you can then deselect certain messages, or continue to send those specific messages with two SMS credits. You can create and save SMS templates for quick future use. Mobii Systems (Pty) Ltd Mobii Timing User Manual V1.1 Page 24 Email Templates: You can also create and send free bulk emails to participants. Name The sender name of the email From Address From Address of sender HTML Template You can construct an HTML version of an email and include autopopulated fields to your message. Note that if images are added to an email, the need to be hosted online before they are linked to your email template. Mobii currently does not support image uploads for email use. Plain Text Template Mobii Systems (Pty) Ltd If you want to send a plain text version of the email, then you can create the template in this section and include auto-populated fields to your message. Mobii Timing User Manual V1.1 Page 25 Utilities: This section will be expanded with new functionality over time and currently supports the following functionality: Race CheckIn This is used for Quick Check-In at an event. You can search for a participant by typing in partial characters of: - First Name Last Name Race Number Team Name ID Number This will locate the person and you can quickly Check the person in and activate them. If you are using the Mobii Timing Pod and issuing RFID tags, then you can quickly assign a new tag to the person using a barcode scanner. There is also an option to quickly add a new participant. Mobii Systems (Pty) Ltd Mobii Timing User Manual V1.1 Page 26 Countdown Countdown is used predominately in a time trial basis. Once you have set the start order of each participant assigned to a Race Course, you can run the automated countdown timer and start each person based on a countdown time. This screen allows you to: - Individual Start Set the Countdown Interval between participants Set a category interval Select a start type (Individuals and teams) Start, Pause, Skip and Restart the timer You can search for any participant and start them individually for any Race Course. Predominately used in Time Trials, but can be applied to any Race Course. You can set each participants start time individually. You can also apply this setting after the race and adjust a participant’s start time. Mobii Systems (Pty) Ltd Mobii Timing User Manual V1.1 Page 27 Reports The reporting section will be expanded significantly over time. Currently there are three dynamic reports which can be generated: Top X per category Display a breakdown of the top X per category for the selected course. This has been modified specifically for Road Running (Road Running only) Top X per Category Display a breakdown of the top X per category for the selected course Course Entry List You can display a detailed list of participants entered into a specific course. You can apply various filters to this search. Mobii Systems (Pty) Ltd Mobii Timing User Manual V1.1 Page 28 Mobii Timing Software Installation The Mobii Timing install packages are online and available for download. First time installation of the Mobii Timing Software http://www.mobii.com/files/timing/MobiiTimingNewInstall.exe o This one is a ‘fresh’ install for a machine that has never had Mobii Timing installed on it (This install package contains all the dependencies, etc. required to run Mobii Timing) o Steps to install: Download the install package Run the install package, leave all settings as defaulted and follow the prompts Once it has finished, it will try to run the Mobii Timing Control Centre If it fails to run and requests that .Net 4.5 is installed, then the user will need to manually install .Net 4.5, this install is available in the C:\MobiiTiming\Dependancies folder. The file is called dotNetFx451KB2858728-x86-x64-AllOS-ENU.exe, the user can just double click on this item and follow the prompts. Once the .Net 4.5 install is complete, the user may execute the Mobii Timing Control centre by going to the C:\MobiiTiming\Control folder and double clicking on “MobiiTiming.Control.exe” Once Mobii Timing Control centre is open, click on “Settings” then click on “Install Dependencies”, this will ensure that all dependencies are installed that we require to run the software. Updating your Mobii Timing Software http://www.mobii.com/files/timing/MobiiTimingUpdate.exe o o This one is to update an existing install, this one does not contain any dependency installs (The reason why it is so much smaller in size) Steps to install: Download the install package Ensure that Mobii Timing Control Centre is not running in the system tray, if so, double click on the Mobii icon to open it, then click on the “X” at the top right of the window to close the program. Run the downloaded install package, leave all the setting as defaulted and follow the prompts. Once installed, it will re-launch the Mobii Timing Control Centre Mobii Systems (Pty) Ltd Mobii Timing User Manual V1.1 Page 29 Menu Options Home This will display status information Portal If your Server is running, then it will connect you to the web based control panel of the host. If your server is stopped, it will re-direct you to http://live.mobii.com if you have an internet connection Start/Stop Server This will start/stop the Host Server. The Host server is the “engine” that calculates results Visual Coder This will run the Visual Coder Software and allow you to video code participants live or after the race Capture Server This will run the Video Capture Server that records video and streams this to Visual Coder clients that connect Settings This displays an installer button that you can use to install all the dependency files required to run either the Host Server, Capture Server or Visual Coder Mobii Systems (Pty) Ltd Mobii Timing User Manual V1.1 Page 30 Starting and Running the Mobii Timing System locally The following steps are required in order to run the Mobii Timing System locally on your computer: 1. Start your Server (you can think of this as the race “engine” that calculates results, displays participant info, etc) 2. Click on the “Portal” button. This opens up a web browser and redirects you to your portal login page. It allows you to download data from your cloud service and begin working with this locally on your computer). Any changes made to your data while working on your local computer will synchronise with your online data automatically when there is an internet connection. At this stage you can now make registration and event configuration changes. If you have an active internet connection, any changes made will synchronise automatically to your online profile. Likewise, any changes another user makes on the system, will update live on your side locally. Downloading, or adding a new Race Working locally, you can select the event you would like to work with from the event selection dropdown on the top left of your portal. When you view the “Races” page, a list of the currently downloaded Races will be listed. If you do not see any races on this screen, you will need to download any races from your online cloud profile, or create a new race. You can “Check-Out” a Race by clicking on “Races” and selecting the “Check-in/Out” option. This will open the “Manage Races” screen and display a list of all the races linked to this event that are stored on your online cloud profile. You need to select the races that you would like to work with locally and click the “apply” button to download the Race to your local server. This will download the selected races as well as all their participant data to your local server so that you can work offline if required. Mobii Systems (Pty) Ltd Mobii Timing User Manual V1.1 Page 31 To check the download status, you can view the “Home” screen of the Mobii Timing System Software that displays status information. If no race has been created for the selected event, you can add a new race to your event from the “Races” screen and clicking on “Add Race”. Once the race has been configured and saved, it will automatically synchronise to your online cloud profile when you have an active internet connection. Mobii Systems (Pty) Ltd Mobii Timing User Manual V1.1 Page 32