1
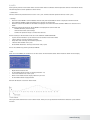
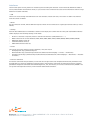
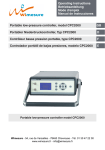
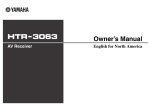
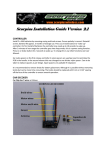
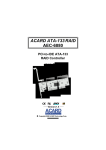
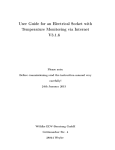
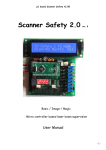
> User Manual Pressure Calibrator | Type DPC Notes > To avoid damage, please read carefully before using > The maximum allowable pressure shall not be exceeded: DPC 1/ DPC 10/ DPC 100 vefold overload; DPC 1000 twofold overload > The calibrator is able to overstep and fall below the target pressure about -/+10%. > The calibrator may be opened only by or in consultation with FSM Elektronik Operating Modes The device has four different modes of operation: Operating mode Application Function CTRL (control) Calibration of sensors and other devices. Pressure is built up and maintained. Target pressure may be percentage or absolute. MESS (measure) Measurement of differential and relative pressure. The calibrator analyzes the pressures that are connected to the deivces. AUTO (automatic) Stored pressure proles are running. Pumps builds up the pressure, based on the stored pressure proles. MENU Customer specic adaption to the respective application. Setup-Function for different operating modes. Operation > I/O: Button to switch on and off the device > MENU: This button will take you to the setup menu. There you can adjust the settings for each mode of operation. When you use the CTRL mode, the calibrator according to the setup menu to leave the VENT mode. > LEAK: This button performs a LEAK test of the connected pressure devices. > ZERO: Button for manual zeroing of the integrated sensor. > UP: In CTRL mode you can set the absolute or percentage values.; In MENU mode to go into the various submenus. > DOWN: In CTRL mode you can set the absolute or percentage values.; In MENU mode to go into the various submenus. > OK: In CTRL mode you can change between the absolute and percentage value with the OK button. In MENU mode, the button serves to conrm each setting. Start the AUTO mode with the OK button. > %: In CTRL mode you can use the % button to change the value from 0 to 100. In submenu for setting the decimal. > The display, you can always check the battery status and the energy (see below). Allgemeine Einstellungen 1) Allgemeine Einstellung Wimesure • 54, rue de Versailles • 78460 CHEVREUSE • Tél. 01 30 47 22 00 • Fax 01 30 47 28 29 www.wimesure.fr • [email protected] Press the MENU button and than press the UP / DOWN until you are on the desired sub menu. With OK you go into the appropriate sub menu. The following items in the submenu are available: > RANGE: Setting of the measurement range (100% value) > UNIT: Selection of the pressure unit (Pa, hPa, kPa, mbar, bar, Torr, mmHG, inHG, psi, mmH20, inH20) > STEPS: Setting of the step size in percent. > MODE: Selection of the operating mode • CTRL (control): Calibration of pressure sensors and pressure switches • MESS (measure): Measurement of differential and absolute pressure • AUTO (automatic): Deposit the pressure proles > LANGUAGE: Select language > SETTINGS: see below Submenu SETTINGS • ZEROING: On and off the automatic zeroing function (exit the operating menü). Time frequency of the automati cal zeroing. RS232/ USB: Select interface DISPLAY: Brightness setting AUTO: Setting of the range, unit and steps in which the range is divided. STEPS UP/ STEPS DOWN: Various values can be assigned. INFO: Informations about the calibrator • • • • • Operating Modes And Operation 1) CTRL (control) The CTRL mode is used for calibration of pressure sensors, switches and other pressure equipment. The pressure pump is active and regulate the corresponding target pressure. The internal sensor displays the actual value on the LCD. > Connection Pressure devices have to be connected to the + and - port of the calibrator. Absolute pressure devices have to be connected to the + port. > Setting • • • • • Press the MENU button. Conrm MODE with OK and press UP/ DOWN until CTRL is shown on the display. Conrm with OK button Set the upper limit of the range in the submenu RANGE (UP/ DOWN and 0%/ 100%), conrm with OK Set of the unit in the submenu UNIT (UP/ DOWN), conrm with OK Set the step sequence (in per cent) in the submenu STEPS (UP/ DOWN and 0%/ 100%) and conrm with OK MENU button to exit the submenu > Use The unit is located at exit from the menu in VENT mode, ie the sensor of the calibrator is vented. On the middle of the top, the target pressure is displayed. On the buttom of the display, the per cent value is shown. When leaving the menu, this value is 0%. Switch between target pressure and per cent value with the OK button. • • The percentage value can be changed with the UP / DOWN (in the xed step sizes) and using the 0% / 100%. The target pressure can only be changed with the UP / DOWN. With 0% / 100% to the appropriate place, the target pressure be jumped. > Example Target pressure: By pressing the OK button, you can switch between the percentage and target pressure. value. Press the OK button until the value (top center display) outlined in bold. Press the 0% or 100% button to jump to the selected location. Choose the required value with the UP and DOWN button. Push the OK button to exit target pressure. The marker moves to the percentage value. (middle of the display). www.fsm.ag When the calibratos displays a stable value, the data can be recorded: • Nominal value: Right below • Unit: Right above • Actual value: On the display of the connected device • Reference value: Middle of the display You can make a manual auto zero of the internal sensor in the CTRL mode. Connected devices can be leak tested: • Manual auto zero: Push the ZERO button - the internal sensor is get to zero. • Leak-test: Push the LEAK button to switch off the pressure cell. The pressure is held. Control the value via the display of the calibrator. Push the LEAK button again to stop the mode. 2) MESS (measure) Use the MEASURE mode to measure absolute or differential pressure. The internal pump isn‘t active. The pressure is measured by the internal sensor. > Connection Connect differential pressure devices to the + and - port. Connect absolute pressure devices to the + port. > Setting • • • • • • • • Push the MENU button. Conrm MODE with OK and push UP/ DOWN till MESS is displayed. Conrm with OK. Submenu RANGE and STEPS aren‘t relevant in the MESS mode. Push the UP/ DOWN buttons to get to the submenu UNIT. Choose the relevant unit and conrm with the OK button. Push the MENU button to quit. Submenu SETTUNGS: Push the UP/ DOWN button to get to the item SETTINGS and conrm with OK. Choose the item ZERO in the submenu and conrm with OK. Via the item AUTO-ZERO you can de-activate- or activate the auto zero function. > Use By leaving the MENU, the internal sensor goes to zero. The calibrator starts to measure the connected pressure. • • • • Right above: Pressure unit Up in the middle: Maximal pressure Left above: Mode Middle: Actual pressure In the MESS mode you can always make a manual zero with the ZERO button. > Attention: If the permissible maximum pressure (125%) is exceeded, the internal sensor is sealed off by solenoid valves. The display shows ERROR. With the OK button you can unlock and release the calibrator. www.fsm.ag 3) AUTO Store specic proles in the AUTO mode. Use the AUTO mode to calibrate different pressure devices with idential values. The dened prole can be repeated a several times. > Connection Connect differential pressure devices to the + and - port. Connect absolute pressure devices to the + port. > Settings • • • • • • • Push the button MENU. Conrm MODUS with OK and push UP/ DOWN till AUTO is displayed. Conrm with OK. The submenus RANGE, UNIT and STEPS aren‘t relevant in AUTO mode. Push the buttons UP/ DOWN till SETTINGS is displayed and conrm with OK. Submenu ZERO isn‘t relevant in this mode. Push the buttons UP/ Down till AUTO-MODUS is displayed and conrm with OK. RANGE: Relevant pressure range UNIT: Pressure unit (see settings) STEPS: The pressure range is divided into sections. Further settings of AUTO mode can be set in the submenu CONFIGURATION. • Cycles: Set the number of cycles that have to be realized in the AUTO mode. • T Start: Wait for vent of the internal sensor. • Stop: Wait after reaching the maximum pressure. • T Pause: Wait between two cycles • AUTO-ZERO: Automatic zeroing at the end of every clycle. Exit of the submenu by pushing the button MENU. > Use After exit of the MENU, the calibrator is on wait status. All informations about AUTO mode are shown on the display. • • • • • Right above: Pressure unit In the middle: Phase 1 Sensor is venting (Pressure = 0) Left in the middle: First of ten cycles Down in the middle: Actual target pressure in per cent In the middle above: Target pressure Pressure OK button to start the AUTO mode. The gure shows the ow chart of the AUTO mode. There you can get detailed informations about the cycles and the function. www.fsm.ag Phase Function 1 Wait -Start with OK button- 2 Wait -can be congurated in the MENU- 4 Duration of zeroing the internal sensor 7 Duration at point of zero 9 Time of the adjustment till the next step 10 Stop time 13 Wait (target pressure) 15 Time of the adjustment till the next step 16 Duration at point of zero 18 Stop -can be congurated in the MENU- Between the phases 10 and 16, the data -if a stable value is displayed- of the calibrator can be evaulated and recorded. Exit of AUTO mode with the MENU button. VENT is shown left above in the display. 4) LEAK (leakage) In the CTRL mode you it is possible to check connected pressure device for leaks. > Connection Pressure devices have to be connected to the + and - port of the calibrator. Absolute pressure devices have to be connected to the + port. > Settings To check pressure devices for leaks, you have to work in the CTRL mode. • Enter the desired pressure with the buttons UP/ DOWN or the buttons 0%/ 100%. • As soon as the required pressure is reached and the value is stable push the LEAK button. The internal pump will be switched off and pressure is held. > Use • • • • • • Left above: Actual mode In the middle above: Target pressure Right above: Unit Down in the middle: Difference between actual and target pressure (in per cent) Right down: Difference between actual and target pressure (absolute) Left down: Time www.fsm.ag Interfaces You have the option of using the PC for monitoring and controlling the calibrator via the interfaces (RS232 and USB). In control, measurement and automatic mode, a cyclical issue of the current device status can be switched on and off. Ausgabeintervall ist dabei 1 Sekunde. > USB The PC can access through the USB interface on the calibrator (Virtual Com Port). The control via USB is not different from the control via RS232. > RS232 For the connection of RxD, TxD and GND are required. The PC will be connected via a gstraight interface cable (1:1, male à female). > Settings Push the UP/ DOWN button till SETTINGS is shown on the display and conrm with OK. Then push UP/ DOWN till RS232/ USB is displayed. The following settings can be made: • • • • • AKTIV: If a interface is required, choose of the indiviual interface (USB, RS232 und -------) BAUD: Choose of the correct Baudrate (1200, 2400, 4800, 9600, 14400, 19200, 28800, 38400, 56000, 57600) DATA-BITS: Default value (8) STOP-BITS: Default value (1) PARITY-BITS: Default value (N) > Drivers You can get the current interface drivers (Windows, Linux, Mac OS) on: • Homepage URL: http://www.ftdichip.com • Download URL: http://www.ftdichip.com/Drivers/VCP.htm (FTDI Homepage --> Drivers --> VCPDrivers) • Installation guide: http://www.ftdichip.com/Documents/InstallGuides.htm (FTDI Homepage --> Documents --> Installation Guides) > Interface commands All interface commands are preceded by a colon and the carriage return (CR) complete.Command and parameters must be separated by a space. By appending a question mark at the respective command can otherwise be read to changing parameters. Receptions commands are acknowledged with „OK“, and missing or incorrect commands with „ERROR“. You can get the interfaceprotocol directly from [email protected] anfordern. Wimesure • 54, rue de Versailles • 78460 CHEVREUSE • Tél. 01 30 47 22 00 • Fax 01 30 47 28 29 www.wimesure.fr • [email protected] www.fsm.ag