1
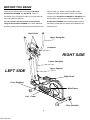
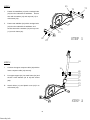
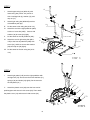
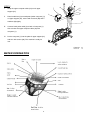
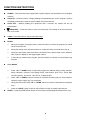
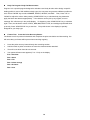
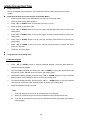
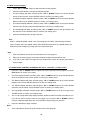
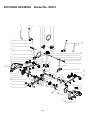
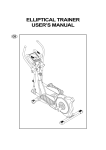
HG-8001E ELLIPTICAL TRAINER USER'S MANUAL IMPORTANT PRECAUTIONS WARNING: To reduce the risk of injury to persons, read the following important precautions and information before operating the ELLIPTICAL TRAINER. 1. Before your starting to exercise, read the manual 6. Before using the machine, please check the nuts and bolts are securely tightened. carefully and also always keep this manual with you. 2. Before beginning any exercise program you should 7. Always use the equipment as mentioned. If any consult your doctor first to determine if you have any defective components while assembling or checking the medical or physical conditions that could put your health equipment has been found, or you hear any unusual noises and safety at risk or prevent any damage. Your doctor’s from the equipment during use, stop immediately. Do not advise is essential if you are taking medication that use the equipment until the problem has been rectified. affects your heart rate, blood pressure or cholesterol 8. Wear appropriate workout clothing while exercising. Do level. not wear robes or other clothing that could become caught 3. Be aware of your body’s signals. Incorrect or excessive exercise can damage your health. If you feel dizziness, in the machine. Running or aerobic shoes are also required while using the machine. nausea, chest pain, back pain or other health symptoms stop the workout at once and consult your doctor before 9. Use the equipment on a flat level, clear surface. Do not use the machine near the water or outdoors. continuing. 4. Do not operate any exercise equipment if it is not assembled well. Also you must inspect your machine 10. Keep hands away from all moving parts. While lifting or moving the equipment, always do it carefully. periodically to ensure your machine in good condition. It is your responsibility to ensure that all users of the 11. The equipment has been tested and certified to En957 equipment are informed of all warnings and precautions. under class H.C. for home use only. Maximum weight of user: 120kg/270Lbs. 5.. Keep children and pets away from the equipment. The equipment is designed for adult use only. The equipment is not suitable for therapeutic use. WARNING: Before beginning this or any exercise program, consult your physician. This is especially important for person over the age of 35 or person with pre-existing health problems. Read all instructions before using. SAVE THESE INSTRUCTIONS 2 fitnessfaq.info BEFORE YOU BEGIN Thank you for selecting the revolutionary HG-8001E help us assist you, please note the product model ELLIPTICAL TRAINER. The HG-8001E offers an number and serial number before calling. The model impressive array of features to make your home workouts number of the ELLIPTICAL TRAINER is HG-8001E. The more enjoyable and effective. serial number can be found on a decal attached to the For your benefit, read this manual carefully before ELLIPTICAL TRAINER. Before reading further, please using the ELLIPTICAL TRAINER. If you have additional familiarize yourself with the parts that are labeled in the questions, please call our Customer Service Department To drawing below. Hand Pulse Upper Swing Bar ` Computer ` RIGHT SIDE Lower Swing Bar Upper Support LEFT SIDE Right Pedal Front Stabilizer Main Frame Left Pedal Rear Stabilizer 3 fitnessfaq.info ASSEMBLY Assembly requires two people. Set the parts in a cleared area and remove all packing materials. Do not dispose of the packing materials until assembly is completed. Identify your hardware 12&DUULDJHEROW0/ 12&DS1XW0 12:DVKHU¶¶7 12&DUULDJHEROW0/ 12 :DVKHU¶¶7 126SULQJ 12.QRE 12&DUULDJHEROW0/ 12&DS1XW0 12 :DVKHU¶¶7 12:DVKHU ¶¶7 126FUHZ0/ 12&DS1XW0 12:DVKHU¶ ¶7 &RPELQDWLRQ:UHQFK ̚̚̚PP 126FUHZ0/ PP$OOHQNH\ZUHQFK 126FUHZ 126FUHZ Unpacking your ELLIPTICAL TRAINER where will be using it. Being careful Not to damage . Place your ELLIPCAL TRAINER on a level flat surface. It is recommended that you place a protective covering on your floor. 4 fitnessfaq.info STEP 1 I. Fasten front stabilizer (73) with 2 carriage bolts (24) from the underside of stabilizers. Secure then with 2 washers (10) and cap nuts (11) to main frame (45). II. Fasten rear stabilizer (25) with 2 carriage bolts 45 (24) from the underside of stabilizers. And secure them with 2 washers (10) and cap nuts (11) to main frame (45). 67(3 STEP 2 I. Connect the upper computer cable (78) with the lower computer cable (75) securely. II. Put upper support (81) into main frame (45) and secure it with washers (10 & 79) and screws (80). III. Attach rubber (77) and plastic cover (76) in to main frame (45). 67(3 5 fitnessfaq.info STEP 3 / I. Attach upper swing bar (6R & 6L) with lower swing bar (12R & 12L) and fix it with 2 carriage bolt (9), washer (10), and cap nut (11). II. 5 Attach right swing bar (6R&12R) to arbor of handlebar post (64). III. Do the same to left swing bar (6L & 12L). IV. Attach the end of the right pedal bar (28R) to arbor of cross bar (22R). Secure with washer (35) & screw (34) tightly. V. Do the same for the left pedal bar (28L). VI. Attach the end of right swing bar (6R & 12R) to the front of pedal bar (28R) with screw (27), and then secure with washer (29) and cap nut (30) tightly. VII. Do the same for the left swing bar (6L & 12L). 67(3 STEP 4 I. Attach right pedal (17R) onto the right pedal bar with carriage bolt (16). And secure them with washers (31), springs (32) and knobs (33) tightly. Do the same for the left pedal (17L). I I . Attach the plastic cover (60) onto the front end of pedal support and secure it with screw (60). Then attach the plastic cover (15) and secure it with screws (46). 5 6 67(3 STEP 5 I. Keep the upper computer cable (78) out of upper support (81). II. 78 Place handle bar (5) to metal parts (under computer (1)) on upper support (81), secure with 2 screws (66) and 2 washers (29) tightly. III. Connect hand pulse cable (3) to back of computer (1). Also connect the upper computer cable (78) with computer (1). IV. Put the computer (1) into the plate of upper support (81) and fix it with screws (26). The machine is ready for use. 67(3 METER OPEREATION 7 FUNCTION INSTRUCTION POWER -- This model has been supplied with a power adapter. The specification for the adapter Is 6V/1A. AUTO ON -- Press any button or begin pedaling to automatically turn on the computer. If part of the display malfunctions check the power adaptor and all connections. AUTO OFF -- Without peddling the equipment after 4 minutes, the monitor will turn off automatically. RECOVERY -- Press this button to enter the fitness test. The ranking of the test resolute is from F1.0 to F6.0. USER -- Press this button to the personal data input. ENTER ¾ During the program choosing function, press this button to confirm the program you would like to do the exercise. ¾ During the setting mode, Press this button to confirm the value you would like to set up. ¾ During the start mode, press this button to choose the time, speed, RPM, calorie, distance, watt or pulse to display on the bigger digital number. ¾ In the body fat measurement program, press this button to read the next result after body exercise. UP or DOWN ¾ Press “ UP” or ”DOWN” button to select the program form Manual, Rolling, Valley, Fat Burn, Ramp, Mountain, Intervals, User Setting Profile, Watt Control, 60% H.R.C. (Heart Rate Control Program), 75% H.R.C., 85% H.R.C., to Body fat test. ¾ Press “ UP” or ”DOWN” button to increase or decrease the setting value of Time, Distance, Calories, height, weight, age, sex, and pulse. ¾ During the start mode, Press “UP” or ”DOWN” button to increase or decrease the resistance level. ¾ Press the “START” button to start or stop exercise or begin to measure the body fat. RESET -- Press the START/STOP button for 3 seconds to set all displayed values back to zero. 8 PROGRAM INTRUCTION Manual Program: Manual PROGRAM 1 is a manual program. Press “ENTER” key to select TIME, DISTANCE and CAL. Then, Press ”UP” or ”DOWN” key to adjust the values. After pressing “START/STOP” key to exercise, please also apply the heart rate detector appropriately. Users may exercise in any desire level (by Pressing ”UP” or ”DOWN” Pressing the workout) with a period of time or a certain distance. Preset Programs: Rolling, Valley, Fat Burn, Ramp, Mountain, Intervals PROGRAM 2 to PROGRAM 7 is the preset program. Press “ENTER” key to select TIME, DISTANCE, and CAL. Then, press ”UP” or ”DOWN” to adjust the values. Users may exercise with different level of loading in different intervals as the profiles show. After pressing “START/STOP” key to exercise, please also apply the heart rate detector appropriately. Users may also exercise in any desire level (by Pressing “UP” or “DOWN” Pressing the workout) with a period of time or a certain distance. User Profile programs: User Setting Profile Program 8 is the user-setting program. Users are free to edit the values in the order of TIME, DISTANCE, CAL, and the level of loading in 10 intervals. The values and profiles will be stored in the memory after setup. Users may also change the ongoing loading in each interval by turning the nut, and they will not change the level of loading stored in the memory. Speed Independent Program: Watt Control Program 9 is a Speed Independent Program. Press “ENTER” key to select the values of TIME, DISTANCE, and WATT. Then, Press “UP” or “DOWN” to adjust the values. After pressing “START/STOP” key to exercise, please also apply the heart rate detector appropriately. During the exercise, the level of loading is not adjustable. In this program, computer will adjust the level of loading according to the value of WATT setup. For example, the level of loading may increase while the speed is too slow. Also, the level of loading may decrease while the speed is too fast. As a result, the calculated value of WATT will close to the value of WATT setup by users. Heart Rate Control Programs: 60% H.R.C. (Heart Rate Control Program), 75% H.R.C., 85% H.R.C. Program 10 to Program 12 is the Heart Rate Control Programs. In Program 10 to Program 12, press “Enter” key to select TIME, DISTANCE, Cal & AGE, and TARGET H.R. Then, Press “UP” or “DOWN” to adjust the values. Users may exercise in a period of time or a certain distance with 60% Max Heart Rate in Program10, 75% Max Heart Rate in Program 11, and 85% Max Heart Rate in Program 12. After pressing “START/STOP” key to exercise, please also apply the heart rate detector appropriately. Or you can choose Target H.R. working program under these 3 main programs, users may setup a target heart rate to exercise in a period of time or a certain distance. In these programs, the computer will adjust the level of loading according to the heart rate detected. For example, the level of loading may increase while the heart rate detected is lower than TARGET H.R. Also, the level of loading may decrease while the heart rate detected is higher than TARGET H.R. As a result, the user’s heart rate will be adjusted to close the TARGET H.R. in the range of TARGET H.R. –5 and TARGET H.R. +5. 9 Body Fat Program: Body Fat Measurement Program 13 is a special program designed to calculate users’ body fat ratio and to design a specific loading profile for users. With 9 different body types, the computer can generate 9 different profiles for each. Press “ENTER” key to select GENDER, HEIGHT, WEIGHT, and AGE. Then, Press “UP” or “DOWN” to adjust the values. After pressing “START/STOP” key to calculate body fat, please also apply the heart rate detector appropriately. If the detector cannot pick up any signals, an error message “E3” will show up in the profile display. If it happens, press “START/STOP” key to calculate again. Then, the calculation values of FAT%, BMR, BMI, BODY TYPE, and a designed profile will show up shortly. Press “START/STOP” key to exercise. The profile shown in the display is specially designed for your body type. Fitness Test: Press the Pulse Recovery Button The fitness note is for personal orientation and compares the pulse rate before and after training. You will notice that your fitness will improve when exercising regularly. ¾ Press the pulse recovery button directly after a training session. ¾ Hold the hand on pulse connections or leave the chest transmitter attached. ¾ Time will count down from 60 to 0 seconds. ¾ Your personal fitness note appears (F1.0 – F6.0) on the display. F1.0 = Excellent F2.0 = Good F3.0 = Fair F4.0 = below average F5.0 = No Good F6.0 = Poor 10 OPERATION INSTRUCTION Plug in the power Plug in the adaptor to the equipment. The monitor will produce a beep sound and turn on the monitor. Determine the User (Only Can Process in the STOP Mode.) ¾ Press the User button to the USER DATA, only can use on the stop mode. ¾ Press the Enter to the USER SELECT. ¾ Press “ UP” or ”DOWN” button to select the User from U1 to U4. ¾ Press the Enter to decide the User. ¾ Press “ UP” or ”DOWN” button to set up your height, and then press the Enter to confirm your setting value. ¾ Press “ UP” or ”DOWN” button to set up your weight, and then press the Enter to confirm your setting value. ¾ Press “ UP” or ”DOWN” button to set up your age, and then press the Enter to confirm your setting value. ¾ Press “ UP” or ”DOWN” to set up your sex, and then press the Enter to confirm you are M (male) or F (female). ¾ Finish the user data input. Program select and setting value C-1 Manual Program ¾ Press “ UP” or ”DOWN” button to select the Manual program, Press the Enter Button to confirm the manual program. ¾ The Time display will flash, and then press “ UP” or ”DOWN” to set up the desired time to do the exercise. Press “ENTER “button to confirm your setting value. ¾ The distance display will flash, and then press “ UP” or ”DOWN” button to set up the desired distance value. Press “ENTER” button to confirm your setting value. ¾ The Calories display will flash, and then press “ UP” or “DOWN” button to set up the desired calories to be consumed. Press “ENTER” button to confirm your setting value. ¾ Press the start/stop to begin exercise. Note: I. Time and distance cannot set up at the same time in this program. II. When you reach the target, the monitor will produce beep sound and then stop. III. If you set up more than one target and you would like to reach next target, press start to exercise again. 11 C-2 Preset Program: Rolling, Valley, Fat Burn, Ramp, Mountain, Intervals Program ¾ Press “ UP” or ”DOWN” to select one of the above programs, Press the Enter Button to enter this program. ¾ The Time display will flash, and then press “ UP” or ”DOWN” button to set up the desired time to do the exercise. Press ENTER button to confirm your setting value. ¾ The distance display will flash, and then press “ UP” or ”DOWN” button to set up the desired distance value. Press ENTER button to confirm your setting value. ¾ The Calories display will flash, and then press “ UP” or ”DOWN” button to set up the desired calories to be consumed. Press ENTER button to confirm your setting value. ¾ Press the start/stop to begin exercise. Note: I. Time and distance cannot set up at the same time in this program. When you reach the target, the monitor will produce beep sound and then stop. II. If you set up more than one target and you would like to reach next target, press start to exercise again. C-3 User Setting Profile ¾ Press “ UP” or ”DOWN” button to USER PROFILE. ¾ Press the Enter Button to enter this program. ¾ The Time display will flash, and then press “ UP” or “DOWN” button to set up the desired time to do the exercise. Press “ENTER” button to confirm your setting value. ¾ The distance display will flash, and then press “ UP” or “DOWN” button to set up the desired distance value. Press “ENTER” button to confirm your setting value. ¾ The Calories display will flash, and then press “ UP” or “DOWN” button to set up the desired calories to be consumed. Press ENTER button to confirm your setting value. ¾ The column 1 will flash, and then press “ UP” or “DOWN” button to create your personal exercise profile. ¾ Press the Enter button to confirm your first column of your exercise profile. ¾ The column 2 will flash, and then press “ UP” or “DOWN” button to create your personal exercise profile. ¾ Press the Enter button to confirm your second column of your exercise profile. ¾ Follow the above descriptions to finish your personal exercise profile. ¾ Press the START/ST0P to begin exercise. Note: I. Your personal exercise profile will be stored in the memory of the monitor. II. Time and distance cannot set up at the same time in this program. III. When you reach the target, the monitor will produce beep sound and then stop. IV. If you set up more than one target and you would like to reach next target, press start to exercise again. 12 C-4 Watt Control Program ¾ Press “ UP” or ”DOWN” button to select the watt control program. ¾ Press the Enter Button to choose the manual program. ¾ The Time display will flash, and then press “ UP” or ”DOWN” button to set up the desired time to do the exercise. Press “ENTER” button to confirm your setting value. ¾ The distance display will flash, and then press “ UP” or ”DOWN” button to set up the desired distance value. Press “ENTER” button to confirm your setting value. ¾ The Calories display will flash, and then press “ UP” or ”DOWN” button to set up the desired calories to be consumed. Press ENTER button to confirm your setting value. ¾ The watt display will flash, and then press “ UP” or ”DOWN” button to set up the watt to do the exercise. Press “ENTER” button to confirm your setting value. ¾ Press the start/stop button to begin exercise. Hint: WATT = TORQUE (KGM) * RPM *1.03. In this program, the WATT value will keep constant value. It means that if you peddle quickly, the load will decrease and if you peddle slowly, the load will increase. Always try to keep you in the same watt value. Note: I. Time and distance cannot set up at the same time in this program. II. When you reach the target, the monitor will produce beep sound and then stop. III. If you set up more than one target and you would like to reach next target, press start to exercise again. C-5 HEART RATE CONTROL PROGRAM: 60% H.R.C., 75%H.R.C., and 85% H.R.C. ¾ Press the “ UP” or ”DOWN” button to select one of the heart rate control program, Press the Enter Button to confirm your choice. ¾ The Time display will flash, and then press “ UP” or ”DOWN” button to set up the desired time to do the exercise. Press “Enter” button to confirm your setting value. ¾ The distance display will flash, and then press “ UP” or ”DOWN” button to set up the desired distance value. Press “ENTER” button to confirm you setting value. ¾ The Calories display will flash, and then press “ UP” or ”DOWN” button to set up the desired calories to be consumed. Press “ENTER” button to confirm your setting value. ¾ The Age display will flash, and then press “ UP” or ”DOWN” button to set up your age. Press “ENTER” button to confirm your setting value. ¾ The T. H.R. (Target Heart rate) display will flash. Please check this number is suitable for you. If you do not want to use this value for your target, you can press “ UP” or “DOWN” button to set up the desired target heart rate you would like to keep during your exercise. ¾ Press the start/stop to begin exercise. Note: I. Time and distance cannot set up at the same time in this program. 13 II. When you reach the target, the monitor will produce beep sound and then stop. III. If you set up more than one target and you would like to reach next target, press start to exercise again. C-6 Body fat measurement ¾ Press “ UP” or ”DOWN” button to select BODY FAT TEST program, Press the ENTER Button to confirm your choice. ¾ The HEIGHT display will flash, and then press “ UP” or ”DOWN” button to set up your height. Press “ENTER” button to confirm your setting value. ¾ The weight display will flash, and then press “ UP” or ”DOWN” button to set up your height. Press “ENTER” button to confirm your setting value. ¾ The AGE display will flash, and then press “ UP” or ”DOWN” button to set up your sex. Press “ENTER” button to confirm your setting value. ¾ The gender display will flash, and then press “ UP” or ”DOWN” button to set up your gender. Press “ENTER” button to confirm your setting value. ¾ Press START/STOP button to begin body fat measurement. ¾ After finished your measurement, press the “ENTER” button to check your test results. ¾ To quit this program, press “ UP” or ”DOWN” button to select your desired program. Note: The personal data will recall from USER SETTING DATE. If the data is correct, just simply press the ENTER button to confirm the values. In this program, your personal data will not store in our memory. If you need to change your personal data, please press the USER button to change your personal information, 14 Things You Should Know Before Exercising A. The values calculated or measured by the computer are for exercise purpose only, not for medical purpose. B. The Variables may need to change in the Programs: Programs Variables P1 ~ P7 TIME, DISTANCE, CAL P8 TIME, DISTANCE, CAL, 10 Intervals xP9 TIME, DISTANCE, WATT. xP10 ~ P12 TIME, DISTANCE, CAL, AGE, TARGET HR xP13 GENDER, HEIGHT, WEIGHT, AGE The pre-set data will begin to count down after you start pedaling. Once a pre-set has been reached the computer will beep and end the training program. C. Body Types There are 5 body types divided according to the FAT% calculated. Type 1 is from 5% to 14%. Type 2 is from 15% to 24%. Type 3 is from 25% to 29%. Type 4 is from 30% to 39%. Type 5 is from 40% to 50%. D. BMR Basal Metabolic Rate (metabolism) is the energy (measured in calories) expended by the body at rest to maintain normal bodily function. E. BMI BMI means Body Mass Index, which is used for body shape adjustment. F. FAT WEIGHT The total body fat in our body measured by Kilogram. 15 TRAINING INSTRUCTION To achieve a considerable improvement of your physical resistance and your health, some aspects of how to find the most efficient amount of training should be followed: If you have not been physically active for a longer period of time and also avoid health risks you should consult your general physician before starting exercise. INTENSITY To achieve maximum results the right intensity has to be chosen. The heart rate is used as guideline. As a rule of thumb, the following formula is commonly used: Maximum pulse rate=220-Age While exercising the pulse rate should always be between 60и~85и of the maximum pulse rate. When starting to exercise, you should keep your rate at 60% of your maximum pulse rate in the first couple of weeks. With increasing improvement of fitness, the pulse rate should be slowly increased to 85% of your maximum pulse rate. FAT BURING The body starts to burn fat at approx. 60% of the maximum pulse rate. To reach an optimum at burning rate, it is advisable to keep the pulse rate between 60%~70% of the maximum pulse rate. The optimum training amount consists of three workouts per week 30 minutes each. Example: You are 52 years of age would like to start exercising. Maximum pulse rate=220-52(age) =168 pulse/min Minimum pulse rate=168x 0.6=101 pulse/min Highest pulse rate=168x0.7=117 pulse/min During the first week it is advisable to start with a pulse rate of 101, afterwards increase it to 117. With increasing improvement of fitness the training intensity should be increased to 70%~85% of your maximum pulse rate. This can be done by increasing the resistance, a higher frequency or longer training period. 16 Trainings hints With buying this training item you have done the first step for healthy fitness. With the help of this item you can exercise your muscles at home every time you feel like. Further is the exercise good for your health as the training is also good for your endurance. Goal of training : Building of muscles General fitness Endurance Better feeling The training success is mainly depending on the following points. Continuous training Good nourishment Control of training progress Who can exercise? Generally every healthy person, young or old, can start to exercise. Capacity: The body, especially the heard and the circulation, need time to adapt to the new circumstances. Because of this reason it is really important to start really slowly with the training and to make brakes between and after the training. Only exercise on a training level where you don’t reach your limit. Start to exercise in a tempo that you feel comfortable with. After continuous training you can extend your training or adjust the item to a higher level. Important: Start your exercise slowly and increase intensity of exercises gradually. You have a lot of time as you do your exercise at home. You have to do some warming –up without item before training. Start and end your training with a little expenditure or energy. After training you should also do some stretching. Tips for a successful and healthy training: · Always remember that the training with your item can be really helpful for your health if you follow the important rules. It is not helpful to do some exercises in a short time, but in long-term and continuously. · Please wear comfortable cloth, we propose to wear sporting cloth. · Never exercise with a full stomach. Do not have a meal about one hour before and after the training. · Do not exercise if you are already tired or feel exhausted. · Always remember that your body needs enough liquid if you exercise. You should follow this necessity. 17 Training: Warming up should generally be done with every sportive activity. All physical and psychically components will be stimulated and increased; further the risk or injury will be decreased. With the following exercises you will warm up the muscle groups, this succeed the best by moving. Run for about 5-10 minutes calmly on one place or through the room. You can jump in between a couple of times. Stretching: Following exercises are light but appropriate movements, which will wake up your body, stimulate your circulation and make your ankles more flexible. Please do these warming up exercises more than once before starting your training. SUGGESTED STRETCHES The correct form for several basic stretches is shown at the right. Move slowly as you stretch—never bounce. 1. Toe Touch Stretch Stand with your knees bent slightly and slowly bend forward from your hips. Allow your back and shoulders to relax as you reach down toward your toes as far as possible. Hold for 15 counts, then relax. Repeat 3 times. Stretches: Hamstrings, back of knees and back. 2. Hamstring Stretch Sit with one leg extended. Bring the sole of the opposite foot toward you and rest it against the inner thigh of your extended leg. Reach toward your toes as far as possible. Hold for 15 counts, then relax. Repeat 3 times for each leg. Stretches: Hamstrings, lower back and groin. 3. Calf/Achilles Stretch With one leg in front of the other, reach forward and place your hands against a wall. Keep your back leg straight and your back foot flat on the floor. Bend your front leg, lean forward and move your hips toward the wall. Hold for 15 counts, then relax. Repeat 3 times for each leg. To cause further stretching of the achilles tendons, bend your back leg as well. Stretches: Calves, achilles tendons and ankles. 4. Quadriceps Stretch With one hand against a wall for balance, reach back and grasp one foot with your other hand. Bring your heel as close to your buttocks as possible. Hold for 15 counts, then relax. Repeat 3 times for each leg. Stretches: Quadriceps and hip muscles. 5. Inner Thigh Stretch Sit with the soles of your feet together and your knees outward. Pull your feet toward your groin area as far as possible. Hold for 15 counts, then relax. Repeat 3 times. Stretches: Quadriceps and hip muscles. 18 8001E PARTS LIST PART# DESCRIPTION Qty PART# DESCRIPTION Qty 1 Computer 1 43 10*16*22mml Tube 1 2 Hand Sponge 1 44 Power Plug 1 3 Hand Pulse Cable 1 45 Main Frame 1 4 Hand Pulse 2 46 Screw 9 5 Handle Bar 1 47 Sensor Set 1 6 Upper Swing Bar(R+L) 1 48 Screw 4 7 End Cap 2 49 Motor Plug 1 8 Upper Swing Sponges(R+L) 1 50 17x22x3 Washer 2 9 M8x35 mml Carriage Bolt 4 51 Belt Wheel 1 10 8x19x1.5 mmT Washer 14 52 Arbor 1 11 M8 Cap Nut 8 53 M8x15Lx1.25 Screw 3 12 Lower Swing Bar (R+L) 1 54 Screw 8 13 10x26x8 Washer 4 55 M5*15 4 14 Plastic Cover (Front+ Rear) 2 56 M4.5*25 5 15 Plastic Cover (R+L) 2 57 Plastic Cover 1 16 M6 Carriage Bolt 4 58 Screw 4 17 Pedals (R+L) 1 59 Crank Cover 2 18 Cover (R+L) 1 60 Screw 2 19 Rubber 2 61 Cap Nut 2 20 M8x25L Washer 2 62 8x16x1.5 Washer 2 21 Chain Cover (R+L) 1 63 Tube 2 22 Crank (R+L) 1 64 Arbor 1 23 Rear End Cap 2 65 19x38 Tube 6 24 8x70mml Carriage Bolt 4 66 Screw 2 25 Rear Stabilizer 1 67 3/8” Nut 2 26 Screw 4 68 10x19x3 Washer 2 27 10x78mml Screw 2 69 Chain Adjuster Set 2 28 Pedal Support (R+L) 1 70 Belt 1 29 8x19x2mmT Washer 4 71 Fly Wheel 1 30 M10 Cap Nut 3 72 Front End Cap 2 31 6x14x1 Washer 4 73 Front Stabilizer 1 32 Spring 4 74 Motor 1 33 Knob 4 75 Lower Computer Cable 1 34 Screw 2 76 Plastic Cover 1 35 Washer 2 77 Rubber 1 36 Screw 2 78 Upper Computer Cable 1 37 Tube 4 79 Washer 6 38 Washer 2 80 8x15mmlx1.25 (5mm) Screw 6 39 Nut 2 81 Upper Support 1 40 Spring 2 78 Upper Computer Cable 1 41 10x38mml Screw 1 79 Washer 6 42 Bearing 4 19 EXPLODED DRAWING / Model No. 8001E 727$//<(;3/2'( 5 20