1
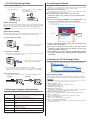
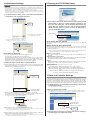
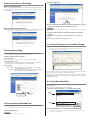
TR-71W / TR-72W Warranty
Customer's name:
Introductory Manual
Address:
Phone No.:
TR-71W / TR-72W
Dealer's name:
Temp/Humidity Data Logger / Network Communication Type
Address:
※ This Introductory Manual explains in a simple manner the basic operations and set
up for TR-71W / TR-72W. For a more detailed explantion, see the User's Manual on
the provided CD-ROM.
※ This data logger is designed for network communication. It does not include any
RS-232 or USB communication interface. To make use of this product you must
connect it to a network.
Phone No.:
12 months from date of purchase
Guarantee period
Package Contents
Date of purchase
Provisions for Free Repair
The following items should be in the package with each main unit.
■ TR-71W
1. If the unit does not work properly despite the fact that the customer used it properly and in line with the User's
Manual, the unit shall be repaired free of charge through the distributor which sold the unit.
■ TR-72W
2. If the customer requests free repair because of trouble within the warranty period, bring or send the unit along with
the warranty to the dealer. A service charge may be added if a repairperson must be sent out to the place of use
for repair.
Temp Sensors
(TR-0106)x 2
3. If you have moved after purchasing, or the product was received as a gift, or there are some difficulties contacting
the shop from which you purchased the unit, please contact us directly for service.
Humidity Sensor
(TR-3110) x 1
4. Free repair is not available in the following cases even though it is within the warranty period:
●
■ Common Items
●
Trouble or damage was caused by careless operation, natural disaster, fire, public pollution, or use of a power
source other than specified.
If repair, adjustment, disassembly or modification of the unit has been carried out by a person other than a
authorized engineer.
��������
RISK OF ELECTRIC SHOCK
DRY LOCATION USE ONLY.
SHOCK HAZARD NONSERVICEABLE PARTS INSIDE.
●
Trouble or damage was caused by transportation, movement or dropping of the unit after purchase.
●
Failure to submit the warranty or failure to fill in all items required in the warranty.
5. The warranty cannot be reissued.
AC Adaptor
(AD-0605 )x 1
LAN Cable
(LN-20W)x 1
Software
CD-ROM x 1
Introductory Manual
(Warranty) x 1
This warranty only promises customers free repair within the period and conditions clarified in this warranty.
Therefore, the customer's legal rights will not be limited by this warranty. For further information on repair and others
service questions after the termination of the warranty period, contact your dealer.
Lithium Battery
(CR-2032)x 1
2005.06
16007004080
© Copyright 2001-2005 All rights reserve.
This Manual is printed using 100% recycled paper.
◆ Safety Precautions and Instructions ※ Please carefully observe the following safety measures when using our product.
To prevent any loss or damage to our customers, other people and / or property, and to ensure the proper use of our products we ask that before using our product you carefully read,
understand and follow the safety rules and precautions for our products as outlined below.
■ Explanation of Symbols
Explanation of Warning Symbols
Explanation of Picture Symbols
DANGER
These entries are actions that absolutely under no circumstance should be taken.
The taking of such an action may cause serious personal physical damage or
death.
CAUTION
These entries are actions that if taken may lead to physical injury or damage to
persons or things.
Denotes an important warning or caution. Near the symbol will appear another symbol giving details.
(EX:
stands for CAUTION AGAINST ELECTRIC SHOCK)
Denotes a forbidden action. Inside or near the symbol will appear another symbol giving details.
(EX:
stands for DO NOT TAKE APART)
Denotes an action that you must take. Near the symbol will appear another symbol giving details.
(EX:
stands for PULL POWER PLUG OUT FROM OUTLET)
DANGER
Do not take apart, repair or modify the main unit. It may cause fire,
electrocution or damage. Ask the shop where you purchased the product or
T&D Corporation to carry out any repairs.
Do not drop the unit, or expose the unit to a strong impact. If that happens to
the unit, immediately remove the batteries and stop using.
Continued use may cause fire or electrocution.
When using a Wireless LAN card, make sure to follow the directions for its
use from the manufacturer.
Do not connect or unplug the AC adaptor with wet hands. It may cause
electrocution.
Make sure to periodically remove dust and dirt from the AC adaptor. Dust can
cause moisture to accumulate and can lead to poor insulation which may
result in fire.
Do not use this unit in wet or humid places, such as a bathroom.
Continued use may cause fire, electrocution or damage.
If water or a foreign body enters into this unit, immediately remove the
batteries and stop using.
Continued use may cause fire or electrocution.
Store all batteries, sensors and Thermo Recorder units out of the reach of
children. It is dangerous to swallow batteries.
This device is designed to measure and record temperature and humidity.
Do not use it for any other purpose than to measure and record temperature
and humidity.
If any smoke or strange smells are emitted from the unit, immediately cease
using it.Continued use may cause fire, electrocution or damage.
While installing and using this product, make sure to always follow your
computer manufacturer's warnings and cautions.
CAUTION
This unit is not water-resistant.
If the unit gets dirty, wipe it with a clean cloth and a mild detergent.
Battery terminals may provide insufficient contact due to age or vibration.
Please be careful not to lose data due to insufficient contact.
Do not place heavy or hot things on top of cables. It may cause electrocution
or damage.
We are not responsible for any malfunction or trouble caused by the use of
our product or by any problem caused by the malfunction of our unit. Please
be fully aware of this before using our product.
Battery life depends on the measurement environment, communication
frequency, recording interval and battery quality.
This product has been designed for private or industrial use only. It is not for
use in situations where strict safety precautions are necessary such as in
connection with medical equipment whether directly or indirectly.
If water or a foreign object enters the case, immediately cease using it.
Do not expose the unit to harmful gases or chemicals. It may cause corrosion
and/or other danger to the unit and to people handling the unit.
To prevent damage to the unit from static electricity, remove static electricity
from your body by touching metal around you (door knob, window frame)
before touching the unit.
Static electricity may cause not only damage to the unit, but may cause
breaks in or a loss of data.
Do not use or store the Thermo Recorder in any of the following places.
Doing so may cause electrocution, fire and/or other adverse effects to the
device and/or your computer.
- Areas exposed to direct sunlight
This will cause the inside of the device to become overheated and may
cause fire, deformation, and/or other damage including malfunction.
- Areas prone to strong magnetic fields
This may cause damage including malfunction.
- Areas exposed to water leakage
This may cause electrocution or other damage including malfunction.
- Areas exposed to excessive vibration
This may cause injury, malfunction, damage or loss of proper electrical
contact.
- Areas near fire or exposed to excessive heat
This may cause damage including malfunction and deformation.
- Areas prone to smoke, dust and dirt
This may cause damage including malfunction.
Condensation may occur if the unit is moved from one environment to
another where the difference in temperature is great.
Use the unit in an environment where the ambient temperature is from 0 to
60℃ and the humidity is from 20 to 80% RH (no condensation) or less.
To avoid poor connections, be sure to push the sensor connector securely
into the jack. When pulling out a cable from the logger, make sure to hold
the connector plug to pull it out.
Remove batteries from any unit that is not to be used for a long period of
time. Batteries left in a unit not being used for a long time may leak and
cause a malfunction.
1.TR-71W/72W Getting Ready
● Is Windows® operating properly?
① Insert the backup battery
※ For normal use please connect the AC adaptor
1. Pull out the battery case
3.Installing the Software
2. Insert the battery into the case making sure
not to mistake + / - .
Please use only new batteries
● Once the battery is reinserted, power will go on.
●
If Windows is not operating properly,「TR-7W Settings Utility」 and「Temp /Humidity
Graph」 may not be installed correctly or it may not operate properly.
● Please quit all other applications.
If other programs are open, please close and quit all of them, making sure to quit all
Quick Start programs such as a virus checker.
● To install the Settings Utility, it may be necessary to have
Administrator Rights for the computer into which it will be installed.
① Open Windows®.
② Place the accompanying CD-ROM into your CD-ROM drive. In a
few seconds, the 「Install Program」 window will appear.
【Battery Functions】
Under normal conditions the AC adaptor should be used for measuring and recording data,
but if there is a power shortage or the AC adaptor cable beomes unusable, the backup
battery can be used for measuring and recording. (without network communication)
※ If that window does not automatically open, please open it by double clicking the CD-ROM icon in 「My
Computer」 on your desktop.
Also, if the file appears in the CD-ROM folder、click on the "start.exe" icon.
CAUTION
If no battery has been installed and the AC adaptor power cannot be used, all data will be lost. So, please be very
careful.
【Replacing the Battery】
When the battery power becomes low, a mark will appear on the LCD of the main unit. If
the battery is not changed and all power is lost, the saved data will also be lost.
Click here
[Execute]
button
② Connecting the AC Adaptor
※ To ensure a proper connection make sure
that the plug is completely inserted.
③ Select「Install TR-7W Settings Utility」 and click the [Execute]
button to start the installation.
④ During the installation you will have choices about which
modules to install. Please select the modules you wish and
follow the installation directions.
③ Connecting a LAN Cable
※ When first making settings, please connect to a computer that is connected to the a
local network(same broadcast domain).
※ To ensure a proper connection make sure
that the plug is completely inserted.
⑤ After installation has been completed,「TR-7W Settings Utility」
and「Temp / Humidty Graph」 will be registered in the Window's
[Start] Menu.
4.Opening the TR-7W Settings Utility
To open, in the Windows Start Menu, under Programs, click「TR-7W Settings Utility」.
※ Do not directly connect the provided LAN cable to your computer.
For how to directly connect to a computer or for how to connect to use a Wireless
LAN card, see [Connecting to a Network] in the User's Manual on the CD-ROM.
④ Connecting the Sensors
※ For more detailed information about using「TR-7W Settings Utility」, see the User's Manual on the CD-ROM
※ To ensure a proper connection make sure that the plug is completely inserted
〔TR-71W〕
〔TR-72W〕
【TR-7W Settings Utility】
The TR-7W Settings Utility contains operational settings for such functions as Detailed
Network Settings, Warning Report Settings, Gather Current Reading Settings and others.
CAUTION
If you open「TR-7W Settings Utility」on multiple computers in the same network, it may not work properly. Please
open it from only one computer at a time in the same network (same broadcast domain).
●「Network Initialization 」Tab
Settings for helping to connect a TR-71W/72W to a network.
●「Detailed Network Settings」Tab
Make detailed network settings here.
2.Check your Computer Specifications
To properly use TR-71W/72W, the following operational environment is necessary.
OS
Microsoft Windows® 2000 / XP ※①
※ To install the Settings Utility, it may be necessary to have Administrator Rights for
the computer into which it will be installed.
PC/CPU
A Stable Windows Operating Environment
LAN・TCP/IP Communication Possible
Memory Capacity
Enough memory to stably operate Windows
Disc Space
More than 10MB free space(More free space is necessary for
data)
Monitor
VGA(SVGA higher than 800 × 600 recommended)
・more than 256 colors
LAN
100BASE-TX or 10BASE-T
Twisted pair cable confirming to Category 5(STP/UTP)
Web Browser
Internet Explorer 6.0 or higher
※① Please note that when using Windows XP SP2, Internet Security warning messages or messages concerning making additions to
the list of reliable sites may appear. Also, high level security settings may cause the browser display to not work properly.
●「Warning Report Settings」Tab
Make settings to send Internet mail to report when current readings have exceeded limit
settings and/or when a unit's backup battery power has become low.
●「Gather Current Reading Settings 」Tab
Make settings to view current readings of multiple TR-71W/72W's in one browser.
●「Menu」-「Login History」
If you wish to disable the History Function, select [Login History] → [OFF].
●「Menu」-「Clear Login History」
To erase an entire history, use [Clear Login History].
●「Menu」-「Communication Time Settings」
It is possible to change the communication time for all types of communication to match
your network environment.
5.Initialization Settings
6.Opening the TR-7W Web Viewer
① Open Internet Explorer®.
CAUTION
・Please note that upon purchase, all TR7W units are set with the same IP address.Do not
connect more than one unit with the same address to the network at the same time. To make IP
address changes, connect one TR7W unit at a time and carry out the changes.
・This explanation is about how to connect to a local network and is not about how to connect to
the Internet. If you wish to use by connecting to the Internet, see [Connecting to the Internet]
in the User's Manual on the provided CD-ROM.
① In「TR-7W Settings Utility」, click on the「Network Initialization」
Tab and then click on the [Search] button.
「Network Initialization」Tab
[Search]
button
② In the address, enter the IP address that was entered in the「TR-7W
Setting Utility」in the form of a URL that begins with http://...and
then press the [Enter] key. The TR-7W Series Web Viewer will
appear. After this, anytime you wish to view an already initialized
TR-7W, enter the address as above, and press the [Enter] key to
open the TR-7W Web Viewer.
Enter address
※ After clicking, the search results will
be shown in about 5 seconds.
※ The factory default settings for TR-7W are as follows:
IP Address:"192.168.1.200", Subnet Mask:"255.255.0.0".
【If the Viewer does not appear】
「Network Initialization」Tab
Check the IP address and subnet mask, and repeat the steps in「5. Network
Initialization」.
【About the TR-7W Series Web Viewer】
With the TR-7W Series Web Viewer you can not only use a browser and manage
recording start and the downloading of recorded data, but can carry out various
operations as listed below.
※ When first opening the TR-7W Series Web Viewer after purchase of the TR-71W/72W or upon a
restarting of the system the「Clock and Calendar Settings」display will appear.
【If no units are detected】
● Monitor Current Readings
・Check the connection between the computer and the TR-7W.
・Check the hub power switch and the network cable type.
・If some network environments, it may be necessary to make changes to the IP address
and subnet mask at the computer side inorder to carry out a search. To find out more
details about checking and changing a computer's network settings, see「Network
Initialization Settings」in the User's Manual on the provided CD-ROM.
② Making Changes to the IP Address and Subnet Mask
1. From the displayed list, select the TR7W to which you wish to make settings by either
double clicking on that address or select and click on the [Change Settings] button. The
「Network Settings」window will then appear.
「Network Initialization」Tab
[Change Settings]
button
The current readings measured every 30 seconds in the TR-71W/72W can be
displayed.
● Monitor Multiple Current Readings
By registering a multiple number of TR-71W/72W loggers in「TR-7W Settings Utility, it
is possible to simultaneously view a number of current readings.
● Graph
Measuremants taken by the TR-71W/72W loggers can be shown in graph form which
updates every 10 minutes and can show up to 1 week's worth of data.
● Administrator Tools
※ To open Administrator Tools, the Login ID and Password are needed.
Recording Settings:Make setting changes to the recording conditions.
Gather Recorded Data:Download recorded data to a computer and create files.
WEB Viewer Settings:Make changes to names of the Main Title, Window Title and
Footer.
Main Unit Settings:Make various settings concerning the TR-71W/72W units.
Properties:View the various TR-71W/72W unit settings.
7.Clock and Calendar Settings
If the date and time have not been set, upon opening the TR-7W Web Viewer, the Clock
and Calendar Settings Window will appear. After completing the date and time settings,
the Monitor Current Readings Window will appear. If the TR-71W/72W's date and time
are incorrect, the recording start time, the download data time, and the monitor cuurent
readings time will all be wrong. Please make sure to set correctly before beginning to use.
① In「Administrator Tools」under「Main Unit Settings」, select「Clock
and Calendar Settings」.
※ To open Administrator Tools, the Login ID and Password are needed.
Computer "IP address"
and "subnet mask"
2. Enter an IP address and subnet mask that is appropriate for your network.
② Enter the Current Date and Time
※ By clicking [Enter your Local Time], your current computer settings will automatically be entered.
※ If using [Enter your Local Time], please make sure that your computer clock settings are correct.
For example, if your computer IP address is "192.168.1.1", and the subnet mask is
"255.255.255.0", then set the TR-7W IP address as "192.168.1.10".
※ If you are unsure, ask your company network administrator.
Enter an "IP address"
and a "subnet mask"
Enter the Current
Date and Time
[Send] button
3. After entering the above, next, enter the login ID and password.
※ The TR-7W factory default login ID is "wsc-user" and the password is "wsc-passwd". Make any necessary
changes to the login ID and password at「Detailed Network Settings」.
4. After checking for entry errors, click the [Send] button. After transmission has been
completed a messgae will appear. Click the [OK] button to finish.
※ After settings are completed the TR-7W will automatically restart. During the restarting process, a [Search]
cannot be performed.(Restarting will take about 30 seconds)
Enter your Local Time
[Set Clock]
button
③ Click the [Set Clock] button to send the date and time settings to
the data logger and complete the setting.
8. Monitoring Current Readings
③ Click the [OK] button.
Monitor Current Readings
The current readings measured every 30 seconds in the TR-71W/72W can be displayed.
By opening the TR-7W Web Viewer, the Monitor Current Readings display will
automatically open.
[OK] button
④ In the「File Download」Window, click the [Save] button, assign a
name to the file and save to complete the process.
Monitor Multiple Current Readings
The current readings of all registered TR-71W/72W loggers can be viewed simultaneously.
※ To register loggers, go to「TR-7W Settings Utility」-「Gather Current Readings Settings」.
CAUTION
By clicking the [Open] button, the「Temp / Humidity Graph」may not function properly. Please do not click the [Open]
button.
⑤ Click the「Open」button to view the「Temperature / Humidity
Graph」
● Clicking the [Open Folder] button will open the folder in which the data was
saved.
● Clicking the [Close] button will finish the process.
11. Using the Temperature / Humidity Graph
Use this to view the downloaded data in graph form.
※ For details about how to operate the「Temperature / Humiidty Graph」
, see the User's Manual on the
provided CD-ROM or check the software Help Menu.
9. Starting Recording
① Under「Administrator Tools」select「Recording Settings」.
※ To open Administrator Tools, the proper Login ID and Password are needed.
② Setting the Recording Conditions
● Recording Interval
Seclect from 1,2,5,10,15,20,30 seconds or 1,2,5,10,15,20,30,60 minutes.
● Recording Start Date / Time
Immediate Start:Recording will begin upon clicking the [Start Recording] button.
Programmed Start:Recoridng will begin on the set date and time.
● Recording Mode
Endless Loop:Upon reaching capacity of 8,000 readings、the oldest data is
overwritten and recording continues.
One Time:Upon reaching capacity of 8,000 readings,“FULL”will appear on
the LCD display and recording will automatically stop.
Up to 8 channels of data can be viewed and processed at one time and recorded data
that has been previously saved can be opened from the Graph.
When installing the「TR-7W Settings Utility」, you can also install the「Temperature /
Humidity Graph 」into the same folder. Also, from the CD-ROM, it is possible to install only
the Graph Tools Program.
12. Saving Recorded Data
When using「Download File」and clicking the [Save] button, the [Save As] Window will
automtically appear.
Ex:)When you click the [Save] button after downloading.
① Assign a location to「Save in:」, and enter a「File name」.
[Recording Start]
button
[Recording Stop]
button
10. Downloading Recorded Data
Assign a
Location
Enter
File name
① Under「Administrator Tools」select「Gather Recorded Data」.
[Save] button
※ To open Administrator Tools, the proper Login ID and Password are needed.
② Click the [Save] button to complete saving.
② Click the [OK] button.
CAUTION
While downloading data do not carry out any other operations.
※ For more about how to save recorded data after viewing the graph, see the User's Manual on the provided
CD-ROM or the software Help Menu.