1
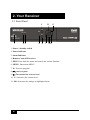
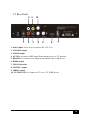
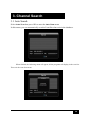
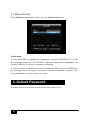
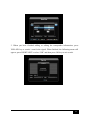
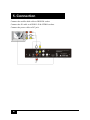
Main Features
● DVB-S/S2 High Definition Set Top Box
● Advanced QPSK demodulation and MPEG-4 decoding
● DVB/MPEG II compatible
● Cisco VideoGuard Conditional Access (Embedded HBSS and Viewing card)
● Friendly user interface
● Fast program switching
● Supports Auto search and Manual search
● Automatic search for frequency and encoding rate
● Electronic program guide (EPG)
● Supports Dolby® Digital Plus
● Support for multiple language channels
● Supports 4:3 and 16:9 Aspect Ratio
● Parental control for channels
Packing list
Your Set-Top-Box also includes the following items:
(1) 1 Pcs
Digital Satellite STB (Set-Top-Box)
(2) 1 Pcs
AV cable
(3) 1 Pcs
Remote control unit (RCU)
(4) 2 Pcs
Battery(1.5V, AAA)
(5) 1 Pcs
User's manual
(6) 1 Pcs
Power adapter
Contents
1. Safety Instructions------------------------------------------------------------ 1
2. Your Receiver ------------------------------------------------------------------- 2
2.1 Front Panel ------------------------------------------------------------------------------- 2
2.2 Rear Panel -------------------------------------------------------------------------------- 3
2.3 RCU--------------------------------------------------------------------------------------- 4
3. Channel Search ---------------------------------------------------------------- 5
3.1 Auto Search ------------------------------------------------------------------------------ 5
3.2 Manual Search --------------------------------------------------------------------------- 6
4. Default Password ------------------------------------------------------------- 6
5. Connection ---------------------------------------------------------------------- 8
6. Troubleshooting --------------------------------------------------------------- 9
1. Safety Instructions
Please read this
user's manual
carefully before
using.
Do not allow the
Receiver to be
exposed to
extreme heat,
cold or humid
conditions.
Do not remove the
cover, to prevent
electrical shock or
damage.
Do not put any
heavy object on
top of the
Receiver.
If the Receiver will
be unused for a
long time please
unplug power
cord. To prevent
fire or electrical
shock do not use a
damaged power
cord.
When the
Receiver is
moved to another
place with a sharp
temperature
difference, please
don't turn it on
until 1-2 hours
later.
Never allow
liquids, spray or
other materials to
come into the
inside of the
Receiver.
Use a soft and
dry cloth to clean
casing. Prior to
cleaning, please
unplug the power
cord.
Please place the
Receiver
horizontally to
prevent damage.
No user
serviceable parts
inside. Do not
open case. Risk
of electrical
shock. Warranty
will be invalidated
1
2. Your Receiver
2.1 Front Panel
6
1
23
4 5
10
11
7 98
1. Power / Standby switch
2. Power Indicator
3. Status Indicator
4. Remote Control IR receiver
5. EXIT: Exits from the menu and cancels the current function
6. MENU: Enter main MENU
7. P-: Previous program
8. P+: next program
9. V-: Decreases the volume level
10. V+: Increases the volume level
11. OK: Activates the settings or highlighted item
2
2.2 Rear Panel
8 9
1
2
3
10
4
5
6
7
1. Power input: Your receiver requires DC 12V/1.5A
2. AUDIO R output
3. S/PDIF output
4. ANT IN: to connect to RF signal from another device or TV antenna
5. DISH IN: To connect to the signal from satellite dish / LNB device
6. HDMI output
7. USB 2.0 interface
8. AUDIO L output
9. VIDEO output
10. TV/LINK OUT: to connect to TV set or TV LINK device
3
2.3 RCU
All features of the set-top box can be controlled with the remote controller.
1.
Turn the receiver On/Off
2.
Mute audio output of the receiver
3. NUMERIC KEY (0-9) Controls the numerical operation
and especially changes program directly
4. RCL Recall / return to the previously viewed channel
5.
TV/R Change to TV or Radio
6. MENU Shows the main menu and exits from any level of
menu to the previous menu or back to view mode
7. EXIT Exits from the menu or sub-menu and cancels the
current function if applicable
8. ▲▼ Changes the current program to the previous/next
program
in
NO-Menu
state;
moves
the
cursor
upward/downward in Menu state
9. ◄► Increases or decreases the volume level in No-Menu
state. Change the setting values in specific Menu item
10. OK Activates the highlighted menu item. Display channel
list
11. FAV Show the current favourite program list
12. EPG Show the Electronic Program Guide in No-menu
state according to TV/Radio Mode
13. VOL+/- Increases or decreases the receiver volume level
14. CH+/- Changes the current program to the previous/next
program in NO-menu state
15. AUDIO Changes multiple audio
16. INFO Shows information of the current channel
17. Zoom Change TV Aspect Radio
18. R/G/Y/B Colour Used depends on info shown in the on
screen menu
4
3. Channel Search
3.1 Auto Search
Select Auto Scan then press OK to enter the Auto Scan menu.
In this menu, you can automatically search all satellites that exist in the database.
When finished, the following menu will appear, all the programs will display in the scan list.
Then exit the Auto Scan menu.
5
3.2 Manual Search
Select Manual Scan then press OK to enter the Manual Scan menu.
In this menu:
1. Press UP/DOWN to highlight the Transponder, then press RIGHT/LEFT to select
the transponder items (eg: 12072/H/27500). When the Transponder is highlighted, you
can press RED key to edit the Transponder information.
2. Also you can press GREEN key to add a transponder. When you press GREEN key,
the following screen will appear. You need to enter the transponder frequency value,
select polarization, and enter symbol rate value.
4. Default Password
If prompted for a password the factory default password is 0 0 0 0.
6
3. When you have finished adding or editing the transponder information, press
YELLOW key to search / scan for the signal. When finished, the following menu will
appear; press RIGHT/LEFT to select "OK" and then press OK key to exit search.
7
5. Connection
Connect the satellite dish cable to DISH IN socket.
Connect the AV cable to AUDIO L/R & VIDEO sockets.
Connect the power cable to DC jack.
8
6. Troubleshooting
Some types of failure are not necessarily due to a breakdown of the receiver. Before
sending the unit in for repair, please check as per the following table:
Failure
Possible cause
Troubleshooting method
After start-up, there
is nothing displayed
on the front panel.
Power plug is not
connected.
Insert the plug into the
socket firmly.
“No TV signal”
displayed on the
screen
Signal cable is not
connected properly.
The parameters are not
set correctly.
Connect DISH input cable
properly.
Check and set parameters
correctly.
Connect the cable
according to wiring
diagram.
Audio cable is not
connected.
No sound / poor
sound from the
loudspeaker.
Audio is OK but
there is no picture
on the TV screen
Remote controller
can’t be operated
Picture freezes or
breaks into blocks
Sound is muted or
volume is turned down.
Turn on sound or adjust
volume louder.
Output audio channel is
not correct.
Enter System Setup to try
other audio channels.
Video cable is not
connected properly.
Connect the cable
according to wiring
diagram.
Unit is tuned to a radio
channel instead of a TV
channel.
Press <TV/R> key to
switch to TV program.
Battery power is running
out.
Replace battery.
Remote controller is not
aimed properly or is too
far away.
Signals are too weak
Aim at the remote control
receiver or reduce the
distance.
Take measures to
strengthen signals.
9