1
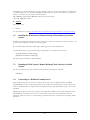
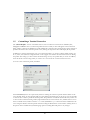
THINSOFT PTE LTD 23, Tai Seng Drive, #06-00, Singapore 535224, Fax (65) 6289 – 7308 www.thinsoftinc.com WinConnect S User Manual Document Version 1.4 Copyright 2004 - 2009 ThinSoft Pte Ltd. All rights reserved. 1 WinConnect S® User Manual Copyright 2004 - 2009 ThinSoft Pte Ltd. All rights reserved. ThinSoft Pte Ltd 23 Tai Seng Drive #06-00 Singapore 535224 Fax: (65) 6289-7308 This documents is being furnished by ThinSoft Pte Ltd for information purposes only to licensed users of the WinConnect S® software product. Efforts are made to ensure the accuracy of the information presented, but is subject to change without prior notice. Changes, if any, will be incorporated in future releases. WinConnect® is the registered trademark of ThinSoft Pte Ltd. WinConnect S® is the registered trademark of ThinSoft Pte Ltd. Other brand and product names are the trademarks or registered trademarks of the respective holders. Microsoft is a registered trademark and Windows, Windows XP, Windows Server 2003, Internet Explorer are the registered trademark of the Microsoft Corporation. Solaris is a registered trademark of Sun Microsystems, Inc. Sparc is a registered trademark of Sun Microsystems, Inc. Unix is a registered trademark of the Open Group. No part of this document may be reproduced for commercial purposes unless prior permission is obtained from the copyright holder. Visit our Web Site at http://www.thinsoftinc.com 2 Table of Contents Introduction to WinConnect S Product Description Hardware Requirements 1. WinConnect S Remote Desktop Client Setup 1.1 Required Libraries for WinConnect S 1.2. Installing the WinConnect S Remote Desktop Client Software for Solaris System 1.3 Running the WinConnect S Remote Desktop Client Software on Solaris System 1.4. Connecting to a Windows Terminal Server 1.5. Customizing a Terminal Connection 1.6. Configuring Connection Profiles for Multiple Users 2. Configuring a Printer 2.1. Setting Up a Printer in Windows Terminal Server 2.2. Setting Up a Printer in WinConnect S Remote Desktop Client 3. Automating a Terminal Connection 4. Uninstalling WinConnect S Remote Desktop Client Software 5. WinConnect S License Server Activation 6. Technical Support 3 4 4 4 4 4 5 5 5 6 12 12 12 15 17 18 18 19 Introduction to WinConnect S Product Description WinConnect S is a software solution that enables Solaris-based terminals to connect to Windows® 2000 and Windows® NT 4.0 Terminal Servers or Windows XP via Remote Display Protocol (RDP). The connection can be over a local area network (LAN) or over the Internet. A broadband Internet connection over digital subscriber line (DSL, ADSL) or Integrated Services Digital Network (ISDN) connection improves performance, but it is not necessary because Remote Desktop transfers only the minimal data (such as display data and keyboard data) to remotely control your Host computer. Therefore, even low–bandwidth Internet connections or a wired or wireless TCP/IP connection, local area network (LAN), wide area network (WAN), dial-up (Internet), virtual private network (VPN) connection allow you to remotely connect to your office computer. Users on the Solaris-based systems may run the same or different applications simultaneously and independently to create and edit documents, and to share peripherals, for example, CD-ROM, printers and other hardware installed on the Host computer. All users can also surf the Internet and access emails at the same time and even share network access with unique customized desktop and login. Manufacturer’s Notice The WinConnect S allows multiple users to simultaneously and independently share the same hardware and software installed on the Host computer. Some software is licensed for use on a single computer while other software may be licensed for single or multiple users. It is the responsibility of the WinConnect S purchaser/user to read and comply with the licensing agreements of any software that may be used on the RDP devices. Terminology The Host is the Windows® Terminal Server. The Client is the Solaris-based computer. 1. WinConnect S Remote Desktop Client Setup 1.1 Required Libraries for WinConnect S WinConnect S is dependent on a number of libraries that are not distributed with the Solaris operating system. If they have not been installed already to support other third party packages, you will need to install them. A. Solaris 8/ 10 These libraries are: libglib libgdk libgtk libesd libgmodule libgdbm libstdc++.so.2.10.0 You can obtain these from www.sunfreeware.com or download them from our website at www.thinsoftinc.com/winconlibs.tar.gz. 4 winconlibs.tar.gz will place the libraries in /opt/winconnect/lib. You can move these libraries to a directory in your library path, or you can alter LD_LIBRARY_PATH to include /opt/winconnect/lib. For a permanent change, you can edit our user profile to include the lines: LD_LIBRARY_PATH=$LD_LIBRARY_PATH:/opt/winconnect/lib export LD_LIBRARY_PATH B. Solaris 9 These libraries are: libstdc++ You can obtain these from ftp://ftp.sunfreeware.com/pub/freeware/sparc/9/libgcc-3.3-sol9-sparc-local.gz 1.2. Installing the WinConnect S Remote Desktop Client Software for Solaris System Installation is simple. By following these steps, a WinConnect S system should take less than 15 minutes to set up. Each step is explained in detail in the following pages. We recommend that WinConnect S be installed while logged in as system administrator. To install WinConnect S, copy the WinConnect S package file to your Solaris system and run: gunzip winconnect-2.6-sparc-pkg.gz pkgadd -d winconnect-2.6-sparc-pkg This will install to the directory /opt/winconnect. 1.3 Running the WinConnect S Remote Desktop Client Software on Solaris System You can run WinConnect S from a terminal session/window by running the command: winconnect 1.4. Connecting to a Windows Terminal Server When the WinConnect S user interface is invoked, the browser results are displayed in the “Available Terminal Servers” section of the WinConnect S screen. All Windows Terminal Servers located on the same subnet as the WinConnect S computer should be displayed, listed by both their NetBios name as well as their IP address. Highlighting the desired server will un-gray the lower right-hand “Connect” button and clicking this button will establish the connection to the server. You will connect to the server using the default connection parameters. Please see section 1.4 “Customizing a Terminal Connection” for instructions for editing default parameters. 5 1.5. Customizing a Terminal Connection The “Stored Profiles” section of the WinConnect S screen contains four icon buttons: Connect, New, Configure and Delete. Once a Connection profile has been created, its name will appear in the Connection listing window. Clicking the Connect icon will establish the connection using the properties of this connection profile. If more than one connection profile exists, clicking the drop-down arrow will display all the profiles. In addition to creating and managing your own connection profiles, you can also edit the default settings. To do so, select (New Connection Settings) and click on the Configure icon. Follow the instructions below for editing the profile. The settings you select will be the initial settings for any new profiles that you create. In addition, these will be the session settings when you connect to a server from the Available Terminal Servers list. To create a new connection profile, click New. On the General tab, there are required entry fields for naming the connection profile and the address of the server desired. There are also optional fields for a User ID and automatic login to the server. It is also possible to click the box to make a profile the default profile. The profile that is made the default will always be the one to show in the Connections listing window when WinConnect S is first invoked. Also, if WinConnect S is run from a terminal session/window with the “-c” switch (winconnect -c), a connection will be established to the server using the default connection profile without invoking the WinConnect S user interface. Finally, there is a drop-down menu of different keyboard language options. Clicking Save will preserve any changes. 6 On the Display Options tab, there are radio buttons for setting desired screen areas and full screen option. In full screen mode the Windows desktop will occupy the entire Solaris screen. All hotkeys are passed on to Windows. In this mode, your WinConnect S session will most closely resemble an actual Windows computer. In addition, WinConnect S is optimized for full screen mode, so you will see the best performance. When running in full screen mode, you cannot switch between WinConnect S and other Solaris applications. This could be an advantage if you are a network administrator who wish to restrict the user to running WinConnect S only. The enhanced Color Depth option of WinConnect S requires a connection to a Windows Server 2003. This includes the 'Remote Desktop' feature built into Windows XP Professional. To enable 24-bit color under Windows XP Professional, you must also add a Registry entry on the XP computer. Run RegEdit and browse to: HKEY_LOCAL_MACHINE System 7 CurrentControlSet Control Terminal Server WinStations RDP-Tcp and add a DWORD value: ColorDepth = 4 To make a Windows XP Professional system visible to the WinConnect S browser, run RegEdit and browse to: HKEY_LOCAL_MACHINE System CurrentControlSet Control Terminal Server and add or edit a DWORD entry: TSAdvertise = 1 The easiest way to set these options is to download the registry file posted on our web site at http://www.thinsoftinc.com/EnableRem-Adv-Col.reg. Select “Open”. When you are asked “Are you sure you want to add the information in [filename] to the registry?”, answer “Yes”. This will automatically update the registry with the required values, so you not need to run RegEdit. On the Advanced Options tabs, there are check boxes for disabling mouse motion and drag events, which help to improve performance. The options are: Disable Window Manager Decorations (borders, etc) - To set the override redirect window property to turn off the window manager frame. The window will be displayed in the extreme top left of the screen, rather than being positioned by the window manager. This option is designed to allow a full screen mode. Disable Mouse Motion Events - To stop WinConnect S from sending mouse motion events to the remote computer, except when a mouse button is pressed. Disable the option conserves bandwidth, but may cause some Windows applications to behave in unexpected ways. Disable Mouse Drag Events – To stop WinConnect S from sending drag events to the remote computer. Windows applications will see the drag start and end, but they will not see any intermediate mouse movements. Disable the option conserves bandwidth, but may cause unexpected effects. Enable Data Compression – Selecting this option allows data sent between WinConnect S and the remote computer to be compressed. It helps to conserve bandwidth at the cost of some processing time. Connect to Server Console Session – Selecting this option allows WinConnect S to connect and take over the server console session instead of creating a new RDP session. This function will only work with Windows Server 2003. Default is “Disabled”. Enable Zoom – The zoom feature is intended for use on devices with small displays such as handheld; however, it will only work on desktops in a window. Using the resolution options, you can instruct WinConnect S what size the Windows desktop should be. In the zoom mode, the height and width of the WinConnect S window will be one half that size. Use the Zoom key to zoom the display in and out. 8 On the Drives tab are entry fields for enabling the local drives in the Linux machine to be able to access from the Remote Desktop session. Check the “Export path” box and supply the Linux path to the file system location that you wish to map. The software supports up to four mappings. Currently removable media such as floppy or CD drives are not supported. On the Printing tab are entry fields for enabling a printer connected to the Solaris machine to be able to print from the Remote Desktop session. The local printer must first be installed and configured to print normally from the Solaris computer prior to configuring WinConnect S for local printing. For printer setup, refer to the section “Configuring a Printer ”. 9 On the Serial tab are entry fields for enabling a serial printer or modem connected to the Solaris machine to be able to print or communicate from the Remote Desktop session. Enable the serial port where the device is attached in the Connection Settings. For more detail on the serial device setup, refer to the sections “Configuring a Serial Printer” and “Configuring a Serial Port Modem”. On the Sound/ Keys tab are entry fields for setting desired audio quality and keyboard mapping. The options are: Enable sound – To enable the sound feature. Use safe sound instead of enhanced sound - On some systems, sound enhancement techniques used by WinConnect S may result in distorted sound. Selecting this option may correct the problem. The default is not to use this option and leave the box unchecked. Send PC scan codes directly – Under most circumstances this option should not be selected under Solaris. 10 Override local windows manager keyboard shortcuts - When WinConnect S is running in windowed mode, hotkeys are used by the local Solaris computer. Select this option if you wish to pass on the hotkeys to Windows when WinConnect S is the focus application. The default is not to use this option and leave the box unchecked. Note that when WinConnect S is running in full screen mode, this option is automatically selected. The sound feature of WinConnect S requires a connection to a Windows Server 2003. This includes the 'Remote Desktop' capabilities built into Windows XP Professional. Menu Options Additional options are available from the menu bar at the top of the WinConnect S user interface. The File menu has several features. New Connection is used to create new Connection profile. Connect establishes the connection to the Terminal Server using the properties of the Connection profile. Delete removes the existing Connection profile. 11 Configure Connection allows users to configure the properties of the Connection profile that has been created. The License menu is used to register the WinConnect S software. To license WinConnect S using the ThinSoft License Server software, select “License” from the WinConnect S menu and then select “License Server”. For more information on ThinSoft License Server, kindly refer to the ThinSoft License Server User Manual. The Help menu provides the WinConnect S version information. Configuring Connection Profiles for Multiple Users 1.6. Profiles are stored in the winconnectdb file. By default, this file is stored in the user home directory. As a result, the profiles are private and can be customized on a per-user basis. You can also configure your system to use global profiles. The “-p” parameter can be used to specify the location of the winconnectdb file. If you path to a location that all users can access, they will use the same profile database. An example would be: winconnect -p=”/opt/winconnect” Quotation marks are required and there should be no spaces surrounding the “=”. 2. Configuring a Printer 2.1. Setting Up a Printer in Windows Terminal Server After connecting to the Windows Terminal Server, you will have a new printer available to Windows applications. Under Windows XP, this printer will be called something like lp (from XXX) where XXX is the Solaris station name. Under Windows 2000 server, it will be called lp/XXX/ Session 2 where XXX is the Solaris station name. Printing to this printer from the Windows applications will send print data to your local Solaris printer. You may be asked to install printer drivers on the Windows Terminal Server if your Solaris printer model is not already available on the server. To install the printer drivers on the Windows Terminal Server Step 1. Connect to a Windows Terminal Server. Step 2. On the Windows desktop, select Main Menu Start Button (on the Panel) => Settings => Printers 12 and Faxes. Right-click on the “lp (from XXX )” printer icon where XXX is the Solaris station name and select “Properties”. Step 3. Under Advanced tab, Windows will try to detect what printer is attached to the printer device as shown below. Select the appropriate printer driver from the list and click on the “OK” button to save the settings. If you are not able to locate the Windows printer drivers from the list, click on the “New Driver...” button to start the Add Printer Driver Wizard. Click “Next” to proceed. 13 Step 4. Select the manufacturer and model of your printer. Then click on “Next” button. Step 5. You have now successfully installing the printer drivers. Click on “Finish” to quit from the Add Printer Driver Wizard. Step 6. Set the printer as the default printer and print a test page to ensure the configuration is correct. 14 2.2. Setting Up a Printer in WinConnect S Remote Desktop Client Step 1. On the Solaris desktop, select Main Menu Button (on the Panel) => Programs => Applications => WinConnect. You can also run WinConnect S from a terminal session/window by running the command: winconnect Step 2. Once a Connection profile has been created (refer to “Connecting to a Windows Terminal Server), click on “Configure” icon. Step 3. All existing Solaris print queues can be seen by clicking the drop-down arrow. After selecting the desired print queue, associate it with a Windows printer driver. 15 For example, if you had a HP DeskJet 656C printer connected to your Solaris system as “lp”, click on the drop-down arrow of the Windows driver and select the HP DeskJet 656C. Click “Save” to quit from the connection settings. If you are not able to locate the Windows printer drivers in the WinConnect S user interface, and it is installed on the Windows Terminal Server, you can enter it manually in the WinConnect S user interface. As the printer driver must be specified exactly including spaces and punctuation, the easiest way to do this is to make use of the WinConnect S cut-and-paste functionality. Logon to your Windows server with WinConnect S in windowed (not full screen) mode. If your server is Windows 2000, select Settings->Printers from the Start menu. If the server is Windows XP, select Printers and Faxes from the Start menu. Right click on the appropriate printer driver. Highlight the printer name on the General tab, right click and select copy. On the Solaris system, open another copy of the WinConnect S Connection Manager. Select the profile that you wish to edit and select Configure. Place the cursor in the “Windows printer name” field and press CTRL-V to paste. The correct printer name will be pasted into the printer configuration. Alternately you can add it to the drop down list in WinConnect S user interface by editing the file: /usr/local/share/winconnect/tsprinters 16 3. Automating a Terminal Connection You can run WinConnect S from your Solaris startup scripts. If the terminal is to be used by multiple users, you can customize each user’s connection individually. The script that automatically runs on login can be found in: /home/user name/.bashrc As each user runs a different script, these scripts can be customized on a per-user basis. If WinConnect S is placed in the .bashrc script with no parameters, it will run automatically and display the standard user interface. There are several command line parameters supported by WinConnect S that can be used to customize the connection on a per-user basis. These are: -c : If there is a default connection profile defined, WinConnect S will automatically connect to the server using that profile. If there is no default profile, WinConnect S will seek out a Windows Terminal Server on the network. If one is found, it will automatically connect to it. Example: winconnect -c Connection name : If you specify a connection profile name, WinConnect S will automatically connect using that profile. Example: winconnect accounting -n : This parameter can be used to specify the local machine name. Local machine name is used by the Windows terminal server to keep track of your terminal session. Your session will be identified in the server administration tools by that name. In addition, Terminal Server Client Access Licenses are managed based on the local machine name. This option should be used with caution as the use of multiple machine names will result in having multiple Terminal Server Client Access Licenses assigned to your computer Using the connection name parameter, you can edit each user’s .bashrc file to automatically connect them to a Windows Terminal Server using a different connection profile. Upon termination of the Remote Desktop session, the user will return to the Solaris desktop. If you wish the user to return to the Solaris login, you should add the command “logout” to the .bashrc file following the winconnect command. As an example, if you wanted user Rosa to automatically connect to the accounting server on logging in, you would edit the file /home/Rosa/.bashrc You would add the lines winconnect “accounting-profile” logout to the end of the file. You would then use the WinConnect S user interface to create a connection profile named “accounting-profile” (without the quotes). If your profile name consists entirely of alpha-numeric characters (no hyphens, for example) the quotes aren’t required. 17 4. Uninstalling WinConnect S Remote Desktop Client Software WinConnect can be uninstalled by running pkgrm winconnect 5. WinConnect S License Service Activation Step 1. Run the WinConnect S user interface on the machine to be licensed. Step 2. Select License from the WinConnect S menu and then select “License Server”. Step 3. Check the box “Use License Server for licensing”. Step 4. Enter the IP address of the computer running the ThinSoft License Server software. Alternatively, you can leave the server IP setting to “Automatic”, WinConnect S will try to locate the License Server on the network. Step 5. Enter the Listening port number used by the License Server. Alternatively, you leave this setting to “Automatic”, and the default port number 29309 will be used. With this option enabled, when WinConnect S is launched, it will contact the ThinSoft License Server to request a valid license token for proper operation. If it is not issued a valid license token, it will display an error message and terminate. 18 For more information on ThinSoft License Server, kindly refer to the License Server User Manual. 6. Technical Support Technical support offered by ThinSoft Pte Ltd. WinConnect S products must be registered with ThinSoft before technical support may be offered. Registration may be completed by registering online at our World Wide Web site. Free support via fax and email is offered for sixty (60) days from the date of registration. Our technical staff is available to answer questions, troubleshoot problems and to assist in the installation of WinConnect S products. Before requesting technical support, please be prepared to provide information including the date and place of purchase and product serial number (______________________). http://www.thinsoftinc.com ThinSoft Pte Ltd 23 Tai Seng Drive #06-00 Singapore 535224 Fax: (65) 6289-7308 email: [email protected] Support hours are 9:00 to 5:00 local time. 19