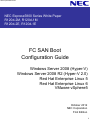
1
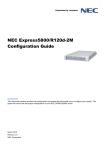
NEC Express5800 Series
NEC Express5800 Series White Paper
R120d-2M, R120d-1M
R120d-2E, R120d-1E
FC SAN Boot
Configuration Guide
Windows Server 2008 (Hyper-V)
Windows Server 2008 R2 (Hyper-V 2.0)
Red Hat Enterprise Linux 5
Red Hat Enterprise Linux 6
VMware vSphere5
October 2012
NEC Corporation
First Edition
1
NEC Express5800 Series
Trademarks
EXPRESSBUILDER and ESMPRO, SigmaSystemCenter, WebSAM DeploymentManager,
WebSAM NetvisorPro, WebSAM StorageManager, and PathManager are registered
trademarks or trademarks of NEC Corporation.
Microsoft, Windows, Windows Server, Hyper-V, Active Directory, and MS-DOS are
registered trademarks or trademarks of Microsoft Corporation in the United States and/or
other countries.
Red Hat® and Red Hat Enterprise Linux are registered trademarks or trademarks of Red
Hat, Inc. in the United States and/or other countries.
Linux® is a registered trademark or trademark of Linus Torvalds in Japan and/or other
countries.
Intel and Xeon are registered trademarks or trademarks of Intel Corporation and/or its
subsidiaries in the United States and/or other countries.
The official name of Windows Server 2008 is Microsoft® Windows® Server 2008
Operating System.
VMware, the VMware logo, Virtual SMP, and Vmotion are registered trademarks or
trademarks of VMware, Inc. in the United States and/or other countries.
All other trademarks are the property of their respective owners.
[Notice]
(1) No part of this document may be copied in whole or in part without permission.
(2) The contents of this document may be be changed in the future without prior
notification.
(3) No part of this document may be copied or revised without permission from NEC.
(4) Care has been taken to make sure that the contents of this document are correct, but
if there are any doubtful items, mistakes or missing items, then please contact your
dealer or the NEC sales department.
(5) Regardless of (4) above, NEC is not responsible for any damages resulting from
using this software.
2
NEC Express5800 Series
Table of Contents
1. Overview
1.1. Purpose of this document………………………………………………… P. 7
1.2. What is SAN Boot?…………………………………………………………. P. 7
1.3. Abbreviations……………………………………………………………….. P. 8
1.4. SAN Boot Environment Hardware Connection Images………………… P. 9
1.5.Precautions for Building a SAN Boot Environment……………………… P. 9
1.6.Confirmation/Advanced Preparations………………………………….... P. 10
1.7. Acquiring Manuals…………………………………………………………. P. 11
1.8. Hardware and Software Specifications………………………………….. P. 14
2. Preparation
2.1. Management Server Preparation…………………………………………. P. 15
2.1.1.
Management Software and Linkage Image……………….. P. 15
2.1.2.
Installing Software in the Management Server……………. P. 16
2.1.3.
Management LAN Settings………………………………….. P. 16
2.1.4.
NEC M-series Storage Control Software Installation…… P. 17
2.2. FC Switch Preparation……………………………………………………... P. 18
2.2.1.
Configuration………………………………………………….. P. 18
2.2.2.
FC Zoning Settings…………………………………………… P. 19
2.3. Confirm WWPN …..……………………………………………………….. P. 20
2.3.1.
Confirm WWPN …………………………………….……….. P. 20
2.4.FC Controller Mounting Location………………………………………... P. 21
2.4.1.
R120d-2M……………………………………………………… P. 22
2.4.2.
R120d-1M……………………………………………………… P. 22
2.4.3.
R120d-2E……………………………………………………… P. 23
2.4.4.
R120d-1E……………………………………………………… P. 23
3. Storage Settings
3.1. NEC M-series Storage Settings……………………………………………P. 24
3.1.1.
Creating a Pool and Logical Disk (LD)………………………P. 24
3.1.2.
Creating an LD Set…………………………………………… P. 25
3.1.3.
Assigning LDs to an LD Set…………………………………. P. 26
3.1.4.
Changing the Port Access Mode……………………………. P. 28
3.1.5.
Linking the LD Sets and FC Controllers……………………. P. 28
3
NEC Express5800 Series
Table of Contents
4. Server Settings
4.1. FC Cable Connection………………………………………………………. P. 31
4.1.1.
R120d-2M……………………………………………………… P. 32
4.1.2.
R120d-1M……………………………………………………… P. 33
4.1.3.
R120d-2E……………………………………………………… P. 34
4.1.4.
R120d-1E……………………………………………………… P. 35
4.2. Server BIOS Settings………………………………………………………. P. 36
4.2.1.
FC Controller BIOS Enable Setting……………………….... P. 36
4.3. FC Controller BIOS Settings………………………………………………. P. 37
4.3.1
Starting the BIOS Configuration Utility………………………P. 37
4.3.2.
Selecting the FC Port………………………………………… P. 38
4.3.3.
Boot Device Registration…………………………………….. P. 39
4.3.4.
Boot BIOS Enable Setting………………………………….... P. 44
4.4. Making Single Path FC Connections……………………………………... P. 46
5. OS Installation
5.1. Overview…………………………………………………………………….. P. 49
5.2. Windows……………………………………………………………………...P. 50
5.2.1.
Windows Server 2008 and Windows Server 2008 R2
Installation……………………………………………………... P. 50
5.2.2.
Advanced Preparations……………………………………… P. 51
5.2.3.
OS Installation………………………………………………… P. 52
5.2.4.
Service Pack Application ……..…………………………..… P. 52
5.2.5.
NEC Storage PathManager for Windows Installation…..… P. 52
5.2.6.
Hyper-V Installation (only when using Hyper-V)…………... P. 53
5.3. Linux…………………………………………………………………………. P. 59
5.3.1.
Red Hat Enterprise Linux 5 and Red Hat Enterprise Linux 6
Installation……………………………………………………... P. 59
5.3.2.
PathManager Installation………………………….…………. P. 60
5.3.3.
Before Setting Up…………………………………………….. P. 60
5.3.4.
Installation……………………………………………………... P. 69
5.3.5.
Uninstalling……………………………………………………. P. 86
5.3.6.
Updating……………………………………………………….. P. 93
5.3.7.
Preparing for Operation……………………………………… P. 94
5.3.8.
Detailed Information………………………………………….. P. 96
5.3.9.
Installing Applications………………………………………… P. 96
5.4. VMware ESX/ESXi………………………………………………………..... P. 97
5.4.1.
Precautions for Configuring SAN Boot …………………….. P. 97
5.4.2.
Precautions for Building SAN Boot ………………………… P. 97
4
NEC Express5800 Series
Table of Contents
6. Confirming Operation and Setting Up Redundant Paths
6.1. Reconnecting the FC Cable……………………………………………….. P. 98
6.2. Checking FC Path Redundancy…………………………………………... P. 98
7. Additional Application Settings
7.1. DDR (NEC M-series Storage)………………………………. …………… P. 99
7.1.1.
Backup and Restore Windows Server 2008 Hyper-V with
the DDR Function………………………………………..…… P. 101
7.1.2.
Backup and Restore Windows Server 2008 R2 Hyper-V
with the DDR Function……………………………………….. P. 103
7.1.3.
Backup and Restore VMware ESX/ESXi with the DDR
Function………………………………………………………... P. 106
7.1.4.
Cautions for Backup and Restore Windows Server OS
Images with the DDR Function ……………………..………. P. 109
8. Precautions and Restrictions
8.1. Server………………………………………………………………………... P. 113
8.1.1.
Mixing FC Controller Models………………………………… P. 113
8.1.2.
Multiple Path Compatibility…………………………………... P. 113
8.1.3.
BIOS Settings for Installing Windows Server 2008……….. P. 113
8.1.4.
Installing the Latest BIOS……………………………………. P. 114
8.1.5.
Internal Disk Mounting Restrictions .……………………….. P. 114
8.1.6.
System BIOS Setup………………………………………….. P. 114
8.2. Storage………………………………………………………………………. P. 115
8.2.1.
Connecting Multiple Storage Devices………………………. P. 115
8.2.2.
Storage Performance and Number of OSs Installed……… P. 115
8.3. OS……………………………………………………………………………. P. 116
8.3.1.
Number of OS Licenses Used………………………………. P. 116
8.3.2.
OS Memory Dump…………………………………………… P. 118
8.3.3.
Redundant Path Connections when Installing the OS……. P. 118
8.3.4.
Linux OS Logical Volume Manager………………………….P. 118
8.4. PathManager...……………………………………………………………...P. 119
8.4.1.
NEC Storage PathManager Versions………………………. P. 119
8.4.2.
Backup and Restore Disks in Linux OS with PathManager
Installed……………………………………….………………. P. 119
5
NEC Express5800 Series
Table of Contents
9. Appendix
9.1. Confirm FC Controller WWPN and WWNN……………………………… P. 120
9.1.1.
Confirm from IEEE Address Labels………………………… P. 120
9.1.2.
Confirm from the WWPN Address Label
(only N8190-153) …………………………………………….. P. 120
9.1.3.
Confirm from the FC BIOS……………………………………P. 121
6
NEC Express5800 Series
1. Overview
1.1. Purpose of this document
This manual describes the process for implementing NEC
Express5800 Series rack server operating system in an FC SAN
Boot system that is located in storage devices in a Storage Area
Network (hereafter referred to as SAN).
Because there are many different reference sources for servers,
storage devices, software and other items when building a SAN
Boot system, this manual shows the overall flow of implementation
by pointing to and indicating the various manuals to be used. By
doing so, this manual shows how to build a SAN Boot system.
Because of this, this manual does not guarantee performance,
availability and reliability. Before building a system, the user must
assure performance, availability and reliability by following the
system design requirements.
1.2. What is SAN Boot?
SAN Boot is a method in which the system is booted through
a SAN from an operating system stored in NEC M-series Storage
in the SAN.
The advantages of SAN Boot are: (1) effective use of storage
resources and improved fault tolerance by assigning the boot area
to a highly reliable storage system; and (2) adding flexibility to
system changes by allowing switching of storage networks and
reducing downtime.
NEC Express5800 Series provides a SAN Boot solution that
encompasses the advantages of SAN Boot and provides
companies with an optimized and highly available IT system
foundation.
7
NEC Express5800 Series
1. Overview
1.3. Abbreviations
The following table shows the meanings of the abbreviations used
in this manual.
Abbreviation
Description
Remarks
FC
Fibre Channel
---
HBA
Host Bus Adapter
---
WWPN
World Wide Port Name
---
WWNN
World Wide Node Name
---
WWN
World Wide Name
---
LD
Logical Disk
---
RHEL
Red Hat Enterprise Linux
---
DDR
DynamicDataReplication
Data replication function
iSM(E)
StorageManager (Express)
Storage management software
ControlCommand
Storage ControlCommand
Storage software
MV
Master Volume
Working volume
RV
Replication Volume
Backup volume
WG
WG
Logical disk usage format: Windows (GPT disk)
WN
WN
Logical disk usage format: Windows (MBR disk)
LX
LX
Logical disk usage format: Linux/VMware (VMFS)
8
NEC Express5800 Series
1. Overview
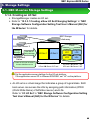
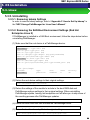
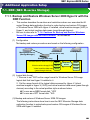
1.4. SAN Boot Environment Hardware Connection Images
The diagrams below following show typical hardware
configurations for a SAN Boot environment.
【8G FC SAN Boot (via switch) configuration】
Management LAN
Management LAN
SAN Boot
server
FC switch
Secondary
path
【8G FC SAN Boot (direct) configuration】
Management
server
FC switch
Console
SAN Boot
server
Secondary
path
Managemnet
server
Console
Primary
path
Primary
path
NEC M-series Storage
NEC M-series Storage
SAN Boot servers should not have HDDs, SSDs, and RAID controllers.
Please be aware of that when ordering equipment.
1.5. Precautions for Building a SAN Boot Environment
Refer to the another paper “SAN Boot Compatibility Table” for
the hardware and software that can be used to build a SAN Boot
system.
Also make sure to check the configuration guidelines and product
operating requirements for servers, storage devices, and software.
There are precautions and restrictions when building a SAN Boot
environment. Be sure to see “8. Precautions and Restrictions”
when considering to implement a SAN Boot environment.
9
NEC Express5800 Series
1. Overview
1.6. Confirmation/Advanced Preparations
The following manuals and system updates may be necessary to
build a SAN Boot environment. Acquiring these before starting the
actual build process is recommended.
Confirmation/Advanced Preparations
Ch
2
2.3. Confirm WWPN
See “9.1.1 Confirm from IEEE Address Labels” to confirm each FC controller WWPN.
2.4. FC Controller Mounting Location
Confirm the mounting locations of the FC controllers on each server in the SAN Boot
environment.
Ch
3
3.1.5. Linking the LD Sets and FC Controllers
See “2.3 Confirm WWPN” to confirm the WWPN.
Ch
5
5.2.3. OS Installation
Be sure to have the EXPRESSBUILDER DVDs for each server in order to update their drivers.
Be sure to have the NEC OS installation media to install the OS.
5.2.4. Windows Service Pack
Windows Server 2008 Service Pack 2 is required to install.
5.2.6.2. Hyper-V Installation – KB Installation for Windows Server 2008 R2
In an environment in which Service Pack 1 is not installed, after enabling Hyper-V,
KB2264080 should be installed if necessary.
5.3.1. OS Installation
Red Hat Enterprise Linux 5
Be sure to have the Red Hat Enterprise Linux 5.7 installation media.
Red Hat Enterprise Linux 6
Be sure to have the Red Hat Enterprise Linux 6.1 installation media.
Ch
7
7.1.2. Backup and Restore Windows Server 2008 R2 Hyper-V with the DDR Function
Acquire “iSMpassthrough_enabler.”
Source: Included in the package with ControlCommand ver. 6.2 or later.
Ch
8
8.1.4. Installing the Latest BIOS
In order to update the system BIOS, acquire the BIOS update module.
Source: http://www.58support.nec.co.jp/global/download/index.html
10
NEC Express5800 Series
1. Overview
1.7. Acquiring Manuals
The following manuals and system updates may be necessary to
create a SAN Boot environment. Acquiring these before starting
the actual build process is recommended.
Reference Manuals
Ch
1
1.7. Acquiring Manuals
Server (NEC Express5800 Series User’s Guide)
FC Controller User's Guide
Source: http://www.58support.nec.co.jp/global/download/
NEC Express5800 Series Microsoft® Windows Server® 2008 R2 Support Information
Source: http://www.58support.nec.co.jp/global/download/w2008r2/sp1.html
Ch
2
2.1.4. NEC M-series Storage Control Software Installation
“SAN Boot Compatibility Table”
“StorageManager Installation Guide”
M Series source: INSTALL.pdf in the WebSAM StorageManager Suite CD-ROM
2.1.4.2. Unlocking the AccessControl License
“NEC Storage Software Configuration Setting Tool User’s Manual (GUI)”
Source: manual¥IS051.pdf in the StorageManager Express Setup and Utility CD-ROM
2.2.2.1. FC Switch Zoning
“User’s Guide”
Source: attached with FC switch.
Ch
3
3.1.1. Creating a Pool and a Logical Disk (LD)
3.1.2. Creating a LD Set
3.1.3. Assigning LDs to an LD Set
3.1.4. Changing the Port Access Mode
3.1.5. Linking the LD Sets and FC Controllers
“NEC Storage Software Configuration Setting Tool User’s Manual (GUI)”
M Series source: manual¥IS051.pdf in the StorageManager Express Setup and Utility
CD-ROM
11
NEC Express5800 Series
1. Overview
1.7. Acquiring Manuals
Reference Manuals
5.2.5. NEC Storage PathManager for Windows Installation
“Storage PathManager for Windows Installation Guide”
Source: Refer to the manual in the PathManager Installation CD-ROM.
Ch
5
5.3.2. PathManager Installation
Detailed information
Source: Refer to the manual in the PathManager Installation CD-ROM.
5.4 VMware ESX/ESXi
“Storage PathManager for VMware Installation Guide”
Source: Refer to the manual in the PathManager Installation CD-ROM.
Ch
6
6.2. Checking FC Path Redundancy
Windows OS
Refer to “NEC Storage PathManager User’s Manual (Windows version)” to
check details.
Source: Refer to the manual in the PathManager Installation CD-ROM
VMware ESX/ESXi
Refer to “NEC Storage PathManager User’s Manual (VMware version)” to
check details.
Source: Refer to the manual in the PathManager Installation CD-ROM
12
NEC Express5800 Series
1. Overview
1.7. Acquiring Manuals
Reference Manuals
Ch
7
Ch
8
7.1. DDR (NEC M-series Storage)
“Storage ControlCommand installation guide”
Source: INSTALL.PDF in the Storage ControlCommand on Windows CD-ROM
Source: INSTALL.PDF in the Storage ControlCommand on Linux CD-ROM
“Storage Series Configuration Settings Guide (GUI)”
M Series source: manual¥IS051.pdf in the WebSAM StorageManager Suite
CD-ROM
“Storage Software Data Replication Usage Guide – Functions”
Source: manual¥IS015.pdf in the Storage ControlCommand on Windows CD-ROM
Source: manual¥IS015.pdf in the Storage ControlCommand on Linux CD-ROM
“Storage Software ControlCommand Command Reference”
Source: manual¥IS041.pdf in the Storage ControlCommand on Windows CD-ROM
Source: manual¥IS041.pdf in the Storage ControlCommand on Linux CD-ROM
“Storage Software StorageManager Command Reference”
M Series source: manual¥IS052.pdf in the WebSAM StorageManager Suite CD-ROM
7.1.2. Backup and Restore Windows Server 2008 R2 Hyper-V with the DDR Function
Backup and restore procedures: “Storage Software Data Replication Usage Guide
– Installation and Operation”
Source: manual¥IS016.pdf in Storage ControlCommand on Windows CD-ROM
8.1.4. Installing the Latest BIOS
With respect to updating procedures, refer to the BIOS download page instructions for
each device and the “Readme.txt” files included with the downloaded data.
Source: http://www.58support.nec.co.jp/global/download/index.html
13
NEC Express5800 Series
1. Overview
1.7. Acquiring Manuals
Acquiring Manuals
This manual describes the various implementation steps while referring to
the relevant sections of the various individual product manuals.
While the product manuals are included with their products, downloading
the latest information from the appropriate website is recommended.
Server (NEC Express5800 Series User’s Guide)
•
http://www.58support.nec.co.jp/global/download/
“Rack” under the Document & Software tab > Select the corresponding device.
FC Controller User's Guide
•
http://www.58support.nec.co.jp/global/download/
“Server Options” under the Document & Software tab > “Host bus adapters”
> Fibre Channel Controller [N8190-153] or [N8190-154]
OS
•
Windows
NEC Express5800 Series Microsoft® Windows Server® 2008 R2 Support
Information
http://www.58support.nec.co.jp/global/download/w2008r2/sp1.html
Refer to the section on the standard rack server.
Applications
•
NEC M-series Storage control software related manuals and installation guides.
1.8. Hardware and Software Specifications
Hardware and Software Specifications
Ask your local NEC subsidiary about the availability for our products.
14
NEC Express5800 Series
2. Preparation
2.1. Management Server Preparation
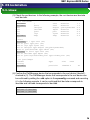
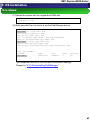
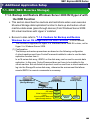
2.1.1. Management Software and Linkage Image
The following diagram illustrates the main roles (installed software) played
by the management server used in a SAN Boot environment.
•
•
Management Servers
Storage configuration setting/monitoring
(ESMPRO/ServerManager)
(StorageManager)
The software installed in the management server are linked in the manner
shown in the image below.
Management Server
ESMPRO/ServerManager
SAN Boot Server
Server monitoring
ESMPRO/ServerAgent
Storage
PathManager
Access
control
Path
redundancy
WebSAM StorageManager
(Basic control)
Storage
configuration and
monitoring
Storage AccessControl
WebSAM
Storage PerforMate Suite
Storage
performance
monitoring
NEC M-series Storage
15
NEC Express5800 Series
2. Preparation
2.1. Management Server Preparation
2.1.2. Installing Software in the Management Server
This section describes the NEC M-series Storage management settings
and FC switch preparation that are necessary before building the SAN
Boot environment (i.e., before OS installation).
See “7. Additional Application Settings” with respect to data replication
functions (DDR) that must be set after installing the OS.
2.1.3. Management LAN Settings
In order to perform the StorageManager that sets up and manages NEC
M-series Storage disk array, use the management LAN (*1) to connect
and setup the network. (Required)
Also, connecting and setting up the management LAN is strongly
recommended in order to facilitate smooth implementation and
management of the SAN Boot servers.
*1 Independently building the management LAN is recommended, but it
is also possible to run it in the same segment as an operating LAN.
If these two are to share a segment, the system should be designed
so that access is possible even under heavy loads.
16
NEC Express5800 Series
2. Preparation
2.1. Management Server Preparation
2.1.4. NEC M-series Storage Control Software Installation
2.1.4.1. StorageManager Installation
•
StorageManager controls the storage disk array in the SAN Boot environment. If
StorageManager is not installed or the version that is installed cannot be used for
SAN Boot, refer to “Chapter 3 Server Installation (Windows)” and “Chapter 4
Client Installation” of the “NEC Storage Manager Installation Guide”.
* See the “SAN Boot Compatibility Table” for the StorageManager version
that can be used for SAN Boot.
* Refer to the INSTALL.pdf file in the NEC Storage Manager Suite CD-ROM to
find the “Installation Guide.”
2.1.4.2. Unlocking the AccessControl License
•
•
•
•
SAN Boot is not recommended to share system disks among multiple servers.
Therefore, it is necessary to control access from various servers with
AccessControl.
Refer to “11.4 License Unlock” of the “NEC Storage Software Configuration
Setting Tool User’s Manual (GUI) for the M Series” with regard to unlocking the
AccessControl license.
When using additional licenses, refer to “11.4 License Unlock” and unlock them.
For the M10e and M100, the AccessControl license is unlocked by default. Thus
there is no need to unlock it.
* Refer to the manual¥IS051.pdf file in the StorageManager Express Setup and
Utility CD-ROM for the “NEC Storage Software Configuration Setting Tool
User’s Manual (GUI) for the M Series.”
17
NEC Express5800 Series
2. Preparation
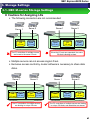
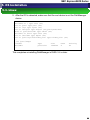
2.2. FC Switch Preparation
2.2.1 . Configuration
In a SAN Boot environment, the SAN Boot servers are connected to
storage disk array through FC switches, or to storage disk array directly.
Note that cascading FC switches are not recommended in a SAN Boot
environment.
SAN Boot Server
SAN Boot Server
SAN Boot Server
FC switch
Storage disk array
Config. Example 1
Direct connection
FC switch
FC switch
FC switch
FC switch
FC switch
Storage disk array
Storage disk array
Config. Example 2
Connection via switches
Config. Example 3
Cascading connection
(Not Recommend)
2.2.1.1. FC Switch Configuration
•
FC Switch can be configured with the NEC WB series
(WB310A/330A/340A/512A/514A).
WB310A / 330A / 340A
WB512A/514A
18
NEC Express5800 Series
2. Preparation
2.2. FC Switch Preparation
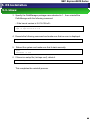
2.2.2. FC Zoning Settings
2.2.2.1. FC Switch Zoning
•
The purpose of zoning FC switches is to logically separate connected devices that
do not have any mutual access, so that they cannot be accessed by connected
devices from outside their zones. This improves security.
When using SAN Boot, unless zoning is set so that FC controllers connects
servers to the FC switches according to zones differentiated by ports, when
another server that belongs to the same zone is linked, a disturbance will occur in
which logging in is allowed from another server. Because of this, zoning must be
set so that the zones are separated by the ports on the FC controllers.
Conversely, when there are multiple devices in the same zone, a device might be
affected by another device. Therefore, it is strongly recommended to divide the
devices into zones on a one-to-one basis with the ports.
Refer to the “User’s Guide” that is included with the FC switches for details on
zoning them.
•
•
•
•
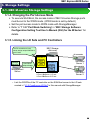
FC switch zoning configuration example:
The illustration below shows a port zoning example configuration in which two
FC switches are connected to two servers with redundant paths.
Server #2
Server #1
1
5
2
6
3
7
4
1
8
5
FC switch #1
SP1
2
6
3
7
4
8
* In this type of configuration, the zoning
settings for FC switches #1 and #2 are
recommended so that the following ports
are paired.
Server #1 zone pairing: [Port 1] [Port 5]
Server #2 zone pairing: [Port 2] [Port 5]
FC switch #2
SP2
NEC M-series Storage
Refer to “Zoning Settings” in the FC switch “User’s Guide” for setting details.
This example shows two servers, but Port 3 or higher can also be zoned in
preparation for future expansion.
19
NEC Express5800 Series
2. Preparation
2.3. Confirm WWPN
Confirm the WWPN (World Wide Port Name) of the FC controllers
on each server that will use SAN Boot before deploying servers in
an FC SAN Boot environment.
In an FC SAN Boot environment, AccessControl is used in NEC M-series
Storage disk array. Thus it is necessary to bind the server FC controllers
and LD sets in NEC M-series Storage.
Because NEC M-series Storage uses the FC controller WWPN for linking,
it is necessary to check the WWPN before binding the logical disks.
.
The FC controller that executes FC SAN Boot must be implemented in the
designated option card slot. The location of the option card slot deoends
on the server models.
2.3.1. Confirm WWPN
See “9.1.1. Confirm from IEEE Address Labels” in this manual, confirm
the WWPN of the FC controller, then write down each value.
20
NEC Express5800 Series
2. Preparation
2.4. FC Controller Mounting Location
Mounting the FC controller on FC SAN Boot server.
The FC controller mounting location is depending on the server
model.
• When linking the LD sets with FC controllers, the WWPN values are required. Note
for future reference all WWPN values for each mounted FC controller.
• When using the N8190-154 on R120d-2M, R120d-1M, R120d-2E or
R120d-1E, give priority to Port 1 for FC SAN Boot.
21
NEC Express5800 Series
2. Preparation
2.4. FC Controller Mounting Location
2.4.1. R120d-2M
When FC SAN Boot is implemented from one FC controller, mount in
Slot #2B.
When FC SAN Boot is implemented from two FC controllers, mount in
Slot #2B and Slot #1B.
•
When FC SAN Boot is implemented from two N8190-154 units, Port 1 position is
the port for FC SAN Boot. Note for future reference which values are assigned to
the Port 1 position.
R120d-2M PCI slots
2.4.2. R120d-1M
When FC SAN Boot is implemented from one FC controller, mount in
Slot #1B.
When FC SAN Boot is implemented from two FC controllers, mount in
Slot #1B and Slot #1C.
•
When FC SAN Boot is implemented from two N8190-154 units, Port 1 position is
the port for FC SAN Boot. Note for future reference which values are assigned to
the Port 1 position.
R120d-1M PCI slot
22
NEC Express5800 Series
2. Preparation
2.4. FC Controller Mounting Location
2.4.3. R120d-2E
When FC SAN Boot is implemented from one FC controller, mount in
Slot #1B.
When FC SAN Boot is implemented from two FC controllers, mount in
Slot #1B and Slot #2B.
When FC SAN Boot is implemented from two N8190-154 units, Port 1 is the
port position for FC SAN Boot. Note for future reference which values are assigned
to the Port 1 position.
R120d-2E PCI slot
2.4.4. R120d-1E
When FC SAN Boot is implemented from one FC controller, mount in
Slot #1B.
When FC SAN Boot is implemented from two FC controllers, mount in
Slot #1B and Slot #1C.
When FC SAN Boot is implemented from two N8190-154 units, Port 1 is the
port position for FC SAN Boot. Note for future reference which values are assigned
to the Port 1 positions.
R120d-1E PCI slot
23
NEC Express5800 Series
3. Storage Settings
3.1. Storage M Series Settings
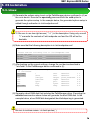
3.1.1. Creating a Pool and Logical Disk (LD)
SAN Boot Server 1
NEC Storage
disk array
Pool
SAN Boot Server 2
Storage
Manager
Use iSM to
setup storage
LD1 and 2 Server 1 LD
LD3 and 4 Server 2 LD
LD1
LD3
LD2
LD4
Create the logical
disks (LD)
necessary for each
SAN Boot server
from the disks in
the pool.
Management
Server
StorageManager creates the pool and logical disk (hereafter referred to as
LD). For NEC M Series Storage, refer to “7.1 Pool Bind” and “9.1 Logical
Disk Bind” in “NEC Storage Software Configuration Setting Tool
User’s Manual (GUI) for the M Series.”
* When the pool has already been created , create the LDs properly.
* It takes long time to format disk up to the capacity and number of LDs.
When using the Storage data replication function to create a Windows OS image,
set the logical disk format of the LD storing the OS to “WG” so that the disk
signature does not change.
See “7.1.4. Precautions for Backup and Restore from a Windows Server OS
Image with the DDR Function” for details.
24
NEC Express5800 Series
3. Storage Settings
3.1. NEC M-series Storage Settings
3.1.2. Creating an LD Set
StorageManager creates an LD set.
Refer to “10.3.3.1 Creating a New LD Set/Changing Settings” in “NEC
Storage Software Configuration Setting Tool User’s Manual (GUI) for
the M Series” for details.
NEC Storage
disk array
SAN Boot Server 1
Pool
SAN Boot Server 2
Storage
Manager
Use iSM to
setup storage
LD Set 1
LD Set 2
Management
Server
Create the LD sets necessary
for each SAN Boot server
LD set 1Server 1 LD set
LD set 2Server 2 LD set
LD1
LD3
LD2
LD4
LD1 and 2 Server 1 LD
LD3 and 4 Server 2 LD
Set the application server platform for the LD set platform.
If the application server OS is VMware ESX/ESXi, set “LX” as the platform.
An LD set is a virtual image that indicates a group of logical disks. SAN
boot server can access the LDs by assigning path information (WWN
(World Wide Name) of SAN Boot server) and LDs.
Refer to “2.3 LD Set” in “NEC Storage Software Configuration Setting
Tool User’s Manual (GUI) for the M Series” for details.
25
NEC Express5800 Series
3. Storage Settings
3.1. NEC M-series Storage Settings
3.1.3. Assigning LDs to an LD Set
StorageManager assigns LDs to an LD set.
Refer to “10.1 Assignment of Logical Disk” in “NEC Storage Software
Configuration Setting Tool User’s Manual (GUI) for the M Series” for
details.
* Assign LDs to an LD set after formatting in “3.1.1. Creating a Pool and Logical
Disks (LD).”
NEC Storage
disk array
SAN Boot Server 1
Pool
SAN Boot Server 2
Storage
Manager
Use iSM to
setup storage
Management
Server
Assign LDs to the
created LD sets
LD set 1
LD set 2
LD1
LD2
LD3
LD4
LD set 1Server 1 LD set
LD set 2Server 2 LD set
LD1
LD3
LD2
LD4
LD1 and 2 Server 1 LD
LD3 and 4 Server 2 LD
26
NEC Express5800 Series
3. Storage Settings
3.1. NEC M-series Storage Settings
Cautions for Assigning LDs
The following connection are not recommended:
SAN Boot
Server 1
OS
(LD set)
Data
(LD set)
The FC controllers of multiple servers
are bound to the same LD sets.
SAN Boot
Server 2
SAN Boot
Server 1
SAN Boot
Server 2
Data
OS
Data
(LD set)
(LD set)
(LD set)
When the LD sets are separated, the same
OS disk is binding to them.
Multiple servers can not access single LD set.
Exclusive access control by cluster software is necessary to share data
disks.
SAN Boot
Server 1
OS
(LD set)
Data
(LD set)
SAN Boot
Server 2
SAN Boot
Server 1
OS
OS
(LD set)
Data
(LD set)
The FC controllers of multiple servers
are binding to unique LD sets.
(LD set)
SAN Boot
Server 2
Data
OS
(LD set)
(LD set)
The FC controllers of multiple servers are binding
to unique OS disks, and data disks are shared.
27
NEC Express5800 Series
3. Storage Settings
3.1. NEC M-series Storage Settings
3.1.4. Changing the Port Access Mode
To execute SAN Boot, the access mode of NEC M-series Storage ports
must be set to the WWN mode. (WWN mode is set by default.)
Set the port access mode to WWN mode with StorageManager.
Refer to “11.2.7 Port Mode Switching” in “NEC Storage Software
Configuration Setting Tool User’s Manual (GUI) for the M Series” for
details.
3.1.5. Linking the LD Sets and FC Controllers
NEC Storage
disk array
The FC controllers of each
server assign unique WWPNs to
the LD sets.
FC controller
LD set 1
Storage
Manager
Use iSM to
setup storage
Management
Server
LD1
LD2
LD set 2
LD3
LD4
LD set 1Server 1 LD set
LD set 2Server 2 LD set
SAN Boot
Server 1
FC controller
SAN Boot
Server 2
• Link the WWPNs of the FC controller on the SAN Boot server to the LD sets
created in “3.1.2 Creating an LD Set” in this manual with StorageManager.
28
NEC Express5800 Series
3. Storage Settings
3.1. NEC M-series Storage Settings
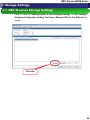
• Refer to “10.3.3.1 Creating a New LD Set/Changing Settings” of “NEC Storage
Software Configuration Setting Tool User’s Manual (GUI) for the M Series” for
details.
Click this
29
NEC Express5800 Series
3. Storage Settings
3.1. NEC M-series Storage Settings
To set a redundant configuration, link all FC controller ports in FC SAN
Boot to the same LD sets at this time.
• User can check WWPNs with the WWPN labels on the FC controllers, or from the
FC controller BIOS.
If the FC controller is not mounted on the server, see “2.3 Confirm WWPN” on how
to check the WWPN label on the FC controller.
• If the FC controller is already mounted on the server, see “9.1.3 Confirm from the
FC BIOS” on how to check it from the FC controller BIOS.
30
NEC Express5800 Series
4. Server Settings
4.1. FC Cable Connection
Before setting up the BIOS, the ports of the FC controller that will
execute FC SAN Boot must be connected to the FC switches /
storage disk array with FC cables.
The locations of the mounting FC controller and FC ports used for
FC SAN Boot will be depending on the server model.
•
FC cables should be connected with only two paths used for FC SAN.
•
If the N8190-154 on R120d-2M, R120d-1M, R120d-2E or R120d-1E, Port 1
should be used for FC SAN Boot.
31
NEC Express5800 Series
4. Server Settings
4.1. FC Cable Connection
4.1.1. R120d-2M
FC SAN Boot implemented from two N8190-153 units:
Connect the FC controllers mounted in Slot #2B and Slot #1B to the FC
switches / storage disk array with FC cables.
FC SAN Boot implemented from one N8190-154 unit:
Connect the FC controller mounted in Slot #2B to the FC switches /
storage disk array with FC cables.
FC SAN Boot implemented from two N8190-154 units:
Connect the Port 1 of the FC controllers mounted in Slot #2B and Slot #1B
to the FC switches / storage disk array with FC cables.
Connect
to Port 1 position
Port1側に接続
32
NEC Express5800 Series
4. Server Settings
4.1. FC Cable Connection
4.1.2. R120d-1M
FC SAN Boot implemented from two N8190-153 units:
Connect both FC controllers to the FC switches / storage disk array with
FC cables.
FC SAN Boot implemented from one N8190-154 unit:
Connect the FC controller mounted in Slot #1B to the FC switches /
storage disk array with FC cables.
FC SAN Boot implemented from two N8190-154 units:
Connect the Port 1 of both FC controllers to the FC switches / storage disk
array with FC cables.
Port1側に接
Connect to Port 1
続
33
NEC Express5800 Series
4. Server Settings
4.1. FC Cable Connection
4.1.3. R120d-2E
FC SAN Boot implemented from two N8190-153 units:
Connect the FC controllers mounted in Slot #2B and Slot #1B to the FC
switches / storage disk array with FC cables.
FC SAN Boot implemented from one N8190-154 unit:
Connect the FC controller mounted in Slot #1B to the FC switches /
storage disk array with FC cables.
FC SAN Boot implemented from two N8190-154 units:
Connect the Port 1s of the FC controllers mounted in Slot #2B and Slot
#1B to the FC switches / storage disk array with FC cables.
Connect to Port 1
Port1側に接続
position
34
NEC Express5800 Series
4. Server Settings
4.1. FC Cable Connection
4.1.4. R120d-1E
FC SAN Boot implemented from two N8190-153 units:
Connect both FC controllers to the FC switches / storage disk array with
FC cables.
FC SAN Boot implemented from one N8190-154 unit:
Connect the FC controller mounted in Slot #1B to the FC switches /
storage disk array with FC cables.
FC SAN Boot implemented from two N8190-154 units:
Connect the Port 1 of both FC controllers to the FC switches / storage disk
array with FC cables.
Connect to Port 1
Port1側に接続
position
35
NEC Express5800 Series
4. Server Settings
4.2. Server BIOS Settings
To execute FC SAN Boot, the server BIOS settings must be
changed to enable the FC controller BIOS.
To change the server BIOS settings, hold down the <F2> key when
booting the server and enter the System Setup screen.
Refer to the maintenance guides of each device and the “System BIOS” section of
the User’s Guide for details on setting up the System BIOS.
4.2.1. FC Controller BIOS Enable Setting
Change the “PCI Configuration” setting.
•
The slot to be enabled is the slot in which the FC controller used to execute FC
SAN Boot in “2.4 FC Controller Mounted Location” is mounted.
[BIOS Setup Screen]
[ Advanced ]
[ PCI Configuration ]
PCI Slot 1 Option ROM: [Enabled]
* The Option ROMs of slots that including FC controllers for FC SAN Boot
should be set to “Disabled.”
Change the setting for the slot with the FC controller from
Disabled to Enabled. (The figure above is for the R120d-2M.)
36
NEC Express5800 Series
4. Server Settings
4.3. FC Controller BIOS Settings
Set up the FC controller BIOS from a local console of the server
used for FC SAN Boot.
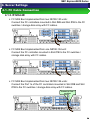
4.3.1. Starting the BIOS Configuration Utility
After completing “4.2 Server BIOS Settings,” turn off the power. Then turn
it on again.
When the following message is displayed, press the <Alt> + <E> key or
<Ctrl> + <E> key combination to start the FC controller BIOS configuration
utility.
Once pressed keys are recognized, the following message is displayed,
then the menu screen is shown. If it does not appear, reboot the server
and try again.
37
NEC Express5800 Series
4. Server Settings
4.3. FC Controller BIOS Settings
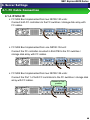
4.3.2. Selecting the FC Port
After the menu is displayed, select the number that corresponds to the
port that is connected to the storage device in which the OS will be
installed, and display the information screen of that port.
Port 1
Port 0
For the N8190-154, the PCI Bus and device are the same and ports 00
and 01 are displayed in Function. Of these, 00 corresponds to Port 0
and 01 to Port 1.
The order in which Port 0 and Port 1 are displayed will differ
depending on the servers.
38
NEC Express5800 Series
4. Server Settings
4.3. FC Controller BIOS Settings
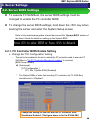
4.3.3. Boot Device Registration
•
Make sure that the Port Name of the selected port matches the WWPN of the
port used for FC SAN Boot. If they do not match, press the <ESC> key, then
reselect the port according to “4.3.2 Selecting the FC Port.”
Select 1 in the following screen. A list of boot devices will be displayed.
39
NEC Express5800 Series
4. Server Settings
4.3. FC Controller BIOS Settings
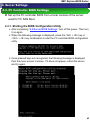
After the boot device list is displayed, enter “1” to display the setup screen
for the Primary Boot entry.
If the boot device is not found through the selected port, the boot device
list will not appear, and “This Adapter is not ready, try again!” message will
be displayed. Make sure that the correct port is selected. If the port is
correct, re-check the connection between server and storage disk array
etc., then reboot the server and try again.
40
NEC Express5800 Series
4. Server Settings
4.3. FC Controller BIOS Settings
Input the number of the boot device to be registered.
• Be sure to enter the device number that includes LUN0 as the boot device number.
If an LUN0 device is not displayed, see “3.1.3 Assigning LDs to an LD set” and
recheck LD assignment.
• When the input screen for entering device starting LUN digits appears, input 00
(meaning LUN0).
41
NEC Express5800 Series
4. Server Settings
4.3. FC Controller BIOS Settings
When the device LUN selection screen is displayed, input 01 (LUN:00).
When the device boot method selection screen is displayed, input “1” (boot
via WWPN).
42
NEC Express5800 Series
4. Server Settings
4.3. FC Controller BIOS Settings
The boot device list is displayed again. Make sure that the “Primary Boot”
entry at the top is set to “Used.”
After checking the above, press <ESC> to return to the menu below.
43
NEC Express5800 Series
4. Server Settings
4.3. FC Controller BIOS Settings
4.3.4. Boot BIOS Enable Setting
Select “2” from the following menu to display the parameter setup screen.
Select “1” to display the BIOS enable/disable setup screen.
44
NEC Express5800 Series
4. Server Settings
4.3. FC Controller BIOS Settings
Since BIOS is disabled by default, “The BIOS is Disabled!!” is displayed.
Press “1.”
Make sure that “The BIOS is Enabled!!” is displayed, then press <ESC>
twice to return to the port selection menu.
Repeat the steps in “4.3.2 Selecting the FC Port” for the remaining FC
ports that are connected to storage devices in which OSs are to be
installed to register the boot devices and enable the Boot BIOS.
Do not register the boot devices and do not enable the Boot BIOS of FC ports
connected to storage devices in which OS will not be installed.
FC controller BIOS setup is completed after setting up the rest of FC ports.
45
NEC Express5800 Series
4. Server Settings
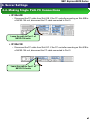
4.4. Making Single Path FC Connections
When installing Windows OS or RHEL OS, the path connecting to the
storage in which the OS is to be installed must be made a single path. The
path to be left will differ depending on the server model.
* VMware can be installed with the redundant path connected.
When N8190-154 is on R120d-2M, R120d-1M, R120d-2E or R120d-1E, FC SAN
Boot is executed with priority given to Port 1.
The remain of FC cable will be reconnected after installing the OS/PathManager.
Note for future reference the original connection location.
46
NEC Express5800 Series
4. Server Settings
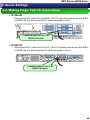
4.4. Making Single Path FC Connections
R120d-2M
• Disconnect the FC cable from Slot #1B. If the FC controller mounting on Slot #2B is
a N8190-154 unit, disconnect the FC cable connected to Port 0.
Leave the path to Port 1 of
N8190-154 units
R120d-1M
• Disconnect the FC cable from Slot #1C. If the FC controller mounting on Slot #1B is
a N8190-154 unit, disconnect the FC cable connected to Port 0.
Leave the path to Port 1 of
N8190-154 units
47
NEC Express5800 Series
4. Server Settings
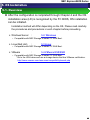
4.4. Making Single Path FC Connections
R120d-2E
• Disconnect the FC cable from Slot #2B. If the FC controller mounting on Slot #1B is
a N8190-154 unit, disconnect the FC cable connected to Port 0.
Leave the path to Port 1 of
N8190-154 units
R120d-1E
• Disconnect the FC cable from Slot #1C. If the FC controller mounting on Slot #1B is
a N8190-154 unit, disconnect the FC cable connected to Port 0.
Leave the path to Port 1 of
N8190-154 units
48
NEC Express5800 Series
5. OS Installation
5.1. Overview
After the configuration is completed through Chapter 4 and the OS
installation area (LD) is recognized by the FC BIOS, OS installation
can be initiated.
Installation method will differ depending on the OS. Please read carefully
the procedures and precautions in each chapter before proceeding.
Windows Server
:
5.2. Windows
• Compatible with NEC Storage M series FC SAN Boot.
Linux(Red Hat)
:
5.3 Linux
• Compatible with NEC Storage M series FC SAN Boot.
VMware
:
5.4 VMware ESX/ESXi
• Compatible with NEC Storage M series FC SAN Boot.
* Go to the URL below and use a storage device that has VMware certification.
http://www.vmware.com/resources/compatibility/search.php
49
NEC Express5800 Series
5. OS Installation
5.2. Windows
5.2.1. Windows Server 2008 and Windows Server 2008 R2
Installation
This section describes the installation of Windows Server 2008 and
Windows Server 2008 R2 into NEC Express5800 series. The compatible
hardware devices are listed below.
<NEC Express5800 Series>
Product name
R120d-2M
R120d-1M
R120d-2E
R120d-1E
The Windows OS is installed according to the following flow.
Start installation
5.2.2. Advanced Preparation
5.2.3. OS Installation
5.2.4. Service Pack Applicaiton
5.2.5. NEC Storage PathManager for Windows Installation
5.2.6. Hyper-V Installation
6. Confirming Operation and Setting Up Redundant Paths
Installation completed
50
NEC Express5800 Series
5. OS Installation
5.2. Windows
5.2.2. Advanced Preparations
Do not make the path between the server and NEC M-series Storage redundant
without installing PathManager. Doing so can lead to OS installation failure.
Items necessary for installation
• EXPRESSBUILDER DVD
R120d-2M / R120d-1M: Ver. 6.10-021.01 or later
R120d-2E / R120d-1E: Ver. 6.10-023.01 or later
• OS installation media
NEC OS installation media (hereafter referred to as “backup DVD”)
• Installation Guide (Windows) (in EXPRESSBUILDER DVD)
51
NEC Express5800 Series
5. OS Installation
5.2. Windows
5.2.3. OS Installation
•
Following the instructions in Installation Guide (Windows), install the OS with OS
Standard Installer.
5.2.4. Service Pack Application
5.2.4.1. Windows Server 2008
•
See the information on the following website and install Service Pack 2.
•
Windows Server 2008 Service Pack 2
http://www.58support.nec.co.jp/global/download/w2008sp2/index.html
5.2.4.2. Windows Server 2008 R2
•
See the information on the following website and install Service Pack 1.
This step can be skipped if Service Pack 1 is not to be installed.
•
Windows Server 2008 R2 and Windows 7 Service Pack 1
http://www.58support.nec.co.jp/global/download/w2008r2/sp1.html
5.2.5. NEC Storage PathManager for Windows Installation
•
Install NEC Storage PathManager that makes NEC M-series Storage path
redundant.
Do not make the path between the server and NEC M-series Storage redundant
until installation is completed.
•
To use NEC Storage PathManager, install it according to “Installation” in the
“Installation Guide” provided with the product.
When using the NEC Storage PathManager that comes with an NEC M10e or
M100 series unit, install the software according to “NEC Storage PathManager
Installation” in the “Disk Array Unit User’s Guide” that comes with the unit.
52
NEC Express5800 Series
5. OS Installation
5.2. Windows
5.2.6. Hyper-V Installation (only when using Hyper-V)
Follow the steps below in in order to use Hyper-V with Windows Server 2008 or
Windows Server 2008 R2. This section can be skipped if Hyper-V is not used.
(1) Start the Server Manager.
(2) Select “Roles” from the menu at left, then click “Add Roles.”
(3) After the screen below is displayed, click “Next.”
53
NEC Express5800 Series
5. OS Installation
5.2. Windows
(4) Select “Hyper-V” from the following screen, then click “Next.”
(5) After the screen below is displayed, click “Next.”
54
NEC Express5800 Series
5. OS Installation
5.2. Windows
(6) After the screen below is displayed, select the network adapter to connect the
virtual network switch if necessary, then click “Next.” The virtual network switch is
necessary for the virtual machine to communicate with other computers.
“
(7) After the screen below is displayed, click “Install.”
55
NEC Express5800 Series
5. OS Installation
5.2. Windows
(8) Hyper-V is being installed.
(9) After the screen below is displayed, click “Close.”
56
NEC Express5800 Series
5. OS Installation
5.2. Windows
(10) After the screen below is displayed, click “Yes” and reboot the server.
(11) After rebooting and logging into Windows, Hyper-V installation will continue.
(12) After the screen below is displayed, click “Close.”
57
NEC Express5800 Series
5. OS Installation
5.2. Windows
(13) Install a hotfix program if necessary.
•
Windows Server 2008
None
•
Windows Server 2008 R2
1. KB2517374: http://support.microsoft.com/kb/2517374
If Service Pack 1 is not installed, install a hotfix program if any of the
following devices is applied.
If Service Pack 1 is installed, the updates are not necessary.
R120d-2M
R120d-1M
R120d-2E
R120d-1E
All
All
All
All
models
models
models
models
After completing all of the above, go to “6. Confirm Operation and Setting Up
Redundant Paths.”
58
NEC Express5800 Series
5. OS Installation
5.3. Linux
5.3.1. Red Hat Enterprise Linux 5 and Red Hat Enterprise Linux 6
Installation
■NEC supported OS version
RHEL5
RHEL6
R120d-2M
R120d-1M
RHEL5.7 and later
RHEL6.1 and later
R120d-2E
R120d-1E
RHEL5.7 and later
RHEL6.2 and later
■Installation Guide
Red Hat Enterprise Linux 5
https://access.redhat.com/knowledge/docs/enUS/Red_Hat_Enterprise_Linux/5/html/Installation_Guide/pt-install-info-x86.html
Red Hat Enterprise Linux 6
https://access.redhat.com/knowledge/docs/enUS/Red_Hat_Enterprise_Linux/6/html/Installation_Guide/pt-install-info-x86.html
59
NEC Express5800 Series
5. OS Installation
5.3. Linux
5.3.2. PathManager Installation
This section describes how to install the “NEC StoragePathManager for
Linux” in SAN Boot environment of NEC Express5800 series.
Red Hat Enterprise Linux 5 or 6 are prerequisites, and one of the following
functional versions of PathManager should be used.
- Red Hat Enterprise Linux 5 → Functional Version 4.0.1 or higher
- Red Hat Enterprise Linux 6 → Functional Version 5.1.5 or higher
5.3.3. Before Setting Up
Confirm the following before setting up PathManager.
(1) Set up the FC driver according to the FC controller setup instructions. If the FC
drivers that come with the OS are used, then it is not necessary to reinstall the
drivers.
(2) If an FC switch is connected, then the FC switch must be set up.
(3) If there is a cross call setting for M-series Storage device, then it must be set
to ”On.” See the Storage device instructions on how to set up the cross call
settings.
(4) Make sure that ExpressCluster is not set up.
If ExpressCluster is used, set up PathManager before setting up ExpressCluster.
In order to install PathManager in an environment in which ExpressCluster is
installed, ExpressCluster must be paused.
(5) It must be possible to execute the sg_scan command.
Since the sg_scan command will be necessary, install the required package if it is
not already installed. (See “5.3.3.1 Checking for the sg_scan Command” for
details.)
Check the following only for Red Hat Enterprise Linux 5
(6) Make sure that the mount targets are not used for the label names.
When mounting NEC Storage SCSI device partitions when booting, do not use the
label information to mount them. If label information is used, mount without the
label information. (See “5.3.3.2 Checking for Mount Targets” for details.)
(7) After consulting “5.3.3.2 Checking for Mount Targets,” make sure that there are
no problems in using a multiple path configuration.
60
NEC Express5800 Series
5. OS Installation
5.3. Linux
5.3.3.1. Checking for the sg_scan Command
This section describes how to check sg_scan used in “5.3.5.2 Installation in a SAN
Boot Environment.” Please follow the instructions below.
(1) Execute the sg_scan command.
# sg_scan
/dev/sg0:
/dev/sg1:
scsi0
scsi0
channel=0
channel=0
id=0
id=0
lun=0
lun=1
(2) There are no problems if the above is output or there is no output. Since the
sg_scan command can be executed, go to “5.3.3.2 Checking for Mount Targets.”
If “command not found” is displayed, then go to the next step.
(3) Use the rpm command to make sure that sg3_utils is installed.
# rpm -qa |grep sg3_utils
sg3_utils-x.xx-x.x
sg3_utils-libs-x.xx-x.x
(4) There is no problem if the version is displayed as in the example above. If
"command not found" is displayed in (2) above, then make sure that there is a path
to sg_scan (to /usr/bin). If there is no such path, add /usr/bin to $PATH, then go to
one of the following sections for the respective OS. If nothing is displayed, then go
to step (5).
- Red Hat Enterprise Linux 5 → “5.3.3.2. Checking for Mount Targets”
- Red Hat Enterprise Linux 6 → “5.3.3.4. PathManager Setup”
(5) Prepare the sg3_utils RPM package.
Insert the installation disk that contains the sg3_utils RPM package into the DVD
drive and mount it.
61
NEC Express5800 Series
5. OS Installation
5.3. Linux
(6) Install sg3_utils.
If sg3_utils-libs is not installed, it must be installed first.
# rpm -ivh sg3_utils-libs-x.xx-x.x.xxx.rpm
Preparing...
###########################################
[100%]
1:sg3_utils-libs ###########################################
[100%]
# rpm -ivh sg3_utils-x.xx-x.x.xxx.rpm
Preparing...
###########################################
[100%]
1:sg3_utils
###########################################
[100%]
* Warnings such as "DSA signature: NOKEY, key ID db42a60e" may be output,
but they can be ignored.
(7) Make sure that sg_scan can be executed.
# sg_scan
/dev/sg0:
/dev/sg1:
scsi0
scsi0
channel=0
channel=0
id=0
id=0
lun=0
lun=1
This completes confirmation of the sg_scan command. Go to one of the following
sections for the respective OS.
- Red Hat Enterprise Linux 5 → "5.3.3.2. Checking for Target Mounts"
- Red Hat Enterprise Linux 6 → "5.3.3.4. PathManager Setup"
The output results are examples. The actual output may differ depending on
your environment.
62
NEC Express5800 Series
5. OS Installation
5.3. Linux
5.3.3.2. Checking for Mount Targets
This section checks for mount targets when booting, and changes settings if label
names are used for mounting. Please follow the instructions below.
(1) Check the information for /etc/fstab and /boot/grub/grub.conf.
# cat /etc/fstab
LABEL=/
LABEL=/boot
none
none
none
none
LABEL=/swap
...
/
/boot
/dev/pts
/dev/shm
/proc
/sys
swap
ext3
ext3
devpts
tmpfs
proc
sysfs
swap
defaults
defaults
gid=5,mode=620
defaults
defaults
defaults
defaults
1
1
0
0
0
0
0
1
2
0
0
0
0
0
# cat /boot/grub/grub.conf
# grub.conf generated by anaconda
...
#boot=/dev/sda
default=0
timeout=5
splashimage=(hd0,0)/grub/splash.xpm.gz
hiddenmenu
title Red Hat Enterprise Linux Server (2.6.18-53.el5)
root (hd0,0)
kernel /vmlinuz-2.6.18-53.el5 ro root=LABEL=/ rhgb quiet
initrd /initrd-2.6.18-53.el5.img
If "LABEL" is shown in the first field of /etc/fstab (the shaded area) or after "root="
in /boot/grub/grub.conf, the label names are used for mounting. In those cases, go
to the next step.
Otherwise, go to "5.3.3.4 PathManager Setup."
63
NEC Express5800 Series
5. OS Installation
5.3. Linux
(2) Check the device file name that corresponds to the label.
# mount
/dev/sda2 on / type ext3 (rw)
none on /proc type proc (rw)
none on /sys type sysfs (rw)
none on /dev/pts type devpts (rw,gid=5,mode=620)
usbfs on /proc/bus/usb type usbfs (rw)
/dev/sda1 on /boot type ext3 (rw)
none on /dev/shm type tmpfs (rw)
none on /proc/sys/fs/binfmt_misc type binfmt_misc (rw)
...
# cat /proc/swaps
Filename
Type
Size
Used
Priority
/dev/sdb1
partition
1048544 0
42
...
(3) Specify the device file that corresponds to the label from the results of /etc/fstab
and mount.
In the above example, they correspond as follows:
LABEL=/ is /dev/sda2
LABEL=/boot is /dev/sda1
LABEL=/swap is /dev/sdb1
(4) The /etc/fstab and /etc/grub.conf notations should be changed to corresponding
device files with an editor. (The following shows the results after editing.)
# cat /etc/fstab
/dev/sda2
/dev/sda1
none
none
none
none
/dev/sdb1
...
/
/boot
/dev/pts
/dev/shm
/proc
/sys
swap
ext3
ext3
devpts
tmpfs
proc
sysfs
swap
defaults
defaults
gid=5,mode=620
defaults
defaults
defaults
defaults
1
1
0
0
0
0
0
1
2
0
0
0
0
0
# cat /etc/grub.conf
# grub.conf generated by anaconda
...
#boot=/dev/sda
default=0
timeout=5
splashimage=(hd0,0)/grub/splash.xpm.gz
hiddenmenu
title Red Hat Enterprise Linux Server (2.6.18-53.el5)
root (hd0,0)
kernel /vmlinuz-2.6.18-53.el5 ro root=/dev/sda2 rhgb quiet
initrd /initrd-2.6.18-53.el5.img
64
NEC Express5800 Series
5. OS Installation
5.3. Linux
(5) Restart the system and make sure it boots normally.
# sync
# shutdown -r now
(6) Make sure that the mounted devices are correct.
# mount
/dev/sda2 on / type ext3 (rw)
none on /proc type proc (rw)
none on /sys type sysfs (rw)
none on /dev/pts type devpts (rw,gid=5,mode=620)
usbfs on /proc/bus/usb type usbfs (rw)
/dev/sda1 on /boot type ext3 (rw)
none on /dev/shm type tmpfs (rw)
none on /proc/sys/fs/binfmt_misc type binfmt_misc (rw)
...
# cat /proc/swaps
Filename
Type
Size
Used
Priority
/dev/sdb1
partition
1048544
0
42
...
This completes confirmation of mount targets. Next, go to "5.3.3.3 Redundant Path
Connections."
65
NEC Express5800 Series
5. OS Installation
5.3. Linux
5.3.3.3. Redundant Path Connections
Path connections should be made after checking the mount targets.
(1) Reconnect the disconnected paths.
(2) Restart the system and make sure that it boots normally.
# shutdown -r now
Depending on the configuration, reconnecting paths may change the order in
which they are recognized by the OS. This may cause an error when booting.
(Example: /dev/sdb changed to /dev/sdc after connecting paths.)
In such a configuration, make sure that there are no settings using labels, then
go to the next step without reconnecting paths.
In this case, paths are reconnected after "5.3.4.4 Migration to an Environment
Using PathManager."
This completes the redundant path connections. Next, go to "5.3.3.4 PathManager
Setup."
5.3.3.4. PathManager Setup
PathManager is set up using the installation CD-ROM and following the steps below.
Be sure to set up PathManager by booting the OS with the kernel that uses
PathManager and as the root user.
Do not use the PathManager version 4.0.0 rpm file (the RPM file name that starts
with "sps-E-4.0.0-") that comes on the PathManager 4.0 installation CD-ROM.
Use the rpm file for PathManager version 4.0.1 or later.
Insert the installation CD-ROM and mount it.
# mkdir –p /mnt/cdrom
# mount /dev/cdrom /media/cdrom
If it is automounted, go to the automount target directory.
# cd /media/ [auto-mounted-directory]
66
NEC Express5800 Series
5. OS Installation
5.3. Linux
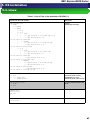
Table 1-1 shows the files in the installation CD-ROM.
Table 1-1 List of Files in the Installation CD-ROM (*1)
Directories and file names
Description
Express5800_100
`-- RPMS
|-- RHEL4
`-- RHEL5
|-- 5.2
|-- 5.3
|
|-- IA32
|
|
|-- sps-utils-4.2.1-0.i686.rpm (*3)
|
|
`-- sps-driver-E-4.2.42.6.18.128.el5.i686.rpm
|
`-- EM64T
|
|-- sps-utils-4.2.1-0.x86_64.rpm
|
`-- sps-driver-E-4.2.42.6.18.128.el5.x86_64.rpm
`-- 5.4
|-- IA32
|
|-- sps-utils-4.3.0-0.i686.rpm
|
|-- sps-driver-E-4.3.32.6.18.164.el5.i686.rpm
|
`-- sps-driver-E-4.3.32.6.18.164.9.1.el5.i686.rpm
`-- EM64T
|-- sps-utils-4.3.0-0.x86_64.rpm
|-- sps-driver-E-4.3.32.6.18.164.el5.x86_64.rpm
`-- sps-driver-E-4.3.32.6.18.164.9.1.el5.x86_64.rpm
RPM file
PathManager package
Express5800_100
`-- doc
|-- IS202.pdf
`-- ISRX203.pdf
PathManager for Linux
instructions (PDF format)
PathManager for Linux
installation guide (PDF format)
Express5800_A1000
|-- RPMS
`-- doc
For Express5800/Scalable HA
Server
readme.txt
filelist.txt
gpl.txt
install.txt
install.sh
Installer
67
NEC Express5800 Series
5. OS Installation
5.3. Linux
*1: The grayed out files in the table are not used in a SAN Boot environment.
*2: From PathManager 4.0.1 to PathManager 4.1.3, there is one rpm file per
kernel.
*3: For PathManager 4.2.1 or later, rpm files are divided into the following
functional units:
sps-utils (utility), sps-driver (driver)
*4: The filenames of the PathManager CD-ROM product are partial.
68
NEC Express5800 Series
5. OS Installation
5.3. Linux
5.3.4. Installation
5.3.4.1. PathManager Installation
PathManager is installed using the installation CD-ROM and taking the following steps.
As the root administrator, be sure to set up PathManager by booting the OS with the
kernel that uses PathManager.
Because the installation process differs depending on the kernel version, refer to (1)
and (2) below and use the suitable process.
(The kernel version can be checked with the "uname -r" command.)
(1) Red Hat Enterprise Linux 5.4 (Kernel-2.6.18-164.el5) and later
Installation can be executed with the installer.
1. Go to the mount target directory.
(* If automounted, go to the automounted target directory.)
# cd /mnt/cdrom
#
69
NEC Express5800 Series
5. OS Installation
5.3. Linux
2. Specify the -i option and install the RPM file. (Execute the underlined
command in the box below.)
*1. If the --silent option is not specified, the OS will not be rebooted.
The OS must be rebooted before using PathManager. Reboot manually.
*2. Specify the --iscsi option for iSCSI connections.
Also specify the --iscsi option for the configurations that use both iSCSI
and FC.
This is the same for both boot disks and data disks that use iSCSI.
For Kernel Version 2.6.18-164.el5 (FC Connection)
# sh install.sh -i --silent
====== Precheck for SPS Installation / Uninstallation =======
Distribution
: RedHat
Architecture
: i686
Kernel Version : Linux2.6
Kernel Details : 2.6.18-164.el5
--------- The following packages will be installed. --------driver : ./Express5800_100_NX7700i/RPMS/RHEL5/5.4/IA32/sps-driver-E4.3.1-2.6.18.164.el5.i686.rpm
utils
: ./Express5800_100_NX7700i/RPMS/RHEL5/5.4/IA32/sps-utils4.3.0-0.i686.rpm
=============================================================
Preparing...
########################################### [100%]
1:sps-driver-E
########################################### [100%]
Preparing...
########################################### [100%]
1:sps-utils
########################################### [100%]
patching file rc.sysinit
Starting up sps devices:
Couldn't open /etc/sps.conf. No such file or directory.
I try auto setting...
This is always output for the first
Wait.
installation, but it is not a problem.
parsing... device:/dev/dda (OK)
parsing... disk-info:NEC
,iStorage 1000
,0000000935000734,00001
(OK)
parsing... LoadBalance:D2 (OK)
parsing... path-info:0 Host:scsi:8 Channel:0 Id:0 Lun:0 Priority:1
Watch:Enable Status:ACT (OK)
parsing... path-info:7 Host:scsi:7 Channel:0 Id:0 Lun:0 Priority:2
Watch:Enable Status:ACT (OK)
Wait until all /dev/ddX is made..........END
dd_daemon (pid 3963) is running...
sps Install Completed......
#
Broadcast message from root (Thu Feb 25 14:15:57 2010):
The system is going DOWN for reboot in 1 minute!
70
NEC Express5800 Series
5. OS Installation
5.3. Linux
3. If installation is completed successfully, the message ”sps Install Completed”
(the shaded area) is output. Installation fails if this message is not output. In
that case, follow the instructions in "Appendix D. Installer Error Messages" in
the "NEC Storage PathManager for Linux Installation Guide".
4. If installation is completed successfully, the system will restart in one minute.
Make sure that the OS functions normally.
This completes installation of PathManager for RHEL5.4 or later. Next, go to “5.3.4.2
Installation in a SAN Boot Environment."
(2) Systems before Red Hat Enterprise Linux 5.4 (Kernel-2.6.18-164.el5):
Install manually.
Go to the directory which is corresponds to the system in the distribution and
architecture (IIA32, etc.) under Express5800_100/RPMS/. (See "5.3.3.4
PathManager Setup" for the directory structure.)
1. Install the RPM file that corresponds to the kernel version being used with the
following command.
- For Kernel Version 2.6.18-128.el5 -
(The shaded sections indicate the corresponding kernel version.)
# rpm -ivh sps-utils-*
sps-utils
###################################
# uname -r
2.6.18-128.el5
# rpm -ivh sps-driver-E-2.6.18.128.el5.*.rpm
sps-driver-? ###################################
#
- For versions before Red Hat Enterprise Linux 5.3 (Kernel 2.6.18-128.el5), this
is a package name that contains both sps-utils and sps-driver.
Example: sps-E-4.1.3-2.6.18.92.el5.i686.rpm
71
NEC Express5800 Series
5. OS Installation
5.3. Linux
The following files are installed:
/lib/modules/(kernel version)/ kernel/drivers/scsi/dd_mod.ko
/lib/modules/(kernel version)/ kernel/drivers/scsi/sps_mod.ko
/lib/modules/(kernel version)/ kernel/drivers/scsi/sps_mod2.ko
/sbin/dd_daemon
/sbin/spscmd
/sbin/hotaddpath
/sbin/hotremovepath
/sbin/removearrayinfo
/sbin/recoverpath
/sbin/mkdd
/sbin/spsconfig
/etc/dualpathrc
/etc/rc.d/init.d/dd_daemon
/etc/rc.d/rc0.d/K77dd_daemon
/etc/rc.d/rc1.d/K77dd_daemon
/etc/rc.d/rc2.d/S45dd_daemon
/etc/rc.d/rc3.d/S45dd_daemon
/etc/rc.d/rc5.d/S45dd_daemon
/etc/rc.d/rc6.d/K77dd_daemon
/opt/nec/report/inf/dualpath.inf
/opt/nec/report/table/dualpath.tbl
/opt/nec/sps/esm/report/inf/dualpath.inf
/opt/nec/sps/esm/report/table/dualpath.tbl
/opt/nec/sps/esm/report/inf/dualpathE.inf
/opt/nec/sps/esm/report/table/dualpathE.tbl
/opt/nec/sps/bin/spslog.sh
/opt/nec/sps/bin/sps_setesmtbl.sh
/opt/nec/sps/patch/rc.sysint.rhel5.diff
2. Execute the following command and make sure that no error occurs.
# depmod -a `uname -r`
#
Be sure to enclose uname -r in back quotes (`).
72
NEC Express5800 Series
5. OS Installation
5.3. Linux
3. Set up automatic booting.
In order to start the PathManager driver when booting the OS, the OS boot
script (/etc/rc.d/rc.sysinit) must be edited. If an iSCSI connection is used, the
iSCSI initiator startup script (/etc/rc.d/init.d/iscsi/) must also be edited. Apply
the patch file as shown below to edit startup scripts. (*1).
If the OS boot script before applying the patch file is /etc/rc.d/rc.sysinit.orig,
then the iSCSI initiator startup script will be left as /etc/rc.d/init.d/iscsi.orig. If
this patch file has already been applied to the OS boot script, it does not have
to be applied again.
# cd /etc/rc.d
<FC connection>
# patch -b -p0 < /opt/nec/sps/patch/rc.sysinit.rhel5.diff
<iSCSI connection>
# patch -b -p0 < /opt/nec/sps/patch/iscsi.rhel5.diff
*1: Patches can be applied to both /etc/rc.d/rc.sysinit and /etc/rc.d/init.d/iscsi
with one patch.
When a patch command is executed, an error may occur and the patch file
may not be applied correctly. In that case, add the lines in the patch file that
start with "+" to /etc/rc.d/rc.sysinit and /etc/rc.d/init.d/iscsi.
Refer to the contents of the patch file when adding these lines.
4. Reboot the system and make sure that it starts normally.
# sync
# shutdown -r now
This completes PathManager installation.
Next, go to "5.3.4.2. Installation in a SAN Boot Environment."
73
NEC Express5800 Series
5. OS Installation
5.3. Linux
5.3.4.2. Installation in a SAN Boot Environment (Red Hat Enterprise
Linux 5)
Follow the process below to use the system in a SAN Boot environment.
Setup process for using a SCSI device (/dev/sdX) as a root device in a SAN Boot
environment.
(When the PathManager device (/dev/ddX) is not used as the root device.)
* A root device is a necessary device to boot the OS. ("/" or "/boot" or "swap" by
default)
(1) Make sure that the following description is not in /etc/modprobe.conf.
# cat /etc/modprobe.conf
...
# Please add the following line to /etc/modprobe.conf
options sps_mod
dda=NEC_____,iStorage_2000___,0000000929200235,00000
ddb=NEC_____,iStorage_2000___,0000000929200235,00001
...
(2) Set up the boot RAM disk to include the PathManager driver. After backing up the
current settings, add the following line (shaded line) to the end of the
/etc/modprobe.conf.
# cp -p /etc/modprobe.conf /etc/modprobe.conf.sps
# vi /etc/modprobe.conf
...
alias scsi_hostadapter aic79xx
alias scsi_hostadapter1 lpfc
alias usb-controller uhci-hcd
alias scsi_hostadapter2 dd_mod
......*1
*1: scsi_hostadapterX: Specify X as the largest number in the alias
scsi_hostadapter line in the file.
74
NEC Express5800 Series
5. OS Installation
5.3. Linux
(3) Check the root devices. In the following example, the root devices are /dev/sda
and /dev/sdb.
# cat /etc/fstab
/dev/sda2
/
ext3
defaults
/dev/sda1
/boot
ext3
defaults
none
/dev/pts
devpts gid=5,mode=620
none
/dev/shm
tmpfs
defaults
none
/proc
proc
defaults
none
/sys
sysfs
defaults
/dev/sdb1
swap
swap
defaults
...
# mount
/dev/sda2 on / type ext3 (rw)
none on /proc type proc (rw)
none on /sys type sysfs (rw)
none on /dev/pts type devpts (rw,gid=5,mode=620)
usbfs on /proc/bus/usb type usbfs (rw)
/dev/sda1 on /boot type ext3 (rw)
none on /dev/shm type tmpfs (rw)
none on /proc/sys/fs/binfmt_misc type binfmt_misc (rw)
...
# cat /proc/swaps
Filename
Type
Size
Used
Priority
/dev/sdb1
partition
1048544 0
...
1
1
0
0
0
0
0
1
2
0
0
0
0
0
42
(4) Confirm the PathManager device that corresponds to the root device (/dev/sd*)
checked in (3). The PathManager device that corresponds to the root device can
be confirmed by adding the -chk option to the spsconfig command and executing
it. In the following example, it can be confirmed that /dev/sda corresponds to
/dev/dda and /dev/sdb corresponds to /dev/ddb.
# spsconfig -chk /dev/sda /dev/sdb
/dev/sda -> /dev/dda
/dev/sdb -> /dev/ddb
75
NEC Express5800 Series
5. OS Installation
5.3. Linux
(5) Generate the options setup to set up the PathManager device confirmed in (4) as
the route device. Execute the spsconfig command with the -add option to
generate the options setup. In the example below, the generated options setup is
added through redirection to /etc/modprobe.conf.
# spsconfig -add /dev/dda /dev/ddb >> /etc/modprobe.conf
...*2
*2: Be sure to use two right arrows ( ">>" ) in the description. Using only one will
">" overwrite the contents of /etc/modprobe.conf and the OS will not be
bootable.
(6) Make sure that the following description is in /etc/modprobe.conf.
# cat /etc/modprobe.conf
...
# Please add the following line to /etc/modprobe.conf
options sps_mod
dda=NEC_____,iStorage_2000___,0000000929200235,00000
ddb=NEC_____,iStorage_2000___,0000000929200235,00001
...
(7) After backing up the current settings, change the root device described in
“/etc/fstab” to the PathManager device confirmed in (4).
# cp -p /etc/fstab
# vi /etc/fstab
/dev/dda2
/dev/dda1
none
none
none
none
/dev/ddb1
...
/etc/fstab.sps
/
/boot
/dev/pts
/dev/shm
/proc
/sys
swap
ext3
ext3
devpts
tmpfs
proc
sysfs
swap
defaults
defaults
gid=5,mode=620
defaults
defaults
defaults
defaults
1
1
0
0
0
0
0
1
2
0
0
0
0
0
(8) Generate a boot RAM disk that includes the PathManager driver. Executing the
mkinitrd command as shown below will generate the boot RAM disk. In the
example below, a boot RAM disk designated /boot/initrdsps.img is generated.
# mkinitrd /boot/initrdsps.img `uname -r`
Be sure to enclose uname -r in back quotes (`).
76
NEC Express5800 Series
5. OS Installation
5.3. Linux
(9) Add a setting to start with the boot RAM disk created in (8) to the boot loader
settings. This is done using the following process:
1. Back up /boot/grub/grub.conf.
2. Copy the current settings used for booting.
3. Change the title to an arbitrary name.
4. Change initrd to the file name of the boot RAM disk created in (8).
5. Based on the results confirmed in (4), specify the PathManager device that
corresponds to /dev/sd* for root.
6. Change the value of the default line.
# cp -p /boot/grub/grub.conf /boot/grub/grub.conf.sps
# vi /boot/grub/grub.conf
1. Back up
...
#boot=/dev/sda
3. Change title
6. Change the value of
default=0
4. Change initrd
the default line
timeout=5
5. Change root
splashimage=(hd0,0)/grub/splash.xpm.gz
hiddenmenu
2. Copy the
current
settings used
for booting
title Red Hat Enterprise Linux Server (2.6.18-53.el5_spssan)
root (hd0,0)
kernel /vmlinuz-2.6.18-53.el5 ro root=/dev/dda2 rhgb
quiet
initrd /initrdsps.img
title Red Hat Enterprise Linux Server (2.6.18-53.el5)
root (hd0,0)
kernel /vmlinuz-2.6.18-53.el5 ro root=/dev/sda2 rhgb
quiet
initrd /initrd-2.6.18-53.el5.img
...
(10) Reboot the system and make sure that it starts normally with the settings added
to the boot loader. If the system does not start normally, return "/etc/fstab" to its
original setup, and boot the system with the existing boot RAM disk.
# sync
# shutdown -r now
77
NEC Express5800 Series
5. OS Installation
5.3. Linux
(11) Make sure that the PathManager device is used as the root device.
# mount
/dev/dda2 on / type ext3 (rw)
none on /proc type proc (rw)
none on /sys type sysfs (rw)
none on /dev/pts type devpts (rw,gid=5,mode=620)
usbfs on /proc/bus/usb type usbfs (rw)
/dev/dda1 on /boot type ext3 (rw)
none on /dev/shm type tmpfs (rw)
none on /proc/sys/fs/binfmt_misc type binfmt_misc (rw)
...
# cat /proc/swaps
Filename
Type
Size
Used
Priority
/dev/ddb1
partition
1048544 0
42
...
This completes installation (initial setup) in a SAN Boot environment.
If there are any application setup files other than the boot device using the disk
array (/dev/sdX), follow the instructions in "5.3.4.4 Migration to an Environment
Using PathManager."
78
NEC Express5800 Series
5. OS Installation
5.3. Linux
5.3.4.3. Installation in a SAN Boot Environment (Red Hat Enterprise
Linux 6)
Execute the following process to use the system in a SAN Boot environment.
<Setup process for using a SCSI device (/dev/sdX) as a root device in a SAN Boot
environment. (When the PathManager device (/dev/ddX) is not used as the root
device.)>
* A root device is a necessary device to boot the OS. ("/" or "/boot" or "swap" by
default)
(1) Enable the PathManager SAN Boot settings.
# spsconfig -sanboot-cfg-add
Addition of San-boot configuration succeeded.
(2) Check the root devices. In the example below, /dev/sda and /dev/sdb are the root
devices.
# cat /etc/fstab
UUID=111d442e-0979-4d9a-a099-97995cecdb4f /
ext4
defaults 1 1
UUID=4a8155ca-dc82-4d32-9806-be29d1607321 /boot ext4
defaults 1 2
UUID=842d0fd5-cd45-4d9c-acc8-0d4f097e7639 swap
swap
defaults 0 0
tmpfs
/dev/shm
tmpfs
defaults
0 0
devpts
/dev/pts
devpts gid=5,mode=620 0 0
sysfs
/sys
sysfs
defaults
0 0
proc
/proc
proc
defaults
0 0
...
# mount
/dev/sda2 on / type ext3 (rw)
none on /proc type proc (rw)
none on /sys type sysfs (rw)
none on /dev/pts type devpts (rw,gid=5,mode=620)
usbfs on /proc/bus/usb type usbfs (rw)
/dev/sda1 on /boot type ext3 (rw)
none on /dev/shm type tmpfs (rw)
none on /proc/sys/fs/binfmt_misc type binfmt_misc (rw)
...
# cat /proc/swaps
Filename
Type
Size
Used
Priority
/dev/sdb1
partition
1048544 0
42
...
79
NEC Express5800 Series
5. OS Installation
5.3. Linux
The preceding screen shows that /dev/sda2 is mounted in "/", /dev/sda1 is
mounted in "/boot," and /dev/sdb1 is used as the swap. From this, the
correlations between UUID and /dev/sd* in fstab in the above example are as
follows.
UUID=111d442e-0979-4d9a-a099-97995cecdb4f
UUID=4a8155ca-dc82-4d32-9806-be29d1607321
UUID=842d0fd5-cd45-4d9c-acc8-0d4f097e7639
-> /dev/sda2
-> /dev/sda1
-> /dev/sdb1
(3) Confirm the PathManager device that corresponds to the root device (/dev/sd*)
checked in (2). The PathManager device that corresponds to the root device
can be confirmed by adding the -chk option to the spsconfig command and
executing it. In the following example, it can be confirmed that /dev/sda
corresponds to /dev/dda and /dev/sdb corresponds to /dev/ddb.
# spsconfig -chk /dev/sda /dev/sdb
/dev/sda -> /dev/dda
/dev/sdb -> /dev/ddb
(4) After backing up the current settings, change the root device described in “/etc/
fstab” to the PathManager device confirmed in (3).
# cp -p /etc/fstab /etc/fstab.sps
# vi /etc/fstab
/dev/dda2
/
/dev/dda1
/boot
/dev/ddb1
swap
tmpfs
/dev/shm
devpts
/dev/pts
sysfs
/sys
proc
/proc
ext4
ext4
swap
tmpfs
devpts
sysfs
proc
defaults
defaults
defaults
defaults
gid=5,mode=620
defaults
defaults
1
1
0
0
0
0
0
1
2
0
0
0
0
0...
(5) Generate a boot RAM disk that includes the PathManager driver. Executing
the mkinitrd command as shown below will generate the boot RAM disk. In the
example below, a boot RAM disk designated /boot/initrdsps.img is generated.
# mkinitrd /boot/initrdsps.img `uname -r`
Be sure to enclose uname -r in back quotes (`).
80
NEC Express5800 Series
5. OS Installation
5.3. Linux
(6) Add a setting to start with the boot RAM disk created in (8) to the boot loader
settings. This is done using the following process:
1. Back up /boot/grub/grub.conf.
2. Copy the current settings used for booting.
3. Change the title to an arbitrary name.
4. Change initrd to the file name of the boot RAM disk created in (5).
5. Based on the results confirmed in (3), specify the PathManager device that
corresponds to UUID for root.
6. Change the value of the default line.
# cp -p /boot/grub/grub.conf /boot/grub/grub.conf.sps
# vi /boot/grub/grub.conf
1. Back up
...
6. Change the value of
#boot=/dev/sda
the
default line
default=0
3. Change title
timeout=5
4. Change initrd
splashimage=(hd0,0)/grub/splash.xpm.gz
5. Change root
hiddenmenu
2. Copy the
current settings
used for booting
title Red Hat Enterprise Linux (2.6.32-131.0.15.el6.x86_64_spssan)
root (hd0,0)
kernel /vmlinuz-2.6.32-131.0.15.el6.x86_64 ro
root=/dev/dda3 rd_NO_LUKS rd_NO_LVM rd_NO_MD rd_NO_DM
LANG=ja_JP.UTF-8 KEYBOARDTYPE=pc KEYTABLE=jp106 crashkernel=auto
rhgb quiet
initrd /initramfs-sps.img
title Red Hat Enterprise Linux (2.6.32-131.0.15.el6.x86_64)
root (hd0,0)
kernel /vmlinuz-2.6.32-131.0.15.el6.x86_64 ro
root=UUID=111d442e-0979-4d9a-a099-97995cecdb4f rd_NO_LUKS rd
_NO_LVM rd_NO_MD rd_NO_DM LANG=ja_JP.UTF-8 KEYBOARDTYPE=pc
KEYTABLE=jp106 crashkernel=auto rhgb quiet
initrd /initramfs-2.6.32-131.0.15.el6.x86_64.img
...
(7) Reconnect any disconnected paths and make the paths redundant.
(8) Reboot the system and make sure that it starts normally with the settings added to
the boot loader. If the system does not start normally, return "/etc/fstab" to its
original setup, and start the system with the existing boot RAM disk.
# sync
# shutdown -r now
81
NEC Express5800 Series
5. OS Installation
5.3. Linux
(9) Make sure that the PathManager device is used as the root device.
# mount
/dev/dda2 on / type ext3 (rw)
none on /proc type proc (rw)
none on /sys type sysfs (rw)
none on /dev/pts type devpts (rw,gid=5,mode=620)
usbfs on /proc/bus/usb type usbfs (rw)
/dev/dda1 on /boot type ext3 (rw)
none on /dev/shm type tmpfs (rw)
none on /proc/sys/fs/binfmt_misc type binfmt_misc (rw)
...
# cat /proc/swaps
Filename
Type
Size
Used
Priority
/dev/ddb1
partition
1048544 0
42
...
This completes installation into a SAN Boot environment.
If there are any application setup files other than the boot device using the disk
array (/dev/sdX), follow the instructions in "5.3.4.4 Migration to an Environment
Using PathManager."
82
NEC Express5800 Series
5. OS Installation
5.3. Linux
5.3.4.4. Migration to an Environment Using PathManager
If there are any application setup files using the NEC Storage SCSI device (/dev/sdX),
follow the instructions below.
< Example of procedures for making changes with /etc/fstab when the NEC Storage
SCSI device /dev/sdX is used. >
Migrating a device mounted in /mnt/work to an environment using PathManager:
# vi /etc/fstab
...
/dev/sdf1
...
/mnt/work
ext3
defaults
0 0
(1) Use the sg_scan command to confirm that the target device is an NEC Storage
SCSI device.
[NEC's D-Series Storage Disk Array]
If "NEC" and "iStorage XXXX" appear, it is an NEC Storage SCSI device. (the
shaded areas)
# sg_scan -i /dev/sdf
/dev/sdf: scsi0 channel=0 id=0 lun=5 [em]
NEC
iStorage 1000
1000 [rmb=0 cmdq=1 pqual=0 pdev=0x0]
[NEC's M-Series Storage Disk Array]
If "NEC" and "DISK ARRAY" appear, it is an NEC Storage SCSI device. (the
shaded areas)
# sg_scan -i /dev/sdf
/dev/sdf: scsi0 channel=0 id=0 lun=5 [em]
NEC
DISK ARRAY
1000 [rmb=0 cmdq=1 pqual=0 pdev=0x0]
[NEC's E-Series Storage Disk Array]
If "DGC“appears, it is an NEC Storage SCSI device. (the shaded area)
# sg_scan -i /dev/sdf
/dev/sdf: scsi0 channel=0 id=0 lun=5 [em]
DGC
RAID 10
0223 [rmb=0 cmdq=1 pqual=0 pdev=0x0]
(2) Make sure /dev/ddX corresponds to /dev/sdf/.
Executing the spsconfig with the -chk option will confirm the corresponding
PathManager device. In the following example, it can be confirmed that /dev/sdf
corresponds to /dev/ddd.
# spsconfig -chk /dev/sdf
/dev/sdf -> /dev/ddd
83
NEC Express5800 Series
5. OS Installation
5.3. Linux
(3) After backing up the file to be changed (any file name can be used), /dev/sdf is
changed to the device /dev/ddd confirmed in (2).
# cp -p /etc/fstab /etc/fstab.sps
# vi /etc/fstab
...
/dev/ddd1
/mnt/work
...
ext3
defaults
0 0
(4) If the NEC Storage SCSI device is used by an application, make the same
changes as in (3).
(5) Reboot the system.
This completes the migration to an environmment using PathManager.
84
NEC Express5800 Series
5. OS Installation
5.3. Linux
5.3.4.5. kdump Setup
When Red Hat Enterprise Linux 6 is used, kdump that uses the PathManager device
must be set up because kdump cannot be used with the default settings.
To use kdump, refer to "Appendix F. How to Set Up kdump" in the "NEC Storage
PathManager for Linux User's Manual" and set it up.
85
NEC Express5800 Series
5. OS Installation
5.3. Linux
5.3.5. Uninstalling
5.3.5.1. Removing kdump Settings
In order to remove kdump settings, refer to "Appendix F. How to Set Up kdump" in
the "NEC Storage PathManager for Linux User's Manual.“
5.3.5.2. Removing the SAN Boot Environment Settings (Red Hat
Enterprise Linux 5)
If PathManager is installed in a SAN Boot environment, follow the steps below before
uninstalling PathManager.
(1) Make sure that the root device is a PathManager device.
# mount
/dev/dda2 on / type ext3 (rw)
none on /proc type proc (rw)
none on /sys type sysfs (rw)
none on /dev/pts type devpts (rw,gid=5,mode=620)
usbfs on /proc/bus/usb type usbfs (rw)
/dev/dda1 on /boot type ext3 (rw)
none on /dev/shm type tmpfs (rw)
none on /proc/sys/fs/binfmt_misc type binfmt_misc (rw)
...
# cat /proc/swaps
Filename
/dev/ddb1
...
Type
partition
Size
1048544
Used
0
Priority
42
(2) Return the root device settings to their original settings.
# mv /etc/fstab.sps /etc/fstab
(3) Return the settings of the module to include in the boot RAM disk and
PathManager options settings to their original settings. When uninstalling
PathManager update, leaving /etc/modprobe.conf will allow you to skip some of
the resetting process after PathManager updates.
# mv /etc/modprobe.conf.sps /etc/modprobe.conf
(4) Delete the boot RAM disk that includes the PathManager driver.
# rm /boot/initrdsps.img
(5) Return the boot loader setup file to its original settings.
# mv /boot/grub/grub.conf.sps /boot/grub/grub.conf
86
NEC Express5800 Series
5. OS Installation
5.3. Linux
(7) Restart the system with the original boot RAM disk.
# sync
# shutdown -r now
(8) Make sure that the root device is not the PathManager device.
# mount
/dev/sda2 on / type ext3 (rw)
none on /proc type proc (rw)
none on /sys type sysfs (rw)
none on /dev/pts type devpts (rw,gid=5,mode=620)
usbfs on /proc/bus/usb type usbfs (rw)
/dev/sda1 on /boot type ext3 (rw)
none on /dev/shm type tmpfs (rw)
none on /proc/sys/fs/binfmt_misc type binfmt_misc (rw)
...
# cat /proc/swaps
Filename
/dev/sdb1
...
Type
partition
Size
1048544
Used
0
Priority
42
This completes removal of the SAN Boot environment settings.
Proceed to "5.3.5.4 Uninstalling PathManager."
87
NEC Express5800 Series
5. OS Installation
5.3. Linux
5.3.5.3. Removing the SAN Boot Environment Settings (Red Hat
Enterprise Linux 6)
If PathManager is installed in a SAN Boot environment, follow the steps below
before uninstalling PathManager.
(1) Make sure that the root device is a PathManager device.
# mount
/dev/dda2 on / type ext3 (rw)
none on /proc type proc (rw)
none on /sys type sysfs (rw)
none on /dev/pts type devpts (rw,gid=5,mode=620)
usbfs on /proc/bus/usb type usbfs (rw)
/dev/dda1 on /boot type ext3 (rw)
none on /dev/shm type tmpfs (rw)
none on /proc/sys/fs/binfmt_misc type binfmt_misc (rw)
...
# cat /proc/swaps
Filename
/dev/ddb1
...
Type
partition
Size
1048544
Used
0
Priority
42
(2) Return the root device settings to their original settings.
# mv /etc/fstab.sps /etc/fstab
(3) Disable the PathManager SAN Boot settings.
# spsconfig -sanboot-cfg-del
(4) Delete the boot RAM disk that includes the PathManager driver.
# rm /boot/initramfs-sps.img
(5) Return the boot loader setup file to its original settings.
# mv /boot/grub/grub.conf.sps /boot/grub/grub.conf
This completes removing the SAN Boot environment settings. Proceed to
"5.3.5.4 Uninstalling PathManager."
88
NEC Express5800 Series
5. OS Installation
5.3. Linux
5.3.5.4. Uninstalling PathManager
PathManager can be uninstalled following the directions below.
Because the installation process depends on the kernel version, select process (1)
or (2) depending on the version used. (The kernel version can be checked with
"uname -r.")
(1) Red Hat Enterprise Linux 5.4 (Kernel-2.6.18-164.el5) or later
The uninstaller can be used.
1. Go to /opt/nec/sps/installer.
# cd /opt/nec/sps/installer
#
2. Uninstall the RPM file. (Execute the underlined command.)
* If the --silent option is not specified, the OS will not be rebooted.
(The OS must be rebooted. Reboot manually.)
# sh uninstall.sh -silent
====== Precheck for SPS Installation / Uninstallation =======
Distribution
: RedHat
Architecture
: i686
Kernel Version : Linux2.6
Kernel Details : 2.6.18-164.el5
-------- The following packages will be uninstalled. -------driver
: sps-driver-E-4.3.1-2.6.18.164.el5
utils
: sps-utils-4.3.0-0
=============================================================
patching file rc.sysinit
sps Uninstall Completed......
#
Broadcast message from root (Thu Feb 25 14:38:01 2010):
The system is going DOWN for reboot in 1 minute!
#
3. If the uninstaller is completed successfully, the message "sps Uninstall
Completed" is output (shaded line). If this message is not output, the uninstall
failed. Follow the instructions in "Appendix D. Error Messages from Installer" in
the "PathManager for Linux Installation Guide."
4. If the uninstaller is completed successfully, the system will reboot in one minute.
Make sure that the OS operates normally.
89
NEC Express5800 Series
5. OS Installation
5.3. Linux
5. After the OS is rebooted, make sure that the root device is not the PathManager
device.
# mount
/dev/sda2 on / type ext3 (rw)
none on /proc type proc (rw)
none on /sys type sysfs (rw)
none on /dev/pts type devpts (rw,gid=5,mode=620)
usbfs on /proc/bus/usb type usbfs (rw)
/dev/sda1 on /boot type ext3 (rw)
none on /dev/shm type tmpfs (rw)
none on /proc/sys/fs/binfmt_misc type binfmt_misc (rw)
...
# cat /proc/swaps
Filename
Type
Size
Used
Priority
/dev/sdb1
partition
1048544
0
42
...
This completes uninstalling PathManager in RHEL 5.4 or later.
90
NEC Express5800 Series
5. OS Installation
5.3. Linux
(2) Systems before Red Hat Enterprise Linux 5.4 (Kernel-2.6.18-164.el5):
Uninstall is executed manually.
1. Use the following command to make sure that PathManager is used in the current
environment.
- If the kernel version is 2.6.18-128.el5
# rpm -qa | grep sps
sps-utils-4.2.1-0
sps-driver-E-4.2.1-2.6.18.128.el5
- For systems earlier than Red Hat Enterprise Linux 5.3 (Kernel
2.6.18-128.el5), this is the package containing both sps-utils and sps-driver.
Example: sps-E-4.1.3-2.6.18.92.el5.i686.rpm
2. Delete the patch file applied to the OS boot script (/etc/rc.d/rc.sysinit) and iSCSI
initiator startup script in "3. Set up automatic booting" of (2) of "5.3.4.1
PathManager Installation."
Execute the following steps.
# cd /etc/rc.d
<FC connected>
# patch -R -p0 < /opt/nec/sps/patch/rc.sysinit.rhel5.diff
<iSCSI connected>
# patch -R -p0 < /opt/nec/sps/patch/iscsi.rhel5.diff
The message "Unreversed patch detected! Ignore -R? [n]" may be displayed
after executing the patch command. Reply "n“ in that case.
When "Apply anyway? [n]" appears, reply "y."
If an error message is displayed, deleting the patch file has failed.
If deleting the patch file fails, edit /etc/rc.d/rc.sysinit and /etc/rc.d/init.d/iscsi to
delete the corresponding sections. (Delete the lines that start with "+.")
91
NEC Express5800 Series
5. OS Installation
5.3. Linux
3. Specify the PathManager package name checked in 1., then uninstall the
PathManager with the following command.
- If the kernel version is 2.6.18-128.el5 # rpm -e sps-driver-?-4.2.1-2.6.18.128.el5
# rpm -e sps-utils-4.2.1-0
4. Execute the following command and make sure that no error is displayed.
# depmod -a `uname -r`
5. Reboot the system and make sure that it starts normally.
# sync
# shutdown -r now
6. If there is a setup file (/etc/sps.conf), delete it.
# rm /etc/sps.conf
This completes the uninstall process.
92
NEC Express5800 Series
5. OS Installation
5.3. Linux
5.3.6. Updating
PathManager is updated by uninstalling PathManager, then reinstalling it.
The following describes how to update PathManager when a kernel is
updated.
(1) Uninstall PathManager. See "5.3.5 Uninstalling" for the uninstalling procedure.
If there are no hardware changes and the current settings are to be used after
updating, there is no need to execute 6 in "5.3.5.4 Uninstalling PathManager."
The current settings can be used by leaving the setup file.
*1: After PathManager is uninstalled, /dev/ddX cannot be used.
Therefore, stop any applications that use /dev/ddX before updating
PathManager.
Also, do not access /dev/ddX while updating.
•
Update the kernel.
*2: If ExpressCluster is used, refer to "Appendix A. Introduction to the
ExpressCluster Environment" in the installation guide.
•
Boot the OS with the updated kernel.
(2) Install PathManager.
See "5.3.4 Installation" for instructions.
This completes the updating process.
93
NEC Express5800 Series
5. OS Installation
5.3. Linux
5.3.7. Preparing for Operation
After installing PathManager and rebooting the system, PathManager will
automatically recognize the target disks and paths and operation will start.
The following describes how to make sure that PathManager operates
normally.
(1) Make sure that the installed PathManager corresponds to the kernel in use. Make sure
that the kernel version (A) displayed by "uname -r" and the kernel version (B)
displayed by "rpm -qi" are the same.
# uname -r
(Check the kernel version)
2.6.X-XX
Kernel version (A) in use
# rpm -qa | grep sps
sps-xxx-yyyy
# rpm -qi sps-xxx-yyyy
Name
: sps-X-XXX
Relocations: (not relocatable)
Version
: 4.X.X
Vendor: NEC Corporation
Release
: 2.6.XX.XX
Build Date: YYYY/MM/DD HH:MM:SS
Install date: YYYY/MM/DD HH:MM:SS Build Host: nec.co.jp
Group
: Utilities/System
Source RPM: sps-X-XX.X.src.rpm
Size
: XXXXXX
License: XXXXXX
Signature
: (none)
Packager
: NEC Corporation
Summary
: SCSI multi-path driver and utilities for NEC iStorage
Description :
------------------------------------------------------------------------This package contains a driver, daemon and some utilities.
The driver (dd_mod,sps_mod) provides the redundant SCSI-path for
NEC iStorage Disk Array System.
The daemon (dd_daemon) supervises the driver.
And, some utilities work for the maintenance.
This Driver works on Red Hat Enterprise Linux X [Kernel:2.6.X-XX].
------------------------------------------------------------------------Kernel version (B) that can operate PathManager
#
94
NEC Express5800 Series
5. OS Installation
5.3. Linux
(2) Check /proc/scsi/sps/ddX (X is the LUN number created in NEC Storage unit; a, b, c,
etc.). Make sure that there are "path-info:" lines for all the multiplexing for each device.
Also, if the "device-info:" status column are all "NML," the paths are multiplexed
normally. If nothing is displayed, NEC Storage unit is not recognized by all the paths.
Check the server and NEC Storage unit connection, FC driver status, NEC Storage
unit cross call settings, etc.
# cat /proc/scsi/sps/dda
device:/dev/dda
disk-info:NEC
,iStorage 2000
,0000000931000013,00000
device-info:Host:scsi:2 Channel:0 Id:0 Lun:0 Status:NML
LoadBalance:S
path-info:0 Host:scsi:0 Channel:0 Id:0 Lun:0 Priority:1 Watch:Enable
Status:ACT
path-info:1 Host:scsi:1 Channel:0 Id:0 Lun:0 Priority:2 Watch:Enable
Status:HOT
95
NEC Express5800 Series
5. OS Installation
5.3. Linux
(3) Make sure that the path crawl daemon is active. If so, the following message is
displayed.
# /etc/rc.d/init.d/dd_daemon status
dd_daemon (pid XXX) is running ...
This completes preparations for operation.
5.3.8. Detailed Information
For detailed information not contained in this manual, refer to "NEC
Storage PathManager for Linux User's Manual"
(Express5800_100/doc/IS202E.pdf) in the installation CD-ROM.
5.3.9. Installing Applications
Refer to the following websites to install the various applications.
•
ESMPRO/ServerAgent
This application provides server operation monitoring, preventive maintenance,
and error monitoring functions.
Use this application with the ESMPRO/ServerManager that provides manager
functions.
Refer to the following URL for ESMPRO/ServerAgent installation instructions:
https://www.express.nec.co.jp/linux/dload/esmpro/esm4.html
* Use the version that is compatible with the installed OS.
96
NEC Express5800 Series
5. OS Installation
5.4. VMware ESX/ESXi
Refer to the following website for details on VMware ESX/ESXi:
http://www.vmware.com/
• Please contact NEC sales or dealers for technical literature on VMware vSphere5.
5.4.1. Precautions for Configuring SAN Boot
Be aware of the following points when making a VMware ESX/ESXi SAN
Boot configuration.
Check the "SAN Boot Compatibility Table" for the recommended
hardware and software.
NEC Express5800
R120d-2M, R120d-1M, R120d-2E, R120d-1E
Network
Separating the NIC used by vMotion service console and
the NIC used by the virtual machine is recommended.
If multiple paths are configured in the ESXi environment,
the ESXi functions will allow HBA failover and SP
(Storage Port) failover, but the NEC Storage PathManager
will manage and control redundant paths tuned for NEC
storage products. PathManager can be used with VMware
vSphere5 Enterprise Edition or higher, and the supported
target disk array is the M series.
FC path
redundancy
<Precautions (Restrictions)>
If VMware ESX/ESXi is made into a SAN Boot configuration, the following
functions are not available.
• Autonomous restoration to a spare VMware ESX (host OS) server through
SigmaSystemCenter
• Backup and restore of VMware ESX (host OS) through DeploymentManager
5.4.2. Precautions for Building SAN Boot
Install VMware ESX/ESXi after executing "4.2.1 FC Controller BIOS
Enable Setting" in this manual.
In order to install NEC Storage PathManager, install VMware ESXi5 first,
then install PathManager according to the Installation Guide that comes
with it.
97
NEC Express5800 Series
6. Confirming Operation and Setting Up Redundant Paths
If the FC cable has not been reconnected in "5. OS Installation,"
then reconnect the FC cable and set it up as a redundant path.
6.1. Reconnecting the FC Cable
Reconnect the FC cable disconnected in "4.4 Making Single Path FC
Connections" to its original FC controller.
If the redundant path is not registered in the FC BIOS, register it.
Follow the example in "4.3 FC Controller BIOS Settings" to register the
Port 2 and higher redundant paths as the boot device.
6.2. Checking FC Path Redundancy
Window OS
•
In the Windows OS, FC path redundancy can be checked by executing the control
command "spsadmin /lun."
Refer to "3.1.2 Path List Display" in the "NEC Storage PathManager User's
Manual (Windows version)" for details.
Linux OS
•
In the Linux OS, FC path redundancy can be checked by linking Port 2 and higher
of the FC controller. Then execute the following after restarting the OS.
“cat /proc/scsi/sps/ddX”
Note: Specify a character that corresponds to the environment in place
of "X."
See "5.3.10 Preparing for Operation" in this manual for details.
VMware ESX/ESXi
•
The steps in this section are not necessary if VMware ESX/ESXi is installed and
the steps in "3.1.5 Linking the LD Sets and FC Controllers" are not executed.
•
If Storage PathManager is installed, then VMware FC path redundancy can be
checked through the VMware vSphere Client.
Refer to "4.1.2 Checking Operation Status" in the "NEC Storage PathManager
User's Manual (VMware version)" for details.
98
NEC Express5800 Series
7. Additional Application Settings
7.1. DDR (NEC M-series Storage)
By NEC M series storage data replication function (DDR), it is possible to
make backup and restore Windows (including Hyper-V), Linux and
VMware ESX/ESXi OS images, Hyper-V and VMware virtual machine
images, and the data areas of physical and virtual machines.
User can make backup and restore with the data replication function by
the replication control screen of StorageManager on the management
server, or by using the ControlCommand on the management server or
on the backup server. Also user can make backup and restore by
iSMCLI on the disk array..
In order to use the data replication function, it is necessary to unlock
DynamicDataReplication license. For the M series, refer to "11.4 License
Unlock" of the "NEC Storage Software Configuration Setting Tool
User's Manual (GUI) for the M Series" for details on unlocking the
license.
In order to use ControlCommand, user needs to install Storage
ControlCommand in the environment used.
Refer to the "Installation Guide (INSTALL.PDF)" on the "NEC Storage
ControlCommand CD-R" for the installation process.
In order to use ControlCommand on the management server, user needs
operations combined with StorageManager. Refer to "4.2.2 Using
ReplicationControl with iSM" in the "NEC Storage Software Data
Replication User's Manual (Function Guide)" and "Chapter 8.
Operation Setting" in the "NEC Storage Software ControlCommand
Command Reference."
99
NEC Express5800 Series
7. Additional Application Setup
7.1. DDR (NEC M-series Storage)
When user executes iSMCLI provided by the Storage M series, it is
necessary to execute commands on the disk array. User must log in the
disk array by ssh/telnet/rsh protocol, or execute commands remotely.
Refer to "Appendix D. Disk Backup and Data Restoration with Use of
Data Replication Function" in "NEC Storage Software NEC Storage
Manager Command Reference" for backup and restore procedures by
iSMCLI.
All references to "Windows Server 2008" in this chapter are also
applicable to revisions after Windows Server 2008 (R2, etc.) unless
noted.
100
NEC Express5800 Series
7. Additional Application Setup
7.1. DDR (NEC M-series Storage)
7.1.1. Backup and Restore Windows Server 2008 Hyper-V with the
DDR Function
•
•
This section describes the cautions and restrictions when user executes the Mseries Storage data replication function to make backup and restore OS images
of Windows Server 2008 with Hyper-V installed, virtual machine images (VHD) in
Hyper-V, and virtual machine data areas (pass-through devices).
Be sure to also refer to "7.1.4. Cautions for Backup and Restore Windows
Server OS Images with the DDR Function " in this manual.
(1) Configuration
The backup and restore procedures are based on the following configuration..
Management server
(Storage Manager)
SAN Boot server
(Windows Server 2008)
Backup server
Storage disk array
Windows Server 2008 OS image
MV1
Virtual machine image(VHD) MV2
Virtual machine data area MV3
(pass-through devices)
Replicate/
Restore
RV1
RV2
RV3
(2) Logical disk format
1. Be sure to set "WG" as the usage format for Windows Server OS image
logical disk that has Hyper-V installed in it.
2. Set the usage format of the logical disks accessed by Hyper-V (virtual
machine images in Hyper-V (VHD)) and virtual machine data areas (pass-through
devices) according to the actual partition style as shown below:
For use as an MBR format disk: “WN”
For use as a GPT format disk: “WG
(3) Backup and restore of Windows Server 2008 OS images:
The following instructions show how to use the NEC M-series Storage data
replication function to make backup and restore OS images of Windows Server
2008 with Hyper-V installed.
101
NEC Express5800 Series
7. Additional Application Setup
7.1. DDR (NEC M-series Storage)
Backup Procedure
(1) Execute replication (Management server):
Execute the replication process from the StorageManager and synchronize MV
and RV for the following:
Windows Server 2008 OS image
Virtual machine image in Hyper-V
Virtual machine data area
(2) Shut down Windows Server 2008 (Windows Server 2008):
Shut down the Windows Server 2008 that uses the MV to make backed up.
(3) Execute separation (Management server):
Execute the separation process from the StorageManager and separate MV and
RV for the following:
Windows Server 2008 OS image
Virtual machine image in Hyper-V
Virtual machine data area
(4) Restart Windows Server 2008 (Windows Server 2008):
Restart Windows Server 2008 shut down in (2), then restart operations.
Restore Procedure
(1) Shut down Windows Server 2008 (Windows Server 2008):
Shut down the Windows Server 2008 that uses the MV to be restored.
(2) Reconstruct MV (Management server):
If it is necessary to reconstruct MV because of a physical error, execute the
following procedure:
1. Set the MV AccessControl (Access prohibited).
2. Reconstruct the LDs.
3. Execute pair reset.
4. Set the MV AccessControl (Access allowed).
(3) Execute restore (Management server).
Execute the restore process from the StorageManager, then restore the RV data
in MV.
(4) Restart Windows Server 2008 (Windows Server 2008).
Restart Windows Server 2008 that was shut down in (1), then restart operations.
102
NEC Express5800 Series
7. Additional Application Setup
7.1. DDR (NEC M-series Storage)
7.1.2. Backup and Restore Windows Server 2008 R2 Hyper-V with
the DDR Function
This section describes the cautions and restrictions when user executes
M-series Storage data replication function to back up and restore virtual
machine data areas (pass-through devices) from Windows Server 2008
R2 virtual machines with Hyper-V installed.
Be sure to also refer to "7.1.4. Cautions for Backup and Restore
Windows Server OS Images with the DDR Function" in this manual.
•
This function is supported for Hyper-V in Windows Server 2008 R2 or later, not for
Hyper-V in Windows Server 2008.
(1) Configuration
The backup and restore procedures are based on the following configuration
A virtual machine must have ControlCommand installed in order to use the data
replication function from it.
In an M series disk array, iSMCLI on the disk array can be used to execute data
replication. In this case, ControlCommand does not have to be installed in the
virtual machine. But ssh/telnet/rsh protocol must be used from a virtual machine to
log into the Storage M series disk array, otherwise the environment that allows
remote iSMCLI to execute commands is necessary.
Management server
(Storage Manager)
SAN Boot server
(Windows Server 2008 R2)
Backup server
Storage disk array
Windows Server 2008R2
OS image
Virtual machine image
(VHD)
Virtual machine data area
(pass-through device)
IV1
IV2
MV1
Replicate/
Restore
RV1
103
NEC Express5800 Series
7. Additional Application Setup
7.1. DDR (NEC M-series Storage)
(2) Backup and restore data areas from virtual machines:
The following instructions show how to use the M series Storage data replication
function to make backup and restore the data areas (pass-through disks) from
virtual machines of Windows Server 2008 R2 with Hyper-V installed.
• Preparation
(1) Execute iSMpassthrough_enabler (Windows Server 2008 R2):
In order to use ControlCommand to replicate data on a virtual machine, the virtual
machine must recognize the data area as an M-series Storage disk array.
The iSMpassthrough_enabler command must be executed one time in the
Windows Server 2008 R2 host OS after the virtual machine is created. (Another
command is necessary if new virtual machine is added after the operation starts.)
The iSMpassthrough_enabler command is included in the ControlCommand
package.
This step is not necessary if data is replicated with iSMCLI provided by NEC Mseries Storage.
•
Backup Procedure
By executing the iSMpassthrough_enabler command, user can use
ControlCommand in the virtual machine to back up the data area in the same
manner as DDR operations on a regular physical server.
Refer to "3.1.1. Example of Backup Operation" in the "NEC Storage Software
Data Replication User's Manual (Installation and Operation Guide for
Windows)."
Refer to "Appendix D: Disk Backup and Data Restore with Use of Data
Replication Function" in the "NEC Storage Software NEC Storage Manager
Command Reference" when backing up data areas with iSMCLI provided by
NEC M-series Storage
104
NEC Express5800 Series
7. Additional Application Setup
7.1. DDR (NEC M-series Storage)
•
Restore Procedure
By executing the iSMpassthrough_enabler command, user can use
ControlCommand in the virtual machine to restore the data area in the same
manner as DDR operations on a regular physical server.
Refer to "3.1.2. Example of Restoring Master Volume Data" in "NEC
Storage Software Data Replication User's Manual (Installation and
Operation Guide for Windows)" for restoration instructions.
Refer to "Appendix D: Disk Backup and Data Restore with Use of Data
Replication Function" in the "NEC Storage Software NEC Storage
Manager Command Reference" when restoring data areas with iSMCLI
provided by NEC M-series Storage.
105
NEC Express5800 Series
7. Additional Application Setup
7.1. DDR (NEC M-series Storage)
7.1.3. Backup and Restore VMware ESX/ESXi with the DDR
Function
•
This section describes the cautions and restrictions when user executes the NEC
M-series Storage data replication function to back up and restore OS images of
VMware ESX/ESXi, virtual machine images (VMFS) on VMware ESX/ESXi, and
virtual machine data areas (RDM (Raw Device Mapping)).
(1) Configuration
The backup and restore procedures are based on the following configuration.
Management server
(Storage Manager)
Backup server
SAN Boot server
(VMware ESX/ESXi)
Storage disk array
VMware ESX/ESXi OS image
Virtual machine
image(VMFS)
Virtual machine data area
(RDM)
MV1
MV2
MV3
Replicate/
Restore
RV1
RV2
RV3
(2) Logical disk format
1. Be sure to set "LX" as the usage format for the logical disk in which the
VMware ESX/ESXi OS image is installed and the logical disk in which the
VMware ESX/ESXi virtual machine image (VMFS) is stored.
Set the usage format of the data area (RDM (Raw Device Mapping)) logical
disk of the virtual machine according to the actual partition style as shown in
the below examples:
For use as a Linux disk: “LX”
For use as a Windows MBR format disk: “WN”
For use as a Windows GPT format disk: “WG”
106
NEC Express5800 Series
7. Additional Application Setup
7.1. DDR (NEC M-series Storage)
(3) Backup and restore VMware ESX/ESXi OS images:
The following instructions show how to make backup and restore VMware
ESX/ESXi OS images with the M-series Storage data replication function.
•
Backup Procedure
1. Execute replication (Management server).
Execute the replication process from the StorageManager and synchronize
MV and RV for the following:
VMware ESX/ESXi OS image
Virtual machine image in VMware ESX/ESXi
Virtual machine data area
2. Shut down VMware ESX/ESXi (VMware ESX/ESXi).
Shut down the VMware ESX/ESXi system which uses the MV to be
backed up.
3. Execute separation (Management server).
Execute the separation process from the StorageManager and separate MV
and RV for the following:
VMware ESX/ESXi OS image
Virtual machine image in VMware ESX/ESXi
Virtual machine data area
4. Restart VMware ESX/ESXi (VMware ESX/ESXi).
Restart VMware ESX/ESXi shut down in 2., then restart operations.
•
Restore procedure
1. Shut down VMware ESX/ESXi (VMware ESX/ESXi).
Shut down the VMware ESX/ESXi system that uses the MV to be restored.
2. Reconstruct MV (Management server).
If it is necessary to reconstruct MV because of a physical error, execute the
following procedure
1) Set the MV AccessControl (Access prohibited).
2) Reconstruct the LDs.
3) Execute pair resetting.
4) Set the MV AccessControl (Access allowed).
3. Execute restore (Management server).
Execute the restore process from the StorageManager, then restore the RV
data in MV.
107
NEC Express5800 Series
7. Additional Application Setup
7.1. DDR (NEC M-series Storage)
4. Restart VMware ESX/ESXi (VMware ESX/ESXi).
Restart the virtual machine that was shut down through the vCenter Server
Restart VMware ESX/ESXi shut down in 1. ., then restart operations.
(4) Backup and restore virtual machine images (VMFS):
The following instructions show how to back up and restore virtual machine images
by NEC M-series Storage data replication function.
• Backup Procedure
1. Execute replication (Management server).
Execute the replication process from the StorageManager and synchronize
MV and RV for the virtual machine image and RDM.
2. Shut down the virtual machine (VMware ESX/ESXi).
From the vCenter Server (vSphere client) or service console, shut down all
virtual machines that use the MV to be backed up.
3. Execute separation (Management server).
Execute the separation process from the StorageManager and separate MV
and RV for the virtual machine image and RDM.
4. Restart the virtual machine (VMware ESX/ESXi).
Restart the virtual machine that was shut down through the vCenter Server
(vSphere client) or the service console, then restart operations.
• Restore Procedure
1. Shut down and delete the virtual machine (VMware ESX/ESXi).
From the vCenter Server (vSphere client) or service console, shut down all
virtual machines that use the MV to be restored, then delete the virtual
machines (delete inventory).
2. Reconstruct MV (Management server).
If it is necessary to reconstruct MV because of a physical error, execute the
following procedure:
1) Set the MV AccessControl (Access prohibited).
2) Reconstruct the LDs.
3) Execute pair reset.
4) Set the MV AccessControl (Access allowed).
3. Execute restore (Management server).
Execute the restore process from the StorageManager, then restore the RV
data in MV.
108
NEC Express5800 Series
7. Additional Application Setup
7.1. DDR (NEC M-series Storage)
4.
5.
Recognize the recovered VMFS (VMware ESX/ESXi).
From the vCenter Server (vSphere client) or service console, rescan with the
“Storage adapter.”
Restart the virtual machine (VMware ESX/ESXi).
Restart the virtual machine shut down in 1., then restart operations.
7.1.4. Cautions for Backup and Restore Windows Server OS
Images with the DDR Function
Please note the following when user executes NEC M-series Storage DDR
(data replication) function to back up a Windows Server OS image.
(1) Logical disk format
When the logical disk is "WN” format, the Windows disk signatures will differ for the
master volume (MV) and replication volume (RV). Then, when a logical disk is
restored from RV, the OS will not be able to start.
Therefore, the usage format for the logical disk that stores the Windows OS must
be set to "WG" regardless of the actual disk format (MBR, GPT) used by the
Windows server.
* When ControlCommand from a management server is used to back up an OS
image in NEC M-series Storage that is FC connected, it is necessary to add
"GPTDISK=USE" to the [CHECK] section of the operation option setup file
(%SystemRoot%¥ismvol¥iSMrpl.ini) in order to manipulate a logical disk in the
"WG" usage format.
(2) BitLocker drive encoding
When handling an OS image (MV, RV backed up from MV, or MV restored from
RV) that has been encoded with BitLocker, the operation will differ as shown below
depending on whether the server that executed the encoding is used or another
server is used.
• Using the server that executed encoding
[OS startup]
Possible
[Enable/Disable BitLocker encoding]
Possible
[Unlocking BitLocker encoding]
Possible
109
NEC Express5800 Series
7. Additional Application Setup
7.1. DDR (NEC M-series Storage)
(3) Backup and restore VMware ESX/ESXi OS images:
The following instructions show how to back up and restore VMware ESX/ESXi
OS images with M-series Storage data replication function.
•
Backup Procedure
1. Execute replication (Management server).
Execute the replication process from the StorageManager and synchronize
MV and RV for the following:
VMware ESX/ESXi OS image
Virtual machine image in VMware ESX/ESXi
Virtual machine data area
2. Shut down VMware ESX/ESXi (VMware ESX/ESXi).
Shut down the VMware ESX/ESXi system which uses the MV to be
backed up.
3. Execute separation (Management server).
Execute the separation process from the StorageManager and separate MV
and RV for the following:
VMware ESX/ESXi OS image
Virtual machine image in VMware ESX/ESXi
Virtual machine data area
4. Restart VMware ESX/ESXi (VMware ESX/ESXi).
Restart VMware ESX/ESXi shut down in 2., then restart operations.
•
Restore procedure
1. Shut down VMware ESX/ESXi (VMware ESX/ESXi).
Shut down the VMware ESX/ESXi system that uses the MV to be restored.
2. Reconstruct MV (Management server).
If it is needed to reconstruct MV because of a physical error, execute the
following procedure
1) Set the MV AccessControl (Access prohibited).
2) Reconstruct the LDs.
3) Execute pair resetting.
4) Set the MV AccessControl (Access allowed).
3. Execute restore (Management server).
Execute the restore process from the StorageManager, then restore the RV
data in MV.
110
NEC Express5800 Series
7. Additional Application Setup
7.1. DDR (NEC M-series Storage)
4. Restart VMware ESX/ESXi (VMware ESX/ESXi).
Restart the virtual machine that was shut down through the vCenter Server
Restart VMware ESX/ESXi shut down in 1. ., then restart operations.
(4) Backup and restore virtual machine images (VMFS):
The following instructions show how to back up and restore virtual machine images
by NEC M-series Storage data replication function.
• Backup Procedure
1. Execute replication (Management server).
Execute the replication process from the StorageManager and synchronize
MV and RV for the virtual machine image and RDM.
2. Shut down the virtual machine (VMware ESX/ESXi).
From the vCenter Server (vSphere client) or service console, shut down all
virtual machines that use the MV to be backed up.
3. Execute separation (Management server).
Execute the separation process from the StorageManager and separate MV
and RV for the virtual machine image and RDM.
4. Restart the virtual machine (VMware ESX/ESXi).
Restart the virtual machine that was shut down through vCenter Server
(vSphere client) or the service console, then restart operations.
• Restore Procedure
1. Shut down and delete the virtual machine (VMware ESX/ESXi).
From the vCenter Server (vSphere client) or service console, shut down all
virtual machines that use the MV to be restored, then delete the virtual
machines (delete inventory).
2. Reconstruct MV (Management server).
If it needed to reconstruct MV because of a physical error, execute the
following procedure:
1) Set the MV AccessControl (Access prohibited).
2) Reconstruct the LDs.
3) Execute pair reset.
4) Set the MV AccessControl (Access allowed).
3. Execute restore (Management server).
Execute the restore process from the StorageManager, then restore the RV
data in MV.
111
NEC Express5800 Series
7. Additional Application Setup
7.1. DDR (NEC M-series Storage)
• Other servers
[OS startup]
need recovery key for startup.
The following actions are executed after starting with a recovery key.
[Enable/Disable BitLocker encoding]
Encoding can be disabled, but cannot be re-enabled after disabling.
[Unlocking BitLocker encoding]
Possible
Applying a hotfix when using ControlCommand in Windows Server 2008
It is possible that the problems in Windows Server 2008 cause unmount
(iSMrc_umount command) to fail.
Microsoft has reported this problem as a product error and hotfix information has been
released.
When using a server with Windows Server 2008 installed, refer to the below website
and apply the appropriate hotfix to the server.
(If Windows Server 2008 SP2 has been applied, the above program is not necessary.)
[ Hotfix download URL ]
http://support.microsoft.com/kb/952790/
* Microsoft Support Technical Bulletin – 952790
112
NEC Express5800 Series
8. Precautions and Restrictions
8.1. Server
8.1.1. Mixing FC Controller Models
Different FC controller models cannot be installed on a single server.
(Only the same model FC controllers can be mounted on a single server.)
8.1.2. Multiple Path Compatibility
Binding multiple servers to the same logical system disk is not allowed.
(Multiple servers cannot share the same OS system disk.)
8.1.3. BIOS Settings for Installing Windows Server 2008
Before installation, go to the Boot Order setup screen in the server device
system BIOS, check the FC controller ports, and make sure that they are
bootable.
The numbers circled in “A” in the illustration show the boot priority. If the
FC controller ports are not specified here, they cannot be used to boot the
system. The numbers circled in “B” indicate the FC controller port
numbers.
Windows Server 2008 installation may fail if the FC controller ports are not
bootable.
Both of the following settings must be made to enable booting from an FC
controller:
•
•
LDs must be assigned to the LD set linked to the FC controller port.
The boot BIOS setting must be enabled for the FC controller port linked to the LD
set with assigned LDs.
See "4.3 FC Controller BIOS Settings" for details on setting the FC
controller boot BIOS.
113
NEC Express5800 Series
8. Precautions and Restrictions
8.1. Server
8.1.4. BIOS updates
• R120d-2M, R120d-1M, R120d-2E, and R120d-1E do not require BIOS updates, but
updating them to the latest public version is recommended.
• Refer to the BIOS download page of each device and the "Readme.txt" file that
comes with the downloaded data for the updating instructions.
See the following website to check for any available BIOS updates.
R120d-2M, R120d-1M, R120d-2E, R120d-1E
• NEC Express5800 Series Product Information
http://www.58support.nec.co.jp/global/download/index.html
8.1.5. Restrictions for Internal option in server
Under SAN Boot environment, mounting HDD/SSDs and RAID controllers
on SAN Boot servers are not recommended.
8.1.6. System BIOS Setup
"SATA AHCI" and "SATA RAID" parameters on server’s system BIOS
must change to “disabled”.
114
NEC Express5800 Series
8. Precautions and Restrictions
8.2. Storage
8.2.1. Connecting Multiple Storage Devices
Connections cannot be made to access multiple storage devices through
the FC switches under the FC controller ports that implement FC SAN
Boot. Only the ports that are not used for FC SAN Boot should be
selected to access multiple storage devices.
While one of the N8190-154 ports is used for FC SAN Boot, the other
ports can access multiple storage.
Server
Server
FC switch
FC switch
FC switch
FC switch
FC switch
OS
The storage device with the OS
installed and another storage device
are connected to the same port of
the FC controller.
FC switch
OS
The storage device with the OS
installed and another storage devices
are not connected to the same port
of the FC controller.
8.2.2. Storage Performance and Number of OSs Installed
AS for the numbers of OSs used per storage device, consider the
estimation based on required performance with responsibility of system
management department.
115
NEC Express5800 Series
8. Precautions and Restrictions
8.3. OS
8.3.1. Number of OS Licenses Used
Windows Server 2008/Windows Server 2008 R2
•
Number of Windows Server 2008 and Windows Server 2008 R2 licenses used for
FC SAN Boot will depend on the number of instances (number of servers).
Operating Units
Server A
Server B
Server C
OS A
OS B
OS C
Spare
Regardless of the number of
OS images created, number
of licenses used depends on
the number of operating
servers (including spares)
Operating units + Spares
4 licenses used
Server D
OS-X
NEC M-series Storage
•
•
In a configuration such as that shown above in which OS-X is automatically used
when there is a problem, the number of licenses used are the same as the number
of servers used (including spares); i.e., four licenses in this case.
Refer to the Windows Server 2008 and/or Windows Server 2008 R2 software end
user's license agreement for a definition of instances.
116
NEC Express5800 Series
8. Precautions and Restrictions
8.3. OS
Red Hat Enterprise Linux 5 and Red Hat Enterprise Linux 6
Operating units
Server A
Server B
Server C
OS A
OS B
OS C
Spare
Regardless of the number
of OS images created, the
numbers of licenses used
depends on the number of
systems in operation (not
including spares)
Only three licenses used for
three systems in operation
Server D
OS-X
NEC M-series Storage
•
With respect to Red Hat Enterprise Linux licenses, the subscription of a failed
server is passed on to the spare. Thus only actual servers in operation (excluding
spares) are counted. In the above illustration, only three licenses are used.
117
NEC Express5800 Series
8. Precautions and Restrictions
8.3. OS
8.3.2. OS Memory Dump
Red Hat Enterprise Linux 5 and Red Hat Enterprise Linux 6
By installing NEC Storage PathManager for Linux, memory dumps can be used
after FC path switching. In such cases, set the dump source as the /dev/ddX (X is
arbitrary) device. If an FC path error occurs while extracting from the dump source,
then extraction will be interrupted.
Using M Series with Windows Server 2008 and Windows Server 2008 R2
• The path used to acquire the dump (hereafter called the dump path) is the path
used to boot the OS. If the dump path is lost to PnP because of an error, the dump
path will switch to an alternative path.
• In an environment in which multiple paths exist for each FC port, dump extraction
may not be possible if there is a path error.
• Configure two paths between servers and storage so that dump extraction is
assured.
8.3.3. Redundant Path Connections when Installing the OS
If there are redundant paths between the server and disk array when Windows or
Linux is being installed, installation will fail. Disable redundant configurations before
installing these systems. Redundant path configurations can be left intact when
installing VMware ESX/ESXi.
8.3.4. Linux OS Logical Volume Manager
Whether it is a system area or a data area, a SAN Boot configuration using LVM
(Logical Volume Manager) is not recommended. If LVM is to be introduced into
a SAN Boot environment, be sure to conduct thorough verification tests.
118
NEC Express5800 Series
8. Precautions and Restrictions
8.4. PathManager
8.4.1. NEC Storage PathManager Versions
The PathManager versions referred to in this manual are as follows (as of
September 2012):
•
•
•
NEC Storage PathManager for Windows
NEC Storage PathManager for Linux
NEC Storage PathManager for VMware
Ver. 5.0
Ver. 5.3
Ver. 1.0
8.4.2 . Backup and Restore Disks in Linux OS with PathManager
Installed
In a Linux system with PathManager installed, if the OS is restored in
a LUN or NEC M-series Storage that differs from the original installation
(LUN replacement because of disk copying or error), the OS cannot be
booted from that area because the information used by PathManager to
recognize the LUN is different.
When restoring the OS to a different LUN or NEC M-series Storage, return
the various setup files to the sd device mount configuration before backing
up with DeploymentManager, then execute the steps in "5.3.4.2
Installation in a SAN Boot Environment" after restoring the OS.
119
NEC Express5800 Series
9. Appendix
9.1. Confirm FC Controller WWPN and WWNN
9.1.1. Confirm from IEEE Address Labels
FC controllers have labels with the IEEE addresses of the FC ports
(N8190-153 have a label for one port and N8190-154 have labels for two
ports). The 16 digit numbers that start with "1000" are for WWPN and
those that start with "2000" are for WWNN.
IEEE address (Port 1)
* Only N8190-154
IEEE address
(Port 0)
9.1.2 . Confirm from the WWPN Address Label (only N8190-153)
The WWPN address can be confirmed from the WWPN label on a N8190153 bracket. Replacing the first "1000" numbers of the WWPN address
with "2000" will give WWNN address.
WWPN address
120
NEC Express5800 Series
9. Appendix
9.1. Confirm FC Controller WWPN and WWNN
9.1.3 . Confirm from the FC BIOS
If an FC controller is mounted, the WWPN and the WWNN can be
checked from the FC controller by setting up the server BIOS. See section
4.2 for the instructions on setting up the server BIOS.
(1) Simultaneously hold down the <Alt>+<E> or <Ctrl>+<E> keys when the following
message is displayed during system startup.
(2) After the keys are recognized, the following message is displayed and the menu
will come up.
(3) A list of FC controller ports installed in the server are displayed. Input the number
of the FC controller to check the WWPN /or WWNN and the details appear.
Port 1
Port 0
* For the N8190-154, the PCI Bus and Device are the same, and Functions are
displayed for both the 00 and 01 ports. Function 00 corresponds to Port 0 of the
FC controller and Function 01 corresponds to Port 1. The displayed order for the
Port 0 and the Port differs according to the server.
121
NEC Express5800 Series
9. Appendix
9.1. Confirm FC Controller WWPN and WWNN
(4) The value displayed next to "Port Name" is the WWPN of the FC controller port
and the value next to "Node Name:" is the WWNN.
* The last 12 digits of the WWPN and WWNN for the same port are the same.
(5) Press the <ESC> key to return to the screen in (3), then check the rest of the
WWPNs and the WWNNs.
122
NEC Express5800 Series
NEC Express5800 Series
FC SAN Boot Configuration Guide
September 2012, first edition
NEC Corporation
5-7-1 Shiba, Minato-ku, Tokyo
© NEC Corporation 2012
123