1
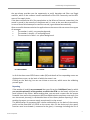
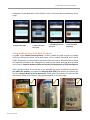
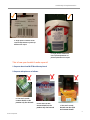
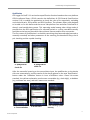
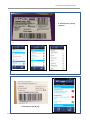
Leadership in implementation
How to check barcodes and create usable reports
with GS1 Logger for Staff
(April 2013)
About the initiative
GS1 Logger for Staff is a unique solution, combining the elements of GEPIR and MobileCom
with the aim to provide an easy-to-use and powerful tool for the purpose of GTIN
Intelligence. The main goal of the initiative running under the umbrella of GS1 in Eur ope
led and developed by GS1 Hungary, is to deliver a commonly agreed mobile tool and
process behind that for GS1 GCP validation helping GS1 Member Organizations in their
fight against ‘illegal/unauthorized’ use of GCPs and ID Keys.
Besides validation of the GS1 ID keys the application is capable to perform data
qualification too. The qualification function is based on GS1Lib, a software library that
includes all the definitions and rules of the latest General Specification and prefixes from
GEPIR Root XML. This function allows users to perform basic barcode quality check beyond
GCP validation.
For more details about the initiative please visit http://gs1logger.gs1hu.org/ !
The application is available on iOS and on Android as well!
For more information about the application and its infrastructure please read the GS1
Logger for Staff User Manual at
http://gs1logger.gs1hu.org/logger_for_staff/documentation.html !
How to check barcodes and make reports?
The control function of the GS1 Logger for Staff version 2.1.1 is divided into two:
‘Validation’ and ‘Qualification’. Scan or type in the number to be checked then select
whether you wish to validate or qualify.
Validation
When using the logger application, you can collect and verify the manufacturer’s or brand
owner’s data by scanning and decoding the barcode placed on the individual trade items.
You can obtain data from a range of databases (e.g. GEPIR) and more importantly you can
send e-mail reports with photos about your scans. No matter when and where you are,
1
Leadership in implementation
the app always provides you the opportunity to verify barcodes and filter out illegal
numbers, which is the common interest and benefit of the GS1 Community and the GS1
users of the supply chain.
If the data transmission fails (for example due to the failure of internet connection), the
record is stored in the memory of the phone and it is sent at the next data transmission.
In case of three failed attempts to send the record, it gets deleted automatically.
After successful data transmission the application on the server side can return three types
of messages:
•
The number is valid – on green background;
•
The number is invalid – on red background;
•
The connection is failed – on yellow background.
a. Valid number
b. Faulted
c. Invalid
In all of the three cases GEPIR return codes (RC) and details of the responding router are
displayed on-screen, on the basis of which the status is set.
Clicking on the ‘New log’ icon we can initiate a new scan, which starts the validating
process again.
Reporting
If the number is invalid, we recommend that you click on the ‘Add Photo’ icon, by which
you can take picture(s) of the product on which the GTIN can be found, and you can
send it/them to the server. While sending data, you can send a report that the system
forwards via e-mail to the competent MO that should take the necessary next steps. You
can also attach picture(s) in the detailed view of the History before reporting it. After
sending the report, we cannot attach new picture(s) to the record.
The identification of competent MO is done automatically on the basis of the country
prefix and the Root XML of GEPIR on the server side. On the device only the report
function must be activated (a command to be given). A message including the list of
2
GS1 in Europe 2013
Leadership in implementation
addressees or the description of the failure is sent to the user about the delivery of the
email.
a. Report open page
b. Select the size of
the picture
c. Uploading picture to
the server
c. Picture upload
completed
Taking usable pictures is the basis of reports
A usable report should include pictures. Pictures should be good enough to provide
sufficient information about the brand owner of the product identified with invalid
GTINs. Sometimes you may need to take more than one picture. Without pictures about
the required information our colleague who receives the report won’t be able to follow
up the report. Reports without pictures are useless for the purpose of GTIN intelligence!
Here is good example! As you can see in this example the report includes three pictures:
one about the product, one about the barcode with GTIN and another one where you
find the contact details of the brand owner. With these information the relevant MO
could easily follow up the report. More good examples on the next page.
3
GS1 in Europe 2013
Leadership in implementation
a. Single picture contains all the
required information to follow up
based on the report
b. Single picture contains all
the required information to
follow up based on the report
This is how you shouldn’t make reports!
1. Reports about invalid GTINs without picture!
2. Reports with pictures as follows:
a. You can’t see the
contact details on the
product only the barcode
b. You can’t see the
contact details on the
product only the barcode
c. You can’t see the
barcode nor the GTIN
and contact details!
4
GS1 in Europe 2013
Leadership in implementation
Qualification
GS1 Logger for Staff 2.1.1 version has a qualification function based on the cross-platform
GS1Lib software library. GS1Lib contains the definitions of GS1 General Specifications
version 13.0, it enables the application to check the rules of its compulsory, excluding
and relational pairs, GS1 prefixes and GS1-8 prefixes. The software library was designed
to be able to run the device and the server side platform-free and after initialization it
doesn’t need outside data source. This operating model among other things makes it
possible that the GS1 qualification of a scanned symbol or a string recorded manually
could be carried out on the mobile client without internet and/or sever connection.
The first screen of Qualification is a checklist containing the processed code (scanned or
manually recorded) and other parameters of the scanning, the decoded ID Keys, the AI
pair checking and the symbol checking.
a. Qualification
check-list
a. Qualification
check-list
After the successful scanning or the manual data input, the qualification on the device
side runs automatically, and the results of the checks appear on the new ‘Qualification’
button under the ‘Validation’ button in icons of different colors. Green tick means
standard, the yellow exclamation mark means correctable (e.g. check digit), or dubious
(e.g. unknown use area), and red X means non-standard.
a. Processed data
b. Decoded data
c. Pair Checking, Symbol
Checking
5
GS1 in Europe 2013
Leadership in implementation
Selecting the decoded elements, you can check the ID Keys one by one or in details by
the AI content, min-max length, format, prefix, prefix handler, prefix format, AI support
by prefix, separator and substance. By the data content the checklist of the element
string pair may show a different number of rows e.g. in the case of faulty or unidentifiable
AI’s other information isn’t displayed, or in the case of other AI’s (e.g. date, bulk extent
...) we make individual checks (e.g. in case of a date we can check if the month/day data
is valid or not), in other case this row doesn’t appear at all.
Just like in case of the validation, you have the option to send a report while you are
using the qualification function as well! This helps to call the attention of the relevant
MO to the non-standard usage of GS1 barcode standards.
a. Invalid checksum
6
GS1 in Europe 2013
Leadership in implementation
b. Invalid AI pairs, missing
separator
c. Invalid AI pair: (01) & (37)
7
GS1 in Europe 2013
Leadership in implementation
For more details please contact the project manager Tímea Berecz at
[email protected] !
8
GS1 in Europe 2013