1
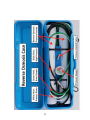
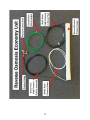
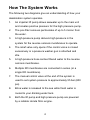
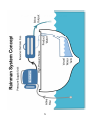
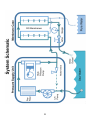
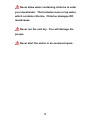
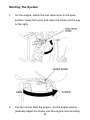
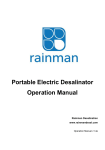
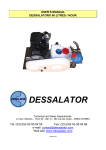
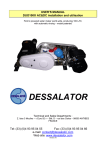
Portable Petrol (Gasoline)
Desalinator
Operation Manual
Rainman Technology Pty Ltd
www.rainmandesal.com
Operation Manual v1.6p
Table of Contents
Getting To Know Your System
1 Pressure Supply Unit
Reverse Osmosis Case
Reverse Osmosis Single Membrane
1 2 3 How The System Works
4 Rainman System Concept
System Schematic
5 6 Setting Up Your New System
7 Getting Started
Fuel Tank Filling
7 9 Installing Your Desalinator (Optional)
10 Operating The Desalinator
11 Setting Up For Use
Starting The System
Desalinating While Under Way
Desalinating Brackish Water
Shutting Down
Freshwater Flushing
Pressure Washing
11 16 21 23 25 26 28 Care and Maintenance
30 Reverse Osmosis Membrane Care
Pickling Your Desalinator
Pickling In Cold Climates
Cleaning and Changing The Pre-filter
High Pressure Pump Maintenance
Changing Engine Oil
Jabsco Lift Pump Service
RO Case Mounting
Flow Gauge Mounting
Physical Storage
Shipping
Service
Troubleshooting
30 32 33 34 35 36 36 37 38 39 40 41 42 Warranty
45 Getting To Know Your System
Pressure Supply Unit
1
Reverse Osmosis Case
2
Reverse Osmosis Single Membrane
3
How The System Works
The following two diagrams give an understanding of how your
desalination system operates.
1.
An impeller lift pump draws seawater up to the main unit
and creates positive pressure for the high pressure pump.
2.
The pre-filter removes particulates of up to 5 micron from
the water.
3.
A high pressure pump delivers high pressure in the
system for the reverse osmosis membranes to operate.
4.
The relief valve only opens if the control valve is closed
excessively or a pressure washer gun is attached and
idle.
5.
A high pressure hose carries filtered water to the reverse
osmosis membranes.
6.
Multiple RO membranes are connected in series (or a
single RO membrane).
7.
The manual control valve at the end of the system is
used to set system pressure to approximately 55 bar (800
psi).
8.
Brine water is released to the sea while fresh water is
routed to your drinking water tank.
9.
Both the lift pump and high pressure pump are powered
by a reliable Honda 50cc engine.
4
Rainman System Concept
5
System Schematic
6
Setting Up Your New System
Thank you for purchasing a Rainman portable desalination
system. We hope you enjoy the simplicity of the system and
have great adventures for many years to come. Please read
this entire manual prior to using the system.
Getting Started
If your Rainman desalinator was delivered by freight and not
picked up from a dealer, the Pressure Supply Unit will arrive
with the engine oil sump and fuel tank dry and the pressure
pump will have a leak-free travel plug fitted. If your
desalinator arrived by freight, follow these instructions.
1.
Fill the engine with 200 ml (.21 US Qt) of grade 10W-30
or SAE30 motor oil. Note: motor has low oil cut-off
switch, so ensure you operate towards the upper limit if in
marine environment with possible uneven surfaces.
7
2.
Remove the hex oil plug from the high pressure pump
and replace with the supplied breather plug. The
breather plug has the world “OIL” on it. Save the travel
plug in case the unit needs to be shipped in the future.
3.
The reverse osmosis membranes inside the reverse
osmosis unit are supplied immersed with a preservative
(pickled). This preservative can cause gastro-intestinal
upset if not flushed. The system will need to be run for at
least 30 minutes before product water is consumed.
8
Fuel Tank Filling
1.
Remove the cover on the Pressure Supply Unit.
2.
With the engine stopped and the unit on a level surface,
remove the fuel cap.
3.
Check the fuel level. If the level is low, fill the fuel tank to
the bottom of the fuel level mark. Do not overfill (past the
maximum fuel level shown). Refill carefully to avoid
spilling fuel. Premium fuel is recommended. Do not use
fuel that contains ethanol.
Wipe up any spilled fuel before starting the
engine.
4.
After refuelling, tighten the fuel cap securely.
For more information about the Honda motor,
consult the provided Honda owner’s manual.
9
Installing Your Desalinator
(Optional)
For full or partial installation, please access our website for
guidelines. www.rainmandesal.com/support.html
10
Operating The Desalinator
This section explains how to operate the system on a regular
basis, including set up, starting, stopping, and flushing the
system.
Setting Up For Use
1.
Place the Rainman Pressure Supply Unit (PSU) and
Reverse Osmosis (RO) Unit in a stable place on the deck
of your vessel. A swim platform is an ideal location.
11
Make sure the PSU is no more than 2 metres (6
feet) above water level. The unit will work best
operating as close to water level as possible.
2.
Unzip the cover on the Reverse Osmosis (RO) unit.
Remove and uncoil the three hoses from the RO unit.
Connect the black high pressure hose to the Pressure
Supply Unit.
12
3.
Open the Pressure Supply Unit by removing the front
cover.
4.
Remove the clear plastic spiral intake hose from inside
the Pressure Supply Unit, remove the cap, and attach the
suction strainer.
Starting the unit with the cap in place will
damage the pumps.
5.
Place the intake hose in the source water.
13
Make sure the intake hose is submerged and is
not on the sea floor or among seaweed, which can
cause blockage.
6.
Place the green brine output water hose in the source
water.
7.
Place the white product water hose on the deck of your
vessel.
Make sure the product water hose is NOT initially
in your fresh water tank.
8.
Make sure the pressure valve in the reverse osmosis unit
is in an open position (fully anti-clockwise).
14
Never allow water containing chlorine to enter
your desalinator. That includes town or tap water,
which contains chlorine. Chlorine damages RO
membranes.
Never run the unit dry. You will damage the
pumps.
Never start the motor in an enclosed space.
15
Starting The System
1.
On the engine, switch the fuel valve lever to the open
position (away from you) and close the choke (all the way
to the right).
2.
Pull the cord to start the engine. As the engine warms,
gradually adjust the choke until the engine runs smoothly.
16
3.
Water will start flowing out the green brine output hose.
4.
Gradually close the pressure control valve on the reverse
osmosis unit by turning clockwise until the pressure
gauge reads 55 bar (800 psi). The correct pressure is
indicated by the dark green area on the pressure dial. For
maximum membrane life, raise the pressure no more
than 20 bar (300psi) a minute. Within 15 seconds water
will start flowing out the white product hose.
17
Never exceed 58 bar (850 psi). If you over tighten
the pressure control valve, a relief valve in the
Pressure Supply Unit will release and water will
recirculate within unit. This prevents damage to the
RO membranes from excess pressure. However,
prolonged operation of the relief valve can damage
the unit.
If you are using your desalinator for the first time,
run for at least half an hour to flush all preservatives
from the system.
5.
Every time you use the unit, let fresh water flow out the
product hose for approximately 30 seconds to ensure any
residual salt in the system is washed away. You should
test the product water at this point with a salinity meter or
by taste.
18
6.
If the product water is pure, put the product water hose in
a fresh water tank and allow the system to run
uninterrupted until full. Check the pressure gauge
approximately every ten minutes and adjust the pressure
if necessary to 55 Bar (800 psi).
7.
Use the white 10 metre product water extension hose if
necessary to fill multiple tanks without the need to move
the desalination system.
19
Unless the weather is hot, we recommend you replace the
cover on the Pressure Supply Unit during operation. When
replacing the cover, take care to ensure the intake hose is
placed in the indentation on the bottom left hand corner of the
cover. If the ambient temperature is over 35°C (95°F) then
leave the cover off to help cool the engine.
The 0.7 litre (0.2 gallon) tank should allow the unit to run for
approximately 70 minutes.
If you stop the machine, or it stops due to low fuel, and you
intend to start it again within the next 30 minutes it is advisable
to remove the lid to prevent excess heat buildup inside. Excess
heat buildup inside can cause fuel in the carburetor to
vaporise, meaning that the machine will be hard to start again
until it has cooled down.
Product water flow will vary depending on temperature and
salinity. The warmer the water, the more fresh water will be
produced. The higher the salinity, the less fresh water will be
produced.
20
Desalinating While Under Way
Your Rainman desalinator can be operated while under way.
The recommended method is to install a dedicated throughhull fitting in a position that will always be under water in all
angles of heel.
The Pressure Supply Unit will need to be placed securely and
protected from getting wet. The green brine hose is then
securely directed overboard.
Some owners have reported success in using their watermaker
while under way without a dedicated through hull by trailing the
intake hose in the wash at the stern of their vessel. It is
important to ensure the end of the hose is fully submerged in
such a way that it doesn’t create turbulence and suck air.
21
We recommend sliding the intake cap up the intake hose and
securing it on board the vessel so that the end of the intake
hose can sink sufficiently below the surface.
We recommend not using the detachable suction strainer
when towing the intake hose.
Success when making water while towing the intake hose
depends on the hull shape and speed of the vessel. Some
vessels will be unsuitable. When trailing the intake hose, the
particle filter needs to be monitored closely for air bubbles.
If the intake hose is sucking air, you will damage the
membranes and this will not be covered by warranty.
22
Desalinating Brackish Water
Brackish water is water that is less salty than seawater, but
more salty than fresh water. Examples include estuaries,
harbours and saline aquifers (bore water). After heavy rain,
some sources of seawater can become less saline.
The Rainman watermaker can be used to desalinate brackish
water. A much lower pressure is needed, so when desalinating
brackish water, only increase pressure until the rated fresh
water production rate of your unit is achieved. The pressure
can be as low as 200 PSI (13 bar).
When desalinating brackish water, Rainman recommends
installing our optional flow gauge to accurately measure
fresh water production rates.
The rated fresh water production rate for the High Output
Unit (twin 40 inch membranes) is 140 litres an hour (2.3
litres a minute).
The rated fresh water production for the Compact RO Unit
(twin 21 inch membrane) and the Economy RO Unit (single
23
40 inch membrane) is 70 litres an hour (1.15 litres per
minute).
Never exceed the rated fresh water flow of your
system. You will damage the membranes and this will not
be covered by warranty.
When desalinating any source other than ocean seawater,
ensure the water is not contaminated with any substance that
can damage the RO membranes and/or be toxic to humans.
Some examples include oil (often found in harbours, estuaries
and marinas), chlorine (found in town water and runoff from
town water) and mineral deposits found in bore water. If in
doubt, do not use your desalinator.
24
Shutting Down
1.
To switch the unit off, first very slowly turn the pressure
control valve in an anti-clockwise direction until the
pressure reads less than 300 psi (20 bar).
2.
Press and hold the engine kill switch until the engine
stops.
3.
Turn off the fuel valve lever by pulling it towards you.
4.
Replace the cap on the intake hose to keep the unit
primed during storage.
5.
Replace the rubber boots on each of the other hoses to
keep the system clean and prevent water dripping while
stowed.
Wait 60 seconds for internal pressure to
dissipate before disconnecting the black high
pressure hose from the Pressure Supply Unit.
Make sure the exhaust has cooled before
moving the unit.
For more information, please watch the instructional video at
www.rainmandesal.com/support.html
25
Freshwater Flushing
We recommend flushing your desalinator with fresh water after
every use to prevent biological fouling and to rinse salt from
the entire system. Freshwater flushing will prevent fouling for
up to two weeks in temperate climates.
1.
When the fresh water tank is full, remove the product
water hose and fill an open container of water with
approximately 10 litres (2.5 gallons) of fresh water.
26
2.
Open the pressure control valve completely and
switch off the unit. Remove the intake hose from the
source water and place it in the open container of fresh
water. Start the unit again, and with the pressure control
valve remaining open, run the entire contents through the
system.
3.
When the bucket is almost empty, switch off your
desalinator, leaving the fresh water in the system.
Never allow the bucket to run dry while the pump
is running. You will damage the unit.
Never flush your desalinator with water
containing chlorine, which will damage the
membranes. That includes town or tap water, which
contains chlorine, or water from a vessel’s tanks,
which also may contain chlorine. Chlorine damages
RO membranes.
If you plan on not using your watermaker within
the next few weeks, you’ll need to pickle the
membranes.
27
Pressure Washing
By connecting the pressure washer gun (sold separately), the
Rainman Desalinator becomes a powerful seawater pressure
washer.
To Operate
1.
Attach the pressure washer quick link hose to the
Pressure Supply Unit.
2.
Place the intake hose in the water.
3.
Before starting, hold down the trigger on the pressure
washer wand and at the same time, start the Pressure
Supply Unit.
The trigger must be depressed when you start
the engine.
28
4.
When the trigger is released, water will re-circulate inside
the pump to release pressure. Do not allow the motor to
run for more than 30 seconds with the trigger released as
the water can heat up and damage the unit.
5.
Be careful using the pressure washer on delicate
surfaces. The pressure washer stream is powerful and
can damage some surfaces including paint and wood.
6.
If you use town or chlorinated water with your Rainman
pressure washer, make sure you flush it completely
before using the reverse osmosis unit. The chlorine in
town water will damage the reverse osmosis membranes.
29
Care and Maintenance
Your system is designed and built with high quality
components. This section shows how to properly care for your
system to ensure it lasts for many years.
Reverse Osmosis Membrane Care
The Dow Filmtec membrane or membranes in your Rainman
desalinator should last between five and ten years if well cared
for. The main way RO membranes are damaged is through
biological growth or “fouling” on the surface of the membranes.
This occurs if seawater is left sitting inside the RO pressure
vessels for extended periods of time.
In temperate climates, growth can occur in less than two
weeks, in tropical climates, growth can occur in as little as a
few days. There are no precise times in which fouling can
occur, only rules of thumb. A conservative approach to
membrane care will ensure long membrane life.
Regular use of your desalinator is the most effective
prevention against fouling. That means using your desalinator
at least weekly in temperate climates and at least every few
days in the tropics.
30
If unused for 2 days or less
No pickling necessary
If unused for between 2 and 7
Fresh water flush
days
If unused for between 7 and
Pickle the system
30 days
If unused for 30 days +
Pickle the system, discard the
pre-filter and drain the prefilter housing. Some pre-filters
can turn black if stored too
long in pickling solution.
When storing the unit for more than a month, discard
the pre-filter and drain the pre-filter housing. Some marine
deposits can continue to decompose even when
immersed in a pickling solution
If you know you won’t be using your desalinator, you can flush
the unit with fresh water to prevent fouling for a week or two in
cool climates, less in warmer climates. If you won’t be using it
for longer periods of time, the membranes can be preserved,
or “pickled”, using a preservative solution.
31
Pickling Your Desalinator
Pickling fills the membrane housings with a biocide that
prevents fouling. Once pickled, membranes can be stored for
six months or more.
1.
To pickle your desalinator, add 5 tablespoons of food
grade sodium metabisulphite (SMBS) to a 10 litre (2.5
gallon) bucket of fresh water, to make a 1-1.5% solution
of SMBS. After opening the pressure control valve
completely, switch off the unit, remove the intake hose
from the source water and place it in the open container
of fresh water. Start the unit again, keeping the
pressure control valve open and run the entire contents
through the system.
2.
When the bucket is almost empty, switch off your
desalinator, leaving the pickling fluid in the system.
When storing the unit for more than a month, discard the prefilter and drain the pre-filter housing.
Your desalinator is now pickled and can be stored for up to 6
months.
Never allow the pickling solution bucket to run dry
while the pump is running. You will damage the unit.
32
Pickling In Cold Climates
If there is a chance that your desalinator will be exposed to
freezing temperatures, you’ll need to pickle the unit with
propylene glycol, otherwise known as potable antifreeze. This
will prevent damage to the unit through freezing, as well as
preventing biological growth.
1.
To pickle your desalinator with potable antifreeze, fill a
bucket with ten litres (2.5 gallons) of propylene glycol
diluted to manufacturer’s specfiications. With the unit
switched off, place the intake hose in the open container
of potable antifreeze.
2.
With the pressure control valve wide open, start the
unit. Watch the brine output and switch the unit off when
you see antifreeze coming out of it.
Your unit is now protected from freezing and from
biological growth for up to six months.
33
Cleaning and Changing The Pre-filter
Pre-filters should be changed if they become discoloured.
1.
To change the pre-filter, place the Pressure Supply Unit
on the deck of your vessel. Use the supplied filter
wrench to remove the clear filter housing.
2.
Replace the filter and then fill the filter housing with
seawater to aid the priming of the pump.
34
High Pressure Pump Maintenance
General Pump (the high pressure pump manufacturer)
recommends the high pressure pump’s crankcase oil be
changed after an initial 50-hour break-in period. Oil should
then be changed every 3 months or at 500-hour intervals
thereafter. General Pump recommends its 100 Series oil,
which is a SAE 30 weight (ISO 100), non-detergent oil.
Crankcase oil can be drained by using an oil extractor to suck
the oil from the crankcase breather hole.
To refill the crankcase oil, insert a long stemmed funnel
through the breather hole and add 350ml (12 ounces) of oil. Oil
levels can be checked via the clear inspection window on the
front of the high pressure pump.
35
Changing Engine Oil
Engine oil can be drained either by tipping the unit forward or
by using an oil extractor. Only tip the unit forward when the fuel
tank is empty.
Jabsco Lift Pump Service
The Jabsco lift pump impeller can be accessed by removing
the three bolts securing the impeller cover.
36
RO Case Mounting
The RO case can be mounted to
a bulkhead or other surface using
the mounting kit included.
Place the plates over these holes
in the rear of the inside of the
case.
And fasten securely using the
screws supplied.
37
Flow Gauge Mounting
The optional extra flow
gauge can be mounted
in your RO case using
the 2 strips of 3M VHB
double sided tape,
supplied on the rear of
the gauge.
Ensure the surface of each RO tube where the tape will adhere
is clean and free of any grease.
After mounting the gauge,
cut the white product hose
at the appropriate length
and push-connect it to the
LEFT hand side of the
gauge. The remaining
white hose should be
connected to the RIGHT
hand side as shown.
38
Physical Storage
Your Rainman Pressure Supply Unit has a petrol (gasoline)
engine in it. In order to avoid oil draining from the sump, the
system should not be inverted. Stow it securely in a dry place
in an upright position (below the deck of your yacht or in a
locker if used in marine environment). Normal heeling of a
yacht will not cause oil spillage.
For long term physical storage, we recommend running the
fuel tank dry.
39
Shipping
To prepare the unit for shipping:
1. Remove the fuel from the carburetor and the tank. If the tank
is empty, just run the machine until the fuel in the carburetor is
gone. Don't run the machine without the intake hose in water.
The easiest way is to put the hose in a bucket and just let the
water spray out onto the ground. If the tank still has fuel in it,
you can siphon it out or run it until the fuel is all gone. It is
important to leave the tank open for a day or so to make sure
the last fuel evaporates. You can help get the last fuel out by
putting a clean rag in the tank to soak it up.
2. Engine oil must be removed from the motor. It’s OK if there
is a little bit of oil left.
3. The travel plug must be in the high pressure pump.
4. The machine should be put inside a plastic bag before it is
packed.
40
Service
If your desalinator exhibits any of the following problems, stop
the unit immediately and consult a qualified technician.
•
Unusual noises or vibration.
•
The pressure gauge will not reach 55 bar (800 psi).
•
With the unit running, there is no water flow through the
green brine output water hose.
•
The white product hose continues to make salty tasting
water after several minutes at 55 bar (800 psi).
•
Major leaks of water in the Pressure Supply Unit or the
RO unit.
41
Troubleshooting
• Symptom
• Possible Cause
• Solution
• Pressure
• Air in system
• Check suction lines
gauge will not
for leaks
reach 60 bar
• Fouled inlet hose
• Clean hose
or
• Fouled pre-filter(s)
• Replace filter
• The Pressure
and/or the
product amount
drops
cartridge
• Cavitation (Noisy
operation)
• Airlocked pump
• Check intake lines for
restrictions
• Allow more time to
prime and ensure
that there are no air
suction leaks
Motor sputters
Fuel tank empty
Add fuel
Motor suddenly
Low oil level
Add oil to upper limit
cuts off
triggering cut-off
marked in “Getting
switch
Started” section.
and dies
42
• Low fresh water
flow
• Damaged
• Consult a qualified
membranes
• Insufficient
pressure
technician.
• Make sure pressure
gauge reads 55 bar
(800 PSI)
• Cold water
temperature
• Product water flow
will decrease
approximately 3% for
each degree Celsius.
• Product water
not fresh
• Damaged
• Replace RO
membrane
• Insufficient time
from startup
membrane
• Allow your unit to run
for up to half an hour,
testing at regular
intervals
• Biological fouling in
• Replace pre-filter
pre-filter
• Biological fouling in
membrane
43
• Replace membrane
• Product water
flow rate higher
than rated flow
• Pressure set too
high
via valve
• Unit operating in
brackish water
• Damaged RO
membrane
• Excessive
vibration in high
pressure hose
• Decrease pressure
• Cavitation due to
blockage
• Decrease pressure
until rated fresh water
flow is achieved
• Replace membrane
• Unblock intake hoses
and pre-filter
• Airlock inside high
• Open pressure
pressure pump
control valve
completely until air
exits system
completely.
44
Warranty
Rainman desalinator Pressure Supply Unit and RO membrane
units are guaranteed to be free of manufacturer defects and to
perform within the published specifications for a period of one
year from the date of shipment to the original purchaser.
In the event of a warranty claim, Rainman Technology will
inspect the defective component and repair or replace at our
discretion. All shipping charges are the responsibility of the
purchaser to and from our office in Sydney, Australia.
The warranty is void if the system was mishandled, abused, or
not operated / maintained as directed by this user manual.
Consumable items, such as the pre-filter cartridge or engine
lubricant are not covered under the terms of this warranty.
Extended or commercial use of the system is not covered in
the terms of this warranty.
Rainman Technology's liability under this warranty is limited to
repair or replacement of our systems to the original purchaser.
Under no circumstances is Rainman Technology Pty Ltd liable
for consequential damages related to failure of the system to
perform.
45