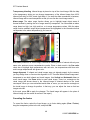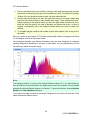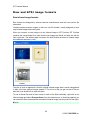
1
GRAYESS IRT Cronista User's Manual IRT Cronista Manual Contents Installation and the first experience ..................................5 Introductory notes and installation ....................................................... 5 Introduction .......................................................................................... 5 Licence agreement ............................................................................6 System requirements ...........................................................................7 Installation notes ..................................................................................7 Application overview ............................................................................. 9 Selecting language and temperature unit .....................................9 Getting started ..................................................................................10 Application structure: Organizer and Analyzer modes ...............14 Organizer mode ................................................................15 Viewing images, files and folders ....................................................... 15 About the Organizer .........................................................................15 View modes .......................................................................................17 Sorting files and folders .....................................................................19 Preview ...............................................................................................19 Layouts ................................................................................................21 Arranging windows ...........................................................................23 Playing sequences, slide shows .......................................................24 Operations with files and folders ......................................................... 26 Files and folders .................................................................................26 Creating a new folder ......................................................................26 Copying and moving files or folders...............................................26 Copying and moving by dragging ................................................27 Changing the name of a file or folder ...........................................28 Deleting files and folders ..................................................................28 Linking visual images to infrared ......................................................... 29 About linking images ........................................................................29 Linking images by copy and paste ................................................29 2 © 2007 GRAYESS Inc. IRT Cronista Manual Linking images by drag and drop ..................................................30 Disconnecting wrongly connected images..................................31 Temperature scale and palettes ......................................................... 32 Temperature Scale window.............................................................32 Selecting the temperature span and palette ..............................32 United Range and Same Palette options ......................................33 Changing temperature unit ............................................................34 Notations ............................................................................................... 35 About notations .................................................................................35 Creating sets of notations ................................................................35 Shared notations ...............................................................................37 Notations Briefcase ...........................................................................38 Selecting notations for images ........................................................39 Thermographic analysis — Analyzer mode....................41 Viewing images in the Analyzer mode............................................... 41 About the Analyzer ...........................................................................41 Windows, buttons and other elements ..........................................42 Zooming the images .........................................................................44 Single- and multi-image analysis.....................................................45 Analysis view adjustments ................................................................46 Fusion of infrared and visual images ..............................................47 Measurement tools ............................................................................... 49 Measurement objects ......................................................................49 Spot tool and connection tool ........................................................50 Hot and cold spots finder tool .........................................................52 Line tool and profiles .........................................................................53 Area tool and histograms ................................................................54 Measurement objects parameters .................................................56 Selection tool .....................................................................................59 Editing labels ......................................................................................60 Deleting measurement objects ......................................................61 Dew Point ...........................................................................................61 3 © 2007 GRAYESS Inc. IRT Cronista Manual Generating reports ............................................................62 Generating reports in Word ................................................................. 62 Reports in Microsoft Word ................................................................62 Generating reports using templates...............................................62 Template Selection dialog ...............................................................63 Reports for image, folder or selection ............................................64 Editing generated reports ................................................................65 Creating and editing templates .......................................................... 66 Report template structure................................................................66 Custom report templates .................................................................66 Thermo Reports toolbar in Word .....................................................68 Sections...............................................................................................70 Placeholders ......................................................................................71 Fields....................................................................................................73 Summary tables .................................................................................74 Notations placeholder and fields ...................................................77 Printing and exporting data to other formats .................79 Printing images and other data ......................................................79 Exporting infrared images to other formats ...................................81 Raw and GTSI image formats ..........................................................82 Keyboard shortcuts .............................................................................. 84 4 © 2007 GRAYESS Inc. IRT Cronista Manual Installation and the first experience Introductory notes and installation Introduction About this program GRAYESS IRT Cronista is extremely powerful but easy-to-use software that enables you to produce thermal analysis and highly customizable professional reports with infrared images. IRT Cronista makes the production of informative and good-looking reports quick and easy allowing you to save time and efforts when working at any type of task concerning interpretation of infrared images. Stored infrared and visual images can be linked to each other and combined with associated annotations. The images are viewed in a thumbnail gallery with adjustable zoom, temperature span and color palette. IRT Cronista provides an extensive range of measurement tools as spot, line/polyline, area,hot/cold spots finder, profile, histogram, etc. It is possible to take measurements simultaneously on several images. The reports are created with just one mouse click on an image. The software includes several pre-defined report templates which can be used to create reports in a straightforward way or as the basis for your own customized templates. Better still, it is easy to edit the resulting report or templates in Word, including whatever information you require. About this manual This manual provides complete instructions for using IRT Cronista. This manual will lead you step-by-step to make exhaustive thermographic analysis of your infrared images and then produce superb reports based on it. The manual is divided into the following main parts: 1. 2. 3. 4. Installation and the first experience; Organizer mode; Thermographic analysis – Analyzer mode; Generating reports. 5 © 2007 GRAYESS Inc. IRT Cronista Manual The first part which you are just reading at the moment includes general information about the software, as well as instructions concerning installation and licensing. The first part of the manual contains also a cursory examination of the program, its structure and the functionality of its elements. The first part will guide you to create your first test report, but the operations needed for this are depicted in details in the following parts of the manual. The second part (Organizer mode) is devoted to such topics as how to arrange the files in folders, how to adjust the appearance of the application in the best way, how to link visual and infrared images, how to create sets of notations, how to use temperature scales and palettes, etc. In the third part of the manual (Thermographic analysis) you will learn how to do any type of thermal analysis, from elementary to sophisticated, using measurement tools provided by IRT Cronista In the last part (Generating reports) you will learn how to create and edit reports using predefined and customized templates. You will find also the information about exporting infrared images to other formats and about slide shows and other types of presentations based on thermal analyses of your images. Licence agreement Important notice Read this License Agreement carefully before using this Software. BY USING THIS SOFTWARE IN ANY WAY YOU ACKNOWLEDGE THAT YOU HAVE READ, UNDERSTAND AND AGREE TO THE TERMS OF THIS AGREEMENT. IF YOU DO NOT AGREE TO THESE TERMS, DO NOT USE THIS SOFTWARE IN ANY WAY, AND PROMPTLY RETURN IT OR DELETE ANY COPIES OF THIS SOFTWARE IN YOUR POSSESSION. By opening the sealed disk package, the end-user agrees to be bound to the terms of this agreement. The use of this software is licensed. GRAYESS Inc. grants a unique, nontransferable, personal license to use this software on single computer systems for an unlimited time. This documentation is under copyright, all rights reserved. This document may not, in whole or in part, be copied or changed without prior consent in writing from GRAYESS Inc. Unauthorized use of this software can result in civil and criminal prosecution. W a r n i n g . The software and accompanying written materials are provided as is. GRAYESS makes no other warranty, either expressed or implied, concerning the contents of this documentation or the performance of the software. 6 © 2007 GRAYESS Inc. IRT Cronista Manual System requirements Protection IRT Cronista requires a hardware key (Sentinel SuperPro) for execution, otherwise it can be run in the trial mode for 30 days. After this period, IRT Cronista has to be deleted from the system or you have to apply to GRAYESS for getting the license. Software requirements IRT Cronista has been designed to work with the following operation systems: Microsoft Windows ME; Microsoft Windows 2000/XP/Vista and higher. To use the reporting features of IRT Cronista you will also need Microsoft Word 2000/XP/2003/2007 or higher. Hardware requirements Minimum: Pentium III class PC, 128 MB RAM, approximately 50 MB of free space on the HDD; Video board with at least 16b (65536) colors; 800x600 monitor resolution. Recommended: Pentium III 1GHz (or higher), 256 MB RAM Video board with at least 16b (65536) colors. 1280x1024 or better monitor resolution. Installation notes Important You must have the administrative privileges in order to install GRAYESS IRT Cronista on Windows NT/2000/XP/Vista successfully. This is because IRT Cronista installation requires access to areas of the registry that are available only to those with administrator access privileges. Administrative privileges are not required to use the software. 7 © 2007 GRAYESS Inc. IRT Cronista Manual Installation procedure Place GRAYESS IRT Cronista installation CD into your CD-ROM drive. The installation will start automatically. If not, you can launch it manually. To start up the installation manually: 1. 2. 3. 4. Open your CD-ROM drive; Insert the disc with the program; Double-click on Setup.exe; Follow the instructions on the screen. First of all, the Installation Wizard will ask you to point out licence type. If you have the hardware key, select Sentinel protected. If not, choose Key-code protected and key in the installation code. You can also determine the location where the program will be installed. When deciding between two options – Complete or Custom setup type – take into account that: in case of the Complete setup, the application will be installed with samples (by default, they are installed to My Documents, but you can specify the location by yourself); in case of the Custom setup, you can choose to not install IRT Cronista samples. Note: If this is your first examination of IRT Cronista, and you are going to learn how to use the program with this manual, choose complete setup (with samples) since many of the examples in this manual are based on these sample files. W a r n i n g : at the end, the installation program might ask you to restart your computer. Note: During the first start, if you have the hardware protection key, insert it into the printer or USB port. Then double-click on IRT Cronista icon on the desktop. The program is ready to be used. 8 © 2007 GRAYESS Inc. IRT Cronista Manual Application overview Selecting language and temperature unit Selecting language IRT Cronista is available in several languages. To change the interface language: 1. 2. 3. Choose Language from the File menu to display the Select Language dialog box. Select the language from the list of available languages. Press OK to apply the new language. W a r n i n g : The new language will be applied only during the next start of IRT Cronista. Selecting temperature unit If you also need to change the temperature unit, IRT Cronista provides such opportunity. You can choose one of three possible temperature units: Celsius, Fahrenheit and Kelvin. To change unit: 1. 2. 3. the temperature Choose Settings from the Tools menu to display the Settings dialog. Select a new language and a new temperature unit (Celsius, Fahrenheit and Kelvin are available). Press OK to apply the changes. This also requires restarting of the application. Other settings In addition to language and temperature unit, in this dialog (Tools / Settings) you can also assign some other settings as Date format (dd.MM.yyyy; MM/dd/yyyy; yyyy-MM-dd), Image export format (Print optimized – metafile or Screen optimized – bitmap), and Digits after decimal separator (temperature values can be displayed with up to two digits precision after the decimal separator). These settings will be used everywhere in the program. 9 © 2007 GRAYESS Inc. IRT Cronista Manual Getting started This article shows you how to get started using IRT Cronista. If you work through the procedures described, you will see how easy is to create good-looking and informative reports. The next chapters in the manual show you the full power and flexibility of IRT Cronista, with options and functions allowing you to customize both the information contained in reports and their appearance. Before you start This topic assumes that you have installed the software. If you prefer to work through the examples given below, you should also have the sample images provided with IRT Cronista. The samples by default are placed in My Documents folder of the user who has installed the software (though, during the installation you can point out another location for these files). 10 © 2007 GRAYESS Inc. IRT Cronista Manual Analyzing images When you start IRT Cronista for the first time, you get a window similar to the one shown on the previous page. At the left-hand part of the window you see the tree of all disks and folders on your computer. Click the small plus sign near My Documents to see its contents. If you have chosen to install samples provided with IRT Cronista, you should find the folder named Infrared Samples. Click on this folder to show its contents in the right part of the window. Click on any image to see its details in the preview window in the middle. To be able to analyze infrared images you should activate the Analyzer mode. To do this, click on Analyzer button in the toolbar. Then select some tool in the toolkit and click on the image to create a measurement object which corresponds to the tool you have selected. 11 © 2007 GRAYESS Inc. IRT Cronista Manual Making a report using your images This section shows you how to produce a report based on the images you have captured. You will use one of the standard report templates supplied with IRT Cronista, but it is easy to edit the resulting report or create your own customized template to include any information you need and to use your own layout and format. Follow these four easy steps to create your first report with IRT Cronista. To create a test report: 1. 2. 3. 4. Push button in the toolbar to show the Template Selection dialog (like in the below) with the available list of report templates. Click on an template item to select it and see its preview in the left part of the dialog. Press Run to transfer infrared images and associated data into a Microsoft Word document which will contain your report. The report is ready! Microsoft Word is shown with your report opened. Now you can make the final adjustments, and save the result. In the picture on the next page there is an example of how your report may look. As you see, it may contain both infrared and visual images (with the measurement marks you have placed), notes and information concerning the analyzed object, different profiles and histograms, and other information you wish to be included there. 12 © 2007 GRAYESS Inc. IRT Cronista Manual 13 © 2007 GRAYESS Inc. IRT Cronista Manual Application structure: Organizer and Analyzer modes IRT Cronista combines file management, thermal analysis and image database functionality in the convenient all-in-one environment, automating routine tasks and saving much of your work and time. Like Windows Explorer, IRT Cronista displays the hierarchical structure of files, folders, and drives on your computer. It also shows any network drives that have been mapped to drive letters on your computer. In IRT Cronista, beside thermal analysis and reporting functionality, you can copy, move, delete, rename files, link infrared images to visual. There are many places in Windows where you can view and work with files and folders. My Documents is a convenient place to store images, or other files you want to access quickly. You can also view My Network Places, which lists other computers that are connected to your local area network (LAN). View modes Files and folders can be viewed in IRT Cronista in two modes: Infrared Organizer mode and Infrared Analyzer mode. The Organizer mode overtakes the functionality of Window Explorer and adds various extensions to make your work with infrared images more convenient. In the Organizer mode you can easily copy, move, delete, rename files, and arrange them in folders. The Organizer provides opportunity to create sets of notations and comments for single images or groups of images. That is a big help for you when analyzing images and generating reports. Moreover, in the Organizer mode you can link infrared images to their visual light analogues. See the chapter Organizer mode for details. The Analyzer mode is only for the folders with infrared images; it performs the thermal analysis of the images. The Analyzer provides a wide range of tools which can help you to make an exhaustive examination of an infrared image – to measure temperature in different points of an object, to determine the hottest and coldest spots, to display maximum, minimum and average temperature along the line/polyline, to create temperature profiles and histograms, to make necessary marks on an image, etc. See the chapter Thermographic analysis for details. Most of the functionality is available in both modes. You select by yourself which mode suits you better for the task you are doing at the moment. Hint: To switch between Organizer and Analyzer, click the corresponding button in the toolbar: 14 © 2007 GRAYESS Inc. IRT Cronista Manual Organizer mode Viewing images, files and folders About the Organizer The Organizer mode suits better for organizing files and folders on your computer, that is for such operations as copying, deleting, renaming and creating new folders. In this mode you can link infrared images with their visual counterparts, edit and create new sets of notations, add comments, change the color palette and displayed temperature range, modify properties of infrared images, etc. Hint: To switch to the Organizer view click its button in the toolbar: In the picture below you see the structure of the main window when the Organizer mode is activated. 15 © 2007 GRAYESS Inc. IRT Cronista Manual 1. 2. 3. 4. 5. 6. 7. 8. 9. Main menu, toolbar and address bar. Buttons to switch between Organizer and Analyzer modes. Folders Tree window. Folder Contents window (displays the contents of the folder selected in the folders tree window). Temperature scale and palette. Preview window (the active item preview). An infrared image connected to a visual image. Notations for the active (previewed) item. Comments for the active (previewed) item. Opening images, files and folders You can select a folder you want to examine in the left part of the screen (in the folders tree window) that displays the tree of folders on your computer and network neighborhood. The contents of a selected folder open in the folder contents window at the right. The exact address of a selected folder is written in the address bar. The address bar can be also used to point the way to the needed folder or drive. For example, if you select C drive in the address bar, C drive’s folders will be represented at once in the folder tree, and you will see C drive’s contents in the folder contents window. In many ways the Organizer mode duplicates the functionality of Windows Explorer. In the toolbar you can find the standard set of buttons such as Back, Forward and Up buttons which will help you to reach the folder you need at the earliest possible time: Back means return to a folder that was opened before; Forward assists you to reach a folder that was opened later (if you had already used Back button one or several times); and Up means go to the upper level folder. In the toolbar you see also the button that undoes your last action and some other buttons which functionality will be depicted below. To begin working with an image, open the folder where it is located and select the necessary image (click on it with the left-mouse button) in the folder contents window. At once, you will see the preview of the image and annotations for it below. If you do not have any infrared images on your computer at the moment, you can learn the program using Infrared Samples (if you have chosen to install samples during the setup). You can find Infrared Samples in My Documents folder. 16 © 2007 GRAYESS Inc. IRT Cronista Manual View modes IRT Cronista provides several ways for you to arrange and identify your files when viewing them in folders. You can see the files in different ways (as thumbnails, as icons of different sizes, as a list, etc.), sort them by one or another criterion, preview images in a bigger window and place the components of the program on the screen in such a way that is convenient personally for you. When a folder is opened and its contents are represented in the Folder Contents window, you can access each of the following view options: thumbnails, icons, tiles, list, and details. They are available in the View menu or under view modes button. Thumbnails This view type shows thumbnail preview of infrared images (and other images and files). You can control the appearance of infrared images by selecting a different color palette and changing the temperature scale. For folders, Thumbnails view displays the images a folder contains on a folder icon so you can quickly identify the contents of the folder. The complete folder name is displayed under the thumbnail. Infrared images in Thumbnails view: If a folder contains linked infrared and visual images, Thumbnails view shows both linked images one below the other: If a folder does not contain any images, its contents are shown in Thumbnail view as large icons. 17 © 2007 GRAYESS Inc. IRT Cronista Manual Icons Icons view displays your files and folders as icons. Tiles Tiles view displays your files and folders, but the icons are larger than those in Icons view. List List view displays the contents of a folder as a list of file or folder names preceded by small icons. This view is useful if your folder contains many files and you want to scan the list for a file name. You can sort your files and folders in this view. Details In Details view, IRT Cronista lists the contents of the open folder. It is similar to List view but in addition to file and folder names Details view provides such information as size, type, and date modified. 18 © 2007 GRAYESS Inc. IRT Cronista Manual Sorting files and folders In all above-mentioned view modes you can sort your files and folders in order to make it faster to find a necessary item. This operation is more purposeful in List and Details views. Sorting procedure is similar to that in Windows Explorer. The Arrange Icons By submenu of the folder view context menu (right-clicking on a blank area) allows you to sort files alphabetically by Name or by other file property (Size, Type, Date modified). In Details view you can also sort the images using any of the details as a criterion by clicking on the column heading – and click again to reverse the sorting order. Preview Between Folders Tree window and Folder Contents window there is a preview window (in the Dual layout it is situated at the top of the screen). You can view the contents of a file or an image in its normal appearance in the preview window: at the left on the picture below. Note: To show or hide the Preview window, press the preview button in the toolbar: Click on an image or other file you want to see it in the preview window. 19 © 2007 GRAYESS Inc. IRT Cronista Manual The preview window represents an item (folder, file, image) selected in the Folder Contents window at the moment. In Thumbnails view the selected (active) item is marked by the red frame which borders it (like in the picture above). If you do not need the preview window at the moment you can also close it by simple clicking on a small cross in its top right-hand corner . Under the image in the preview window you can see two icons with arrows . Pressing these buttons you can consecutively glance over all images contained in the open folder. If the selected visual image is linked to infrared one, the preview window will contain both. To see just the infrared image click on the icon below the displayed picture. To see both images press this button again. Active and selected items The previewed image is considered to be active. The active state of an image is marked by a red border. Preview, notations, comments, file info and temperature scale all refer to the active image. The selected images (there can be several at once) are marked by a blue border. The grouped operations can be carry out with them (such as copying, moving, deleting, playing a slide show, printing, generating report for selection, etc.). To see which operations are available for a selection of images, right-click on one of them and see the context menu. The images that are neither selected nor active are not marked by special means. They have just a thin gray border. In the picture below, three items are displayed in three possible states: active item with a red border, selected item with a blue border, neither active nor selected item with a thin gray border. 20 © 2007 GRAYESS Inc. IRT Cronista Manual File Info and Notations tabs Below the previewed image there is an informational section that has two tabs: Notations and File Info. If you do not see this section, choose Windows / Infoview in View menu. If Notations tab is selected, notations and comments related to the previewed (active) item are displayed. If there is no notes, it means that they are not created yet for this folder. See the chapter Notations below to learn how to do this. While Notations contain the notes created by yourself, File Info (that consists of Image Info and File Details) contains some information automatically defined by the computer or taken from the camera (image size, name, location, date/time of capture, different temperature parameters, emissivity, sensitivity, etc.). Some of these parameters you can change by yourself, though, you can always restore the starting data (just double-click on Restore originals at the bottom of Image Info list). You can hide comments and notations (or image info and file details) bellow the picture clicking on the notations icon . This will enlarge the image in the preview window. Notations and comments will temporarily disappear until you press this button again. Layouts You can arrange windows in the most convenient way to perform the current task. For this, IRT Cronista has several predefined window layouts: standard, filmstrip and dual. Layout selection is made in the Layouts menu. You can switch between different layouts using hot keys. F7 corresponds to the standard layout, F8 – to the filmstrip layout, F9 – to the dual layout. Every layout has two variants: vertical and horizontal. Depending on images proportions, resolution and orientation of your monitor, one or the other variant will be more preferable. You can choose one or another variant in the same Layout menu. The three mentioned layouts differ from each other for the position of the preview window (together with notations and comments) and the Folder Contents window (that displays the thumbnails or icons of the images contained in the viewed folder) regarding to each other. At the same time, the layouts do not touch the Folders Tree window and the Temperature Scale window (you can only show or hide them). Standard layout The standard layout is a default windows placement. It looks similar to Windows Explorer. The Folder Contents window shows several rows and columns of icons (or thumbnails), and the preview window is situated at the left (in vertical position): 21 © 2007 GRAYESS Inc. IRT Cronista Manual In horizontal position, the preview window is situated at the top. Filmstrip layout Your pictures appear in a single row of thumbnail images. You can scroll through your pictures using the left and right arrow buttons. If you click a picture, it is displayed as a larger image above the other pictures. 22 © 2007 GRAYESS Inc. IRT Cronista Manual Dual layout This layout displays the contents of one folder in two windows: the left window shows only the infrared images, the right - all the other files. This helps to separate the infrared images from the visual ones, so it is easier to link them with drag and drop. Arranging window s Though different layouts provide several ways to arrange the windows on the screen of your computer, you may need to amend them to your discretion. You can control the preview window size, like other windows sizes and their arrangement on the screen, simply using the mouse. When the cursor is over the border of a window, it changes its usual appearance and takes the form of twosided arrow . Then just hold down left mouse button and drag it up/down or right/left. The window will widen or decrease depending on the direction of dragging. For example, you may need to make the preview window bigger in order to see images in more detail. Drag the right edge of the preview window toward the right, and the bottom edge further down. 23 © 2007 GRAYESS Inc. IRT Cronista Manual The preview window becomes larger. At the same time, the information part below (with notations and comments) and Folder Contents window (on the right) decrease. Moreover, you can hide or show some windows. To do this, use Windows in the View menu or Windows in the context menu to show or hide one or another window. Playing sequences, slide show s IRT Cronista includes Sequence Player, which enables you to: open and view sequence files (files that contain sequences of infrared images, for example .IRS files). play separate images consequently as if they were a sequence. run a slide show with infrared images. Playing separate images To play a selection of images: 1. 2. 3. Select infrared images you want to play. To select consecutive images, click the first item, press and hold down SHIFT, and then click the last item. To select nonconsecutive files or folders, press and hold down CTRL, and then click each item. To select all images in the folder, press CTRL + A. Choose Play from the Tools menu (or from the context menu) to display Sequence Player. Press the Play button to start. Playing sequence files To play a sequence, double-click the sequence file to open it in the Sequence Player, and press the Play button. To play more than one sequence one after another, mark all sequences you want to play and choose Play from the Tools menu (or from the context menu). You can also play separate images together with sequences if you select them all. Sequence Player Sequence Player is opened in a separate window (see the picture on the next page). In Sequence Player, you can read the temperature at any point of an image pointing the mouse over it. This feature functions like the spot temperature flying tool. Sequence Player has its own independent temperature scale and palette. When playing sequences and slide shows, it displays the same color palette for all played images. You can choose the palette that fits you better in the palettes combo box, set temperature range – in the same way as you do in the Organizer or Analyzer modes. 24 © 2007 GRAYESS Inc. IRT Cronista Manual When Sequence Player opens a sequence, it shows the average speed at which frames of this sequence were recorded. To change the playback speed, use Playback speed combo boxes at the bottom of Sequence Player. Specify the number of frames played per second or specify a delay between frames in seconds. At the left bottom part of the Sequence Player window there is a set of buttons to help you control the playing process: play the sequence forward; play the sequence back; stop button; go to the next frame (you can manually go through the sequence showing one frame after another); go to the previous frame; Auto repeat means that the sequence is repeated from the first frame after the last frame in the sequence is played. You can also go through the sequence using playing slider. From the right of the slider, image name and its sequence number are displayed. You can maximize or minimize the Sequence Player window in order to fit zoom factor. Zoom combo box is situated at the top of the window. 25 © 2007 GRAYESS Inc. IRT Cronista Manual Operations with files and folders Files and folders Operations with files and folders are pretty much similar to those in Windows Explorer. Most Windows tasks involve working with files and folders. Windows uses folders to provide a storage system for the files on your computer, just as you use manila folders to organize information in a filing cabinet. Folders can contain many different types of files, such as documents, music, images, videos, and programs. You can copy and move files from other locations, such as another folder, computer, or the compact flash card with images from your camera, to folders you create. You can even create folders within folders. For example, if you are creating and storing files in the My Documents folder, you can make a new folder within My Documents to contain the files. If you decide that you want to move the new folder to a different location, you can easily move it and its contents by selecting the folder and dragging it to the new location. Creating a new folder To create a new folder: 1. 2. 3. 4. 5. Switch to the Organizer mode. Open a folder where you want to have a new folder (for example, My Documents). Choose New / Folder in the File menu, or right-click on a blank area in the folders contents window, pointing to New, and then clicking Folder, or just press the appropriate button in the toolbar . A new folder is displayed with the default name New Folder selected. Type a name for the new folder and then press ENTER. Copying and moving files or folders Copying means that you create a duplicate of a file in other location. So, you can have the same file in several folders. On the contrary, if you are moving a file, it means that this operation will change its location: the file will be deleted from one folder and will appear in another one. To copy an item: 1. 2. 3. Switch to the Organizer mode. Open a folder where the file or folder you want to copy is located. Click on the file or folder you want to copy with the right mouse button and choose Copyfrom the context menu. This will temporary place a copy of the item in the clipboard. 26 © 2007 GRAYESS Inc. IRT Cronista Manual 4. Select the drive or folder you want to copy to, and then click Paste in the context menu of this folder or drive. The operation of moving is quite similar to copying. To move an item: 1. 2. 3. 4. Switch to the Organizer mode. Open a folder where the file or folder you want to copy is located. Click on the file or folder you want to copy with the right mouse button and choose Cut from the context menu. This will temporary place a copy of the item in the Clipboard. Select the drive or folder you want to copy to, and then click Paste in the context menu of this folder or drive. Notes: All these operations (Cut, Copy, Paste) are also contained in the Edit menu. To speed up these operations use the combinations of keys: to copy press CTRL + C; to move (cut) press CTRL + X; to paste press CTRL + V. Copying and moving by dragging Another way to copy (or move) files and folders is to drag them with the mouse. It is convenient to drag files from the Folder Contents window (on the right of the preview) to any folder visible in the Folders Tree window (on the left of the preview) or to drag files within the Folder Contents window. To drag an item: 1. 2. 3. 4. Select the file or folder you want to move. Make sure the destination for the file or folder you want to move is visible. For example, if you are moving a file from the My Documents folder to the desktop, you might need to resize IRT Cronista so that the desktop becomes visible. Drag the file or folder to the destination. To do this, simply hold down the left mouse button when clicking on the required file or folder. When you begin to drag the file, the cursor changes its form . When you keep on dragging, and the cursor reaches a folder, drive or desktop, it changes its appearance again, and the folder under cursor becomes selected. The file you have chosen will be copied into the folder you have selected when the left mouse button is released. Notes: If you drag an item while pressing the right mouse button (instead of the left button), you can move, copy, or create a shortcut to the file in its new location. Just choose the necessary option from offered menu. This menu appears when you release the button. 27 © 2007 GRAYESS Inc. IRT Cronista Manual If you drag an item to a folder located on the same disk, the item will be moved. To copy the item instead of moving it, press and hold down CTRL while dragging. If you drag an item to another disk or drive, it is copied, not moved. To move the item, press and hold down SHIFT while dragging. Changing the name of a file or folder To rename an item: 1. 2. 3. 4. Open a folder where the file or folder you want to change name of is located. Click on the file or folder you want to rename. Choose Rename in the File menu or in the context menu of this file (click on it with the right mouse button to make the context menu appear). Type a new name, and then press ENTER. Notes: File names cannot contain the following characters: \ / : * ? " < > |. The names of system folders such as Documents and Settings, Windows, or System32 cannot be changed. They are required for Windows to run properly. If you need to change names of many files, it is much faster to do this with the hot key F2 . So, you do not need to open Edit or context menu every time you want to rename a file or folder. Just press F2 and key in a new name. Deleting files and folders To delete an item: 1. 2. 3. Find a file or folder you want to delete in the Folder Contents window or in the Folders Tree window. Choose Delete from File menu or from the context menu (right clicking on the chosen item). Press OK in the dialog box that appears (usually accompanied by a special sound) or press No if you have changed your mind. Note: Usually, deleted files first get into the Recycle Bin, and you can restore them until you empty it. But you can delete files permanently (without sending them into the Recycle Bin) if you hold down SHIFT while deleting. 28 © 2007 GRAYESS Inc. IRT Cronista Manual Linking visual images to infrared About linking images You can link an infrared image to a usual visual light image. Two linked images are displayed and handled by IRT Cronista as one item. For example, when a report is generated, the linked images will appear at the same page and you will not need to choose the corresponding images manually. IRT Cronista automatically links images if they are situated in the same folder and have the same filename (note that such images have the same filename but not the same extension), and in some other cases as well if it is possible to determine the correspondence. In other cases, you have to link the images manually, and IRT Cronista has many possibilities to help you. Linking images by copy and paste To link an infrared and a visual images by copy and paste: 1. 2. 3. Switch to the Organizer mode. Go to the folder with visual images, right-click on the visual image you want to link, and choose Cut in the context menu (or Copy if you want to create a linked copy of the visual image). Go to the folder with infrared images, right-click on the infrared image you what to link a visual image to, and choose Paste in the context menu. 29 © 2007 GRAYESS Inc. IRT Cronista Manual Notes: You can only copy-cut a visual image and paste it on an infrared image, but not the opposite. If the images you are linking are in different folders, the visual image will be moved or copied to the folder with the infrared image. You can use keyboard shortcuts to speed up the process: CTRL + C to copy, CTRL + X to move (cut), CTRL + G to paste and link. Linking images by drag and drop To link an infrared and a visual images: 1. 2. 3. 4. Switch to the Organizer mode. Copy all visual images into the folder with infrared images. Select Dual layout by choosing Dual in the Layouts menu. Drag one visual image to the corresponding infrared image. When you are dragging a visual image over the infrared one, the preview window shows both images as if they were connected. Note: You can only drag a visual image and drop it on infrared, but not the opposite. 30 © 2007 GRAYESS Inc. IRT Cronista Manual Disconnecting w rongly connected images You can disconnect one pair of wrongly connect images or several pairs at once. To disconnect one wrongly connected pair, right-click on the image and choose Disconnect from the context menu (see the picture) or use key combination: CTRL + D. To select consecutive images, click the first item, press and hold down SHIFT, and then click the last item. To select nonconsecutive files or folders, press and hold down CTRL, and then click each item. Then disconnect these images. 31 © 2007 GRAYESS Inc. IRT Cronista Manual Temperature scale and palettes Temperature Scale w indow The temperature scale and the color palette for the active infrared image (or all infrared images in the viewed folder, depending on the current setup) is shown at the right-hand side of the main window. The temperature scale window shows the temperature range selected for displaying it against the palette – it gives the correspondence between temperatures and the palette of colors used to represent them. If you do not need the temperature scale window at the moment, you can temporary hide it by clicking on the sigh in its top right-hand corner. Selecting the temperature span and palette Temperature span You have three options to set the displayed temperature range for an image: 1. 2. 3. Preset range is the temperature span defined when the image was taken by the camera. Auto range is from the minimum temperature to the maximum temperature on the image. By clicking on Custom range radio button you can define the temperature range limits of your own. 32 © 2007 GRAYESS Inc. IRT Cronista Manual Palettes Palette is a number of colors to display temperature differences. IRT Cronista has a wide selection of pseudo-color palettes that can be used to display infrared images. Sometimes one palette suits better to reveal the problem than the other. To change the palette, select its name from the palettes combo box under the palette bar (see the picture on the left). United Range and Same Palette options You can apply the same temperature range and the same color palette to all infrared images in the folder. In this case, the same color at different spots of different images will mean the same temperature at these spots (this is true only if other parameters such as emissivity and calibration range coincide). United Range To apply the same temperature range to all images in the folder, mark the United Range check box. In this case, the resulting temperature span will be the lowest minimum to the largest maximum of all images temperature spans and it will be applied to display all images in the folder. You can also define your own temperature span by clicking on the Custom radio button, which again will be applied to all images in the folder. If United Range is not marked, every image in the folder will have its own temperature range. 33 © 2007 GRAYESS Inc. IRT Cronista Manual Same Palette To display all images using the same color palette, place a mark in the Same Palette check box. Clear the Same Palette check box to allow every image in the folder to have a different palette. Changing temperature unit The indicator of temperature unit is situated on the Temperature Scale window. IRT Cronista provides the opportunity to choose one of three possible temperature units: Celsius, Fahrenheit and Kelvin. To do this, choose Settings from the Tools menu. In the Settings dialog choose the temperature unit that suits you better: 34 © 2007 GRAYESS Inc. IRT Cronista Manual Notations About notations A set of frequently used notes, divided into groups is called notations in IRT Cronista. Consider, how many different sentences do you use when writing an inspection report? Most likely not that many and they repeat frequently. Notations allow you to define all possible comments once and divide them into groups. Every time, when you need to add a note to an image, instead of keying in the text again (or copying it from another image), you can simply choose it from a list of notations. Moreover, software of some infrared cameras allows you to do it right in the field. The notations are indispensable when creating reports. Just define the place in the report template where to insert notations belonging to the given category – and the textual part of your report will be done automatically. In IRT Cronista, you can assign sets of notations at the folders level, that is you can choose notes for an image from the notations set assigned to the folder which this image belongs to, or from notations assigned to folders higher in the hierarchy. In such a way, sub-folders inherit notations sets of their parents. However, the inheritance can be turned off. You can also create Notations Briefcase which will contain any number of sets of notations from which you choose the set you need for selected folder. Creating sets of notations This topic depicts how to create a set of notations for a folder (or shared notations for all folders). This set of notations will be assigned to all images in this folder and its subfolders. It remains only to mark necessary check boxes when working at a certain image to have ready notes concerning particularly this image. To create a set of notations, use the special Notations Editor that is a part of IRT Cronista Notations are divided into groups by means of categories. So, before creating a new notation, it is necessary to specify which category it belongs to. As an example let us use the following notations: Location: Minsk, Munich, New York; Equipment: Pump starter, Motor controller, Lighting breaker; Problem Class: No fault, Maybe a fault, Definitely a fault; Problem: Circuit hot, maybe overloaded; Temperature annomality; Fuse clip overheated. Location, Equipment, Problem and Problem Class are the categories of notations in our example. 35 © 2007 GRAYESS Inc. IRT Cronista Manual For every category it is possible to specify how many notations from this category can be simultaneously selected: one or many. For example, for categories Location, Equipment and Problem Class it is meaningless to select several notations to describe one image. At the same time, for category Problem we should allow selecting several notations at once. To create a new set of notations: 1. 2. 3. Switch to the Organizer mode. Open the necessary folder. Choose New / Notations for Folder in the File menu or choose the same command in image context menu. 4. Then the Notations Editor opens. 5. Click on the blank space in the notations section to begin editing. 6. Enter category name Location and press ENTER. 7. Press CTRL + ENTER to insert the first notation into the new category. Key in Minskand press ENTER. 8. Press ENTER again to add the second notation, key in Munich and press ENTER. 9. Repeat point 8 to add the last notation in this category – New York. 10. Press SHIFT + ENTER to add the second category and repeat points 4-7 to add categories Equipment, Problem and Problem Class. Remember that SHIFT + ENTER always creates a new category (you can even create a category within another category), CTRL + ENTER creates a new notation in the selected category. ENTER means the addition of a neighbor – if a category is selected at the moment, then another category will be created; if a notation is selected, then another notation will be created below. By default, the categories allow multiple selection. To change the allowed selection use special buttons in the toolbar . The first (round) button means that only one notation can be chosen for this category; the second (square) button allows choosing several notations at once. In our example we should change the allowed selection for categories Location, Equipment and Problem Class to single selection. To do this select the necessary category with the left mouse button and press the appropriate button in the toolbar. If you want some of the notations to be selected by default for all images in the folder, place a mark near these notations (Minsk in our example). 36 © 2007 GRAYESS Inc. IRT Cronista Manual To speed-up the process you can move up and down through the list of categories and notations using the up/down arrows on the keyboard and put check marks with the space button. Notations Editor toolbar In the toolbar of the Notations Editor window there are some useful buttons that will help you creating and editing notations: creates a new category, notation or neighbor; undoes the last action(s); redoes the last action(s); renames a selected category or notation; deletes selected notation or a whole category with all notations in it; moves a category or a notation up changing their sequence order; moves a category or a notation down changing their sequence order; allows single choice in the category; allows multiple choice in the category; determines the inheritance status: if the inheritance is turned on, the current folder will “inherit” notations form folders on higher level (if there are such); if not – the current folder will have its own set of notations. Comments The notations editor has Comments field in the bottom part of the window. Here you can create a comment that will be applied to every image in the folder (then, while selecting notation for images, you can apply individual comment to each image if it is necessary). You can use this field in cases when the note you want to add does not fit into the notations structure – whether it is too long or contains information unique for this folder. You can also use this field if you are used to manage without the structured notations and there is no need of them for you. At the end press OK to save the newly created or edited set of notations. Shared notations If you create a set of notations for a folder, this set of notations becomes available to every image in this folder and its sub-folders (if the inheritance is turned on). In this manner you can define a set of notations available to all images on your computer – the Shared Notations. If you need only one set of notations, or you want to use some notations with all images – use Shared Notations. 37 © 2007 GRAYESS Inc. IRT Cronista Manual To create the set of Shared Notations, choose Shared Notations from the Tools menu. The structure of shared notations is the same as in Notations for folder. See the previous topic Creating sets of notations for instructions how to edit them. Notations Briefcase Notations Briefcase is a convenient mean to store different sets of notations in one place. In this case, when you need one or another set (created before), just select it from the list of existing sets. To see your Notations Briefcase, choose Tools / Notations Briefcase. The right part of the dialog shows the list of available notations sets. Click on any set to preview its content (assigned categories and notes within them). If you do not see any notations there, you can copy them from another place through the clipboard or create new sets right in the field. Here is the description of buttons situated in the local toolbar: creates a new notations set using Notations Editor depicted above; allows to edit selected notations set using Notations Editor; deletes selected set of notations; cuts notations and places them into the clipboard; copies notations to the clipboard; paste the data from the clipboard; 38 © 2007 GRAYESS Inc. IRT Cronista Manual allows you to update Notations Briefcase on your Pocket PC. In this case, Notations Briefcase folder in the PPC will be overwritten. To use any set from Notations Briefcase, choose New / Notations from Briefcase in the context menu of current folder. Then click on the necessary set and push Assign button. Selecting notations for images To have notations available for an image, it is necessary to have some set of notations assigned to the folder where the image is located or to a folder of higher level. The notations editor for images is located below the preview window (or to the right from it). If you have selected an image and do not see the notations editor, do the following steps to show it. To show image: 1. 2. 3. the notations editor for Make sure that it is selected to display the preview window: check if there is a check mark near Windows / Preview item in the View menu. Make sure that it is selected to display the infoview window: check if there is a check mark near Windows / Infoview item in the View menu. In the bottom part of the window where you see two tabs Notations and File Info, choose Notations. Two modes of Notations Editor for images If the keyboard focus is at another window, the notations window shows only the selected notations. In our example we have specified Location / Minsk to be chosen by default, this is why only this notation is visible when the focus is not at the notations editor. To show all available notations, click on the notations editor window – it will go into the editing mode and you will be able to select new or change the already selected notations. To see all available notations permanently (without regard to what window is active at the moment), place a check mark near Lock edit mode. 39 © 2007 GRAYESS Inc. IRT Cronista Manual Editing notations for images If the set of notations does not have the note you need for an image, you can add it. In this case, only this image will have the added note. To create an additional notation for an image, do the same steps as creating notations for a folder or use the context menu (click on a blank area of the notations window) that contains the full list of commands for editing (Insert Category, Insert Notation, Add Neighbor, Delete, Rename, Copy, Past, Move Up, Move Down, Single Selection, Multiple Selection, etc). Here you can also add a comment (in the same window, below the notations) that will contain information unique for a selected image. If you need to add a new notation available for other images, you have to add it to the set of notations for folder. To do this, return to New / Notations for Folder in File menu or edit the existing set of notations selecting Folder Notations (this icon is placed in a folder for which the notations have been created – double-click this icon to display the Notations Editor for folder). If the image has already some notations, and you are not sure they are correct, you can restore the starting data. To do this, click on a blank area in notations for image window and choose Clear from the context menu. After you confirm the operation, all not inherited notations will disappear, and only notations assigned for folder will remain. Copying notations You can copy a whole notations set or a definite category from one folder/image to another. To copy a set of notations, click on a blank area in the notations window and choose Copy from the context menu. Then select other image or folder and in its notations window choose Paste. So, the notations set will be transferred from one image/folder to another. If the second item has already had any notations, the new set of notations will be added to the earlier created notations. 40 © 2007 GRAYESS Inc. IRT Cronista Manual Thermographic analysis — Analyzer mode Viewing images in the Analyzer mode About the Analyzer The Analyzer mode performs thermal analysis of infrared images. The Analyzer provides a wide range of tools which can help you to make an exhaustive examination of an infrared image – to measure temperature in different spots of an object, to determine the hottest and coldest spots, to display maximum, minimum and average temperature along the line/polyline, to create temperature profiles and histograms, to make necessary marks on an image, etc. Hint: To switch to the Analyzer view click its button in the toolbar: If you need, for example, to forecast a hardware breakdown and explain the reason why it may happen, you will use the measurement tools to describe it in the most comprehensible way. Beside the majority of operations in the Organizer mode, the Analyzer mode can perform the thermal analysis of infrared images. IRT Cronista is a powerful program, which has various measurement tools to present thermal information contained in an infrared image. The measurement tools include: Under cursor spot temperature flying tool to know the temperature at any point in the image quickly; Spot temperature tool to display the temperature value at a point in the image; Line tool to be used as graphic object to display the maximum, minimum and average temperatures along a line; Profile diagram to display the temperature profile along the line; Area tool to display the maximum, minimum and average temperatures within this area; Histograms to display the temperature distribution in certain area; Difference tool to show differences between the temperatures measured by other tools; Hot and cold spot finder tool to automatically locate problem zones in the image; Dew Point option to locate zones of dew accumulation; Labels to identify objects in the image. 41 © 2007 GRAYESS Inc. IRT Cronista Manual The image can be temperature calibrated (by supplying emissivity, ambient temperature and other parameters) as a whole, but each measurement object can also be calibrated independently. The results from these tools can be used in the generated reports. They can also be copied and pasted into documents in other applications. All above mentioned tools and operations are available in the Analyzer mode. Window s, buttons and other elements To take thermal measurements, open an infrared image in the Analyzer mode. To switch to the Analyzer mode, simply double-click on an infrared image or press the appropriate button in the toolbar: In the picture below you see the structure of the application when the Analyzer mode is on. 1. 2. Active image with analysis objects on it. Measurement Details concerning active image (notations, comments, linked visual image). 42 © 2007 GRAYESS Inc. IRT Cronista Manual 3. 4. 5. 6. 7. 8. 9. Properties of the active object or image. Profile diagram(s). Analysis toolkit with all the measurement tools. Infrared (and linked visual) images in the active folder. Buttons to switch between Organizer and Analyzer modes. Temperature scale and palettes window. Folders tree. Many elements and windows are similar to those in the Organizer mode. For instance, you can find here the Temperature Scale window, the Folder Tree window, the main menu, toolbar and address bar – all the same as in the Organizer mode. Below follows a brief description of several elements: Analysis window, Folder Contents window, Temperature scale and palette and Folder tree. Analysis window The central part of the screen is occupied by the analyzed infrared image. The analyzed infrared image is accompanied by Measurement Details (on the right) and Analysis Details (at the bottom): As you can see form the picture above, the Analysis Details (under the image) consist of two parts: information section and profile diagram. The Measurement Details (on the right of the analyzed image) include three parts: notations chosen for the active image, comments, and linked visual light image. If there is no visual image, that means it was not linked to this infrared image (see the chapter Linking visual images to infrared for details). If there is no comments and notations, see the chapter Notations to know how to create them. You may need to hide analysis and measurement details in order to enlarge the analysis space. To hide or show these elements, use View menu or context menu of the analysis window. Folder Contents window On the right of the folders tree window there is the folder contents window. This is a filmstrip of images in the active folder (opened in the folders tree). To show or hide this window, place or remove a check mark against Image Thumbnails in View / Windows menu. 43 © 2007 GRAYESS Inc. IRT Cronista Manual Temperature scale and palettes The temperature scale window (situated in right-hand part of the screen) shows the temperature range selected for displaying it against the color palette. It gives the correspondence between temperatures and the palette colors used to represent them. The functionality of the temperature scale window in the Analyzer mode is the same as in the Organizer mode. So, see Temperature scale and palettes topic above. To show or hide this window, choose View / Windows / Temperature Scale. Folders tree The folders tree window is situated in the left-hand part of the screen. It shows the content of catalogues and folders on your computer and network. Here you can go to a folder with your infrared images that you want to analyze. To show or hide this window, choose View / Folders or press CTRL + F. Zooming the images IRT Cronista can magnify any image to up to 1000%, which will allow you to see the value of every detector separately, and help you positioning measurement tools more precisely. Hint: Control images' zoom by the zoom combo box in the toolbar: Zoom In and Zoom Out In order to change the zoom factor of images, simply use Zoom In and Zoom Out buttons in the toolbar (or the same commands in the context menu). This will increase or decrease the size of the analyzed infrared image. When an image is zoomed to such size that it does not fit to the window, additional Zoom window automatically opens to help you to see where the zoomed part is located: 44 © 2007 GRAYESS Inc. IRT Cronista Manual Custom zoom You can also select or key in the needed zoom into the zoom combo box. It can possess any value from 25% to 1000%: Auto zoom Auto zoom calculates the zoom factor so that the image fits the size of the analysis window. To apply auto zoom to the image, select Auto in the zoom combo box, or right-click on the image and choose Zoom / Auto in the image context menu. When the auto zoom is selected in zoom combo box, the zoom percent is accompanied by the letter A in brackets. Standard zoom The standard zoom factor is used when infrared images are exported to reports. For 320 x 240 images the standard zoom is 100%, for 160 x 120 it is 200%, for larger images it can be less than 100%. To know what is the size of your image, see image properties below the analyzed image. When the standard zoom is selected in zoom combo box, the zoom percent is accompanied by the letter S in brackets: Note: The underlying image pixel data is not scaled, so any analysis tools used to take measurements from the image will take their measurements from the same data and will not suffer rounding errors from the scaling. Single - and multi -image analysis IRT Cronista has two options to analyze images: single-image analysis and multi-image analysis. 45 © 2007 GRAYESS Inc. IRT Cronista Manual In case of single-image analysis, only one image is available in the analysis window. In case of multi-image analysis, you can see several images in the analysis window at once (simply adjust the zoom factor). To switch to the multi-image analysis, make sure that the button in the analysis toolkit is depressed (which corresponds to the Multi-Image Analysis command in the View menu). To switch to the single-image analysis, make sure that this button is not depressed. Multi-image analysis allows to compare images and values at certain points. This also allows to put analysis objects onto several images at once. How many images at once are displayed depends on zoom factor – the smaller it is, the more images you see on the screen. Hint: If you have chosen multi-image analysis for the purpose to comparing images, it is convenient to set United Range and Same Palette options. Analysis view adjustments Beside the infrared images, the analysis view can display associated visual images as well as notations and comments. To specify what to display, use the View Adjustments dialog. To display it, push the button in the analysis toolkit or select Adjust View in View menu. In the section of Single or Multiple, you can specify the kind of analysis you want to perform. In the section Image Details, you can choose whether to display notations and linked visual images near infrared images or not. In Auto Zoom section, it is possible to enable auto zoom as well as define the number of columns to display the images in the analysis window. In makes sense only in case of multiple-image analysis. 46 © 2007 GRAYESS Inc. IRT Cronista Manual Fusion of infrared and visual images In case your infrared camera has a built-in visible light camera, you may overlay the two images – infrared and visual. There are several options of how infrared image is fused with the visual image: transparency blending from full infrared to full visual and opaque alarm range by high, low, or high and low temperatures. Fusion parameters This operation is available only in the Analyzer mode. Choose Fusion from the View menu or from the context menu of an infrared image to display fusion dialog: 47 © 2007 GRAYESS Inc. IRT Cronista Manual Transparency blending. Infrared image is placed on top of the visual image. With the help of the transparency slider you can change transparency of the infrared image from 100% infrared (left side) to 100% visual (right side). If you stop the slider somewhere in between, infrared image will be semi-transparent so that you can see the visual image under it. Alarm range. The alarm range function allows you to highlight target object areas of thermal interest by making the out of range area fully transparent. You can enable an alarm range based on high, low, high and low, or in-range temperature values. With the alarm range function enabled, target object temperatures are highlighted in the infrared color that corresponds to the alarm temperature(s) you have set. One color (isotherms on visual image). Sometimes marking areas of interest with only one same color produces more comprehensive results. Place a check mark in the One color check box to highlight high temperatures with red color, low temperatures with blue color and in-range temperatures with green color. Image alignment. If infrared and visual images were not aligned properly by the camera, you may realign them or fine-tune the alignment in IRT Cronista. Make infrared image semitransparent to see both infrared and visual images. Use Vertical and Horizontal sliders to move visual image. Use Zoom slider to scale visual image. There is a rectangle on the visual image that shows where is the infrared image is situated relative to the visual counterpart. When you use vertical/horizontal slider or zoom, you can see the rectangle on the visual image to change its position. In that way, you can adjust the view so that two images coincide. At the end, press OK to apply the changes. The fused image will appear in the place of infrared image (on the screen as well as in the report). Canceling the fusion To cancel the fusion, select the fused image, go to fusion dialog again (View / Fusion), drag the transparency slider to the left, and press OK. 48 © 2007 GRAYESS Inc. IRT Cronista Manual Measurement tools M easurement objects To create a measurement object on the image you should use the corresponding tool from the toolkit: To pick one of the placement tools from the toolkit, click on the tool in the toolkit. The toolkit contains a number of tools for placing and altering measurements objects onto images. Picking these placement tools from the toolkit is equivalent to choosing them from the Analysis menu. Some tools have sub-tools. For example, the area tool has a selection of different area types: rectangle, ellipse and polygon. To select a sub-tool, click on the small rectangle on the tool button in the toolkit. Note: The analysis toolkit, as well as Analysis menu, are available only in the Analyzer mode. To switch to the Analyzer mode, press the Analyzer button in the toolbar: Active, selected, not selected objects Every measurement object can be in one of the following states: active and selected (only one for every image); selected (several is allowed); not selected. This picture shows objects in all three states: Line 1 is active (black squares around); Spots A and B are selected (white squares around); Line 2 is neither active nor selected. 49 © 2007 GRAYESS Inc. IRT Cronista Manual To select an object, pick up the selection tool and click on this object. The object becomes selected and active. To unselect a measurement object, click on another object or on a blank area in the image. When there is no active object, the whole image is decided active. When a measurement object is active, its parameters are shown below in the Analysis Details window. If none object is active, the Analysis Details window displays the image properties. Operations which require one object take the active object. Operations that can handle more than one object take the selected objects. Spot tool and connection tool The spot and connection tools allow to determine the temperature at any point of the analyzed infrared image, and automatically show temperature difference between these points. can also automatically mark hottest IRT Cronistaand coldest spots in the image. The spot tool has several functions depicted below in this topic. First of all, it functions as under cursor spot temperature flying tool and spot placement tool. Under cursor spot temperature flying tool Under cursor spot temperature flying tool is used to check the temperature at any place of the image. Activate the spot tool in the toolkit. The mouse pointer will change when it is over the active image to show that you have picked the spot tool . Then move the mouse pointer over the image to read temperatures under the pointer and show them in a small window near the pointer (if in such a moment you make a click with the left mouse button, a new measurement object will appear on the image). Spot placement tool To place a measurement spot on the image: 1. Pick the spot tool from the toolkit . The mouse pointer will change when it is over the active image to show that you have picked the spot placement tool (in fact, this is under cursor spot temperature flying tool). 50 © 2007 GRAYESS Inc. IRT Cronista Manual 2. Place the pointer at the spot on the image where you want to measure the temperature and click. Now you have a new spot on your image with the temperature indicated. Connection tool The connection tool displays the difference in temperature readings between any two measurement spots. Before using this tool you should already have two or more spots on your image. To display temperature difference: 1. 2. 3. Select the connection tool from the toolkit . The pointer will change when it is over the image to show that the connection tool is selected . Move the pointer over a measurement spot, click on it with the left mouse button and, holding it, drag the pointer towards the measurement spot that will be subtracted from the first spot. A line is dragged out from the first spot to the pointer showing that you are making a link between two spots. When the pointer is on the second spot, release the mouse button to display the temperature difference between the tools. In the picture below, you see the measurement object A-B that displays temperature difference between spots A and B. Select Spots This command contained in the spot tool submenu selects all spots in the active image at once (regular temperature spots, hot/cold spots, and temperature difference spots). After you have selected them, you can delete or move them altogether. Delete Spots This command is also contained in the spot tool submenu. It erases all types of spots in the active image at once. 51 © 2007 GRAYESS Inc. IRT Cronista Manual Hot and cold spots finder tool IRT Cronistacan automatically locate the hottest and coldest spots in an infrared image. To do this, choose Find Hot / Cold Spots from the spot tool submenu or from image context menu. The hot/cold spots finder dialog opens (see the picture on the right) Now set the parameters of search: Select the kind of spots to find: hot or cold spots. Specify the number of spots to find in the Spots number field (from 1 to 5). Specify the minimum allowed distance between the spots in the Minimum distance field (from 0 to 1000 pixels). If you need to locate spots falling into some temperature range, check Enable temperature range box and specify the temperature span. To locate spots on all images in the folder, check Process all images box. To find the spots and show them on the images, press Find. Then press Close to close the dialog. Hint: To delete hot or cold spots from the image (images) specify zero as spots number to find. In the picture below you see the example. There are three spots: A!, B! and c!. The hot spots are marked with a capital letter followed by the exclamation sign. The cold spots are marked with a lowercase letter followed by the exclamation sign. 52 © 2007 GRAYESS Inc. IRT Cronista Manual Note: It is not possible to move hot/cold spot objects. Line tool and profiles The line tool can be used to draw a line or polyline (a series of lines joined end to end) on the image. You can use lines in several ways: to display the maximum, minimum and average temperature along the line (or polyline) in the image; to display the temperature profile along a line (or polyline) in the image. To draw a line or polyline on the image: 1. 2. 3. Pick a line sub-tool from the toolkit by clicking on the small rectangle near the line tool button and choosing the type of the line that you need (free line, horizontal line, vertical line or polyline). The pointer will change to when it is over the active image to show that you have picked the line placement tool. Position the pointer where you want the line to begin and press the left mouse button to place the first of line's end-points. Then, holding the button, drag the pointer to the position where you want to place the next (or the last) point and release the button. In case of polyline, consequently click on places where you want to create new vertices. To complete polyline creation and be able to place other objects, click on any tool in the toolkit. When you create a line measurement object, IRT Cronista automatically draws the line profile in the profile window at the screen bottom. A profile is a curve showing temperatures at every point along a line. A line profile visualizes primary analysis information about a line. Hint: 53 © 2007 GRAYESS Inc. IRT Cronista Manual The profile section is a part of the analysis details window. So, if you have drawn a line or polyline and still do not see its profile in the right bottom corner of the screen, this is probably because the Analysis Details window is not shown. To show this window, choose Analysis Details from View / Windows submenu. If you place more than one line on the image, all of them will be drawn in the same window with different colors: Profile of the active line is always drawn with a bold pen. Additional statistics like minimum or maximum refer only to the active line. Notes: Though, all profiles are displayed in the same window on the screen, it can be different in a report: if you place two placeholders for profiles in the report template. In this case your report will have profiles in two places. Using the context menu of the profile window (right-click on the window), you can copy the diagram into the clipboard or change properties of the displayed line object. Area tool and histograms The area tool can be used to place an area object (rectangle, ellipse or polygon) on the image. You can use areas on the image for several purposes: to display the maximum, minimum and average temperature within this area; to display the temperature distribution (histogram) in this area. To draw an area on the image: 54 © 2007 GRAYESS Inc. IRT Cronista Manual 1. 2. 3. Pick an area sub-tool from the toolkit by clicking on the small rectangle near the area tool button and choosing the type of the area that you need. The pointer will change when it is over the active image to show you have picked the tool. Position the pointer where you want the upper-left corner of the area to begin and press the left mouse button to start creating area object. Then, holding the button, drag the pointer to the position where you want the right bottom corner to be (or to place the next joint point in the case of polygon) and release the button. In case of polygon, consequently click in the image on places where you want to create new vertices. To complete polygon creation and be able to place other objects, click on any tool in the toolkit. When you create an area object, IRT Cronista automatically creates a histogram and shows it in the diagram window at the screen bottom. Area histogram presents more thermal information about an area. Histogram is a diagram showing temperature distribution in an area. In other words, for every temperature you can see haw many pixels fall into this range. Hint: The histogram section is a part of the Analysis Details window. So, if you have drawn an area and still do not see its profile in the right bottom corner of the screen, this is probably because the Analysis Details window is not shown. To show this window, choose Analysis Details from View / Windows submenu. If you place more than one area on the image, histograms for all of them will be drawn in the same window with different colors: 55 © 2007 GRAYESS Inc. IRT Cronista Manual Histogram of the active area is always drawn in the foreground in red color. Additional statistical values like minimum or maximum refer only to the active area. Notes: Though, all histograms are displayed in the same window on the screen, it can be different in a report: if you place two placeholders for histograms in the report template. In this case your report will contain two histograms in two places. Using the context menu of the histograms window (right-click on the window), you can copy the diagram into the clipboard or change properties of the displayed area object. M easurement objects parameters You can control some of the measurement objects parameters., such as emissivity or ambient temperature. You can also make use of such features as averaging or temperature offset. Emissivity and ambient temperature Emissivity is the fraction of the ideal blackbody spectrum energy a real body actually emits. Ambient temperature is the temperature of the background. You can change emissivity and ambient temperature values (and other supported parameters) for the whole image, or you can do it individually for every measurement object. To change temperature parameters for an object or image: 1. 2. 3. Right-click on the object (or the image) to display the context menu of the object. Choose Parameters. The parameters dialog will be displayed. Select the parameter you want to change and key in a new value. 56 © 2007 GRAYESS Inc. IRT Cronista Manual You can also display the parameters dialog by double-clicking on an object (or image). In this dialog you can see (and change), besides emissivity and ambient temperature, such parameters as averaging and temperature offset (see description below). Note: If a measurement object does not have its own parameters, it takes them from the image. That is why changing a temperature parameter of the image will change the corresponding parameter of the objects, but not for the objects which parameters were individually changed before - their properties will remain unchanged. Objects with individual temperature parameters are marked by single quote sign. For example: 'Line 1, 'A. The most important temperature parameters of the whole image are always shown under the analyzed image. Averaging Averaging can be used when an image is noisy and you want to get more reliable values, not affected by the noise at individual pixels. This is the spatial averaging: to calculate a pixel value, IRT Cronista takes values from pixel's neighbors and calculates their average. You can choose between 3x3 and 5x5 averaging to specify the size of pixel's neighborhood to average. To apply averaging, right-click on a measurement object to display its context menu and choose the type of averaging you want to apply to this object (3x3 or 5x5). If you want to cancel averaging, choose OFF. You can also set up averaging in the parameters dialog (see the depiction above). 57 © 2007 GRAYESS Inc. IRT Cronista Manual Note: The operation of averaging can be applied only to measurement objects, not to the image as a whole. Temperature Offset This method simply adds some value (which can be negative) to the temperature value of an object. Right-click the object and choose Temp. Offset from its context menu. Then, key in the value which should be added to the object value. Properties editor The properties editor situated under the analyzed image is a part of the Analysis Details window. It can contain two kinds or information: image properties or measurement objects properties. If you have measurement objects on your image and one of them is selected at the moment, then object's properties will be displayed (left picture) for this particular object. To switch to image properties (right picture), unselect objects (click on the image at a place where there is no measurement objects). Note that the details given depend on the type of camera used. 58 © 2007 GRAYESS Inc. IRT Cronista Manual Image properties display the information taken from the camera. Some of them cannot be changed, such as image size (in pixels), temperature range, calibration range and sensitivity. Such properties are written in gray color. Other properties like date, time, ambient or atmosphere temperature, emissivity, humidity, etc. can be changed manually. They are written in black. If you have changed something, you can always restore the starting image parameters which were set up in the camera during image capture. To restore original image parameters, double-click against Restore original in the list of image properties. Measurement object properties contain besides emissivity, ambient temperature, averaging and temperature offset described above, such properties as position data (for spots), nodes (the position of lines and areas end-points), value (spot temperature), maximum, minimum and average temperature (along a line or within an area). The list of properties depends on object type. If you change position data of a spot, the spot will change its location on the image. The same concerns lines and areas end-points (nodes). The temperature values can be changed only with the help of Temperature Offset parameter. Selection tool The selection tool has a number of different uses: Left-clicking with the selection tool on a measurement object activates the object. Left-clicking on an empty place in the image unselects all objects. In this case the whole image is considered to be active. Drawing the selection rectangle with the selection tool selects all objects that fall into this rectangle. Double-clicking with the selection tool a measurement object or the image displays the temperature parameters dialog for the object or the image. Double-clicking an object label displays the dialog to change label appearance and contents. Right-clicking with the selection tool an object or the image displays the context menu for the object or the image. The selection tool is also used to reposition and reshape measurement objects and to move object labels. To select several objects hold down SHIFT key and consequently click on the objects you want to select. The active object is always the last clicked one. To select all measurement objects on the image, press CTRL + A. To select just certain types of objects, use Analysis / Select menu. Here you can choose to select all spots, all lines, all areas, all notes or all objects in general. Hint: To switch quickly back to the selection tool after an object placement tool has been used, right click on an empty area on the image. 59 © 2007 GRAYESS Inc. IRT Cronista Manual Editing labels As you can see, every measurement object has its own label showing some information about the object. By default, labels for measurement spots show the temperature at the spot, and labels for lines show the minimum and maximum temperature along the line. You can select object's properties to show in the label and add any custom text to a label. To edit label settings: Pick the selection tool in the toolkit and double-click on the label which appearance you want to change (or choose Label in the context menu of the measurement object). The label settings dialog (like in the picture on the right)will be displayed. Below follows the description of sections contained in the label dialog. Text. Any user-defined text can be entered here. Multi-line text: to start a new line press CTRL + ENTER, as ENTER will only close the dialog. Show properties. This field allows you to show and hide any of supported properties. To show a property on the label, place a check mark near this property Zoom. Allows you to change the size of the font used to draw the label. Arrow. Check box specifies whether to show the arrow between a label and an object or not. The number is the thickness of the arrow. Arrow color, Text color, arrow/text/background color. Background. Press "…" button to change the Transparency of the background. Use the slider to change label background from invisible to opaque. If there is a mark in the check box, the text will be outlined using the background color. So, to see the effect, background must be transparent. By Default. Press this button to save current appearance settings as the default. These default values will be applied to all newly created objects in the future. Reset to Default. This button resets the appearance of the object to the default values. It does not touch custom text and properties to show. Hint: You can change labels of several objects at once. Select the objects and display the label settings dialog for one of the selected labels: your changes will be applied to all selected objects. 60 © 2007 GRAYESS Inc. IRT Cronista Manual To select several objects at once, hold down SHIFT key and consequently click on the objects you want to select. To select all measurement objects in the image, press CTRL + A. Deleting measurement objects Select the objects you want to delete and click delete button objects will be deleted. in the toolkit – all selected You can also delete all objects of some type by choosing corresponding item in the Analysis / Delete menu. Dew Point Dew Point option allows to define zones of possible condensation. To do an inspection of accumulation of dew, choose Analysis / Dew Point. This option is available only in the Analyzer mode. Dew Point dialog shows automatically calculated temperature when the dew forms. It depends primarily on relative air humidity and atmosphere temperature. These values are taken from the camera. But you can set them manually if you have more precise data. If you change relative humidity or atmosphere temperature, then Dew Point temperature will also change. Moreover, you can determine Dew Point temperature of your own. For that, put a check mark near Dew Point combo box and key in the needed value. If there is a check mark near Show dew point isotherm IRT Cronista marks dew zones visually with green color. If you do not want dew zones to be shown graphically on the image, just remove this mark. Click OK to close the dialog and leave the results on the image. Click Cancel to return to the image in its initial look. 61 © 2007 GRAYESS Inc. IRT Cronista Manual Generating reports Generating reports in Word Reports in M icrosoft Word IRT Cronista generates reports in the format of Microsoft Word documents. Thermal analysis, comments, annotations, infrared images and linked to them visual images are stored together and handled in IRT Cronista. Then, all these data can be sent to a report (using templates or not). The advantages of such an approach are the following: The thermal analysis is made in the convenient and specially developed for the purpose workspace of IRT Cronista. Quick report creation: routine, oft-recurring jobs IRT Cronista takes upon itself. A report is a single file in the widely spread Microsoft Word format, which can be easily sent to a customer or converted into another form. Pictures, diagrams and data in the report are active, this means that at any time if you find a mistake, you can return the picture with the analysis back to IRT Cronista and correct them. With the help of the Thermo Reports toolbar IRT Cronista assists you also in creating your custom report templates. You can export not only pictures and diagrams, but any analysis data in the text form as well. IRT Cronista supports at least two working styles to write reports: 1. 2. The automatic generation of reports using templates (inherit or custom), then editing the result. This is the fastest method of report creation, it suits very well when you need to create a report having many similar pages. Creating a new or editing an existing document, periodically inserting images and analysis data. Even though IRT Cronista gives many possibilities to speed up this process, you will have to import and place every image manually in this case. The advantage is that it does not require a prior created report template. This method should be also used when you need to edit an already existing report. Generating reports using templates To generate a report using a template, you should already have a report template. Use one of the templates included with GRAYESS IRT Cronista or create your own (see Custom report templates for details). Before creating a report, you need to make the Thermographic analysis of your infrared images. It is easier also to define notations and comments (see Notations) and link visual images (see Linking visual images to infrared) in IRT Cronista before creating the report, than to do it later while editing the report in Word (though, it is possible to do it even then). 62 © 2007 GRAYESS Inc. IRT Cronista Manual To generate the report for all images in the active folder: 1. 2. 3. 4. Choose Create Report for Folder from the Tools menu or push button in the main toolbar (it does not matter whether you are in the Organizer or Analyzer mode at the moment). The Template Selection dialog opens (see Template Selection dialog for details). Select a report template by clicking on it in the right-hand field of the dialog. Click the Run button. IRT Cronista will go through all infrared images in the folder and export them into the report, showing the progress in Report Generator dialog. Now your report is ready! It is opened in Microsoft Word, you can change whatever you need and save the document, specifying the location where to save it. In the picture on the left you see the result – the first image of a generated report for a folder (using sample template). It may contain the both infrared and visual image, measurement marks placed while doing thermographic analysis, notes and other information concerning measurement objects (profiles and histograms) and image in the whole. The example of how the report may look, see on the page 13. Template Selection dia log The template selection dialog opens when you choose Create Report for Image or Create Report for Folder in the Tools menu. 63 © 2007 GRAYESS Inc. IRT Cronista Manual The Template Selection dialog has its own toolbar. In this toolbar you can choose in which view mode to show the templates in the right-hand field of the dialog. You can choose between thumbnails, icons, list and details view. You can also delete a template selected in the righthand field, or choose command to create a new template. Under the toolbar there is a preview section. There you can see how the report will look. Click on a template name to select it and see its preview. Yellow, blue and red rectangles are placeholders that determine the place in the page where one or another element will be located in the report. The right-hand field of the dialog contains the index of templates. It has three tabs at the bottom. There you can choose which templates to show – All Templates, Only Local or Only Shared. Shared templates are available for all folder on the computer. Local templates are available only for the active folder and its subfolders. All templates display the list of both local and shared templates, custom and inherited. The templates list is the usual list of files, and all operations can be done in the same way as they done for usual files: renaming, deleting, copying through the Clipboard, copying and moving by drag and drop and others. To create a copy of a template, press the CTRL button and, holding it, drag the template you want a copy of to a blank area in the list of templates. To edit a template in Word double-click on it. For above mentioned operations you can use also template's context menu. At the and, press Run button to start the process of report generation. Reports for image, folder or selection The Tools menu contains such options as Create Report for Image and Create Report for Folder. In the first case, a report will be generated just for one selected image (that is active at the moment). You can also reach the Create Report for Image command in the context menu of an infrared image. In the second case, all infrared images in the folder will be sent to the report. But often you do not need to export all the images you have. For such cases, IRT Cronista provides opportunity to generate a report for the custom selection of images. To create a report for selection: 1. 2. 3. 4. In Folder Contents window (that usually displays thumbnails of images), select infrared images you need to export to the report. To select consecutive images, click the first item, press and hold down SHIFT, and then click the last item. To select nonconsecutive images, press and hold down CTRL, and then click each item. Right-click on one of the marked images to display the context menu. Choose Create Report for Selection to generate a report by the selected images. In the Template Selection dialog choose the template, and press Run. 64 © 2007 GRAYESS Inc. IRT Cronista Manual Editing generated reports After IRT Cronista has generated the report, you, most likely, will want to check it or make additional comments. You should feel free here, as the generated report is a usual Word document and you can use all the Word features. For instance, you can draw an arrow connecting the problem zones at the infrared and visual images. IRT Cronista adds its own Thermo Reports toolbar to Microsoft Word. This toolbar is designed to help you to perform the tasks concerned with report creation. Correcting mistakes If you have noticed, that some of the information is not correct (or not full) and reanalysis is required, do not worry, you do not need to recreate the complete report again. Links to the original images and corresponding analysis collections are stored together with the document. You just need to send the element you want to change back to IRT Cronista, make necessary correction and send it back to the report. To edit an image or a diagram in IRT Cronista: 1. 2. 3. Click the item you want to edit once to make it active. Press Edit button in the Thermo Reports toolbar. IRT Cronista will open with the needed image shown in the Analyzer mode. Make needed correction in IRT Cronista and push the Apply to Report button in the toolbar to apply the changes or Cancel button to ignore the changes and return to Word. Hint: Another way to make any corrections is to double-click an item you want to edit. This action will return you to IRT Cronista. To add one more infrared image to the report: 1. 2. 3. 4. Choose a place where you want to insert a new image by placing there the cursor. Press Add Page button in the Section group of the Thermo Reports toolbar to insert a new section (an empty copy of the template). A new section will be added after the current one. Click once the rectangle marked with caption Infrared Image and push the Edit button in the Thermo Reports toolbar, IRT Cronista will be launched. In IRT Cronista: open the needed image in the Analyzer mode, make the analysis and click Apply to Report button in the toolbar. 65 © 2007 GRAYESS Inc. IRT Cronista Manual Creating and editing templates Report template structure These are the basic rules of report templates organization: 1. 2. 3. 4. 5. 6. 7. To mark places for images and diagrams special objects – placeholders are used. There are different types of placeholders: infrared image placeholder, visual image placeholder, profile placeholder, histogram placeholder, image info placeholder and notations placeholder. You insert placeholders using Placeholders group in the Thermo Reports toolbar. Every template must have at least one infrared image placeholder. You can use special fields in a template as placeholders for the text information. When a report is generated, fields are replaced with the actual information about an image or measurement object. You insert fields using Fields group in the Thermo Reports toolbar. To separate parts that will be copied for every inserted infrared image from those that will be not, IRT Cronista uses sections (any Word document can be divided into sections). You can insert sections pushing Add Page button in the Section group of the Thermo Reports toolbar. The section that contains an infrared placeholder will be copied for every infrared image received from IRT Cronista. This section is called main section. There can be only one main section in a template. Other sections (even if they have placeholders) will remain unchanged in the resulting report and can be used as report headers or footers. Placeholders lying in the same section take their data from the same infrared image. A template can have any additional information, this information will be copied without changes into the resulting report afterwards. Custom report templates Report templates in GRAYESS IRT Cronista are nothing else but the usual Microsoft Word document templates. Because of that, you can use the standard means of Word to create report templates, though, we recommend you to use IRT Cronista, as it is easier, and new templates will be automatically saved in the proper places. IRT Cronista has two types of report templates: shared and local. Shared templates are available for reports created for infrared images located at any place on your computer or in the network. You can view these templates and change them by choosing Report Templates in the Tools menu and selecting the Only Shared tab. Local templates are private for a folder. They are available only when making reports for images located in the same folder or its sub folders. To view these templates, select Only Local tab in report templates dialog. 66 © 2007 GRAYESS Inc. IRT Cronista Manual Report Templates dialog contains the list of all installed templates, shared and local, for the current user (every user has different shared templates – templates are shared by the folders on your computer, and not by the users of the computer). In many ways the report templates dialog is similar to the Template Selection dialog. Here you can rename, copy, delete, drag files, edit a template and create a new one (use templates' context menu or local toolbar). The main window is not blocked when sIRT Cronistahared report templates dialog is displayed. So, you can copy templates from or to other locations on your computer. The field at the bottom of the window shows the location of the selected template. Creating a new report template To create a new template: 1. 2. 3. 4. 5. 6. 7. Open Report Templates dialog or Template Selection dialog, choosing Create Report or Report Templates in the Tools menu. Choose Only Local or Only Shared tab, depending on the type of the template you need. Click the New Template button in the toolbar. Type the name for the new template and click OK. Microsoft Word opens with the a special template that have already structure and contains hints to help you create your own template. Edit the template placing necessary placeholders and fields. Follow the hints and then delete them. Close Word, you will be prompted to save the changes. As the result, a new template will appear. It can be shared or local template. Note that to create a shared template, you should choose Only Shared tab in template selection or report templates dialog (step 2). To create a local template, you should, first of all, go to the folder you want to create a template for, and in Template Selection or Report Templates dialog you should choose Only Local tab. The alternative way to create a new template is to choose File / New / Templates for Folder. Local templates are stored in the special subfolder named Report Templates. This subfolder is created automatically. When you create a new template for folder, IRT Cronista locates it in report templates folder. 67 © 2007 GRAYESS Inc. IRT Cronista Manual Making a copy of an existing template Do not worry if you have created a template in a wrong place. You can easily copy templates from one location to another. Making a copy of an existing template is similar to making a copy of any other file. To copy a template: 1. 2. 3. 4. 5. Right-click the template you want to make a copy of. In the context menu, choose Copy to place a copy of the template in the clipboard. Go to the location where you want to save the copy (or stay at the same location to save the copy there). Right-click on a blank area in the files list. In the context menu choose Paste. This is how to make a copy using Copy & Paste method. You can also make a copy by Drag & Drop. For instance, you can drag a template from the report template dialog to any folder in the Folders Tree window. Finally, you can create a copy of a template in the same location (folder). You may need it, for example, in order to edit this template later and get a new template as a result. To create a copy of a template, press CTRL button and, holding it, drag the template you want a copy of to a blank area in the list of templates. Then double-click on it to open it in Word and start editing. You can also rename it. Thermo Reports toolbar in Word To edit a report template is as simple as to draw several rectangles in a Word document. For any operation you could need use the Thermo Reports toolbar. In the picture above you see the Thermo Reports toolbar in Word-2007. In earlier versions it may look otherwise, but the functionality of buttons remains the same: 68 © 2007 GRAYESS Inc. IRT Cronista Manual If you cannot find the Thermography Report toolbar in your Word, there can be two reasons for that: 1. 2. The toolbar was hidden. To show it back, right-click anywhere on the toolbars area and choose Thermography Reports from the list. In the same way, you can hide the Thermography Report toolbar if you do not need it. IRT Cronista is not installed or installed not properly. To solve the problem, try to reinstall IRT Cronista. Thermo Reports toolbar description As you see, the Thermo Reports toolbar is divided into three groups: 1. 2. 3. Section; Placeholders; Fields. 1. S e c t i o n group can be used to separate template data that will be copied from the information that will be not copied. The corresponding part of the toolbar allows to insert a new main section (and a new infrared image) to the report, delete sections containing unnecessary infrared images, navigate between sections, etc. Section part of the toolbar contains also such important buttons as Edit and Update. Edit button opens the active placeholder for editing in IRT Cronista. Update button updates the active section with the actual information from the currently selected in IRT Cronista image. 2. P l a c e h o l d e r s are special objects that mark places in the document where one or another type of data should be inserted. Placeholders group of the toolbar contains buttons to insert infrared and visual images, profiles and histograms, spots data and image information to the report or template. 69 © 2007 GRAYESS Inc. IRT Cronista Manual 3. F i e l d s are very similar to placeholders, only they are replaced not with pictures but with text information. Push Field button and choose any data you want to add to your report form the given list (image information, measurement objects parameters, camera information, any notations and many others). Use Summary Table to automatically create tables collecting information on one or more parameters through all images in the report. Sections As was described before, IRT Cronista uses sections to separate template data that will be copied from the information that will be not copied. Sections can be added using the Thermo Reports toolbar in Word. A section is a part of report that contains one infrared image (or infrared image placeholder). Where appears another one infrared image – there begins another section. Edit button opens the active placeholder for editing in IRT Cronista. Update button updates the active section with the actual information from the currently selected in IRT Cronista image. Section Break: adds empty section. Use this command to separate the part of template which is copied for every infrared image from report header and footer. Section break is inserted at the cursor position. Delete Current Section: use this item to delete an infrared image with its analysis from a report. Add Page (Section): this item helps when you need to add an infrared image with analysis to an existing report. It will make a copy of the template’s main section and insert it at the cursor position (or after the current section if the cursor is situated inside a section). After that, you can click Edit to get a new image with data from IRT Cronista. Previous Section: goes to the previous section (or infrared image). Next Section: goes to the next section (next infrared image). 70 © 2007 GRAYESS Inc. IRT Cronista Manual Placeholders Placeholders are ActiveX objects filled during report generation with actual pictures provided by IRT Cronista. At the picture on the right, you see the infrared image placeholder. Other types of placeholders (visual image placeholder, profile placeholder, histogram placeholder, image info placeholder, etc.) look similar but have different colors. To add a placeholder to a template (or a document): 1. 2. 3. Place the cursor to the point where you need to insert a placeholder. Click the corresponding placeholder icon in the Thermo Reports toolbar. Position and resize the placeholder as you need – placeholders behave similar to Word drawing objects. Every object in Microsoft Word has a property defining how it interacts with the text – it can be inline or floating. A floating object can be moved freely on the page, while an inline object is attached to some cursor position. The disadvantage of floating objects is that, as they are moved freely, their behavior is not that easy to predict during report generation: they may jump somewhere. Therefore, we recommend using the inline objects (newly created placeholders are inline). In order to define the position of an inline object, you have to use tables and insert placeholders into their cells. Here is placeholders list: Infrared image placeholder marks the place for infrared image that will be copied to the report with all analysis objects on it and temperature scale. Visual image placeholder marks the place for visual light image. Profile placeholder creates a diagram for lines or polylines drawn on the image in IRT Cronista. 71 © 2007 GRAYESS Inc. IRT Cronista Manual Histogram placeholder marks a place for histogram for areas drawn on the image. Spots placeholder creates a table with spots information (value, position, etc.) Image Info placeholder creates a table for such image data as filename, size, date, time, different temperature parameters and other data taken form the camera and stored with image. Below is the example how placeholders look in the template (left picture) and how they are filled with information in the report (right picture). 72 © 2007 GRAYESS Inc. IRT Cronista Manual Notes: Profile, histogram and spots placeholders are filled with information only if there are corresponding measurement objects on the image. The same is for visual image placeholder: if there is no visual image connected to infrared, the placeholder will not be replaced with an image. Such placeholders as Infrared, Visual, Image Info can be used only once in one section. Histograms and profiles can be used twice and more. It is convenient when you have more then one line or area drawn on the image. In any cases, a profile contains diagrams for all line objects drawn on the image. But if a template contains more then one profile, each profile has its own "main" line that is drawn in bold red. In the Placeholders group of the Thermo Reports toolbar there is also a button All Placeholders that can help you to insert notations placeholder. Fields Fields are replaced with actual values (image date, temperature at a spot and so on). They are similar to placeholders, with the difference that placeholders are replaced with pictures, while fields are replaced with text data. To insert a field: 1. 2. 3. Click the place where you want to insert a tag to move the cursor there. Click the Field button in the Thermo Reports toolbar to show the Report Fields Editor. Choose the field you need in the menu to insert it at the cursor position. Report Fields Editor Report Fields Editor is divided into two parts. In the left part there is a list with fields that are grouped for the convenience under several categories. The right part of the dialog contains three sections. In the upper section you always see the tag of the field chosen in fields list on the left. This is how one or another field will be represented in the template. The middle section contains the description of the chosen field. For tags that need an ID, like spots, lines or areas, indicate this ID in the Index edit box. Spots have numerical indexes – 1, 2, 3... Lines and areas are identified in letters – A, B, C... See the picture on the next page. 73 © 2007 GRAYESS Inc. IRT Cronista Manual Editing fields To edit a field, move the cursor there and push the Edit button in the Fields group of the Thermo Reports toolbar. This will open Report Fields Editor dialog where you can correct the selected field or choose another one. Report Fields Editor also opens if doubleclick on a field. To delete a field from the report or template, move the cursor there and push the Delete button in the Fields group of the Thermo Reports toolbar. Summary tables Summary table is a special table of fields that is added to the report or template. You can choose by yourself what columns summary table will contain. That can be the same categories as for usual fields. 74 © 2007 GRAYESS Inc. IRT Cronista Manual To create a summary table: 1. 2. 3. 4. 5. Generate a report for several infrared images or open a template. Push Summary Table button in the Thermo Reports toolbar in Word. Select necessary categories in the Summary Table Editor and push OK button. The summary will be added to the document at the cursor position. If the cursor is situated inside the duplicated section with infrared image, the summary will be inserted after this section; but if the cursor is situated at the very first position , the summary is inserted before the current section. Use Microsoft Word features to format your table, for instance, Table Tools Design and Layout toolbars. Summary Table Editor 75 © 2007 GRAYESS Inc. IRT Cronista Manual Summary Table Editor is pretty similar to Report Fields Editor. In the left part of the dialog there is a list of all available fields grouped under several categories. Click on any field in a category and below you will see the description of this field. The list of fields is the same as in Report Fields Editor with the exception of Special category that contains two fields – Number (which means number of section or number of infrared image in the report) and Page Number (which simply means page number how it is numbered in usual Word document). You can have as many columns in the summary as you want. To add a column, click on it and push Add button. It will appear in the right part of the dialog which contains the list of selected columns (fields). To remove a field from the list, click on it in the right part of the dialog and push Remove button. You can also determine the ordering of fields (columns). For this use Up and Down buttons. Below is an example of how a summary table may look. Editing Summary Tables To edit a summary, just double-click on it or push Edit button in the Fields group of the Thermo Reports toolbar. This action will open Summary Table Editor where you can remove a column or add a new one. To delete a summary, move the cursor to any of its cells and push Delete button in the Fields group of the Thermo Reports toolbar. Sometimes you may need to update a summary table. This can happen, for example, when you delete images from the report or add new images. To update a summary, move the cursor there and push Update button in the Fields group of the Thermo Reports toolbar. 76 © 2007 GRAYESS Inc. IRT Cronista Manual Note: A document can have more then one summary table, for example, at the beginning (presenting contents) and at the end (presenting results of inspection). Notations placeholder and fields There are two ways to insert notations into report. One way is to use notation placeholder. In this case all notation chosen for the image will be copied into one place as picture. Another way to insert image notations into the report is by using fields. Use fields when you want to insert notations from different categories in different places on the page. Notations placeholder The notations placeholder is filled with a picture showing all notations selected for an infrared image. This placeholder is additional, that means that you will not find a button in the Thermo Reports toolbar assigned specially for this placeholder. To insert notations placeholder: 1. 2. Click the All Placeholders button to show the list of additional placeholders. In the All Placeholders dialog, select Notations and click Insert to insert the notations placeholder. Notations fields As you know, every image can have several notations assigned for it and divided into categories. To insert notations selected in some category, first you should assign one or another notations set. 77 © 2007 GRAYESS Inc. IRT Cronista Manual To assign notations set to the template or report: 1. 2. 3. Click Link Notations button in the Thermo Reports toolbar. In Notations Briefcase dialog choose notations set you need and push Assign button. Notations set you have assigned appears in the Report Fields Editor. Now you need to insert a certain category from assigned set. To insert notations selected in some category: 1. 2. 3. 4. Click the place where you want to insert a notations field. Click the Field button in the Thermo Reports toolbar to show the Report Fields Editor. Choose Notation and select necessary category name. Push OK button. The tag for notations from this category will be inserted at the position of the cursor. In the picture below you see how notations look in the template (left picture) and in the report (right picture). For the convenience, all information is inserted into table sells. 78 © 2007 GRAYESS Inc. IRT Cronista Manual Printing and exporting data to other formats Printing images and other data IRT Cronista provides options for printing infrared images, visual images, image details and diagrams. The way how the images will be printed depends on the active mode: In the Organizer mode: infrared image thumbnails without associated data will be printed, approximately 18 thumbnails per an A4 page. In the Analysis mode: one infrared image with all analysis details, diagrams, linked visual image and notations will be printed at every page, similar to how it looks on the Analysis mode screen. For even greater flexibility, you can copy and paste images, image details, visual images and diagrams into documents in other applications such as word processor to produce fully customized prints. Or you can generate reports in Microsoft Word and print them: see Reports in Microsoft Word for more details. Print Setup in the File menu allows you to change the printer used to print the images and associated data, the way it is set up, the paper size and orientation. Print preview To check how the images will appear when they are printed, choose Print All Preview from the File menu to display the print preview window. The whole pages is shown when the preview window is first displayed, although you will not be able to see all the small details, you will be able to see the general layout. A row of buttons at the top of the window allows you to control the way the window displays the preview: Press Print to print all pages as they appear in the preview. Press Next Page if images and their associated data cover more than one page and you want to see the next page. The button will be grayed if you are viewing the final page. Press Prev Page if images and their associated data cover more than one page and you want to go back to an earlier page. The button will be grayed if you are viewing the first page. Press Two Page if images and their associated data cover more than one page and you want to view two pages side-by-side at the same time. The button changes to One Page when you are in two page mode so that you can change back to viewing one page at a time. 79 © 2007 GRAYESS Inc. IRT Cronista Manual Press Zoom In for a magnified view of the previewed page. When you move the pointer over the page in the preview window it changes to a magnifier and clicking on the page has the same effect as pressing Zoom In, unless the page is already at maximum magnification, when it displays the page at minimum magnification. Press Zoom Out to return to a less magnified view of the previewed page. Press Close to close the print preview window and return to the main IRT Cronista window. Printing in the Organizer mode In the Organizer mode, infrared images will be printed in the small (thumbnail) size together with the temperature scale, approximately 18 thumbnails per an A4 page. To print all infrared images in the viewed folder, choose Print All from the File menu. To preview all infrared images in the way they can be printed, choose Print All Preview in the File menu. You can print a selection of images. In this case, select the images you want to print, rightclick one of the selected images and choose Print Selection in the context menu. Note: To select consecutive images, click the first item, press and hold down SHIFT, and then click the last item. To select nonconsecutive files or folders, press and hold down CTRL, and then click each item. Printing in the Analyzer mode In the Analyzer mode, one infrared image with all analysis details, diagrams, linked visual image and notations will be printed at every page, similar to how it looks on the Analyzer mode screen. To print all infrared images in the viewed folder, choose Print All from the File menu. To preview all infrared images in the way they can be printed, choose Print All Preview in the File menu. To print one infrared image, right-click on the image in the Analysis view and choose Print Image in the context menu. Choose Print Image Preview to see how the image and its analysis details can be printed. To print only a selection of images, select the images you want to print in the thumbnails view, right-click on one of the selected images and choose Print Selection in the context menu. 80 © 2007 GRAYESS Inc. IRT Cronista Manual Exporting infrared images to other formats By using this function you can convert infrared images to a common picture format (such as JPEG or Bitmap) or to a text format (such as CSV or TXT). To export infrared images to other formats: 1. 2. 3. 4. Select the infrared images you want to convert in the folder view (available in both the Organizer and Analyzer modes). Choose Export from the Tools menu (or from the context menu). The Export dialog will be displayed. Specify necessary export settings (see the description below). Press Export to save converted images. Export dialog In the Export dialog you can specify where to save the converted images – Definition folder. There are two choices: to save them in the same with infrared images folder or to save them in a subfolder. In the second case you also need to key in a name for the subfolder. Select the Format of the resulting pictures by clicking the corresponding item in the formats list (BMP, JPEG, TIFF, PNG, CSV, TXT). To include the temperature scale in the resulting pictures, check Include temperature scale. To show measurement objects on the resulting image, check Include analysis information. You can change the size of the resulting pictures by specifying the magnification factor in the Resize combo box. 81 © 2007 GRAYESS Inc. IRT Cronista Manual Raw and GTSI image formats Raw infrared image formats Raw formats are designed by infrared cameras manufacturers and can have various file extensions. Infrared cameras produce images in their own raw file formats, usually designed to store only infrared images and nothing else. When you connect a visual image to a raw infrared image in IRT Cronista, IRT Cronista renames the visual image file to mark that the two images are linked, so there are still two files on the disk. The analysis data is stored in the third file with the name of infrared image but a different extension (.nxclt). The plus of such an approach is that the original infrared image data is never changed and is kept in the form infrared imager created it. The minus is that you get a mess of files on disk and it can be difficult to cope with them. To see all linked files and to have access to each of the files individually, right-click on an infrared image and select Grouped Items from the context menu. In the dialog opened, you can see all the files connected with the selected infrared image (see the picture at the right). Note: 82 © 2007 GRAYESS Inc. IRT Cronista Manual If there are no files linked to the selected infrared image (no notations and comments and no linked visual image), the menu command Grouped Items is not available. GTSI analyzed image format GTSI is a GRAYESS proprietary file format that stores infrared image, linked visual image and analysis data in one file. When you connect a visual image to a infrared image in IRT Cronista, the visual image is written into the infrared image file. The analysis data is also saved in this file. It is very convenient, for example, when you want to e-mail this three-inone file to somebody instead of sending all three separated files. Things you should be aware of when keeping images in GTSI format: 1. 2. Infrared image data is converted into a proprietary format. Image pixels and infrared parameters are kept unchanged, so measurement will be as accurate and as functional as for raw format. At the same time, raw infrared image file may store some additional data known and used only by the internal software of the camera this kind of data may be lost when converted to GTSI. Because of this we recommend always to keep images backup copy in the raw format. Visual images are converted to Jpeg when stored in GTSI files (quality loss may occur); in some cases they may be reduced in dimensions (IRT Cronista will warn you then). To convert infrared images to GTSI format: 1. 2. 3. 4. Switch to the Organizer mode. Select the images you want to convert. Right-click on one of the selected images and choose Convert to GTSI from the context menu. Follow the instructions on the screen: you can overwrite the original file or keep GTSI files in a special folder/subfolder (recommended). Note: If an infrared image has analysis data and a visual image connected to it, this additional data will be automatically included in the resulting GTSI image. 83 © 2007 GRAYESS Inc. IRT Cronista Manual Keyboard shortcuts This is the list of hot keys used in IRT Cronista: F1 to open IRT Cronista help system; F2 to rename an item; F5 to refresh the application look; F7 to switch to the standard layout; F8 to switch to the filmstrip layout; F9 to switch to the dual layout; CTRL + A to select all items in current folder; CTRL + C to copy an item; CTRL + D to disconnect one or more pares of wrongly connected visual and infrared images; CTRL + E to open the contents of current folder in Windows Organizer; CTRL + F to show or hide the Folders Tree window; CTRL + G to link visual image to infrared; CTRL + I to invert selection; CTRL + P to open the Print dialog; CTRL + S to save changes for active item; CTRL + V to paste an item; CTRL + X to cut/move an item; CTRL + Y to redo your last action; CTRL + Z to undo your last action CTRL + SHIFT + I to show or hide the Infoview window (in the Organizer mode) or the Analysis Details window (in the Analyzer mode); CTRL + SHIFT + S to save changes made to all images in current folder; CTRL + SHIFT + T to show or hide the Temperature Scale window (in both modes); CTRL + SHIFT + W to show or hide the Preview window (in the Organizer mode) or Image Thumbnails (in the Analyzer mode); ALT + RightArrow to go to the next folder; ALT + LeftArrow to go to the previous folder. 84 © 2007 GRAYESS Inc.