1
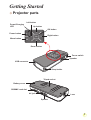
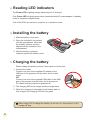
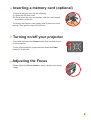
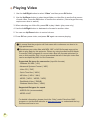
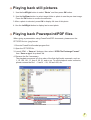
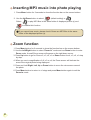
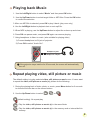
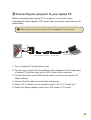
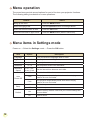
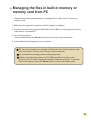
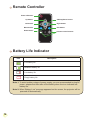
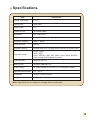
Welcome:
Thank you kindly for purchasing this fine product.
Much investment in time and effort has gone into its development, and it is our hope
that it will give you many years of trouble-free service.
Safety Notice:
1. Do not drop, puncture or disassemble the device; otherwise the warranty will be voided.
2. Avoid all contact with water, and dry hands before using.
3. Do not expose the device to high temperature or leave it in direct sunlight. Doing so may
damage the device.
4. Use the device with care. Avoid pressing hard on the device body.
5. For your own safety, avoid using the device when there is a storm or lightning.
6. Do not use batteries of different specifications. Doing so may lead to the potential for serious
damage.
7. Remove the battery during long periods between usage, as a deteriorated battery may affect
the functionality of the device.
8. Remove the battery if it shows signs of leaking or distortion.
9. Use only the accessories supplied by the manufacturer.
10. Keep the device out of the reach of infants.
11. Risk of explosion if battery is replaced by an incorrect type.
12. Dispose of used batteries according to the instructions.
FCC Compliance Statement:
This device complies with Part 15 of the FCC Rules. Operation is
subjected to the following two conditions: (1) this device may not cause
harmful interference, and (2) this device must accept any interference
received, including interference that may cause undesired operation.
This equipment has been tested and found to comply with limits for a
Class B digital device, pursuant to Part 15 of the FCC rules. These limits
are designed to provide reasonable protection against harmful interference in residential
installations. This equipment generates, uses, and can radiate radio frequency energy, and if
not installed and used in accordance with the instructions, may cause harmful interference to
radio communications.
However, there is no guarantee that interference will not occur in a particular installation. If this
equipment does cause interference to radio or television equipment reception, which can be
determined by turning the equipment off and on, the user is encouraged to try to correct the
interference by one or more of the following measures:
-Reorient or relocate the receiving antenna.
-Move the equipment away from the receiver.
-Plug the equipment into an outlet on a circuit different from that to which the receiver is
connected.
-Consult the dealer or an experienced radio/television technician for additional suggestions.
You are cautioned that any change or modifications to the equipment not expressly approved
by the party responsible for compliance could void Your authority to operate such equipment.
If the time arises to throw away your product, please
recycle all the components possible.
Batteries and rechargeable batteries are not to be
disposed in your domestic waste! Please recycle
them at your local recycling point.
Together we can help to protect the environment.
Table of Contents
Getting Started................................................................. 1
Projector parts....................................................................................... 1
Reading LED indicators......................................................................... 2
Installing the battery.............................................................................. 2
Charging the battery.............................................................................. 2
Inserting a memory card (optional)........................................................ 3
Turning on/off your projector.................................................................. 3
Adjusting the Focus............................................................................... 3
Functions and Operations.............................................. 4
Introduction to main menu..................................................................... 4
Setting language.................................................................................... 4
Checking Memory.................................................................................. 5
Playing Video......................................................................................... 6
Playing back still pictures...................................................................... 7
Playing back Powerpoint/PDF files........................................................ 7
Inserting MP3 music into photo playing . ............................................. 8
Zoom function........................................................................................ 8
Playing back Music................................................................................ 9
Repeat playing video, still picture or music .............................................. 9
Playing back files in other devices......................................................... 10
Menu operation...................................................................................... 12
Menu items in Settings mode................................................................ 12
Managing the files in built-in memory or memory card from PC............ 13
Remote Controller................................................................................. 14
Battery Life Indicator.............................................................................. 14
Specifications........................................................................................ 15
Getting Started
Projector parts
Left button
Power/Charging
LED
Up button
OK button
Power button
Right button
Menu button
Down button
Focus switch
Speaker
USB connector
Strap holder
Tripod socket
Battery cover
SD/MMC card slot
AV jack
Lens
Speaker
Reading LED indicators
The Power LED is lighting orange when projector is charged.
Only Power LED is lighting green when connected with AC power adapter in standby
mode or complete charged mode.
If all of the LEDs are turned on, projector is in operation mode.
Installing the battery
1. Slide the battery cover open.
2. Place the included Li-Ion battery
into the compartment. Note that
the metallic contacts must be
aligned with the contacts in the
compartment.
3. After the battery is properly
installed, replace the battery cover.
Charging the battery
Please charge the battery at least 3 hours prior to its first use.
1. Connect the cable.
Connect one end of the supplied AC adapter to the
USB port of the projector and the other end to a wall
outlet.
OR
Connect one end of the supplied USB cable to the USB
port of the projector and the other end to a powered
PC. Make sure the projector is powered off.
2. The charging LED turns orange and the charge starts.
3. When the charging is interrupted or the battery pack is
fully charged, the charging LED will turn green.
When using a PC to charge the battery, do not turn on the projector, or the
charge will stop.
Inserting a memory card (optional)
To insert a memory card, do the following:
(1) Open the SD card cover.
(2) Gently push the card as indicated until the card reaches
the bottom of the slot.
To remove the memory card, gently push it down and it will
pop up. Then pull the card out of the slot.
Turning on/off your projector
Press and hold down the Power button for 4 seconds to turn
on the projector.
To turn off the projector, press and hold down the Power
button for 2 seconds.
Adjusting the Focus
Please adjust the Focus switch to have a better view during
usage.
Functions and Operations
Introduction to main menu
After turn on the projector, you will see “Welcome” screen first then main menu as
below.
●
Settings: This function allows users to set some preference settings such as
Language, Brightness, Contrast, Saturation, Slideshow Speed,
Auto power off and Beep sound.
●
Video: This function allows users to select video file to project from screen.
●
Photo: This function allows users to select JPEG image file to project from screen.
●
Music: This function allows users to select MP3 files to play from the projector.
●
Memory: This function allows users to check the available memory type and
capacity and select it for target source for projection.
Setting language
1. Turn on the projector. The main menu will appear.
2. Use the Left/Right button to select the Settings mode and press OK to enter the
menu screen.
3. Use the Up/Down button to select the Language item, and then Press the Right
button.
4. Move the Up/Down button to select a language.
5. When done, press OK to confirm the setting.
Checking Memory
This function is to select which memory type to playback from and its capacity and
available size. The default is built-in memory.
1. Use the Left/Right button to select “Memory” and then press OK button.
2. The Memory Check box will display as below. Use the Up/Down button to select the
memory type.
Selection
Memory
Available/Capacity
669MB / 979MB
1.9GB / 1.9GB
3. Press OK button after selection to return to the main menu.
If there is no memory card inserted, the screen will only show internal built-in
memory status.
Playing Video
1. Use the Left/Right button to select “Video” and then press OK button.
2. Use the Up/Down button to select target folder or video files to see the first screen
of each video. Press the OK button to confirm the selection. (Some larger files may
require more time to switch.)
3. When selecting one Video file, press OK to play it back. (play once only)
4. Use the Left/Right button to backward or forward to another video.
5. You can use Up/Down button to control volume.
6. Press OK can pause video, and press OK again can resume playing.
It’s normal that the projector will feel warm with continuous use due to its
high performance.
Sometimes your video files with MP4, ASF or AVI file formats may not be
able to play back by this projector. Please try using bundled ArcSoft Media
Converter (AMC) program to convert video files into formats optimized for
use on this projector. But it is not guaranteed that all of the input video files
can be accepted by AMC for file conversion.
Supported file types for conversion (Input file formats)
- Windows AVI files (*.AVI)
- Advanced Systems Format (*.ASF)
- Video CD (*.DAT)
- Quick Time files (*.MOV)
- MP4 files (*.MP4; *.M4V)
- MPEG (*.MPG; *.MPEG; *.MPE)
- RealMedia Video (*.RMVB)
- Windows Media Video (*.WMV)
Supported file types for export
- MJPEG AVI (recommended)
- MPEG-4 ASF
For details information, please check the “Help” under Extra from AMC
program or visit AcrSoft web site at www.arcsoft.com to understand the key
features and how to use.
Playing back still pictures
1. Use the Left/Right button to select “Photo” and then press OK button.
2. Use the Up/Down button to select target folder or photo to see the pre-view image.
Press the OK button to confirm the selection.
3. After a photo is selected, press OK to display full size of this photo.
4. Use the Left/Right button to display last or next photo.
Playing back Powerpoint/PDF files
When giving a presentation using PowerPoint/PDF documents, please save the
PPT/PDF file into .jpeg format.
1. Execute PowerPoint/Acrobat program first.
2. Open the PPT/PDF file.
3. Launch “File” > “Save as” dialogue, then select “JPEG File Exchange Format”
from “Save as type” drop-down list.
4. Rename the file if necessary:
The playback sequence is in the order of the first digit Arabic numerals, such as
1, 10, 100, 101, 11, then 2, 20, 21, and so on. To avoid playback order confusion,
please rename the file 1 ~ 9 as 01 ~ 09, 100 as A100, etc.
Inserting MP3 music into photo playing
1. Press Menu button for 2 seconds to show the function bar on the screen bottom.
2. Use the Up/Down button to select
Select
(default setting) or
.
to play MP3 files in the same folder of displayed picture (s) and
to disable this function.
If you cannot hear music, please check if there are MP3 files in the same
folder of the displayed picture (s).
Zoom function
1. Press Menu button for 2 seconds to show the function bar on the screen bottom.
2. Use the Left/Right button to select “Zoom-in” mode and use Down button to enter
Zoom mode. A small Zoom screen will appear on the right down corner.
3. Press Up button to go for Zoom x2, x3, x4, x1 or Down button for x4, x3, x2, x1 step
by step.
4. When you are in magnification of x2, x3 or x4, the Zoom screen will indicate the
area of the original photo being displayed.
5. Press and hold Right, Left, Up or Down button to move the view screen around
the photo.
6. Press Menu button to return to x1 stage and press Menu button again to exit the
Zoom-in mode.
Playing back Music
1. Use the Left/Right button to select “Music” and then press OK button.
2. Use the Up/Down button to select target folder or MP3 files. Press the OK button
to confirm the selection.
3. After one MP3 file is selected, press OK to play it back. (play once only)
4. Use the Left/Right button to playback last or next mp3 file.
5. When MP3 is playing, use the Up/Down button to adjust the volume up and down.
6. Press OK can pause music, and press OK again can resume playing.
7. Using headphone to listen to music. (also suitable for playing video)
1) Connect headphone to AV jack of projector.
2) Press OK to select “Audio Out”.
Headphone jack
Headphone adapter
If the projector stays inactive for 20 seconds, the screen will automatically
turn off.
Repeat playing video, still picture or music
The default setting is to play selected video, still picture or music once. If users want
to repeat the video, still picture or music (s), please do the following:
1. During the playing back of video, photo, or music, press Menu button for 2 seconds
to show the function bar on the screen bottom.
2. Use the Up/Down button to select
,
, or
.
(default setting): No repeat play
: Play the video, still picture or music (s) in the same folder
: Play the video, still picture or music (s) in the memory card or internal built-in
memory.
Playing back files in other devices
Connecting the projector to your media players
Steps of connecting projector with external player:
Before connecting your media player to projector, you need to have
media player dedicated composite AV-out cable and projector AV cable
ready.
Projector AV cable
AV OUT
Composite AV-out cable
(red)
(red)
(white)
(white)
<AV cable> (yellow)
Video/Music
Player
Mobile Phone
(yellow)
Digital camcorder/
camera
Portable Media
Player
1. Connect Composite AV-out cable to media player.
2. Connect both AV cables (Yellow to Yellow, white to white and red to
red).
3. Select “AV in” when you are asked to select “AV in” or “Audio out”.
4. Now you can project image and audio from projector. You also can
control the volume from control panel (Up/Down button).
10
Connecting the projector to your laptop PC
Before connecting your laptop PC to projector, you need to have
Composite/S-video adapter, RCA (dual male) connector, and projector AV
cable ready.
Please make sure that your laptop PC is equipped with S-video port.
(red)
AV OUT
(white)
(yellow)
<AV cable>
RCA (dual male) connector
S-video cable
S-video port
1. Turn on laptop PC and projector first.
2. Connect one end of the Composite/S-video adapter to the S-video port
of laptop PC and the other end to RCA (dual male) connector.
3. Connect the other end of RCA (dual male) connector to projector AV
cable (yellow).
4. Connect the AV cable to the AV jack of projector.
5. Select “AV in” when you are asked to select “AV in” or “Audio out”.
6. Switch the laptop display mode from LCD mode to TV mode.
11
Menu operation
The menu items provide several options for you to fine-tune your projector functions.
The following table gives details on menu operations.
How to...
Action
Bring up the menu
Press the MENU button.
Move the highlight bar
Use the Up/Down button or Left/Right button.
Enter sub-menu/Confirm an item
Press the OK button.
Exit menu/Go back to upper menu
Press the MENU button (when in sub-menu).
Menu items in Settings mode
Power-on → Select the Settings mode → Press the OK button.
Item
Option
Language
-
Brightness
-4 ~ +4
Set projection screen brightness.
Contrast
-4 ~ +4
Set projection screen contrast.
Saturation
-4 ~ +4
Set projection screen color saturation.
Slideshow
Speed
3 sec, 5 sec,
8 sec, 15 sec
Off
Auto
Power Off
Beep
Default
12
Description
Lets you select the language used for OSD.
Set the interval time between each slide
Disable Auto-off function.
3 min
The projector automatically shuts down when staying
inactive for over 3 minutes.
5 min
The projector automatically shuts down when staying
inactive for over 5 minutes.
On
Enable beep sound.
Off
Disable beep sound.
Yes
Restore factory defaults. Note that your current settings will
be overridden.
No
Cancel action.
Managing the files in built-in memory or
memory card from PC
Please follow the procedures below to manage files in either built-in memory or
memory card.
1. Make sure the projector is powered off if the battery is installed.
2. Connect one end of the bundled USB cable to the USB port of the projector and the
other end to a powered PC.
3. Turn on the projector:
Press and hold down the Power button for 4 seconds till you hear music.
4. A removable disk will appear in your computer.
PC can only recognize one storage medium each time (check memory card
first, then built-in memory if no memory cards is inserted).
Do not switch the storage medium during operation.
When connecting the projector to PC USB port without turning on the
projector, the PC starts charging the battery inside the projector. To read the
files in the memory, press the Power button or remove the battery first.
13
Remote Controller
Power off button
Up button
OK/Play/Pause button
Left button
Right button
Menu button
Exit button
Down button
Volume control buttons
Battery Life Indicator
Icon
Description
Full battery life
Moderate battery life
Low battery life
Empty battery life
Note 1: To avoid sudden outage of power supply, you are recommended to plug AC
power adapter first then take off the battery when the icon indicates low
battery life.
Note 2: When “Battery Low” message appeared on the screen, the projector will be
powered off automatically.
14
Specifications
Item
Description
Optical Technology
LCoS
Light Source
White LED
Aspect Ratio
4:3
Luminous Flux
10 Lumens (Max.)
Resolution
640 x 480 (VGA)
Projection Image Size
6” ~ 50” (15cm ~ 127cm) (Diagonal)
Projection Distance
25cm ~ 180cm
Zoom & Focus
Manual
Projection Source
External from 3-in-1 AV jack, built-in memory or memory card
Play back format
Photo: .JPEG
Audio: .MP3
Video: .MPEG-4 (.AVI, .ASF, .MP4), H.264 (.MP4), M-JPEG
(.AVI) through ArcSoft Media Converter.
Audio speaker
Stereo (0.5W x 2)
Memory Slot
SD/SDHC/MMC/MS Pro
Power Supply
AC power adapter or NP120 Li-Lon rechargeable battery
Operation temperature
0°C ~ 35°C
Dimension
125mm x 55mm x 23mm
Weight
100g (without battery)
Note: Specifications are subject to change without notification.
15