1
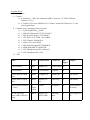
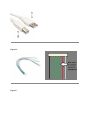
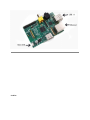
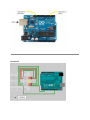
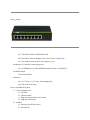
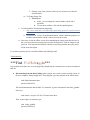
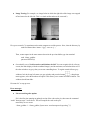
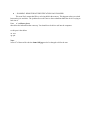
Multicamera Array User’s Manual Freshman Imaging Project 20122013 Amy Becker, Elizabeth Bondi, Matthew Casella, Ambar de Santiago, William Frey, Alexander Jermyn, Colin McGlynn, Victoria McGowen, Jason Mitchell, Briana Neuberger, Michaela Piel, Elizabeth Pieri, Wesley Robinson, Kevin Sacca, Victoria Scholl, Lindsey Schwartz, Tyler Shelley, Dan Simon, Benjamin Zenker Table of Contents 1. Assemble system 2. Calibrate 3. Capture video from cameras 4. Run through code 5. Troubleshooting Assemble System Pieces of the System 1. Cameras ● 6; PointGrey 1.3 MP Color Chameleon USB 2.0 Cameras, 1/3” CCD CSMount, Firmware 1.11.3.0 ● 6; Fujinon CCTV lenses (DF6HA1B 1:1.2/6mm Cmount fixed focal lens 1/2” color camera applications) 2. Computer (Type, operating system, tech specs) ● 1; 8port Gigabit Greennet Switch ● ● ● ● ● ● ● ● ● 3. Cords 1; MB ASUS Sabertooth X79 X79 LGA2011 1; PSU Rosewill Capstone750 750W RT 1; CPU Intel Core I7 3930K 3.2G 12MB R 1; NIC SYBA SYPEX24028 R 1; Water Cool Corsair H100I 2; SSD 500G Samsung MZ7TD500KW R 8; MEM 4GB Gskill F314900CL9D 1; CPU Thermpas Arctic Silver Adhesiv% 2; CPU Thermpaste AS53.5G% Name # Color Connect From Connect To See Figure Purpose Cat5e (Ethernet) 6 Blue Raspberry Pi GreennetSwitch A Cat6 (Ethernet) 1 Green GreennetSwitch Computer B USBA Male to USBB Male 1 White Computer (A) Arduino (B) C Data transfer USBA Male to USBB Male 6 Black Raspberry Pi (A) Camera (B) C Data transfer GPIO Header (Extended by wires) 6 5 Green 1 Red Camera Breadboard D Synchronization of cameras ACDC Converter, Micro USB to USB A to outlet 6 Black Raspberry Pi (Micro USB) Powerstrip, outlet E Power supply for Pis Figure A: Figure B: Figure C: Figure D: Figure E: Raspberry Pi Arduino Breadboard GreennetSwitch ●1; 15ft USBA Male to USBB Male cable ●6; Cat5e cables from the Raspberry Pis to the Greennet Switch (blue) ●1; Cat6 cable from the switch to the computer (green) 4.Raspberry Pi’s (Number, connecting pieces) ●6; 521MB Rasperry Pi Board HDMI Harmonized Code: 8534.00.00.70 5.Arduino Boards ●2; Arduino Boards 6.Structure ●3; 2x1 8” bars, 6 1x1 8” bars, 16 mounting plates ●“L” bar at top of structure How to Assemble the System 1. Connect Raspberry Pis a. SD cards b. Ethernet cables c. Plug into ethernet hub in work station d. Plug into Chameleons 2. Arduinos a. Into pins (specific pins later) b. Into cameras Calibrate 1. Take pictures of calibration target 2. Run BasicCalibration.m, it will ask you to select a file: pick a good, clean image from the first camera 3. Pick 4 points (preferably the corners of the target) (click zoom tool off to turn it on, then use it, click again to turn off, then select point, then click again to turn back on, shift and click zooms it outdouble click while it’s on and it will bring it back to 100%) 4. It will ask where to save it to main file where your other code in, and for filename: use CamData Capture Video from Cameras Capture Video WITH PIsthis system wasn’t working and needs to be improved 1. Power Pis and Trendnet Network switch on 2. Log onto Ubuntu (password platypus) 3. Open up 6 terminals by pressing ctrl alt t 4. In each terminal, type and then press enter: terminal 1: ssh [email protected] terminal 2: ssh [email protected] terminal 3: ssh [email protected] terminal 4: ssh [email protected] terminal 5: ssh [email protected] terminal 6: ssh [email protected] 5. Log into each one when prompted for password (password is raspberry), character’s won’t appear just press enter 6. Mount the drive on the pis (make the pis write to the computer) by typing in each terminal, then pressing enter: sudo mount 192.168.2.2:/home/share /media/share 7. Navigate to folder where the capture code is by typing in each terminal and pressing enter: cd src/frame_grabber 8. Open the Arduino IDE from the side bar and navigate to: File>Sketchbook>frame_trigger 9. Upload the code, and wait for the relay to come back on. After the relay is on wait 3 seconds for the cameras to register on the pi’s. 10. Running capture code by typing in each terminal then pressing enter: sudo ./frame_grabber *frame counter will show up 11. Open MATLAB from the dashboard by searching for it, DO NOT CLOSE THE TERMINAL WINDOW IT CREATES. 12. On the tool bar on the left side, click the plus sign on the documents tab and double click on the file “Matlab.” Then select “Multicam live” and the calibration files. 13. Press the green play button in MATLAB to run the code. If you can’t see the button then click in the code window 14. To end capture press ctrl C for each terminal that’s running 15. To shut down when done capturing, type in each terminal and press enter: sudo shutdown h now Capture Video from Cameras Capture Video WITH PIs Automated Version 1. Double click Capture1 on Desktop 2. Click “Clear Images” to erase the share folder 3. Click “Start Capture” Takes 35 seconds to start capturing frames Capture Video WITH MACS 1. Turn on system and Macbooks logon to macs as CISADMIN password: Ric18Fey! 2. Unplug cameras for 5 seconds 3. Open Terminal app in utilities directory 4. Change directory to: cd src/frame_grabber/ 5. Mount the NFS share in the terminal on each mac: sudo mount o resvport 192.168.2.2:/home/share share/ 6. On workstation open Terminator and create 6 terminal windows this is done by right clicking in the window and clicking divide 7. Ssh to each mac from i = 2:7 you will need to disconnect the groups by going to the drop down menu at the top left corner of each terminal : ssh [email protected](i) 8. Change directory to: cd src/frame_grabber/cd src/frame_grabber/ 9. Open the Arduino IDE from the side bar and navigate to: File>Sketchbook>frame_trigger 10. Open MATLAB from the dashboard by searching for it, DO NOT CLOSE THE TERMINAL WINDOW IT CREATES 11. In the Terminator type in but do not press enter: sudo ./frame_grabber *****From Step 12 to 13, you have 10 SECONDS to do this!!!!***** 12. Click the upload button in the Arduino IDE 13. Press enter on the code in the Terminator, if prompted for a password type: Ric18Fey! 14. Press the green play button in MATLAB to run the code. If you can’t see the button then click in the code window 15. The buttons in the MATLAB figure control the depth and the top live button catches the code up to the most recent frames. 16. To end capture go to the Terminator and press ctrlc 17. To delete the frames from a previous capture open another terminal instance from the sidebar by right clicking and selecting new terminal, if should have text in it before you start typing. If you don,t have text, you’re in the wrong terminal. 18. Change directory to: cd /home/share 19. Clear frames by typing: sudo find /home/share iname "*.jpg" exec rm {} \; Run Through Code: Software only for a linear array (shift values won’t line up if you add another row of cameras) 1. Download it from the wiki to your computer 2. Open MultiCamLive.m in Matlab 3. At about line 100, there’s a code block named Render 1 Depth a. The variable Filename needs to be updated to the folder to which you want the images to go 4. Click run a. While running, different options: i. Change depth by 1 or by 10pixels ii. A live button (counts how many images are in the folder, then divides by camera number (6 currently), then subtracts 7 to give it a safe distance away from the current live image) iii. Using the stop button instead of the red close button in the top left will give you a “clean” close with no errors iv. There’s a fast forward button next to the stop button that allows you to jump up to live frame careful, if you overshoot, it might stop running b. Prerun options i. CamNum: change if you add cameras ii. FrmStart: start on a frame other than zero, but probably don’t want to do that if you’re running live iii. Depth: change to default depth value (i.e. if you’ve determined 20pixels is a good starting position from previous tests, update the default depth to 20) 1. Distance away from cameras (value is just a reference, not related to actual distance) iv. To Change Image Size: 1. MainData.m a. In this, you can change the camera number, and X and Y resolution. b. To save these variables, click run after updating them. c. To Understand the Transformations happening i. http://www.mathworks.com/help/images/performinggeneral2dspatialtransfor mations.html ii. Scroll down to “Using a Transformation Matrix” (defines different properties of an affine transformation, which is what is used in the system) d. Note: there is also an Offline version for manipulating the image plane after the fact. In this, you can set the start and stop times (not just the start time). Load the images in and press run. You can pause and shift the cameras to your liking and then press play and it will be at the new depth. For software questions, please email Ben Zenker at [email protected]! Troubleshooting ***Find Phil Salvaggio*** If you cannot locate him, here are some [hopefully] helpful tips for common issues we have encountered thus far: ● Disconnecting from the shared folder (where images were saved to on the network) on one of the mac computers during Imagine RIT. If this happens, type into terminal on the affected mac: sudo diskutil unmount share password: Ric18Fey! This should unmount the shared folder. To remount it, type the command (in the frame_grabber/ directory): sudo mount o resvport 192.168.2.2:/home/share share Then, restart capture. In terminal, type: sudo ./frame_grabber password: Ric18Fey! ● Image Tearing (For example, see image below in which the right side of the image was cropped off and moved to the left side. This is a visual artifact and must be corrected!) First, press control+C in terminator on the main computer to end the process. Next, clear the directory by sudo find /home/share iname “*.jpg” exec rm {} \; Then, restart capture in the same manner shown in the previous bullet; type into terminal: sudo ./frame_grabber password: Ric18Fey! ● Occasionally, one of the directories would claim to be full. You can recognize this by a frozen screen (the main display with the combined images), and in terminator, one window turns red. If the other windows are grey, then you are not controlling those. To regain control of those grey windows, look in the top left corner one gray window and press the button , a drop down menu appears, select the broadcast all option. This allows you to control all of the windows. The windows should turn blue. Hit control+C to stop process. Error messages ● Pies not working after update If it is the first time running an updated version of the code on the pis, then enter the command “make” between steps 7 and 8 above. This will compile the code on the pies. most likely error to occur: ./frame_grabber: 1: ./frame_grabbe; Syntax error: word unexpected (expecting ”)”) ● “ WARNING: REMOTE HOST IDENTIFICATION HAS CHANGED! This most likely means that ID key are being held in the memory. This happens when you switch between the pies and macs. The ip addresses are the same so the workstation thinks the device is trying to hack into it. Enter vi .ssh/knows_hosts then delete the information that comes up. You should now be able to ssh into the computers. to edit press i then delete :w save :q quit Note: in line 97 of the mat lab code the frame%05.jpg need to be changed to 06 for the mac