1
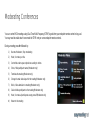
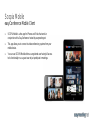
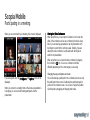
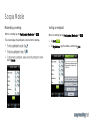
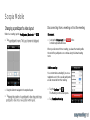
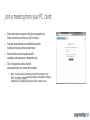
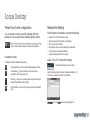
EasyConference User Manual Seamless user experience between Video conferencing systems, Win OS, Mac OS, and Mobile devices with Easymeeting EasyConference Meet them all EasyConference is a cloud service that enables several video conferencing systems to connect to the same meeting. This means that we can see and hear all participants simultaneously, and we can share presentations in the same meeting. This is a service where you seamlessly can collaborate with any videoconferencing system, and or Win/Mac, iPhone and or iPad. To join in, you smply dial the easynumber and meet everyone. Highlights Join from a standards-based videoconferencing system or from a iPhone, iPad, iPod Touch, Windows OS or Mackintosh OS. See up to 28 participants simultaneously. H.239 Data Collaboration with Review. Control, moderate and administer meetings. Invite guest systems by their easynumber or address. 3 or 6 simultaneously participants in the standard package (max 480 participants). Join from your video system Join A Meeting from a Video Conferencing System Registered to the easymeeting network: Dial the easynumber of the meeting you want to join. Not registered to the easymeeting network: Sign up for a free easynumber, register, then dial the easynumber of the meeting you want to join. or Dial IP 109.239.231.221, enter easynumber of the virtual meeting you want to join followed by #. Telephone access (uses up a port on bridge): Dial toll free phone number 1-877-538-0926. At prompt enter the easynumber you want to join, followed by #. Moderating Conferences You can control MCU meetings using Dual Tone Multi-Frequency (DTMF) signals from your endpoint remote control or key pad. You may need to enable touch tone mode for DTMF entry on some endpoint remote controls. During a meeting press followed by: 1) Become Moderator / Stop moderating 2) Mute / Un-mute your line 3) Control the volume your endpoint are sending to others 4) Show / Hide participant names (Moderator only) 5) Terminate the meeting (Moderator only) 6) Change the main video layout for the meeting (Moderator only) 7) Block / Allow admission to meeting (Moderator only) 8) Call and invite participants to the meeting (Moderator only) 9) Mute / Un-mute all participants except yourself (Moderator only) #) Return to the meeting Controlling Personal Video Layout With DTMF Press 0 on your endpoint remote control to activate the personal video layout mechanism. Continue pressing 0 to rotate through these different personal video layout options: Dynamic Conference Default Enlarged Main View Static Same Sized View Full screen Fixed 2 Participants Fixed 4 Participants Fixed 6 Participants Press # to automatically adjust the size of the video display to better fit your endpoint screen. Fixed 9 Participants How To Activate Touch Tones Polycom Press the button on your remote control. Enabled by default. LifeSize Black Remote Controls , then select Touch Tones. Radvision VC240 button on the remote control, or press Tandberg Press the Use the button on your remote control to toggle between Touch Tone Mode and Camera Presets Mode. LifeSize Grey Remote Controls You can enable Touch Tone Mode by pressing the button on your remote control. This will access the Call Manager Menu. You can now start using the number pad. TIPS for LifeSize users: Select Touch Tone Mode by default from Call Manager Menu if not using any camera presets. Join by iPhone / iPad Scopia Mobile easyConference Mobile Client SCOPIA Mobile is a free app for iPhones and iPads that works in conjunction with a EasyConference hosted by easymeeting.net. This app allows you to connect to videoconferencing systems from your mobile device. You can use SCOPIA Mobile either as a registered user having full access to its functionality or as a guest user to just participate in meetings. Scopia Mobile Installation Tap the App Store button on your mobile device. Search for Scopia and download the client for free. License are included in your easymeeting Virtual Room Subscription. Install SCOPIA Mobile v3 if you have: iPad 1 & 2 iPhone 3GS & 4 iPod Touch 3rd and 4th generation Install SCOPIA Mobile if you have: iPhone 3 Scopia Mobile Configuration Enter the Settings menu Enter the URL to one of the two easymeeting SCOPIA Desktop Servers: us.easym.net eu.easym.net Enter your Login Credentials if you are a registered user or leave the Login Credentials empty to join in as a guest user. from the Connect menu on the mobile app. Note: A registered user must join the meeting before a guest user can join. Tap Done and the Scopia Mobile will connect to the selected easymeeting server. us.easym.net eu.easym.net Scopia Mobile If you are a registered user, this screen is displayed: If you are a guest user, this screen is displayed: Select Connect to your virtual room to connect to a virtual meeting room that is permanently assigned to you. Or Connect to a meeting room other than your virtual room by entering the ID of a meeting and tapping Connect. Scopia Mobile Participating in a meeting When you are connected to your meeting, this screen is displayed: Viewing the Video Conference When using iPhone, you can tap the Conference icon to view the video of the conference and access conferencing functions at any time. If you are viewing a presentation, tap the presentation with two fingers to switch to the conference view. Similarly, if you are viewing the video conference, tap the video with two fingers to switch to the presentation. When using iPad, you can view the video conference by tapping the Conference icon. You access conference functions differently depending on the current layout you are using. If you are a guest user, the Participants and Options icons are not displayed. When you connect to a meeting from an iPad and a presentation is in progress, you can see both meeting participants and the presentation. Changing the way participants are shown You can double-tap a participant in the conference view to see only this participant on the screen. Double-tap the participant again to go back to the conference view. You can also change the position of participants by dragging and dropping their videos. Scopia Mobile Moderating a meeting When in a meeting, tap the Participants / Moderate icon Inviting an endpoint . When in a meeting, tap the Participants / Moderate icon The screen displays the participants connected to the meetings. Tap Invite Tap By Address, type the address, and then tap Join. and tap Delete. . . Scopia Mobile Disconnecting from a meeting or End the meeting When in a meeting, tap the Participants / Moderate icon Tap . Disconnect Just tap the Disconnect icon conference/presentation view. in the When you disconnect from a meeting, you leave the meeting while the rest of the participants can continue using this virtual meeting room. End the meeting You can terminate a meeting if you are a registered user. In this case all participants are disconnected from this meeting. Drag the slider to navigate to the required layout. To Tap the Options icon . The Meeting Control screen opens. Tap Terminate Meeting. Join from Windows or Mac OS Join a meeting from your PC client Start a web browser, navigate to http://www.easymeeting.net. Select a connection point near you (USA or Europe). Enter your name (optional) as a identification during the meeting and the easy number you want to join. Select whether you want to participate with audio/video and presentation or presentation only. Click Participate Now and the client will automatically launch and connect to the meeting. Note: You will be asked to download and install the conference client if Answer positively on all questions during the installation to successfully install and launch the conference client. Scopia Desktop Manage the Meeting Layout Main View Control Click to turn your microphone off. button at the top of the meeting room. By default, the SCOPIA Desktop meeting window displays the Automatic layout. Common Layout Controls Swap Views - Switches between the presentation and video panes location Enter Full Screen - Expands the video or presentation pane to full screen. Video controls (located on top of the video pane) Camera Control Manage Your Audio Settings Click to stop your webcam. Click again to resume. Picture-in-Picture (PiP) Click to turn your self-view on or off. Click the pull down arrow to select the PiP location. Remote Video Select the resolution of received video (High Definition or Standard Definition) and the layout received (Active Speaker or Continuous Presence). Some selections many not be available in all meetings. Presentation controls (located on the presentation panel) Click select to Share the entire desktop or to Share specific applications Click to turn your microphone on and drag the slider next to the button to adjust the volume. Click to turn your speakers off. Click to turn your speakers on and drag the slider next to the button to adjust the volume. Scopia Desktop Present Your Screen or Application Moderate the Meeting You can share your screen or a specific application with other participants. You may need to have moderation rights to present. From the toolbar, the moderator can perform the following: select to Share the entire desktop or to Share specific applications. Invite a H.323 or SIP terminal to the meeting. Mute/Un-mute a specific participant or all participants Disconnect specific participants Block/Unblock video of a specific participant or all participants Lock Meeting (no new participants allowed) Terminate meeting (and disconnect everyone) Presentation Controls The following controls are available while presenting Change Application Invite a H.323 or SIP Terminal to the Meeting Click the Moderate button and choose Invite. Use this to select a different application to share. Start Annotating Click once to freeze the screen and open the annotation tool pane. Click again to exit. Select the Invite a by address and enter the destination address to call. This can be a easynumber, IP address or SIP address. Main Menu Opens a menu containing advanced options including full moderation capabilities and video handling End Presentation mode. Use this to stop presenting and return to participant Click Invite then click Close when done inciting participants. Configuration MS Windows Scopia Desktop has many settings you can adjust to help improve the quality of your videoconference. Normally you will get the best overall quality with the default settings. If you experience issues with your quality or having trouble getting audio or video to work we recommend you to have a look at these settings. You access the settings by right mouse clicking on the Scopa Conference Client icon in your System Tray. Audio and Video Select, adjust and test the device you want to use for audio and video. Network This is very useful if you experience issues with the video and/or the audio quality. Select the bandwidth rate your private connection can handle. If the Current rates are to high you will experience frozen and/or pixelated video quality. To avoid dropped frames or issues with your connection we recommend you to adjust bandwidth settings to a maximum of half of your available bandwidth capacity. A rate of 384 Kb/s send and 384 Kb/s receive is inside the range of almost all broadband connections. Configuration Macintosh OS Scopia Desktop has many settings you can adjust to help improve the quality of your videoconference. Normally you will get the best overall quality with the default settings. If you experience issues with your quality or having trouble getting audio or video to work we recommend you to have a look at these settings. To access the preferences section of Scopia Desktop on Mac, go to the Menu Bar at the top of your screen and select Scopia Desktop > Preferences. General / Bandwidth Adjust the sent / receive bandwidth according to your network. If the Current rates are to high you will experience frozen and/or pixelated video quality. To avoid dropped frames or issues with your connection we recommend you to adjust bandwidth settings to a maximum of half of your available bandwidth capacity. A rate of 384 Kb/s send and 384 Kb/s receive is inside the range of almost all broadband connections. FAQ Frequently Asked Questions What does the apps or the software cost ? The app or the software to attend the meetings are free. Can I dial from one mobile device to another? All participants joins the same Virtual Meeting Room. It is not possible to dial directly to another mobile device. Is it possible to secure the meeting by a PIN-code? Yes, you can secure joining meeting with a PIN and/or secure the moderator menu with a pin-code. Please contact easymeeting service center for help setting this up. Are there any additional documentation available? Easymeeting are currently developing all necessary documentation with will be available during Q4 - 2011. Does Easymeeting support Android? Easymeeting will support Androids first half of 2012. Does Easymeeting support Lync? Easymeeting will support Microsoft Lync first half of 2012. Does Easymeeting support Skype? Skype is currently not supported by easymeeting.net. Is it possible to send presentations from a mobile app? This is not currently possible.