1
Panasonic
_
SD Video Camera
Operating
Instructions
Model No. SV-AV25
D-snap
Before
use, please
read these
instructions
completely.
DPOF
[_
VQTOG81
Before
opening
theCD-ROM
package,
please
read
thefollowing.
End
User
License
Agreement
You ("Licensee") are granted a license for the Software defined in this End User License
Agreement ("Agreement") on condition that you agree to the terms and conditions of this
Agreement. If Licensee does not agree to the terms and conditions of this Agreement, promptly
return the Software to Matsushita Electric Industrial Co., Ltd. ("Matsushita"), its distributors or
dealers from which you made the purchase.
Article
1 License
Licensee is granted the right to use the Software, including the information recorded or
described on the CD-ROM, instruction manuals, and any other media provided to Licensee
(collectively "Software"), but all applicable rights to patents, copyrights, trademarks and
trade secrets in the Software are not transferred to Licensee.
Article 2 Use by a Third Party
Licensee may not use, copy, modify, transfer or allow any third party, whether free of charge
or not, to use, copy or modify the Software, except as expressly provided for in this
Agreement.
Article 3 Restrictions on Copying the Software
Licensee may make a single copy of the Software in whole or in part solely for back-up
purpose.
Article 4 Computer
Licensee may use the Software only on one computer, and may not use it on more than one
computer.
Article 5 Reverse Engineering, Decompiling or Disassembly
Licensee may not reverse engineer, decompile, or disassemble the Software, except to the
extent either of them is permitted under law or regulation of the country where Licensee
resides. Matsushita, or its distributors will not be responsible for any defects in the Software
or damage to Licensee caused by Licensee's reverse engineering, decompiling, or
disassembly of the Software.
Article 6 Indemnification
The Software is provided "AS-IS" without warranty of any kind, either expressed or implied,
including, but not limited to, warranties of non-infringement, merchantability and/or fitness
for a particular purpose. Further, Matsushita does not warrant that the operation of the
Software will be uninterrupted or error free. Matsushita or any of its distributors will not be
liable for any damage suffered by Licensee arising from or in connection with Licensee's
use of the Software.
Article 7 Export Control
Licensee agrees not to export or re-export to any country the Software in any form without
the appropriate export licenses under regulations of the country where Licensee resides, if
necessary.
Article 8 Termination
of License
The right granted to Licensee hereunder will be automatically terminated if Licensee
contravenes any of the terms and conditions of this Agreement. Upon termination hereof,
Licensee must destroy the Software and related documentation together with all the copies
thereof at Licensee's own expense.
Contents
End User License Agreement ...................
Information for Your Safety .......................
Introduction ...............................................
2
4
7
Preparation
Standard Accessories
...............................
!2
12
Selecting Operation Modes .................. 13
Using the Menu Screen ........................... 14
List of Menus ...........................................
!5
Setting Date and Time ............................ 17
Adjusting Brightness and
CoIor Level on the LCD Monitor ........... 18
Basic Functions
Recording Still Pictures ...........................
Playing Back Still Pictures .......................
Recording Moving Pictures
(MPEG4) ...............................................
Playing Back Moving Pictures
(MPEG4) ...............................................
Voice Recording
(Voice Recording Function) ..................
Listening to Voice Recordings
(Voice Playback) ...................................
Listening to Music (Audio Playback) .......
Adjusting the Volume ..............................
Advanced
!9
20
21
22
23
24
25
26
Functions
Digital Zoom Function .............................
Night View Function ................................
Backiight Compensation Function ...........
Adjusting White Balance .........................
Erasing the Files Recorded
on a Memory Card ................................
30
31
32
33
8
Optional Accessory ...................................
8
Controls and Components ........................ 9
Power Supply ..........................................
!0
Inserting a Memory Card .......................... 11
Attaching the Hand Strap ......................... !1
Using the LCD Monitor ............................
Using the Earphones ...............................
Turning the Power On/
Protecting Files (File Protection) .............
Writing Printing Data on a Memory Card
(DPOF Setting) .....................................
Playing Back Still Pictures One by One
(P. Slide Show) .....................................
Formatting the Memory Card ..................
27
27
28
28
29
On a Personal
Computer
About the supplied software ....................
USB Driver ..............................................
34
36
SD-MovieStage .......................................
SD-Jukebox .............................................
36
37
Installing USB Driver ............................... 38
Installing SD-MovieStage Ver.2.5 ............ 38
Installing SD-Jukebox Ver.4 ....................
Connecting to the PC ..............................
Starting the Software ...............................
Disconnecting the USB Cable Safely ......
If you no longer need software
(UninstaII) ..............................................
Constructing a Folder when the Memory
Card is used with a PC .........................
39
40
41
41
41
42
Others
Charge the Built-in Battery for Maintaining
the Date Information .............................
After Use .................................................
Indications ...............................................
Cautions for Use .....................................
Notes and Hints .......................................
Before Requesting Service .....................
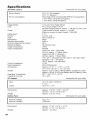
Specifications ..........................................
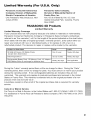
Limited Warranty
(For U.S.A. Only) ..................................
Customer Services Directory
(For U.S.A Only) ...................................
Index .......................................................
43
43
44
46
49
57
60
61
63
64
Dear Customer,
Spanish Quick Use Guide/
Guia espa#ola para el uso
rapido
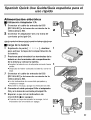
Alimentaci6n
electrica .............................
We would like to take this opportunity to
thank you for purchasing this Panasonic SD
Video Camera. Please read these
Operating Instructions carefully and keep
them handy for future reference.
65
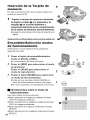
Insercidn de la Tarjeta de memoria ......... 66
Encendido/Seleccidn
modos de
funcionamiento .....................................
66
Information
Safety
for Your
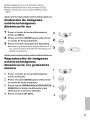
Grabaci6n de imagenes estaticas/
imagenes dinamicas/Ia voz .................. 67
Reproducci6n de imagenes estaticas/
imageries dinamicas/la voz grabada/la
mOsica ..................................................
TO REDUCE THE RISK OF FIRE OR
SHOCK HAZARD AND ANNOYING
67
INTERFERENCE,
USE ONLY THE
RECOMMENDED ACCESSORIES AND
DO NOT EXPOSE THIS EQUIPMENT TO
RAIN OR MOISTURE, DO NOT
REMOVE THE COVER (OR BACK);
THERE ARE NOT USER SERVICEABLE
PARTS INSIDE, REFER SERVICING TO
QUALIFIED SERVICE PERSONNEL.
Notice:
This product has parts that contain a small
amount of mercury. It also contains Iead in
some components. Disposal of these
materials may be regulated in your
community due to environmental
considerations. For disposal or recycling
information please contact your local
authorities, or the Electronics Industries
Alliance: <http://www.eiae.org.>
IMPORTANT
Please respect all copyrights.
Whatever you have recorded and
created can be used for your personal
entertainment
only. Under copyright
laws, other materials cannot be used
without
holders
obtaining permission
of the copyrights.
from the
• Injury
or material damage resulting
from any kind of use that is not in
accordance with the operating
Instructions are the sole responsibility
of the user.
Extremely high precision technology is
employed to produce the LCD Monitor
screen featuring a total d approximately
117,600 pixels. The result is more than
99.99% effective pixels with a mere
0.01% of the pixels inactive or always lit.
However, this is not a malfunction and
does not affect the recorded picture.
• If the SD Video Camera is used
continuously for a long time or used at a
high ambient temperature, red, blue,
green or white dots may appear on the
screen and be recorded on a still picture.
This is due to the rise of the temperature
inside the body. This is not a malfunction.
Under this condition, turn the SD Video
Camera off and leave it for a while.
• The manufacturer shall in no event be
oThe SD Video Camera uses copyrightprotected technologies and is protected by
the patented technologies and intellectual
properties of Japan and the U.S. To use
these copyright-protected technologies,
authorization of the Macrovision Company
is required, it is prohibited to disassemble
or modify the SD Video Camera.
o(4 00) indicates the page to be referred
to.
oNote that the SD Video Camera may not
play back the data recorded or created on
another product and another product may
not play back the data recorded on the SD
Video Camera.
oThe nameplate of the SD Video Camera is
fixed on the bottom of the battery
compartment.
• MPEG Layer-3 audio decoding technology
licensed from Fraunhofer IIS and
Thomson multimedia.
liable for the loss of recordings due to
malfunction or defect d this SD Video
Camera, its accessories or Memory Card.
• Please note that the actuat controls and
components, menu items, etc. of your SD
Video Camera may look somewhat
different from those shown in the
CAUTION
illustrations in these Operating
Instructions.
Replace only with the same or
equivalent type recommended by the
manufacturer,
• SD Iogo is a trademark.
• In this Operating Instructions, "Memory
Card" and "Card" mean "SD Memory
Card".
Danger of explosion if battery is
incorrectly replaced.
Dispose of used batteries according to
the manufacturer's instructions,
FCCNote:(U.S.only)
This equipment has been tested and found to comply with the limits for a Class B digital
device, pursuant to Part 15 of the FCC Rules. These limits are designed to provide
reasonable protection against harmful interference in a residential installation. This
equipment generates, uses, and can radiate radio frequency energy and, if not installed
and used in accordance with the instructions, may cause harmful interference to radio
communications. However, there is no guarantee that interference will not occur in a
particular installation. If this equipment does cause harmful interference to radio or
television reception, which can be determined by turning the equipment off and on, the
user is encouraged to try to correct the interference by one or more of the following
measures:
• Reorient
• Increase
oConnect
receiver
or relocate the receiving antenna.
the separation between the equipment and receiver.
the equipment into an outlet on a circuit different from that to which the
is connected.
oConsuIt the dealer or an experienced radio/TV technician for help.
FCC Caution:
To assure continued compliance, follow the attached installation
instructions and use only shielded interface cables with ferrite
core when connecting to computer or peripheral devices.
Any changes or modifications not expressly approved by the
party responsible for compliance could void the user's authority
to operate this equipment.
Trade Name:
Model No.:
Panasonic
SV-AV25
Responsible party:
Matsushita Electric Corporation of America One Panasonic Way,
Secaucus, NJ 07094
Support Contact:
Panasonic Consumer Electronics Company
1-800-211 -PANA(7262)
This device complies with Part 15 of the FCC Rules. Operation is subject to the following
two conditions: (1) This device may not cause harmful interference, and (2) this device
must accept any interference received, including interference that may cause undesired
operation.
This Class B digital apparatus complies with Canadian
Panaso_c
sv _,,,25
With FCC
St_da, ds
"re,ted
To Comply
:FOR HOME
OR OI_FICE
USE
ICES-003.
Introduction
This SD Video Camera can record MPEG4 moving
pictures, still picture and voice data. Additionally, it can
play back a high quality music file of the MPEG2-AAC
and MP3 format (Records files with the supplied
SD-Jukebox Ver.4). And using the viewer software
SD-MovieStage Ver.2.5 (supplied accessory), the
MPEG4 moving picture data can be edited on the
personal computer.
,Clock
setting
When you purchase the SD Video Camera, the
clock setting has not been performed. To start,
please set the year, month, date and time. (4 17)
PRESS
MENUTO
SETCLOCK
7 CD-ROM (4 34)
USB Driver,
Preparation
Standard
SD-MovieStage
Ver.2.5,
SD-Jukebox Ver.4,
Adobe Acrobat Reader
Accessories
1 AC Adaptor (VSKO647) (4 10)
eSupplies power to the SD Video
Camera.
• For using the SD-MovieStage Ver.2.5
and SD-Jukebox Ver.4, refer to the
PDF manual. This manual describes
installation only.
8 Carrying Case (VFC4030)
ePut the SD Video Camera in the
2 Battery Pack (4 10)
eSupplies power to the SD Video
Camera.
3 SD Memory Card (8 MB)
(RP-SD008BVEO) (4 11)
• Useable capacity will be less.
4 USB Cable (KIHA09BD0O01)
(4 40)
5 Stereo earphones (LOBAB0000172)
6 Hand Strap (VFC4012) (4 11)
J
after use or
9 Cleaning Cloth (VFC3778)
f
(4 12)
Carrying Case (supplied)
when carrying it.
Optional
Accessory
1 Battery Pack (CGA-S302A/1B) (4 10)
• Supplies power to the SD Video
Camera.
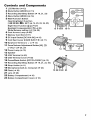
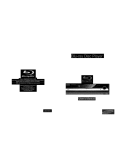
Controls
and
Components
1 LCD Monitor (4 12)
2 Mode Button [MODE]
3 Recording
(4 13)
Start/Stop Button (4 19, 21,23)
4 Menu Button [MENU] (4 14)
5 Multi-Function Button
Operating/Select
[l_l_lllll)._llll_
Function
SET] (4 14, 20, 22, 24, 25)
Night View Function [[] ] (4 27)
Backlight Compensation [[]] (4 28)
White Balance setting [_=,_] (4 28)
6 Card Access Lamp (4 49)
6 789
101t
t2
7 Memory Card Slot (4 11)
8 DC Input Socket [DC IN 4.8V] (4 10)
9 Card Eject Lever [CARD EJECT I_] (4 11)
t0
Earphone Terminal [ _ ] (4 12)
t t Zoom/Volume
t2
Adjustment
Button [W], [T]/
[-VOL+]
(4 26, 27)
Power Lamp (4 10)
1 3 Speaker
t4
USB Terminal (4 40)
t5
USB Terminal Cover (4 40)
t 6 Power/Mode
18
Switch [OFF/PLAY/REC]
t7
Recording
t8
Strap Holder (4 11)
(4 13)
Start/Stop Button (4 19, 21, 23, 50)
19 Microphone
(built-in, monaural) (4 23)
19 20 2t 22
20 Flash (4 19)
21 Lens (4 48)
22 Battery Compartment
(4 10)
23 Battery Compartment
Cover (4 10)
23
Power
,Using
1
2
Supply
AC Adaptor
Connect the DC Input Lead to the
[DC IN 4.8V] socket on the SD Video
Camera.
2
Connect the AC Adaptor to AC Main
socket.
,Charging
the Battery
]
While holding the [o o o _>] part. slide it
to remove the Battery Compartment
Cover.
2
Press the terminals of the battery onto the
terminals of the Battery Compartment and
set the battery.
• Fit the battery with its label facing upward.
• After the battery is set, close the cover.
Connect the BC Input Lead to the [BC IN 2
4.8V] socket on the SD Video Camera.
• Be sure to turn the power switch oil the camera
off when charging the battery.
Connect the AC Adaptor to AC Main
socket.
• Power Lamp flashes O, and charging starts.
Wait until Power Lamp O goes off.
• When recharging is completed, Power Lamp
goes off.
3
4
5
• Under normal operation the charging light stays on
during charging. If it blinks a charging problem may
be occurring. Please see page 48 for more details.
4
10
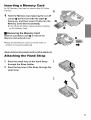
Inserting
a Memory
Card
An SD Memory Card can be used for this SD Video
Camera.
1
Hold the Memory Card placing the cut off
corner O at the front with the label
facing up, and then insert it fully into the
Memory Card Slot horizontally.
eTurn off the SD Video Camera before inserting
an SD Memory Card.
==Removing
the Memory Card
Slide the Card Eject Lever _) to remove the
Memory Card and pull it out.
O
CARD E,_ECT
eKeep the SD Memory Card out of the reach of
children to prevent swallowing.
Attaching
the
Hand
Strap
]
Pass the small loop of the Hand Strap
through the Strap Holder.
2
Pass the big loop of the Strap through the
small loop.
11
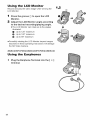
Using
the
LCD Monitor
Record and play the video image while viewing the
LCD Monitor.
1
Press
the groove
_
to open
1,2
the LCD
Monitor.
2
Adjust
the LCD Monitor
to the desired
angle according
recording/playing
angle.
eThe LCD Monitor can rotate up to the angles
illustrated.
O:
Upto
120 ° maximum
_:
Upto
180 ° maximum
I_) : Up to 90 ° maximum
• Forcefully rotating the LCD Monitor beyond ranges
described in these operating instructions will damage
the SD Video Camera.
Using
]
12
the
Earphones
Plug the Earphone Terminal into the [ Q ]
terminal.
$
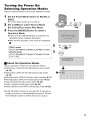
Turning
the Power
Selecting
Operation
On/
Modes
Select a desired mode on the mode selection screen.
1
Set the Power/Mode
Switch
to [PLAY]
or
[REC].
eThe SD Video Camera is turned on.
2
Set to [REG]
Set to [PLAY]
3
Press
to select
to select
the [MODE]
Operation
Record
Play
Button
OFF
PLAY
REC
Mode.
Mode.
to select
a
Mode.
• Every time the [MODE] Button is pressed, the
Operation Mode changes as follows.
eAfter several seconds, only icons are displayed.
0
[_EC]
2
mode
[PICTU RE]4[MPEG4]4[VOICE]4[PICTURE]
[PLAY] mode
[PICTU RE]4[MPEG4]4[VOICE]4[AU
DIO]4
o_c
3
0
[[PICTURE]
==About the Operation
Modes
Seven operation modes are provided as follows.
• Still picture (JPEG format still picture) record mode
(4 19)
• Still picture (JPEG format still picture) play mode
(4 20)
• Moving picture (MPEG4 format) record mode (4 21)
• Moving picture (MPEG4 format) play mode (4 22)
• Voice (VOICE format) record mode (4 23)
• Voice (VOICE format) play mode (4 24)
• Audio (MPEG2-AACtMP3 format) play mode (4 25)
• If the SD Video Camera is not used for 5 minutes or
longer, the power is automatically turned off. Set the
Power/Mode Switch to [OFF] and turn it back on.
13
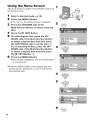
Using
the
Menu
Screen
Allows the functions usable in the selected mode to be
set from the menu.
1
2
Select a desired mode. (4 13)
3
Press the [MENU] Button.
eThe menu in the selected mode is displayed.
Press the UP/DOWN side of the
Multi-function Button to select a desired
item.
4
Press the [1_ SET] Button.
5
For selecting an item, press the UP/
DOWN side of the Multi-function Button
6
to select a desired item and then press
the LEFT/RIGHT side to set the item.
For conducting an item, press the UP/
DOWN side of the Multi-function Button
to select a desired item and then press
the [1_ SET] Button.
Press the [MENU] Button.
• Menu screen disappears, and the selected item
is now being set.
• Press the [MENU] Button when playing back the
moving picture, still picture or voice to edit the file
being played back.
14
OFF
PLAY REC
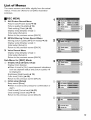
List
of Menus
The menu screens used differ slightly from the actual
menus. These are offered for simplified illustration
purposes.
IIREC
t
MENU
Still Picture Record Menu
_i__
Picture size [Picture size] (4 19)
Picture quality [Quality] (4 19)
Flash setting [Flash] (4 19)
Display setup [Display setup] (1_
InitiaI setup [Setup] (2_
Return to the previous screen [BACK]
2
MPEG4 Moving Picture Record Menu
Moving picture quality [MPEG4 mode] [4 21)
ii
:;_:_:_:_:_:'_:_:
2
Display setup [Display setup] _1_
Initial setup [Setup] (2_
Return to the previous screen [BACK]
3
¸-
d)
@
Voice Record Menu
Display setup [Display setup] (1_
Initial setup [Setup] (#
Return to the previous screen [BACK]
Sub-Menu
for [REC] Mode
(_) Display setup [Display setup]
Display [icon display]
eWhen it is set to [On], superimposed indications
such as playback status and picture quality will
be displayed.
3
,®
,@
Brightness [Brightness] (4 18)
Color level [Color] (_ 18)
Return to the previous screen [BACK]
(_) Initial setup [Setup]
Beep sound [Beep]
eWhen it is set to [On], beeps for confirmation or
alarm.
Card format [Format card] (_ :}3)
Clock setting [Clock set] (4 17)
Return to the previous screen [BACK]
(_
@
15
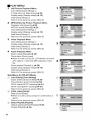
• PLAY MENU
t
Still Picture Playback Menu
'1
Card editing [Card editing] (_
R Slide show [R Slide show] (4 32)
Display setup [Display setup] (_" 15)
Initial setup [Setup] (2_
Return to the previous screen [BACK]
2
MPEG4 Moving Picture Playback Menu
Playback size [Screen] (4 22)
MPEG4 repeat [Repeat] (4 22)
Card editing [Card editing] (_
Display setup [Display setup] (4 15)
2
@
Initial setup [Setup] (_
Return to the previous screen [BACK]
3
Voice Playback Menu
Card editing [Card editing] (_
Display setup [Display setup] (4 15)
3
Initial setup [Setup] (_
Return to the previous screen [BACK]
4
Audio Playback Menu
Music repeat [Repeat] (4 25)
Power save [Power save]
oWhen it is set to [On], the LCD Monitor is turned
off in approx. 5 seconds after playing a music
file.
Select playlist [Playlist] @ (4 26)
,@
4
Display setup [Display setup] (4_ 15)
Initial setup [Setup] (2_
Return to the previous screen [BACK]
Sub-Menu
for [PLAY] Mode
(1) Card Editing [Card editing]
Erase all files [Erase all files] (4 29)
File protection [Lock/Unlock] (,4_30}
DPOF check [DPOF checking] (4 31)
DPOF reset [DPOF resetting] (,a_31)
Return to the previous screen [BACK]
(_) Initial setup [Setup]
Beep sound [Beep]
oWhen it is set to [On], beeps for confirmation
alarm.
C)
or
@
Return to the previous screen [BACK]
_
Select Playlist [Playlist]
Default playlist [DefauItP_ay_ist] (4 26)
Playlist [PIaylist] (4 26)
16
(_
Setting
Date
and
Time
At the time of purchase of the SD Video Camera, the
date and time are not set ([PRESS MENU TO SET
CLOCK] is displayed). First, set the date and time,
then use the SD Video Camera.
1
1
Set the Power/Mode
2
Press
3
Select
the [MENU]
[Setup]
Switch
OFF
PLAY REC
to [REC].
Button.
and press
the [1_ SET]
Button.
4
Select
[Clock
set]
and press
[Year]
and press
the [1_ SET]
Button.
5
Select
side
of the Multi-function
desired
6
In the
[Hour],
7
Press
the LEFT/RIGHT
Button
to set a
_tuD
value.
same
way,
[Minute]
the [MENU]
set [Month],
to a desired
[Day],
value.
Button.
• When the built-in battery has been exhausted, set
the date and time again after the battery has
charged. (4 43)
17
Adjusting
Brightness
and
Color Level on the LCD
Monitor
1
LCD Brightness [Brightness]
It adjusts the brightness of the image on the LCD
screen.
2
LOB Color Level [Color]
It adjusts the color saturation of the image on the LCD
screen.
1
Set the
Power/Mode
set the operation
Switch
mode
to [REC]
to [PICTURE]
and
or
[MPEG4].
2
Press
3
Select
the
[MENU]
[Display
[1_ SET]
Button.
setup]
and press
the
Button.
4
Select
[Brightness]
5
Press
the LEFT/RIGHT
Multi-function
• If [Brightness]
or [Color].
Button
side
of the
for adjustment.
is selected, the brightness can be
increased by moving the [(b ] to the right.
• If [Color] is selected, the color can become
darker by moving the [
6
Press
the
[MENU]
] to the right.
Button.
• The [MENU] screen disappears. (if left unused
for approx. 3 seconds, the display will
automatically revert to the [Display setup]
screen.)
• These adjustments
images.
18
do not affect the recorded
OFF_ _PLAYREC
0
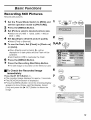
Basic Functions
Recording
Still
Pictures
Records still pictures.
'!
Set the Power/Mode
set the operation
2
Press
3
Set [Picture
Switch
mode
the [MENU]
size]
to [REC]
and
to [PICTURE].
Button.
to desired
picture
size.
=Select one of [1600 × 1200], [1260 × 960] or
[640 × 480].
4
Set [Quality]
to desired
picture
quality.
2
(MENU)
• Select [Fine] or [Normal].
5
To use the flash,
Set [Flash]
to [Flash
on]
or [Auto].
A----;,,li141_
=
oWhen [Flash] is set to [Auto], _A will be
displayed in a dark place and the Flash will be
available.
• Set [Flash] to [Off] to inactivate the Flash.
6
Press
the [MENU]
7
Press
the Recording
Button.
Start/Stop
_sple_se_D
Button.
setu_
oThe still image is recorded on the Memory Card.
iTo Check the Recorded Image
immediately
Press the [1_ SET] Button _.
• The recorded image displays for approx. 5 seconds.
• The [REVIEW] Indication is displayed.
• Press the [MENU] Button when the checking display
appears to show [Erase card file] display. Select
[Yes] and press the [1_ SET] Button to delete the
image.
19
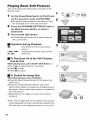
Playing
Back
Still
Pictures
This mode plays back still pictures recorded on the
Memory Card.
1
2
3
Set the Power/Mode Switch to [PLAY] and
set the operation mode to [PICTURE].
eStill picture files recorded on the Memory Card
are displayed in the index picture screen.
Press the UPIDOWNILEFTIRIGHT
side of
the Multi-function Button to select a
desired file.
Press the [1_ SET] Button.
eThe selected still picture file is played back oil
the LCD monitor.
iOperation
JR]:
[_1],
[1_1_]:
[1_ SET]:
during Playback
Stop (Reverts to the index picture
screen.)
Displays the previous (next) screen.
Slide show
iTo Play Back All of the Still Pictures
One by One
While playing back, press the [1_ SET] Button d),
eThe image is played back for 3 seconds.
ePress [HI to stop.
ePress [|1] to pause.
iTo
Double the Image Size
While playing back, press [T] Button.
• Press the Zoom/Volume Button [W] to resume the
picture size.
• Press the UP/DOWN/LEFT/RIGHT
side of the
Multi-function Button to change the enlarging area of
the image. (Cannot select files unless you restore the
size of a picture.)
• Depending on the image, you may not be able to
enlarge it.
• Only JPEG images that were created by this product
will be displayed correctly. Files that are copied to the
SD card may not be displayed properly, or not at atl.
20
1
OFF_ _PLAY REC
0
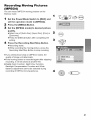
Recording
(MPEG4)
Moving
Pictures
You can record MPEG4 moving pictures on the
Memory Card.
1
Set the Power/Mode
set the operation
2
Press
3
Set the [MPEG4
Switch
mode
the [MENU]
to [REC]
and
,
O
to [MPEG4].
Button.
mode]
to desired
picture
quality.
• Select one of [Extra fine], [Super fine], [Fine] or
[Economy].
• Press the [MENU] Button after completing the
setting.
4
Press
the Recording
Start/Stop
Button.
• Recording starts.
aWhile recording the moving picture, press the
Recording Start/Stop Button to stop recording.
• If you select [Economy] on [MPEG4 mode], the
quality of image will deteriorate.
• If the moving picture is recorded again after stopping
recording, it wiii be saved as another file.
• Digital Zoom Function, Night View Function,
Backlight Compensation Function and White
Balance adjustment cannot be selected during
recording of MPEG4 moving pictures.
21
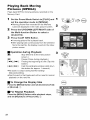
Playing
Pictures
Back
Moving
(MPEG4)
Plays back MPEG4 moving pictures recorded oil the
Memory Card.
1
Set the Power/Mode Switch to [PLAY] and
2
set the operation mode to [MPEG4].
• Moving picture files recorded on the Memory
Card are displayed in the index picture screen.
Press the UPIBOWNILEFTIRIGHT
side of
the Multi-function Button to select a
desired file.
3
Press the [1_ SET] Button.
• A moving picture file is played back.
• After playing back continuously from the selected
file to the last file, the display reverts to the index
picture screen.
iOperation
during Playback
Ill:
Stop (Reverts to the index picture
screen.)
[I I]:
Pause (Press during playback.)
[ _41], [ IH_ ]: Finding the beginning of a file (Tap this
button.)
[),(1_1],[l_l_l]:
Fast forwardinglrewinding
(Hold down
this button for approx. 1 second.)
• No audio is output during fast-forwarding/
fast-backwarding.
• Fast forward or fast backward will be reset to normal
playback on the next file.
iTo
Change the Display Size
Press the [MENU] Button and set [Screen] to [Full]
or [Normal]. (i)
iFor
Repeat Playback
Press the [MENU] Button while playback stops,
and set [Repeat] to [1File] or [All]. (2)
22
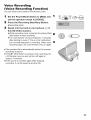
Voice
(Voice
Recording
Recording
Function)
You can record voice data on the Memory Card.
1
Set the Power/triode
set the
2
Press
operation
the Recording
• Recording
3
Speak
this
Switch
mode
into
to [REC]
and
to [VOICE].
Start/Stop
,
Button.
starts.
the built-in
SD Video
microphone
(_ of
Camera.
• While recording voice, press the Recording Start/ 2
Stop Button to stop recording.
• The LCD Monitor will shut off approx. 5 seconds
after starting to record. This is not a malfunction
but a normal sequence in recording. When voice 3
recording stops, the LCD Monitor turns on again.
• The recorded file is automatically locked (to prevent
accidental erasure).
• If the [1_ SET] Button is pressed while recording, the
LCD Monitor turns on and will turn off again in
approx. 5 seconds.
• If the sound is recorded again after stopping
recording, it will be saved as another file.
23
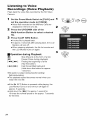
Listening
to Voice
Recordings
(Voice
Playback)
Plays back the voice files recorded by the SD Video
Camera.
1
Set the Power/Mode
Switch
to [PLAY]
and
set the operation
mode to [VOICE].
eVoice files recorded on the Memory Card are
displayed in the form of a list.
2
Press
the UP/DOWN
Multi-function
side of the
Button
to select
a desired
file.
3
Press
the [1_ SET]
Button.
eA voice file is played back.
eln approx. 5 seconds after playing back, the LCD
Monitor will turn off.
eWhen stopping playback, the file list reverts and
the LCD Monitor turns on again.
iOperation
during Playback
JR]:
[I I]:
[ _41],[I,-I_1 ]:
Stop (Reverts to the form of a list)
Pause (Press during playback)
Finding the beginning of a file
(Tap this button.)
[ ),4_1],[l_l_l ]:
Fast forward/fast backward
(Hold down this button for approx.
1 second.)
• No audio is output during fast-forwarding/
fast-backwarding.
• The playback speed becomes normal when you
reach the next file.
• If the [I_ SET] Button is pressed while playing, the
LCD Monitor turns on and will turn off again in
approx. 5 seconds.
• Hold down the [1_] for approx.1 second for
10 times the normal speed or for approx. 7 seconds
for 60 times.
24
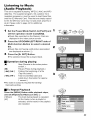
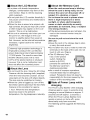
Listening
(Audio
to Music
Playback)
This unit is capable of playing MPEG-2 AAC and MP3
data files. The supplied program, SD-Jukebox Ver.4
(supplied accessory), must be used to load these files
onto the SD Memory Card. Files that are simply copied
to the SD Memory Card may not play back properly or
at all. Please refer to page 34 for additional
information.
1
Set the Power/Mode
set the
operation
Switch
mode
to [PLAY]
and
Q
1
to [AUDIO].
• Music files recorded on the Memory Card are
displayed in the index picture screen.
2
Press
the UPIDOWNILEFTIRIGHT
Multi-function
Button
to select
side
of
a desired
file.
• Music files not having a still picture associated
are displayed as shown d_.
3
Press
the [1_ SET]
2
Button.
• The selected music file is played back.
==Operation
during playing
Ira]:
Stop (Reverts to the index picture
screen.)
[I I]:
Pause (Press during playback.)
[ 1441],[I)-I_1]:
Finding the beginning of a file
(Tap this button.)
[ 1441],[I)-I_l ]:
Fast forward/fast backward
(Hold down this button for approx.
1 second.)
• No audio is output during fast-forwarding/
fast-backwarding.
==To Repeat Playback
_!_
Press the [MENU] Button while playback stops,
and set [Repeat] to [1Music] or [All]. _
[1 Music]:
The track being played is repeated.
JAil]:
All the tracks (when a playlist is
selected, all the tracks in the ptaylist)
are repeated.
25
==Selecting
a Playlist
Playlists set using the SD-Jukebox Ver.4 can be
played back.
Press the [MENU] Button to select a desired
playlist in [Playlist] of the menu. O}
®
i_!i!i!i!i!i!i!i!i!i!i!i!i!i!i!i!i!i!i!i!i!i!i!i!i!i!i!i!i!i!i!i!i!i!i!i!i!i!i!i!i!i!i!i!i!i!i!i!i!i!i!i!i!i!i!i!i!i!i!i!i!i_
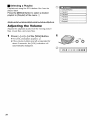
Adjusting
the Volume
Adjusts the playback audio level for moving picture
files, music files, and voice files.
Press
[--] or [+]
of the [VOL]
Button.
eThe [VOL] indication appears. (2}
• If the volume buttons are left unoperated for
about 2 seconds, the [VOL] indication will
automatically disappear.
26
-
VOL
O0
+
Advanced
Functions
...........................................................................................
.............................................................................................................
..............................................................................................
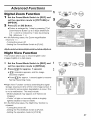
1
Digital
1
Zoom
Function
Set the Power/Mode
set the operation
Switch
mode
to [REC]
to [PICTURE]
and
or
2
[MPEG4].
2
Press
[T] or [W] Button.
• Picture is enlarged by 1 step
Zoom!Volume Button up to 3
2.5 ×) and it is reduced by 1
[W]. (Minimum: 1 x)
• In the following cases, the Zoom
returns to I ×.
-Turning the power off.
-Setting the Power/Mode
Night
View
by pressing [T] of
steps (Maximum:
step by pressing
magnification
Switch to [PLAY].
Function
This function allows you to record brighter color
images brightly in a dark place.
!
Set the Power/Mode
set the operation
2
Press
[N
Switch
mode
] for approx.
to [REC]
and
to [MPEG4].
I second.
• IN]
indication appears, and the image
becomes brighter.
• Press [N ] for approx. 1 second again to resume
Normal Recording mode.
• Night View Function works by extending the signal
storage (exposure) time of the CCD image sensor. It
is normal for some picture degradation to occur-This
is not a malfunction. This may include:
-Motion playback may appear as if frames are
dropped.
-"Points" of light not normally visible in brightly
lighted situations may be visible.
• In the following cases, the Night View function is
released.
-Turning the power off.
-Setting the Power/Mode Switch to [PLAY].
-Setting the operation mode to [VOICE].
27
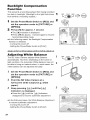
Backlight
Function
Compensation
This prevents a recording subject from being recorded
too dark in backlight. (Backlight is the light that shines
from behind a recording subject.)
1
Set the Power/Mode
set the operation
Switch
mode
to [REC]
to [PICTURE]
1
OFFL._ _PLAY REC
O
OFFL._PLAY
O
and
or
[MPEG4].
2
Press
[[]]
for approx.
I second.
eThe [[_] Indication is displayed.
ePress [[_] for approx. 1 second again to resume
Normal Recording mode.
• In the following cases, the Backlight Compensation
function is released.
-Turning the power off.
-Setting the Power/Mode
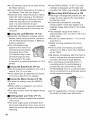
Adjusting
White
Switch to [PLAY].
Balance
The SD Video Camera adjusts White Balance
automatically.
light condition, the Automatic White Balance may not
be able to bring out natural colors. In such cases, the
white balance can be adjusted manually.
]
2
white subject (e.g. white
Keep pressing [_',a] until the [_',a]
Indication is displayed,
• Press the [t_=zl] untii the [_'zl] Indication
disappears to resume automatic adjustment.
• In the following cases, the White Balance Adjustment
to resume automatic adjustment.
-Turning the power off.
-Setting the Power/Mode Switch to [PLAY].
28
2
Set the Power/Mode Switch to [REC] and
set the operation mode to [PICTURE] or
[MPEG4].
Point the SD Video Camera at a
full-screen
paper).
3
1
However, depending on the scene or
3
REC _
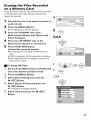
Erasing
on
the
Files
Recorded
Card
a Memory
Using SD Video Camera, you can erase files recorded
on the Memory Card. After files are erased, they
cannot be restored.
1
Play back
the file to be erased
or pause
it.
(4 20, 22, 24)
2
Press
3
• The editing menu screen appears.
Press the UP/DOWN
side of the
the [MENU]
Multi-function
file]
4
Button
until
[Erase
card
3,4,5
is displayed.
Press
the LEFT/RIGHT
Multi-function
5
Button.
Press
side
Button
the [1_ SET]
of the
to select
[Yes].
Button.
• Erased files cannot
be restored.
• The selected file is erased from the Memory
Card.
• If [NO] is selected, the file selection is canceled.
• After erasing the file, the display reverts to the
index picture screen.
llTo
]
,
Erase All Files
Set the Power/Mode
Switch
set to the desired
operation
2
Press
Button.
3
Select
the [MENU]
[Card
[1_ SET]
4
Select
5
and
Q
and
mode.
press
the
3,4,5
Button.
[Erase
[1_ SET]
editing]
to [PLAY]
all files]
and
press
the
Button.
• A verification
message appears.
Select
and
[Yes]
press
the
[1_ SET]
Button.
29
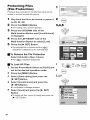
Protecting
(File
Files
Protection)
Precious files recorded on the Memory Card can be
locked to prevent accidental erasure.
1
Play back
the file to be locked
or pause
it.
2
(4 20, 22, 24)
2
Press
the
[MENU]
3,4,5
Button.
eThe editing menu screen appears.
3
Press
the UP/DOWN
Multi-function
is displayed.
4
Press
Button
Press
Button
the [1_ SET]
of the
until
the LEFT/RIGHT
Multi-function
5
side
side
[Lock/Unlock]
of the
to select
[Lock].
Button.
eThe selected file is locked and the [0_]
Indication is attached to the selected files.
lTo
lTo
]
Release the File Protection
Select [Unlock] in Step 4 above.
eThe [On] Indication disappears.
Lock All Files
Set the Power/Mode
Switch
set to the desired
operation
2
Press
Button.
3
Select
the
[Card
[1_ SET]
4
Select
[MENU]
[Lock]
and press
the
and press
the
message appears
and
press
the [1_ SET]
Button.
eTo unlock all files, select [Unlock] and press the
[1_ SET] Button.
3O
,
mode.
Button.
eA verification
Select
and
Button.
[Lock/Unlock]
[1_ SET]
5
editing]
to [PLAY]
3,4,5
0`
Writing
Printing
Memory
Card
Data
(DPOF
on a
Setting)
DPOF Setting Printing data (DPOF Setting), such as
the number of images to be printed, can be written to
the Memory Card.
1
Play back a still picture to be DPOF-set.
(4 20)
2
3
Press the [MENU] Button.
• The editing menu screen appears.
Press the UP/DOWN side of the
4
Multi-function Button until [DPOF print] is
displayed.
Press the LEFT/RIGHT side of the
2
Multi-function Button to set the number to
be printed and press the [1_ SET] Button.
• When DPOF setting is set to 1 or more, the
[_ ] indication appears.
lTo
Release
All the DPOF Settings
1
Set the Power/Mode Switch to [PLAY] and
2
set the operation mode to [PICTURE].
Press the [MENU] Button.
3
Select [Card editing] and press the
[1_ SET] Button.
4
Select [DPOF resetting] and press the
5
[1_ SET] Button. (_
• A verification message appears.
Select [Yes] and press the [1_ SET]
Button.
lTo
Check the DPOF Settings in Slide
Show
Select [DPOF checking] in Step 4 in
"To Release All the DPOF settings" above
(_)
and press the [1_ SET] Button. _)
• DPOF-set images are displayed one by one for
approx. 3 seconds each.
31
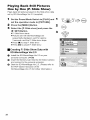
Playing
Back Still Pictures
One by One (P. Slide Show)
Plays back still pictures based on the Slide show data
set by SD-MovieStage Ver.2.5 (supplied).
I
Set the Power/Mode
set the operation
2
Press the [MENU]
3
Select
the [P. Slide
Switch
mode
to [PLAY]
and
to [PICTURE].
,
O
Button.
show]
and press
the
[1_ SET] Button.
op. Slide show starts.
• Pictures set with SD-MovieStage are
sequentially displayed, each for approx.
3 seconds, and the R Slide show stops.
• Press [O] to stop R Slide show.
• Press [ll] to pause R Slide show.
°°Creating P. Slide Show Data with
SD-MovieStage Ver.2.5
O
Install the SD-MovieStage Ver.2.5 on your
personal computer. (4 38)
I_ Insert the Memory Card into the SD Video Camera
and connect to the personal computer.
1_) Start the SD-MovieStage Ver.2.5. (Please refer to
the PDF-based instruction of the
SD-MovieStage
32
Ver.2.5 for further information.)
P. Slide show
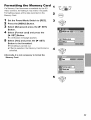
Formatting
the
Memory
Card
If a Memory Card becomes unreadable by the SD
Video Camera, formatting it may make it reusable.
Formatting erases all the data recorded on the
Memory Card.
1
Set the Power/Mode Switch to [REC].
2
Press the [MENU] Button.
3
Select [Setup] and press the [1_ SET]
Button.
4
Select [Format card] and press the
[1_ SET] Button.
eA verification message appears.
Select [Yes] and press the [1_ SET]
Button to be formatted,
• Formatting is carried out.
• If [No] is selected, the Memory Card format is
canceled.
5
1
OFF
PLAY REC
• Normally, it is not necessary to format the
Memory Card.
33
On a Personal
About
the
iAbout
the supplied software
supplied
Computer
software
The SD Video Camera comes with SD-Jukebox
Ver.4, SD-MovieStage
Ver.2.5, and a USB
driver to allow the SD Video Camera to be used on a personal computer. By using these
software packages, you can record high-quality music which can be played back in the
[AUDIO] mode of the SD Video Camera (SD-Jukebox Ver.4), arrange the pictures on a
Memory Card, and cut and edit moving pictures (SD-MovieStage Ver.2.5). Please read the
PDF-format instructions installed with the software for how to use the software. These
Operating Instructions describe only how to install and start up the software and how to
connect the SD Video Camera to a personal computer. Install the USB driver before
connecting the SD Video Camera to a personal computer,
SD-Jukebox incorporates copyright protection technology using encryption technology in
order to protect copyrights, to ensure the healthy development of music culture, and to
protect the rights of valid purchasers.
The following restrictions are therefore applied:
• SD-Jukebox records music data in encrypted form onto your hard disk drive. Encrypted
music cannot be moved/copied to other folders, drives, and other personal computers
for use.
• Unique information pertaining to your personal computer's processor and hard disk drive
is used in the encryption process. Therefore, if either the processor or hard disk drive is
replaced, previously created music data will no longer be available for use.
• SD-Jukebox
label.
cannot play or record music CDs that do not have a _
mark on the disc
• While every attempt is made to create software that will operate properly in most personal
computers, previously installed software and unique hardware in the PC may occasionally
cause an operating problem.
• USB Driver, SD-MovieStage Vet.2.5 and SD-Jukebox Ver.4 cannot be used on Microsoft
Windows 3.1, Windows 95, Windows 98, Windows NT and Macintosh.
• Operation on an upgraded OS is not guaranteed.
• Operation on an OS other than the one pre-installed is not guaranteed.
• Multi-boot environments are not supported.
• Only users having system administrator (Administrator) authority can use these software
applications.
• The software is available in English.
• Even if you operate a personal computer in French, the application and PDF manual
installed is the English version. Please refer to the PDF manual of the French version in
the supplied CD-ROM.
• A USB hub or USB card used for connection does not guarantee a normal operation. Use
the attached USB cable for direct connection to the personal computer.
34
• Before installing (or uninstalling), quit all other applications.
If the launcher for
installation is not activated automatically when the CD-ROM is inserted in the
personal computer's CD-ROM drive, double-click the CD-ROM icon in
[My Computer].
• For operating instructions, please read the PDF manual on the CD-ROM. To read the
PDF Manual, you must have Adobe Acrobat Reader 5.0 or higher. If Adobe Acrobat
Reader is not installed on the Personal Computer, please install it from the
launcher.
• Microsoft ®, Windows ®, Windows Media
TM
Windows
NT ® and DirectX ® are either
trademarks or registered trademarks of Microsoft Corporation
other countries.
in the United States and/or
• Intel ®, Pentium ® and Celeron ® are trademarks or registered trademarks of Intel
Corporation in the United States and/or other countries.
• Adobe ®, Adobe Acrobat ® and Acrobat Reader e are trademarks or registered trademarks
of Adobe Systems Incorporated in the United States and/or other countries.
• Music recognition technology
and related data are provided by Gracenote ® and the
Gracenote CDDB ® music recognition service. Gracenote
is the industry standard in music
recognition technology and related content delivery. For more information visit
www.,qracenote.com.
• CD and music-related data from Gracenote, Inc., copyright © 2000-2003 Gracenote.
•
•
•
•
•
Gracenote CDDB ® Client Software, copyright 2000-2003 Gracenote.This product and
service may practice one or more of the following US.Patents: #5,987,525; #6,061,680;
#6,154,773, #6,161,132, #6,230,192, #6,230,207, #6,240,459, #6,330,593, and other
patents issued or pending.
Gracenote and CDDB are registered trademarks of Gracenote. The Gracenote Iogo and
logotype, the Gracenote logo, CDDB Iogo and logotype and the "Powered by Gracenote"
logo are trademarks of Gracenote.
Other names of systems and products mentioned in these Operating Instructions are
usually the registered trademarks or trademarks of the manufacturers who developed the
systems or products concerned.
The contents or complete reproduction or copy of these Operating Instructions could be
changed without notice.
When installing or using this software, specify the user name to (Administrator (computer
administrator)] or any other user name having the equivalent right. Then log on with that
user name to install this software. (For Windows XP/2000 Professional)
(if you do not have such a right, consult with your system administrator.)
Licensed AAC Patents (U.S. patent numbers);
08/987,950
8848891
8,291,557
8,451,954
8400433
8,222,189
8,357,594
8,752,225
8,394,478
8,883,962
8,274,740
8,638,981
8297238
4,914,701
8,235,871
07/840,550
5,579,430
08/678,866
98/03037
97/02875
97/02874
98/03036
8,227,788
8,285,498
8,481,614
5,592,584
5,781,888
08/039,478
08/211,547
5,703,999
08/557,046
08/894,844
8,299,238
8,299,239
8,299,240
5,197,087
5,490,170
5,264,846
5,268,685
5,375,189
5,581,654
05-183,988
5,548,574
08/806,729
08/876,495
5,717,821
08/392,756
35
USB
Driver
• System Requirements for USB Driver
OS:
Microsoft Windows 98SE, Windows Me, Windows 2000 Professional,
Edition/Professional
Drive: CD-ROM Drive
Windows XP Home
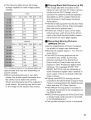
SD-MovieStage
• Features of SD-MovieStage
Ver.2.5
• MPEG4 moving pictures (ASF-format files) and still pictures (JPEG pictures) recorded on
the SD Video Camera are displayed in thumbnail form and can be easily played back on a
personal computer.
• When MPEG4 moving pictures recorded with [Extra fine] are played back on a personal
computer, SD-MovieStage Ver.2.5 (supplied) must be installed.
• MPEG4 moving pictures (ASF-format files) can be cut-edited
• Pictures recorded on other DV devices can be converted into those for the SD Video
Camera.
• E-mails with moving pictures attached can be easily sent.
• System Requirements for SD-MovieStage
Ver.2.5
OS:
Microsoft Windows 98SE, Windows Me, Windows 2000 Professional,
Edition/Professional
CPU:
Windows XP Home
Intel Celeron 466 MHz or higher
HDD:
350 MB or more
RAM:
128 MB or more (Windows 98SE, Me)
256 MB or more (Windows 2000, XP)
Display:
High Color (!6 bit) or more with a resolution of 800 × 600 pixeIs or more
Sound:
Windows compatible
Drive:
sound device
CD-ROM Drive
I/F:
USBterminal
Others:
Pointing device such as a mouse or equivalent to mouse. The following software except for
the above environment motions are installed;
Windows Media Player 6.4 or later, Internet Explorer 5.5 or later, DirectX 9.0b or later.
• As an IEEE1394 terminal is not provided on the SD Video Camera, transfer or editing of
pictures using the IEEE1394 terminal is not supported.
36
SD-Jukebox
• Features of SD-Jukebox Ver.4
• Records high quality music onto an SD Memory Card that can be played back ell the SD
Video Camera.
eAIIows Playlists to be created containing your favorite tracks. (if a Playlist is selected, only
the tracks in the Playlist are played back.)
eAIIows a still picture to be associated with the music data.
iSystem
Requirements for SD-Jukebox Ver.4
OS:
Microsoft Windows 98SE, Windows Me, Windows 2000 Professional
XP Home Edition/Professional
CPU:
SP2 or later, Windows
Intel Pentium II 333 MHz or higher (Windows 98SE, Me)
Intel Pentium III 500 MHz or higher (Windows 2000, XP)
HDD:
100 MB or more
RAM:
128 MB or more (Windows 98SE, Me)
256 MB or more (Windows 2000, XP)
Display:
High Color (16 bit) or more with a resolution of8O0 × 600 pixels or more
Sound:
Creative Labs Sound Blaster 16 ore compatible
Drive:
device
CD-ROM Drive (Must support digital recording. CD-ROM drive connected through
IEEE 1394 or USB may not allow accurate recording.)
I/F:
USB terminal
Others:
Pointing device such as a mouse or equivalent to mouse. The following software except for
the above environment motions are installed;
Internet Explorer 5.01 or later, DirectX 8.! or later. Connection to Internet, if CDDB
functions are used.
• Portions of this product are protected under copyright law and are provided under license
by ARIS/SOLANAt4C.
• In some personal computer environments, recording may be disabled, the music data
recorded may not be used, or other failures may occur. Please note that we are not liable
for the loss of your music data or other direct or indirect faults.
37
Installing
USB
Driver
When the USB driver is installed, the SD Video
Camera will be recognized by the personal computer.
Do not connect the USB cable until the USB driver has
been installed.
1
Insert
the supplied
CD-ROM
2
into the
personal
computer's
CD-ROM drive.
eThe launcher for installation is activated
automatically.
2
Click
[USB Driver].
3
Click
[Finish].
3
eAfter rebooting the computer, the USB driver is
activated.
Installing
Ver.2.5
SD-MovieStage
eApplications compatible with older version of DirectX
may not operate properly by installing DirectX9.0b.
]
Insert
the supplied
CD-ROM
2
into the
personal
computer's
CD-ROM drive.
eThe launcher for the installation is activated
automatically.
2
Click
[SD-MovieStage
eWhen [SD-MovieStage
click [Next].
3
Read License
click [Yes],
Ver.2.5].
Ver.2.5] screen appears,
.......................
Agreement
carefully,
if you accept
the terms
and
of the
agreement.
4
Complete
the installation
according
to the
message.
eWhen the DirectX 9.0b setup screen appears,
install it according to the message. (Failure to
instatl DirectX 9.0b disables you from using
SD-MovieStage Ver.2.5.)
We recommend using the new version of
DirectX. Please refer to Microsoft's website for
details on DirectX.
eAfter rebooting the computer, the
SD-MovieStage Ver.2.5 is enabled.
38
3
Installing
1 Insert the
SD-Jukebox
supplied
Ver.4
CD-ROM
into
2
the
personal
computer's
CD-ROM
drive.
• The launcher for the installation is activated
automatically.
2
Click
[SD-Jukebox
Vet.4].
oWhen [Welcome] screen appears, click [Next].
• If the confirmation indicating whether you have
the right to administrate the personal computer is
displayed, click [OK] and continue with
installation.
3
Read
License
Agreement
carefully,
click
[Yes], if you accept
the terms
and
of the
agreement.
4
Enter
your name
described
click
and the serial
on the CD-ROM
No.
casing
and
[Next].
i
5
Complete
the installation
according
_
to the
message.
oWhen the setup screen for the Media Format 9 is
displayed, install the Media Format 9 according
to the message.
oWhen the DirectX 9.0b setup screen appears,
install it. (When you are using former version of
DirectX 8.1, failure to install DirectX 9.Ob
disables you from using SD-Jukebox Ver.4.)
We recommend using the new version of
DirectX. Please refer to Microsoft's website for
details on DirectX.
oAfter rebooting the computer, the SD-Jukebox
Ver.4 is enabled.
39
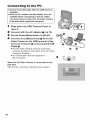
Connecting
to the
PC
• Connect the USB cable after the USB driver is
installed.
• Both the AC adaptor and the battery must be
installed when connecting to the PC. Either
one alone does not allow the SD Video Camera
to be used with a personal computer.
1
Slide down the USB Terminal Cover to
open it.
2
Connect with the AC Adaptor O. ('_ 10)
3
Set the Power/Mode
4
Connect the [USB] terminal _ of the SD
Video Camera to the USB terminal of the
personal computer _) using supplied USB
Cable O.
• The SD Video Camera works as a personal
computer peripheral. (Operation of the SD Video
Camera is disabled.)
• The [Removable disk] icon appears in
[My Computer].
When the SD Video Camera is connected for the
first time,
• [Found New Hardware Wizard] screen appears.
40
2
Switch to [PLAY].
4
3
OFF
PLAY REO
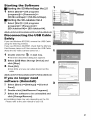
Starting
the
==Starting
1
Select
Software
the SD-MovieStage
[Start]>>
[Panasonic]>>
[SD-MovieStage]>>
]
Select
[SD-MovieStage].
the SD-Jukebox Ver.4
[Start]>>
(program)]>>
[All programs
[Panasonic]>>
[SD-JukeboxV4]>>
Disconnecting
[SD-JukeboxV4].
1
the
_i/ii'
USB Cable
If you use Windows XP/2000, remove the USB Cable
Safely
using the following method.
If you use Windows Me/98SE, check that the Memory
Card Access Lamp is off, then remove the USB Cable.
(Keep the SD Video Camera turned on.)
t
Double
1
[All programs
(programs)]>>
==Starting
Ver.2.5
click the
_
1
in task tray
• Hardware disconnect dialog box appears
2
Select
click
3
[USB
Storage
Device]
and
2
Click [OK]
• Click [OK], and you can safely disconnect the
cable.
If you
no longer
software
]
Mass
[Stop].
Select
.................
need
(Uninstall)
[Start]
_[;_
3
(>>[Settings])
>>[Control
[Add/Remove
Programs].
Panel].
2
Double-click
3
Select
click
the software
to be uninstalled
and
[Change/Remove].
• Uninstalling steps may vary depending on the OS.
Please refer to the user manual of your OS.
41
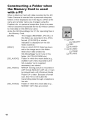
Constructing
the Memory
with
a Folder when
Card is used
a PC
When a Memory Card with data recorded by the SD
Video Camera is inserted into a personal computer,
folders will be displayed as in the figure. (When a file
name and a folder name are changed using the
Explorer etc. on personal computers, there is a case
where it becomes impossible for the SD Video Camera
to read data on this Memory Card.)
• Use the SD-MovieStage Ver.2.5 for operating files in
the Memory Card.
[DCIM]:
The images (IMGA0001 .JPG etc.) in
this folder are recorded in the JPEG
[MlSC]:
[SD_AUDIO]:
[SD_VlDEO]:
format. ([100-0001] or similar
indication is displayed on the SD
Video Camera.)
Files in which DPOF Data has been
set to the image are in this folder.
Slide show data created by
SD-MovieStage Ver.2.5 are in this
folder. (AUTPLAY0.MRK etc.)
Folder in which the music data (e.g.,
AOB001 .SA! ) files recorded by the
SD-Jukebox Ver.4 (supplied
accessory) are stored.
MPEG4 moving picture is recorded in
ASF format (MOL001 .ASF etc.). It can
be played back with Windows Media
Player 6.4 or later. Because of small
size, this File is well suited for
transmitting
line etc.
[SD_VOICE]:
42
data through a telephone
Folder in which the voice data (e.g.,
MOB001 .VM! ) files are stored.
iljIOOODPFP
LJ M_c
_
SD_AUDIO
_-_ SD_DEO
i_ PRLO01
i,_ SD VOIOE
Others
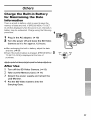
Charge
for
the
Built-in
Maintaining
Battery
the
Date
Information
There is a built-in battery which is used to save the
memory of date and time. If [PRESS MENU TO SET
CLOCK] is displayed when the power is on, the built-in
battery may be exhausted.
procedure:
Charge using the following
1
Plug in the AC adaptor. (4 10)
2
Turn the power off and leave the SD Video
Camera as it is for approx. 12 hours.
• After recharging the built-in battery, adjust the date
and time. (4 17)
• Even if the built-in battery is charged, [PRESS MENU
TO SET CLOCK] is displayed
purchase.
After
OFF
PLAY
REC
Use
]
Turn off the SD Video Camera. (-> 13)
2
Take out the Memory Card. (4 11)
3
Detach the power supply and retract the
LCD Monitor.
Put the SD Video Camera into the
4
2
at the time of
Carrying Case.
43
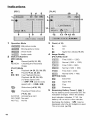
Indications
[REC]
[PLAY]
10
5
1=
=8
2=
7
8
9
12
3
13
t4
15
16
Flash (4 19)
Operation
Mode
;_
:Still picture mode
_A :
Auto
1_
:Moving picture mode
9:
on
_
:Voice mode
N :
Night View Mode (4 27)
Image Quality
i,_::_
:Audio mode
Status Indications
4
[PICTURE]
[REC] Mode
O:
Record (4 19, 21, 23)
REVIEW:
Checking the Recorded
Image
[PLAY] Mode
I_ :
Playback (4 20, 22, 24, 25)
I1:
Pause (4 22, 24, 25)
IH_/<<:
Cue Playback/Review
Playback (4 22, 24, 25)
(10 times speed with
× 101H_/_I<
and 60 times
Fine (1600 × 1200)
_:
[_
:
Pausing of Slide show
(4 20, 32)
ACCESS:
Accessing a card
NO CARD: No card
NO FILE:
No file
Fine (1280 × 960)
Normal (1280 × 960)
×
:
Fine (640 × 480)
×
:
Normal (640 × 480)
[MPEG4] mode
:
Extra fine
:
Super fine
_:
Slide show (4 20, 32)
:
Normal (1800 × 1200)
_:
speed with × 601H_/<<)
@:
mode
Fine
:
5
Remaining
Economy
Battery
Power
[ _
]
As the battery power becomes low, the
indication changes. When the battery
level indicator indicates _,
the
battery will run out in a few minutes.
Recharge the battery. _
may be
displayed when the AC Adaptor is used.
This is normal. (4 10)
44
6
Camera Functions
t 6 Displayed
_:
[_:
[Low Battery]:
The battery may be exhausted. Replace it
with a fully charged battery or recharge the
supplied battery.
[No Card]:
The Memory Card is not inserted, or the
Memory Card may not be inserted correctly.
[Card full]:
The memory capacity is fully utilized. Erase
any unnecessary files or replace it with a
new Memory Card.
[Card locked]:
The write-protect switch of the SD Memory
Card is set to [LOCK] (4 48).
[Check card]:
Re-insert the Memory Card. If [Check card]
is still displayed, the Memory Card is not
compatible or applicable. The SD Video
Camera cannot recognize it. Format it.
(4 33)
[File locked]:
You attempted to execute the erase
operation on a locked file.
[Please re-operate]:
Turn off and on the SD Video Camera.
Digital Zoom (4 27)
Backlight Compensation
Mode (4 28)
White Balance setting
(4 28)
_.azl:
7
8
9
Date/Time Indication (4 17)
Elapsed time indication
OhgOmOgs
[REC] mode:
Elapsed recording time
[PLAY] mode:
Elapsed playback time
Indication of recordable
recordable
RO:
time and
number of images
Number of remaining recordable still
pictures (Lights up in red when it
reaches zero.)
R 0h00m:
Remaining recordable time for MPEG4
moving pictures or voice (VOICE)
(Lights up in red when it reaches
0h00m.)
t 0 Repeat Playback (4 22, 25)
:
Repeats all files (all tracks).
:
Repeats one file (one
track).
t 1 Playback Zoom (4 20)
t 2 File Name (4 20, 22, 24, 25)
t3
DPOF setting
t4
File Protection
tS
Volume
(4 31)
(4 26)
(4 30)
by the text
[Please connect both AC adaptor and
battery.]:
When connecting the SD Video Camera to
a personal computer, be sure to use both an
AC adaptor and a battery.
[Set to PLAY mode]:
Before connecting the SD Video Camera to
the personal computer with the USB cable,
slide the Power/Mode switch to [PLAY].
45
Cautions
,About
for Use
the SD Video Camera
Keep this unit away from magnetized
equipment (such as a microwave oven,
TV, video game equipment, etc,).
• If you use this unit on or near a TV, images
and sounds may be disturbed due to
electromagnetic wave radiation.
• Do not use near a cell phone because
doing so may cause noise to adversely
affect the picture and sound.
• Recorded data may be damaged, or
images may be distorted by strong
magnetic fields created by speakers or
large motors.
• Electromagnetic wave radiation generated
by a digital circuit (including a
microprocessor) may adversely affect this
unit, causing the disturbance of images
and sounds.
• If this unit is affected by magnetically
charged equipment and does not function
properly, turn the power off and detach the
battery and then connect it again.
Thereafter, turn the power on.
Do not use this unit near radio
transmitters or high-voltage lines.
• If you record near radio transmitters or
high-voltage lines, recorded images or
sounds may be adversely affected.
Do not spray insecticides or volatile
chemicals onto this unit.
• If this unit is sprayed with such chemicals,
the camera body may be damaged and
the surface finish may peel off.
• Do not keep rubber or plastic products in
contact with this unit for a Iong period of
time.
When you use this unit on a beach or
similar place, do not let sand or fine dust
get into the camera.
Do not wet this unit with seawater or
other liquid.
• Sand or dust may damage this unit. The
lens may be scratched, fogged or other
damage may be caused.
46
• If this unit gets drenched with seawater,
rain or droplets, wipe with a well wrung
cloth, and then wipe with a dry cloth.
When carrying this unit, take care not to
drop or hit it.
Do not carry this unit in a pocket,
• The outer case may be destroyed by the
strong shock, and it may cause
malfunction of this unit. Store this unit in
the carrying case (supplied).
Do not use benzine, thinner or alcohol
for cleaning this unit,
• Detach the battery before cleaning this
unit.
• The camera body may be deformed and
the surface finish may peel off.
• Wipe this unit with a soft, dry cloth. To
remove stubborn stains, wipe with a cloth
that is soaked in a detergent diluted with
water and afterward finish wiping with a
soft, dry cloth.
• When you use a chemical cloth, read the
instructions of the cloth.
• Wipe the stains on the lens and the LCD
monitor with the cleaning cloth (supplied).
Do not place the AC Adaptor and the
battery of this unit in any place
(especially under the blazing sun or
inside a car in the summer) where they
will be subjected to high temperatures.
• High temperatures under conditions noted
above may cause leakage, heat
generation, fire or explosion of the battery.
,About
using this unit
• After long operation, this device can
get warm. This is not a malfunction.
• Turn on and operate the SD Video
Camera every 6 months even if you do not
have plans to use it.
,About
the AC Adaptor
• Be sure to use supplied AC Adaptor.
• If you use the AC adaptor near a radio
(especially when you are tuning in AM
stations), radio reception may be
disturbed. Keep the AC adaptor 1 meter or
more away from a radio.
oWhen the AC adaptor is in use, it may
generate whirring sounds. This is normal.
oAfter use, be sure to disconnect the AC
Adaptor from the AC Main socket. (If it is
left connected, about 0.3 W of current is
• Extremely high or low temperatures will
shorten the life of the battery.
• If the battery is kept in hot, humid, smoky
or dusty places, the terminals may rust
and cause malfunctions.
consumed at most.)
• Keep the electrodes of the AC Adaptor
clean at all times.
• Store the battery in a completely
discharged state. To store the battery for a
long period of time, we recommend
charging it once every year and storing it
again after you completely use up the
charged capacity.
Do not throw the battery into a fire.
• If you heat or burn the battery, it may
cause an explosion.
=The battery has a limited life.
If the operating time is drastically
shortened even after charging, the life has
expired. Replace it with a new battery.
• About the Battery
Battery characteristics
A lithium ion battery is a small-sized battery
with large capacity. However, when it is
cooled down due to the low temperature
(50°F (10°C) or less), the operating time
becomes short by its characteristics and it
may not operate properly. In this case,
warm the battery moderately (e.g. in a
pocket) and then insert it just before you
use the Camera. (When using a body
warmer, be careful that it does not directly
touch the battery.)
Be sure to detach the battery after use.
• If it is left attached to this unit, a minute
amount of current is consumed even when
this unit power is off. If it is left for a long
time, over discharge takes place. The
battery may become unusable even after
it is charged.
Have spare batteries on hand when you
use this unit outdoors.
• In a cold place, the recordable time will be
shorter.
• When you travel, be sure to bring the
supplied AC adaptor for charging in the
place you are visiting.
•
Condensation
When using the camera outdoors during
very cold weather, dew can be formed on
the camera and the lens when you return to
a warm place.
If condensation takes place, the lens may
be fogged or the camera may not properly
operate. Take care not to cause
condensation and take the appropriate
countermeasures.
Causes of condensation
Differences in temperature and humidity as
shown below cause condensation.
oWhen this unit is brought into a warm
room from outdoors in the cold.
oWhen this unit is brought inside a car from
outside.
If the battery is dropped, check that the
terminal is not deformed.
oWhen warming a cold room suddenly.
oWhen coo! air from an air conditioner is
• If the battery attached to this unit with the
terminal is deformed, it may damage the
body of SD Video Camera.
directly blowing on the unit.
oWhen the place is humid.
Be sure to pull out the battery and the
card, disconnect the plug after use.
• Store the battery in a cool and dry place
with a relatively stable temperature.
(recommended temperature: 59 to 77°F
(15 to 25°C), recommended humidity:
40 to 60%)
When condensation has taken place:
oTurn the power off and leave this unit in
this condition for about 1 hour. When the
camera becomes close to the ambient
temperature, the fog disappears naturally.
oWhen you move this unit from a cold place
to a warm place, enclose the camera in a
plastic bag, wait until the camera is
warmed, and then take it out of the bag.
47
,About
the LCD Monitor
,About
• In a place with drastic temperature
changes, condensation may form on the
LCD monitor. Wipe it with the cleaning
cloth (supplied).
• Do not push the LCD monitor forcefully. It
may cause unevenness and malfunctions
to the monitor.
• When the lens is aimed at a subject with
high contrast, the picture may look uneven
or after images may appear on the LCD
monitor. This is not a malfunction.
• If this unit is extremely cold when you turn
the power on, the image on the LCD
monitor is slightly darker than usual at
first. However, as the internal temperature
increases, it goes back to the normal
brightness.
Extremely high precision technology is
employed to produce the LCD Monitor
screen featuring a total of approximately
117,600 pixels. The result is more than
99.99% effective pixels with a mere
O.01% of the pixels inactive or always lit.
However, this is not a malfunction and
does not affect the recorded picture.
,About
the Lens
• Do not touch the lens. Wipe the SD Video
Camera with the cleaning cloth (supplied)
when the lens becomes unclean. Do not
wipe stains on the lens with sharp objects.
The lens may be scratched or broken.
• When the Lens is fogged up, turn off the
SD Video Camera and leave the SD Video
Camera in this condition for approx.
1 hour. When the lens temperature
becomes close to the ambient
temperature,
48
the fog disappears
naturally.
the Memory Card
When the card access lamp is blinking
(when the card is being read), do not
remove the card, turn the power off, or
subject it to vibration or impact.
Do not leave the card in places where
there is high temperature or direct
sunlight, or where electromagnetic
waves or static electricity are easily
generated. Do not bend, drop, or subject
it to strong vibration.
• If the above precautions are not taken, the
card or the recorded content may be
damaged.
Be sure to pull out and store the card
after use.
• Keep the card in the storage bag to store
or carry the card around.
• Do not allow dirL dust or water to enter the
terminals on the back of the card. Do not
touch it with your fingers.
• The SD Memory Card
has a write-protect
switch. Sliding the
switch to [LOCK]
prevents the contents in
the Memory Card from
deleting accidentally.
• As a result of improper operations,
recorded data may be damaged or
erased. Panasonic does not assume
responsiblity for the loss caused by the
erasure of the recording data.
,State
of Power Lamp while
charging
The Power Lamp flashes while charging.
(Flashes approx, every 4 seconds when
charging is normal (flashes on approx. 2
seconds and off approx. 2 seconds).)
When the Power Lamps flashes more
quickly or slowly (or turns off), some
abnormality may have occurred.
The flashing speed suggests the following
states.
Flashing approx, every 1 second
(flashes on approx. 0.5 seconds and oft
approx. 0.5 seconds):
=The SD Video Camera, battery or AC
adaptor may be defective. Contact your
nearest Panasonic dealer.
Flashing approx, every 12 seconds
(flashes on approx. 6 seconds and off
approx. 6 seconds):
eThe ambient temperature or that of the
battery itself is too high or too low.
Charging proceeds, but will take a longer
time.
Turning off:
Charging is completed.
• If the Power Lamp turns oft when charging
is not completed, the AC Adaptor or the
battery is probably defective. Contact your
nearest Panasonic dealer.
Notes
and
Hints
•
Charging the Battery (-) 10)
• When the Battery Level Indicator
indicates [ _
], the battery will run
out in a few minutes. Recharge the
battery.
• It takes approx. 145 minutes, maximum
for full-charging. (The charging times are
for normal ambient temperature
(77°F (25°C)/60%). If the Battery is
charged at a higher or lower temperature,
the charging time may be longer.)
• The capacities of the recording time/
playback time/still picture storage with a
supplied, full-charged battery are as
follows (77°F (25°C)/60%):
The times/number of images listed in the
above table are approximate.
• Be sure to detach the battery after use.
• If you disconnect the DC Input Lead or the
AC Main Lead while charging the Battery,
Power Lamp flashes several times and
goes off. For continuing Battery charge,
wait for approx. 1 minute, and then
connect the AC Main Lead and the DC
input Lead.
• It is recommended to set the battery even
when using the AC adaptor.
oThe main unit becomes hot when it is
being charged or used. This is normal.
oWhen removing the battery, take care not
to drop it.
• When the SD Video Camera is turned on,
do not attach or remove the battery, or
plug the power cord in or out.
• Inserting a Memory Card (-) 11)
• While the card access lamp is on, the
following operations should not be
attempted: (Such action will damage the
Memory Card, cause loss of recorded
data and cause the SD Video Camera to
malfunction.)
-Remove or insert the Memory Card.
-Remove the battery or unplug the power
cable.
-Apply vibration or shock.
49
cAn SD Memory Card can be used for this
SD Video Camera.
oDo not touch the terminals on the back of
the Memory Card with your fingers.
• Electrical noise, static electricity or failure
of the SD Video Camera or the Memory
Card may damage the Memory Card or
erase the data stored on the Memory
Card. It is recommended to save
important data onto a personaI computer.
• Some cards may pop out when they are
removed.
• Using the LCD Monitor (-) 12)
• When the LCD Monitor is closed with its
display section facing outward, operation
with the Multi-function Button or [MENU]
Button is disabled.
• The LCD Monitor may
appear on the video to be
recorded at some monitor
set angles. Even if the
LCD Monitor may not be
viewed through the lens,
it may appear if the video
is viewed on a personal computer or if it is
printed.
• Using the Earphones
(-) 12)
• Use the earphones supplied or one with a
cord of 10 ft. (3 m) or less.
• If the earphones are attached, the sound
will not be output from the speaker.
• If the [PRESS MENU TO SET CLOCK]
indicator is displayed, set the date and
time after the battery has charged. (4 43)
•
Recording
Still Pictures (-) 19)
• The larger the target still pictures are, the
longer the time required for recording to
the Memory Card.
• If [Normal] is selected for recording,
mosaic-pattern noise may appear on a
playback image depending on the image
content.
• The available range of the Flash is
approximately 2 to 3.3 ft. (60 to 100 cm) in
a dark place.
• Record the subject approx.1.7 ft. (50 cm)
away from it.
• Digital zooming degrades the picture
quality.
• If the number of remaining recordable
pictures is 10,000 or more, the indication
wilI be "9999".
• _. flashes immediately after the Flash is
used to indicate that pictures cannot be
recorded. Wait until it stops flashing.
• For recording a portrait still picture, a
recording button for portrait taking is
provided for your convenience. With
SD-MovieStage Ver.2.5, a portrait picture
can be converted into a landscape picture
on the personal computer.
• Using the Menu Screen (-) 14)
• To abort the setting, press the [MENU]
Button.
• While a Menu is displayed, you cannot
record or play back.
• The menu screen does not appear during
recording.
• Setting Date and Time (-) 17)
• The built-in battery sustains the operation
of the clock.
• The clock might cause a deviation from
the correct date and/or time, so be sure to
check the current date and/or time before
recording.
50
• As the magnification of Zoom increases,
the quality of image may deteriorate.
oThe following table shows still image
storage capacity for each image quality
settings:
Fine
30
80
M 18o
280
570
1280 × 960
640 × 480
8
3O
20
70
50
160
100
330
210
680
440
1370
900
2770
NormaF
N 8
2o
80
M lOO
220
450
N
920
The numbers
shown
• Playing
Back Still Pictures (-') 20)
oThe image data files recorded on the
Memory Card with the SD Video Camera
conform to the DCF (Design rule for
Camera File system) universal standard
stipulated by JEITA (Japan Electronics
and Information Technology Industries
Association).
oThe file format supported by this SD Video
Camera is JPEG. (Some JPEG formatted
files may not be played back.)
• If there are 7 files or more on the index
picture screen, each press of the left (or
right) of the Multi-function Button makes
the previous (or next) page appear.
•
1280 × 960
640 × 480
15
60
30
130
80
290
160
600
340
1220
700
2470
1420
5000
in the above table are
approximate
and may vary depending on
picture content.
oWhen recording pictures in very dark
places, the shutter speed becomes
slow.
Be careful not to shake the camera.
When recording pictures of the subjects in
quick motion, the picture may be blurred
or the image of the subject may persist.
Recording
Moving
(MPEG4)
(-). 21)
Pictures
• As the magnification of Zoom increases,
the quality of image may deteriorate.
• Record the subject approx.1.7 ft. (50 cm)
away from it.
• The MPEG4 moving pictures can be
recorded in any mode, but moving
pictures recorded in the [Extra fine],
[Super fine] or [Fine] mode may not be
played on other Panasonic digital video
cameras. The message [PUSH THE
RESET SWITCH] may be displayed on
some Panasonic digital video cameras in
such a case. This is not a fault of the SD
Video Camera.
• Playing back MPEG4 moving pictures
recorded in the [Extra fine] or [Super fine]
mode is not guaranteed for digital devices
other than this SD Video Camera.
• The MPEG4 moving picture recorded in
the [Extra fine] mode is not recognized on
the DMR-E100H.
• MPEG4 moving pictures of the [Extra fine]
or [Super fine] mode cannot be recorded
in the MultiMediaCard.
• The sounds recorded will be in monaural.
51
oThe capacities of the recording time for
MPEG4 files are as follows:
,xt,o
fine
:
_ 5 rain
8 rain
18_in
10_in S7min
21 min
1 h 15rain.
11min
17 min. 46min
2 h 30 min.
23 min
35 min. 1 h
33 min
5 h 00 min.
l
10h
i11
............................................
46
m,n
h
Voice
Recording
(Voice Recording
Function)
,cooom,
fine
rain 2m_n 5_in
2min 4_n
•
3h
10 min. 6min.
10 min.
The times listed in the above table are
(-_ 23)
• The screen shows a simple black
background.
• The sounds recorded will be in monaural.
• The maximum continuous recordabte time
is 24 hours. (When using the AC adaptor
connection and using the 512 MB of the
SD Memory Card.)
• The sound recorded cannot be played
back on another Panasonic SD IC
recorder.
• The indexes of the recording time for
Voice files are as follows:
8h30m,n
approximate.
•
Playing Back Moving
(MPEG4)
(-_ 22)
• To change the screen size, select [Normal]
or [Full] on [Screen] in the PLAY MENU.
When [Normal] is selected, the screen
size is normal and when [Full] is selected,
the picture is enlarged to fill the screen.
• When you set the screen size to [Full], a
mosaic-pattern may appear depending on
the picture file.
• Files are numbered hexadecimally.
• The file format supported by this SD Video
Camera is ASF. (Some ASF formatted
files may not be played back.)
• When a moving picture is played back, a
mosaic may appear or some frames may
be missing. This is normal.
• If there are 7 files or more on the index
picture screen, each press of the left (or
right) of the Multi-function Button makes
the previous (or next) page appear.
• In the index picture screen, the first frame
for the pictures is displayed. (For example,
if the first frame is painted in black as a
whole, a black screen will be displayed.)
• MPEG4 files recorded by another device
or another application may not be played
back. Files recorded on the SD Video
Camera may not be played back on
another movie camera or the file size may
not be displayed correctly.
52
17h
30 ,n.
Pictures
4h 80 rain.
The times listed in the above
table are
approximations.
•
Listening
to Voice
Recordings
(Voice Playback)
(-) 24)
• The screen shows a simple black
background.
• Fast forward (or fast backward) will be
reset to normal playback at the beginning
of the next file.
•
Listening
to Music
(Audio Playback)
(-_ 25)
• Only the MPEG2-AAC and MP3 data
transfered using SD-Jukebox Ver.4
(supplied accessory) are applicable to
play on your SD Video Camera.
• This SD Video Camera alone does not
allow tracks to be recorded or deleted.
• Refer to the PDF manual of the
SD-Jukebox Ver.4 as for Recording Music
file and Playlist.
• If there is no Music file, [Playlist] screen on
the menu is not displayed.
• If [Power save] has been set to [On] on
the menu, the LCD Monitor will be turned
off approx. 5 seconds after playback, and
it will be turned on after playback end.
AndtheSDVideo
Camera
willbeturned • Night View Function (-) 27)
offapprox.
30seconds
after
stopping. • If you move the camera from bright places
Turn
thepower
[OFF],
thenturniton
to dark places when you record images in
again.
Night View mode, it takes time for the LCD
• Ifthestillpicture
associated
bythe
Monitor to brighten.
SD-Jukebox
Ver.4
islarge
(volume),
it
maytakealonger
timetobedisplayed • Backlight Compensation
Function
(-) 28)
than
expected.
oWhen the Backlight Compensation
• Ifthere
aretwoormore
stillpictures
associated
bytheSD-Jukebox
Ver.4,
only Function is activated, the entire screen
becomes brighter.
thefirststillpicture
willbedisplayed.
• Even
ifastillpicture
hasbeen
associatedoThe backlight may not be sufficiently
compensated for in dark places.
bytheSD-Jukebox
Ver.4,
itmaynotbe
played
back
ontheSDVideo
Camera, oThe Backlight Compensation Function
cannot be set or released while recording.
depending
onthestillpicture
type.
• Atitle,anartist
name
orthe[PIaylist]
may • Adjusting White Balance (-_ 28)
oYou may not be able to achieve correct
notbedisplayed
insome
cases.
• Allmusic
filesarelocked.
White Balance adjustment manually under
• Using
itsFormatting
Function,
allthedata weak illumination. (In this case, the [_.mzl]
onanSDMemory
Card
canbeerased. Indication flashes.)
• MP3istheabbreviation
forMPEG!
Audio oThis mode cannot be set or released while
recording.
Layer3.
oThe White Balance may not be adjusted in
• When
youusetheMP3
filecreated
by
other
software,
usethe[Import]
function
of dark places.
SD-Jukebox
Ver.4.
ThisSDVideo
CameraoAdjustment of White Balance is effective
mayhave
afilenotplaying
back
inallMP3 under the following conditions.
files.
-When recording under reddish lighting
• Some
MP3
orMPEG2-AAC
fileswhich
(halogen light bulb, incandescent light
bulb, etc.).
were
written
withSD-Jukebox
Ver.4
may
-When recording a picture d mono-tone
notbeplayed
back.
• Thebitrates
(recommended)
supported color.
are64kbps,
96kbps
or128kbps
forboth -When recording under multiple light
sources.
theMPEG2-AAC
andMP3
files.
• WMA
datacannot
beplayed
back.
• Erasing the Files Recorded
on a
Memory Card (-) 29)
• Adjusting the Volume (-) 26)
oThis SD Video Camera cannot erase any
• The L/R indication on the earphones
represents Left/Right.
• When checking the sound which is being
recorded, volume adjustment is not
available.
music files (MP3 and MPEG2-AAC).
oThe files recorded in the Voice Record
mode are automatically locked. Release
the lock to erase them.
• Do not erase the Voice files recorded with
this SD Video Camera using other
devices.
oA locked file cannot be erased. Release
the lock to erase them.
oNo files can be erased if the write protect
switch on the SD Memory Card is set to
[LOCK].
53
• If a file is erased on the SD Video Camera,
•
•
•
•
•
the DPOF information set by another
camera may also be erased.
A still picture file (other than JPEG) that
cannot be played back on the SD Video
Camera may be erased.
Erasing many files may take a little time.
Wait until the Card Access Lamp goes out.
Recorded voice data always has serial
numbers even after an arbitrary file is
deleted. For example, if [100]TRACK003
is deleted, the current [100]TRACK004
will change into [100]TRACK003 and the
files that follow will also change
accordingly.
Do not turn the power off or remove the
Memory Card while a file is being deleted.
Otherwise, the Memory Card may be
damaged.
Delete voice (VOICE) files by the SD
Video Camera or the SD-MovieStage.
•
Protecting
Files (File Protection)
(-) 30)
• Even if files are locked, the files will be
deleted when the Memory Card is
formatted.
• Any music files (MPEG2-AAC and MP3)
cannot be locked or unlocked.
• Files recorded by Voice Recording
Functions are automatically locked (to
prevent accidental erasure).
• The File Protection carried out by this SD
Video Camera is only effective for this SD
Video Camera.
• The SD Memory Card has a write
protection switch on it. If the switch is
moved to the [LOCK] side, you cannot
write to or format the Memory Card. If it is
moved back, you can.
• Locking/Unlocking many files may take a
little time. Wait until the Card Access
Lamp goes out.
•
Writing
Printing
Data on a
Memory Card (DPOF Setting)
('-)31)
• DPOF is the abbreviation of Digital Print
54 Order Format. DPOF is used to select
images you want to print. DPOF can only
be used with products that support this
feature.
• The number of prints can be set from 0 to
99.
• This SD Video Camera may not recognize
the DPOF set by another type of device.
• DPOF-setting many files may take a little
time. Wait until the Card Access Lamp
goes out.
•
Playing Back Still Pictures One
by One (P. Slide Show) (-) 32)
• Playback time may take longer than usual
depending on the picture.
• If the R Slide show data is not recorded on
the Memory Card, the display reverts to
the picture index screen.
• The time for the Slide show set by
SD-MovieStage Ver.2.5 is not applied to
the SD Video Camera.
•
Formatting
(-) 33)
the Memory
Card
• If the Memory Card performance becomes
unstable (recording or playback fails, etc.),
try to format it.
• If a message to prompt you to check the
Memory Card comes up, it will be
necessary to format it in order to use it on
the SD Video Camera.
• By formatting, all data stored in the
Memory Card (e.g., still pictures, MPEG4
moving pictures, voice data, music data)
are erased.
• Format the Memory Card on the SD Video
Camera or on the SD-Jukebox Ver.4
(supplied). A Memory Card formatted on a
machine other than the SD Video Camera
may not be used. A Memory Card
formatted on the SD Video Camera may
not be used on other machines. Format a
Memory Card on the machine on which it
is used.
• Particularly for a Memory Card containing
music files, check in the Memory Card
using SD-Jukebox Ver.4, with which the
music files were recorded, then format it.
(For details, read the PDF-format manual
forSD-Jukebox
Ver.4.)
(Itmaybeunable oWhen you operate the SD Video Camera
tocheck
independing
onaSD-Jukebox'susing its buttons, pull out the USB cable.
version.)
(The SD Video Camera cannot be
• Donotusethepersonal
computer
operated in the [PC accessing] mode.)
(Explorer)
toformat
it.Otherwise,
itmay oWhen you play back MPEG4 moving
notberecognized
bytheSDVideo
picture file in the card on a personal
Camera.
computer while the SD Video Camera and
• Ifthewriteprotection
switch
oftheSD
the personal computer are connected, the
Memory
Card
issetto[LOCK],
data
frame of the picture may be dropped. In
cannot
beerased.
this case, copy the desired file to the
• When
theMemory
Card
isformatted,
the personal computer and play it back.
fileswillbedeleted,
even
iffilesare
oUse only the supplied USB cable.
locked.
• Do not remove the AC adaptor when the
• Asformatting
erases
allthedata,
save
the SD Video Camera is connected to the
necessary
dataonapersonal
computer, personal computer.
etc.beforehand.
• If the SD Video Camera's personal
• Formatting
maytakealittletime.
Waituntil computer peripheral mode
theCard
Access
Lamp
goes
out.
([PC accessing] is displayed) is not
• While
formatting
acard,
youshould
not
canceled when the personal computer is
turned off, remove the USB cable.
remove
theMemory
Card
orturnoffthe
power.
Thecardmaybedamaged.
• If the personal computer switches to the
suspend mode when the SD Video
• Installing SD-MovieStage Ver.2.5
Camera is connected to it, the personal
(-> 38)
• If you failed to install DirectX 9.0b when
installing SD-MediaStage Ver.2.5, click
[DirectX] on the installation screen or
double-click [dxsetup.exe] in [DirectX90b]
on the CD-ROM (supplied) and follow the
instructions on the screen to install
DirectX 9.0b.
•
Connecting
to the PC (-> 40)
• To erase pictures that you recorded on the
Memory Card by using the SD Video
Camera, be sure to erase them on the SD
Video Camera or SD-MovieStage Ver.2.5,
not on a personal computer (the Explorer,
etc.).
• You may not be able to properly play back
on the SD Video Camera after editing the
recorded data or changing the image data
on a personal computer.
• Moving Picture format (MPEG4) that can
be played back on the SD Video Camera
is ASF. (Depending on the file, it may not
be able to be played back even if it is in
ASF format.)
computer may not recognize the SD Video
Camera when it reverts to normal mode.
In this case, restart the personal
computer.
oWhen you restart the personal computer
while it is connected to the SD Video
Camera, the personal computer may be
stopped during the restart. In this case,
turn the personal computer off, disconnect
the USB cable connecting the SD Video
Camera and the personal computer or
turn the SD Video Camera off, and then
restart the personal computer.
55
• Do not use other applications to access
the CD that you are recording from or
playing back with the SD-Jukebox Ver.4
(supplied).
• While SD-MovieStage Ver.2.5 (supplied) is
accessing a CD, the CD may not work
properly in other applications.
• When an NTFS-formatted Memory Card is
inserted into the SD Video Camera and
the Device is connected to the personal
computer, the Memory Card active lamp
keeps lighting. In this case, log on with
[Administrator (computer administrator)]
(or any other user name having equivalent
rights), right-click the Removable Disk
icon in [My Computer], and select
[Remove]. Check that the Card Access
Lamp goes off, then remove the Memory
Card.
• When the USB Driver is installed and the
SD Video Camera is connected to the
personal computer for the first time, the
[Found New Hardware Wizard] screen
may appear. Complete the operation in
the following procedure, and the personal
computer wilI recognize the SD Video
Camera.
OClick [Next].
_Confirm
whether your device is
configured to the optimal driver
detection setting and click [Next],
_)lnsert the supplied CD-ROM into the
CD-ROM drive,
CEnter the path as "D:\USB
Driver\files",
(example of D drive
assigned as CD-ROM drive)
QClick [Next].
QClick [Next].
_Click
[Finish].
56
•
Constructing
a Folder when the
Memory Card is used with a PC
(-_ 42)
• [DCIM], [SD_VIDEO], [SD_VOICE] etc.
are necessary items in the folder
structure. They have nothing to do with
actual operations.
• The memory capacity indicated on the SD
Memory Card label corresponds to the
total amount of the capacity to protect and
manage the copyright and of the capacity
available as a conventional memory for a
SD Video Camera, Personal Computer or
others.
• The [SD_VOICE] folder, the voice files
contained in it, and [SD_AUDIO] folder are
specified to the hidden files. Those folders
and files may not be displayed on the
Explorer and My Computer screen
depending on the setting of your PC.
• Files are numbered hexadecimally.
• Do not delete any folders located on the
Memory Card. If this is done, the Memory
Card may net be recognized on your SD
Video Camera.
• The MPEG4 moving picture file (ASF
format) can be played on the Windows
Media Player 6.4 or later. If files recorded
with [Extra fine] are to be played back on a
PC, [MPEG4 Decoder Plug-in] on the
CD-ROM (supplied) must be installed. If
sound cannot be played back, download
the appropriate software (G.726). (G.726 is
installed at the same time as the supplied
software, SD-MovieStage Vet.2.5.)
• When formatting a Memory Card, format it
on the SD Video Camera or on
SD-Jukebox Vet.4.
• When a moving picture is played back on
a personal computer, a black belt may be
present along the top and bottom of the
picture.
• If data not supported by the SD Video
Camera is recorded on a personal
computer, it cannot be recognized by the
SD Video Camera.
• When you play back MPEG4 moving
picture files (ASF format) recorded for 3 or
more
minutes
withtheSDVideo
Camera Before Requesting
onWindows
Media
Player,
these
filesmay Service
bestopped.
Also,
when
using
these
files
onSD-MovieStage,
youmayfailin[Play], Power
[Cutedit]or[Convert].
Inthiscase,
click 1: The SD Video Camera power cannot
be turned on.
[Windows
Media
Update]
onthe
1-1: Is the power source connected
installation
screen
or[WMP9QFEInst.exe]
correctly?
in[WMP9QFE]
folder
ontheCD-ROM
and
follow
themessages
toupdate
Windows 1-2: Is the Battery fully charged? Charge it
with the AC Adaptor.
Media
Player.
(This
update
iseffective
2:
The SD Video Camera power shuts
when
youplayback
these
fileswith
off automatically.
Windows
Media
Player
andtheplayback
isstopped
about
3or4minutes
later.) 2: If you do not use the SD Video Camera
for more than 5 minutes, the power
oToplayback
filesrecorded
with
shuts off automatically to save the
[Extra
fine]without
installing
Battery power.
SD-MovieStage
Ver.2.5,
install
[MPEG4
3:
The SB Video Camera power does
Decoder
Plug-in]
ontheCD-ROM
not stay on long enough.
(supplied).
oWhen
MPEG4
moving
picture
recorded
by 3: Is the Battery low? Charge the Battery
or attach a fully charged Battery.
[Extra
fine]isplayed
back
withother
PCs
Battery
(Windows
Media
Player
6.4orlater),
1:
Battery runs down quickly.
re-change
itusing
[Convert]
function
d the
SD-MovieStage Ver.2.5.
OStart the SD-MovieStage Ver,2,5.
_Copy the MPEG4 file recorded by
[Extra fine] to the hard disk of the PC
with the SD-MovieStaeg Ver,2.5,
(Refer to page 16 of the PDF-based
instruction of the SD-MovieStage
Ver.2.5.)
_)Select the file copied to the hard disk
and click [Convert], (Refer to page 41
of the PDF-based instruction of the
SD-MovieStage Ver,2.5.)
OSelect [D-snap (SV-AV25/AV50)] on
[Output format] and select [High] on
[Quality].
_Click [OK].
1-! : Is the Battery fully charged? Charge it
with the AC Adaptor.
1-2: Are you using the Battery in an
extremely cold place? In cold places,
the operating time of the Battery
becomes shorter.
1-3: Has the Battery worn out? If the
operating time is still short even after
the Battery is fully charged, the Battery
has worn out.
Recording
1:
Recording does not start although
power is supplied to the SD Video
Camera and the Memory Card is
correctly inserted.
1-! : Is the SD Video Camera turned on?
1-2: Is the write-protect switch set to
[LOCK]? Being set to [LOCK], the
Memory Card cannot be recorded.
1-3: Does the Memory Card have enough
free space? Delete useless data in the
Memory Card.
57
Playback
1:
Recorded still pictures are not clear.
1:
Is [Quality] on the menu set to
[Normal]? If recording is done with it
set to [Normal], images with fine details
may include a mosaic-like pattern. Set
[Quality] to [Fine].
2:
Playback images do not look
normal.
2:
3:
The picture may be damaged. In order
to prevent the loss of image data,
backing up on a personal computer is
recommended.
Actual recording time/still image
storage capacity in the Memory
Card is different from those
described in these Operating
Instructions drastically.
3-1 : Actual recording time/still image
storage capacity depends on the kind
of the image.
3-2: When MPEG4 moving picture data, still
picture data, sound data, and audio
data are recorded in the Memory Card,
less capacity in the Memory Card can
be used.
4:
While playing back a Voice file or a
Music file, the LCD Monitor is
suddenly turned off.
4-1: The LCD Monitor is automatically
turned off approx. 5 seconds after
starting playing back or recording a
Voice file. Pressing the [1_ SET] button
turns on the LCD Monitor. However, in
the case of not conducting any
operation for approx. 5 seconds, the
LCD Monitor is turned off again. (The
LCD Monitor is on while stopping
playback (or pausing ).)
4-2: When the [Power save] mode is set to
[On], the LCD Monitor is turned off 5
seconds after starting playback of a
Music file.
5:
An [x] Indication or a black screen
is displayed.
5-!: The [×] Indication appears when the
data is damaged and cannot be played
back.
58
5-2: The screen turned black when you
tried to play back the data with the
format which is not compatible with the
SD Video Camera.
6:
Even if a Memory Card is formatted,
it cannot be used.
6:
Either the SD Video Camera or the
7:
7:
8:
Memory Card may be damaged.
Please consult your Panasonic dealer.
Playing back or recording do not
function and the screen has frozen.
The LCD Monitor stays dark when
recording still pictures or moving
pictures,
Set the Power/Mode Switch to [OFF]
and then set it back to [REC] or [PLAY]
after a while (approx.1 minute). If the
SD Video Camera is not turned off
after setting to [OFF], unplug the AC
Adaptor and remove the battery.
Sound is not heard while a still
picture is played back,
Sound is not presented in the Still
Picture mode (recording or playing
back of still pictures).
Others
8:
1:
1:
How do I send an MPEG4 moving
picture recorded as e-mail?
Capture the moving picture data
recorded on the SD Video Camera
onto a personal computer and attach it
to an e-mail to send it. In this case, it is
recommended to make a file size 1 MB
or less. The recording time of 1 MB
MPEG4 moving picture is approx. 8
seconds (Super fine), 15 seconds
(Fine) or 60 seconds (Economy).
(The capacity limit of the file which is
attachable to an e-mail differs
depending on the environment used.)
Even if you send data recorded with
[Extra fine], they cannot be played
back without Panasonic SD Video
Camera (SV-AV50, SV-AV25). If the file
is played back on the personal
computer, Windows Media Player 6.4
or later is required. If the file is played
back on Macintosh, use the Windows
Media
Player
forMacintosh.
(Mac
OS
®
8.0orlater)
TheWindows
Media
Player
forMacintosh
canbe
downloaded
fromMicrosoft's
Website.
2: Red,blue,green
orwhitedots
2:
3:
3:
appear on the screen.
0.01% or less of the pixels of some
LCD Monitors may remain turned on or
off.
When the USB cable is connected, a
green [?] mark is indicated in [USB
Mass Storage Device] in [Device
Manager] of the Windows OS,
If the USB cable is connected without
installing the USB Driver (supplied), [?]
will be indicated on some OSs.
Remove the USB cable from the SD
Video Camera and install the USB
4:
Driver according to the procedure
shown on page 38, and [?] will
disappear.
When the USB cable is removed
4:
when Windows Me is used, Device
removal warning appears.
If the USB cable is connected without
installing the USB Driver (supplied)
when you use Windows Me, the
warning message will appear as soon
as the USB cable is pulled out. Install
the USB Driver, and the warning
message will not appear.
For how to disconnect the USB cable
on Windows XP or Windows 2000,
refer to page 41.
59
Specifications
SD Video Camera
Power Source:
Power Consumption:
Image Sensor:
Lens:
Pixels:
Digital Zoom:
Monitor:
Ftash:
Microphone:
Standard Illumination:
Minimum Required Illumination:
Recording Media:
Image Compression:
Video Compression:
Voice Compression:
Music Expansion:
Dimensions:
Weight:
Operating Temperature:
Operating Humidity:
AC Adaptor
Dimensions:
Weight:
Battery Pack
Dimensions:
Weight:
6O
Information for your safety
DC 48 V (AC Adaptor)
DC 37 V (Battery)
Recording (When recording the MPEG4 moving picture )
2.0 W (When using the AC Adaptor)
1.9 W (When using the battery)
1/3.2-inch CCD Image Sensor
F4.0, Focal Length; 45 mm
Shortest Image Distance; Approx 1.7 ft (50 cm) from Lens
Total number of pixeis: Approx 2,110,000
Effective number of pixels: Approx. 1,950,000
2.5 ×
2 0-inch LCD
GN 3.5 (Built-in)
Mono
3000 Ix
60 Ix
SD Memory Card
JPE®
MPEG4
Extra Fine: 320 × 240 pixels
(QVGA, Approx 1 5 Mbps 30fps)
Super Fine: 320 × 240 pixels
(QVGA, Approx. 1 Mbps 15fps)
Fine: 320 × 240 pixels (QVGA, Approx. 420 kbps 12fps)
Economy: 176 × 144 pixels
(QCIF, Approx 100 kbps 6fps)
G726
MP3, MPEG2-AAC
Approx 2-7/16" × 1-1/16" × 3-1/16"
(61.7 (W)× 25.9 (H) × 771 (U) mm)
Approx 3.32 oz (94 g)(without Battery and Memory Card)
Approx. 4.34 oz. (123 g)(with Battery and SD Memory Card)
32_F 104°F (0 _C 40 _C)
10% 80%
Information for your safety
Approx 1-15/16" × 5/8" × 2-9/16"
(49 (W)× 16 (H)× 65 (D) mm)
Approx 247 oz (70 g)
Information for your safety
Approx 1-7/16" × 5/16" × 2-1/8"
(36 (W) × 7 (H) × 53 (U) mm)
Approx 1 oz (28 _)
Limited
Warranty
Panasonic Consumer
(For
U.S.A.
Electronics
Only)
Panasonic Sales Company,
Division of Matsushita Electric of
Puerto Rico, Inc.
Company, Division of Matsushita
Electric Corporation of America
One Panasonic Way Secaucus, New
Jersey 07094
Ave. 65 de Infanteria, Km. 9.5, San
Gabriel Industrial Park, Carolina, Puerto
Rico 00985
PANASONIC
Limited
8D Products
Warranty
Limited Warranty Coverage
If your product does not work properly because of a defect in materials or workmanship,
Panasonic Consumer Electronics Company or Panasonic Sales Company (collectively
referred to as "the warrantor") will, for the length of the period indicated on the chart below,
which starts with the date of original purchase ("warranty period"), at its option either (a)
repair your product with new or refurbished parts, or (b) replace it with a new or a
refurbished product. The decision to repair or replace will be made by the warrantor.
Product
or Part
Name
SD Multi AV Device,
(except items listed
CCD
Image
Rechargeable
SD Mobile
below)
Printer
Sensor
Battery
USB Reader-Writer
Pack,
SD Memory
(in exchange
Card,
for defective
Parts
Labor
One (1) year
Ninety
(90) days
Six (6) months
Ninety
(90) days
Ninety
Not Applicable
AC Adaptor
item)
(90) days
During the "Labor" warranty period there will be no charge for labor. During the "Parts"
warranty period, there will be no charge for parts. You must carry-in or mail-in your product
during the warranty period. If non-rechargeable batteries are included, they are not
warranted. This warranty only applies to products purchased and serviced in the United
States or Puerto Rico. This warranty is extended only to the original purchaser of a new
product which was not sold "as is".
A purchase receipt or other proof of the original purchase date is required for warranty
service.
Carry-In or Mail-In Service
For Carry-In or Mail-In Service in the United States call 1-800-211-PANA (!-800-2!1-7262).
For assistance in Puerto Rico call Panasonic Sales Company (787)-750-4300 or fax (787)768-2910.
61
Limited Warranty Limits And Exclusions
This warranty ONLY COVERS failures due to defects in materials or workmanship, and
DOES NOT COVER normal wear and tear or cosmetic damage. The warranty ALSO
DOES NOT COVER damages which occurred in shipment, or failures which are caused by
products not supplied by the warrantor, or failures which result from accidents, misuse,
abuse, neglect, mishandling, misapplication, alteration, faulty installation, set-up
adjustments, misadjustment of consumer controls, improper maintenance, power line
surge, lightning damage, modification, or commercial use (such as in a hotel, office,
restaurant, or other business), rental use of the product, service by anyone other than a
Factory Servicenter or other Authorized Servicer, or damage that is attributable to acts of
God.
THERE ARE NO EXPRESS WARRANTIES EXCEPT AS LISTED UNDER" LIMITED
WARRANTY COVERAGE".
THE WARRANTOR IS NOT LIABLE FOR INCIDENTAL OR
CONSEQUENTIAL
DAMAGES RESULTING FROM THE USE OF THIS PRODUCT, OR
ARISING OUT OF ANY BREACH OF THIS WARRANTY. (As examples, this excludes
damages for lost time, travel to and from the servicer, loss of media or images, data or other
memory content. The items listed are not exclusive, but are for illustration only.) ALL
EXPRESS AND IMPLIED WARRANTIES, INCLUDING THE WARRANTY OF
MERCHANTABILITY, ARE LIMITED TO THE PERIOD OF THE LIMITED WARRANTY.
Some states do net allow the exclusion or limitation of incidental or consequential damages,
or limitations on how long an implied warranty lasts, so the exclusions may not apply to you.
This warranty gives you specific legal rights and you may also have other rights which vary
from state to state. If a problem with this product develops during or after the warranty
period, you may contact your dealer or Servicenter. If the problem is not handled to your
satisfaction, then write to the warrantor's Consumer Affairs Department at the addresses
listed for the warrantor.
PARTS AND SERVICE WHICH ARE NOT COVERED
ARE YOUR RESPONSIBILITY.
62
BY THIS LIMITED WARRANTY
Obtain Product Information and Operating Assistance; locate your nearest Dealer
or Servicenter; purchase Parts and Accessories; or make Customer Service and
Literature requests by visiting our Web Site at:
http://www.panasonic.corn/support
or, contact us via the web at:
http://www.panasonic.com/contactinfo
You may also contact us directly at:
1-800-211 -PANA (7262),
Monday-Friday 9 am-9 pro; Saturday-Sunday
10 am-7 pro, EST.
For hearing or speech impaired TTY users, TTY : 1-877-833-8855
Purchase
Parts, Accessories
and Instruction Books online for all Panasonic
Products by visiting our Web Site at:
http://www.pasc.panasonic.corn
or, send your request by E-mail to:
[email protected]
You may also contact us directly at:
1-800-332-5368 (Phone) 1-800-237-9080
(Monday - Friday 9 am to 8 pm, EST.)
Panasonic Services Company
20421 84th Avenue South,
Kent, WA 98032
(We Accept Visa, MasterCard,
Checks)
(Fax Only)
Discover Card, American
Express, and Personal
For hearing or speech impaired TTY users, TTY : 1-866-605-1277
Matsushita Electric of Puerto Rico, Inc. Panasonic Sales Company
Factory Servicenter:
Ave. 65 de Infanteria, Kin. 9.5, San Gabriel Industrial Park,
Carolina, Puerto Rico 00985
Phone (787)750-4300,
Fax (787)768-2910
63
Index
liA
liQ
AC Adaptor
Audio
................................
Playback
10, 46
................................
25
liB
Backlight
Compensation
Battery
Beep
Function
.......................................
...28
10, 47
................................................
15
lic
.............................................
19
Playback
Playback
..............
.............
25
22
11,42,
48
liR
Repeat
Repeat
..................................
liD
Date and Time setting .....................
Digital Zoom Function .....................
DPOF Setting ..................................
liE
Earphones .......................................
Erasing the Files ..............................
liF
File Protection
.................................
SD Memory
Card
17
27
31
System
12
29
Requirements
................................
40, 41
USB Driver
................................
36, 38
liv
Volume
adjustment
Format
33
Screen
MPEG4
15
44
12, 18, 48
List .........................................
15
...................................
......................................
14
21,22
liN
Night View Function
........................
27
lio
Operation
Mode
...............................
13
liP
..................................
.........................
26
liw
White
Menu
36, 37
USB Cable
Warning
Menu
..............
liu
19
liL
LCD Monitor ........................
liM
37, 39, 41
SD-MovieStage
....................
36, 38, 41
Slide show ......................................
20
30
liI
Icon display .....................................
indications .......................................
.................
.........................
47
Flash ................................................
.............................................
(AUDIO)
(MPEG4)
lis
SD-Jukebox
Condensation
64
Quality
R Slide
Show
Picture
size ......................................
32
19
Playlist .............................................
Power save ......................................
26
53
display
Balance
..............................
Adjustment
..............
45
28
Spanish
Alimentacion
Quick Use Guide/Guia
uso rapido
espafmla para el
electrica
• Utilizacion
Adaptador
CA
1 Conectar el cable de entrada del DC
[DC IN 4.8V] a la toma de corriente de la
videoc&mara SD.
2
2
Conectar el adaptador CA a la toma de
corriente principal CA.
BBCarga
de la bateria
]
Sujetando la parte [ o © o _> ], deslizar
para extraer la tapa del compartimento de
la bateria,
2
3
Presionar para introducir los terminales de la
bateria en los terminales del compartimento
de la misma y colocar la bateria.
oAcoplar la bateria coil la etiqueta mirando hacia
arriba.
• Despu¢s de haber colocado la bateria, cerrar la
tapa.
Conectar el cable de entrada del DO
4
[DC IN 4.8V] a la toma de corriente de la
videoc&mara SD,
oLa luz indicadora de encendido parpadea y
empieza a cargar.
• Durante la recarga, apagar la videocAmara SD.
Conectar el cable principal CAs al adaptador
5
CA y a la toma de corriente principal CA.
Esperar a que la luz indicadora de
encendido O se apague.
oCuando se haya terminado la recarga, la luz
indicadora de encendido se apaga.
]
Y
Insercion
memoria
de la Tarjeta
de
En esta videocdtmara SD, s61o se puede utilizar una
tarjeta de memoria SD.
1
Sujetar
la tarjeta
de memoria
colocando
el angulo cortado O a la izquierda
y la
etiqueta _ en la parte delantera
e
insertarla
totalmente
de la tarjeta
en el compartimento
de memoria
horizontalmente.
eApagar la videocdtmara SD antes de insertar una
tarjeta.
OARD EJEOT
Encendido/Seleccion
de funcionamiento
modos
Seleccionar el modo deseado en Ia pantalla de
selecci6n de modo.
]
Poner el bot6n de encendido/selector
modo en [PLAY] o [REC].
• La videocamara SD esta encendido.
2
3
Poner en [REC] para seleccionar el modo
de grabaci6n.
Poner en [PLAY] para seleccionar el
modo de reproducci6n.
!
OFF
2
OFF
PLAY REC
Pulsar el bot6n [MODE] para seleccionar
un modo de funcionamiento.
• Cada vez que se pulsa el bot6n [MODE], el
modo de funcionamiento cambia como sigue.
• En varios segundos, se visualizardmsolo iconos.
ilnformaciones
funcionamiento
sobre el modo de
Hay siete modos de funcionamiento.
• Modo grabaci6n de imagenes est_ticas (formato
JPEG de imagenes estaticas).
• Modo reproducci6n de imagenes estaticas (formato
JPEG de imagenes estaticas)
• Modo grabaci6n de imagenes dinamicas (formato
MPEG4)
• Modo reproducci6n de imagenes dinamicas (formato
66 MPEG4)
$
PLAY
REC
• Modo grabaci6n de la voz (formato VOICE)
• Modo reproducciOn de la voz (formato VOICE)
• Modo reproducci6n de la mQsica (MPEG2-AAC/
MP3)
Grabacion
de imagenes
estaticas/imagenes
dinamicas/la
voz
1
Poner
2
modo en [REC].
Pulsar el bot6n [MODE]
el bot6n
un modo
3
Pulsar
de encendido/selector
OFF
PLAY REC
para seleccionar
2
de funcionamiento.
el bot6n
1
de grabaci6n
%J
Start/Stop.
• Durante la grabacion de la imagen din_mica o la
voz, pulsar el boton de grabaci6n Start/Stop para 3
detener la grabaci6n.
Reproduccion
de imagenes
estaticas/imagenes
din:_micas/la
voz grabada/la
mt_sica
OFF
]
Poner el bot6n de encendido/selector
modo en [PLAY].
Pulsar el bot6n [MODE] para seleccionar
un modo de funcionamiento.
2
2
3
Pulsar hacia ARRIBAIABAJOIIZQUIERDAI
DERECHA el bot6n multifunci6n para
seleccionar el archivo deseado.
3
4
Pulsar el bot6n [1_ SET].
PLAY REC
0
4
67
Panasonic Consumer Electronics
Company,
Division of Matsushita Electric Corporation
of America
One Panasonic Way, Secaucus, NJ 07094
Panasonic Sales Company ("PSC")
Division of Matsushita Electric of Puerto Rico, Inc.
Ave. 65 de Infanter[a, Km. 9.5, San Gabriel Industrial Park, Carolina, Puerto Rico 00985
Panasonic Canada Inc.
5770 Ambler Drive, Mississauga,
Ontario, L4W 2T3
VQTOG81
F1203Mk0 (
34 (A))
<0)2003 Matsushita
Electric Industrial Co., Ltd.