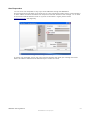
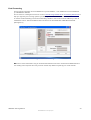
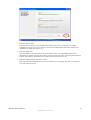
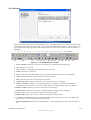
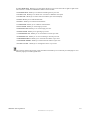
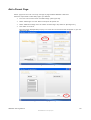
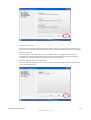
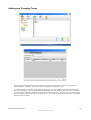
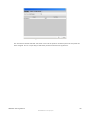
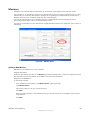
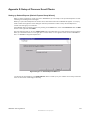
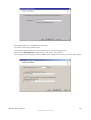
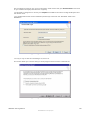
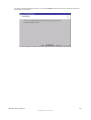
1
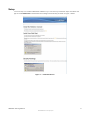
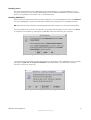
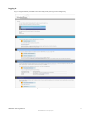
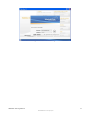
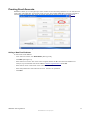
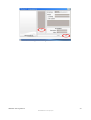
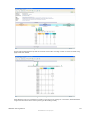
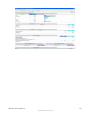
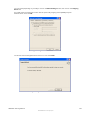
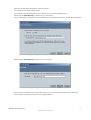
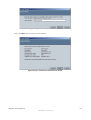
Training Manual 2.2
WebAlive Training Manual
1
©2005 WebAlive™ Technologies Pty Ltd
Table of Contents
Training Manual 2.2............................................................................................................................. 1
Introduction.......................................................................................................................................... 4
System Requirements........................................................................................................ 4
Setup .................................................................................................................................................... 5
........................................................................................................................................... 5
Installing Java™................................................................................................................ 6
Installing WebAlive™....................................................................................................... 6
Logging In..........................................................................................................................7
Creating Email Accounts......................................................................................................................9
Adding a New Email Address........................................................................................... 9
Auto Responders..............................................................................................................11
Email Forwarding............................................................................................................ 12
Email Settings..................................................................................................................13
Viewing Your Website....................................................................................................................... 14
Site Design..........................................................................................................................................15
Changing My Site's Appearance......................................................................................15
Custom Design................................................................................................................ 17
Editing The Home Page......................................................................................................................18
The Text Editor................................................................................................................20
Add a Parent Page...............................................................................................................................22
Adding a Child Page...........................................................................................................................25
Moving Pages..................................................................................................................................... 27
Deleting a Page................................................................................................................................... 30
Product Catalogue...............................................................................................................................31
Customising Your Invoice........................................................................................................ 32
Setting the Look and User Access of the Catalogue................................................................. 33
Setting Up Freight..................................................................................................................... 35
Adding a Product.......................................................................................................................38
Product Options.........................................................................................................................41
Edit...................................................................................................................................42
Add Product..................................................................................................................... 42
Move To.......................................................................................................................... 42
Copy To........................................................................................................................... 43
Link To............................................................................................................................ 43
Delete...............................................................................................................................43
Adding and Changing Taxes..................................................................................................... 44
E-Commerce.......................................................................................................................................46
E-Commerce Features in WebAlive™............................................................................ 46
Payment Gateway Options...............................................................................................46
Checking Your Orders..................................................................................................... 47
Members............................................................................................................................................. 48
Adding a New Member................................................................................................... 48
Editing an Existing Member............................................................................................49
Member Groups............................................................................................................... 49
Assigning Members to Groups........................................................................................ 49
Emailing Members...........................................................................................................50
Site Admin..........................................................................................................................................51
Administration – Filling Out Your Company Details..................................................... 51
WebAlive Training Manual
2
©2005 WebAlive™ Technologies Pty Ltd
Changing Your Password................................................................................................ 52
Backup Site......................................................................................................................52
Restore Site......................................................................................................................52
Hide / Publish Site........................................................................................................... 52
Site Statistics ..................................................................................................................................... 53
Getting Help....................................................................................................................................... 56
User Manual.....................................................................................................................56
Knowledgebase................................................................................................................56
Technical Support Trouble Ticket................................................................................... 56
Email................................................................................................................................56
Telephone Support Hours:...............................................................................................56
Glossary.............................................................................................................................................. 57
References.......................................................................................................................................... 59
Appendix 1 : E-Commerce Payment Gateways................................................................................. 60
EMAIL.............................................................................................................................60
2CHECKOUT................................................................................................................. 60
STRATAPAY - Only available in Australia (AUD)....................................................... 61
PAYPAL.........................................................................................................................61
EWAY – Only available in Australia (AUD).................................................................. 62
WORLDPAY...................................................................................................................62
SECURE PAY................................................................................................................. 62
MAL'S ECOM................................................................................................................. 63
NO GATEWAY.............................................................................................................. 63
Appendix 2: Setup of Common E-mail Clients..................................................................................64
Setting up Outlook Express (Outlook Express Setup Wizard)........................................64
Setting up Outlook XP / 2002..........................................................................................68
Setting up Netscape Communicator................................................................................ 70
Appendix 3: Search Engine Optimization.......................................................................................... 73
Page Title......................................................................................................................... 73
Page Content....................................................................................................................73
Links................................................................................................................................ 73
Navigation........................................................................................................................74
WebAlive Training Manual
3
©2005 WebAlive™ Technologies Pty Ltd
Introduction
WebAlive Technologies have developed WebAlive™' to enable you to manage all facets of your
organisation's on-line presence, including web site content, e-mail addresses, e-commerce and much more,
all from a simple to use management console.
Some of the features of the WebAlive™ set include...
• Easy to use interface.
• Ability to dynamically add 1000+ pages to your web site.
• Hosting including 4 Gigabytes of data transfer per month.
• Over 100 site design templates to choose from, or the option to have your site customised by the
WebAlive™ design team.
• Ability to insert your own images.
• Automatic image optimisation on upload.
• 25 email addresses with your site.
• Create your own username and password protected areas - set up each of your clients with their
own private 'extranet'.
• Product catalogues/shopping trolleys.
• Choice of up to 7 payment gateway options to receive payments online.
• Logistics management to calculate freight charge.
• Websites structurally optimised for search engine visibility.
• Event Calendars, newsrooms, surveys, form builders and much more.
System Requirements
The WebAlive™ Console is platform independent meaning that it will run on Windows, Mac and Linux
systems.
Windows Microsoft 98, NT, 2000, XP Pentium III or greater 50 Mb of FREE disk space 128 Mb of Memory
Sun Microsystems™ Java™ Runtime Environment 1.4.X or greater
Macintosh Systems Mac OSX 10.3.8 or greater Mac G3 or greater 50 Mb of FREE disk space 128 Mb of
Memory
Linux X Windows Environment Pentium III or greater 50 Mb of FREE disk space 128 Mb of Memory Sun
Microsystems™ Java™ Runtime Environment 1.4.X or greater
Important Information:
All computer systems must have an active connection to the Internet without using a proxy server. Proxy
servers can be turned off in all web browser applications such as Internet Explorer.
If a firewall is being used on your computer system, or between your computer system and the Internet, the
WebAlive™ software suite may need your network administrator to reconfigure the firewall to allow
WebAlive™ to function properly.
WebAlive Training Manual
4
©2005 WebAlive™ Technologies Pty Ltd
Setup
Your first step is to install the Web Alive software so you can control your web site. Open a browser and
type in install.webalive.biz and installation should begina automatically as shown in Figure 1 below.
Figure 1 – install.webalive.biz
WebAlive Training Manual
5
©2005 WebAlive™ Technologies Pty Ltd
Installing Java™
The Java™ Runtime Environment (JRE) needs to be installed before you can install WebAlive™ on your
computer. Simply click on the link in the Site Ready Email. Java allows the WebAlive™ console to installed
and run on any platform and resolves a lot of compatibility issues.
Installing WebAlive™
Once the Java™ Runtime Environment has been installed, you can install WebAlive™ Click on the Download
link, then the WebAlive™ console and it will begin installing. The install process is completely automatic.
NB: These links are also contained in the Site Ready Email which contains your username and password.
Once the installation process has commenced, a security warning will appear on your screen. Click “Start”
to accept the security warning. (See Figure 2) WebAlive™ will now install onto your computer.
Figure 2 - Accepting the Security Warning
You will then be presented with a screen that will ask if you would like to set up WebAlive™ on your desktop.
(See Figure 3) Click 'Yes' to accept the installation of the Desktop Item. This will create a desktop
shortcut for future use of the cons.
Figure 3 - Accepting the Desktop Integration
WebAlive Training Manual
6
©2005 WebAlive™ Technologies Pty Ltd
Logging In
Log in using the details provided in the site ready email. (see Figure 4 and Figure 5)
Figure 4 – Site Ready Email
WebAlive Training Manual
7
©2005 WebAlive™ Technologies Pty Ltd
Figure 5 – WebAlive Console Login
WebAlive Training Manual
8
©2005 WebAlive™ Technologies Pty Ltd
Creating Email Accounts.
WebAlive™ allows you to manage all your site's email from the same easy interface. You can add, set auto
responders and forwarders, and remove email accounts. The standard WebAlive™ package is limited to
unlimited email addresses* with 10mb of istorage allocated for each. Eg [email protected]
Figure 6 – Main Menu in WebAlive Console
Adding a New Email Address
To add a new email address:
• From the main screen, click Email Admin. (See Figure 6)
• Click New. (See Figure 7)
• Enter the account name. This is the name to appear before the @ in the new email address. For
example, if you wanted the new email address [email protected] enter info.
• Enter the full name of the owner of the new email address.
• Enter the password for the new email account. Confirm the password.
• Click Save.
WebAlive Training Manual
9
©2005 WebAlive™ Technologies Pty Ltd
Figure 7 – Creating Email Accounts
WebAlive Training Manual
10
©2005 WebAlive™ Technologies Pty Ltd
Auto Responders
You can set an auto responder for any of your email addresses through the WebAlive™.
An auto responder simply replies to any email sent to it. For example this maybe useful if a staff member is
on leave. When an email is recived the auto response could read: 'Thanks for the message – I'm on leave
at the moment and will attend to email on my return. If the matter is urgent, please contact
[email protected]'. (See Figure 8.)
Figure 8 – Setting an Auto Responder
To set the auto responder, click on the 'auto response' checkbox, then enter your message in the field
below. Click Save to Mail will still be delivered to your mailbox as normal.
WebAlive Training Manual
11
©2005 WebAlive™ Technologies Pty Ltd
Email Forwarding
Incoming email messages can be forwarded to any email address – even addresses not associated with
your WebAlive™ website.
This is useful for creating email accounts such as [email protected] or [email protected] to
help you organise your incoming queries by forwarding them to the one centralised address.
To set the email forwarding, click on the 'Forwarding' checkbox, then enter the email address you wish to
forward the mail to. This email address does not have to be associated with a WebAlive™ website.
(See Figure 9.)
Figure 9 – Email Forwarding
NB: Care must be taken when using an email forward that the email set to receive the forwarded email is
not sending auto responses. This may cause an infanite loop which may disrupt your email services.
WebAlive Training Manual
12
©2005 WebAlive™ Technologies Pty Ltd
Email Settings
To read your email you will need an email client such as Microsoft Outlook™, Eudora™, or Netscape™.
There are a large number available and which program you use is entirely a personal preference.
Incoming Mail Server
Your incoming POP3 mail server name will always be defined in the following format:
mail.<your-domain>
For example the incoming ail erver for WebAlive™biz is:
mail.webalive.biz
Outbound Mail Server
Your outgoing Mail Server will be your Internet Service Provider’s (ISP) Outbound Mail server. Check your
documentation or call the support desk of your ISP. If you are currently using email you can check the
outbound mail settings in your current email addresses.
Mail Account Username
Your email account name, when entered into an email client such as Microsoft Outlook or Netscape
Communicator™ is always entered in the following format:
<account-name>@<your-domain>
For example the Email Account “john” is to be added as an email account to the domain
training.webalive.biz. When adding this account to your email client the username that will be entered will
be:
[email protected]
NB: Please see Appendix 2 for more detailed setup of common mail clients
WebAlive Training Manual
13
©2005 WebAlive™ Technologies Pty Ltd
Viewing Your Website.
To view your website, enter your domain name into the web browser. Ie: training.webalive.biz. Once your
domain name is registered and visible you will see the coming soon page. (See Figure 10)
Figure 10 – Comming Soon Page
You can check to see what the website looks like while under construction by going to the preview page, in
this case training.webalive.biz/preview.php (See Figure 11)
Figure 11 – Detail Of Homepage
WebAlive Training Manual
14
©2005 WebAlive™ Technologies Pty Ltd
Site Design
Figure 12 – Site Design
Changing My Site's Appearance
WebAlive™ comes with many site designs available for you to apply to your WebAlive™ site.
You can change the look of your site very simply.
1. From the main page, click Site Design. (See Figure 12)
2. Select a design category from the drop down list at the top of the window.
3. Select from the designs that appear in this list. A preview loads so you can see the design before you
commit it to your site.
4. Once you have selected the design you like, you can change the heading and slogan on the Banner press
Save. (See Figure 13 and Figure 14)
Figure 13 – Site Design
WebAlive Training Manual
15
©2005 WebAlive™ Technologies Pty Ltd
Figure 14 – Preview of Site Design Changes
NB: If you have had a custom design created for your site, do not save a new design to your site. This
process will overwrite your design and will not be recoverable unless you have made backup of your site.
WebAlive Training Manual
16
©2005 WebAlive™ Technologies Pty Ltd
Custom Design
If you have a particular design requirement, and you wish to incorporate your own corporate identity into
your site, you can have WebAlive™ Technologies assist you in having a custom design created.
A custom design can range from the simple altering of one of the standard templates to add your own logo,
through to a complete redesign.
To view some of the custom designs go to:
http://www.webalive.biz/
and view the 'Delighted Customers' page.
Contact WebAlive™ Technologies or your authorised WebAlive™ reseller for further details on your own
tailored package.
WebAlive Training Manual
17
©2005 WebAlive™ Technologies Pty Ltd
Editing The Home Page
Follow the steps below to edit a web page to your website:
•
From the main console screen click Edit a Page. (See Figure 15)
•
Select “Home” from the drop down list. (See Figure 16)
•
Click “Next” to continue.
Figure 15 – Edit a Page
Figure 16 – Selecting The Home Page
WebAlive Training Manual
18
©2005 WebAlive™ Technologies Pty Ltd
Figure 17 – Selecting Button Text
•
Enter the “Button Text”.
This is the text to appear in the navigation tree. That is, the link your users will click on when
navigating around your site. Try to keep this text short and descriptive. This field is limited to 23
characters in length. (See Figure 17)
•
Enter the “Page Title”.
This text appears in the left hand corner of the web browser. It is suggested that this be as
descriptive as possible, and should include your business name and your search key words. Search
engines and browser's 'Favorites' lists use this text when they save your site.
•
Enter the “Page Heading” then select “Next”.
This is the text that displays at the top of your content on your web page. This text is usually what
your users will look at first.
WebAlive Training Manual
19
©2005 WebAlive™ Technologies Pty Ltd
The Text Editor.
Figure 18 – The Text Editor
Enter the required information into the “Page Text” area. (See Figure 18) You can select to bold text, add
links, images, tables and many other things. The text editor in WebAlive™ is similar to any text editor used
in popular word processing programs. See below for descriptions on the text editor functions available in
WebAlive™.
1
22
2
3
4
23
5
6
7
8
24
9
10 11 12 13 14 15 16 17 18 19 20 21
25 26 27
28
29 30
31 32
33 34
35
Figure 19 – The WebAlive Console Toolbar
1. SPELL CHECKER: Allows you to perform a spell check on all text within your web page.
2. CUT: Allows you to cut text.
3. COPY: Allows you to highlight and copy text on your web page.
4. PASTE: Allows you to paste text.
5. FIND: A search function which allows you to find and replace words throughout your webpage.
6. UNDO: Reverses the last command or the last entry you typed.
7. REDO: Reverses the action of the last Undo command.
8. HORIZONTAL RULE: Inserts a horizontal rule or page break into your webpage.
9. INSERT HYPERLINK: Allows you to create hyperlinks from images, email addresses, websites or
uploaded files such as PDFs. You can also create hyperlinks to internal pages within your website.
10.INSERT SYMBOL: Allows you to insert symbols into your webpage.
11.INSERT IMAGE: Allows you to insert an image and hyperlink image into your webpage.
12.FLASH: Allows you to insert Flash components into your webpage.
13.INSERT TABLE: Allows you to insert a table into the body of your text page.
14.-19. ROW/COLUMNS: Once a table is inserted, these functions enable you to insert and delete rows
and columns. You can also split cells and merge cells.
20.SHOW GRIDLINES: Allows you to select whether or not the dividing lines on your table are visible or
not.
WebAlive Training Manual
20
©2005 WebAlive™ Technologies Pty Ltd
21.TEXT DIRECTION: Allows you to change the direction of your text from left to right or right to left.
This function is suitable for WebAlive's Arabic license holders.
22.HEADING SIZE: Allows you to select the heading size of your text.
23.FONT TYPE: Allows you to select from a number of different font styles.
24.FONT SIZE: Allows you to select the size at which your text will display.
25.BOLD: Allows you to bold selected text.
26.ITALIC: Allows you to italicise selected text.
27.UNDERLINE: Allows you to underline selected text.
28.LEFT ALIGN: Allows you to left align your text.
29.CENTRE ALIGN: Allows you to centre align your text.
30.RIGHT ALIGN: Allows you to right align your text.
31.UNORDERED LIST: Allows you to use bullets to format your text.
32.ORDERED LIST: Allows you to use numbering to format your text.
33.INCREASE INDENT: Allows you to increase the indent of your text.
34.DECREASE INDENT: Allows you to decrease the indent of your text.
35.FONT COLOUR: Allows you to change the colour of your text.
This function appears at the top of the text editor and allows you to maximise your webpage so as to
view the page you are editing with ease.
WebAlive Training Manual
21
©2005 WebAlive™ Technologies Pty Ltd
Add a Parent Page.
Parent pages are the most commonly used type of page added in WebAlive™ web sites.
Follow the steps below to add a web page to your website:
•
From the main console screen click Add a Page. (See Figure 20).
•
Select “Web Page” from the “Select a Template” drop down list.
•
Select “New Parent Page” from the “Select a Parent Page” drop down list. (See Figure 21)
•
Click “Next” to continue.
The next screen displayed will prompt you to insert various information that will appear on your site.
(See Figure 22)
Figure 20 – Add A Page
Figure 21 – Selecting Type Of Page
WebAlive Training Manual
22
©2005 WebAlive™ Technologies Pty Ltd
Figure 22 – Button Text
•
Enter the “Button Text”.
This is the text to appear in the navigation tree. That is, the link your users will click on when using
your site. Try to keep this text short and descriptive. This field is limited to 23 characters in length.
•
Enter the “Page Title”.
This text appears in the left hand corner of the web browser. It is suggested that this be as
descriptive as possible, and should include your business name. Search engines and browser's
'Favorites' lists use this text when they save your site. (See Figure 22)
•
Enter the “Page Heading” then select “Next”.
This is the text that displays at the top of your content on your web page. This text is usually what
your users will look at first.
Figure 23 – Page Restriction
WebAlive Training Manual
23
©2005 WebAlive™ Technologies Pty Ltd
•
Select “All can see” – this means everyone on the Internet can see this page – it is viewable to the
public. (See Figure 23)
'Nobody can see' gives you the option to 'hide' particular pages within your site.
NB: Once member admin is utilised, further functionality is available.
•
Enter the required information into the “Page Text” area. (See Figure 24) You can choose to bold
text, add links, images, tables etc. The text editor in WebAlive™ is similar to any text editor used in
popular word processing programs.
Figure 24 – Text Editor
The output can be viewed by going to the preview page. You will see that the new parent page has been
added. (See Figure 25)
Figure 25 – Preview Of Site
WebAlive Training Manual
24
©2005 WebAlive™ Technologies Pty Ltd
Adding a Child Page
Child pages are created as a sub-category of a parent page. This allows multiple pages of a similiar nature
to be grouped together and only become visible when the parent page is selected.
Follow the steps below to add a web page to your website:
•
From the main console screen click Add a Page.
•
Select “Web Page” from the “Select a Template” drop down list.
•
Select the name of the parent page which the child will belong too, in this case
“Parent Button ” from the “Select a Parent Page” drop down list. (See Figure 26)
•
Click “Next” to continue.
Figure 26 – Selecting A Parent Page
WebAlive Training Manual
25
©2005 WebAlive™ Technologies Pty Ltd
Follow the steps from adding the parent page and then use the text editor to change your content.
Figure 27 – Preview Of A Child Page
The output can be viewed by going to the preview page and clicking on the associated parent page.
(See Figure 27)
WebAlive Training Manual
26
©2005 WebAlive™ Technologies Pty Ltd
Moving Pages
You are able to change the order in which pages appear in your navigation tree. You can also move pages
so they become a Child Page – that is, they are only visible in the navigation when their Parent is open.
To change the order of pages in the navigation tree:
• From the consoles main screen click “Move Page”.(See Figure 29)
Figure 28 – Website With Added Pages
Figure 29 – Move Pages
WebAlive Training Manual
27
©2005 WebAlive™ Technologies Pty Ltd
• Select the page you wish to move.(See Figure 30)
• Click the up and down arrows to alter the order of the pages.
To move pages so they become a Child Page – that is, they are only visible in the navigation when
their Parent is open:
• Click the up and down arrows to position the selected page directly under the page to be the
parent. (See Figure 31)
• Click the right arrow.
• Click “Save”.
Figure 30 – Select The Page To Move
Figure 31 – Use The Arrows To Create A New Arrangement.
WebAlive Training Manual
28
©2005 WebAlive™ Technologies Pty Ltd
Figure 32 – Website With Pages That Have Been Moved
The output can be viewed by going to the preview page and viewing the changes you have made.
(See Figure 32)
WebAlive Training Manual
29
©2005 WebAlive™ Technologies Pty Ltd
Deleting a Page
To remove a page from your site:
• From the console's main page click “Delete Page”.(See Figure 33)
• Select the page you wish to delete from the drop down box.
• Click “Next” to continue.
• You will receive a confirmation page showing you the page you have selected for deletion. If this page is
correct click “Yes”.
WARNING: If the page you have chosen to delete has children or sub pages, these pages will also be
deleted.
Figure 33 – Delete A Page
WebAlive Training Manual
30
©2005 WebAlive™ Technologies Pty Ltd
Product Catalogue
The new Product Catalogue will introduce the following major features - Multiple category display types - Line Item, Full Detail and Standard Thumbnail
- Extended product information allowing click-thru to more information with full editing features
- Comprehensive discounting system allowing member, volume and date based discounts
- Ability to set tax regimes based on sale region and tax display options
- Enhanced usability including drag and drop, right click and display enhancements
WebAlive hopes that you will enjoy the new features and welcomes any feedback on functionality for future
releases.
Figure 34 – Main Catalogue View
This is the main screen of WebAlive 2.0. From here it is possible to add products, categories and set
freight ect.
WebAlive Training Manual
31
©2005 WebAlive™ Technologies Pty Ltd
Customising Your Invoice
Figure 35 – Tax Header
The first item that should be set up is the invoice. This will give a custom look and feel to your customers
email invoices. The header will appear at the top of the invoice emailed to your customer.
Figure 36 – Tax Footer
Both the header and footer can be changed. Examples of items that could be added are contact details,
personalised messages, telephone numbers, website address etc.
This will only need to be setup once, even If you have mulitple catalogues.
WebAlive Training Manual
32
©2005 WebAlive™ Technologies Pty Ltd
Setting the Look and User Access of the Catalogue
From the main menu, select a category in the list on the left tree menu and click on the 'Edit' button.
Figure 37 – Main Category View
There are three main display types; Standard, Image and Line Item. The standard view has an image with
product name description and price.
Figure 38 – Standard Display
WebAlive Training Manual
33
©2005 WebAlive™ Technologies Pty Ltd
Figure 39 – Image Display
The Image display centralises the product around the image. This will have the name of the product
underneath and a small blurb.
Figure 40 – Line Item Display
The Line item view is useful if you do not have images or you have a large number of items that you wish
users to quickly browse through.
If you wish to restrict the user access to your catalogue and you can change the “User Access” options.
Selecting “Category Access is Restricted” and setting a “Member Group” in the pull down list below will only
allow members of that group access to the category. When the “Category is Hidden” is selected, the
category will not display on your website.
WebAlive Training Manual
34
©2005 WebAlive™ Technologies Pty Ltd
Setting Up Freight
Figure 41 – Main Category View
The freight for items in the catalogue can be set by clicking on the freight button from the main menu. A
flat rate for freight can be set by putting the amount in you wish to charge for a base rate of freight. This
will apply to all orders and catalogues. This is done by entering in the dollar amount and a handling charge if
you wish.
You can also add extra handling charges on your freight with customised “Handling Text.”
This text will be displayed on the invoice that your customers will receive.
Figure 42 – Flat Rate
A varible freight can be setup by selecting in the pull down menu.
WebAlive Training Manual
35
©2005 WebAlive™ Technologies Pty Ltd
Figure 43 – Variable Rate
The new variable freight allows the setup of a freight to be changed based on the price of the total order.
The “Rate” is defined as the freight amount in dollars and the “Order Value” is entered as the maximum
customer order value to which that rate is to be charged. A handling charge can also be added here.
You can add or remove more freight rates by using the “+” and “–“ buttons. In order setup a freight system
where, for the first 25 spent the freight would cost 5, and for orders from 25 up to to 100 the freight will
be 10, and anything over 100 was a rate 15. You can see this setup in the example shown below.
If you wish to deliver your products internationally, tick the box that says “Allow International Delivery”, and
enter a charge for international delivery.
Figure 44 – Variable Freight Date
WebAlive Training Manual
36
©2005 WebAlive™ Technologies Pty Ltd
Figure 45 – Freight Tax Profiles
The “Tax Profiles” tab in your Freight window allows you to apply tax to both the freight and handling charges
required. It defaults to GST but can be altered as needed. If you do not want to charge tax on your freight
and handing charges, another “Tax Profile” (See “Tax Profiles”) need to be created. It will then appear on this
list.
NB: If you need to charge extra for certain items over and above this freight it can be done in the packing
charges on the individual product. (See “Adding a product”).
WebAlive Training Manual
37
©2005 WebAlive™ Technologies Pty Ltd
Adding a Product
Figure 46 – Main Category View
Select the category you would like to have a product placed and click on “Add Product”. This will load the
“Product” window. From here you enter the mandatory fields. These are:
• Name
• Item Code
• Description
• Price
Product attributes can also setup by clicking on the “+” button. This will add another field to fill in. To remove
this attribute, click on the “-” button.
Each “Product Item” also has the ability to have individual packing costs for products that may be obscurely
shaped or extra delicate. Your products can also be displayed without a price by clicking on the “Call for
price” button. From here you can enter customisable display text.
If your products are available in different types, for example; red, blue and green, more “Product Items” can
be added by clicking on the “+” button just above the Item Code. This will allow you to fill out another item
code and description etc.
WebAlive Training Manual
38
©2005 WebAlive™ Technologies Pty Ltd
Figure 47 – Product Items
Further descriptions can be added to the particular product from the description tab. In Figure 47, the
blank description can be optionally filled with text, images, hyperlinks, etc as shown below in Figure 48.
Figure 48 – Product Description
WebAlive Training Manual
39
©2005 WebAlive™ Technologies Pty Ltd
Figure 49 – Product Description Date
Figure 50 – Tax and Display Options
The “Tax and Display Options” tabs allows you to set the particular tax that is applicable to the product. This
also gives you some options to either hide the product from your site or display it in extra places. GST is set
as default on all items for all Australian customers, but if you have other foreign taxes that you require to
sell overseas they can be selected in this window once setup.
The display options available for your Product are shown in Figure 50,
• “Hide product” will hide the product from your website
• “Feature Somewhere” will place the product in a box in the top right part of random pages so when
users of your site are browsing they will see your featured product.
• “Feature on Homepage” will add the product in a product box. It will display your Product with a small
description, price and add to cart button to the homepage of your website.
WebAlive Training Manual
40
©2005 WebAlive™ Technologies Pty Ltd
Product Options
Once you have a Product in your catalogue you can right click on it to give you the following options.
• Edit
• Add Products
• Move To...
• Copy To...
• Link To..
• Delete
Figure 51 – Right Click Product Menu
WebAlive Training Manual
41
©2005 WebAlive™ Technologies Pty Ltd
Edit
The “Edit” button will open the Product window where you can edit Name, Price, Description, Item Code etc,
Figure 52 – Edit Product Items
Add Product
When selected, this will create a new product in the same category and subfolder that the current product
is in. This can also be done by clicking on the Add Product button. See page “Adding a Product”.
Move To
If you wish to move a product into a different category you can select “move” from the menu. Once selected
you are prompted to select the category to move it to. Select the destination folder and click on the “Ok”
button.
Figure 53 – Tree Naviation of Catagories
WebAlive Training Manual
42
©2005 WebAlive™ Technologies Pty Ltd
Copy To
This is very similar to the above move function. When selected it will open up the same window as move but
instead of moving the item, it will place the a copy of the product in the that particular folder. Once a copy
has been made, they exist independently. If a price is changed on one, it is not reflected in the other.
Link To
Link to is similar to the copy function but they are not independent. As they are a linked, any price,
description or other changes will be reflected on all the links that have been created. This will allow you to
have your products displaying in mulitple categories.
Delete
If an item is no longer needed you may delete it from the product catalogue. This can be done from the
product options or from the main menu.
Figure 54 – Confirmation Of Deletion
When deleting an item you are prompted with a confirmation window. If you wish to delete then click “Yes”.
WebAlive Training Manual
43
©2005 WebAlive™ Technologies Pty Ltd
Adding and Changing Taxes
Figure 55 – Main Tax View
Figure 56 – Tax Profile
.
By selecting the Tax profiles from the left tree menu you can select “Add” or “Edit” to bring up the tax
options window. The GST is the only tax listed in by default for Australian users.
To create another “Tax Profile” select “Add Tax”. Enter the “Tax Profile Name” of the tax and the “Name”.
The “Country/Region” can be selected with the drop down box. The “State and Province” field is optional
and the tax will be applied if this data is entered in the checkout process. The rate is set as a percentage
(%) and “Display” tick box will allow you display this tax in your invoices and product view. If this is not ticked,
the tax will not be shown.
WebAlive Training Manual
44
©2005 WebAlive™ Technologies Pty Ltd
Figure 57 – Tax Profile Overview
The “Product Tax Profile Overview” tab, shows a list of all the products and which particular tax profile has
been assigned. This is a simple way to view which products have which tax applied to it.
WebAlive Training Manual
45
©2005 WebAlive™ Technologies Pty Ltd
E-Commerce
E-Commerce Features in WebAlive™
WebAlive™ gives you the capability to offer your products or services for sale online.
WebAlive™ offers a range of e-commerce options. By default your WebAlive™ website uses email ordering,
where you receive orders through your email account. There are however, a number of payment gateways
available.
Payment Gateway Options
See below for a full list of payment gateway options. Note: Not all payment gateway options will be available
in your respective country.
EMAIL: Email ordering allows you to take orders from your website without the need for a credit card
merchant account. Customers create an order and you are emailed the details. You then contact the
customer and organise payment offline, ie by cheque or direct debit.
WORLDPAY: The WorldPay payment gateway allows your web site to securely accept credit cards with
different currency in real time. This means your account will be credited within seconds after a customer
makes a purchase from your site. http://www.worldpay.com
2CHECKOUT: The 2Checkout payment gateway allows your web site to securely accept credit cards in real
time. This means your account will be credited within seconds after a customer makes a purchase from
your site. http://www.2checkout.com
STRATAPAY: (Australia Only) StrataPay Multiple Solution Payment service offers EIGHT easy and
recognisable methods of payment to your customers. Your shoppers will be taken off your site to complete
payment details using the secure servers at StrataPay's e-commerce set up. http://www.stratapay.com.au
PAYPAL: The PayPal payment gateway allows your web site to securely accept credit cards with different
currency in real time. This means your account will be credited within seconds after a customer makes a
purchase from your site. http://www.paypal.com.au
EWAY: (Not available in Middle East)The eWAY payment gateway allows your web site to securely accept
credit cards in real time. This means your account will be credited within seconds after a customer makes
a purchase from your site. To use this payment gateway you will need an online merchant account from
your bank. http://www.eway.com.au
SECURE PAY: The Secure Pay payment gateway allows your web site to securely accept credit cards in real
time. This means your account will be credited within seconds after a customer makes a purchase from
your site. Http://www.securepay.com
MALSECOM: MalsEcom is not itself a payment gateway, but an integrator of payment gateways. It allows
merchants to set up multiple payment options for their user. A few different selections are available in
MalsEcom, ie – Paypal, 2Checkout, Pay be cheque, Cash on Delivery and more. http://www.mals-e.com/
NO GATEWAY: You have the option to select NoGateWay . The ordering process, including your shopping
cart will disable. Product information is for display purposes only.
NB: Please see Appendix 1 for more details
WebAlive Training Manual
46
©2005 WebAlive™ Technologies Pty Ltd
Checking Your Orders
Every time your website receives an order, you are sent an email detailing the order and the contact details
of your customer. If you have not established a secure credit card process through one of the many
payment gateway options available, you will need to contact the customer and arrange payment.
All sales emails with customer order details are sent to:
sales@[your-domain]
For example if your web address is www.training.webalive.biz, all sales emails will be sent to
[email protected].
NB: This can change depending on the gateway selected. i.e. Stratapay will send to the email used in the
registration process.
You can also check all your orders through WebAlive™.
To view your orders in WebAlive™:
• From the main console click E-Commerce.
• The list on the left displays orders your site has received. You can sort these orders using the dropdown
boxes above the list. Ie – Status / Date Range. (See Figure 58)
• Select an order to view the contact details of your customer.
Figure 58 – E-Commerce Orders
WARNING: All sales emails are sent to sales@[your-domain]. Your first step when setting up a product
catalogue is to create an email address for sales.
WebAlive Training Manual
47
©2005 WebAlive™ Technologies Pty Ltd
Members
WebAlive™ has member features that allows you to tailor the user's experience to their own needs.
For example, you could publish a quote on your website and only give one specific member access to view it.
Alternatively, you could also add a product catalogue for a specific group of wholesale clients that have a
different price structure or product range than your retail catalogue.
You can also send emails to your members, giving you a highly effective email marketing tool. This is
particularly effective when used to encourage repeat custom.
This type of functionality turns your website into a highly effective business tool, rather than just a means of
advertising.
Figure 59 – Member Admin
Adding a New Member
Members can be added by one of two methods.
Register themselves
Visitors to your website can click on the Register link beneath the login form under the navigation tree. This
will collate the users contact details, email address and username/password.
Registration via WebAlive™
To add a new member:
• From the Main Console Screen, click Member Admin. (See Figure 59)
• Click Member Admin.
This screen shows you all your current members.
• Click New.
• Enter your new member's contact details. Ensure you include at least an email address and username
and password.
• Click Save.
WebAlive Training Manual
48
©2005 WebAlive™ Technologies Pty Ltd
Editing an Existing Member
To edit an existing member:
• From the Main Console Screen, click Member Admin. (See Figure 59)
• Click Member Admin.
• Select the member you wish to edit.
• Click Edit.
• Alter the member's details.
• Click Save.
Member Groups
You can create member groups to enable you to assign page view permission to large groups of members,
or mail to groups of members.
To create a new group:
• From the Main Console Screen, click Member Admin. (See Figure 59)
• Click Group Admin.
• Click Add Group.
• Enter the name of the new group – ensure this name has not already been used for another group.
• Click Enter.
Assigning Members to Groups
To assign a member to an existing group:
• From the Main Console Screen, click Member Admin. (See Figure 59)
• Click Group Admin.
• In the Available Groups list select <No Group>.
• A list of all members currently not assigned in a group is displayed in the Not in any group list.
• Select the user name of the member you wish to move into a group.
• A dropdown list appears above the Not in any group list. In this dropdown list select the group you wish
to move the member to.
• Click Return.
WebAlive Training Manual
49
©2005 WebAlive™ Technologies Pty Ltd
Emailing Members
You can email members individually, as part of a selection of members, by group, or all members. Your
member list can become an invaluable marketing and customer relations tool.
To email members:
• From the Main Console Screen, click Member Admin. (See Figure 59)
• Click Email Members.
• Select your members to email.
• To select all members, click Select All.
• To select a group, use the Select By Group dropdown list.
• To select individual members, click on the members name in the main list. If you wish to select multiple
users hold down the Ctrl key while clicking on any subsequent member names.
• Click Next to continue.
• Create the email you wish to send to your members. Ensure you include the subject and content. You
can also add an optional attachment.
• Click Send.
WebAlive Training Manual
50
©2005 WebAlive™ Technologies Pty Ltd
Site Admin
Figure 60 – Site Admin
Figure 61 – Site Admin Options
Administration – Filling Out Your Company Details
You will need to enter your company details such as address, telephone number, postcode, state, country
and email address to be displayed on your website.
·
Select “Admin” from the WebAlive main console screen.
·
Select “Contact Details” from the administration options.
·
Enter your contact details in the defined fields then select “Save”.
·
If you view your website in the web browser you will see that the details entered in the “Contact
Details” section are now on the left hand side of your website.
WebAlive Training Manual
51
©2005 WebAlive™ Technologies Pty Ltd
Changing Your Password
To change your password for WebAlive™:
• From the Console Main Screen, click Admin. (See Figure 60)
• Click Change Password.
• Enter the password you currently use in the first field.
• Enter your new password in the next two fields.
By entering your password twice, you will ensure that you do not mistype your password and are not locked
out of your Console. If the two entries are not identical your new password will not be saved.
Backup Site
To ensure you protect your site from loss, it is strongly recommended you regularly back your site up to
your local machine.
To back your site up:
• From the Console Main Screen, click Admin. (See Figure 60)
• Click Site Backup.
• Select the location on your machine you wish to save your backup to. It is suggested to create a
directory such as 'c:\Website Backups\', so you can easily locate your backup files again.
• Click OK.
This will save a file to your machine containing all of your content and your design. Each filename will show
the backup date for later reference.
Neither email configuration or email messages are backed up as part of this process.
Restore Site
To restore your site from backup:
• From the Console Main Screen, click Admin. (See Figure 60)
• Click Site Restore.
• Locate the backup file you wish to restore from your local computer.
• Click OK.
This will restore your site to the state it was in when the backup was taken.
WARNING: Restoring from backup will overwrite all information currently on your site. This includes all text,
products, custom designs etc.
Hide / Publish Site
To hide your site from public view or to make your site live:
• From the Console Main Screen, click Admin. (See Figure 60)
• Click Publish Site (Note this button will appear if your site is currently hidden).
Alternatively:
• Click Hide Site (Note this button will appear if your site is currently published).
NB: When the Website is hidden a holding page will be displayed. (See Figure 11)
WebAlive Training Manual
52
©2005 WebAlive™ Technologies Pty Ltd
Site Statistics
Site statistics provide you with a detailed report and summary of the history of visitors to your site.
To view your site's statistics:
• From the Console Main Screen, click Admin. (See Figure 62)
• Click Site Statistics (See Figure 44) or go to http://training.webalive.biz/stats.php
Figure 62 – Site Admin
Figure 63 – Site Statistics
WebAlive Training Manual
53
©2005 WebAlive™ Technologies Pty Ltd
Figure 64 – Site Statistics Overview
(Figure 64) The Site Statistics provide an overview of the traffic including number of vistors and how many
pages have been viewed.
Figure 65 – Daily Statistics
Other Statistics about your website are shown on the page such as daily “hit” information, detailed website
usage and information about visitors. (See Figure 65 and Figure 66)
WebAlive Training Manual
54
©2005 WebAlive™ Technologies Pty Ltd
Figure 66 – Visitor Statistics
WebAlive Training Manual
55
©2005 WebAlive™ Technologies Pty Ltd
Getting Help
We have a range of methods available if you require assistance.
User Manual
You can download this version of this user manual from:
http://support.webalive.biz/
Knowledgebase
The WebAlive™ Support System is located at:
http://support.webalive.biz/
It contains a detailed, searchable knowledgebase. This contains articles and hints on setting up, operating,
and getting the most out of WebAlive™.
Technical Support Trouble Ticket
If you have a specific issue for WebAlive™ to resolve, by far the most effective method is to create a Trouble
Ticket.
These tickets enable you to track the progress of your issue.
• Go to the WebAlive™ Support System at:
http://support.webalive.biz/
• Click on Submit a Ticket.
• Fill in the support form, being as specific as you can.
• Submit the form.
The support system will use the description of your issue and search the support knowledgebase, and offer
you some suggestions on some possible resolutions. If none of the suggestions are of assistance, then click
Submit the Ticket, my answer is not listed, located at the bottom of the page. Your issue will then be
forwarded to a support technician.
If you are receiving an error, or your site is not operating correctly, ensure you document the steps you are
taking prior to the error occurring.
Email
You can obtain customer and technical support by emailing:
[email protected]
Telephone Support Hours:
Australia
Call our support team on +61 1300 797 471
Monday to Friday 8.30am to 9pm
Saturday and Sunday 9am to 5pm
Canada
For technical support phone 604.642.6150
Telephone Support Hours:
Monday to Friday 9am to 5pm
United Kingdom
For technical support phone 0871 4346405
Telephone Support Hours:
Monday to Friday 9am to 6pm
Middle East
For technical support phone 971-4-3326645
WebAlive Training Manual
56
©2005 WebAlive™ Technologies Pty Ltd
Glossary
DOWNLOADS
This refers to the data or information that is sent to you FROM the internet. Downloads include for example
looking at websites, "downloading" files, viewing pictures, checking your email etc. See also uploads
EMAIL
Email stands for Electronic Mail. This is the most common way for Internet users to communicate with one
another. See also POP and SMTP
INTERNET
Internet is a term used to refer to any type of computer network that connects different types of computer
devices. The Internet (note the capitals) refers to one particular worldwide network which consists of a
large number of interconnected networks. When people say "Internet" they are usually referring to this
worldwide network.
ISP
ISP is short for Internet Service Provider. This is a company which provides clients with an Internet
connection.
INTRANET
The term intranet refers to an organisation's private internal network. This can consist of LANs and WANs.
See also internet
LAN
A LAN is a Local Area Network. This is a network that exists only in a single building. See also WAN
LINK / HYPERLINK
A Link or HyperLink is simply a piece of text which takes you to another webpage or website when clicked on
in your web browser.
MODEM
MODEM is an acronym for MOdulator DEModulator. This is a device which translates signals from one type
to another for transmission over a particular medium. A MODEM is typically used to connect clients to their
ISP via a telephone line. The term MODEM is also sometimes used to refer to the device which connects
clients through a DSL line.
POP
PoP stands for "Point of Presence". This refers to the location of an Internet provider's data centre or office.
POP also refers to a type of mail server. A POP (Post Office Protocol) server stores emails. Users log on
using their email software and the POP protocol to retrieve (download) the email to their computer for
viewing. See also IMAP
SERVER
A server is a computer on a network which shares it's resources and allows other computers to connect to
it to send or retrieve information. There are many different servers on the Internet including WWW (web)
servers which make websites available and mail servers which allow people to send and receive emails.
WebAlive Training Manual
57
©2005 WebAlive™ Technologies Pty Ltd
SMTP
An SMTP (Simple Mail Transfer Protocol) server uses the SMTP protocol to send emails to other servers.
This is how an email gets from one Internet user to another. The email is then stored on the server for the
user to retrieve using the POP protocol.
TRAFFIC
Traffic refers to the amount of information exchanged between your computer and the internet. It typically
includes both uploads and downloads
UPLOADS
This is the opposite of downloads. Uploads refers to the information that is sent from your computer TO the
internet. This includes "uploading" or sending files to other people, sending email etc. The amount uploaded
is usually much smaller than the amount downloaded on an Internet connection.
WEBSITE
A website is a particular collection of web pages (pages of information) stored on a server. These are
accessed using software called a web browser using the HTTP (hyper text transfer protocol). Webpages
usually contain links to other pages and websites.
WebAlive Training Manual
58
©2005 WebAlive™ Technologies Pty Ltd
References
2Checkout
2Checkout.com -- merchant account / credit card processing
alternative
http://www.2checkout.com/
StrataPay
StrataPay - Eight easy ways to pay - Log in to view your details
http://www.stratapay.com.au/
PayPal
PayPal – Welcome
https://www.paypal.com/
Web Active Corporation
eWAY - Australias leading payment gateway
https://www.eway.com.au/
WorldPay
WorldPay - Online Credit and Debit Card Clearance
http://www.worldpay.com/asiapac_au/
Mal's e-commerce Limited Mal's e-commerce
http://www.mals-e.com/
Secure Pay
Secure Pay Simple Effective e-Commerce Solutions
http://www.securepay.com/
Google
Google Information for Webmasters
http://www.google.com/webmasters/
Netscape
ODP - Open Directory Project
http://www.dmoz.org
Ahmad Permessur
Ten Steps To A Well Optimized Website
http://www.hostingtech.com/?m=show&id=689
Dave Davies
Beanstalk Search Engine Positioning
http://www.beanstalk-inc.com/
WebAlive Training Manual
59
©2005 WebAlive™ Technologies Pty Ltd
Appendix 1 : E-Commerce Payment Gateways
EMAIL
The Email process allows you to receive customer orders without the need for a credit card merchant
account. Customers email you the appropriate order details and you follow up to organise payment offline.
Ie, payment made by cheque or direct debit.
2CHECKOUT
The 2Checkout payment gateway allows your web site to securely accept credit cards in real time. This
means your account will be credited within seconds of a customer purchasing from your site.
•
$49 Setup Fee *
•
$0.45 per Sale
•
5.5% of Sale Amount
•
30 Day Money Back Guarantee
•
No application Fees
•
No Monthly Fees
•
No Statement Fees
•
No Leases
•
No SSL Certificate to buy
•
No Fees for ACH Deposits to U.S. or participating Canadian Bank accounts.
•
Cheque payment or low cost wire to Non U.S. Bank accounts
•
Free Shopping Carts
•
Free Code for your site
•
Free Online tech support
(*Prices valid at time of issue)
WebAlive Training Manual
60
©2005 WebAlive™ Technologies Pty Ltd
STRATAPAY - Only available in Australia (AUD)
StrataPay Multiple Solution Payment Service offers EIGHT easy, recognisable and secure methods of
payment for your customers. Payment can be made through the following channels:
•
At any Heritage Building Society Branch
•
Over the phone
•
At Australia Post
•
Through Bill Pay
•
At any Bill Express
•
By Direct Debit
•
By Mail
•
Over the Internet
Schedule of Fees:
A. Transaction Fees: All payment Methods
$2.50
B. Service Fees: (Calculated on amount of payment not including Transaction Fee)
1. Credit Card (Visa, Mastercard or Bankcard)
1.65%
2. Charge Card (American Express or Diners)
2.65%
3. Cards issued outside Australia
Additional 2%
C. SMS Confirmation Messages
$0.30
D. Fee for Dishonoured Cheque or Direct Debit or Credit Card
$35.00
E. Replacement or additional card
$11.00
F. Non-Payment to Biller (Biller's bank account closed or incorrect amount details)
$35.00
PAYPAL
PayPal, an eBay Company, enables any individual or business with an email address to securely, easily and
quickly send and receive payments online. PayPal's service builds on the existing financial infrastructure of
bank accounts and credit cards and utilizes the world's most advanced proprietary fraud prevention
systems to create a safe, global, real-time payment solution.
PayPal has quickly become a global leader in online payment solutions with 50 million account members
worldwide. Available in 45 countries around the world, buyers and sellers on eBay, online retailers, online
businesses, as well as traditional offline businesses are transacting with PayPal.
The PayPal payment gateway allows your web site to securely accept different currency credit cards in real
time. This means your account will be credited within seconds of a customer purchasing from your site.
WebAlive Training Manual
61
©2005 WebAlive™ Technologies Pty Ltd
EWAY – Only available in Australia (AUD)
The EWAY payment gateway allows your web site to securely accept credit cards in real time, allowing your
account will be credited within seconds of a customer purchasing from your site.
•
Shopping Carts
•
Reporting
•
Batch processing
•
Manual Transactions
•
Re-bill / Refund Facility
•
Re-bill / Refund Facility
•
Customised Email Receipt
•
Flexibility
•
Clustered Web servers
•
Accounts
•
Documentation
WORLDPAY
WorldPay enables thousands of businesses (small and corporate) to accept payments on the internet, by
phone, fax or mail. Credit and debit cards and installments. In any language and most currencies. All
through one merchant account, one payment processing system, 24/7.
They accept Visa, Mastercard, American Express, JCB and all the major credit cards. Not forgetting debit
cards and local payment schemes like Switch, Laser, Electron and more. Bank transfers (such as the
German ELV system), installments, standing-order and direct-debit style payments. All in their customer's
currency and language – wherever they are in the world.
SECURE PAY
By using Secure Pay, Internet Merchants Are Provided 3 Ways of Accepting Credit Card Payments
Real-Time
This option connects a merchant's Web store to our secure server for automatic processing. The credit
card number is submitted directly to the processing center using the company's merchant account
number.
Virtual Terminal
This option allows a merchant to log into SecurePay and manually enter a credit card transaction. Perfect
for phone, FAX, e-mail or regular mail orders.
Pass-Through
This option allows a merchant to set up a simple link from their Web site to our secure server. The credit
card number is collected using our secure server and e-mailed to the merchant for manual submission
through a processing terminal or desktop software.
Secure Credit Card Processing
Since all transactions are processed via a secure server, your customers will feel more comfortable
ordering online.
WebAlive Training Manual
62
©2005 WebAlive™ Technologies Pty Ltd
MAL'S ECOM
MalsEcom is not itself a payment gateway, but an integrator of payment gateways. It allows merchants to
set up multiple payment options for their user. A few different selections are available in MalsEcom, ie –
Paypal, 2Checkout, Pay be cheque, Cash on Delivery and more.
NO GATEWAY
NoGateWay means you have elected to disable all ordering processes. Shopping cart will disable. Product
information is for display purpose only.
WebAlive Training Manual
63
©2005 WebAlive™ Technologies Pty Ltd
Appendix 2: Setup of Common E-mail Clients
Setting up Outlook Express (Outlook Express Setup Wizard)
After you have created your email accounts in WebAlive™ you are ready to set-up Outlook Express to start
collecting and sending email messages.
When you open Outlook Express for the first time, the Internet Connection Wizard will appear. You simply
need to follow through each of the dialogues that are presented in order to setup Outlook Express to
receive mail through your mailserver.
If the Wizard does not appear, access it by clicking on the Tools menu, then select Accounts. Click the Add
button to the right and select Mail.
The first dialog will ask you for your display name. This name will show up in other people's email programs
when you send them email. You can type your full name here, or use a generic name such as "WebAlive™
Info", or "WebAlive™ Support Department".
Appendix Figure 1: Outlook Express Wizard 1
You will now be prompted for your Email Address, which is made up of your mailbox name and your domain
name in the format: mailbox@[your-domain]
WebAlive Training Manual
64
©2005 WebAlive™ Technologies Pty Ltd
Appendix Figure 2: Outlook Express Wizard 2
The third dialog will ask for the Mailserver information.
You should use the setting "POP3" server.
You will need to type the hostname of the mailserver for incoming and outgoing mail.
See the section Email Settings to determine your mail servers and username.
If you need assistance verifying your Outbound Mail server settings please contact your ISP for these details.
Appendix Figure 3: Outlook Express Wizard 3
WebAlive Training Manual
65
©2005 WebAlive™ Technologies Pty Ltd
The next dialog prompts for your account information. It will assume that your Account Name is the same
as your mailbox name (the part before the @ symbol)
You will need to change this to contain your complete email address and also including the @ symbol and
the domain name.
Your password will be the same as whatever password you entered in the “Password” fields of the
WebAlive™.
Appendix Figure 4: Outlook Express Wizard 4
You may or may not see this next dialog. If not, that is ok.
This screen allows you to choose how your email program should connect to the Internet.
Appendix Figure 5: Outlook Express Wizard 5
WebAlive Training Manual
66
©2005 WebAlive™ Technologies Pty Ltd
You will see the Congratulations screen. You can click Finish and the email account should be now set-up
and ready to receive email.
Appendix Figure 6: Outlook Express Wizard 6 Complete
WebAlive Training Manual
67
©2005 WebAlive™ Technologies Pty Ltd
Setting up Outlook XP / 2002
When you open Outlook 2002 for the first time, the Internet Connection Wizard will appear. You simply
need to follow through each of the dialogs that are presented in order to setup Outlook 2002 to receive
mail through your mailserver.
The first dialog will ask you for your server type. You need to choose POP3
Appendix Figure 7: Outlook Wizard 1
The third dialog will ask for the Mailserver information.
You should use the setting "POP3" server.
You will need to type the hostname of the mailserver for incoming and outgoing mail.
See the section Email Settings to determine your mail servers and username.
If you need assistance verifying your Outbound Mail server settings please contact your ISP for these details.
Appendix Figure 8: Outlook Wizard 2
WebAlive Training Manual
68
©2005 WebAlive™ Technologies Pty Ltd
You may need (depending on your ISP) to click on the More Settings button, then click on the Outgoing
Server tab.
If your ISP requires authentication then Tick the option "My outgoing server (SMTP) requires
authentication", then click OK
Appendix Figure 9: Outlook Wizard 3
You will now see the Congratulations screen. You can click Finish
Appendix Figure 10: Outlook Wizard Finish
WebAlive Training Manual
69
©2005 WebAlive™ Technologies Pty Ltd
Setting up Netscape Communicator
When you open Netscape Communicator for the first time, the Add New Account Wizard will appear. You
simply need to follow through each of the dialogs that are presented in order to setup Netscape
Communicator to receive mail through your mailserver.
If the Wizard does not appear, you can access it by clicking on the Edit menu, then select Mail and
Newsgroup Account Setting. Click the Add button to the right and select Mail.
The first dialog will ask you for your Account type. You need to choose Email Account as depicted below.
Appendix Figure 11: Netscape Communicator 1
The next dialog will ask you for your display name and your Email address. The Display name (Your Name)
will show up in other people's email programs when you send them email. You can type your full name here,
or use a generic name such as "WebAlive™ Info", or "WebAlive™ Support Department".
The Email address filed should be filled as your true email address. For example if you have created an
“Email Account” called john for the domain training.webalive.biz then the correct email address would be:
[email protected]
Appendix Figure 12: Netscape Communicator 2
WebAlive Training Manual
70
©2005 WebAlive™ Technologies Pty Ltd
Click next and the Server Information screen will appear.
You should use the setting "POP3" server.
You will need to type the hostname of the mailserver for incoming and outgoing mail.
See the section Email Settings to determine your mail servers.
If you need assistance verifying your Outbound Mail server settings please contact your ISP for these details.
Appendix Figure 13: Netscape Communicator 3
See the section Email Settings to determine your username.
Appendix Figure 14: Netscape Communicator 4
Using a single “Left Mouse” Click on the “Next” button to move to the Account Name screen. Enter the
name by which you will refer to this account. eg Work Account
WebAlive Training Manual
71
©2005 WebAlive™ Technologies Pty Ltd
Appendix Figure 15: Netscape Communicator 5
Click on the Next button to verify your set-up details.
Appendix Figure 16: Netscape Communicator Finish
WebAlive Training Manual
72
©2005 WebAlive™ Technologies Pty Ltd
Appendix 3: Search Engine Optimization
Page Title
The best way for your WebAlive™ website to rank highly in search engines is to make use of the "Page Title"
text which will appear at the top of your browser. The "Page Title" text can be modified on every page of your
WebAlive™ website and should contain the keywords that best suit your website. Each page title can
include up to 80 characters of keywords.
Think like a layman. Just because you know your industry terms does not mean that everyone does. Do not
just think of the words you use to describe your products/services, rather think of the words you would use
if you knew nothing about it other than the fact that you needed it. You may want to recruit a friend and
have them run some searches for you.
On the other side of the coin, there may be phrases used specifically in your industry that people "in the
know" would use to search for your products and/or services. Be sure to look into these phrases.
Page Content
The next tip in obtaining a high search engine ranking lies in the first few paragraphs of text on each of your
pages. Including the major products and services in these first few paragraphs of text makes your site more
attractive to search engines. Making pages more relevent
Google's search engine works on the idea of relevence. When a user searches for a website they want to
find the website that is most relevent to them. The best way we have found to achive this is by placeing your
targeted keyword phrase/s in your content as often as possible while keeping the content easily readable
by your users. The aim is not to sell to search engines, it is to sell to people. Some sites have gone so
overboard in increasing their keyword density that the content itself reads horribly. If you are simply aware
of the phrase that you are targeting while you write your content then chances are you will attain a keyword
density somewhere between 3 and 5%.
Also remember when you are looking over your page your targeted phrase may stand out more than any
other phrase on the page and may even seem like it is a bit too much. Unless you have obviously overdone it
(approached the 10% rather than 5% end of the spectrum) it is alright for this phrase to stand out. This is
the phrase that the searcher was searching for. When they see it on the page it will be a reminder to them
what they are looking for and seeing it a few times will reinforce that you can help them find the information
they need to make the right decision.
Links
One of the easiest ways to get search engines to find your site is to have your site listed on popular
websites. If you are part of a professional body or part of a user group, try to get your website listed on as
many other sites and online directories as possible. This will increase your search engine traffic greatly.
Alternatively, create links on your WebAlive™ website to major websites that are related to your industry.
The other way to get links is by having good quality unique content.
If you provide great information that other people will find useful people will link to it naturally. With so much
emphasis in recent times on reciprocal linking some might think this is the only way to get links at all.
Believe it or not there are still webmasters out there who will link to sites for no other reason than they feel
their visitors will be interested in it’s content.
Lisiting your website in directories such as yahoo.com and dmoz.org will also create links to your website.
We suggest adding one record based on your regional location and one record based on the business type,
NB: adding multiple records will remove you from the directories.
WebAlive Training Manual
73
©2005 WebAlive™ Technologies Pty Ltd
Navigation
WebAlive websites include navigation on the left hand side. This makes it one of the first things read by a
search engine spider so be sure to include the targeted keywords in some of the links. Do not cram your
keywords into each and every link because this is your navigation and that would look ridiculous. But product
names can make good navigation links as do service names. Remember you want your website to look
professional.
WebAlive Training Manual
74
©2005 WebAlive™ Technologies Pty Ltd