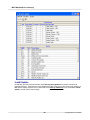
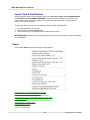
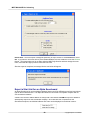
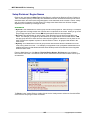
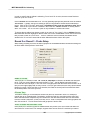
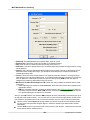
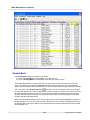
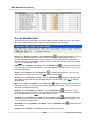
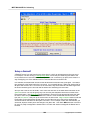
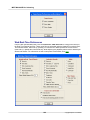
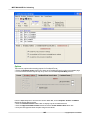
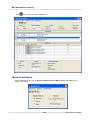
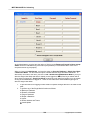
1
MEET MANAGER 3.0
for Swimming
HY-TEK Sports Software
- User Guide -
Updated: 6/29/2010
Copyright©Sports-Tek Software
Contents
MEET MANAGER for Swimming
Table of Contents
Section I Introduction
11
Section II License Agreement
14
Section III Install MEET MANAGER
17
1 Installing MEET
...................................................................................................................................
MANAGER from a CD
17
2 Installing MEET
...................................................................................................................................
MANAGER using Web Delivery
18
3 How to Re-Install
...................................................................................................................................
MEET MANAGER
20
4 How to Setup...................................................................................................................................
a Desktop Icon or Shortcut
21
5 How to Uninstall
...................................................................................................................................
MEET MANAGER
21
6 How to Give ...................................................................................................................................
Permissions to Users
22
Section IV System Requirements
23
Section V New in MEET MANAGER 3.0
24
Section VI Evaluation Edition
30
Section VII Upgrading from MM 2.0 to MM 3.0
31
Section VIII MM Product Options
32
Section IX eLessons
34
Section X FAQ - Frequently Asked Questions
35
Section XI Getting Started - Overview
39
1 Generic Steps
...................................................................................................................................
in Setting Up Your Meet
39
2 Monitor Size...................................................................................................................................
and Resolution
41
3 Resizing Menus
................................................................................................................................... 41
4 Short-Cut Icons
................................................................................................................................... 41
5 Icons
................................................................................................................................... 42
45
Section XII File Menu
1 Utilities
................................................................................................................................... 46
Open a Database
.......................................................................................................................................................... 47
Save As to Create
..........................................................................................................................................................
a New Meet from an Existing Meet
47
Backup a Database
.......................................................................................................................................................... 48
Move a MM
.........................................................................................................................................................
Database to Another Computer
50
Restore a Database
.......................................................................................................................................................... 51
Unzip File
.......................................................................................................................................................... 52
Repair and Compact
..........................................................................................................................................................
Database
52
1
Copyright©Sports-Tek Software
Contents
MEET MANAGER for Swimming
Purge a Database
.......................................................................................................................................................... 53
Remove Data
.........................................................................................................................................................
Selectively
54
Reset Event
.........................................................................................................................................................
Results Only
55
Reset Event
.........................................................................................................................................................
Results and Seeding
56
Reset Scores
......................................................................................................................................................... 57
Remove Blank
.........................................................................................................................................................
Splits
58
Scratch Entries
.........................................................................................................................................................
Selectively By Team
59
Install Update.......................................................................................................................................................... 60
Enable / Disable
..........................................................................................................................................................
Network Login
61
Open in Multi-User
..........................................................................................................................................................
Mode
62
Network Administration
.......................................................................................................................................................... 62
License Management
.......................................................................................................................................................... 62
2 Import
................................................................................................................................... 64
Import Meet Entries
.......................................................................................................................................................... 65
TM Lite for
.........................................................................................................................................................
Entries
67
Import Rosters
.......................................................................................................................................................... 68
Import Merge..........................................................................................................................................................
Entries File
68
Import Merge..........................................................................................................................................................
Results File
69
Import Records
.......................................................................................................................................................... 70
Import Time Standards
.......................................................................................................................................................... 71
Import USA Swimming
..........................................................................................................................................................
OnLine Entries
72
Import British..........................................................................................................................................................
Swimming OnLine Entries
72
Import Athletes
..........................................................................................................................................................
from a Registration File
73
Import Track ..........................................................................................................................................................
& Field Rosters
74
3 Export
................................................................................................................................... 74
Export Results
..........................................................................................................................................................
for TEAM MANAGER or SWIMS
75
Export Entries
..........................................................................................................................................................
for SWIMS Times Recon
76
Export Entry Fees
..........................................................................................................................................................
for Sports BUSINESS MANAGER
77
Export Entries
..........................................................................................................................................................
for MEET MANAGER Merge
78
Export Advancers
.......................................................................................................................................................... 79
Export Results
..........................................................................................................................................................
for MEET MANAGER Merge
81
Export Athletes
..........................................................................................................................................................
/ Teams / Email
82
Export Entries
..........................................................................................................................................................
for Diving Only
83
Export Records
.......................................................................................................................................................... 84
Export Time Standards
.......................................................................................................................................................... 85
Export Events..........................................................................................................................................................
for TEAM MANAGER
86
Export a Start..........................................................................................................................................................
List for an Alpha Scoreboard
88
Export USA-S..........................................................................................................................................................
Registration
89
Export UK Competitors
..........................................................................................................................................................
List
89
Convert a Hy-Tek
..........................................................................................................................................................
Export CL2 File to SDIF
90
Export Generic
..........................................................................................................................................................
Data in MS Access
90
Export Results
..........................................................................................................................................................
to Swimming World Magazine Web Site
91
Export Results
..........................................................................................................................................................
for Disabled Athletes in IPC Format
93
94
Section XIII Set-up and Preferences
1 Meet Setup ................................................................................................................................... 94
2 Athlete / Relay
...................................................................................................................................
Preferences
98
3 Seeding Preferences
................................................................................................................................... 99
Basic Seeding
..........................................................................................................................................................
Settings
99
Conversion
.........................................................................................................................................................
Factors for Entry Times
101
Standard Lane
..........................................................................................................................................................
Preferences
101
Dual Meet Seeding
.......................................................................................................................................................... 102
2
Copyright©Sports-Tek Software
Contents
MEET MANAGER for Swimming
Masters Seeding
.......................................................................................................................................................... 103
4 Report Preferences
................................................................................................................................... 104
Report Formats
.......................................................................................................................................................... 104
Report Headers
.......................................................................................................................................................... 107
Punctuation.......................................................................................................................................................... 108
Footer Logos
.......................................................................................................................................................... 109
5 Entry / Scoring
...................................................................................................................................
Preferences
111
Scoring/Awards
.......................................................................................................................................................... 111
Hy-Tek Points
......................................................................................................................................................... 114
NISCA Points
......................................................................................................................................................... 115
British GB
.........................................................................................................................................................
Points, BAG Points and BAGCATs
115
LEN Points
......................................................................................................................................................... 115
FINA Points
......................................................................................................................................................... 116
SNZ Points
......................................................................................................................................................... 116
AUS Points
......................................................................................................................................................... 117
Entries / Entry
..........................................................................................................................................................
Limits
117
Results
.......................................................................................................................................................... 119
Time Standards
..........................................................................................................................................................
Meet
120
Flighted Meet
.......................................................................................................................................................... 120
2 or 3+ Double
..........................................................................................................................................................
Dual
121
Improvement
..........................................................................................................................................................
Points
122
6 Setup Point...................................................................................................................................
Scoring
123
7 Setup Divisions
...................................................................................................................................
/ Region Names
125
8 Language Preference
................................................................................................................................... 126
9 Directory Preferences
................................................................................................................................... 129
10 Setup Timing
...................................................................................................................................
Console Selection
130
11 Setup Alpha...................................................................................................................................
Scoreboard Interface
131
12 Setup Open...................................................................................................................................
Water Button Timer Interface
132
13 Options Menu
................................................................................................................................... 133
Global
.......................................................................................................................................................... 133
Customize the
..........................................................................................................................................................
Background Picture
135
Personal Preferences
.......................................................................................................................................................... 135
137
Section XIV Events Menu
1 Add or Edit...................................................................................................................................
Events
138
Round 1 - Prelims
..........................................................................................................................................................
or Timed Finals Setup
139
Declare .........................................................................................................................................................
2 to a Lane
141
Round 2 or Round
..........................................................................................................................................................
3 - Finals Setup
141
Other Event ..........................................................................................................................................................
Setup Details
142
Setup Multi-Age
.........................................................................................................................................................
Groups
143
2 Delete an Event
................................................................................................................................... 146
3 Combined Events
...................................................................................................................................
Setup
146
Add or Edit Combined
..........................................................................................................................................................
Events
147
Delete a Combined
..........................................................................................................................................................
Event
148
Add Sub-Events
..........................................................................................................................................................
to a Combined Event
149
4 Sessions
................................................................................................................................... 150
Add or Edit Sessions
.......................................................................................................................................................... 151
Delete a Session
.......................................................................................................................................................... 153
Create a Session
..........................................................................................................................................................
Schedule
153
3
Copyright©Sports-Tek Software
Contents
MEET MANAGER for Swimming
Change Results
..........................................................................................................................................................
Course
155
5 Event Comments
...................................................................................................................................
/ Sponsors
156
6 Re-Number...................................................................................................................................
Events
156
7 Clear Indicators
................................................................................................................................... 157
8 Setup and Use
...................................................................................................................................
Records
158
9 Setup and Use
...................................................................................................................................
Time Standards
161
Custom Qualifying
..........................................................................................................................................................
Times
164
167
Section XV Athletes Menu
1 Athlete Menu
...................................................................................................................................
Shortcut Keys
168
2 Add or Edit ...................................................................................................................................
Athletes
168
3 Delete an Athlete
................................................................................................................................... 170
4 Add or Edit ...................................................................................................................................
Entries
170
5 Delete an Entry
................................................................................................................................... 172
6 Athlete Contact
...................................................................................................................................
Information
173
7 Competitor ...................................................................................................................................
Numbers
173
8 Declare Foreign
...................................................................................................................................
Athletes
174
9 Declare an Exhibition
...................................................................................................................................
Swim (Individual or Relay)
175
10 Declare Unattached
...................................................................................................................................
Athletes
175
11 Declare Athlete
...................................................................................................................................
Entry as 6th Event for a Masters Meet
175
12 Declare "No...................................................................................................................................
Proof of Time" for an Entry
175
13 Automatically
...................................................................................................................................
Age-Up Athletes
176
177
Section XVI Relays Menu
1 Add a Relay................................................................................................................................... 177
2 Delete a Relay
................................................................................................................................... 178
3 Enter Relay...................................................................................................................................
Names
178
180
Section XVII Teams / Schools Menu
1 Add or Edit...................................................................................................................................
a Team
180
2 Delete a Team
................................................................................................................................... 182
3 Enter Contact
...................................................................................................................................
Names for a Team
182
184
Section XVIII Seeding Menu
1 Seeding Basics
...................................................................................................................................
and Tips
185
2 Seeding Process
................................................................................................................................... 186
3 Preview/Adjust
...................................................................................................................................
Seeding
187
4 Scratch Pad................................................................................................................................... 189
5 Scratch Back
................................................................................................................................... 191
6 Scratch Forward
................................................................................................................................... 192
7 Copy Entries
................................................................................................................................... 192
4
Copyright©Sports-Tek Software
Contents
MEET MANAGER for Swimming
8 Combine Entries
...................................................................................................................................
Between Two Events
193
9 Consolidate...................................................................................................................................
Meet
194
10 Seeding How
...................................................................................................................................
To's
195
Combine Heats
.......................................................................................................................................................... 195
Converting Entry
..........................................................................................................................................................
Times
195
Deck Seed an
..........................................................................................................................................................
Entry (Individual or Relay)
196
How to Manually
..........................................................................................................................................................
Seed an Event
197
Scratch an Athlete
..........................................................................................................................................................
or Relay from an Event
197
Seed "2 to a..........................................................................................................................................................
Lane"
198
Seed Exhibition
..........................................................................................................................................................
Athletes Last
198
Seed Non-Conforming
..........................................................................................................................................................
Entry Times Last
198
199
Section XIX Run the Meet Menu
1 About the Run
...................................................................................................................................
the Meet Screen
199
Event List Window
.......................................................................................................................................................... 200
Records Window
.......................................................................................................................................................... 200
Splits Window
.......................................................................................................................................................... 201
Team Scores..........................................................................................................................................................
Window
201
Heat Window
.......................................................................................................................................................... 202
Run the Meet
..........................................................................................................................................................
Menu Bar
204
Run Screen ..........................................................................................................................................................
Options Bar
206
Session .........................................................................................................................................................
F7 Selection
206
Refresh .........................................................................................................................................................
Ctrl-D Selection
207
Splits F9.........................................................................................................................................................
Selection
207
Relay Names
.........................................................................................................................................................
Ctrl-R Selection
208
Adjust F8
.........................................................................................................................................................
Selection
209
Awards Ctrl-A
.........................................................................................................................................................
Selection
209
Restore .........................................................................................................................................................
Pads Ctrl-P Selection
210
Calculate.........................................................................................................................................................
Time Adjustments Ctrl-K Selection
210
Lane Malfunction
.........................................................................................................................................
- Adjusting Pad Times
210
Heat Malfunction
......................................................................................................................................... 212
Using Dolphin Backup
.........................................................................................................................................
Times
214
JD Ctrl-J.........................................................................................................................................................
Selection
214
UnSeeded
.........................................................................................................................................................
Ctrl-U Selection
216
Race # F2
.........................................................................................................................................................
and Get Times F3 Selection
218
List Ctrl-L
.........................................................................................................................................................
and Score Ctrl-S Selection
219
Re-Rank.........................................................................................................................................................
and Re-Score Selection
220
Previous.........................................................................................................................................................
Event Ctrl-F4 and Next Event Ctrl-F5 Selection
220
Run Menu Shortcut
..........................................................................................................................................................
Keys
220
2 Enter Results
...................................................................................................................................
for the Meet
221
Add an Additional
..........................................................................................................................................................
Heat
222
Add Late Entries
.......................................................................................................................................................... 222
Enter Multiple
..........................................................................................................................................................
Watch Times
222
Enter Results
..........................................................................................................................................................
by Lane
223
Setup a Swimoff
.......................................................................................................................................................... 224
3 Re-Score Events
................................................................................................................................... 225
4 Combine Results
................................................................................................................................... 225
5 Run Menu Preferences
................................................................................................................................... 226
Award Labels
..........................................................................................................................................................
Preferences
226
Backup Times
..........................................................................................................................................................
Preferences
228
Results for List
..........................................................................................................................................................
and Score Preferences
229
5
Copyright©Sports-Tek Software
Contents
MEET MANAGER for Swimming
Run Screen ..........................................................................................................................................................
Columns
229
Backup Times
.........................................................................................................................................................
Column Preferences
230
Reaction.........................................................................................................................................................
Times and DQ Codes Column Preferences
230
Team Scores..........................................................................................................................................................
on Run Menu Preferences
231
Web Real-Time
..........................................................................................................................................................
Preferences
232
6 How To Run...................................................................................................................................
Meets
233
Run an A/B/C
..........................................................................................................................................................
Type Meet
234
Run a BCSSA
..........................................................................................................................................................
Meet
235
BCSSA Meet
.........................................................................................................................................................
Setup
235
BCSSA Divisions
......................................................................................................................................................... 236
Run a Championship
..........................................................................................................................................................
Meet
237
Run a Combined
..........................................................................................................................................................
Event Such as a Pentathlon Meet
238
Run a Disability
..........................................................................................................................................................
Meet
239
Run a Double
..........................................................................................................................................................
Dual Meet
239
Run a Dual Meet
.......................................................................................................................................................... 240
Run an IMX ..........................................................................................................................................................
Meet
240
Run an Inter..........................................................................................................................................................
Squad Meet
241
Run a Flighted
..........................................................................................................................................................
Meet
242
Run a Masters
..........................................................................................................................................................
Meet
242
Run a Meet using
..........................................................................................................................................................
a Network
243
Run a Multi-Age
..........................................................................................................................................................
Super Final
245
Run an Open..........................................................................................................................................................
Water Meet From the Run Menu
245
Run an Open..........................................................................................................................................................
Water Meet Using the OW Module
246
Run a Skins..........................................................................................................................................................
Event
249
Run a Timed..........................................................................................................................................................
Final Meet
249
Run Time Trials
.......................................................................................................................................................... 249
Run a Totally..........................................................................................................................................................
Deck Seeded Meet
250
Run a Varsity/JV
..........................................................................................................................................................
Meet
250
Run a Zone Meet
.......................................................................................................................................................... 250
7 Setup and Run
...................................................................................................................................
Diving
251
252
Section XX Reports Menu
1 Report Exports
................................................................................................................................... 253
2 Memorized ...................................................................................................................................
Reports
255
3 Administrative
...................................................................................................................................
Reports
256
4 Events Report
................................................................................................................................... 258
5 Teams Report
................................................................................................................................... 259
6 Athlete Rosters
...................................................................................................................................
Report
260
7 Session Report
................................................................................................................................... 262
8 Records Report
................................................................................................................................... 263
9 Time Standards
...................................................................................................................................
Report
264
10 Entry Lists ...................................................................................................................................
Report
264
11 Psych Sheets
...................................................................................................................................
Report
266
12 Meet Program
...................................................................................................................................
Report
268
13 Check-In Report
................................................................................................................................... 271
14 Lane/Timer ...................................................................................................................................
Sheets
273
15 Warm-Up Sheet
...................................................................................................................................
Report
275
6
Copyright©Sports-Tek Software
Contents
MEET MANAGER for Swimming
16 Results Report
................................................................................................................................... 276
Results Indicators
.......................................................................................................................................................... 280
17 Scores Report
................................................................................................................................... 281
Scores Report
..........................................................................................................................................................
- Standard Events
281
High Point
.........................................................................................................................................................
Award Labels
283
Scores Report
..........................................................................................................................................................
- Combined Events
284
Combined
.........................................................................................................................................................
Event Award Labels
285
Scores Report
..........................................................................................................................................................
- Open Water Teams
286
18 Meet Summary
...................................................................................................................................
Report
287
19 Exceptions ...................................................................................................................................
Report
289
20 Record / POP
...................................................................................................................................
Forms
293
21 Point Systems
...................................................................................................................................
Report
297
22 Results Conversions
................................................................................................................................... 298
23 Medal Count
...................................................................................................................................
Report
299
24 Export / Import
...................................................................................................................................
Files Report
300
301
Section XXI Labels Menu
1 Award Labels
................................................................................................................................... 301
2 Entry Cards...................................................................................................................................
or Labels
303
3 Mailing/Registration
...................................................................................................................................
Labels
307
Section XXII Check for Updates
310
Section XXIII Pro Option
312
1 Setup a Network
................................................................................................................................... 312
2 Logon the Network
................................................................................................................................... 313
3 Setup Network
...................................................................................................................................
Administration
315
4 Real-Time Results
...................................................................................................................................
Setup
317
Log-In Menu.......................................................................................................................................................... 317
Settings Menu
.......................................................................................................................................................... 319
How To Export
..........................................................................................................................................................
Real-Time Results During the Meet
321
322
Section XXIV Interfaces
1 Timing Console
...................................................................................................................................
Interfaces Overview
322
ALGE SWIM..........................................................................................................................................................
2000
323
ALGE Timy .......................................................................................................................................................... 325
BestBet Timer
.......................................................................................................................................................... 327
Colorado Time
..........................................................................................................................................................
Systems 4, 5, or 6
328
Download
.........................................................................................................................................................
Event Setups to the CTS 5 or CTS 6
329
Colorado Time
..........................................................................................................................................................
Systems Dolphin
330
Dolphin Setup
......................................................................................................................................................... 330
Dolphin Stand
.........................................................................................................................................................
Alone Operation
330
Dolphin Backup
.........................................................................................................................................................
Mode Operation
331
Daktronics OmniSport
..........................................................................................................................................................
1000
333
Daktronics OmniSport
..........................................................................................................................................................
2000
334
Download
.........................................................................................................................................................
Event Setups to the OmniSport 2000 Timing Console
335
Daktronics OmniSport
..........................................................................................................................................................
6000
336
7
Copyright©Sports-Tek Software
Contents
MEET MANAGER for Swimming
Download
.........................................................................................................................................................
Event Setups to the OmniSport 6000 Timing Console
337
Incomar Splash
..........................................................................................................................................................
1
338
IST Timer .......................................................................................................................................................... 338
Download
.........................................................................................................................................................
Event Setups to the IST
339
Kryotech Tec-Timer
.......................................................................................................................................................... 339
Omega OSM..........................................................................................................................................................
6 or ARES 21
341
Download
.........................................................................................................................................................
Event Setups to the ARES 21 Bi-Directional
342
Omega PowerTime
.......................................................................................................................................................... 342
Take-Your-Mark
.......................................................................................................................................................... 343
Download
.........................................................................................................................................................
Event Setups to Take Your Mark
344
2 Scoreboard...................................................................................................................................
Interfaces
344
Customizing..........................................................................................................................................................
the Scoreboard
346
How to Create
..........................................................................................................................................................
Start Lists for IST
346
ResulTV from
..........................................................................................................................................................
Lynx Developers
346
3 Open Water...................................................................................................................................
Button Timer Interfaces
347
Time Machine
.......................................................................................................................................................... 349
Sprint 8
.......................................................................................................................................................... 349
Chronomix 737
.......................................................................................................................................................... 350
Nielsen-Kellerman
..........................................................................................................................................................
Interval 2000XC Watch
350
Omega Power
..........................................................................................................................................................
Time
350
Ultrak L10 .......................................................................................................................................................... 350
FinishLynx File
..........................................................................................................................................................
Sharing
351
Daktronics OmniSport
..........................................................................................................................................................
2000
351
4 Cables
................................................................................................................................... 352
Serial Cables
.......................................................................................................................................................... 352
USB to Serial
..........................................................................................................................................................
Adaptor
353
354
Section XXV Appendix
1 Masters Record
...................................................................................................................................
File Format
355
2 Hy-Tek Products
................................................................................................................................... 356
Personal SWIM
..........................................................................................................................................................
MANAGER
356
Sports BUSINESS
..........................................................................................................................................................
MANAGER
356
TEAM MANAGER
.......................................................................................................................................................... 357
3 Sales Office................................................................................................................................... 358
4 Technical Support
................................................................................................................................... 358
360
Section XXVI Glossary of Terms
1 About
................................................................................................................................... 361
2 Advancers ................................................................................................................................... 361
3 Aggregate Time
................................................................................................................................... 361
4 Altitude Factor
................................................................................................................................... 361
5 Backup
................................................................................................................................... 361
6 British Age ...................................................................................................................................
Group Categories (BAGCATS)
361
7 Cancel
................................................................................................................................... 362
8 Combined Events
................................................................................................................................... 362
9 Conforming...................................................................................................................................
Time
363
10 Consoltation
................................................................................................................................... 363
8
Copyright©Sports-Tek Software
Contents
MEET MANAGER for Swimming
11 Contents Button
................................................................................................................................... 363
12 Conversion...................................................................................................................................
Factor
363
13 Converted Time
................................................................................................................................... 363
14 Course
................................................................................................................................... 363
15 Database ................................................................................................................................... 363
16 Deck Seeded
...................................................................................................................................
Meet
363
17 Default
................................................................................................................................... 363
18 Directory
................................................................................................................................... 363
19 DQ
................................................................................................................................... 364
20 Drag
................................................................................................................................... 364
21 Dual Meet ................................................................................................................................... 364
22 Event
................................................................................................................................... 364
23 Exhibition ................................................................................................................................... 364
24 FAQ's
................................................................................................................................... 364
25 Field
................................................................................................................................... 364
26 FINA
................................................................................................................................... 364
27 Finals
................................................................................................................................... 364
28 Heats
................................................................................................................................... 364
29 Interface Software
................................................................................................................................... 365
30 Judge's Decision
................................................................................................................................... 365
31 Lane
................................................................................................................................... 365
32 Leg
................................................................................................................................... 365
33 List Box
................................................................................................................................... 365
34 LSC
................................................................................................................................... 365
35 Masters
................................................................................................................................... 365
36 Meet Entry ................................................................................................................................... 365
37 Meet Program
................................................................................................................................... 365
38 Meet Sanction
................................................................................................................................... 365
39 Non-Conforming
...................................................................................................................................
Times
365
40 NZS
................................................................................................................................... 365
41 Prelim/Final...................................................................................................................................
Meet
366
42 Preliminary...................................................................................................................................
Heats
366
43 Race
................................................................................................................................... 366
44 Radio Button
................................................................................................................................... 366
45 Record
................................................................................................................................... 366
46 Relay Leg ................................................................................................................................... 366
47 Release Notes
................................................................................................................................... 366
48 Reportable ...................................................................................................................................
Times
366
49 Restore
................................................................................................................................... 366
9
Copyright©Sports-Tek Software
Contents
MEET MANAGER for Swimming
50 Sanction
................................................................................................................................... 366
51 Scoreboard...................................................................................................................................
Interface
366
52 Scratch
................................................................................................................................... 367
53 Scroll Bars ................................................................................................................................... 367
54 SDIF
................................................................................................................................... 367
55 Search Button
................................................................................................................................... 367
56 Seeding
................................................................................................................................... 367
57 Session
................................................................................................................................... 367
58 Split Time ................................................................................................................................... 367
59 Time Standard
...................................................................................................................................
or Cut
367
60 Timed Final...................................................................................................................................
Heats
367
61 Unattached................................................................................................................................... 367
62 USA Swimming
................................................................................................................................... 368
63 Venue
................................................................................................................................... 368
64 Version
................................................................................................................................... 368
65 Workout Manager
................................................................................................................................... 368
369
Index
10
Copyright©Sports-Tek Software
MEET MANAGER for Swimming
Introduction
HY-TEK Sports Software
Welcome to MEET MANAGER for Swimming, the finest in meet management software designed to help
you run the most successful swim meet possible. This Online Help section provides simple to follow
instructions on "How to" accomplish specific tasks that you will be performing during the meet process.
The #1 goal of the design team was to make MM easy to use and INTUITIVE!
New Features in MEET MANAGER 3.0
Click Here for a summary list of NEW and exciting features in MEET MANAGER 3.0
Installing MEET MANAGER
Click Here for specific information about how to install MEET MANAGER.
What To Do First
After you have installed MM, click Here to review an Overview of MEET MANAGER and How to Get
Started including how to convert your DOS-MM over to the new MM format.
Hardware Required to Run MM
MM is designed to run on any PC compatible computer with a minimum speed of 300 MHz and at least
64 MB of RAM. HY-TEK recommends using a 1 GHz PC or faster with 128 MB of RAM or more. If
connecting to a timer, a computer with a serial COM port is recommended. If the computer does not
have a serial COM port, you will need a USB to serial adaptor.
Software Required to Run MM
MM is a true Windows 32 bit application and runs on any of the following Operating Systems Microsoft's Windows NT, Windows 2000, Windows XP, Vista, or Windows 7.
How To Get Help
There are a number of ways you can get answers to your questions and/or problems.
MM Product Help
The fastest and easiest way to get answers to your questions is to use the MM Help included with your
product. The Help section provides simple to follow instructions on "How to" accomplish specific tasks
that you will be performing as you use MEET MANAGER to set up your meet, declare the entries, seed
your meet and then actually run your meet. Click on Help from the MM Main Menu Bar as shown
below.
When you click on Help, there will be a number of choices. Click on Contents to display the Help
Introduction screen.
11
Copyright©Sports-Tek Software
MEET MANAGER for Swimming
You can "minimize" this screen so that it will always be available on the your Windows Task bar and
you can "resize" and "position" it on your desktop as you wish.
Now click on Index and enter a key word or part of a key word as shown below.
For example, suppose you wish to find out detail information about entering an athlete into your
Database. Just enter "Athlete" as the key word and the MM Help will display all the topics about
"Athletes". Click on the appropriate topic and the MM Help will display that particular help screen that
discusses that topic.
12
Copyright©Sports-Tek Software
MEET MANAGER for Swimming
User Guide in Acrobat pdf Format
If you prefer to review the User Guide using Acrobat Reader instead of using the MM Help facility, you
can do that either by going online at http://www.hy-tekltd.com/downloads.html and downloading and
unzipping SwimMeetManager3-UserGuide.zip or by using Acrobat Reader on your PC and accessing
the Swimming MEET MANAGER pdf file that was loaded in your installation directory when you
installed MEET MANAGER. If you do not have a copy of Acrobat Reader, click Here to go to the
Acrobat Reader web site to download a FREE copy.
Start up your Acrobat reader and click on File then Open and specify c:\hysport\SwMM3\MEETMANAGER3.pdf. You can find topics either by using the Table of Contents at
the beginning of the User Guide, by using the Bookmark topics on the left panel of the screen, or by
clicking on the Find combo box down arrow on the Acrobat Reader tool bar.
Tech Support
Please click Here for information on how to contact Tech Support.
Sales Office
Please click Here for information on how to contact the Sales Office.
13
Copyright©Sports-Tek Software
MEET MANAGER for Swimming
License Agreement
Copyright
This software product is Copyrighted by HY-TEK Sports Software - All Rights
Reserved.
Copyright Information
U.S. copyright laws and international copyright treaties protect this software, and any documentation.
By using this software, you acknowledge that you have read, understood, and agree to be bound by all
of the provisions of this license.
License, Copy, and Use Restrictions
The licensed name is printed at the top left of all reports, is shown when you click on Help then About,
and is displayed at the bottom left of the Main Screen.
HY-TEK Sports Software offers four types of product Licenses for MEET MANAGER for Swimming.
1. Team, School, or Club License
MM is licensed to a "Sports Team or Club", not individuals or organizations. MM may be used for
meets hosted by, and directly participated in, by that sports team. For example, Central high
School may use its licensed copy of MM to run any dual or invitational high school meet hosted by
and participated in by Central High School - no age group, Masters, or college meets should be run
with a High School License.
2. Championship Meet License
The software can be licensed to run a SPECIFIC championship meet. For example, MM can be
licensed to the "City Summer League Championship", no matter where it is held or what team
hosts it.
3. Facility or Site License
MM may be used to run any type of meet (High School, College, Age Group, Masters, etc) that is
swum at this one facility. For example, if MM is licensed to the Lakeside Natatorium, it can be
used to run ANY meet that is swum at that facility. However, the site licensed software is not to be
distributed to entering teams to facilitate their data entry. The Facility License has an annual fee.
4. Organizational License
A Swim Organization may want to order MM and use it for the organization's Championship
Meets that they host and run - as long as there are no concurrently run meets and it is loaded on
only one computer. An example of this type of Organizational License option would be for a
Province or Association for their meets that they run each year. This License is not an option for
club hosted meets. The Organizational License can be used for a maximum of 4 meets a year and
has an annual fee.
HY-TEK Sports Software licenses (not sells) this single user software to the Swim Team or Swim
Organization that is printed on the top left of all reports and displayed on the product Logo/Introduction
Screen for use on multiple computers for which the software was designed. This means HY-TEK
Sports Software allows you to use the software on multiple computers at the same site for the same
meet. You may also use the software on multiple computers to facilitate data entry for a given meet.
This software cannot be used to run a meet unless the swim team to whom the software is
licensed is hosting the meet and is participating in the meet as that licensed team. Those
facilities or sites that have HY-TEK's Site License may use the software for any meet run at the facility
so licensed.
Specific Restrictions: The single user software may NOT be distributed to run separate meets at
separate sites for subsets of one organization. For example, if there are four district meets advancing
to a state championship, this requires five licenses unless one of the districts is also running the
championship meet in which case four licenses would be required. Except for Site Licenses, this
14
Copyright©Sports-Tek Software
MEET MANAGER for Swimming
software may not be used to run meets at a particular facility unless the school, club, or team to whom
the software is licensed is hosting and participating in the meet as that licensed team. For example, if
the software is licensed to a YMCA or USS club, that software cannot be used to run a College or High
School meet.
If the software is licensed to a League's Championship Meet, that software may NOT be used to run
the Dual Meets or Divisionals for that league.
You may make no more than one (1) additional copy of the original CD that the software is delivered on
for back-up purposes and you may install the software on a hard disk on your authorized computers as
a working copy.
You may not make any changes or modifications to the software, or delete any of the files contained in
the software, and you may not decompile, disassemble, or otherwise reverse engineer the software.
This software is not for sale, and you may not sublicense, rent, lease, donate, sell, loan, pledge,
transfer, or distribute on a temporary or permanent basis the original copy or back-up copies of the
software or the documentation to another user or company.
LIMITED WARRANTY
This product is warranted that the magnetic media that the software is recorded on and the
documentation provided with it are free from defects in materials and workmanship under normal use.
The software is warranted that the software itself will perform substantially in accordance with the
specifications set forth in this User Guide provided that the data itself is either keyed in using this
product's data entry screens, or imported from any other HY-TEK Sports Software product
database.
HY-TEK Sports Software will replace the installation CD that proves defective in materials or
workmanship, without additional charge, on an exchange basis within 30 days of having shipped the
CD. If a CD media problem is reported after this 30 day period, HY-TEK Sports Software will replace
the CD according to its standard Disk Replacement policy in which you would remit to HY-TEK Sports
Software the CD replacement costs of $10.00 plus the S&H costs. In the case of an error in the
documentation, HY-TEK Sports Software will correct errors in the Help section of the product without
charge and provide updates as required that reflect these Help section changes.
HY-TEK Sports Software will either replace or repair without additional charge any software that does
not perform in substantial accordance with the specifications of the documentation. This will be done
by your downloading the current update from the HY-TEK Sports Software web site at www.hytekltd.com, assuming you're on the current released version of the software. If you are not on the
current released version of the software, you may receive a corrected version by remitting the standard
HY-TEK Sports Software product update fee.
HY-TEK Sports Software does not warrant that the functions contained in the software will meet your
particular requirements or that the operation of the software will be uninterrupted or error free. The
warranty does not cover any media or documentation that has been subjected to damage or abuse by
you. The software warranty does not cover any copy of the software that has been altered or changed
in any way by you or others. HY-TEK Sports Software is not responsible for problems caused by
changes in the operating characteristics of the computer hardware or operating system which are
made after the delivery of the software.
Except as specifically provided herein, HY-TEK Sports Software makes no express or implied
warranties whatsoever and expressly disclaims the implied warranties of merchantability and fitness for
a particular purpose. These warranties shall be in effect two years from the time the original software
or product update is delivered.
Your Obligations Under the Warranties:
15
Copyright©Sports-Tek Software
MEET MANAGER for Swimming
During the warranty period, you must contact HY-TEK Sports Software customer service department
for an authorization to return any defective item to HY-TEK Sports Software. If HY-TEK Sports
Software's customer service representative is unable to correct your problem, you will be provided a
return authorization number and an address for returning the defective item for warranty service or
replacement. You must insure any defective item being returned since HY-TEK Sports Software
does not assume the risk of loss or damage while in transit.
LIMITATION OF LIABILITY
HY-TEK Sports Software shall not, in any event, be liable for special incidental, consequential,
indirect, or other similar damages, even if HY-TEK Sports Software or its distributor has been advised
of the possibility of such damages. In no event shall HY-TEK Sports Software's liability exceed the
licensee fees paid for the right to use the licensed software or $200.00, whichever is less.
16
Copyright©Sports-Tek Software
MEET MANAGER for Swimming
Install MEET MANAGER
There are two ways to install MEET MANAGER. You can install using a HY-TEK CD that you receive
in the mail or you can install electronically from the HY-TEK Sports Software web site using HY-TEK's
web delivery system. Select the appropriate topic below for complete information about installing MEET
MANAGER.
Installing MEET MANAGER from a CD
Installing MEET MANAGER using Web Delivery
How to Re-Install MEET MANAGER
How to Setup a Desktop Icon or Shortcut
How to Uninstall MEET MANAGER
Installing Users Under Administrator in XP SP2
Installing MEET MANAGER from a CD
Installing MEET MANAGER using the HY-TEK CD
You install MEET MANAGER just as you would any Windows product using Windows Installer. From
your Windows desktop, click on Start and then Run and key in the CD drive letter followed by :Setup.
For example if your CD is Disk Drive D, enter D:Setup.
NOTE: If you have the Windows AutoRun turned on, Windows will automatically read the CD and
begin the installation process and you will not have to type in D:Setup.
The HY-TEK MEET MANAGER Installation software will guide you through the installation process.
When asked for a directory/folder name to use, HY-TEK recommends that you use the default
installation folder/directory name of "Hy-Sport\SWMM3".
17
Copyright©Sports-Tek Software
MEET MANAGER for Swimming
After the Installation process is complete, you may be asked to restart Windows in order to register
some Windows System files. DO NOT remove the CD. Now click OK to restart Windows.
Read the License File From the CD
After Windows has completed its restart, re-insert the CD (if you have removed it) and cancel at the
first opportunity if it starts to install again. Click on the MEET MANAGER icon on your Windows
desktop. The first thing that MEET MANAGER will do the very first time it is started is to read the
License file from the CD. Once this is completed, the Main Menu will be displayed. Open an initial
database by clicking File / Open / New, type in a database name and click Open. You may remove the
CD and you will not need it again unless you need to re-install for some reason.
Installing MEET MANAGER using Web Delivery
When ordering HY-TEK's MEET MANAGER, you can elect to have Web Delivery of the software.
What this means is that you will download the setup.exe for installing MEET MANAGER from the HYTEK Sports Software web site. This is the same setup.exe that you would receive on a HY-TEK CD.
You will receive an Email that details the steps to accomplish the installation.
If your license name was Dolphin Swim Team for example, you would receive an Email delineating the
steps for the Web Delivery.
The Email would have a link that said click Here to download the required setup.exe. Then you would
do the following:
1. Upon clicking the link, you Save the exe to your DeskTop or other location where you can find it.
Note: Should you have trouble downloading the setup.exe, you can type the following into your
18
Copyright©Sports-Tek Software
MEET MANAGER for Swimming
browser: http://www.hy-tekltd.com/WebDelivery/SWMM3/setup.exe
2. After the setup.exe is downloaded, you Open the downloaded exe or double click the exe to start
installation.
3. After the program is installed, you start MEET MANAGER and the program will bring up a window
asking whether you are installing by CD or Web Delivery.
4. Select Web Delivery and another window will appear asking for a code.
5. In this example, the Email would tell you to enter this code: DolphinSwimTeam, and click OK.
The HY-TEK web site would be searched for your license and if found will download and install it. At
this point you would be ready to use MEET MANAGER.
Note: Should you have trouble connecting to the HY-TEK web site, you may need to turn off your
firewall.
After installation is complete, you can click Help / About at the top of the Main Menu to verify your
license and options.
19
Copyright©Sports-Tek Software
MEET MANAGER for Swimming
How to Re-Install MEET MANAGER
How to Re-Install MEET MANAGER
VERY IMPORTANT: If you receive a new MM CD or wish to re-install MEET MANAGER from
your original CD, you first need to Un-Install or Remove your MM 3.0 software. The easiest way to do
this is click on the Windows Start button then Control Panel then Add/Remove Programs. Find
MEET MANAGER 3.0 in the list and click on the Remove button. Or you can continue as described
below and choose Remove from the Program Maintenance screen.
After Windows has completed removing MM 3.0, place your MM 3.0 CD in your CD drive. From your
Windows desktop, click on Start and then Run and key in the CD drive letter and then "setup". For
example if your CD is Disk Drive D, enter D:Setup. Windows Installer will check to see if MEET
MANAGER is already installed on your computer. If it is, the following screen will be will be displayed.
Choose the Remove option to first remove MM 3.0 from your computer. After Windows has completed
removing MM 3.0, restart the installation process by going to your Windows desktop, click on Start and
then Run and key in the CD drive letter and then "setup". For example if your CD is Disk Drive D, enter
D:Setup.
NOTE: If you receive a 2nd CD with new options included that you ordered, those new options will
NOT be installed unless you first go through the Remove MM 3.0 process described above. Or you can
go to License Management and click Update License.
20
Copyright©Sports-Tek Software
MEET MANAGER for Swimming
How to Setup a Desktop Icon or Shortcut
How to Setup a Desktop Icon or Shortcut
When you install MEET MANAGER, the installation process automatically sets up an MM 3.0 icon on
your desktop as a shortcut. But if the installation process fails to set up an icon due to various
Windows settings, you may want to set up a desktop icon shortcut yourself. To set up an MM 3.0 icon
on your desktop, start Windows Explorer, pick the installation directory (the default is c:\HySport\SWMM3), find the swmm.exe file and right mouse click on it and choose Send To and Desktop
(Create Shortcut) as shown below. Then you can right mouse click on the desktop icon just created
and choose Rename to name the shortcut anything you wish.
How to Uninstall MEET MANAGER
How to Uninstall MEET MANAGER
To Uninstall MEET MANAGER, please use the standard Windows Add or Remove Programs
feature included with your Microsoft Windows product. For most Windows releases, click on Start,
Control Panel, and then click on Add or Remove Programs. Select MEET MANAGER 3.0 from the
list and click Remove.
21
Copyright©Sports-Tek Software
MEET MANAGER for Swimming
How to Give Permissions to Users
If you are the Administrator installing Users in XP SP2, you must give users permissions to use certain
folders on the hard drive, otherwise the users will log-in and get permission denied errors when trying
to run MM. Log-in as Administrator and using Windows Explorer or My Computer, right click on each
folder listed below, click Security and give full control of the folder to any user on the users list.
MM requires access to the following folders:
· hy-sport\SwMM3 (this is where MM is normally installed)
· swmeets3 (and any other folder used for the database)
· realtime (used by real time results)
22
Copyright©Sports-Tek Software
MEET MANAGER for Swimming
System Requirements
Computer Hardware:
Minimum:
Any 300 MHz Pentium, Celeron, or AMD class computer or faster with 64 MB
RAM.
Recommended:
Any 1 GHz Pentium, Celeron, or AMD class computer or faster with 128 MB RAM.
Any Macintosh computer that will run Microsoft's Windows NT, Windows 2000,
Windows XP, or Windows Vista using Hardware or Software Emulation. Click on
Running HY-TEK on Your Mac for detail information.
Note: If you are running the Pro Option with the Network feature, then you will
need a Network card in each computer as well as appropriate Fast Ethernet
cabling among the computers being used. Or, you can setup a wireless router
with the appropriate wireless card in each computer being used. HY-TEK
recommends using the fastest computer for the computer that contains the MM
Database.
Software:
Microsoft's Windows NT, Windows 2000, Windows XP, Vista, or Windows 7.
Printer:
Any Windows supported printer. Dot-matrix printers are not recommended for
reports.
23
Copyright©Sports-Tek Software
MEET MANAGER for Swimming
New in MEET MANAGER 3.0
This New Features List is based on MEET MANAGER 2.0Hm which is the last planned version of the
2.0 release series.
Major Features
More Powerful Software Engine
· MM 3.0 has upgraded its internal tools with more powerful grids, better report features, and an
upgrade from Access 97 to Access 2003 for the database structure.
Grid Tools
· Grids in the Athlete Menu, Events Menu, and the Teams Menu can be exported to HTML or printed
quickly with one click to save the HTML file or view the grid report. The columns can be moved
around to customize the export or printing of the grid.
Reports Tools
·
·
·
·
MM 3.0 uses Crystal Reports version 11, whereas MM 2.0 used Crystal Reports version 7.
With a couple clicks, any and all reports can be exported to pdf for perfect replication of the report.
Exports to MS Word and MS Excel are to much more current versions of those products.
Email any report directly from the Print Preview screen.
Database Conversion
· If MM 3.0 attempts to open an MM 2.0 database, the database will be automatically converted to the
MM 3.0 structure.
· MM 2.0 versions will not be able to open an MM 3.0 database. The work around for MM 2.0 users is
to install the Free MM 3.0 Demo and use the Demo to view the data, create reports, and create
needed export files. The HY-TEK Sports Software Demo for MM 3.0 can be downloaded from the
HY-TEK web site at: http://www.hy-tekltd.com/downloads.html
Multi-Lingual
· MM 3.0 contains Multi-Lingual support for English, Spanish, German, and French. By choosing one
of these languages from the Setup Menu, every word and phrase in MM's windows will be translated.
All reports will also be translated.
New Features
General
· The Main Menu screen has new Shortcut Icons for Backing Up the database, opening Sessions,
opening Records, opening Time Standards, Importing Entries, Exporting Results for TM, opening
Memorized Reports, and linking to the MM eLessons web site.
· The File Menu has an option to Disable/Enable the Login Menu for those with the Network option
opening in Single User mode. This makes it faster to get to the Main screen.
· License Management has been increased from five licenses to 12 licenses.
· Standard Lane Preferences have been expanded from 10 lanes to 12 lanes for those who may run a
12 lane meet.
Interfaces
· The CTS 6 Interface has been updated to handle Getting Times for a 11 or 12 lane meet. Previously
there was a 10 lane limit per heat.
· Interfaces for nine Button Timing systems have been added for the new Open Water Module
discussed further down this page.
24
Copyright©Sports-Tek Software
MEET MANAGER for Swimming
Import / Export
· When importing entries, there is an option to delete all entries for a team before importing. This
would be only be used in cases where the new import contains all of the entries for the team. This
solves the issue where some entries have been deleted in the new import.
· When importing entries, there is an option to import relays only. This is handy when just wanting to
get the relay names in without the chance of altering the individual entries.
· When exporting Generic Data in Access, Records and Time Standards can be included.
· Rosters in .tcl format from HY-TEK's Track & Field products can be imported into Swimming MM
3.0. This reduces keying in the same basic information twice for athletes in both sports.
· When exporting results to TM, the date of each swim for each round is included in the export file.
· When exporting Proof of Times Recon for SWIMS, there is an option to only export entries with an
asterisk (an * usually means the time has not been proven).
· When importing Records or Time Standards, those record and time standard files can be zipped
and MM will unzip them for you.
· When exporting Advancers, there are three choices for the best time to be included. Newly added is
the choice to use the original entry time if it is faster than any swum times in the meet.
· For Masters meet, masters records can be exported in the masters format (.lcm, .scm, .scy) as
opposed to only the HY-TEK format (.rec).
· For Disability Meets, results can be exported in the International Paralympic Committee (IPC)
format.
· When exporting Meet Events to TEAM MANAGER, a new option is to select whether to include
standard events, time trial events, and/or swim-off events.
· You can import British Swimming's OnLine Entry file.
Purge Choices
· A new selection to Scratch a Team's Entries from one or more sessions has been added to the
Purge choices. This is very useful when a team withdraws from a meet before the meet is over such
as after the prelim morning session on the last day.
Scoring
· When scoring a Combined Event that is prelim/final, there is an option to use the best time from
either round, not just finals.
· In the Combined Event scoring spreadsheet, zero points are given for an exhibition swim and an X is
placed next to time.
· In a flighted meet, there is an option to exclude DQ's and Exhibition from the fastest group when
using swum time so that the division into flights is based on valid swims.
· In a flighted meet, there is an option to allow 2, 3, or 4 flight separations instead of just 2.
· In the Scores Report Menu, there is an option for a Quality Club Award where total team points are
divided by number of athletes on the team. There is a minimum of 4 athletes on the team to be
included in this scoring. This allows for more parity between small teams and large teams.
· When scoring into prelims, the rankings are dynamically revised if there are scratches from finals
and/or there is a limit to how many from one team can score. For example, if 16 score and only 8
swim in finals, the 9th through 16 points are first allocated to entries scratched from finals and then
the remainder of points are assigned by order of finish in prelims for those entries that do not exceed
the maximum scorers per team (if set up with a maximum).
· An option has been added for Individual High Point to show in spreadsheet form the events used to
calculate the total along with the points for each.
· When creating the BAGCATS report for High Point, there also is the option to show the points
allocated in each BAGCAT category.
Athlete Menu
· The grid layouts can be saved or restored for the Athletes grid based on customization of columns.
· When editing, there is a Next and Previous button in the edit window to allow quicker movement to
the next or previous athlete.
25
Copyright©Sports-Tek Software
MEET MANAGER for Swimming
· Next to each event in the entries list at the bottom of the Athlete Menu, there is a colored status
column indicating whether the event is Un-Seeded, Seeded, Done or Scored.
· In the Athlete Contact section, an emergency contact and emergency phone has been added.
· For Disability meets, the S, SB, and SM code 1-13 can be assigned to each athlete for each of the
three event types. In addition, if the meet is Division by Entry, the disability code will be automatically
entered as entry events are selected in the Athlete Menu. This saves time from having to select the
disability code from the combo box next to each entry.
· A new competitor numbering menu is added which provides much flexibility in renumbering the
athletes. This may be especially helpful for Open Water events.
Events Menu
· The grid layouts can be saved or restored for the Events grid based on customization of columns.
· When editing, there is a Next and Previous button in the edit window to allow quicker movement to
the next or previous event.
· Relay events can be setup for not just 4 relay swimmers, but now can be setup for 2 to 8 swimmers.
This is useful where you want to do some creative relays such as 8x50 or 8x100 with 8 swimmers on
each relay. The results will contain the splits for each leg even if the relay is a 5x100 relay with five
swimmers.
· When an event is setup with Multi-Age groups, there is a new option for the seeding to list the heats
from oldest to youngest age groups rather than just youngest to oldest.
· If an event is setup as Timed Finals with Multi-Age groups, there is a new second set of MultiAge Groups you can setup for results only. These extra age groups can be any set of ages, but
cannot duplicate any age ranges setup in the primary Multi-Age Group settings. For example, if the
primary age ranges are 13-14, 15-16, and 17 & over, you can create extra results for Open, 13-16,
or 15 & over. These extra results will not contain team point scores since the team points are
associated with the primary age ranges.
· For Prelim/Final events, there is a new option called Multi-Age Super Finals. If the event is setup
with Multi-Age groups for say 13-14, 15-16, and 17 & over, the Super Final would be the fastest
swimmers from all age groups with the other age groups having the top remaining finalists seeded
together in their respective age groups. There is also an option to eliminate the oldest age group. In
this example, the 17 & over final would be eliminated and there would be a Super Final heat, a 13-14
heat and a 15-16 heat.
· Each round of each event can have its own setting for whether pads are at both ends or not. This
means the preliminaries of an event could be pads at the finish end only and the finals could have
pads at both ends.
Sessions Menu
· When double clicking an event to move it into a session, if the event and round is already in another
session, you have the option to move it instead of deleting it first from the other session and coming
back to move into the new one.
Teams Menu
· The grid layouts can be saved or restored for the Teams grid based on customization of columns.
· The coaches information has been expanded to allow for an unlimited number of coaches, trainers,
chaperones, etc. Each has data fields for title, phone, cell phone, Email, and 4 certifications with
expiration dates.
· The E-mail addresses for the coaches can be exported to a file which Outlook can import.
· To go along with the existing Alternate Team Abbreviation, a 16 character Alternate Team Name
has been added.
Relays Menu
· Next to each event in the entries list at the bottom of the Athlete Menu, there is a colored status
column indicating whether the event is Un-Seeded, Seeded, Done or Scored.
· When re-entering the Relay Menu, the last event and last relay selected is highlighted.
26
Copyright©Sports-Tek Software
MEET MANAGER for Swimming
Seeding Menu
· When seeding the second or third round of an event, you are alerted when there is a tie for any slot
requiring a swim-off. Previously, there was only an alert for the last place tie. As an example, in an 8
lane pool with A-B-C finals, there is now a warning if there is a tie for 8th, 16th, 24th, and 25th (the
alternate). A warning is given, but you can continue with the seeding and the ties will be randomly
broken. However, all entries for last place will be seeded and this will cause an extra heat for finals.
· For timed final events where the events are being swum in two sessions (such as the 800 / 1500,
and relays), there is a new feature in the ScratchPad to allow for marking athletes as swimming
Early and these athletes will be seeded in the first session rather than the later session.
· When seeding a meet that has limitations on the number of entries from one team that can swim in
finals and/or has limitations on the upper age for swimming in the C-Final, the seeding now
accurately takes into account these limitations when there have been scratches from finals.
· There is an additional option to Hide events with "0 Entries".
Run Menu
· By pressing Ctrl-I you can toggle back and forth between showing the upper right grid with the
Records for the event or the splits for the heat. The display in this new Splits window can be toggled
back and forth between cumulative and subtracted splits. There is also a Print button above the
Splits window that will print the splits.
· Right clicking on an athlete name brings up a window with basic information about the athlete and
includes a list of all entries and relays for the athlete. The status and results for each entry are also
displayed.
· The even lanes are colored for easier lining up an athlete name with the time.
· Relay splits are handled for relays with from 2 to 8 swimmers. Previously only splits for 4 person
relays were allowed. However, the splits and relay names for relays that do not use the standard of 4
swimmers will not be exported to TEAM MANAGER.
· There is a new option in Run Screen Preferences to have the cursor default to the first backup cell
instead of the finals time cell when entering watch times and no timing console is being used.
Open Water
· MM 3.0 contains a new Open Water Module accessed from the Run Menu. The OW Module has a
Times Menu, a Ranks Menu, a Match Ranks and Times Menu, and a Merge Chutes Menu.
Times can be downloaded from eight different Button Timing vendors within the Times Menu. Order
of finish can be typed into the Ranks Menu using competitor numbers or can be imported by reading
bar codes from a bar code reader. In order to use any of the nine button timers or to read in bar
codes, the new Button Timer Interface Option must be purchased. After the separate Times and
Ranks lists are complete, the two lists can be matched using the Match Ranks and Times Menu to
get the results. If there are more than one finish lines (different chutes), you can merge these two or
more sets of chutes into one list. If there are wave offsets and the waves have been seeded, the
times and ranks can be updated from the OW Module into the Run Menu so that the wave offset
times can be used to adjust the times.
Real-Time Results to the Web
· There is new Refresh button added to each result page for users whose web browsers do not
automatically refresh.
Time Standards
· Each Time Standard Tag can have a 20 character description which will be printed on Meet Program
and Results reports.
Records
· When updating records in the Records Menu, if there is a tie, the tied record will be shown in the list
of record breakers in pink instead of yellow. When you select to update the records, the updating will
create a second identical tag name for the record and add the record to this new tag, thus allowing
you to store both record holders.
27
Copyright©Sports-Tek Software
MEET MANAGER for Swimming
· If there are records that are LSC records, you can denote the LSC for the record tag and only
athletes or teams in that LSC will be eligible to be flagged as breaking that record.
Logos
· Logos can be inserted in the footer of the Meet Program report, the Psych Sheet report, and Results
reports. You can include from 1 to 5 logos at the bottom of the reports by going to the Footer Logos
tab of Report Preferences. In the logo setup you can adjust the height of the space allocated for the
logos from 5/32 inches to 1.5 inches. The logos selected will be automatically equally spaced in the
footer and any image that is too large will automatically be re-sized to fit in the space allocated. Any
re-sizing will maintain the aspect ratio.
Report Features
· The Entries Report has an option to create a Split Sheet report for each team sorted by age group
and with columns for recording splits for each event.
· The Entries Report lists the individual and relay events in order by event number. In the prior
version, individual events were listed first, followed by relays.
· The Results Report has an option to include splits for prior rounds when including results for prior
rounds.
· A new report called Results Conversions has been added which allows you to print the actual results
with the conversion to the other two courses using either MM's built-in system, the High School
conversion system, the NCAA conversion system, or the UK's conversion system.
· The Point Systems Report has an option to limit the athletes listed to an age range.
· The Check-in Sheet Report has an option to exclude athlete ages on the report.
· The Roster Report has two new reports for athlete addresses with phones only or emergency
contact only.
· The Meet Summary Report has been improved to include splits for all rounds, reaction times for all
rounds, and relays in the individual section.
· The Meet Summary Detailed Report shows the relay results for each swimmer along with the
individual entries and results.
· The Meet Summary Report has a new option to exclude seed times.
· The Meet Program Report now accurately lists the alternates when the meet has limitations on the
number of entries from one team that can swim in finals and/or has limitations on the upper age for
swimming in the C-Final. For example, if there is a limitation of 18 and under eligible for the C-Final,
then only 18 and under athletes will be listed as alternates.
· The Meet Program Report for relays can be set to alternate relays by gender with the two fastest
women's heats first, followed by the two fastest men's heats, and then followed by women's and
men's heats alternating one heat at a time. The setting for this is in the Report Preferences Menu.
· When two multi-age group events are set to alternate female and male heats in finals of a
prelim/final event, the Meet Program Report will alternate each age group and gender. For example,
if a pair of events have 11-12 and 13-14 in them, the order for finals will be 11-12 girls, 11-12 boys,
13-14 girls, 13-14 boys.
· The Entry Fee report can be created one team per page.
· The Team Report menu has a choice to show the coaches names, cell, email and certifications.
· The Athlete Roster Report has two new address reports with phones only or emergency contact
only.
· The Session Report has a new option to list the date and time for when Get Times was used for
each heat. If the Timer is a CTS6 or CTS5, the data for each heat will include the date and time the
race was started in the Timer along with the date and time Get Times in the Run Menu was clicked.
For any other timer, the only data that will be included for each heat is the date and time Get Times
in the Run Menu was clicked.
· The Session Report has a new option to include a list of teams in a particular session with the entry
and athlete count for each team. Teams with no athletes in a given session are not listed. The
athlete count includes relay swimmers if they are listed with a relay.
Other Features
28
Copyright©Sports-Tek Software
MEET MANAGER for Swimming
· In the Run Menu for events with more than one round, the JD button can be used to JD heat places
before all heats are done.
· The settings for customizing the names sent to alpha-numeric scoreboards is saved with the
computer rather than the database. This enables you to keep the scoreboard settings from meet to
meet.
· When selecting Repair Database, the option to perform a recommended backup first is provided
instead of needing to exit and go to the Backup menu.
· Division abbreviations have been expanded from 2 characters to 3 mainly for disability codes.
· If results are already entered and you change the course in the meet setup without having setup any
sessions, you will get a question about whether you want to change the course for the existing
results.
· When using the Generic Serial or the Colorado Scoreboard Interface and pressing Ctrl-F9 from the
Run menu, you now have the choice to export combined team scores instead of the team score
matching the gender of the event.
29
Copyright©Sports-Tek Software
MEET MANAGER for Swimming
Evaluation Edition
If this MEET MANAGER product has been provided to you as an Evaluation Edition (or Demo), all
the functional capabilities of the production edition are available to you as follows:
You may restore any completed database and view the contents of those databases and view all
reports. This can be very useful for Administrative officials to check the meet setup before the meet
and to review the meet after the meet. However, editing data is limited to the constraints listed below. If
there are more than 25 athletes in the database, you may edit the athlete information pertaining to the
athletes, but not the entries.
If starting a new database, you are limited to the following constraints:
· You may enter up to 6 events numbered 1 through 6.
· You may enter up to 25 athletes in events numbered 1 through 6.
· You may enter any number of teams.
· You may enter up to 8 relays total if the event number is 1 through 6.
· You may enter up to 25 meet entries or 8 relays with seed times in events 1 through 6.
· You may enter any number of combined events such as the Pentathlon.
· You may connect to your Timing Console and retrieve meet results for events 1 and 2 as well as
download event setups to the timer.
· Reports may be previewed but not printed.
· Exports of Results to TM and SWIMS, exports of Advancers, and exports of Generic Data in MS
Access are limited to events numbered 1 through 6.
Please click Here for information about how to install MEET MANAGER. Set up a small meet and
review all the reports available to you from HY-TEK's MEET MANAGER software. Your Evaluation
Edition includes all the MEET MANAGER basic product options, so that you can customize your order
to meet your particular needs.
30
Copyright©Sports-Tek Software
MEET MANAGER for Swimming
Upgrading from MM 2.0 to MM 3.0
MM 3.0 will be able to open any 2.0 database and automatically convert it as soon as it is opened.
· However, MM 2.0 versions will not be able to open an MM 3.0 database. The work around for MM
2.0 users is to install the Free MM 3.0 Demo and use the Demo to view the data, create reports, and
create needed export files. The HY-TEK Sports Software Demo for MM 3.0 can be downloaded from
the HY-TEK web site at: http://www.hy-tekltd.com/downloads.html
31
Copyright©Sports-Tek Software
MEET MANAGER for Swimming
MM Product Options
MEET MANAGER for Swimming (MM) is available in a Start-Up version and you may add up to two
standard options and three modules to meet your specific needs. The two standard options may be
purchased to support different types of swim meets. For example, you may not need any options if you
are running High School or College meets but you may want to add the Ribbon and Entry Label options
if you are running Age Group meets. Mailing and Registration labels are now included in the Start-Up.
Standard Options
Award Label Option
This option allows for the printing of an award label for various kinds of criteria - each of the top
finishers in an event, Standard breakers, top heat finishers, etc.
Entry Card/Label Option
This option allows for the printing of an Entry card or label that contains each swimmer's name, age,
sex, what event they are entered in, their entry time, etc. MM offers a wide range of card and label
formats from which to choose.
Modules
Timing Console Interface
The Timing Console INTERFACE software allows MM to connect directly to popular timing consoles
including the Colorado Time System CTS 4000, 5000, and 6000; Daktronics Omnisport 1000, 6000,
and 2000; Kyrotech Tec-Timer; IST; Omega OSM 6, Ares 21, and PowerTime; Incomar Splash 1;
BestBET Timing; the ALGE SWIM 2000; and CTS Dolphin Wireless Watches. Connect your PC or
Mac (using Windows hardware or software emulation) running MEET MANAGER to the timing console
with a standard serial cable available at most computer supply stores. With one mouse click, import
times including splits as well as download events right to the Timing Console - it's easy and fast and no
KEYING ERRORS!
Dolphin Backup Mode
The CTS Dolphin is a wireless stopwatch timing system available for 6 to 10 lanes with up to three
watches per lane. The CTS Dolphin hardware interfaces directly to MEET MANAGER and replaces the
standard stop watches used to backup the pad and push button times from a timing console.
Button Finish Interface
Designed for Open Water events, this option allows the after race downloading of times from the Time
Machine, the Time Tech Sprint 8, the Chronomix 737, the Nielsen-Kellerman Interval 2000XC Watch,
the Omega Power Time, and the Ultrak L10. In addition, FinishLynx result .lif files can be imported if a
FinishLynx photo finish system is used.
Alphanumeric Scoreboard Interface
The Scoreboard INTERFACE connects the HY-TEK MEET MANAGER for Swimming computer
directly to most alphanumeric scoreboard systems. MM sends both Start Lists (Swimmers' names) and
Results right to the Scoreboard display. Connect the HY-TEK MM computer directly to the Scoreboard
computer with a standard serial cable available at most computer supply stores.
Network Pro
The Pro Option of HY-TEK's MEET MANAGER for Swimming includes two very powerful features:
Multi-User Network Feature
Whether you are running your meet in one pool or you are running a double-ended meet, this feature
32
Copyright©Sports-Tek Software
MEET MANAGER for Swimming
will clearly change the way you run your meets. If you are running a double-ended meet, you can set
up two computers and share the same Database - one computer running the boys events and one
computer running the girls events Or you can even run the even heats on one computer and the odd
heats on the other. And at the same time, you can have the Clerk of Course handling Check-In,
Scratches, and Seeding - all information being shared from a common Database.
Real-Time Results Upload to the Web
MM Pro can upload a complete results web page with the event list indexed into each event's result
without the web master writing a single line of HTML code. In addition, as the meet progresses, MM
Pro can upload the results to the web site for the just completed Event or the just completed Heat with
one key stroke. This is a great feature for parents, swimmers, and coaches to actually watch the meet
live as it happens.
To find out what options are included in your MM release, click on Help / About and MM will display
the options you currently have configured. If you need additional options, just call or Email the HY-TEK
Sales Office or order Online at www.hy-tekltd.com/store.
33
Copyright©Sports-Tek Software
MEET MANAGER for Swimming
eLessons
MEET MANAGER for Swimming provides an extensive series of eLessons that are designed to
provide Online Training for not only new users of MM, but also customers that have upgraded from
MM 2.0 to MM 3.0.
Each eLesson typically lasts 20-30 minutes and is designed for a specific feature or task using MEET
MANAGER.
To access MM eLessons Online, be sure your computer is connected to the Internet and from the Main
Menu, click on the eLesson icon
.
You will be routed to our eLesson web site for MM. Pick any one of the eLessons that interest you and
you are on your way with our web based training tool.
34
Copyright©Sports-Tek Software
MEET MANAGER for Swimming
FAQ - Frequently Asked Questions
A. Compatibility with MM Version 2.0
1. I am sending MM 3.0 Backups to users with MM 2.0 and they are restoring the backup and
are unable to open the database . Why is this happening ?
MM 2.0 versions will not be able to open an MM 3.0 database. The work around for MM 2.0
users is to install the Free MM 3.0 Demo and use the Demo to view the data, create reports, and
create needed export files. The HY-TEK Sports Software Demo for MM 3.0 can be downloaded
from the HY-TEK web site at: http://www.hy-tekltd.com/downloads.html. Note: MM 2.0 users can
contact HY-TEK sales at 866-456-5111 from 9 AM to 5 PM Eastern about upgrading to MM 3.0.
B. Installing
1. My Admin person at my school installed MM for me. I am logged in as a non-Admin user
and when I run MM, it gives me errors about not having permission to open certain files.
What can I do ?
This means you do not have rights to alter files in certain folders that MM needs. The Admin user
must give rights to you as a user to alter files in c:\hy-sport and all folders under c:\hy-sport. The
Admin must also give you rights to the database folder c:\swmeets and also c:\realtime and if
doing real-time results to the web. To give you rights, the Admin must log on, use Windows
Explorer and right click on the folders mentioned and give the appropriate user rights to these
folders.
C. General
1. How do I get MEET MANAGER to periodically check for updates ?
Go to Setup / Options / Personal Preferences. Upon startup of MM, you can have MM to prompt
you to check for updates. In Personal Preferences, enter a number for days between prompting
you to check for updates.
2. How do I get MEET MANAGER to periodically backup my database ?
Go to Setup / Options / Personal Preferences. Upon startup of MM, you can have MM to prompt
you to create a backup. In Personal Preferences, enter a number for days between prompting
you to backup your database.
3. I like the way I can enter a reason for a DQ but MM's DQ codes are different from what we
use. Is there any way to change the DQ codes ?
The DQ codes can be changed or added to, but you must follow the rules for the coding. You
use MS WordPad or MS NotePad to edit the DQcodes.txt file that is in your MM installation
folder. You can add new codes by inserting a new line or you can edit an existing line. The text
file is a comma delimited file with three fields on each line. The first field is a 2 character code
where the first character is a number and the second character is a letter. Each code must be
unique and in order. The number refers to the stroke or type of DQ where 1 = fly, 2 = back, 3 =
breast, 4 = free, 5 = IM, 6 = relay, and 7 = Miscellaneous. The second field is the description of
the DQ. This description must be kept as brief as possible. The third field is the stroke name in
short form..."fly", "back", "breast", "free", "IM", "Relay", "Misc".
4. How do I use the events from a previous meet for an upcoming meet ?
Use the File / Save As feature. Click Here for specific instructions.
5. I have my events numbered 1-20, but need to add a new event and it needs to be
event number 11. How do I do that ?
Go to the Events Menu and click Re-Number at the top. Click Increase Event Numbers, put 1 in
35
Copyright©Sports-Tek Software
MEET MANAGER for Swimming
for the Offset, put 11 to 20 for event range and click Ok. Now add the new event and make it
event 11.
D. Seeding
1. I am in an 8 lane pool and the seeding is assigning the entries to lanes 1 to 6. How do I
get MM to seed the entries in 8 lanes ?
First go to File / Purge / Reset Event Results and Seeding. Select all events and click Reset.
This will erase the seeding, but leave the entries intact. Now go to Setup / Options / Global and
check the boxes next to "Change number of lanes for all Prelim Rounds to:" and "Change
number of lanes for all Prelim Rounds to:". Enter 8 in both text boxes next to these statements
and then click Ok. This will change all events to 8 lanes. You could also edit each event
individually and change the lanes one at a time, but the global method is much faster.
E. Results
1. My MM results are supposed to be for a Yards course, but when exporting the results
from MM and importing into TM, the results are showing up as Short Course Meters times
?
This means the course was incorrect in MM for either the Meet Setup or for the Sessions.
Changing the meet course in the Meet Setup will not solve the problem. To correct the course for
results, the course for each session must be corrected. If there are no sessions, create a
session with the wrong course and add all events to the session. Then edit the session and
change the course to the correct course and MM will ask if you want the results changed to the
new course. Answer yes, export the results to TM again, and import the new file into TM while
checking the TM box to overwrite duplicates. If sessions were already setup, correct the course,
answer Yes to the question about changing the results and re-export from MM and import into
TM.
2. On the Adjust selection from the Run Menu, how do I move an athlete or relay from say
Heat 2 to Heat 11 when both heats do not show on the screen ?
In the far left column there is a row number. If the athlete in heat 2 is in row 12 and the empty
row number in heat 11 is 87, click on the number 12 in the row column and change it to 87. That
moves the athlete or relay to row 87. If there was an athlete or relay already in row 87, the entries
are switched.
3. If I am in the Run screen, what is the fastest way of finding out if a particular swimmer in
the heat on screen has previously been DQ'd ?
Right click on the athlete's name and a window pops up with the details about the athlete and all
events entered including results. Click Here for an example.
F. Scoring
1. A 14 team conference championship wants to score the meet as an overall 14 team meet
(1-16th place) as well as a two seven team divisional meet (1-16th place). How do I do this
?
Run the meet as a normal 14 team meet with no divisions. After the meet is over or at the end of
each day, use one of the two processes below to get the separate divisional scores:
1) Assign each of the teams to one of two regions and list their score totals using the
actual points awarded during the meet with no changes to those points. To do this,
use Setup / Division/Region Names, pick Regions and enter a name for each division (edit
the Northeast, etc to be just the two you want). Assign the correct Region Name to each
team by editing each team from the Teams/Schools Menu. During or at the end of the meet,
go to Reports / Scores and for Grouping, choose By Region. Select your events and create
the scores. You will get the two sets of team scores.
2) Re-score the meet so that there are two sets of 1st thru 16th. To do this, use Setup /
36
Copyright©Sports-Tek Software
MEET MANAGER for Swimming
Division/Region Names, pick Divisions and enter a name for each division (edit JV and
Varsity to be just the two you want). Assign the correct Division to each team by editing each
team from the Teams/Schools Menu. At the end of the meet or at the end of each session,
print your normal scores. To get the Division scores, go to Setup / Meet Setup and change
the Meet Type to Divisions by Teams. Go to the Run Menu and click Re-Score at the top of
the Run to re-score the entire meet as Divisions by Teams. Go to Reports / Scores and for
Grouping, choose By Division. Select your events and create the scores. You will get the two
sets of team scores. To return the meet to standard scoring, go back to Setup / Meet Setup
and change the Meet Type to Standard. Go to the Run Menu and click Re-Score at the top
of the Run to re-score the entire meet back to the standard scoring.
G. Records
1. I am running a Masters Meet and I want to use the USMS National Records without rekeying them. Is there a way I can do this ?
The records can be imported into the Records Menu after you download the record files from the
U.S.Masters web site at http://www.usms.org/comp/recordsmm.php
After downloading these files, use the Import button at the top of the Records Menu.
H. Time Standards
1. How do I set up a meet where event 1 is the girls 11-12 100 free with a qualifying time of
faster than or equal to the A time standard and event 2 is the girls 11-12 100 free with a
qualifying time of slower than the A time standard ?
This requires that you use Custom Qualifying Times from within the Time Standards Menu.
Add or import the A time standards using the Time Standards Menu. Check the box for Custom
Qualifying Times. For event 1, enter A in the cell for = or Faster. For event 2, enter A in the cell
for Slower Than. Click Here for more examples.
I. Imports and Exports
1. Whenever I try to import meet entries, MM always defaults to the wrong folder. How do I
set up a default folder/directory that MM will always use for the import of meet entries ?
You can setup Favorite Directories. Go to Setup / Directory Preferences and select the default
folder for Imports and Exports.
2. I am running a big meet and I want the teams to submit their entries electronically so I do
not have to key them all into MM. Is there a way I can do this?
If the teams coming to your meet do not have HY-TEK's TEAM MANAGER, then they can
download a free version of TM called TM Lite which can be downloaded from HY-TEK's
Download Center. TM Lite will allow teams to import the Meet Events file from your MEET
MANAGER. After that the teams can enter their swimmer names and then simply select the
swimmers they want in each event, put in an entry time, enter the relays, and then export the
entry file from TM. That file gets emailed to you and you import the file. Click Here for more
exact details.
J. Reports
1. How do I create a pdf of the Meet Program ?
You can export any MM report to PDF by creating the report and then clicking the Export icon at
the top left of the report. Then you select Adobe Acrobat for the Format, click OK and select the
location and name for the pdf. Click here for exact details.
2. How do I create a pdf of the Results to post on my web site ?
Same as in question 1. Create the results report and click the Export icon at the top left of the
37
Copyright©Sports-Tek Software
MEET MANAGER for Swimming
report. Then you select Adobe Acrobat for the Format, click OK and select the location and
name for the pdf. Upload this pdf file you your web site. Click here for exact details on creating
the pdf.
3. How do I print a meet program with a heat sheet for most events, but a Psych Sheet for
some distance events that we are checking in ?
Go to the Sessions Menu and create a session. Move the events for the session from left to right
in the order they will be swum. For the distance events that will not be pre-seeded, change the H
in the Rpt column on the right to P. The P will cause the Meet Program to print the Psych Sheet
for that event. Later, after you seed the event, you must either change the P back to an H in the
Session Menu or click the Ignore Psych check box at the bottom of the Meet Program Menu.
K. Scoreboards
1. I have an Alpha Scoreboard and the only way I can get the names up is to use the Export
option. But when a swimmer is scratched or we have to re-seed an event, I have to go
back and re-export the names. Is there a better way to do this ?
The only other way is to have the Alpha Scoreboard Interface and then the changes are
automatically sent to the scoreboard when requested by the timer or scoreboard controller. With
the Interface there is no need to export scoreboard files.
38
Copyright©Sports-Tek Software
MEET MANAGER for Swimming
Getting Started - Overview
MEET MANAGER (MM) has been designed and built by HY-TEK's Software Engineering staff using
the very latest in computer software technology so that it can be very powerful and simple to use! The
system is menu driven - select a menu option with your mouse or keyboard, and MEET MANAGER
will route you to the appropriate data entry screen or report.
One person should be able to perform the bulk of the administrative tasks of running a meet, including
entering events, teams, and athlete entries; producing the meet program using a wide range of report
layout options; and entering results. To make your task even easier, MEET MANAGER supports the
import of entries from diskette or from the Internet before the meet, as well as the Import of results with
splits from your Timing Console using HY-TEK's Interface software. The INTERFACE option is special
software that is designed to communicate with many different Timing Consoles including Colorado,
Daktronics, and Omega. Click Here for more information about The INTERFACE.
One of the challenges for the HY-TEK software engineering staff was to develop a product that could
run any kind of swim meet, yet be simple to use! Here is a summary list of the type of meets that
can be run using MEET MANAGER:
Timed Final
Age Group (USS, YMCA, Rec League)
Championship with Prelims, Semis, and Finals
High School or College Dual or Double Dual
Combined events such as Pentathlon, Heptathlon, or Decathlon
Masters
FINA
Senior
A/B/C
Flighted
Disability Type Meets
Open Water
Another feature offered by MM is the Pro Option which provides multi-user capabilities and real-time
results to the web. This permits up to nine computers to "share" one database and permits the
instant upload of HTML pages to your website.
A very real scenario might be four computers sharing one common database over a wired or wireless
network set up as follows:
1. Results computer at the Timing Console area
2. Clerking and seeding computer at the check-in area
3. Report and label printing computer in the photo copy room
4. Reports only computer in the media area
Click Here for more information about the Pro option.
Generic Steps in Setting Up Your Meet
Here is a set of the generic steps to help you get started setting up your meet.
1. Click on File from the Main Menu Bar then Open/New Database. Click Here for more specifics.
39
Copyright©Sports-Tek Software
MEET MANAGER for Swimming
2. Click on Set-up from the Main menu Bar then click on Meet Set-up to customize major
parameters for your meet . Click Here for more specifics.
3. Click on Set-up from the Main Menu Bar and then click on each of the items to further customize
your particular meet.
Athlete / Relay Preferences
Seeding Preferences
Report Preferences
Entry / Scoring Preferences
Scoring Set-up
Division / Region Names
Language Preferences
Options
4. Click on Events from the Main Menu Bar to set up the events for your meet.
Click Here for more specifics.
5. Click on the Session button in the Events Screen and set up the Sessions for your meet.
Click Here for more specifics.
6. Click on the Records button in the Events Screen to enter the meet records from the keyboard or
to Import them. Click Here for more specifics.
7. Click on the Time Standards button in the Events Screen to enter Time Standards for the meet
from the keyboard or to Import them. Click Here for more specifics.
8. Click on Athletes from the Main Menu Bar to set up your Team and Athletes as well as their
entries for the teams that HAVE NOT provided you entry disks. Click Here for more specifics on
How to Add an Athlete and How to Add a Team.
9. Click on Relays from the Main Menu Bar to set up your Relay entries for the teams that HAVE
NOT provided you entry disks. Click Here for more specifics.
10. Click on File from the Main Menu Bar and then click on Import then Entries to import team athlete
and relay entries that have been provided to you on diskette. Click Here for more specifics.
At this point, you have set up your meet and put in most if not all of your Individual and Relay
entries. It's time to look at a few of the Reports to check what you have done.
11. Click on Reports from the Main Menu Bar and then click on the following Reports to at least
Preview and possibly Print.
Events
Teams
Rosters
Sessions
Entry Lists
Psych Sheets
Check-In Report if you are doing a Positive Check-In
12. Once you have checked your entries, you are ready to Seed the meet. Click on Seeding from the
Main Menu Bar and click Here for more specifics.
13. Click on Reports from the Main Menu Bar and then click on the following Reports to at least
Preview and possibly Print.
Meet Program
Lane/Timer Sheets
Warm-up Sheets
14. Click on Labels from the Main Menu Bar and then click Entry Cards/Labels if you are printing
them for the meet. Click Here for more specifics.
At this point, you should have completed all of your pre-meet set-up, entry, and reports. You
are now ready to Run the Meet! Click here for information on How To Run the Meet.
40
Copyright©Sports-Tek Software
MEET MANAGER for Swimming
Monitor Size and Resolution
MEET MANAGER has been designed to accommodate most computer monitor screen sizes and
resolutions. Whether you are using a 14 inch, 15 inch, 17 inch, or even a 21 inch monitor, MM will
automatically and dynamically adjust the screens for optimum utilization of your monitor based on your
monitor size and resolution.
An 800 x 600 monitor resolution or higher is required.
Please Note
If the Windows Task Bar at the edge of your screen is covering part of the MM screen, be sure that
the Windows Task Bar is in "auto hide" mode. To put your Task Bar in auto-hide mode, right
mouse click on the Task Bar and then click Auto-Hide.
Resizing Menus
Many of the MEET MANAGER menus have re-sizable windows inside of the main window. For
example, a re-sized Relays Menu is shown below. You can use the mouse to "grab" a divider bar and
move it up or down or left to right to resize each smaller window.
There are 3 moveable divider bars in the example below.
· A horizontal bar between the Relay Events and the Eligible Athletes
· A vertical bar between the Relay Order and the Team list
· A horizontal bar between Relay Team Entries and the bottom pair of windows
Short-Cut Icons
From the Main Menu, there are several short-cut icons for quick selection of a task.
41
Copyright©Sports-Tek Software
MEET MANAGER for Swimming
Icon
Description
Backup Database Menu
Sessions Menu
Records Menu
Time Standards Menu
Import Entries
Export Results to TM or SWIMS
Memorized Reports
Online Entries (to be available at a later date)
eLessons
Icons
Many menus use icons for quick selection of a task. The following set of icons are used throughout
MEET MANAGER.
Icon
Description
Add
Edit
42
Copyright©Sports-Tek Software
MEET MANAGER for Swimming
Delete
Show/Hide Filters
Print
Exit Menu
Select All
Undo, De-Select All, Scratch All, Clear Indicators, Combine Results
Preferences
Memorize Report
Find
Save Grid Layout
Print / Preview Grid
Export to HTML
Contact Information
Create Export File
Events Menu
Athlete Menu
Relays Menu
Team Menu
Seeding Menu
Records Menu or Re-Score All Events in Run Menu
Time Standards Menu
Preview Menu or Event Comments
Sessions Menu or Scratch Pad
Show/Hide Swim Ups
Copy Relay Names, Copy Entries
Scratch Back
Scratch Forward
Consolidate Meet
Combine Event Entries
Start Seeding
43
Copyright©Sports-Tek Software
MEET MANAGER for Swimming
Save
Switch Heats
Web Real Time Results Setup
Reset Events in Purge Menus
Move All
Remove All
Open Water Module
44
Copyright©Sports-Tek Software
MEET MANAGER for Swimming
File Menu
At the top of the Main screen for MEET MANAGER, you have the Main Menu bar:
From the Main Menu Bar, click on File to get a list of MM's file management and utility features. Each
of these functions is important in managing the database and making use of various utility features that
will make your job easier.
Open a Database
Save As to Create a New Meet from and Existing Database
Backup a Database
Restore a Database
Unzip a Zip File
Repair a Database
Purge a Database
Import Data
Export Data
Install Update
Disable Network Login
Open in Multi-User Mode
Network Administration
License Management
45
Copyright©Sports-Tek Software
MEET MANAGER for Swimming
Utilities
46
Copyright©Sports-Tek Software
MEET MANAGER for Swimming
Open a Database
When you start MM from your Windows desktop, MM will automatically Open the last database that
you used. But if you click on File from the Main Menu Bar, MM will display, just below the word Exit, a
list of the 10 most recent Databases that you have used. As a shortcut, just click on the one that you
want and MM will Open it for you.
If you do not see the Database that you want to open on MM's "most recent" list, click on Open/New
and MM will display the standard Windows file directory lookup screen. MM will default to the
swmeets3 directory/folder and list any Databases that it recognizes. If you still do not see the one you
are looking for, pick another directory/folder and MM will display the list of databases that it finds in that
particular directory/folder. Once found, double click the database name and MM will open it.
If you wish to create a New Database, click on Open/New, select the "Look in" folder (it will default to
swmeets3) and enter a new Database file name in the "File name" text box. MM will create a new
database with the file name and take you through the initial Meet Set-Up menu. For readability and
recognisability, use upper and lower case and give meaning to the database name such as
"JuniorOlympics2009LC". Note that MM 2.0 databases will most likely be found in c:\swmeets.
Save As to Create a New Meet from an Existing Meet
If you are ready to setup a new meet but have previously run that meet or a similar type meet, you may
want to follow these instructions to minimize the amount of setup you will have to do for your new meet.
1. Start MM and open the previous meet.
2. Click on File then Save As. In the File Name text box, type in the name you want for the next meet
and then click Open. A copy of the previous database will be made and renamed and opened. You will
47
Copyright©Sports-Tek Software
MEET MANAGER for Swimming
see the new database name at the top of the Main screen.
3. Now click on File then Purge then Remove Data Selectively and pick the items you wish to delete.
Usually you would click on Teams to remove everything except the events. Doing this is like Copying
Events from one meet to the next. Please refer to the Purge section for details on what may be
purged.
4. After purging, click on Set-up then Meet Set-up and change the name and dates for your meet as
well as any other parameters that are different.
Using this procedure, you will always have your meets saved on your Hard Drive as well as on a
diskette and you will minimize the amount of time and effort required to set up a new meet.
This is a great way for setting up dual meets for your College or High School season.
Backup a Database
Backing up a database means taking the currently opened .mdb database file, zipping it so that the
size of the file can be shrunk six fold or so, and then copying to a diskette, CD, zip drive, or your hard
drive. Backing up your database is extremely important because it protects you from the loss of your
data from accidental cause or from the malfunction of your hardware. If your hard disk goes bad, the
only way you can recover your database is from a copy of it made to some external storage media
such as a diskette. Or if the database gets corrupted for some reason, you will need to go back to a
backup you made on the hard drive or to some external storage media. Note that a Backup only copies
data and does not copy anything that relates to the program itself.
Note: If you are using a CD-RW for Backup, the CD must first be formatted using your CD-RW
software.
It's easy to backup your database and it only takes a minute or less. Just click on File / Backup from
the Main Menu Bar. After you select the folder location for the backup, you get a screen like the one
below that gives you two options:
· Include a message: The message with the backup that will be re-displayed when the backup is
Restored.
· Lock Database Backup as Read-Only: Check this box if you want to provide backups to others by
placing the backup on the web for download, but want to guarantee that no one can alter the result
times, splits, or relay names. Do NOT lock the database backup if this is backup is being used
as protection during the meet!
48
Copyright©Sports-Tek Software
MEET MANAGER for Swimming
If you check the box to Include a message, you can provide some meaningful information about the
backup as shown below.
After the message, your entire database will be copied to whatever media you have chosen.
49
Copyright©Sports-Tek Software
MEET MANAGER for Swimming
If you ever need to, just "Restore" back to your hard drive or to a hard drive on another computer. MM
will always use the following File name convention for your backup: Swmm3BkupxxxxxxxxxxxxxxxXX.ZIP where xxxxxxxxxxxxxxx is the name of your Meet and XX is a number from 01 to 99. An
example name is shown above.
HY-TEK recommends that you perform the extremely important backup function periodically to
both the hard drive and an external media. If you are using floppy diskettes, then two sets of
backups should be maintained and alternated - label them Backup A and Backup B. Also,
make a set of backups once a week and store them in a different location from your computer.
Backups in Multi-User Mode
If you have the Pro option and are running in Multi-User mode, you can perform a backup if you are
not logged in as a Report Only user. However, it is important to note that you will get the following
warning when in Multi-User mode.
Suppose you have setup and entered all the meet entries for your upcoming meet on your home
computer and you wish to take the Database and put it on the computer at the pool that will be running
the meet - Here's How.
1. Backup up the Database
A. Put a formatted CD, zip disk, or thumb drive into the appropriate device.
B. Click on File from the Main Menu Bar and then click on Backup, follow the menu prompts,
and backup to the removable media.
2. Install MEET MANAGER on your Meet Computer
A. Follow the install instructions on your MM Installation CD to install the software on the Meet
50
Copyright©Sports-Tek Software
MEET MANAGER for Swimming
computer.
3. Restore the Backup You Created in Step 1
A. Place the media created in Step 1 into the appropriate device.
B. Click on File from the Main Menu Bar and then click on Restore and follow the menu prompts.
After the Restore has been completed, the Meet computer has exactly the same Database as you
have on your home computer.
Restore a Database
Restoring a database means to copy your database from a backup disk(s) onto your hard drive. You
may want to restore your database from a previously created backup because:
· You want to have an identical copy of your meet database on another computer.
· Your hard drive was bad and you sent it out to be repaired. When it was returned to you, the hard
drive did not contain your MEET MANAGER database and now you want to put back your database
to continue your work.
· During a meet your database was corrupted and you need to use a backup that was before the
corruption occurred.
Just click on File / Restore and MM will offer you four options. HY-TEK recommends that, when in
doubt, select choice four, check the rename check box and provide a new unique name for the
database. This way you are unlikely to overwrite another database and you are able to give a better
name for the database.
The backup zip file will be unzipped and based on your selection above will perform the following:
1. OVERLAYs and replaces the current Database that is opened and re-opens it. The currently open
database is lost.
2. Copies the backup database to the current directory using the name of the database that was
backed up. If the name is the same as a database already in the database folder, you will be
warned that it will overwrite the database of the same name.
3. Copies the backup database to a directory/folder that you will select.
4. Copies the backup database to a directory/folder that you will select and then Opens this new
Database.
Note: For choices 2, 3 and 4 above, MM offers the option to rename the database name before it is
copied to the hard drive.
Read-Only Databases
51
Copyright©Sports-Tek Software
MEET MANAGER for Swimming
If the backup you are restoring was created as a Read-Only database, you will be given the following
warning message after the backup is restored:
If you need to be able to edit the data, then you must contact the person that created the backup.
See Backup for information on Locking a Database to be Read-Only.
Unzip File
There may be a circumstance where you want to unzip a file that has been sent to you or that you
created with MM. If you do not have a ZIP/Unzip utility on your computer, this feature may help you. A
ZIP file can contain really anything. Zipping is a way of compressing any file or set of files into a much
smaller "zip" file. "Unzip" just decompresses it to its original form.
From the Main Menu bar, click on File / Unzip File. Select the disk drive and directory that contains
the file you want to unzip. Now highlight the Zip file and click OK.
MM will unzip the selected file and store the contents of the ZIP file in a directory named ZipTemp
under your root directory.
Repair and Compact Database
There may be situations in which your MM Database gets damaged because of a hardware problem or
power outage. In those cases, you could Restore your latest backup. The problem here is that you
will lose any changes or additions you have made since the last time you backed up your Database.
You still may have to resort to this but first, try HY-TEK's Repair and Compact Database utility. This
utility is also handy for "shrinking" the database file size because the Compact Database removes data
that has been marked for deletion.
Click on File from the Main menu Bar and then Repair and Compact Database and MM will offer the
following three choices:
52
Copyright©Sports-Tek Software
MEET MANAGER for Swimming
Click Yes to Repair and Compact the currently open Database. In case there is a problem
during the repair, before the open Database is repaired, a copy of the database will be saved
in the database folder and will be named RepairBackup-MyDb.mdb where MyDb is the name
of the database.
Click No to Repair an Unopened Database and then MM will ask you to choose which
Database that you want repaired. This Unopened Database utility can applied to any Access
database, not just MM databases. Note also that an Unopened Database will be repaired, but
will not be compacted.
Click Cancel and MM will return to the Main Menu
If you answer Yes or No, MM will then give you an opportunity to create a backup.
After answering Yes or No to the backup, MM will ask for confirmation to continue and if you continue,
MM will check to be sure you have enough temporary disk space on your Hard Drive to perform the
repair operation. Then MM will go through the actions for repairing and compacting your Database, as
much as possible.
After MM has completed the repair, go back and check the integrity of the Database - check your
Athletes and Events and run a few reports. If there are still problems, click Here to find out How To
Restore a Database.
Purge a Database
You may want to Purge all or part of your Database for the following situations:
1. This year's meet is exactly like last year's meet including most of the athletes and teams. So you
might want to purge last year's Entries/Results ONLY and then age-up the athletes to this year's
meet date.
53
Copyright©Sports-Tek Software
MEET MANAGER for Swimming
2. You want to Purge your old "records" and Import in your new ones.
3. You want to purge the Athletes but keep the events and teams from a previous Database.
4. You meet has been completed and you want to purge the Interface Files that have been stored on
your hard drive from the Daktronics 1000, Kyrotech, or Omega OSM 6/Ares Timing Consoles.
Interface files are NOT stored on your hard drive when you use the CTS 4/5/6 or Daktronics
6000/2000 Timing Console.
5. Suppose you were "learning" how to use MM and actually ran some events and put in some
results. You may want to "reset" those events before you actually run the meet.
6. You have inadvertently scored some events and you wish to erase the point scores ONLY.
7. The splits have come in to MM from a timer that was incorrectly set to Near and Far End pads
when there were no pads at the far end.
8. A team in your meet is flying home after the prelims on the last day and you need to scratch all
swimmers and relays that made finals for that day.
Please Note: These operations are NOT reversible so HY-TEK recommends you make a backup
of your current Database before you begin any purge process.
From the Main Menu Bar, click on File / Purge / Remove Data Selectively. MEET MANAGER will
display a panel of Purge options. Click on the Start new database option to purge all the Data or click
on the appropriate items that you want to purge including:
54
Copyright©Sports-Tek Software
MEET MANAGER for Swimming
You may want to reset one or more event results from a Database in which some events were run. By
"reset" we mean remove any Result information for all rounds of a selected event. If you have
"accidentally" run an event(s), this is a great way to reset those events for the meet.
From the Main menu Bar, click on File / Purge / Reset Event Results Only. From the event list,
select the events you want to reset and MM will remove all results and scores for those selected
events and reset the event to Seeded. This will not remove the entries nor will it remove the first
round seeding.
55
Copyright©Sports-Tek Software
MEET MANAGER for Swimming
You may want to reset one or more event results from a Database in which some events were seeded
or run. By "reset" we mean remove any Seeding or Result information for all rounds of a selected
event. If you have "accidentally" seeded or run an event(s), this is a great way to reset those events for
the meet.
From the Main menu Bar, click on File / Purge / Reset Event Seeding and Results. Choose from
the Event List and MM will reset the status of those events to Un-Seeded and will remove the seeding
and results data. This will not remove the entries.
56
Copyright©Sports-Tek Software
MEET MANAGER for Swimming
If you have inadvertently scored an Event that you did not wish to score, from the Main Menu Bar, click
on File / Purge / Reset Scores and MM will erase the point scores for the events you select. This
choice does NOT affect result times or result places.
57
Copyright©Sports-Tek Software
MEET MANAGER for Swimming
When using a Timing Console, there is a setting in the timer to tell the timer whether you have Near
End pads Only or Near and Far End pads. If the Timer is set for both Near and Far End pads and
there are no pads at the far end, the Timing Console sends MM blank splits for all the odd splits (which
would be the far end splits). This means, for example, in a 200 event in a short course pool, the timer
would send 8 splits to MM instead of just 4 splits. Splits 1, 3, 5, and 7 will be blank and 2, 4, 6, and 8
will be the 50, 100, 150, and 200 split. When this happens, MM cannot create a report with the correct
subtracted splits. And upon exporting results to HY-TEK's TEAM MANAGER, the splits will be
incorrect.
To correct this problem after the results and splits have been brought into MM, this module will delete
all of the blank splits.
From the Main menu Bar, click on File / Purge / Remove Blank Splits. Only events that have been
detected as having a problem with all odd splits being blank will be listed. From the event list, select the
events you want to reset and MM will remove improper blank splits for the selected events. This will
not remove the entries or any results.
58
Copyright©Sports-Tek Software
MEET MANAGER for Swimming
This purge selection can be a real time saver. There are two main situations where you would use this
selection.
· One is where you have a team that has entered and notifies you the day before the meet that they
cannot attend. You can use this selection to scratch the entire team from the meet.
· Another common situation is where a team is flying home after the prelims on the last day of a prelim
/ final meet. You can select the finals session for say Sunday night and select the team or teams
leaving early and scratch them all from finals.
59
Copyright©Sports-Tek Software
MEET MANAGER for Swimming
Install Update
Periodically, HY-TEK provides what are called Service Pack Updates that contain corrections to
reported problems. These Service Pack Updates are FREE if they are for the same "major release" of
MM and are always provided on HY-TEK's web site at www.hy-tekltd.com. If you select File / Install
Update, you will receive this message.
60
Copyright©Sports-Tek Software
MEET MANAGER for Swimming
As stated in the above message, the preferred method for updating is to use the Check for Updates
selection from the main menu bar.
Alternative Method for Installing a Service Pack Update
Besides the preferred Check for Updates method, there is one other way to Download and Install a
Service Pack Update.
Go to the HY-TEK web site using your internet browser and download and install the update
yourself. Connect to the HY-TEK web site at www.hy-tekltd.com using your Internet browser.
Then click on the Download Center, and under Swimming, click Update next to MEET
MANAGER 3.0. If your browser gives you the choice to "Open" or "Save to Disk", you must
choose "Save to Disk". After the "Save to Disk" is selected, your Browser asks you where to save
the Service Pack Download File (the name of the file is swimMM3Update.zip). Specify any
directory or folder on the Hard Drive such as C:\Hy-Sport. DO NOT save the download to a floppy
diskette drive because the file will not fit on one diskette. When the download has been
completed, open MM and click on File then Install Update as described above and select the
same directory/folder you chose for the download (such as C:\Hy-sport) and double click on the
downloaded file and MM will install the Service Pack Update and start the new version.
After the update has been installed, the version number shown on the Main screen at the bottom left
should be the new version. If it is not, the update did not succeed and you will need to try installing the
update again. This time wait several seconds before clicking any OK buttons that the install update
provides.
Installing The Update On Other Computers
If you do not have access to the Internet, then you have two ways of updating your computer with the
latest MM software from HY-TEK.
1. Obtain a copy of the SwimMM3Update.zip file you have downloaded and copy that file to a ZIP disk
or a writeable CD and take that ZIP disk or CD to your computer that does not have Internet
access. Now start MM and click on File / Install Update and pick your ZIP disk or CD. Note: On
an MM computer that has Internet access and where you used the Check for Updates option, you
will find the last SwimMM3Update.zip file that was downloaded in a directory named Download in
the installation directory - typically c:\hy-sport\SWMM3\Download.
2. Order a replacement CD from the HY-TEK Sales Office. When you receive the new MM
Installation CD, follow the normal instructions for installing MM. Click Here for information about
how to do that.
Enable / Disable Network Login
The Enable Network Login or Disable Network Login toggle selection applies to the Network feature
available ONLY if MM has the Pro option. Click Here for more information about the Pro option.
61
Copyright©Sports-Tek Software
MEET MANAGER for Swimming
This feature is designed for Customers with the Network Pro option that are using MEET MANAGER in
a stand-alone environment and are not connected to the network. With the Disable Network Login
selected, the Login screen is bypassed and there is no need to click on the Login OK button every time
MM is started.
Open in Multi-User Mode
The Open in Multi-User or Single User Mode toggle selection applies when you have the Pro option
Network feature. Please click Here for more information on MM with the Pro option.
Network Administration
This File menu selection applies when you have the Pro option Network feature. Make this selection
and MM will display a list of the nine User Names with the name of the computer associated with each
logged-on User Name. Please click Here for more information on MM with the Pro option or click
Here for details on setting up passwords.
License Management
This feature is designed specifically for Customers who want to use more than one MEET MANAGER
License on their one computer.
Suppose you may be a volunteer parent who is good at using MEET MANAGER and several teams
use you to run their meets. For purposes of this example, let's say there are two teams you work with Geneva High School and Geneva Swim Club. Since Windows Installer will not permit you to install any
software in two different places, only ONE COPY of MEET MANAGER can be installed on a single
computer. But from a legal/copyright point of view, we cannot use the Geneva Swim Club license to
62
Copyright©Sports-Tek Software
MEET MANAGER for Swimming
run a meet for Geneva High School. Therefore the volunteer needs to have both licenses, 1) each on
separate computers or 2) both licenses on the same computer which is much more convenient.
Click File / License Management from the MEET MANAGER Main Menu bar and MM will offer the
following features to manage up to eleven additional Licenses. Of course, MM always displays the
Active License name on all reports and on the front page of the MM screen.
Add License
To add a license to your Available Licenses list, insert into your CD-ROM drive a HY-TEK MM CD
that has the license you want to add. Now click Add License or click the Add icon
and MM will
copy the HY-TEK MEET MANAGER License from the CD into your License Management system.
Note: You can also use this feature to update your current MM License when you order additional
features and options.
Change Active License
To change the current Active License (the one you are currently using) to another one on the Available
Licenses list, just select the radio button in front of the license you want to make active, and click on
Change Active License or click on the Heart icon
63
.
Copyright©Sports-Tek Software
MEET MANAGER for Swimming
Delete License
To delete a license, select the radio button in front of the license you want to delete, and click Delete
License or click the Delete icon
. If you want to delete the Active License, you must use the
Change Active License feature first to activate another license, and then delete the previously active
license from the list.
Restore Original
Click on this option to restore your original license. When you do this, all added licenses will be deleted
from the license management list. If you want to add licenses again, you will need the original HY-TEK
MEET MANAGER CDs for those licenses before using the Add License feature.
Update License
Click on this option if you have arranged with HY-TEK Sales to receive an updated license via Web
Delivery. This allows you to update your license immediately rather than wait for a CD to be shipped.
The license to be updated must be the Active License. You would receive an Email from HY-TEK
Sales with a License Code which you enter into the following window which appears after clicking
Update License. In this example, the License Code is CentennialSportsPlex which matches the Active
License in the example above.
After you click OK, MM will search the HY-TEK web site for your license and will download and replace
the Active License with the downloaded license. After the license is replaced, you can go to Help /
About to verify the new license. You would do this to add an option or maybe update your Site License
which may be due to expire.
Import
MM offers a powerful set of import choices to help minimize your data entry tasks. Click on File /
Import and pick from the following list of Import options.
64
Copyright©Sports-Tek Software
MEET MANAGER for Swimming
How MM Matches on Athlete Names
When Athlete information is imported, MM always tries to match first on the Registration ID and
assumes that the Registration ID is unique for each athlete. If the Athlete's ID matches an existing
one in the Database and the Last name and Sex are the same, then MM assumes it is the same
athlete. If the ID does not match any IDs in the Database, then MM checks to see if the Last name,
First name, Sex, and Team match an existing Athlete. If neither of these two criteria match an existing
Athlete, then MM adds that Athlete to the Database.
When importing information, if MM cannot find an Athlete or in the case of importing entries, an event,
then that record is added to an Import Exception List. That list is then printed at the completion of
the Import so that you can find out why the record was not added and possibly decide to manually
enter the information.
Import Meet Entries
Import Rosters
Merge Entries
Merge Results
Merge Results from a Diving Program
Import Records
Import Time Standards
Import USA Swimming OnLine Entries
Import Registration File
Import Track & Field Rosters
Import Meet Entries
Meet Entries are made up of Individual and Relay declarations for one particular meet. They can be
provided on diskette, Emailed over the Internet, or downloaded from HY-TEK's Online Meet Entry
System. Meet Entries can be imported from:
HY-TEK's TEAM MANAGER 5.0 or TM Lite.
HY-TEK's Online Meet Entry System.
Advancers from a HY-TEK MEET MANAGER Database.
SDIF File from another vendor's product with an SD3 file extension. This file will be checked for
SDIF compliance before it is imported to protect your Database from any import errors.
Note: If you are running a large meet and if many of the teams coming to your meet do not have
TEAM MANAGER, you can request a FREE copy of HY-TEK's TEAM MANAGER Lite and then
provide that software to the teams. Then they can do the keying of their meet entries and export those
65
Copyright©Sports-Tek Software
MEET MANAGER for Swimming
entries to you - no keying for you and no mistakes! Contact the HY-TEK Business Office Toll Free
at 866.456.5111 to get your FREE copy of TM Lite to distribute. Or download a full install of TM Lite
from HY-TEK's Download Center.
To Import Meet entries click on File / Entries. MM will ask to specify where the entry file resides - on
diskette or a folder/directory on your Hard Drive and will then display files that match the following file
types:
.HY3 files - Entries from TEAM MANAGER 5.0 or TM Lite
.HY3 files - Advancers from a MM Database
.HY3 files - Entries from HY-TEK's Online Meet Entry System
.SD3 files - another vendor's product
You can also click on the Files of Type button and pick ZIP files which may contain entries that have
been zipped and Emailed to you. Just click on the ZIP file that you want and MM will unzip the file to a
directory and ask you to choose which file to Import.
Once you confirm that you wish to continue the Import, MM will offer various filter options and then
proceed to Import the entries contained in the Meet Entries file.
· Match on event numbers: The best way to insure that entries are imported into the correct event is
to match on event numbers. If the meet host exported the Meet Event file to the teams using HYTEK's TEAM MANAGER, then the event numbers will match exactly. If you do not match on event
numbers, MM will try to find the correct matching event based on distance, stroke, gender, age
group, and in some cases division.
· Include entries with No Time (NT): If your meet does allows No Time entries, then check this box.
If NT entries are not allowed, then uncheck this check box.
· Enforce meet entry qualification times: If you have qualifying times for your meet, then check this
box. When enforced, NT times will not be imported along with times that do not meet the
qualification time for a given event. Note: When importing entries based on qualifying times that can
be from any of the three courses (Yards, LCM, or SCM), an Exception Report is created that filters
the non-qualifying entries based on the actual course. The only case where a converted time is
compared is when the event is a 1650, 1000, or 500 and the time is a LCM or SCM time.
· Use LSC as part of Team match: The LSC two character code refers to the Local Swim
Committee and is usually appended to the Team Abbreviation - for example, "FAST-CO". But if a
Team is already in the Database as "FAST" without an LSC code, you would probably want the
Team "FAST-CO" to match on the "FAST" Team Abbreviation. The option to "Use LSC for Team
match" is used whenever importing .CL2 files or .SD3 files for entries. For .HY3 files the LSC is
66
Copyright©Sports-Tek Software
MEET MANAGER for Swimming
always used, except when importing advancers, when one is given the option to not use the LSC
code to match on team.
· Update Times Only (No new Entries): Use this option in cases where teams are allowed to update
their times, but new entries are not permitted.
· Import Relay entries only: This allows you to import a second entry file where teams have updated
the swimmer relay legs, but you do not want to allow any changes to individual events. Please note
that this only replaces swimmer names and if there is a swimmer in say leg 3 and there is no
swimmer in leg 3 in the import file, the swimmer will not be removed from leg 3.
· Delete a team's entries before importing: This is really handy when you import a second file from
a team that has updated its entries and you know the file contains the entire entry. This gets around
the problem of deleting entries that have been removed from the team's entry.
Once this Import has been completed, you might want to run the Entries Report for this team.
Import Exception Report
If MM is not able to Import an entry into the Database, an Exception Report will be displayed and
optionally printed. This Report will tell you which entries were NOT Imported and why. For example, if
a Swim Team provides an Entry Disk that declares an Athlete in a 100 Fly and there is no 100 Fly
Event in the MM Database, that entry information will be included in the Exception Report.
TEAM MANAGER Lite is a free software product from HY-TEK which allows teams and schools to
setup their entries and email them to you the meet host for import into MM. TM Lite can be downloaded
from HY-TEK's Download Center. There are some limitations to TM Lite such as a limit of 100 athletes
in the TM Lite database.
Procedures
Meet Host
1. The meet host sets up the meet name and meet events in MM.
2. In MM, the meet host clicks File / Export / Events for TM and Emails this Meet Events file to all
teams/schools entering.
TM Users
1. Each team/school imports the Meet Events file into TM Lite or TEAM MANAGER using File /
Import / Meet Events. Note that upon first use of TM Lite or TEAM MANAGER and before
importing, the TM user must click File / Open and type in a database name to create a TM
database.
2. If the TM person did not receive a Meet Events file, then the TM person must add the meet as
well as the meet events. In TM, Go to Meets / Add and enter the appropriate information. Then
go to Events, click the radio button for Entry Events, then add the events. It is highly
recommended that the TM person import the Meet Event file rather than manually add the meet
events to TM Lite.
3. The TM user adds their team abbreviation and team name using the Teams Menu. Then the TM
person enters their rosters using the Athletes Menu.
4. The TM user then clicks Meets, selects the meet and clicks Entries and selects By Event or By
Name to place athletes into events and to add relays. For each entry, the team puts in a custom
entry time. Relays can only be added By Event.
5. The TM user then clicks Reports / Performance / Meet Entries to create a report of the meet
entries to verify that all entries are complete and correct.
6. Upon verification, the TM user clicks File / Export / Meet Entries. This will create a zipped file that
is to be Emailed to the meet host
Meet Host
1. The meet host runs MM, clicks File / Import / Entries, and selects the zipped entry file received
from the TM or TM Lite user. A menu will appear with various options and it is important to check
67
Copyright©Sports-Tek Software
MEET MANAGER for Swimming
the box that says to "match on event number". This way the entries from each team are
guaranteed to come in perfectly with the correct event.
2. The meet host then creates a Flat HTML report for each team using Reports / Psych Sheets.
This Flat HTML file is then Emailed back to the team/school for verification that the entries are
correct.
Import Rosters
Choose this option when you are importing just swimmers' names and schools/clubs that will be
swimming in your meet. This type of Import contains no entry times – just names, teams, ages, school
year, gender, etc. This type of Import is typically used for Dual Meets when the specific entries are not
declared until the event begins. The file containing the Rosters can come from a TEAM MANAGER
Database or from another MM Database as an HY3 file.
To Import Rosters from a file you have received, follow the steps outlined below:
1. From the Main Menu, choose File.
2. Choose Import and then Rosters Only
3. Choose the Drive you are importing from and then the File Name.
MEET MANAGER will check the File Integrity and then Import the file and add the Teams and Athletes
to your Database.
If the roster file is from HY-TEK's TEAM MANAGER or MEET MANAGER, you will have the option to
import the competitor number or not:
Import Merge Entries File
Select this Import option to import a HY-TEK HY3 entries file that was exported from another computer
running MM 3.0. The export file contains meet entries from another MM 3.0 Database that are to be
"merged" with your Master Database. The file name for this Entries export is always in this format:
HFilexxx.HY3 where "xxx" is a sequential number beginning with"001". This file may be zipped and if it
is, the zipped file name will be: Meet Entries-Meet Name-MeetDate-xxx.zip where "xxx" is a sequential
number beginning with"001".
The typical scenario for this type of situation would be having two or more volunteers doing the entries
for a large meet on different computers. One computer would be designated the Master and after the
events and sessions were set up on that one computer, a Backup of that Master Database would be
loaded on each of the other computers doing the entries. After the entries were completed, each of the
computers doing the entries would export those entries to diskette. Then each of those entry diskettes
would be imported into the Master MM Database.
Another scenario - you may want to merge entries from two MM Databases that has been prepared by
each team for a Dual meet. The Export will offer you the option of including the Heat and Lane
assignments set up by either or both teams so the heat and lane will be included when imported.
68
Copyright©Sports-Tek Software
MEET MANAGER for Swimming
From the Main Menu Bar click on File / Import / Merge Entries (MM To MM). MM will then import the
entries that were exported from another MM Database and MM will automatically match on Event
Number since these entries would be merged based on the same meet setup.
Import Merge Results File
Select this Import option to import a HY-TEK Results file that was exported from another computer
running MM. The export file contains meet results from another MM Database that are to be "merged"
with your Master Database. The file name for this Results export is always in this format:
HFilexxx.HY3 where "xxx" is a sequential number beginning with"001". This file may be zipped and if it
is, the zipped file name will be: Meet Results-Meet Name-MeetDate-xxx.zip where "xxx" is a sequential
number beginning with"001".
The typical scenario for this type of situation would be running a meet at two or more venues or running
a double ended meet with two computers. One computer would be designated the Master and each
day, a backup from the Master Database would be loaded onto the other computers. After the day's
session has been completed, each computer other than the Master would export results to be merged
and then the Master computer would then Import each of these sets of results into the Master
database. Only rounds that have been completed, seeded, or partially completed are merged into the
Master Database.
From the Main Menu Bar, click on File / Import / Merge Results (MM To MM). MM will then import
the results that were exported from another MM Database and MM will match on Event Number since
these results would be merged based on the same meet setup.
Please keep in mind that when merging results from the source computer to a target computer, the
events in the source Database must be a higher status than the one in the target Database. For
example, if event 9 is timed finals and computer A has results completed, but not scored, the round is
"done". If the computer B has the same event with results done and scored, B cannot be merged into
A. The final round "done" and the final round "scored" are considered the same level. The only way
computer Be's data for event 9 can be merged is if in computer A event 9 is either unseeded or round
1 seeded. If event 10 is prelim/final, then finals done/scored is higher than finals seeded, prelims
done, prelims seeded, and unseeded.
Importing Diving Results
Diving results can also be imported using this option if the results hy3 file comes from eDive or
DiveMeets.com.
The typical scenario for this type of situation would be running a meet that has both swimming and
diving. You would export the diving entries from MM and import them into the diving product. After or
during the diving portion of the meet, you would export results from the diving program and import
them into your MM database.
Please keep in mind that when merging results from a diving program to MM, the events in the diving
program must be a higher status than the ones in MM. Normally this would not be a problem unless
you also entered some diving results manually in MM. For example, if event 9 is the 1 meter dive and
has 2 cuts (3 rounds) and the diving program has the first cut done (i.e round 1 completed), it will not
be imported by MM if this same round 1 already has results in it. The only way event 9 can be merged
in this case is if event 9 in MM is either unseeded or round 1 seeded. If event 10 is prelim/final (one
cut), then finals done/scored is higher than finals seeded, prelims done, prelims seeded, and
unseeded. Also keep in mind the diving events must be set up in MM before you do the merge.
69
Copyright©Sports-Tek Software
MEET MANAGER for Swimming
Import Records
To import a records file, click Events / Records and then click Import at the top of the Records Menu.
Or from the Main Menu, click the Records short-cut icon
.
There are three types of Record files that you can Import into your MM Database:
1. You may import a HY-TEK Record file that has been created by HY-TEK's TEAM MANAGER or
MEET MANAGER. The HY-TEK Record file always has the file extension ".REC". The Record
holder information is currently an 80 character field. So first, MM checks to see if this record is for
a relay event. If it is a relay, it takes the first 30 characters as the record holder info and the last 50
characters as the relay names. If it is not a relay, it takes the first 30 characters as the record
holder info and next 16 characters for the team affiliation.
2. You may Import a US Masters (USMS) comma delimited Records file. HY-TEK includes the
World and National USMS Records files for all three courses in the installation directory that was
specified when you installed MM. The file extensions for Masters files are .scm, .lcm, and .scy.
3. If your meet is setup as a BCSSA meet, records can be imported from files with a .bcs file
extension. Only MM can properly create record files with the .bcs extension. So to create a BCSSA
records file that other MM users can import, the records must first be manually entered into MM
and then exported.
Note: The current USA Swimming National Age Groups Record files (NAG-L.rec and NAG-Y.rec) are
automatically included on your MM Installation CD and stored in your installation folder (typically c:\hysport\SWMM3). These files can also be download from the HY-TEK web site at www.hy-tekltd.com.
For the Masters World Record files (IWRL.lcm and RWRL.lcm) and the Masters US National Record
files (INAT.lcm. RNAT.lcm, INAT.scy, and RNAT.scy) go to http://www.usms.org/comp/recordsmm.php
for these files.
70
Copyright©Sports-Tek Software
MEET MANAGER for Swimming
Import Time Standards
To import a Time Standards file, click Events / Time Standards and then click Import at the top of the
Time Standards Menu. Or from the Main Menu, click the Time Standards short-cut icon
.
You may import a HY-TEK Time Standard file that has been created by HY-TEK's TEAM MANAGER
or MEET MANAGER. The HY-TEK Time Standard file always has the file extension ".STD" or ".ST2".
If your meet is setup as a BCSSA meet, time standards can be imported from files with a .stb file
extension. Only MM can properly create time standards files with the .stb extension. So to create a
BCSSA time standards file that other BCSSA MM users can import, the time standards must first be
manually entered into MM and then exported.
The current USA Swimming National Time Standards file is automatically included on your MM
Installation CD and stored in your installation folder (typically c:\hy-sport\SWMM3). This file can also
be download from the HY-TEK web site at www.hy-tekltd.com.
When importing, the time standards tags inside the file will be displayed and you can select any one of
up to 12 time standard tag sets. If there are 4 sets of time standard tags you want to import, then you
must import the file 4 different times.
You can edit the time standard tags and change them to anything you want, plus you can add a 20
71
Copyright©Sports-Tek Software
MEET MANAGER for Swimming
character description to the tag for display on reports.
Import USA Swimming OnLine Entries
If you are running a USA Swimming high level meet where entries are entered on USA Swimming's
OnLine Entry system, then you will be downloading a file from the USA Swimming site that can be
imported by MM. This entry file might also be emailed to you by a USA Swimming representative.
To import the file, the meet events must first be setup in MM. After events are setup, click on File /
USA Swimming OnLine Entries. MM will ask you to specify where the entry file resides and so you
find it on your hard drive and open it. MM will scan the file to be sure it came from USA Swimming and
then will tell you some details about the file such as the meet name and date and then ask if you wish
to continue. If you continue, the data will be imported and you will receive a report of how many teams,
athletes, and entries were imported. If some entries were not imported, an exception report will appear
and list those entries not imported.
Import British Swimming OnLine Entries
If you are running a meet where entries are entered using British Swimming's OnLine Entry system,
then you will be downloading a file from the British Swimming site that can be imported by MM.
· To import the file, the meet events must first be setup in MM.
72
Copyright©Sports-Tek Software
MEET MANAGER for Swimming
· After events are setup, click on File / British Swimming OnLine Entries. MM will ask you to
specify where the entry file resides and so you find it on your hard drive and open it. The data will be
imported and you will receive a report of how many teams, athletes, and entries were imported. If
some entries were not imported, an exception report will appear and list those entries not imported.
· The current design of the British OnLine system does not handle relays, so relays are not included in
the entry file.
· British Swimming has assigned specific team names, short team names, and team abbreviations for
each club. MEET MANAGER has a copy of the clublist.csv file and uses it to verify the team name
and 4 character team code are correct. When exporting results back to the British Swimming
rankings database, it is important that these names and codes match what British Swimming has
assigned.
Import Athletes from a Registration File
This feature allows you to import the athletes into your MM Database from a semicolon delimited file
that has been provided from a National or Regional Registration database. The file extension is RE1.
Click on File / Import / Registration File. Tell MM where the file is located and MM will import the
athlete's last, first and preferred name, Registration ID, sex, birth date, and team. You may also
choose any set of teams that are included in the file to filter only the information that you need for your
meet. The feature is currently implemented for LSCs in the United States using USA Swimming's LSC
Registration software LSCDB for Swimming.
The file format is as follows:
The first line contains information about the file. The 5 fields are:
File title
Date file created
Created by
Version of software creating the file
LSC code (optional)
All successive lines are for athletes, one line per athlete. The 10 fields are:
USSID or other ID
Last Name
First Name
Middle Initial
Gender (M/F)
Birth Date (MM/DD/YYYY)
Team Abbreviation Code (up to 5 characters)
Team Name
Preferred Athlete First Name
Annual Registration (optional, "N" means Year Round, "S" is Seasonal)
A sample of the format with one athlete follows:
"USA Swimming Registration List";"5/28/2009";"LSCDB for
Windows";"1.08";"SE"
"030391JOHFDOEL";"Doel";"John";"J";"F";"03/03/1991";"HURR";"Hurricane Swim
Club";"Johnny";"N"
73
Copyright©Sports-Tek Software
MEET MANAGER for Swimming
Import Track & Field Rosters
Choose this option when you are importing rosters from HY-TEK's Track & Field TEAM MANAGER
or HY-TEK's Track & Field MEET MANAGER. This type of Import contains no entry times – just
names, teams, ages, school year, gender, etc. The file extension will be TCL if coming from HYTEKS's Track & Field products.
To Import Rosters from a file you have received, follow the steps outlined below:
1. From the Main Menu, choose File.
2. Choose Import and then Rosters Only
3. Choose the Drive you are importing from and then the File Name.
MEET MANAGER will check the File Integrity and then Import the file and add the Teams and Athletes
to your Database.
Export
Click on File / Export for the following list of export options.
Export Results for TEAM MANAGER or SWIMS
Export Entries for SWIMS Times Recon
Export Entry Fees for Sports BUSINESS MANAGER
Export Entries for MEET MANAGER Merge of same meet
Export Advancers
Export Results for MEET MANAGER Merge of same meet
Export Athletes / Teams / Email
Export Entries for eDive
Export Records
Export Time Standards
74
Copyright©Sports-Tek Software
MEET MANAGER for Swimming
Export Events for TEAM MANAGER
Export Start Lists for Alpha Scoreboards
Export USA-S Registration
Convert a HY-TEK Export CL2 File to SDIF
Export Generic Data in MS Access
Export Results for Swimming World Magazine Web Site
Export Results for Disabled Athletes in IPC Format
Export Results for TEAM MANAGER or SWIMS
After your meet has been completed, there will probably be many teams who want to get their meet
results on a diskette so that they can Import results into their HY-TEK TEAM MANAGER Database.
You might also want to Export all of the Meet Results to make it available on a Web Site or to Email it
to Teams. The result of this Export will be a standard HY-TEK Zipped Results File that can be imported
directly into a HY-TEK TEAM MANAGER or Sports BUSINESS MANAGER Database, or USA
Swimming's SWIMS Database. The zipped file contains both the "old" CL2 file format and the "new"
HY3 format. The HY3 file format contains additional features including results by Division, Semis,
Swim-Offs, and other capabilities.
· The CL2 file will be used by TEAM MANAGER versions prior to 4.0G.
· The HY3 file will be used by TEAM MANAGER versions 4.0G and later.
From the Main Menu Bar click on File / Export / Results for TEAM MANAGER or SWIMS.
MM will display the Export Results screen for you to Customize and/or filter the Results as follows.
75
Copyright©Sports-Tek Software
MEET MANAGER for Swimming
·
·
·
·
·
·
·
·
·
·
·
·
·
You may filter this export to include only results from a particular Team, LSC, or Region.
You may filter this export by Gender to include Male Only, Female Only, or Both.
You may include Relays with or without their Swimmers or just No Relays.
You may filter what type of event results are exported to include Standard events, Time Trial
events, or Swim-Off events or any combination. These event types are defined in the Event
Set-up screen.
You may optionally include Splits.
The Semis Results Only check box only applies to the old CL2 export file and regardless of
whether this is checked or not the HY3 file will always have results for all rounds.
Click on the Copy last created CL2 File and MM will copy the last export you made out to
diskette or a directory on your hard drive.
You may filter this report to exclude Foreign Swimmers.
You may choose to exclude athlete birth dates for data sensitive reasons. The Registration ID
cannot be excluded since this is the key field used for importing the export file.
You may choose to exclude diving events from the results file.
You may choose to exclude results that were designated as bonus entries.
You can also export the meet results using the Alternate Team abbreviation instead of the
Regular Team abbreviation. The Alternate Team Abbreviation is perfect for use in Intra squad
meets where the team is divided in half into Red and White teams. For example - you make the
Alternate Team Abbreviation be the real team abbreviation and the Regular Team abbreviation
be Red and White. Then when you export the results back to Team Manager, you can use the
Alternate Team Abbreviation.
You can limit the export to only athletes who have a USA Swimming ID. This is useful for
example in cases where the meet is a high school meet with non USA Swimming athletes and
the export is to be used for importing into the SWIMS database
Please Note: When exporting results to TEAM MANAGER for meets that are set-up as Divisions by
Event, the relay export eliminates duplicate relay letter designations for the same team and same
events. For example, if the JV Division 50 FREE has an A, B, and C Relay for a Team and the Varsity
Division also has an A, B, and C relay for that team, MM exports the six relays as A, B, C, D, E, and F
so that when they are imported into TEAM MANAGER, there are no relay duplicates.
Export Entries for SWIMS Times Recon
Choose this option to Export Entries to a file so that it can be uploaded to USA Swimming's SWIMS
database for verification or proof of time.
From the Main Menu Bar click on File / Export / Entries for SWIMS Times Recon. Now you may
filter the export for a Team, for an LSC and/or a Region. You may also filter by Gender and include or
exclude Standard Events, Time Trial Events, and/or Swim-Off Events. Entries flagged with an asterisk
usually mean that the entry times have not been proven and if you want to only export * entries, check
that box. If you do not want bonus events to be verified for a valid time then check the Exclude Bonus
Events check box.
76
Copyright©Sports-Tek Software
MEET MANAGER for Swimming
Export Entry Fees for Sports BUSINESS MANAGER
Choose this option to Export all of your meet entry fee information to HY-TEK's Sports BUSINESS
MANAGER for Windows software. This is a great feature to save your team's accounting person time
and possible data entry errors. Take this diskette to the computer that is running Sports BUSINESS
MANAGER and follow the instructions in the Sports BUSINESS MANAGER User Guide to import the
meet entry fees for each swimmer.
From the Main Menu Bar click on File / Export / Entry Fees for Business Manager. Now you may
filter the export for a Team or for an LSC. You may also filter by Gender and include or exclude
Standard Events, Time Trial Events, and/or Swim-Off Events.
77
Copyright©Sports-Tek Software
MEET MANAGER for Swimming
Export Entries for MEET MANAGER Merge
Choose this option to export entries to another MM Database to be merged into a Master database.
You would use this option if more than one person were doing the data entry work for your upcoming
meet. Person A and person B would export their entries that they had keyed onto a diskette and bring
those diskettes to Person C to Import into their Master MM Database. You would also use it in the
case of a Dual meet where both teams have MM and you want even/odd seeding by Team. The
export allows for including the heat and lane so the other team can pick who they want in each lane.
From the Main Menu Bar click on File / Export / Entries for Meet Manager Merge of the same meet.
MM will offer a number of filters such as Team, LSC, Region and Gender. You may also select the
type of events to Export including Standard events, Time Trial Events, or Swim-Off Events. Typically,
you would not filter the export and include Standard Events.
78
Copyright©Sports-Tek Software
MEET MANAGER for Swimming
MM will create an HY3 Entries Results file that you would typically export to a diskette and then take to
the "Master Computer" to Import or Merge into the Master Database for this meet. The file name for
this Entries export is always in this format: HFilexxx.HY3 where "xxx" is a sequential number beginning
with"001". This file may be zipped and if it is, the zipped file name will be: Meet Entries-Meet NameMeetDate-xxx.zip where "xxx" is a sequential number beginning with"001".
Export Advancers
Choose this option to export Advancers to be imported into another MM Database. Advancers are
results from one meet converted into entries for the next level meet, such as "advancing" athletes and
relays from a High School Regional Meet to the State meet.
From the Main Menu Bar, click on File / Export / Advancers.
79
Copyright©Sports-Tek Software
MEET MANAGER for Swimming
Follow these steps to complete the export.
1. Select which events you wish to use for the advancement or click on Select All to choose all the
events in your meet. You can filter the event list using the filter choices shown above.
2. Specify the Top How Many to export for each event. For example, you might want to export the
top 3 finishers in each event. Or, you may specify a range of qualifiers to export such as 4th
through 6th. This might be used for a situation where 8 qualifying meets advance to the
Championship with the top 3 and next best 10 times from the 4th through 6th finalists in each of
the 8 qualifying meets.
3. Specify the Maximum Qualifiers for each event or leave this entry blank for no maximum.
4. Indicate if you wish to export Relay Athlete names.
5. Indicate if you wish to include Results that meet the Qualifying Standards listed. For example,
you might want to advance the top 2 finishers plus anyone else that swam the State Qualifying
80
Copyright©Sports-Tek Software
MEET MANAGER for Swimming
Time.
6. If this is a Prelims/Finals meet, indicate whether you wish to export each qualifier's best time from
prelims and finals or just the finals time.
7. If advancing based only on a time standard, check the appropriate time standard. You have the
option to enter a number for "Maximum Qualifiers per Event" if there are automatic qualifiers, but
you can leave it blank if none are automatic.
8. You have three choices on what times to use as the entry time. If you check the box for Select
best time from finals only, MM will only look at finals times and advance anyone who made a
qualifying time in finals. If you check the box for Select best time from finals and prior rounds,
MM will search all results for qualifiers and advance anyone who made a qualifying time in any
round. If you want to include Entry Times in the mix, check the box for Select best time from
finals, prior rounds, and entry time.
Click on Export and MM will export those advancers based on the criteria you specified. You would
then Email or mail that file to the meet host running the next level meet to import into their MM
Database - no keying errors or mistakes.
Export Results for MEET MANAGER Merge
If the meet is being run at two or more venues or it is a double-ended meet, choose this option to
export results after each event or session has been concluded. Then Import those results into the
Master Database. A much more efficient way of handling this type of meet is to use HY-TEK's Pro
Version with the Network option. Click Here to find out more information about this feature.
Click on File from the Main Menu Bar and then Export. Then pick Results for MEET MANAGER
Merge of the Same Meet (HY3). The result of this Export will be a HY-TEK .HY3 file that can ONLY
be used to Import (merge results) into another MM Database. The file name for this Results export is
always in this format: HFilexxx.HY3 where "xxx" is a sequential number beginning with"001". This file
may be zipped and if it is, the zipped file name will be: Meet Results-Meet Name-MeetDate-xxx.zip
where "xxx" is a sequential number beginning with"001".
Filter the Export by Session and/or Gender and MM will display the a complete list of events from
which you can choose to export results. You may also select the type of events you which to export
from the following list:
1. Completed rounds
2. Seeded Rounds with no results, which allows seeding to be done elsewhere
3. Partially completed rounds where maybe odd heats were swum in one pool and even heats were
swum in another pool.
Pick the particular filter from the above list and typically select all the events that match that criteria and
then click on Create Export and MM will create an HY3 file that contains the results from all of the
events/rounds that you have selected. Typically you would export this file to a diskette and then take it
to another computer to Import.
81
Copyright©Sports-Tek Software
MEET MANAGER for Swimming
Please keep in mind that when merging results from the source computer to a target computer, the
events in the source Database must be a higher status than the one in the target Database. For
example, if event 9 is timed finals and computer A has results completed, but not scored, the round is
"done". If the computer B has the same event with results done and scored, B cannot be merged into
A. The final round "done" and the final round "scored" are considered the same level. The only way
computer Be's data for event 9 can be merged is if in computer A event 9 is either unseeded or round
1 seeded. If event 10 is prelim/final, then finals done/scored is higher than finals seeded, prelims
done, prelims seeded, and unseeded.
Export Athletes / Teams / Email
Choose this option to Export rosters of your Swimmer's names, ages, gender, etc from an existing MM
Database. You might use this feature to move swimmers' names from a meet that has been already
completed to a new MM Database for an upcoming meet, assuming that most of the same swimmers
82
Copyright©Sports-Tek Software
MEET MANAGER for Swimming
and teams are competing in the upcoming meet.
From the Main Menu Bar click on File / Export / Athletes / Teams / Email. You may filter the export
by Team, LSC, Region, and Gender and choose to include addresses or not. After exporting and
Athletes / Teams file, import the exported file into another MM Database to add these athletes to that
database's roster list.
If you choose one of the Email options, after the export, a message like the following will be displayed:
Export Entries for Diving Only
Choose this option to export entries Diving computer software products that handle diving events in a
High School or College dual meet as well as Diving Meets.
83
Copyright©Sports-Tek Software
MEET MANAGER for Swimming
From the Main Menu Bar, click on File, then Export then Entries for Diving. MM will offer a number
of filters such as Team, LSC, Region and Gender. You may also select the type of events to Export
including Standard events, Time Trial Events, or Swim-Off Events. Typically, you would not filter the
export and include Standard Events.
MM will create an HY3 Entries file that you would typically export to a diskette and then take to the
"Dive Computer" to Import or Merge into the Dive Database. The file name for this Entries export is
always in this format: HFilexxx.HY3 where "xxx" is a sequential number beginning with"001". This file
may be zipped and if it is, the zipped file name will be: Meet Entries-Meet Name-MeetDate-xxx.zip
where "xxx" is a sequential number beginning with"001".
Export Records
From the Main Menu Bar, click on Events / Records. Or from the Main Menu, click the Records shortcut icon
. Highlight the Record Tag Name at the bottom that you wish to export and then click on
the Export at the top of the Records screen. MM will ask for confirmation - click OK and MM will
export the records file and ask you to specify the destination drive and file name.
If you are setting up a new meet, you might want to move records that were set up in a previous meet
to your new MM Database so that you do not have to re-key them. When exporting, you choose one
record tag at a time and it creates a .rec file which can be copied to a diskette or Hard Drive to be
imported later into your upcoming meet's Database or into TEAM MANAGER. If your meet is setup as
a BCSSA meet, records will be created with a .bcs file extension. If your meet is setup as Masters,
records will be created using the masters record file format (.lcm, .scm, .scy file extensions).
84
Copyright©Sports-Tek Software
MEET MANAGER for Swimming
Export Time Standards
From the Main Menu Bar, click on Events / Time Standards. Select which Time STDs you wish to
include in the Export by clicking on the check box column "For Time Stds" next to the Time STD tag.
Now click on Export at the top of the Time Standards screen. MM will ask for confirmation - click OK
and MM will export the Time STDs file and ask you to specify the destination drive and file name. This
file may be imported into HY-TEK's TEAM MANAGER or another MM Database. The file extension of
the exported file will be .st2. If your meet is setup as a BCSSA meet, time standards will be created
with a .stb file extension.
85
Copyright©Sports-Tek Software
MEET MANAGER for Swimming
Export Events for TEAM MANAGER
Once you have set up the Events for your meet and specified any Entry Qualification times, you will
want to Export your Meet Setup to Teams that are coming to your meet. This will greatly benefit teams
who use HY-TEK's TEAM MANAGER product because they will be able to Import these setups rather
then having to key them in to their own TM Database. This also minimizes keying errors since now the
teams will have the "correct" meet setups and events just as you have specified them in your MM
Database.
MM will always export the Meet Event file as a zipped file containing both the older HYV format and the
newer EV3 format. The EV3 format includes more meet information than did the HYV format, such as
the sanction number, the altitude, the entry eligibility date, the open event low age, the max entries per
athlete for the entire meet, the max entries per session per athlete, the session number for each event
and the course for each session. As pertains the EV3 format, if MM is setup as Divisions by Event, the
Division Code and Division Name are included with each event (such as JV / Varsity or Gold / Novice)
so that when the file is imported into TM, entries can be declared based on Divisions.
· The HYV file will be used by TEAM MANAGER versions prior to 4.0G.
· The EV3 file will be used by TEAM MANAGER versions 4.0G and later.
The Meet Events Export handles qualifying time standards for multi-age group events. For example, if
an event is set-up as event 12, 13-18 100 free with multi-age groups of 13-14 and 15-18, the export will
contain 12A for 13-14 and 12B for 15-18 and the qualifying time standard for each event will be
included.
86
Copyright©Sports-Tek Software
MEET MANAGER for Swimming
From the Main Menu Bar, click on File / Export / Events for TM. Verify the Meet Age-Up Date, Meet
Start Date, and Entry Eligibility Date as shown in the window below. You are also given notice that
surcharges and max entries are exported in the meet event file and if these are important for your
meet, you should check them to verify their accuracy. This saves many questions on the TEAM
MANAGER end when the file is imported.
If the Age-Up Date and other data is correct, then click yes to display the menu below. Complete the
screen responding to options about which Qualifying courses to include and if this meet supports
converted entry times. Click OK and MM will ask you where you want the exported zip file to be placed
and then proceed to build the file.
87
Copyright©Sports-Tek Software
MEET MANAGER for Swimming
Please Note: The event export is designed specifically to export events to TEAM MANAGER, not to
MM. If you want to use events from a previous MM Database, the best method is to use the Save As
feature. Then purge what you do not want using the MM Purge function and then change the meet
name, meet date and age-up date to reflect the new meet.
After the export is completed, a message like the one below will appear:
Export a Start List for an Alpha Scoreboard
An Alpha Scoreboard is one that displays Athletes' Names and Club Affiliation as well and result times
right on the Scoreboard itself. This Alpha Scoreboard is connected to a separate computer with its
own Scoreboard software.
A Start List is the list of Athlete Names or Relays with Team Names that MM can export to diskette to
subsequently Import into the Scoreboard computer. Once that Start List is imported into the
Scoreboard computer, each Athlete's Name and Team can be displayed as each heat is swum.
88
Copyright©Sports-Tek Software
MEET MANAGER for Swimming
To Export Athletes' Names and Club Affiliation to the Alpha Scoreboard computer, click on File /
Export / Start List for Scoreboard. You then have two choices: Start Lists for CTS or Start Lists for
Omega. Your next step is to choose where you want the start list files copied to. For CTS, this usually
requires copying to a diskette. For Omega, usually you would copy them to a network drive where the
scoreboard computer is located. After selecting the file location, you must pick a session. If you have
not created any Sessions, go to Events / Sessions to create them. The CTS export will create one file
for each event. The Omega export will create a set of 8 text files all of which are required for the
Omega scoreboard software to function correctly.
Note: The Omega Start List export requires the HY-TEK Scoreboard Interface option.
Export USA-S Registration
This is a great feature when as the meet host, you want to make sure that all the swimmers entered in
your meet are currently registered with USA Swimming. Choose this option to export all of your
swimmers with their USA-S Registration ID Number as they were imported or keyed. Please make
sure you run the Exception Report to check that all of your swimmers have a legitimate USA-S
Registration ID number. If they do not, go back to the Athlete browser and enter one.
From the Main Menu Bar click on File / Export / USA-S Registration. After making selections to the
typical screen as shown below, click OK and MM will create a standard SD3 export file that contains
the names of the swimmers in the meet along with their Team and USA-S Registration ID. You may
filter the export by Team, LSC, Region, or Gender. Send the file by diskette or Email to your LSC
Registration Chairperson to check against their USA Swimming registration database. The USA
Swimming Registration software will print a list of swimmer's in your meet that are not currently
registered or that do not have a correct USA-S Registration ID number.
Export UK Competitors List
This is an export which creates a comma delimited text file competitors list for use by the governing
body or local swim committee in the UK.
From the Main Menu Bar click on File / Export / UK Competitors List. After making selections to the
typical screen as shown below, click OK and MM will create a text file with an alphabetical list of
athletes with the data separated by commas.
The format is: Last Name, First Name, date of birth in YYYY/MM/DD format, team name, and gender.
89
Copyright©Sports-Tek Software
MEET MANAGER for Swimming
An example data line might be: Baxter,David,1991/04/02,Dunkirk,M
Convert a Hy-Tek Export CL2 File to SDIF
After the meet when you are ready to export meet results to TEAM MANAGER or to SWIMS, MM
exports those results in HY-TEK's Standard Data Interchange Format. This export zip file contains two
files, the old .cl2 format and the new .hy3 format. The hy3 file format can be imported by all of HYTEK's Swim Software products and many 3rd party products can import the .cl2 format. However if
you wish to provide an SDIF formatted file (.sd3), you must unzip the HY-TEK export file (you can use
File / Unzip File from within MM) and then click on File / Export / Convert a HY-TEK CL2 Export File
to SDIF.
MM will ask you to specify the location of the HY-TEK export file that you have previously created as
well as the location of where you wish MM to build the SDIF File. The file name created by this
process is SDIFxxx.SD3 where xxx is a sequential number - for example, SDIF001.SD3.
Export Generic Data in MS Access
The MM 3.0 Access database is password protected so that changes cannot be made to the data
outside of MM. If it is desired to manipulate the data for statistical purposes using MS Access, Excel or
some other tool that can import or convert an Access database, you can export the data to an MS
Access database that is not password protected. You have several options for the export as detailed in
the screen shot below.
· If the Export Type is Athletes / Teams, the exported database will have a Meet table, a Teams table
and an Athlete table.
· If the Export Type is Athletes / Teams / Entries, the exported database will also have an Entries
table.
· If the Export Type is Athletes / Teams / Entries / Results, the exported database will also have an
Results table.
· Where appropriate, a Divisions table, a Records table, and a Time Standards table will be created.
90
Copyright©Sports-Tek Software
MEET MANAGER for Swimming
Export Results to Swimming World Magazine Web Site
Swimming World Magazine has a web site designed to receive HY-TEK's results directly from MEET
MANAGER using MM's built in FTP engine. This requires a live Internet connection on the MM
computer. Typically you would export the results at the end of each day or after each session.
To export your meet results from within MM, open the meet you want to upload and from the Main
Menu, click File / Export / Results for Swimming World Magazine Web Site and the following menu
appears:
91
Copyright©Sports-Tek Software
MEET MANAGER for Swimming
Steps for uploading
· Make sure you have an Internet connection.
· Select what you want to include in the Results, such as Records and Time Standards. Spec Pts can
be selected instead of Time Standards in case you want to show FINA points or HY-TEK Points.
· Verify that the Class of the meet is correct. This is important because the web site has these Class
Titles sorted into different sections so that you can easily find just High School meets, for example.
· The location, state (or province), and country are required. If the meet setup has USS for the ID
Format, you must also enter the LSC where the meet was held.
· Click Upload and MM will create html files for each event and upload them in the same format used
by Real-Time results.
Notes
·
·
·
·
·
Results will always include cumulative and subtracted splits.
Scratches and No Shows will not be listed.
Up to 4 relay names will always be listed for relays.
The creation of the result files may take several minutes if you have a large meet.
To see the results, go to http://www.swimmingworldmagazine.com/results/Hy-Tek_search.asp. From
this search page, you can find your meet by entering the date of your meet and the class.
92
Copyright©Sports-Tek Software
MEET MANAGER for Swimming
Export Results for Disabled Athletes in IPC Format
If you have setup the meet as Disabled, then this format is appropriate. The IPC Format is a format
created by the International Paralympic Committee which is a semi-colon delimited format.
The fields are:
Sport (SW for swimming)
Discipline (Long Course or Short Course)
Event
Phase (Heat or Finals)
Eligible Classes
Family Name
Given Name
NPC (Country)
Class (Disability class for the athlete)
Date (of the event)
Rank (Finish Place)
Time
A sample of one entry in the format follows:
SW;Long Course;Men 50 m Freestyle S8;Heat 2;S8;Doe;John;CHN;S8;9/13/2008;3;00:27.88
93
Copyright©Sports-Tek Software
MEET MANAGER for Swimming
Set-up and Preferences
The Set-up Menu choices are as follows:
Meet Set-up
Athlete / Relay Preferences
Seeding Preferences
Report Preferences
Entry / Scoring Preferences
Scoring Set-up
Division / Region Names
Language Preference
Directory Preferences
Timing Console Interface
Alpha Scoreboard Interface
Open Water Button Timer Interface
Options
Meet Setup
Whenever you Open a New Database, MEET MANAGER will route you to the Meet Set-up screen so
that you can initialize the basic information about your meet.
Click on Set-up / Meet Set-up view or revise the basic parameters for your meet such as the meet
name, location, meet start and end date, the type of meet you are running, the course, etc.
94
Copyright©Sports-Tek Software
MEET MANAGER for Swimming
Age-Up Date
Normally the age-up date is the first day of the meet. If you have entered the incorrect age-up date and
athletes have been entered, you can correct the date and then click the Age-Up Athletes button at the
bottom to recompute all athlete ages.
Entry Deadline
This date is included in the meet event export file for TEAM MANAGER.
Course
Choose from one of three courses. If you find out that the seed times have been converted to the
wrong course or the seed times have not been converted properly, simply click the Re-Convert
Entries button at the bottom to reconvert all entries to the course selected.
Touch Pads at Both Ends
If you are using a Timing Console with touch pads at both ends for most events, click on the "Default
Touch Pads at Both Ends" check box. Because each event has it own setting for each round as to
whether touch pads are used at both ends, this is simply a default setting to be set when adding a new
event to the database.
95
Copyright©Sports-Tek Software
MEET MANAGER for Swimming
ID Formats
Specify any registration ID Format you wish so that MM can build information based on the
Registration ID of the Athlete. If the athletes in this meet do not use one of the specific ID Formats
listed, click the Other radio button. If you choose USS or SSA, MM will assume that you want to enter
that ID first for each Athlete and then MM will build the information that it can derive from the ID. If you
select NZSF or AUS for the ID Format, MM will automatically generate as much of the ID that it can
with the information entered.
Choosing BCSSA for the ID Format causes MM to conform to the British Columbia Summer
Swimming Association rules for swimming. Click Here for details on the special features that pertain to
BCSSA meets.
The following information describes the format of the various Registration ID Formats:
USS - USA Swimming
MMDDYYFFFILLLL
MMDDYY is the birth date of the athlete in the month/day/year format
FFF is the 1st three characters of the First name
I is the middle initial
LLLL is the 1st four characters of the Last name
An "*" is included if the first or last name does not fill the required number of characters. The
middle initial may be a number if there is a need for an unduplicating character.
SSA - Swimming South Africa
MMDDYYFFFILLLL
MMDDYY is the birth date of the athlete in the month/day/year format
FFF is the 1st three characters of the First name
I is the middle initial
LLLL is the 1st four characters of the Last name
An "*" is included if the first or last name does not fill the required number of characters.
AUST - Australian Swimming
SSSFFDDMMYYx
SSS are the 1st 3 characters of the Surname
FF are the 1st 2 characters of the First name
DDMMYY is the birth date of the athlete in day/month/year format
x is the character used for unduplicating
SNZ - Swimming New Zealand
CCCSFIDDMMYY
CCC is the Club identifier
S is the 1st character of the Surname
F is the 1st character of the First name
I is the middle initial
DDMMYY is the birth date of the athlete in the day/month/year format
BS - British Swimming
There is no format and consists of a number assigned by British Swimming
Class
The Class of the meet will be used for Report Header information as well as Customization options. If
you pick Masters, MM will automatically set up scoring based on the standard Masters age groups. If
you pick Canadian Masters, MM will automatically set up scoring based the same as Masters but with
the following difference - the low age of 20-24 instead of 19-24 and the low relay age of 80-99 instead
96
Copyright©Sports-Tek Software
MEET MANAGER for Swimming
of 76-99. If you click on Disability, MM will automatically set up scoring based on the disability meet
format.
DQ Codes
You have the option to use USA Swimming DQ Codes, FINA DQ Codes, or UK-ASA DQ Codes.
There is also a Custom DQ Codes choice which defaults to being the USA Swimming DQ Code set.
With a text editor, you can edit the Custom set and add new codes or edit the descriptions. The coding
system must not be changed. The first digit of the code represents the stroke such as 1 for butterfly
and 2 for back. 7P and 7Q should not be altered. These are for Declared False Start and Did Not
Finish.
Meet Type
Most meets will use Standard for the Meet Type. But if your meet requires multi-level Division scoring,
there are a number of choices. Do not select Division by Team unless you understand why you
are selecting it. Otherwise, select the type of Division scoring from the list below.
By Event
This is used when you have more than one division competing in the same meet and the
athletes in each division compete in separate events. For example, there may be a
separate100 free for Varsity and a separate 100 free for JV. When you set up each event, pick
from the list of Divisions so that each event will be associated with a division, and then you can
get separate team scores for each division.
By Team
This is rarely used, but you might have several teams from different divisions competing in the
same event. For example, you might have High School AAA, AA, and A divisions, each with
multiple teams. Each event would have three 1st places, three 2nd places, and so on. When
you set up each Team, assign a Division to each. Athletes and relays will be seeded together
based on time, but results will be separated by the Division of the athlete's team. In a
Prelim/Final event, after finals are completed, MM's Seeding Menu will create a separate set
of Finals for each Division.
By Entry
This method is most often used in Disability meets where there are many
divisions/classifications and there are numerous first places in each event. For each Individual
Entry in the Athlete Menus entry browser, pick from the list of Divisions to assign the entry to a
Division. Athletes will be seeded together based on time, but results will be separated by the
Division of the athlete's entry. In a Prelim/Final event, after finals are completed, MM's
Seeding Menu will create a separate set of Finals for each Division.
Flighted
A Flighted Meet is a special meet where the entries in each event are dynamically divided into
two to four groups by either the Seed times or the Result times and the groups compete
separately for placing and scoring. In each event, each group competes against one another.
So for each event, there are two to four 1st places, two to four 2nd places, and so on
depending on how many flights/groups you want.
By Time Standard
In this type of meet, Time Standard categories are set up for each event and then multiple
places are assigned - one for each Time Standard Group. The placings can be based on the
time standard of the seed time or the time standard of the swum time. For example, if you set
up A, B, and C Time Standards for each event based on swum time, there would be a 1st,
2nd, 3rd, ... for those athletes that swam an A time, a 1st, 2nd, 3rd, ... for those athletes that
swam a B time, and so forth.
You may Customize your Division names by clicking on Set-up from the Main Menu Bar and then
Division / Region Names then pick Division and follow the instructions on the screen.
Meet Style
97
Copyright©Sports-Tek Software
MEET MANAGER for Swimming
If you are running a Dual Meet and you want MM to seed the two teams in odd/even lanes, click on the
Team Dual radio button. If you are running a Double Dual meet in which each of the teams are to be
scored based on swimming against one another in a Dual meet format, click on 3+ Team Dual radio
button. The 3+ dual choice also allows you to seed up to 10 teams in assigned lanes. Otherwise, click
on the Standard radio button.
Base Country
Specify your Base Country so that MM can customize your State/Province selections for mailing
information.
Altitude
The altitude in feet is optional. When using File / Export Results to TM or SWIMS, the altitude will be
included in the export file.
Athlete / Relay Preferences
From the Main Menu Bar, click on Set-up / Athlete/Relay Preferences to display the screen shown
below.
The Athlete Preferences section determines which fields are enabled in the Athlete Add Menu. Relay
Preferences pertain to what is allowed when adding relays and relay swimmer names. The
Competitor Numbers section determines whether competitor numbers are to be used or not.
98
Copyright©Sports-Tek Software
MEET MANAGER for Swimming
Athlete Preferences
·
·
·
·
·
Enter Ages if events are based on ages.
Enter Birth Dates to have MM automatically compute ages.
Enter School Year usually only applies to College and High School meets.
Enter "Citizen Of" is optional.
Enter Athlete Status choices are Normal, Exhibition, Foreigner, Disabled, or Rookie.
Relay Preferences
· Allow "A" Relays only prevents you from entering more than one relay per team and so you will
not be allowed to enter, for example, "B" or "C" Relays.
· Allow anyone from any team on a relay means any person from any team can be on a given relay.
Usually this is used for all-start meets
· Allow athlete on 2+ relays in same event means the same athlete could be on the A relay for
prelims and on the B relay for finals.
· All-Star Meets: Relay Names linked to LSC is used in the Relay Names menu from Run and the
Relays menu and means the eligible athlete name list is based on LSC rather than the team.
Competitor Numbers
Competitor numbers are optional in MM. You can have MM automatically assign this number as you
add athletes or you can later use the Athlete Menu's Competitor Number button to automatically renumber all athletes starting with any number and it will then number alphabetically by team and
alphabetically by name within each team. If you do not check the box Enter competitor numbers,
then the competitor number text box in the Athlete Menu will not be enabled.
Seeding Preferences
MEET MANAGER's Seeding Preferences provides many ways to customize how your events will be
seeded depending on the type of meet you are running - Timed Finals, Dual, Masters, Championship,
etc. There are many different options to choose from to determine the seeding of your meet. It is very
important to know which type of seeding you will be using for your meet and to understand the
differences in the types of seeding prior to choosing these options.
From the Main Menu bar, click Set-up / Seeding Preferences and click on one of the four Tabs as
shown below.
Basic Seeding Settings
Standard Lane Preferences
Dual Meet Seeding
Masters Seeding
Basic Seeding Settings
From the Main Menu bar, click Set-up / Seeding Preferences and click on Basic to display the panel
below which allows you to set some basic seeding rules.
99
Copyright©Sports-Tek Software
MEET MANAGER for Swimming
Preliminaries
Most swim organizations require that the fastest 3 heats of Preliminaries be Circle Seeded in a
Championship Meet for events with more than one round. In the VERY UNUSUAL case where you
want to Circle Seed 2 heats or any other number of heats, this is the place to make the change.
Timed Finals
· Standard: For one round timed final events, standard is the normal choice where the fastest
athletes are seeded together in the same heat. The next fastest athletes are seeded together in the
next heat and so on.
· Circle Seed: In the VERY UNUSUAL case where you want to have the fastest athletes assigned to
different heats, select Circle Seed so that the fastest athlete is in the last heat, the 2nd fastest in the
second to last heat and so forth. If there are four heats, the fastest four would be in different heats.
Parameters
· Allow Foreign athletes in Championship Final: Normally this would be allowed, but if checked,
athletes with a status of Foreigner will not be permitted to advance from prelims or semis into finals.
· Allow Exhibition athletes in Championship Final: Normally this would be allowed, but if checked,
athletes with an athlete or team status of Exhibition or with the entry set as exhibition will not be
permitted to advance from prelims or semis into finals.
· Seed Exhibition athletes last: No matter what the entry time is, exhibition athletes and relays will
be seeded last.
· Maximum age for C-Final: This allows you to specify the maximum age that MM will allow to be
seeded in the C-Finals of a multi-round event that has 3 finals and is an ABC Final Type.
Non-Conforming Entry Times
· Prelim / Final Events Seed non-conforming times last
· Timed Final Events Seed non-conforming times last
· Course Order, such as LSY
With the first two options, you may choose the seeding order you want for entry times with different
100
Copyright©Sports-Tek Software
MEET MANAGER for Swimming
courses. This feature is used in Championship type meets that do not use course conversions. For
example, if the championship meet is in a Long Course Meter pool and you want to seed Long Course
entries first, then Short Course Meter entries second, then finally Yard entries, you would specify LSY
for the course seeding order. Any entries designated as Bonus will be seeded after the three sets of
courses of regular entries if Seed non-conforming times last is selected. Exhibition entries will follow
bonus entries in the course order chosen if Seed Exhibition Athletes Last is selected.
Note: If neither of these seed non-conforming times last options is checked and you wish MM to
convert entry times for seeding purposes, MM will convert them to the Meet Course as specified in the
Meet Setup.
See Conversion Factors for Entry Times for the conversion factors built into MM.
MM will use the following conversion factors when converting entry times from one course to another:
· 1.11 to convert SC Meters to/from Yards
· 2% to convert SC Meters to/from LC Meters
· 0.875 to convert 400/500 and 800/1000 Meters to Yards
· 0.997 to convert 1500 Meters to/from 1650 Yards
Standard Lane Preferences
Lane Preferences refers to the order of assigning lanes when seeding. From the Main Menu bar, click
Set-up / Seeding Preferences and click on Standard Lanes.
Click on the red diamond to display the Standard Lane Preferences menu. In most cases, no changes
should be made to these "standard" lane preferences. For example, for meets using 8 lanes, the
default standard lane preferences will be lane 4 for fastest, lane 5 for 2nd fastest, lane 3 for 3rd fastest,
lane 6 for 4th, etc. But, if you are swimming in a pool where Lanes 5 and 6 are at the shallow side and
you wish to give them "lower priority" in terms of lane preferences, you might want to seed the fastest
in Lane 3, then 2, then 4, then 1, then 5, then 6. Another example is if you have a 10 lane pool and are
using only the middle 8 lanes, change the 8 lane row to 5, 6, 4, 7, 3, 8, 2, 9 and in the Events Menu,
set-up each event's number of lanes to be 8 standard lanes instead of 10 standard lanes. This will
leave lane 1 and lane 10 empty when seeding.
101
Copyright©Sports-Tek Software
MEET MANAGER for Swimming
Note that in any given row, no number may be repeated and you may use any set of numbers from 0 to
12 in any row. If a row is highlighted in yellow, it is being used by at least one event. Click the default
button to reset all lane preferences to the normal setting.
Dual Meet Seeding
From the Main Menu bar, click Set-up / Seeding Preferences and click on Dual Meets to display the
panel below which allows you to assign teams to lanes.
102
Copyright©Sports-Tek Software
MEET MANAGER for Swimming
For Dual and 3+ Dual meets, you can assign lanes to up to 10 teams with any lane assignments
desired. Just double click the team name on the left to move it to the next available lane on the right.
Or drag the team from the left to the right and drop it into any empty lane. Once teams are assigned on
the right, you can switch them by dragging one and dropping it on top of the other. These assignments
are only used in the Seeding Menu if the Meet Style in Meet Set-up is Dual or 3+ Dual and if Use Lane
Assignments Above is checked.
· Strict Assignment All Heats: If this is checked, teams are only seeded into their assigned lanes
regardless of the number of entries from each team. If this is not checked, then there is an attempt
to prevent there being empty lanes. For example, if the first team above has 3 athletes in an event,
the second has 4, and the third has only 2, then the second team will use the third team's empty
lane. With Strict Assignment, the second heat would have 1 athlete and the first would have 8.
· Strict Assignment Fastest Heat Only: After the fastest heat has been assigned strictly, then there
will be an attempt to prevent empty lanes in the heats that follow. When one team runs out of
athletes for the event, other teams will be assigned to their lanes.
· Use Lane Assignments Above: If this is not checked, then the lane assignments are ignored when
seeding.
· Alternate Use of Unassigned Lane (2 team dual): For 2 team duals only and in cases where there
is no team assigned to a lane in the menu above, such as in a 5 or 7 lane pool, the empty extra lane
will alternate by event as to which team will fill it.
Masters Seeding
From the Main Menu bar, click Set-up / Seeding Preferences and click on Masters Meets to display
the panel below which allows you to set some seeding rules for Masters events.
103
Copyright©Sports-Tek Software
MEET MANAGER for Swimming
· Seed by time Only: This is usually only used in Masters Meets where there are few entries.
· Seed by age group, then by time: This option is usually chosen for large National Masters meets.
If you select this seeding option, then you must specify the number of age groups to skip before a
residual heat is forced to be included. This number of age groups to skip is usually set to 2.
· Low age for Individual Events and Low age for Relay Events: This age varies for the youngest
age group depending on the country or the rules being followed. Typically it is 18-24 or 19-24 for
individual events. The relays low age only applies to long course and short course meters and is
typically 72-99 or 76-99 for relays.
Report Preferences
MEET MANAGER's Report Preferences provides ways to customize your Reports. From the Main
Menu bar, click Set-up / Report Preferences and click on one of the four Tabs as shown below.
Report Formats
Report Headers
Punctuation
Footer Logos
Report Formats
From the Main Menu bar, click Set-up / Report Preferences / Report Formats to display the panel
below.
104
Copyright©Sports-Tek Software
MEET MANAGER for Swimming
Athletes / Relays
There are several choices for how to display athlete names.
· List athletes with last name first: When checked, it is Smith, Jessica R; unchecked is Jessica R
Smith.
· Show athlete middle initial: When checked, it is Smith, Jessica R; unchecked is Jessica Smith.
· First name initial with full last name: When checked, it is Smith, J; unchecked is J Smith.
· Full first name with last name initial: When checked, it is S, Jessica; unchecked is Jessica S.
· Show athlete status with name: If an athlete is foreigner, MM will put an * in front of the swimmer
name; if exhibition, an x in front of the swimmer name; if rookie, a # in front of the swimmer name;
if disabled, a % in front of the swimmer name.
· Show birth year in place of age: Instead of say 14 for the age, if the athlete was born in 1992, 92
will be displayed where appropriate.
· Suppress "A" Relay Designator: This would be normally used when there is only one relay per
105
Copyright©Sports-Tek Software
MEET MANAGER for Swimming
team and so the "A" designator is meaningless.
Teams
· Use home town in place of team: The team name will be replaced by the city and state entered for
each athlete. If there is no city and state entered, the team name will still be shown.
· Show 2nd Club with primary team: This option only applies to the Psych Sheet, Meet Program,
and Results. For Award Labels, it means show the primary team abbreviation plus the second club
name. For the 3 reports, MM will use the full team name plus second club name for single column.
However, if the combined name is greater than 18 characters, MM will use the short team name plus
the second club name. For two column without time standards, MM will use the short team name
plus second club name. If time stds are included, it will only use the short team name.
· Show country code with team name: For individual events, the athlete's three character citizen
of country code will be concatenated with the team name such as Hurricane Swim Club - USA. In
order for the citizen of country code to appear, you must check the box in Athlete / Relay
Preferences for Enter Citizen Of and add the citizen of country for each athlete using the athlete
add/edit menu. For relay events, the relay team names use the team address country code. Note 1:
For individual events, the country code is not taken from the country for the athlete address. Note 2:
For two column and three column Results reports and Meet Program reports, you must also check
the Suppress LSC team designator preference in order for the country code to appear.
· Suppress LSC team designator: This would be used where all teams have the same designator so
it is pointless to show it or where the meet does not use LSC codes, but the teams entered with the
LSC codes anyway.
· Use Alternate Team Abbreviation: If you have entered an Alternate Team abbreviation for each
team in the Team Setup menu, you can choose to use this Alternate Team abbreviation on all
reports instead of the Regular Team abbreviation.
Meet Program / Results
· Always display actual entry time: This allows you to show the actual seed time on heat sheets
rather than the converted time.
· Suppress small "x" for scorer limits: This small "x" is normally inserted in front of a result time to
show that the entry was ineligible to score either because the entry exceeded the maximum entries
per team that can score. Or the small "x" is inserted to indicate that the entry was ineligible to score
because the time was slower than the qualifying time.
· Suppress the "J" for JD on results: The "J" is inserted in front of the result time to show that the
place or the score was manually adjusted using the JD button in the Run Menu.
· Suppress the Time Standard designator: The time standard designator is a 1 to 4 character
abbreviation which is listed at the top of the Meet Program and the Results report along with the time
standards This designator is also listed to the right of the seed and result times on the report and
when this check box is checked, the designator is only listed at the top and not to the right of the
time.
· Suppress splits if result is a DQ: When results are printed for a DQ, the result time is never
printed, but the splits are printed. In US Masters, the rules require that splits not be printed if the
swim was a DQ. If either the individual event or relay event check box is checked, splits for DQ
individual swims or relays or both will not be included on the results report.
· Show both age and birth year (1 col only): The age and birth year will be displayed as 14-92, for
example, on one column heat sheets, psych sheets, and results. The two and three column reports
will display the age or year depending on the Show birth year in place of age check box setting
under Athletes/Relays above.
· Suppress results "q" for Advancers: When results for prelims or semis are printed, a line is drawn
under each set of qualifiers for the next round. A small "q" is also printed next to the qualifiers, but
you can suppress that small "q" by checking this box.
Miscellaneous
· Flag Over-Achievers with a "+": An Over-Achiever is an athlete who improves to a higher time
standard, such as one entered with a B time and then swimming an A time. The Results Report and
106
Copyright©Sports-Tek Software
MEET MANAGER for Swimming
·
·
·
·
·
·
Award Labels showing time standards would be displayed with a "+" after the time standard, such as
1:23.45 A+.
Flag Under-Achievers with a "-": An Under-Achiever is an athlete who swims slower than his/her
seed time and drops to a lower time standard, such as one entered with an A time and then
swimming a B time. The Results Report and Award Labels showing time standards would be
displayed with a "-" after the time standard, such as 1:33.45 B-.
12 and Under as Under 13: This would cause all events that are normally XX and under to be
displayed as Under XX+1. So a 15 and under event would become a Under 16 event.
13, 15, or 17 and Over as Senior/Open: This causes 13 & Over, 15 & Over, and 17 & Over to be
displayed as Senior or Open.
Display military time: Whenever a time is displayed, such as heat start times, 2:13 PM would be
displayed as 14:13 PM, for example.
Relays as 4x100 and 4x200 style: In case you want relay events to be displayed as 4x100 instead
of just 400, check this box.
Relays alternate with the 2 fastest heat first: If you want to alternate the women's and men's
relays, but have the two fastest women's heats first followed by the first two fastest men's heats, and
then alternate one heat at a time, check this box.
Paper Size
· Paper Size: Paper size is really determined by the setting on your printer. This paper size does not
change the setting on your printer, but is used by the Meet Program, Psych Sheet, Result, and Lane
Timer Sheet reports to determine how many lines are expected for the report so that, for example, a
heat is kept together without a page break in the middle of the heat list. All other reports do not need
to know the paper size because the report itself can break at any point to a new page.
Printer Options
There is a separate setting for Reports and for Labels.
· Print Directly to the default printer: These check boxes determine whether to print directly or to
preview first. The label choice is independent of the preference for the Award Labels button in the
Run Menu which has its own preferences for printing directly or not.
· Number of Copies to printer if printing directly: When printing directly, you can specify the
number of copies to be printed. Note that the Awards Labels button in the Run Menu will always print
1 copy regardless of the setting here for labels.
· Collate: If printing more than one copy directly to the printer, you can specify whether to collate or
not. The default setting is to collate.
Report Headers
From the Main Menu bar, click Set-up / Report Preferences / Report Headers to display the panel
below.
107
Copyright©Sports-Tek Software
MEET MANAGER for Swimming
You can enter a one or two line report header that will be displayed at the top of each page of any
report along with the Meet Name and Date entered in Meet Set-up. If you choose, you can exclude the
Meet Name and Date and only show the Header 1 and Header 2 at the top of each report page.
You can also add a Sanction # and optionally display it with line 1 of your report Header.
Punctuation
From the Main Menu bar, click Set-up / Report Preferences / Punctuation to display the panel below.
Punctuation is a real time saver and makes report presentation much cleaner. Suppose some names
are entered as all upper case, some all lower case, and some mixed case. By choosing Upper/Lower
Case or All Upper Case, reports will be consistent. Because upper case characters use more space
108
Copyright©Sports-Tek Software
MEET MANAGER for Swimming
than lower case characters, Upper/Lower Case is recommended so that longer names will fit on
reports. When you enter athlete names, they will be stored as typed, but converted to proper
uppercase and lowercase punctuation on reports if so selected.
To avoid punctuation of a name, make the 2nd letter lowercase or turn off punctuation in this menu.
Note that if using upper/lower case punctuation, names beginning with MAC do not get punctuated
because there is no right way to do it in all cases. So you have to edit the name yourself and put in the
upper/lower case. One exception to this is that if the first four letters of a name is all lowercase, the 2nd
letter lowercase rule is ignored and the entire word is punctuated.
You may also specify how you want your Open Events designated - as Open, Senior, or "blank". You
may customize your AP News Export choices for Short Team name, Long Team name, or just Team
Abbreviation.
Footer Logos
From the Main Menu bar, click Set-up / Report Preferences / Footer Logos to display the panel
below. From this panel you can select up to five logos to be included in the footer of reports for the
Meet Program, Psych Sheets, or Results. In order for the logos to appear within any of these reports,
you must also check the Include Logos check box found in the Include Tab of each of the report
menus.
The images that can be used for logos are .bmp files, .png files, .jpg files, and .jpeg files. After you
have selected the images you want, click the Create Sample Report button to see how the logos will
look. The images will be equally spaced across the bottom and automatically resized using the proper
aspect ratio to fit within the footer. You can adjust the height of the footer from 5/32 inch to 1.5 inches
by entering a number from 0 to 9 in the text box below. You can experiment with different settings to
see what looks best.
We suggest that you store your logos image files in c:\hy-sport\swmm3\logos for easy access.
109
Copyright©Sports-Tek Software
MEET MANAGER for Swimming
Select a Printer for Reports and a Printer for Labels. These can be different printers since you could
print your Results on one printer say on LPT1 and use a second printer on LPT2 for Award Labels. If
you are using a Dot-Matrix printer to print Entry cards or labels, please set up that printer as your
default printer in Windows. To do this, click on the Windows Start button, then Settings then Printer.
Now double click on the Dot-Matrix printer and then click on the Printer pull-down and click on Set
Default. If you have problems printing on the Dot-Matrix printer, please go to your printer vendor's web
site and download the latest printer driver. Please note that Windows NT does not have printer drivers
for some of the older Dot-Matrix printers.
You can choose to Preview each report on the screen or print Directly to the Printer with no Preview.
This print directly to printer does not apply to labels except in the Run Menu when using the Awards
button, you can specify for it to print directly to the printer (see Run / Preferences / Awards).
Choose your paper size from the three choices shown and the number of copies you want reports to
default to.
110
Copyright©Sports-Tek Software
MEET MANAGER for Swimming
Entry / Scoring Preferences
MM offers powerful and flexible customization options for Entries and Scoring. From the Main Menu
Bar, click on Setup / Entry Scoring Preferences. Then click on the appropriate Tab to customize
how you want MM to handle very specific entry and scoring alternatives.
Scoring Awards
Entry Limits
Results
Time Standards Meet
Flighted Meet
2 or 3+ Double Dual
Improvement Points
HY-TEK Points
NISCA Points
British GB Points, BAG Points and BAGCATs
LEN Points
FINA Points
SNZ Points
Scoring/Awards
From the Main Menu Bar, click on Setup / Entry Scoring Preferences / Scoring/Awards.
111
Copyright©Sports-Tek Software
MEET MANAGER for Swimming
Different point system for male and female
Click on this check box and MM will provide a totally independent set of place scoring points for the
Male and Female events in your meet. For example, you may wish the Female events scoring to be
10-8-7-6-5-4 and the Male Scoring to be 7-5-4-3-2-1. Click Here to find out How To Setup Point Scoring.
Different point system for each Division
Click on this check box and MM will provide a totally independent set of place score points for each
Division that you have set up. For example, you might want 1st place for the Varsity events to be worth
10 points and for the JV events 8 points.
Score points ONLY if athlete equals or exceeds event qualifying time
Click on this check box and MM will check each Athlete's Result and allow him/her to be awarded
points only if that time equals or exceeds the meet entry qualification time for that event. You may
want to make this selection to penalize entries that do not swim the publicized entry qualification
requirements to enter the meet. MM will print a small "x" beside these result times indicating that they
are not eligible to score points - for example, "x 1:23.45".
Score fastest heat ONLY, regardless of overall place
Click on this check box and MM will assign points to Athletes and Relays that have been seeded in the
Fastest Heat ONLY. For example, if an Athlete in the 3rd fastest heat swims the fastest time, he/she is
NOT eligible for first place Points or Awards. This is used primarily in Summer type recreation
leagues, but can be used in Prelim / Final meets where there is more than one heat for the second
round. Note that "score fastest heat only" does not apply to events that are multi-age group and does
112
Copyright©Sports-Tek Software
MEET MANAGER for Swimming
not apply to meets that have a Meet Type of Divisions by Time Standards, Divisions by Flight, Divisions
by Team, or Divisions by Entry.
Allow foreign athletes' point scores to count toward team scores
Click on this check box and MM will allow Foreign Athlete's Scores to be totaled for Team Points.
Click here to find How To Declare Foreign Athletes.
Score "A" Relay Only
Click on this check box and MM will only allow "A" Relays to score points.
Penalty Points awarded if No Show (NS)
Enter a negative number such as -1 or -2 if you want to penalize No Shows. These points will be
subtracted from Team Scores and Individual Scores.
Maximum scorers per team per event
Enter the max number of scored places for Individual and Relay events you will permit a Team to
place. This feature prevents the larger teams from totally dominating the scoring. Leave these two
fields "blank" if you do not wish to restrict scoring in this way.
Top how many for award labels
Enter the number of Award Labels you wish to print for each Individual and Relay event when using the
Awards button in the Run Menu. For example, enter 8 and MM will print an Award Label for the top 8
finishers in each event. The value you enter here will also be the default value when you use the
Award Labels Menu, but in the Award Labels Menu, you can adjust this to be a range of places, such
as 4th through 7th only.
Maximum per team that advance to finals from prelims
In some meets, each team may swim as many as desired in prelims, but are limited to say 4 to
advance to finals.
Masters Team Scoring
Click on the Team Sizes button to set up or edit the Region Names as, for example, Small, Medium,
and Large. Then specify the minimum number of athletes for each scoring group for Female, Male,
and Combined. That way when you go to compute Team Scoring from Reports / Scores, you click on
the "by region" group radio button and MM will group the teams according to your specifications.
Special Point System
Click on this pull down list and select HY-TEK Age Group Points, HY-TEK Single Year Age Group
Points, HY-TEK Open Points, FINA Points, NISCA Points (High School yard meets), LEN Points,
or SNC Points to choose which set of Special Points you want to use. These points can be displayed
next to each result time in results from the Run Menu or the Report / Results Menu, but ONLY if you
click on the Spec Pts check box on the report menu itself or in the Run / Preferences / Results menu.
In addition, when scoring team or individual points in Reports / Scores, you have the option to use the
Standard Point System that we are all accustomed to or to use the Special Points for scoring the
Team Scores or the Individual High Point winners. However, Improvement Points are a replacment
113
Copyright©Sports-Tek Software
MEET MANAGER for Swimming
for the Standard Points and are not used for Spec Pts. See also Point Systems Report.
If using HY-TEK points, you have the option to show decimals for more accuracy. This means instead
of 733 points, it may display 733.82.
HY-TEK Points is a system for assigning a point value to virtually any swim. It is the only point system
in existence that covers every event in all three courses:
· long course meters
· short course meters
· short course yards
HY-TEK Age Group Points
There are 9 different sets of points for each course covering the following age groups:
· 8 & under girls and boys and includes 25's
· 9-10 girls and boys
· 11-12 girls and boys
· 13-14 girls and boys
· 15-16 boys
If an event is specified as 10 & under and HY-TEK Age Group Points are used, any swimmers 8 and
under will be scored using the 9-10 points rather than the 8 & under points. However, if the 10 & under
event has multi-age groups configured with 9-10 and 8 & under age groups, then the swimmers who
are 8 and under will be scored using the 8 & under points.
HY-TEK Single Year Age Group Points
There are 18 different sets of points for each course covering the following one year age groups:
· 9, 10, 11, 12, 13, 14, 15, 16, 17, and 18 year old girls and boys
· Anyone older than 18 will get zero points when using Single Year Age Group Points. 8 and under
athletes will receive the same points as a 9 year old.
HY-TEK Open Points
· There are 2 sets of points which can be used for any age. These are similar to FINA points in
concept.
About HY-TEK Points
· The points range from 1 to 1150 where 800 points closely approximates a U.S. Top 16 reportable
time for a particular age group. This system allows one to approximately compare the quality of
swims between age groups.
· The point system will not be changed from year to year unless there is some change to the rules for
a stroke that causes times to suddenly drop for that particular stroke (such as the backstroke turn
change). This way performances can be compared over the years to a common standard. The HYTEK Points system is ideal for scoring individual high point and team high point at meets and for
scoring Combined Events such as Pentathlons, Heptathlons and Decathlons.
114
Copyright©Sports-Tek Software
MEET MANAGER for Swimming
Enabling HY-TEK Points
· Click Set-up from the Main Menu Bar and then Entry/Scoring Preferences. Then click on the
Scoring Awards tab and select the Special Point System combo box to pick from the list of Point
Systems.
· To use the points for scoring team points or individual high points, go to Reports / Scores and
select Spec Pts under Format / Points.
· To show the points next to each result when using List or Score in the Run Menu, at the top of the
Run Menu click Preferences / Results for List and Score Preferences and select Spec Pts in the
Include in Results section.
· To show the points next to each result when Reports / Results, select Spec Pts in the Include in
Results section.
NISCA Points were developed by the National Interscholastic Swimming Coaches Association, a
United States based organization. It is a point system which is only for short course yards and only for
high school events. The points range from 0 to 200 per event. These points are also called NISCA
Power Points.
To enable NISCA Points, click Set-up from the Main Menu Bar and then Entry/Scoring Preferences.
Then click on the Scoring Awards tab and select the Special Point System combo box.
British GB Points, BAG Points and BAGCATs
As of January 1, 2010, the ASA has dropped their GB Point System and has replaced it with
FINA Points. BAGCATS scoring has been retained, but the point calculations are computed using
FINA Points and the Age Factors are no longer used to adjust each age group's points.
To enable FINA Points, click Setup from the Main Menu Bar and then Entry/Scoring Preferences.
Then click on the Scoring Awards tab and select the Special Point System combo box.
Once FINA Points is selected, be sure to click the Spec Pts check box in Reports / Results and in
Run / Preferences / Results to display the points when you list results for an event from the Run
screen or from Reports / Results. In order to get the BAGCATS score for each individual Use Reports /
Scores and check the BAGCATS and check the Spec Pts check boxes.
LEN Points is a point system based on the World records since the last Olympics. This world record
time is assigned 1000 points. HY-TEK has built in the World records for Long Course Meters and Short
Course Meters from the 2004 Olympics. After the 2008 Olympics, HY-TEK will update these base
times which will cause the points will change.
115
Copyright©Sports-Tek Software
MEET MANAGER for Swimming
To enable LEN Points, click Set-up from the Main Menu Bar and then Entry/Scoring Preferences.
Then click on the Scoring Awards tab and select the Special Point System combo box.
LEN is short for Ligue Europeene de Natation.
FINA Points is a point system based on the previous year's world record. In 2009, FINA Points was
based on the average of the top 10 all-time best performances through 2008. In 2008 and prior years,
FINA Points was based on the average of the top 10 all-time best performances through last
Olympics. This base time is assigned 1000 points and a formula is used to calculate the points for a
swum time in comparison to the base time. In 2010 this formula changed slightly from using rounding
rules to truncating the points to the next lowest integer when the point claculation has a fraction. HYTEK has built in these base times and formulas for Long Course Meters and Short Course Meters.
In 2008, the FINA Bureau decided that the FINA Points Table will be updated annually, respecting the
following deadlines: For short course (SCM) the base times are defined with the cut of date of August
31st. For long course (LCM) the base times are defined at the end of the year (December 31st). HYTEK will update these base times when they are available which will cause the points to change. As of
this writing, the base times for Short Course Meters reflect 2009 times and the base times for Long
Course Meters reflect 2009 world records.
To enable FINA Points, click Set-up from the Main Menu Bar and then Entry/Scoring Preferences.
Then click on the Scoring Awards tab and select the Special Point System combo box.
SNZ Points is a point system developed by Swimming New Zealand. The points are based on the
average of the best 10 NZ National Championship swims since 1995. This base time is assigned 1000
points. A logarithmic scale is used with twice the base time being worth 100 points.
To enable SNZ Points, click Set-up from the Main Menu Bar and then Entry/Scoring Preferences.
Then click on the Scoring Awards tab and select the Special Point System combo box.
116
Copyright©Sports-Tek Software
MEET MANAGER for Swimming
AUS Points is a point system for Australian swimming. The points are based on the average of the
best 10 swims through 2007. This base time is assigned 1000 points. The formula used to calculate
points is almost exactly the same as the formula for FINA points (actually the formula is the same, but
the rounding rules vary slightly when the calcualtion of the points has a fraction). The logic of the 2007
base times is that this was the last year before the technical suits came into use. Also, in 2010, FINA
changed from using the average of the top 10 best times to using the world record as the base time.
To enable AUS Points, click Set-up from the Main Menu Bar and then Entry/Scoring Preferences.
Then click on the Scoring Awards tab and select the Special Point System combo box.
Entries / Entry Limits
From the Main Menu bar, click on Setup / Entry Scoring Preferences / Entries/Entry Limits.
117
Copyright©Sports-Tek Software
MEET MANAGER for Swimming
Entries
· Warn if times are out of range: This is a very useful feature that traps keying errors. If you have
this option checked, MEET MANAGER will warn you if you key in a "silly" entry time, i.e. 3:44.56 for a
50 Free.
· Minimum age for Open Events: Sometimes Open events have a minimum age such as 12 and by
putting in an age here, the eligible athletes list in the Seeding Preview and in Relay Names will
exclude those under age. This is also used by the Exceptions Report to give you a list of all entries
that are under this minimum age for each Open event. However, note that you will NOT be warned
when trying to enter someone under age into an Open event.
· Meet Eligibility for Entries: Enter the earliest date for which entry qualifying times can be attained.
If there is no date, leave the date at the default of 1 Jan 1970. This date is only used when
exporting meet events to TEAM MANAGER.
Entry Limits
· Maximum entries per athlete including relays: Customize your meet entry limits (if any) for
Individual and Relay events. Enter the total maximum entries allowed per athlete for the entire meet
including relays.
· Maximum individual entries per athlete: Enter the total maximum number of individual entries
allowed per athlete for the entire meet.
· Maximum relay entries per athlete: Enter the total maximum number of relays allowed per athlete
for the entire meet.
· Warn if entry limits exceeded: Click on the check box and MM will give you a warning when Entry
limits are exceeded and give you an opportunity to override the limit.
· Count Relay Alternates (5-8): This determines whether being a relay alternate counts when
computing the number of relay entries an athlete is in.
118
Copyright©Sports-Tek Software
MEET MANAGER for Swimming
Results
From the Main Menu bar, click on Setup / Entry Scoring Preferences / Results.
Conversion Factor for Results
For leagues using pools with odd lengths such as 22 yards or 22 meters, an optional conversion factor
can be applied to results to normalize the results to a 25 length. Enter the conversion factor you wish
to use and then click on the "Apply the non-conforming pool factor" check box so that the conversion
can be applied to the Results Export to TEAM MANAGER, or the Results Report created in the
Reports Menu, and the Ribbon Labels Report. All other reports will display the actual swum time.
Finals Round Meet Results
If you check the box for Suppress Results and Splits for finals results that do not meet the
qualifying time, the check box for Score points only if athlete equals or exceeds event qualifying
time on the Scoring / Awards panel will also be checked. The effect of this is that results for finals for
individual events that do not meet the qualifying time will not display results or splits on any report.
What will be displayed is the athlete name, but with NT for the result time. In addition these NT results
will not be exported when using the File / Export routines. This option is a requirement for FINA
Masters meets.
119
Copyright©Sports-Tek Software
MEET MANAGER for Swimming
Time Standards Meet
From the Main Menu Bar, click on Setup / Entry Scoring Preferences / Time Stds Meet and you can
set the following preferences. These rules only apply to meets set-up with the Meet Type as Divisions
by Time Standards.
For a three time standards meet, such as an A/B/C meet, you may customize how you want Point
Scoring and Awards based either on the Athlete's Entry Time or on the Swum Finals Time. For
example, an athlete may have entered the meet with a B time but swam an A time. Do you want
him/her ranked with the B Athletes (seed time) or with the A Athletes (swum finals time) ?
You may also customize how you wish to award Places, Points, and Awards to Over achievers and
Under achievers. For example, an Over achiever is an athlete that entered the meet with a B time but
swam an A time. An example of an Under achiever is an athlete who entered the meet with an A time
and swam a B time. If you do not allow Points and Awards to be given to either Over achievers and/or
Over achievers, they will be ranked in the results under a non-Award category.
Flighted Meet
From the Main Menu Bar, click on Setup / Entry Scoring Preferences / Flighted Meet and you can
set the following preferences.
120
Copyright©Sports-Tek Software
MEET MANAGER for Swimming
· Minimum number of entries for the event to be flighted: This only applies to meets set-up with
the Meet Type as Flighted Divisions. A Flighted Meet is one that has 2 to 4 levels of Scoring where
the Athletes entered in the Event are divided equally.
· Flights based on Seed Time or Finals Time: You have the choice to divide the event based on
seed time or finals time.
· Exclude DQ's and Exh from flight split: Checking this box will exclude DQ's and Exhibition
athletes from being in the calculations for where to divide the flights. The results of these athletes will
be included with the slowest flight.
· Number if flights (2 to 4): You can select to have from 2 to 4 flights which will be divided as equally
as possible.
As an example, if 48 Athletes are entered in the 11-12 50 Free and you choose to have 3 flights, then
the fastest 16 are competing against one another, the next 16 against one another, and the slowest 16
are competing against one another. There will be three 1st places, three 2nd places, etc. The
"Minimum number of entries for event to be flighted" question tells MM if there are enough entries to
Flight the event. In this example, if this value is 49, then the event would NOT be flighted.
Note: If an event is set up as multi-age group, the flight rules above will apply to each age group within
the event. So if there are two age groups, say 13-14 with 15 swimmers and 15-18 with 25 swimmers,
the 13-14 will not be split into two flights, but the 15-18 will be divided into a flight of 12 and 13 with the
13 being in the faster flight.
2 or 3+ Double Dual
From the Main Menu Bar, click on Setup / Entry Scoring Preferences / 2 or 3+ Double Dual.
This selection is needed if you have specified Dual or 3+ Dual in the Meet Set-up for Meet Style and
you wish to customize which teams/gender to compute scores for. For example, there may be 3 teams
in the meet but you only want to compute Dual meet scoring for Men/Women Team 1 versus Team 2
and Men/Women Team 1 versus Team 3, leaving out the scores for Men/Women Team 2 versus
Team 3.
121
Copyright©Sports-Tek Software
MEET MANAGER for Swimming
Improvement Points
From the Main Menu Bar, click on Setup / Entry Scoring Preferences / Improvement Points which
are used to replace the Standard Points setup for team points.
Select Improvement Points to assign points based on how much the swimmer improves over his/her
best time. By selecting Improvement Points, the Standard Point scoring setup is replaced by
Improvement Points. This system is great for novice meets and club meets and is used extensively
in Australia. To use the Improvement Point System, setup the Slow and High Range for each point
assignment. Each Slow Range must be less than High Range in the same row. In addition, each Slow
Range must be one hundredth greater than the previous row's High Range. The value with 0.00 is the
best time and this the Slow Range and the High Range are relative to the entry time. You can also
assign a number of points based on participation for each of the range values - called Competed
Points. For example, assign 4 points for an improvement of from 1.01 to 2.00 seconds and also add
1 point for participation. You also have the option to customize the points that can be awarded for DQ,
NS, and an NT seed time.
MM also offers additional customization for Improvement Points including:
· Points awarded if DQ
· Points awarded of No Show (NS)
· Points awarded if seed time is NT
· Check box to award points if exhibition
To enable the Improvement Points that you have defined above, From the Main Menu Bar, click on
122
Copyright©Sports-Tek Software
MEET MANAGER for Swimming
File / Entry Scoring Preferences / Scoring Awards and select Improvement Points from the combo
drop down for Special Points System. When you score an event from the Run screen, MM will assign
points for each result based on result time improvement over the entry time.
Setup Point Scoring
For meets that are "scored", that is, points are assigned to 1st place, 2nd place, etc for each event,
MM provides an easy way for you to customize how many points should be assigned for each place in
each event.
There are two separate types of Point Scores - Standard and Alternative. The Alternative points are
rarely used. The Standard Points are assigned to individuals and relays as the meet progresses and
when an event is scored in the Run Menu. At any time during the meet you can get the total points
each individual has earned or each team has earned. The Alternative Points are only used in Reports
/ Scores and if you select Alternative Points in that menu.
Assign Scoring Preferences First
First, from the Main Menu Bar click Set-up / Entry Scoring Preferences / Scoring/Awards and
customize your scoring preferences. In that menu you may specify 1) whether Male and Female
Athletes use a different point system or not and in the case of a Divisions meet, 2) whether each
division uses a different point system or not. If you are using the same number of points for both Male
and Female events and the same points for Divisions, then make sure these two check boxes are not
checked.
Standard Scoring System
To customize the point assignments for each place finish, click on Set-up from the Main Menu Bar and
then Scoring Set-up and then Standard. MM will initially default to a standard point scoring system
for 16 lanes as shown below. If you ever wish to return to that standard system, click on the "Default"
button at the bottom of the panel.
123
Copyright©Sports-Tek Software
MEET MANAGER for Swimming
Now customize your particular meet's point system with the number of points for each Individual and
Relay place.
If you have chosen to have a separate point system for each Division, select each Division one at a
time from the drop down box at the lower left of the Scoring Set-up screen.
Alternative Scoring System
To setup the rarely used Alternative Points the point assignments for each place finish, click on Set-up
from the Main Menu Bar and then Scoring Set-up and then Alternative. MM will initially default to a
standard set of points. The menu looks the same as the one above for Standard Points.
One example where you would use both Standard and Alternative Point Systems is where individuals
are assigned the standard points and Team Scores are computed by adding up these standard points
for each team, but individual high points, as computed in Reports / Scores, uses the Alternative Point
System (as is common in Canada).
124
Copyright©Sports-Tek Software
MEET MANAGER for Swimming
Setup Divisions / Region Names
Divisions are used when the Meet Type in Meet Setup is configured as Division by Event, Division by
Team, or Division by Entry. Division by Time Standards would not use divisions as setup in the menu
described below, but would use the tags assigned to Time Standards as the "Division" names. Varsity
and JV would be examples of a High School or College meet where these two divisions compete
separately in a Divisions by Event type of meet.
Divisions
· By Event: This classification is used to group events for the purpose of Team Scoring. For example,
you might have a Varsity Division set of Events and a JV Division set of events. When you go to the
Score Report and print Team Scores, MM will total each Division's events separately.
· By Team: This classification is used to group Team Divisions for multi-level scoring within one
event. For example, you might set up two Divisions for a High School meet as AAA and AA. MM
will then group and rank Teams from the same Division together so that there is a 1st place for the
AAA Teams and a separate 1st place for the AA Division Teams - all grouped and ranked in the
same event.
· By Entry: This classification is used to group Entries with the same Division declaration for multilevel scoring within one event. For example you might want to set up separate classifications for a
disabled type meet so that athletes with the same handicap would be ranked and scored together
within the same event.
From the Main Menu bar, click Set-up / Division/Region Names / Divisions and you will have a
menu like the one below. The Division Code can be 3 characters and the Division Name can be up to
20 characters.
To Edit the Junior Varsity Division, double click the Junior Varsity name or select row 2 and click Edit
or the Edit icon and you get a menu as follows:
125
Copyright©Sports-Tek Software
MEET MANAGER for Swimming
Regions
Region names are assigned to Teams only and allow you to group teams together for the purposes of
Team Scores. When you go to Reports / Scores, click on the Group by Region radio button at the
bottom right and MM will group and rank teams based on the region that has been assigned to each
Team.
From the Main Menu bar, click Set-up / Division/Region Names / Regions and you will have a menu
like the one below.
You can Add and Edit the Region names and Region codes as you wish and then these will be
available to be assigned to Teams. The Female Size, Male Size, and Combined Size columns are only
used in Masters Meets where teams are scored by small, medium and large teams. So for Masters,
the Regions would be altered to three regions named Small, Medium, and Large.
Language Preference
The Language Preference Menu allows you to select English or Spanish for all MM menus, reports
and messages.
To switch between English and Spanish click on Lanuage Selection.
126
Copyright©Sports-Tek Software
MEET MANAGER for Swimming
MEET MANAGER gives you the flexibility of translating nearly every word and phrase on reports. If
Spanish is selected, all words and phrases will be in Spanish to begin with. These can still be altered,
regardless of the language. From the Main Menu Bar, click on Setup / Language Preference and
then pick either Keywords or Phrases. This could be used as a language translation from English to
French or a way to change the word "Backstroke" to just "Back". An example of a Keyword you might
want to change would be "Meter" to "Metre". An example of a Phrase you might want to change would
be "Results Report" to just "Results".
To change any word or phrase, click on the word in the second column and edit the word. Because
there are space limitations on many of the reports, each word or phrase has a limit on the number of
characters it can be. This character limit is listed to the right of each word in the Language Browser.
The language changes you make are saved in the directory where MM is installed. This revised
"language set" is not included in the backup of the database if you are transferring the meet to another
computer.
127
Copyright©Sports-Tek Software
MEET MANAGER for Swimming
Here is the Key Phrases window when Spanish is selected.
128
Copyright©Sports-Tek Software
MEET MANAGER for Swimming
Directory Preferences
From the Main Menu bar, click Set-up / Directory Preferences and a window like the one below will
appear. To set directory preferences, pick the directory at the upper right first. In this case c:\swmeets
is selected. To pick a different directory, double click the C:\ and that will display all directories on the C
drive where you can pick any one of them. After the upper right is selected, click any or all of the 7 Set
button at the lower left. These directory preferences will be saved with the computer and not the
database so that they remain the same no matter what database is opened.
129
Copyright©Sports-Tek Software
MEET MANAGER for Swimming
Setup Timing Console Selection
HY-TEK's MEET MANAGER offers the option to Interface with many Timing Consoles. The software
module that actually handles the communication with your particular Timing Console is called the
Timing Console INTERFACE software.
To specify which timing Console INTERFACE software you wish to use for your meet, from the Main
Menu bar click Set-up / Timing Console INTERFACE to display the screen below.
130
Copyright©Sports-Tek Software
MEET MANAGER for Swimming
Select your timer from the list above. If you are not using a Timing Console for your meet, select Stop
Watch Timing and then when you actually Run the meet, MM will calculate the official time from 2 or 3
stop watches that are entered in the three Backup Time columns.
Setup Alpha Scoreboard Interface
An Alpha Scoreboard is a scoreboard with a computer that can display swimmer names and team
affiliations on the 6 to 10 line scoreboard. If your swimming facility has an Alpha Scoreboard and you
have purchased the Alpha Scoreboard INTERFACE option from HY-TEK, from the Main Menu bar
click Set-up / Alpha Scoreboard Interface. Pick the particular vendor scoreboard that you will be
using:
If you have chosen Generic Serial, then when you are ready to Run the meet, click on Interfaces then
131
Copyright©Sports-Tek Software
MEET MANAGER for Swimming
Scoreboard (Genser) from the Run Menu Bar and select the Communications COM port to which the
Scoreboard is connected by clicking on Open/Close Serial Port for GENSER. Click on Configure
Serial Port to customize the COM port to open at 1200, 2400, 4800, or 9600 baud. The parity, data
bits, and stop bits can also be set.
The Generic Scoreboard Interface has a feature which allows the HY-TEK operator in the Run Menu to
send the current heat start list to the scoreboard by pressing Ctrl-F10. To send the top 8 results to the
scoreboard, press Ctrl F-11 when heat one is highlighted. To send 9th - 16th results to the scoreboard,
press Ctrl F-11 when heat two is highlighted, and so on. To send the Team Scores for the gender of
the event in the Run Menu, press Ctrl-F9. To send the complete compiled list of the results of the
current event, press Ctrl-F12. This can be done at any time such as after two heats of five are
completed. This feature also supports the ResulTV product provided by Lynx System Developers.
The Daktronics Venus Scoreboard computer uses the same COM port connection for the Scoreboard
as it does for the Timing Console. The Colorado Time System and Omega Alpha Scoreboards use
COM port 2 for the connection to their Scoreboard computer.
Please check with your Scoreboard vendor for the exact details on how to connect the Scoreboard
Computer to HY-TEK's MEET MANAGER and how to request Start Lists and Results from MM.
Setup Open Water Button Timer Interface
There are numerous button timers on the market that can be used for Open Water meets. HY-TEK's
Button Timer INTERFACE software is designed to support the following timing systems:
Click Set-up / Open Water Button Timer Interface and select one of the choices above. Please note
that this INTERFACE permits downloading of result times after an Open Water race is completed. The
downloading of results occurs in the OW Module found in the Run Menu.
For details on using Button Timers for Open Water, click Here.
132
Copyright©Sports-Tek Software
MEET MANAGER for Swimming
Options Menu
From the Main Menu bar, click Set-up / Options and MM will display additional ways for you to further
customize your settings.
Global
Import Picture
Personal Preferences
Global
From the Main Menu Bar, click on Set-up / Options / Global to display "global" utility functions that
will automatically make Database changes. Select as many of the items as needed and click OK to
execute each one selected.
Increment School Year
· Choose this function and MM will look at every Athlete in your Database and add "1" to the School
Year field. This is a great feature when you are running the same meet as last year and do not want
133
Copyright©Sports-Tek Software
MEET MANAGER for Swimming
to go through and manually change the school year for each Athlete. For example, this feature will
change the school year for an Athlete from "9" to "10" or from "FR" to "SO".
Replace School Year
· Often times athletes are imported and one school uses SR to designate a Senior and another school
uses 12 to designate a Senior. Use the Replace School Year choice to fix up your athlete data so
that the school years are consistent such as having all seniors show SR and all Juniors show JR,
etc.
Change Number of Lanes for All Prelim Rounds
· Choose this function and MM will change the number of lanes for all of your Prelim rounds. This is a
great feature to quickly change the number of lanes for every event that has Prelims. This only
applies to events that have NOT been seeded. If events have been seeded, go to File / Purge /
Reset Event Results and Seeding, before changing the number of lanes.
Change Number of Lanes for All Final Rounds
· Choose this function and MM will change the number of lanes for all of your Finals rounds. This only
applies to events that have NOT been seeded. If events have been seeded, go to File / Purge /
Reset Event Results and Seeding, before changing the number of lanes.
Change non-Time Trial Individual Event Entry Fees
· Choose this function and MM will change all of the non-Time Trial Individual Event Entry Fees to the
amount that you enter.
Change non-Time Trial Relay Event Entry Fees
· Choose this function and MM will change all of the non-Time Trial Relay Event Entry Fees to the
amount that you enter.
Change Time Trial Individual Event Entry Fees
· Choose this function and MM will change all of the Time Trial Individual Event Entry Fees to the
amount that you enter.
Change Time Trial Relay Event Entry Fees
· Choose this function and MM will change all of the Time Trial Relay Event Entry Fees to the amount
that you enter.
Set Every Standard Event to Score
· If you choose this function, MM will set every Standard event to be scored instead of Not scored.
Set Every Standard Event to be Not Scored
· If you choose this function, MM will set every Standard event to be Not scored instead of scored.
Change all Prelim Rounds to Fast-Slow Heat Order
· If you choose this function, MM will change the heat order of Prelim rounds for all un-seeded events
to Fast-Slow.
Change all Final Rounds to Fast-Slow Heat Order
· If you choose this function, MM will change the heat order of Final rounds for all un-seeded events to
Fast-Slow.
Change all Prelim Rounds to Slow-Fast Heat Order
· If you choose this function, MM will change the heat order of Prelim rounds for all un-seeded events
to Slow-Fast.
134
Copyright©Sports-Tek Software
MEET MANAGER for Swimming
Change all Final Rounds to Slow-Fast Heat Order
· If you choose this function, MM will change the heat order of Final rounds for all un-seeded events to
Slow-Fast.
Set Every Event to Expect Pads at Both Ends for Splits
· Each event has its own setting for whether pads are at both ends of the pool for both "Round 1 and
Semi-Finals" and "Finals of a multiple round event". This affects the number of splits to be received
from the timer. If you choose this option, MM will put a check mark in both settings for Pads at Both
Ends in every event.
Set Every Event to NOT Expect Pads at Both Ends for Splits
· If you choose this option, MM will un-check both settings for Pads at Both Ends in every event.
Customize the Background Picture
The Import Picture option allows you to choose any Bitmap Picture that you want to use for a
Background Picture. A Bitmap Picture file has the file extension "BMP" or "JPG". Once you click on
Set-up / Options / Import Picture, MM will ask you to choose the Drive and Directory where the
Picture file is located. Click on OK and MM will import that file and use it as background for your MM
Desktop.
Note: If the imported picture causes an error, use Windows Explorer to delete the file named
swmeet.jpg from the directory where MM is installed (usually C:\hy-sport\SWMM3) and then start MM
again.
Personal Preferences
From the Main Menu Bar, click on Setup / Options / Personal Preferences.
135
Copyright©Sports-Tek Software
MEET MANAGER for Swimming
Enter Key
· MM makes it easy for you to use your keyboard instead of your mouse when keying in data. Check
the box next to Use Enter key to move between fields and you can use your Enter key, in addition
to the traditional tab key, to move between fields. If the box is not checked, then the Enter key
functions as the Windows standard which causes the OK button to be clicked if there is an OK
button on the screen.
Check for Updates
· HY-TEK provides free program updates from the HY-TEK web site. You can set MM to automatically
check the HY-TEK web site for new updates every "x" days.
Automatic Backup
· MM offers the ability for you to specify how often (and if at all) you want to automatically backup the
database. You can set MM to automatically create a backup every "x" days.
136
Copyright©Sports-Tek Software
MEET MANAGER for Swimming
Events Menu
From the Main Menu Bar, click on Events to display the Events Menu which contains the Events
Browser shown below.
· You can sort the event list by clicking on any column header.
· The event list can be filtered by gender, age range, individual versus relay events, and type of event.
· To make room to show more events in the list, you can hide the filter choices by clicking the View
icon or by clicking View / Show/Hide Filters.
· To create Event Reports, click the Printer icon or click Print.
· You can move the columns of the grid to a different order by clicking on the header of a column,
releasing the mouse, and then dragging the header to another location and dropping it.
· To save the current layout of the grid, click the
· To print or preview the grid, click the
icon.
· To export the grid to HTML, click the
icon.
icon and you have the following choices:
Add or Edit Events
Delete an Event
Combined Events
Sessions
Event Comments
Re-Number Events
Clear Indicators
Records
137
Copyright©Sports-Tek Software
MEET MANAGER for Swimming
Time Standards
Add or Edit Events
Normally you would add events right after completing your meet set-up. To add events, click the Add
icon
, click Add, or press the F3 key. To edit an existing event, click the Edit icon
, click Edit,
or double click an event in the browser list. A sample of the Edit Event Menu is shown below. Note the
black left and right arrows at the bottom which allow you to go to the previous or next event and stay in
edit mode.
Event #
Start with the event number and enter any alphanumeric number where the event number can range
from 1 to 999, optionally followed by a single letter. Events 4, 12, 106, 8B, and 115C are example of
event numbers. Note: If using a Timing Console Interface, some timers do not accept alphanumeric
event numbers, so check this first before setting up event numbers.
Individual or Relay and Gender
Specify if the event is an Individual or Relay event and then select the Gender of the event. When
adding events, if you want MM to automatically alternate the sex of the event, click on the Alt Sex
check box. After you have entered all your data for the event, for example, for event 1 girls, then click
OK, the girls event is added and the screen is re-displayed exactly as before except that the gender
has been switched to boys. Simply click OK again and the boys event will be added. Setting up 60
events only requires setting up 30 events.
138
Copyright©Sports-Tek Software
MEET MANAGER for Swimming
Division
If the meet is set-up as Divisions by Event, select from the Division pull-down list to assign a Division,
such as JV to event. For this combo box to be active, the Meet Type in Meet Set-up would have to be
Divisions by Event. If your divisions have special names that indicate the distance or you do not want
to show the distance, you can suppress the distance from the event name.
Age Group and Distance
Enter the Age Group information by clicking on the appropriate age group radio button or click Custom
and enter a special age group such as "12-18", "0-12" for 12 & under, or "13-109" for 13 & over. Click
on a Distance selection from the list or click Custom and enter a distance. If the event is Open Water
and you enter a custom distance from 1 to 9, MM will consider that to be Miles.
Stroke
Select one of the swimming Strokes or one of the diving events. For diving, you may specify 6 or 11
dives for each diving event. You can customize the event description by entering up to a 20 character
event description under the Note selection on the Event menu under the stroke selection column. This
event description will be printed with each event. You may also click on the Suppress Stroke Name
check box and MM will not include the stroke when the event description is printed.
Relay Legs
Relays can have from 2 to 8 legs instead of just the traditional 4. MM is designed to handle the splits
for the relay legs regardless of the setting.
Rounds
Click one of the "Rounds" choices. If you select Timed Finals, then the lower right panel becomes
disabled. If you pick Prelims/Finals or Prelims/Semis/Finals, the lower right panel will apply to the final
round. If you pick Prelims/Semis/Finals rounds, then you will need to enter the number of heats
desired for semi-finals and the lower left panel will apply to both prelims and semis. Relays are limited
to two rounds and thus cannot have semi-finals. If a relay event is changed from Prelims/Finals to
Finals Only after relay names have been entered, the option will be provided to move the relay names
from the Prelims slots to the Finals slots.
Number of Lanes
Each event has its own setting for the number of lanes.
· The lower left panel applies to prelims, semis, and timed finals.
· The lower right panel only applies to the finals of a 2 or 3 round event.
Round 1 - Prelims or Timed Finals Setup
Round 2 or Round 3 - Finals Setup
Other Event Setup Details
Round 1 - Prelims or Timed Finals Setup
When adding or editing an event, the lower left panel of the Add/Edit window contains the settings for
prelims, semis, and timed finals as shown below. There is a different panel for Finals of a multi-round
event.
139
Copyright©Sports-Tek Software
MEET MANAGER for Swimming
Assign Lanes
·
·
·
·
Standard: Use the standard lane assignments that were set up in the Seeding Preferences'
Standard Lane Assignments. This is the normal setting for most meets.
Un-Seeded: Directs MM to seed into one large flight either slow-fast or fast-slow. This is a great
option when you want to manually seed the event and then sort the cards to pass to the computer
operator to enter the results. In this case, all of the athletes in the event will be displayed in the
Run as one giant heat.
2 per Lane: Requests that a particular event be seeded "2 to a Lane". This type of seeding is
usually used for Long Distance events like the 800/1000 and is only available for Timed Final
events. Click Here for more information on this feature.
2 per Choice: Athletes in this event can "choose" whether or not they wish to swim "2 to a Lane".
This option is only available for Timed Final events. For more on 2 per lane, click here.
Heat Order
Note there is a separate Heat Order for both the initial rounds and the final round.
· Slow to Fast means seed the event with the slowest entry time in Heat 1 and thus the fastest heat
is the last heat.
· Fast to Slow means seed the event with the fastest entry time in Heat 1 and thus the fastest heat
is the first heat.
Special Settings
· In a 10 lane pool, you might want to seed 10 lanes for all heats, but you want the fastest heat to be
seeded in 8 lanes. To set this up, enter 10 for number of lanes, check the check box just under the
number of lanes and to the right and enter 8 Lanes for Best 1 Heats.
· For Timed Finals, you can specify to score the event like it was a second round A-B Final. This
would mean the fastest heat would get the 1st thru 8th places, the second fastest heat would get 9th
thru 16th and so on depending on the number of heats you specify.
· If the event is multi-age group timed finals, you can also specify to seed it as a Multi-Age Group
Super Seed where the fastest heat has the top entries for the highest age group, the second fastest
heat has the top entries for the next age group, and so on. After the fastest heat for each age group
has been seeded, the remainder are mixed by age and sorted by time as in normal timed final
seeding.
140
Copyright©Sports-Tek Software
MEET MANAGER for Swimming
In order to specify that an Athlete is swimming "2 to a Lane" for an event, that event must first have
been set up as "2 to a Lane".
Click on Events from the Main Menu bar. You may optionally specify that a particular event be seeded
"2 to a Lane". Typically, this type of seeding is used for Long Distance events like the 800/1000 or
longer. Click on the "2 per lane" radio button if all athletes in the event are required to swim "2 to a
Lane". Click on the "2 per Choice" if athletes in this event can "choose" whether or not they wish to
swim "2 to a Lane". The "2 to a Lane" option is only available for Timed Final events.
To declare that an athlete has chosen to swim in an event as "2 to a Lane", click on Athletes from the
Main Menu Bar and then highlight an Athlete. Now click on the "2 To a Lane" column next to the event
that you wish to swim as "2 to a Lane". That's it! When the event is seeded, that Athlete will be
seeded in the "2 to a Lane" heats with the other Athletes that have chosen this option.
Round 2 or Round 3 - Finals Setup
When adding or editing an event, the lower right panel of the Add/Edit window contains the settings for
the finals which follow prelims or semi-finals.
Heats in Finals
There may be 1 to 6 heats in finals. If A - Final, B - Final Style is checked, the fastest heat would be
the A - Final, the second fastest heat would be the B - Final, ...the 6th fastest heat would be the F Final. With the A-B Final Style, no one can move to a higher place than their heat which means in an 8
lane pool, the highest place that an entry in the B - Final can get is 9th event if the entry has the fastest
finals time overall. If A-B Final Style is not checked, the finals are scored just like a timed final where
the slowest qualifier can move up to first.
# Lanes Vary
This feature allows you to have different numbers of lanes for each heat in finals. For example a
popular way to run Championship, Consolation, and Bonus finals is to seed them with a super final
where the fastest heat comprises only four swimmers in the odd lanes and the other two final heats
have the normal 8 swimmers. In this 8-8-4 case, the B - Final or Consolation final would get places 5th
thru 12th and the C - Final or Bonus final would get places 13th thru 20th.
Score Prelims as Extended Final
If this check box is checked, points are awarded down into prelims if a 2 round event and down into
semi-finals if a 3 round event. For example, suppose there are two finals of 8 each and you want to
141
Copyright©Sports-Tek Software
MEET MANAGER for Swimming
score down to 24th place. Set up the point system with points for 1st thru 24th and the entries from
prelims (or semis) that were not in finals and got 17th thru 24th will get points. If there were scratches
and/or there is a limit to how many from one team can score, the rankings are dynamically revised
from finals. For example, if 16 score and only 8 swim in finals, the 9th through 16 points are first
allocated to entries scratched from finals and then the remainder of points are assigned by order of
finish in prelims for those entries that do not exceed the maximum scorers per team (if set up with a
maximum).
Multi-Age Super Final
If the event is setup with Multi-Age groups for say 13-14, 15-16, and 17 & over, the Super Final would
be the fastest swimmers from all age groups with the other age groups having the top remaining
finalists seeded together in their respective age groups. There is also a check box to eliminate the
oldest age group. If the check box for Super Final Eliminates Oldest Age group is checked, The 17 &
over final in this example would be eliminated and there would be a Super Final heat, a 13-14 heat and
a 15-16 heat.
Custom Finals Heat Order
This only applies if A - Final, B - Final Style is checked and allows you to alter the order of the finals.
For example, if there are 3 finals, you may want the order to be B-C-A, so you enter BCA in the text
box and the meet program will have B-Final heat first, then the C-Final heat, then the A-Final heat.
Other Event Setup Details
When adding or editing an event, the center bottom panel contains some basic settings for the event
such as whether to score it or not.
Multi-Age Group
In the center bottom panel, click on the Multi-Age Group check box if you want different age groups
and genders seeded together but broken out for results. Click here for examples to consider. If an
event is setup as Timed Finals with Multi-Age groups, you can check the Multi-Age Group Extra
check box which is for results only. These extra age groups can be any set of ages, but cannot
duplicate any age ranges setup in the primary Multi-Age Group settings. For example, if the primary
age ranges are 13-14, 15-16, and 17 & over, you can create extra results for Open, 13-16, or 15 &
over. These extra results will not contain team point scores since the team points are associated with
the primary age ranges. With the Seed Multi-Age Young to Old check box, you can have the younger
age groups listed first on the heat sheet for finals of a given prelim/final event. Click Here for more on
Multi-Age Groups.
142
Copyright©Sports-Tek Software
MEET MANAGER for Swimming
Score Event
Click on the Score Event check box if you want points assigned to each result based on the point
system setup in the Scoring Setup.
Manual Seed
Click on Manual Seed to specify to the Seeding Menu that you do NOT want MM to automatically seed
this event. If later you want to seed the event from the Seeding Menu, uncheck this box or uncheck it
in the Seeding Menu where there is a column indicating manual or not.
Entry Fee
If there are Entry Fees, enter an amount and you can get a Entry Fee Report from the Teams Report
Menu.
Event Type
You may also classify an event as a Time Trial, Swim-Off, Multi-Disability, or Open Water event. If
Open Water is selected for the Event Type, you will be able to enter up to 99 for the number of
positions (lanes) in each wave (heat) and can seed the event to fill the waves with that number. For
each wave in the Run, you can enter an offset time for the amount of time the wave starts from the
original start.
Pads at both ends
This is important for MM being able to know how many splits to expect for each event. If there are
pads at both ends, there are twice as many splits. You can have a separate setting for Finals as
opposed to Prelims and Semi-Finals. Timed Finals apply to the Round 1 / Semis choice.
If you want to set up your events such that different age groups and genders are seeded together but
broken out for results, here are some examples. Note the Standard A, Standard B, U.S. 5 Year, and
FINA 5 Year buttons at the top of the Multiple Age groups windows. These are used to quickly setup
the age groups. For example, clicking Standard A for an Open event would create 0-10, 11-12, 13-14,
15-16, 17-18, and 19-109 age groups.
Example 1:
Suppose for the Girls 13 and Over 100 FREE, you want to have the 13-14, and 15 & Over age groups
separated for rankings and scoring. Click on the Multi-Age Group check box in the Events Set-up
menu or click the button to the right of the check box, and enter the two age groupings: 13-14, 15-109.
In this example, if there are 12 year olds that are "swimming up" in this event, MM will score them with
the "last" age group that you have specified - the 15 and Overs. This event will be seeded with 13 year
old girls and older but the results and scoring will be broken out into two groups - 13-14 and 15 and
Overs. To enter a 12 year old in the 13 & over event, select the 12 year old from the Athlete Menu.
Click the 4th button from the bottom left until it says All Events. With all events showing, you can enter
the 12 year old in any event.
143
Copyright©Sports-Tek Software
MEET MANAGER for Swimming
Example 2:
Suppose you want to seed all ages of both the boys and girls 50 FREE together to minimize the
number of heats and then break out the results by gender and age group. From the Events Set-up
menu, specify the gender of the event as Mixed and then click on the Multi-Age Group check box or
click the button to the right of the check box, and enter the groupings you wish to use for breaking out
and scoring - for example, 10 & Under, 11-12, 13-14,15 & Over. This event will be seeded with all
swimmers entered in the 50 FREE - both boys and girls but the results and scoring will be broken out
into 8 groups - 4 age groups for each gender.
144
Copyright©Sports-Tek Software
MEET MANAGER for Swimming
Example 3:
Suppose you want to run a meet with heats, finals, and consolation finals and you also want the
preliminaries to be mixed. Setup the events as multi-age groups as you wish. When the event is multiage group with 2 or more rounds, the number of heats for finals in the lower right panel of the
add/edit event window is ignored, however, if you want A - Final, B - Final Style, you must
check that box as that is not ignored. The setup for number of finals for each age group is
contained in the multi-age group window in the 3rd column next to each age group. As an example,
you could select 1 Final for the 13-14's and 2 Finals for the 15-18 age group in a 13-18 age group
event.
145
Copyright©Sports-Tek Software
MEET MANAGER for Swimming
Delete an Event
Click on Events from the Main Menu Bar and then from the Events Browser, select the Event that you
wish to delete. Now click on the Delete icon
or click Delete and MM will ask you to confirm that
you wish to delete that Event. Click OK to confirm.
If the event has results, you will get the following message:
Please note, once an event is deleted, it is NOT reversible without re-keying the
information !
Combined Events Setup
From the Main Menu Bar, click on Events / Combined Events to display the Combined Events Menu
similar to the one shown below.
A Combined Event is an event that contains 2 to 10 sub-events where the points scored in each of the
sub-events are added up or where the times swum in each of the sub-events are added up. The
rankings for a Combined Event are based on the total points scored, highest to lowest, or on the total
time, lowest to highest. If the scoring method used is to add up times and a athlete is DQ'd in one or
more of the events, click here to set your preference on whether to use the actual time or not so that
146
Copyright©Sports-Tek Software
MEET MANAGER for Swimming
the athlete will still get ranked in the totals.
Add or Edit Combined Events
Delete a Combined Event
Add or Edit Combined Events
To setup a Combined Event, click on Events from the Main Menu Bar and then click on the Combined
Events icon. Now click on the Add icon
to show the screen below and fill out the information.
147
Copyright©Sports-Tek Software
MEET MANAGER for Swimming
Combined Event #
Start with the event number and enter any alphanumeric number where the event number can range
from 1001 to 1099, optionally followed by a single letter.
Gender
Specify the event Gender. When adding combined events, if you want MM to automatically alternate
the sex of the event, click on the Alt Sex check box. After you have entered all your data for the
event, for example, for event 1001 girls Pentathlon, then click OK, the girls event is added and the
screen is re-displayed exactly as before except that the gender has been switched to boys. Simply click
OK again and the boys event will be added.
Division
If the meet is set-up as Divisions by Event, select from the Division pull-down list to assign a Division,
such as JV to event. For this combo box to be active, the Meet Type in Meet Set-up would have to be
Divisions by Event.
Age Group
Enter the Age Group information by clicking on the appropriate age group radio button or click Custom
and enter a special age group such as "12-18", "0-12" for 12 & under, or "13-109" for 13 & over.
Type
Select one of the nine Combined Event Types. A Pentathlon would have five events to be scored with
combined points and a Heptathlon would have seven events.
Delete a Combined Event
Click on Events from the Main Menu Bar and then click on the Combined Events icon, select the
Combined Event that you wish to delete. Now click on the Delete icon
or click Delete and MM will
ask you to confirm that you wish to delete that Combined Event. Click Yes to confirm.
148
Copyright©Sports-Tek Software
MEET MANAGER for Swimming
Please note, once a combined event is deleted, it is NOT reversible without rekeying the information !
Add Sub-Events to a Combined Event
From the Main Menu Bar, click on Events / Combined Events to display the Combined Events Menu.
After an 11-12 Girls Pentathlon Combined Event is added, the lower half of the screen might look like
the following with the entire event list at the lower left:
You can click and drag an event to the right panel to include in the new Combined Event or just
position the cursor on a event and double click it to move it into the schedule. After a few events have
been moved to the right, the window might look like this:
149
Copyright©Sports-Tek Software
MEET MANAGER for Swimming
The events on the right can be in any order regardless of the event number. You can drag any event in
the schedule and drop it onto any other event in the schedule to switch the order of the two events. To
remove an event from the right, double click the event.
Sessions
From the Main Menu Bar, click on Events / Sessions to display the Sessions Menu shown below.
150
Copyright©Sports-Tek Software
MEET MANAGER for Swimming
Add or Edit Sessions
Delete a Session
Create a Session Schedule
Add or Edit Sessions
A Session is a schedule of events and rounds that are swum in a specified order. For example, you
might have a Day 1 Morning Session in which all the Prelims are swum and then an afternoon or
evening Session in which the Finals are swum. Although setting up a Session is NOT REQUIRED by
MEET MANAGER, the advantage in setting up a Session is that when you go to print reports, seed, or
run the meet, you don't have to think and remember "what events and rounds are being swum this
afternoon". Another advantage in setting up a Session is that you can time-line that session and your
entire meet.
To setup a Session, click on Events from the Main Menu Bar and then click on the Sessions icon.
Now click on the Add icon
to show the screen below and fill out the information.
151
Copyright©Sports-Tek Software
MEET MANAGER for Swimming
Session #: A number followed by an optional letter, such as 3 or 3A.
Session Title: This will be printed as a header for all Session Reports.
Day: Enter the day as a number where the first day of the meet is 1.
Start Time: This will be printed at the top of a Session report and provides the begin time for Timing
out the Session.
· Interval: This is the time estimated between heats for the purpose of timing out the Session. Since
backstroke heats usually take longer, you can add an extra interval time for these events which
includes the medley relay.
· Course: This is the course for the Session. You might have a prelim Session in a Yard pool and a
finals Session in a Long Course Meter pool. If you subsequently change the session of a course say
from SC Meters to Yards because it was set up for the wrong course, MM will offer the option to
change all the results for that session to the new course.
· Max Entries for Meet Events Export to TM: These max entry numbers are optional and are used
in two ways:
1. When exporting meet events to TEAM MANAGER, these max entry values will be applied to the
appropriate session.
2. MM only uses these max entry numbers as default values in the Exceptions Report to check for
over-entry in a given session. Note: MM does not use these max entry numbers to filter imports
or to provide warnings if the max limit is exceeded.
·
·
·
·
After you click OK to Add a new Session, MM will display all of the events that you previously set up on
the left side of the Session screen. You can click and drag an event to the right panel to include in the
new Session or just position the cursor on a event and double click it to move it into the new Session.
Use the column named Report to specify whether you want a Psych Sheet or Heat Sheet printed
for each event using the Meet Program Report - enter P to choose Psych Sheet or H to choose
Heat Sheet.
Use the Order column to specify the order of the events in your Session - that will be the order the
events will be printed, seeded, and run.
152
Copyright©Sports-Tek Software
MEET MANAGER for Swimming
You can also use the Alt column to declare a pair of events to alternate heats between two timed
final events of the same stroke, such as alternating women/men in the 1500 meter free or
women/men in the women's 800 free and men's 1500 free. For example, if event #1 is the Girls
1500 FREE and event #2 is the Boys 1500 FREE and you wish to alternate heats, then enter a "2"
in the Alt column for event #1 and a "1" in the Alt column for event #2. The records, time
standards, and qualifying times for both events are shown in the one combined event header.
Use the Break column to enter a break in minutes to be used in the time-line computation
If you wish to swim the fastest 1-3 heats of a Timed Final Long Distance Event with the Finals
Session, enter that event into the Prelims Session to include the slower heats AND also into the Finals
Session. When you select this event for the Finals Session, MM will note that you have entered this
event into a second Session and ask you if you wish to include the fastest heats (1-3) in this second
Session. Answer accordingly and then when you print the Meet Program for this Session, MM will
include only the fastest heats as you specified.
Click on the Reports button on the left panel to get a report for the Session to review or publish,
including a Time Line. If later you find out that you want to change a Session, just pick it from the
Session list at the top and click on the Edit Session button and make the changes that you wish.
Click on the Move button on the left hand panel to move all events into a session with one click. This
can also be used to move all remaining events into the last session.
Delete a Session
From the Main Menu Bar, click on Events / Sessions, select the Session that you wish to delete. Now
click on the Delete icon
or click Delete and MM will ask you to confirm that you wish to delete that
Session. Click Yes to confirm.
Please note, once a session is deleted, it is NOT reversible without re-keying
the information !
Create a Session Schedule
From the Main Menu Bar, click on Events / Sessions to display the Sessions Menu. After the first
session is added, the lower half of the sessions windows might look like the following with the entire
event list at the lower left:
153
Copyright©Sports-Tek Software
MEET MANAGER for Swimming
You can click an event on the left and drag it to the right panel to include in the new Session or just
position the cursor on a event and double click it to move it into the new Session.
· Use the column named Report to specify whether you want a Psych Sheet or Heat Sheet printed for
each event using the Meet Program Report - enter P to choose Psych Sheet or H to choose Heat
Sheet.
· The Order column specifies the order of the events in your Session - that will be the order the
events will be printed, seeded, and run.
· If the events are out of order on the right, the best way to change the order is to use the order
column. For example, to move the 40th event in a list to the 16th, simply edit the 40 and change it to
a 16. A second way to change the order of the list on the right is to drag an event up or down and
drop it onto another event. The drag and drop method only works well if the event is being
moved to a slot that is visible on the screen.
· You can also use the Alt column to declare a pair of events to alternate heats between two timed
final events or two prelim events of the same stroke, such as alternating women's 800 free and
men's 1500 free. For example, if event #87 is the women's 800 Free and event #88 is the men's
1500 Free and you wish to alternate heats, then enter a "88" in the Alt column for event #87 and an
"87" will be automatically entered in the Alt column for event #88. The heat start times are not
shown for events which use this alternating heat feature. However, the records, time standards, and
qualifying times for both events are shown in the one combined event header.
· Use the Break column to enter a break in minutes to be used in the time-line computation
After a few events have been moved to the right, the window might look like this:
154
Copyright©Sports-Tek Software
MEET MANAGER for Swimming
In the example above, the heats for events 87 and 88 will alternate female / male. There will be a 5
minute break built into the time line after event 86. Events 89 and 90 will be printed as Psych Sheets in
the Meet Program.
Other Features
· If you double click an event that is already in another session, you are given the option to move the
event from the other session to the active one.
· If you wish to swim the fastest 1-3 heats of a Timed Final Long Distance Event with the Finals
Session, enter that event into the Prelims Session to include the slower heats AND also into the
Finals Session. When you select this event for the Finals Session, MM will note that you have
entered this event into a second Session and ask you if you wish to include the fastest heats (1-3) in
this second Session. Answer accordingly and then when you print the Meet Program for the Finals
Session, MM will include only the fastest heats as you specified. For the Prelims Session, all heats
will be printed, but the last three heats will say "Swimming with Finals" next to the heat number.
· Click on the Printer icon to get a report for the Session to review or publish, including a Time Line.
If later you find out that you want to change a Session, just pick it from the Session list at the top and
click on the Edit Session button and make the changes that you wish.
· Click on the Move All icon to move all events into a session with one click. This can also be used to
move all remaining events into the last session.
· Click the Remove All icon to remove all events from a session.
Change Results Course
Suppose you run a meet setup as Yards and enter results, but the meet is actually in short course
meters. The results will be stored with an S denoting short course meters. To change the course for
the results to yards, you must use the sessions to menu to do this.
There are three scenarios:
· No Sessions are Setup: Add one session with the wrong course and move all events into the
session. Then edit the session and change the course to the correct session. MM will offer the
option to change all the results for that session to the new course.
· Sessions are setup with the wrong course: Edit each session and change to the correct course.
MM will offer the option to change all the results for each session to the new course.
· Sessions are setup with the correct course, but the results course is still wrong: Edit each
session and change to an incorrect course. Edit each session again and change to the correct
course. MM will offer the option to change all the results for each session to the new course.
155
Copyright©Sports-Tek Software
MEET MANAGER for Swimming
Event Comments / Sponsors
You many want to solicit sponsors for your meet to help offset some of the costs associated with
running the meet. When you sell the Meet program and Results Sheets, you can display the sponsor
information as headers for each event. For example:
Boys 11-12 50 FREE
Sponsor: Halter Printing
(Call 488-655-9787)
To enter the Sponsor information, click on Events from the Main Menu Bar and then pick an event and
click on the Event Comments icon. MM will display 4 lines of comments for you to use for your
information for that particular event. Whatever you enter for Comments Line 1 will be prefixed by the
word "Sponsor:". Information for Comments Lines 2-4 will be printed as is.
You can also use this feature to display other information about the event. For example, you could
enter the following information in lines 2-4: "At last year's meet, Billy Pratt broke the State Record".
When you print your Meet Program or Meet Results reports, you may optionally choose to print the
Sponsor and/or Event Comment information for each event by checking the Event Comments check
box.
Re-Number Events
Suppose you set up your meet events and then the meet host tells you that they have decided to add some new
events. Here's how to quickly add those events without re-entering all the events you have already set up.
Click on Events from the Main Menu Bar and then click the Re-Number icon and MM will display the following
screen.
156
Copyright©Sports-Tek Software
MEET MANAGER for Swimming
First, choose whether you wish to decrease or increase event numbers. Then enter the offset amount which is
how much you wish to add or subtract from the starting event number. Then enter the event number you wish to
start with and the event number you wish to end with. For example, suppose your events were numbered 1-20
and you wanted to add 5 new events beginning with event 11. Enter 5 for the Offset amount, 11 for the Starting
Event Number, and 20 for the Ending Event Number. Click OK and MM will re-number the events and you would
end up with events 1-10 and 16-25. Now you could add your five new events in 11-15.
As another example, suppose you have events 1-100 and you want to switch events 1-50 with 51-100. First
increase 1-100 by 50 which gives you 51-150. Now decrease by 100 starting with event 101 and ending with 150.
You now have 1-100 again, but the first 50 has been switched with the second 50.
Clear Indicators
You can apply "Special" characters to the entry time to imply certain meanings. For example, if you
wish to track athletes who do not have a proof of time as used in USA Swimming National Meets, or to
indicate an optional 6th event in USMS National Meets, you can enter an "*" in the "Special" field. The
allowable special characters are: *, #, !, and $.
MEET MANAGER will display the special character on the Psych Sheet and Team Entry reports, but
WILL NOT seed these entries.
To clear these "Special" Indicators, click on Events from the Main Menu Bar, pick an event from the
list and then click on the Clear Indicator icon. MM will ask for confirmation and then clear all of the
special indicators for one event, all events in a session, or all sessions.
If you wish to clear these Indicators for all events of a session, click on the Session button, pick the
Session or All sessions, then click on the Clear Indicator icon.
157
Copyright©Sports-Tek Software
MEET MANAGER for Swimming
Setup and Use Records
Records are used by MM in four ways:
· To be listed as part of the Event Header for the Meet Program and Results Reports.
· To "Flag" any record breakers in the Results Report.
· To list the record breakers on the Exceptions Report.
· To update the records list itself based on swum times during the meet.
There are two ways of getting records into your MM database.
· Keying them
· Importing them
Keying Records
Setting up Records is a two step process.
· Create the Tag Names, such as World, along with the "Flag" symbol and the order for listing the
records on reports.
· Enter the record information for each event in the meet - the record time, who holds the record,
when the record was set, etc.
Click on Events from the Main Menu Bar and then click on the Records icon. Add a Tag Name by
clicking the Add icon in the Tag Names area at the lower left of the Records Menu.
· Order - that is the order you wish the record printed on the Meet program and Results reports.
· Tag Name - That's the name of the record. "State", "World", "Meet" are all examples of Tag names.
· Flag - This is a one character field that will be displayed on the Results Report next to any Time that
ties or breaks the record. Enter an "x" to tell MM not to display this record on reports. Examples of
flags are "!", "R", and "#" - 1:23.45! or 1:23.45R.
· If the record is a team record such as might be the case in a dual meet, select the team that the
record tag is for and only members of that team will be flagged if one or more breaks the record.
· If the record is an LSC, LMSC, or other organization type record, select the LSC and only athletes
and relays belonging to the selected LSC will be eligible to break this record.
· Depending on the record, exhibition or foreign athletes may or may not be eligible to break the
record. Use the check boxes to indicate your preference for the particular tag.
158
Copyright©Sports-Tek Software
MEET MANAGER for Swimming
After you have added several tags for a National meet, the tag names might be like this:
The full Records Menu might look like this:
In the Records Menu above, you can filter the list of events in a couple ways.
· To only show records of one tag, select the tag and then click the "Show Records of Selected Tag
Only" check box at the top.
· To filter the events to one gender select the gender and then click the Apply Filters icon or click
Apply Filters.
· You can also filter by event age range or individual or relays, but you must use the Apply Filters icon.
Enter Data for a Record
To enter data for a record, edit the grid directly and type into the grid. Enter the following:
159
Copyright©Sports-Tek Software
MEET MANAGER for Swimming
· Record Time
· Year, Month, Day the record was set
· Record Holder - if this is a Relay Event, enter the names of the 4 Athletes in the Relay Names
column
· Affiliation - Enter the Team affiliated with the Athlete or Relay that holds the record
· If you do not want MM to check a Record for a particular event, click on the Hide check box for that
event.
Custom Age Groups
You may also click on Custom Age Groups at the top to specify that Records for an age group be used
for another age group in your meet. For example, you could use the 17-18 Record for the 15-18 age
group in your meet.
Ties
If you have any records where two individuals or relays are tied for a record, create a second identical
Tag Name. Enter only the tied individuals or relays in the second tag. MM does not display a tag for a
given event if there is no data for that event and tag.
Importing Records
Please click Here for detail information about Importing Records into your MM database.
Updating Records
During the meet or after the Meet has been completed, you might want to go back and Update your
Records with any new ones that have been broken.
To update records, highlight the Record Tag you wish to update and click on the Update icon at the
top of the Records screen. MM will check all the events/rounds that have been completed and display
a check box list of any Records that have been broken together with the "old" record time and record
holder and date information. MM will default to all boxes checked so that when you click OK, MM will
move the information for those you have checked into the Records section. If you do not want MM to
update a particular record, just remove the check box for that event. If there is a tie, the tied record will
be shown in the list of record breakers in pink instead of yellow. When you select to update the
records, the updating will create a second identical tag name for the record and add the record to this
new tag, thus allowing you to store both record holders
Here are two ways that you might want to use this feature:
160
Copyright©Sports-Tek Software
MEET MANAGER for Swimming
· If records have been broken in the Prelim Session, update them and then they will now show up in
the Meet Program for Finals!
· Update all your Records after the meet has been completed and then Export them to a diskette for
another meet or to Import into TEAM MANAGER.
· You might also want to run the Meet Summary Report to print a report of all Record Breakers.
However, this should be done before updating records.
Setup and Use Time Standards
Time Standards are classifications that use 1 to 4 character tag names for athlete performances.
Examples of Time Standards would be a 52.34 AAA or 1:03.42 B.
Time Standards are used by MM in three ways:
· To be listed as part of the Event Header for the Meet Program and Results Reports.
· To "Flag" Athletes or Relays that achieve a particular Time Standard.
· To provide criteria for grouping Athletes/Relays for Place/Finish in an Event.
There are two ways of getting time standards into your MM database.
· Keying them
· Importing them
Keying Time Standards
Setting up Time Standards is a two step process.
· Create the Tag Names, such as AAA and BB.
· Enter the Time Standard time for each event.
Click on Events from the Main Menu Bar and then click on the Time Standards icon. Add a Tag
Name by clicking the Add icon in the Tag Names area at the lower left of the Time Standards Menu.
You can optionally add up to a 20 character Tag description which will be shown on reports with time
standards.
After you have added several tags for a meet, the tag names might be like this:
161
Copyright©Sports-Tek Software
MEET MANAGER for Swimming
For each Standard you wish displayed on reports, enter the following information:
· Tag Name - That's the name that will be displayed next to the time that meets that Standard criteria.
The tag can be up to four characters long - "AAAA", "BB", "OLYM", and "STAR" are all examples of
Tag names.
· Now Specify how you want MM to use the Time Standard by checking the appropriate 3 columns of
check boxes:
a. Column 1 For Time Stds - MM will check the entry or result time and if it meets the Standard
criteria, it will display the corresponding tag next to the time - for example, 1:23.45 AA.
b. Column 2 For Entry Qual - MM will use this time as the meet entry qualification time for the
meet and will provide enforcement for keyboard and imported entry times.
· You may click the "Equal to or faster" OR the "Slower than" radio button to tell MM how to
check the particular Standard. For example, if you are running an A meet, you would want to
click on the "Equal to or Faster" button and select the A time standard. If you were running a
BB type meet where the time standard was slower than an A time, you would want to select
"Slower than" and select the A time standard. If you pick two time standard tags for the entry
qualifying time, it means use them as a range where the qualifying time must be faster than
or equal to the slower tag and slower than the faster tag.
· You may check the "Custom Qual Times" check box if your meet has some events that are
faster than or equal to a qualifying time and some other events that are slower than a
qualifying time. You can even have some events with a range for the qualifying times. See
Custom Qualifying Times for more details on how to use this feature.
c. Column 3 For Scoring - This check box column is only used if the Meet Type in Meet Setup is
Divisions by Time Standard. If it is, check the boxes next to the time standards to be used for
multi-level scoring. If you are running an A/B/C meet, check the For Scoring box next to the A, B
and C time standard tags. You can enter the C tag name with no times and MM will classify all
entries/results that do not meet any of the other Time Standard criteria as a C time. Be sure to
go to Setup / Entry/Scoring Preferences / Time Standards for this type of meet so that A/B/C
results and Over and Under achievers will be ranked the way you want them.
Note: To have a time standard ignored when the Meet Type is Divisions by Time Standards, enter
1.00 for the time standard time. This is necessary when two events have scoring tags with no time.
The full Time Standards Menu might look like this:
162
Copyright©Sports-Tek Software
MEET MANAGER for Swimming
In the Time Standards Menu above, you can filter the list of events in a couple ways.
· To filter the events to one gender select the gender.
· You can also filter by event age range or individual or relays.
Enter Data
To enter times for the time standards, edit the grid directly and type into the grid.
Custom Age Groups
You may also click on Custom Age Groups at the top to specify that Records for an age group be used
for another age group in your meet. For example, you could use the 17-18 Record for the 15-18 age
group in your meet.
163
Copyright©Sports-Tek Software
MEET MANAGER for Swimming
Importing Time Standards
Please click Here for detail information about Importing Time Standards into your MM database.
Custom Qualifying Times
Custom Qualifying Times are only necessary when:
1. You have separate events that are identical except for their qualifying times. For example, event 1
and 2 might both be the 10 & under 100 breast, but event 1's qualifying time is faster than an A time
and event 2's qualifying time is slower than A, but faster than B. The example below illustrates this
concept.
2. You have some events that use faster than qualifying times and other events that use slower than
qualifying times.
164
Copyright©Sports-Tek Software
MEET MANAGER for Swimming
Notes:
· In order for the Slower Than and the = or Faster columns to appear, you must check the "Custom
Qual Times" check box.
· If you also check one or two of the "For Entry Qual" check boxes, they will be used for events that do
not have any custom qualifying times. In the screen below, the qualifying times will be the same as
those for the above screen. Notice that the even numbered events will still use the range between
the A and B times.
165
Copyright©Sports-Tek Software
MEET MANAGER for Swimming
166
Copyright©Sports-Tek Software
MEET MANAGER for Swimming
Athletes Menu
From the Main Menu Bar, click on Athletes to display the Athletes Menu which contains the Athlete
Browser shown below.
· You can sort the athlete list by clicking on any column header.
· To quickly jump to an athlete in a long list, click on the alphabet bar at the top to scroll to the
beginning of the first letter of the athlete's last name.
· Press F6 or click Find or click the Find icon and start typing the last name and the browser instantly
scrolls to the nearest matching name. If the sort is by team, the search is by team. If the sort is by
competitor number, the search is by competitor number.
· The athlete list can be filtered by gender, age range, and team.
· The entries list can be filtered by Eligible Events only, All Events, or Entered Events only.
· The entries list can also show relay events if you check the Show Relays check box.
· The entries list can be filtered to only show events from one session by click the Session button to
the right of the icons.
· If results have already been entered, clicking the Show Results check box will include all result
times along with the entries.
· You can move the columns of the grid to a different order by clicking on the header of a column,
releasing the mouse, and then dragging the header to another location and dropping it.
· To save the current layout of the grid, click the
icon and you have the following choices:
· To print or preview the athlete grid, click the
icon.
· Tp print or preview the entries grid, click the
icon.
· To export the grid to HTML, click the
icon.
· To make room to show more athletes in the list, you can hide the filter choices by clicking the View
icon or by clicking View / Show/Hide Filters.
· To create Athlete Reports, click the Printer icon or click Print.
· You can resize the bottom and top grids by grabbing the divider bar with the mouse and moving it up
or down.
· If you click Help / Shortcuts at the top of the Athlete Browser, there will be a list of
keyboard shortcuts.
167
Copyright©Sports-Tek Software
MEET MANAGER for Swimming
Add or Edit Athletes
Delete an Athlete
Add or Edit Entries from the Athlete Browser
Delete an Entry
Athlete Contact Information
Athlete Menu Shortcut Keys
The following keyboard Function keys may be used instead of the mouse for navigation and functional
purposes in the Athlete Menu of MEET MANAGER.
F1
F3
F4
F6
Help
Add an athlete
Edit the currently selected athlete
Search for an athlete either by last name, comp#, or by team depending on the sort column
Ctrl-F3 Add an athlete, but do not display the eligible event list
Ctrl-F4 Edit an athlete and start with the cursor on the first event rather than the last name
Add or Edit Athletes
There are three ways to enter athletes into your database:
· Manually with typing
· By Importing Meet Entries from a HY-TEK Meet Entry File
· By Importing Rosters from a HY-TEK Meet Entry or Athletes/Teams File
Click here to see How to Customize your Athlete/Relay Preferences
168
Copyright©Sports-Tek Software
MEET MANAGER for Swimming
Note: If you are running a large meet and if many of the teams coming to your meet do not have
TEAM MANAGER, you can request a FREE copy of HY-TEK's TEAM MANAGER Lite and then
provide that software to the teams. Then they can do the keying for their meet entries and export those
entries to you - no keying for you and no mistakes! Contact the HY-TEK Business Office Toll Free at
866.456.5111 to get your FREE copy of TM Lite to distribute or download it FREE from the HY-TEK
web site at www.hy-tekltd.com.
To add athletes, click the Add icon
at the top of the Athletes Browser or press the F3 key.
When adding athletes, you have a check box to allow you to Retain Gender when adding say a set of
girls in succession. Otherwise the Gender will be blank and you will be forced to enter either M or F for
the gender.
To edit a previously entered athlete, click the Edit icon
at the top of the Athletes Browser or
double click an athlete name in the browser list. A sample of the Athlete Edit Menu is shown below. If in
edit mode, you can use the left and right arrow at the bottom to move to the previous or next athlete.
Pressing F4 or F5 will do the same.
How to Enter Data Into the Add/Edit Athlete Menu
1. Key in the information about each Athlete including name, gender, birth date, age, registration ID (if
any), competitor #, citizen information, and Class/YR. Some of these fields may not be needed
and you can "disable" them from the Athlete Preferences Screen in the Set-up Menu. Please note
that if you selected a specific Registration ID format (such as USA Swimming), MM will
automatically build the Registration ID based on the particular format you chose.
2. To choose the Athlete's Team, click the down arrow on the Team combo box. An unattached
athlete is one that is assigned to an unattached Team. An unattached athlete's points will not be
accumulated toward Team Scores. An unattached Team is any Team that has the first 3
characters of the Team Abbreviation as "UN-", "UNA", "UNAT", or "UNATT". For example, "UNFL" and "UNA" would both be unattached Team names, but "UNAC" would not. Or, you can click
on Teams at the top which takes you to the Teams menu and allows you to add a new
169
Copyright©Sports-Tek Software
MEET MANAGER for Swimming
team/school.
3. You may declare an athlete as Exhibition, Foreigner, Disabled, or Rookie by clicking on the
Status combo box on the Add/Edit Athlete screen. The status of an athlete defaults to "Normal".
When Meet Results are printed, an "x" (Exhibition), "*" (Foreign), "%" (Disabled), or "#" (Rookie)
will prefix each swimmer's name based on his/her particular status declaration if Report
Preferences are set to show athlete status.
4. Competitor Numbers are optional and you can enter any number you wish from 1 to 99999. If you
do not wish to bother adding the competitor number ahead of time, later you can click Comp # at
the top of the Athlete Browser, select a starting number, and MM will re-assign every athlete
alphabetically by team and alphabetically by name within each team. This competitor number can
be used to Deck Seed Athletes from the Run Menu or to enter them into Relays from the Run
Menu's Relay Names menu.
5. The eligible events (based on age and gender) are listed on the bottom half of the Add/Edit
screen. To select an event for an entry, click an event name and the event number will be entered
on the left side, or simply type in the event number in the Entries Event # column. Key in the entry
time (sometimes called seed time) with or without a colon or period - "12345" or 1:23.45". You may
also append a course designator to the entry time to specify a non-conforming course entry time for example for a LCM meet, enter 1:23.45Y to specify a Yard entry time. To make an entry
Exhibition, place an "x" or "X" in front of the time. To make an entry a Bonus entry, place an "b"
or "B" in front of the time. To assign a special indicator to an entry, enter *, #, !, or $ in front of the
time. Please click here for more information about Converting Seed Times. Note that if you put
in some entries and then change the athlete's age or gender, the entries will disappear and they
are not retrievable unless the entries had been previously saved.
6. The 2nd Club is limited to 12 characters and is used in the Meet Program, Psych Sheet, Results,
and Award Labels if the Report Preferences are set to show 2nd Club.
7. The Disability codes are only entered if the meet is a Multi-Disability meet or if the athlete status is
Disabled. The disability codes are from 1 to 13 and the S code is for freestyle, backstroke, and
butterfly. The SB code is for breaststroke. The SM code is for individual medley.
Add or Edit Entries
Delete an Athlete
To delete an existing athlete, click on Athletes from the Main Menu Bar, highlight the Athlete in the
Athlete Browser and click on the Delete icon
. MM will ask for confirmation and then delete that
athlete and all of his/her entries from your Database. Relays will not be deleted, but this athlete's name
will be removed if listed on a relay.
Please note, once an athlete is deleted, it is NOT reversible without re-keying
the information !
Add or Edit Entries
There are three ways to add entries:
· Manually when you Add or Edit an Athlete
· Manually from the Athlete Browser
· By Importing from an entries file (click here to see How to Import Meet Entries)
Add Entries When You Add or Edit a Particular Athlete
· Click on the Add icon
the Edit icon
at the top of the Athlete Menu or select a particular Athlete and click on
. The bottom half of Add or Edit window is shown below.
170
Copyright©Sports-Tek Software
MEET MANAGER for Swimming
· You may declare the events the Athlete will be swimming directly from this screen either by clicking
on the event, or by keying in the event number in the event # field. Then key in the entry time
(sometimes called seed time) with or without a colon or period - "12345" or 1:23.45". You may also
append a course designator to the entry time to specify a non-conforming course entry time - for
example for a LCM meet, enter 1:23.45Y to specify a Yard entry time. To make an entry Exhibition,
place an "x" or "X" in front of the time. To make an entry a Bonus entry, place an "b" or "B" in front of
the time. To assign a special indicator to an entry, enter *, #, !, or $ in front of the time. Please
click here for more information about Converting Seed Times.
· Note that if you put in some entries and then change the athlete's age or gender, the entries will
disappear and they are not retrievable unless the entries had been previously saved.
Add or Edit Entries From the Athlete Browser
· From the Main Menu, click on Athletes. Refer to the screen shot below for the entries window which
would be at the bottom of the Athlete Browser.
· Highlight the Athlete (or click on the alphabet bar to get to the beginning of the first letter of the
athlete's last name) and the eligible events based on gender and age will be listed in the Entries
section at the bottom of the screen. If the Athlete is not listed, you must enter the Athlete in the
Database. (Click here to see How to Add Athletes to your Database).
· You can filter the events shown for this athlete by clicking Eligible Events only, All Events, or Entered
Events only a the top of the Athlete Browser.
· Click on the events you want to enter the athlete in. The event will turn yellow. To remove an Entry,
click on the event again.
· Key in their seed time (if any). You may enter the time as either 23057, 2:30.57 or NT (No Time).
You can also prefix the entry time with any of the Special Indicators as described below. If the entry
time is for a different course than the meet course, then add an L, S, or Y to the entry time, such as
2:30.57S. When keying in entry times in a particular course, each entry time is compared against the
appropriate entry qualification time standard (if any) that matches the course.
· If you are manually seeding and know the heat and lane the athlete will be in, key that in now - for
example enter "2/5" for Heat 2 lane 5.. If that heat/lane is already assigned to someone else, MEET
MANAGER won't let you assign that heat and lane.
· You can scratch an athlete, declare the athlete as an alternate, declare the athlete as an
exhibition athlete, or declare the entry to be a bonus event by clicking on the SCR, Alt, Exh, or
Bonus check boxes.
· When seeding from the Seeding Menu, any entry with SCR or Alt checked WILL NOT be seeded.
Any entry with only EXH or Bonus checked WILL be seeded. The Bonus check box is used for
indicating an extra entry for a given athlete that maybe did not meet the qualifying time.
· You can apply "Special" characters to the entry time to imply certain meanings. For example, if you
wish to track athletes who do not have a proof of time as used in USA Swimming National Meets,
or to indicate an optional 6th event in USMS National Meets, you can enter an "*" in the "Special"
field. The allowable special characters are: *, #, !, and $. MEET MANAGER will display that
character on the Psych Sheet and Team Entry reports.
· When seeding from the Seeding Menu, any entry with a special character assigned of *, #, !, or $
171
Copyright©Sports-Tek Software
MEET MANAGER for Swimming
WILL NOT be seeded.
· There is a special Event Age option for each entry where you can specify what age to use for the
athlete for the event. For example, if there is a 13 & over event with 13-14 and 15 & over scoring and
a 14 year old wants to score in the 15 & over age group, enter 15 for the Event Age.
· The Scratch All icon at the top of the Athlete Browser will allow you to quickly scratch an athlete
from all events in the case where he/she did not show up for the meet. This does not scratch relays.
The Athlete WILL NOT be scratched from rounds that have been already completed. You may want
to click on the Session button at the top of the screen to filter the eligible events for a given athlete
to a particular session. This is very helpful in cases where you want to scratch a swimmer for all
entries within a given session.
Note: To clear the "Special" Indicators for an entire event, click on Events from the Main Menu Bar,
pick an event from the list and then click on the Clear Indicators icon. If you wish to clear these
Indicators for all events of a session, click on the Session button, pick the Session or All sessions,
then click on the Clear Indicators icon. MM will ask for confirmation and then clear all of the special
indicators for one event, all events in a session, or all sessions. The Clear Indicators will not clear
SCR, Alt, EXH, or Bonus check boxes.
Adding or Editing Entries in Multi-User Mode
It is important to know that when an event is selected in the Run Menu while in multi-user mode, the
event is locked from editing. Even when exiting the Run Menu, the last event selected is still active and
locked. If you select an event in the Athlete Menu that is locked by the Run Menu on your computer,
you will get a message that the event is temporarily locked by User Admin.
The best solution is to go back to the Run Menu and select a relay event or some other event that does
not need any new entries. However, if another computer's Run Menu has an event locked, then you will
not be able to make changes to entries for that event.
Delete an Entry
Click on Athletes from the Main Menu Bar and then from the Athletes Browser, click on the Athlete
that has the Entry you wish to delete. Now click on the event name of the entry and MM will ask you if
you wish to Delete that specific Athlete's entry for that event. Click OK to confirm.
Please note, once an entry is deleted, it is NOT reversible without re-keying the
information !
172
Copyright©Sports-Tek Software
MEET MANAGER for Swimming
Athlete Contact Information
To enter athlete contact information, such as address and phone, click on Athletes from the Main
Menu Bar, highlight the Athlete in the Athlete Browser and click on the Contact icon at the top of the
Athletes Browser. Or you can click Contact at the top of the Add or Edit Athlete Menu.
Enter the information based upon what you really need. For example, if you are planning on mailing
Meet Results to everyone in the meet, you might want to enter each athlete's address and then use
MM's Mailing Label feature to print all of the mailing labels.
Competitor Numbers
Competitor Numbers are numbers that can be assigned to Athletes and used as a "shortcut" way of
referencing an Athlete. If you decide you want to make use of Competitor Numbers for Athletes, first
click on Set-up from the Main Menu Bar and then Athlete/Relay Preferences and check the box
labeled "Enter Competitor Numbers".
There are three ways to assign Competitor numbers:
1. As you Add/Edit the Athlete, enter a number into the Competitor # field on the Screen.
2. Click on Setup from the Main Menu Bar and then Athlete/Relay Preferences and check the box
labeled "Auto Increment Competitor numbers". This should be done before you start Adding your
Athletes. As you Add an Athlete, MM will automatically assign the next sequential Competitor
number beginning with "1". As you Import meet entries, MM will also assign sequential Competitor
Numbers.
3. To automatically re-number all Competitor Numbers, click the Comp# icon at the top of the
Athlete Menu and the screen below will be displayed. There are many options for numbering. To
zero out all numbers or just male or female, check the Zero out competitor numbers check box
and click Ok. To renumber, make your selections, enter a starting number and click Ok. You can
reassign 1) alphabetically by team and alphabetically by name within each team or 2) alphabetically
by athlete. You also have the option to skip numbering athletes that are not entered in any event.
The Separate Genders check box when applied to Alphabetical by Team means to number the
females first and the males second within a team. If Alphabetical by Athlete is selected along
with Separate Genders, all females will be numbered first before the males.
173
Copyright©Sports-Tek Software
MEET MANAGER for Swimming
The competitor number can be used as follows:
1. To manually place Athletes into lanes in the Run Menu.
2. To enter them into Relays in the Relay Names Menu in the Run Menu.
3. To enter them into Relays in the Relays Menu.
For example, if you are Manually Seeding Athletes into an event, you might want to use competitor
numbers rather than use the Adjust feature to click and drag athletes into a heat and lane. In this
case, you would click on the Competitor # column next to an open lane on the Run Screen and enter
the Athlete Competitor # right there. MM will look up that Competitor Number and enter the
corresponding Athlete into the lane. If the athlete is in another heat or lane, you will be notified and
given the option to move the athlete or not.
For Reports, if you have checked the box in the Athlete/Relay Preferences labeled "Enter Competitor
Numbers", then MM will automatically print the Athlete's Competitor Number on Entry Cards/Labels,
Check-In Report, etc. In other reports like the Meet Program or Results reports, you will have the
option of printing the Competitor #, Registration ID, or neither.
Please Note: Whenever you Import Athletes into your Database, MM will automatically assign
competitor numbers in case you need them at a later time.
Declare Foreign Athletes
Click on Athletes from the Main Menu Bar and then the Add or Edit icon. Click on the Status pull
down arrow and click on "Foreigner" to declare that Athlete as a Foreign Athlete.
A foreigner status for an athlete will allow you to restrict seeding and scoring as follows:
· Prevent from advancing to the Championship Final of a Championship meet. Click here for how to
do this.
174
Copyright©Sports-Tek Software
MEET MANAGER for Swimming
· Restrict foreigners from Team Scoring. Click here for how to do this.
· When you Export Results at the completion of the meet, you can "exclude" foreign athletes.
Declare an Exhibition Swim (Individual or Relay)
When you declare a swim as "Exhibition" or "Unofficial", you are saying that the Athlete or Relay is
swimming for time and is not eligible for Points or Awards.
There are 4 ways to declare a swim as Exhibition:
1.
2.
3.
4.
From the Athlete Menu's Add or Edit Menu: Click on the Status pull down arrow and click on
Exhibition to declare that Athlete as Exhibition for every individual event the athlete is entered in.
Or place an "x" or "X" in front of the entry time for a given event.
From the Athlete or Relay Menus: From these menus, you can declare any entry as Exhibition
by clicking the Exh check box next to the entry.
From the Run Screen: Click on the Exh check box in the lane where the Athlete or Relay is listed.
From the Add/Edit Team Screen: Click on the Team Status pull down and select Exhibition and
MM will set up every individual and relay entry for this Team as Exhibition.
Declare Unattached Athletes
An unattached athlete is one that has no affiliation with a Team. An unattached athlete's points will not
be accumulated towards Team Scores, but will count for Individual High Point scores.
When you Add or Edit an Athlete, MM forces you to assign the athlete to a team and that team can be
an "unattached" team.
Click here for what defines a team as Unattached.
Declare Athlete Entry as 6th Event for a Masters Meet
In a large Masters meet, there are cases where the meet host requests that each Athlete that wants to
swim as many as 6 events indicate his/her least preferred event. If the meet does become too large,
the athletes are not seeded in these 6th event choices.
When you are editing or declaring entries for an Athlete, click on the data entry field under the column
marked Special in the row for the event that you wish to indicate as a least preferred 6th event. Then
enter an asterisk (*) character in that field to indicate that choice. The * will be displayed when you run
the Psych Sheet report - for example, 1:23.45*. Please note that entries that have this special
character will NOT BE SEEDED.
If a 6th event seeding is approved, go to the Events Menu and click on the Clear Indicators icon to
remove them all from an event. Go to the Sessions screen and click on the Clear Indicators icon to
remove them from all events in any session.
Declare "No Proof of Time" for an Entry
When you are editing or declaring entries for an Athlete or Relay, click on the data entry field under the
column marked Special in the row for the event that you wish to indicate as not having a Proof of Time.
Then enter a asterisk (*) character in that field to indicate that the entry has no proof of Time. The *
will be displayed when you run the Psych Sheet report - for example, 1:23.45*. Please note that
entries that have this special character will NOT BE SEEDED.
When that Relay or Athlete proves his/her Entry Time, you can edit the entry in the same way and
remove the *. Or you can go to the Events Screen and click on the Clear Indicators icon to remove
them all from an event. Go to the Sessions screen and click on the Clear Indicators icon to remove
175
Copyright©Sports-Tek Software
MEET MANAGER for Swimming
them from all events in any session.
Automatically Age-Up Athletes
Whenever you Open a New Database, MM will ask you to specify the Age-Up-Date to use to calculate
each Athlete's age. That way when you enter an Athlete's birth date, MM will automatically calculate
his/her age.
If later you find that you want to change the Age-Up-Date and have MM recalculate each Athlete's Age
based on this new Age-Up-Date, click on File from the Main Menu Bar and then Set-up and then Meet
Setup. Now you may change the Age-Up-Date and then click the Age-Up Athletes button at the
bottom to recompute all athlete ages.
176
Copyright©Sports-Tek Software
MEET MANAGER for Swimming
Relays Menu
Click on Relays from the Main Menu Bar to display the Relays Menu as shown below.
· You can sort the Relay Team Entries list by clicking on Team header, the Entry Time header, or the
Heat/Lane header.
· To make room to show more Relay Events in the list, you can hide the filter choices by clicking the
View icon or by clicking View / Show/Hide Filters.
· The Relay Event list can be filtered by gender or age range.
· Each window can be resized by dragging one of the divider bars.
Add a Relay
Delete a Relay
Enter Relay Names
Add a Relay
There are three ways to enter relays into your database:
· Manually from the Relays Menu
· Manually from the Athletes Menu
· By Importing Meet Entries from a HY-TEK Meet Entry File
To add relays, click on Relays from the Main Menu Bar or on Relays at the top of the Athletes Menu.
In the Relays Menu at the upper left, select the relay event desired. You can 1) click the Add icon
and select a team or 2) double click the team name at the lower right. MM will ask you what Relay
"letter" you wish to assign to that Relay. The first Relay Team for an event will be the "A" Relay, the
177
Copyright©Sports-Tek Software
MEET MANAGER for Swimming
2nd the "B" Relay and so on. You can later edit the relay letter by clicking on the Letter column in the
Relay Team Entries grid and make the change.
If the meet is a Masters Meet or Multi-Age Group event, you will also be asked to enter the Relay Age
which can be any number in the range of the age group, such as 12 in the 11-12 age group. If the
event is a mixed event, you will need to enter the Relay Gender. You can later edit the relay age or the
relay gender by clicking on the appropriate cell in the appropriate column in the Relay Team Entries
grid. Here is an example Relay Team Entry grid for an 11-14 relay event with 11-12 and 13-14 multiage groups with mixed gender. Note the Age and Gen columns.
After a relay is added as shown in the Relay Team Entries grid above, you can enter a seed time by
clicking the appropriate cell in the Entry Time column. You can also manually enter a relay in a heat
and lane by clicking the appropriate cell in the Heat/Lane column. And finally, you can click on the
SCR, Alt, Exh, or Bonus check boxes as appropriate.
Click here for how to enter relay names. Relay names can be added at any time, before, during, or
after the meet.
At this point, you may add additional Relay Teams to the Meet or you might want to declare what
Athletes are actually swimming for each Relay Team. This declaration does not have to be done right
away, or even at all. If, or when, you do want to declare what Athletes are swimming for what Relay
teams, highlight the particular Relay Team in the Relay Team Entries grid. MM will show you a list of
all eligible Athletes for that Relay Team based on the Gender and Age of the event. You may click on
the Show Swim-ups button to show any Younger Athletes that might qualify for the Relay Team. For
example, for a Girls 13-14 200 Free Relay, you might also like to look at younger athletes that you
might want to put on one of the Relay Teams for this event.
Delete a Relay
To delete an existing relay, click on Relays from the Main Menu Bar, and double click the relay name
or click the Delete icon
. MM will ask for confirmation and then delete that relay and all relay
names attached to that relay.
Please note, once a relay is deleted, it is NOT reversible without re-keying the
information !
Enter Relay Names
You have three ways to assign an Athlete to a position on a Relay Team:
1. Click and drag an athlete from the Eligible Athletes list to the Relay Order list.
2. Double-Click on an eligible Athlete and MM will automatically assign him/her to the next available
178
Copyright©Sports-Tek Software
MEET MANAGER for Swimming
slot for the Relay.
3. Type in the competitor number in the Relay Order list.
There is room for up to 8 Athletes on each Relay Team to accommodate the 4 primary athletes and up
to 4 alternates. If a relay has prelims and finals, there are two sets of 8 slots, one for each round.
Relay Names can be entered from the Relays Menu as shown below.
· If names are entered for Prelims, you can click the Copy Pre to Fin button to copy the names from
left to right.
· If you want to copy relay names from Prelims to Finals for every relay in a given event, click the
Copy Names icon at the top of the Relays Menu.
· If athletes younger than 15 are eligible for the 15-18 relay in the example below, then click the Swimups icon at the top of the Relays Menu and all athletes 18 and under will be displayed.
Or Relay Names can be entered from the Relay Names Menu found in the Run the Meet Menu. From
this menu, an entire heat of relay names can be entered.
Entering Relay Names in Multi-User Mode
It is important to know that when an event is selected in the Run Menu while in multi-user mode, the
event is locked from the Relay Menu for editing. Even when exiting the Run Menu, the last event
selected is still active and locked. If you select an event in the Relay Menu that is locked by the Run
Menu on your computer, you will get the following message:
The best solution is to go back to the Run Menu and select an individual event, thus guaranteeing that
no relay events will be locked. However, if another computer's Run Menu has a relay event locked,
then you will not be able to make changes to the one relay event that is locked by the Run Menu.
179
Copyright©Sports-Tek Software
MEET MANAGER for Swimming
Teams / Schools Menu
Click on Teams or Schools from the Main Menu Bar to display the Teams Menu as shown below.
· If the meet is setup as High School or College, then this menu is called the Schools Menu.
Otherwise it is called the Teams Menu.
· You can sort the team list by clicking on any column header.
· To quickly jump to a team in a long list, click on the alphabet bar at the top to scroll to the beginning
of the first letter of the team name.
· Click Find or click the Find icon
and start typing the team name and the browser instantly
scrolls to the nearest matching team name. The sort must be by team name for this to work.
· You can move the columns of the grid to a different order by clicking on the header of a column,
releasing the mouse, and then dragging the header to another location and dropping it.
· To save the current layout of the grid, click the
· To print or preview the grid, click the
icon.
· To export the grid to HTML, click the
icon.
icon and you have the following choices:
Add a Team
Delete a Team
Enter Coach Names
Add or Edit a Team
To add teams, click the Add icon
at the top of the Teams Browser or press the F3 key.
180
Copyright©Sports-Tek Software
MEET MANAGER for Swimming
To edit a previously entered team, click the Edit icon
at the top of the Teams Browser or double
click a team name in the browser list. A sample of the Add New Team window is shown below. The
Edit Team window would look the same, but with data.
Enter the Team Abbreviation which may consist of up to 5 alpha-numeric characters. FAST, SSTAA,
and EXAC are examples of Team Abbreviations. This Team Abbreviation will be printed on most
Reports next to the name of the Athlete or Relay. You also have the option to specify an Alternate
Team abbreviation of five characters or less and a 16 character Alternate Team Name. On the
export of meet results to TM, you have the choice to use the Regular Team abbreviation or the
Alternate Team abbreviation. In Setup / Report Preferences, there is a check box to specify whether
to use the Regular Team abbreviation or the Alternate Team abbreviation on reports. The Alternate
Team abbreviation is perfect for use in Intra squad meets where the team is divided in half into Red
and White teams. for example - you make the Alternate Team Abbreviation be the real team
abbreviation and the Regular Team abbreviation be Red and White. Then when you export back to
Team Manager, you can use the Alternate Team Abbreviation.
Enter the Full Team Name and Short Team Name that will be used on various reports - for example,
the Full Team name will be used on the Team Score report. If you wish for a particular team to not be
eligible for team points, click the check box above.
If you have specified USA-S or SSA Registration IDs in the Meet Set-up, MM will request that you
specify an LSC code for your Team and will default to the last LSC code that was used. That LSC
code option will not be displayed unless you choose USS or SSA in the Meet Setup. If you wish to
enter any of the teams in your meet with an LSC code, then you must specify SSA or SSA Registration
in the Meet Setup. If you have specified this meet as a Masters meet, then the LMSC codes have
been set up for you to choose for each team.
You can optionally declare all of the athletes and relays on this team to be Exhibition by clicking on
the Team Status pull-down arrow and selecting Exhibition.
If you have declared the Meet Type as Divisions in the Meet Set-up screen, you may optionally assign
this Team to a Division. Click here to find out How To Set-up Division names. If you wish to group
teams for the purpose of Team Scoring and have set up Region names, click on the Region pull-down
arrow to assign this Team to a region.
An unattached athlete is one that has no affiliation with a specific Team and is assigned to an
181
Copyright©Sports-Tek Software
MEET MANAGER for Swimming
unattached Team.
· Unattached athletes receive points for placing high just like any other athlete, but an unattached
athlete's points will NOT be accumulated towards Team Score.
· An unattached Team is any Team that has the first 3 characters of the Team Abbreviation as "UN-",
or has the exact Team Abbreviation name of "UNATT" or "UNAT".
· Any athlete on these unattached teams would be classified as "unattached" and would accumulate
individual points, but not team points.
· You can also designate any regular team to have Unattached status. To do this, check the box in the
Add/Edit window shown above where it says Team not eligible for team score point rankings
(similar to Unattached). This will cause the team to behave exactly like an Unattached team in that
points will accumulate for each athlete on that team, but the team will not be listed in any Team
Score reports or on the Run screen where team scores are displayed.
Click the OK button to save this information in the database.
Delete a Team
Click on Teams from the Main Menu Bar and then from the Team Browser, select the Team that you
wish to Delete. Now click on the Delete icon
at the top and MM will ask you to confirm that you
wish to delete that Team and all of its Athletes, Entries, Relays, and Results. Click OK to confirm.
Please note, once a team is deleted, it is NOT reversible without re-keying the
information !
Enter Contact Names for a Team
Click on Teams from the Main Menu Bar and then pick a Team from the Team Browser list. Now click
on the Coaches icon
at the top. You may enter as many coaches, trainers, chaperones, etc. that
you wish. These staff can be printed on the Teams Report and on the Registration Label Report.
Add Coaches
To add coaches to a particular team. click the Add icon
at the top of the Coaches window or click
the Edit icon
to revise and existing coach's information. You can specify one coach as the
Primary Head Coach for Women and Men or you can specify one coach as the Head Coach for Men
and one coach as the Head Coach for Women. You can also specify anyone as a Men's Coach or a
Women's Coach. Note the sections for certifications where you can keep track of such things as CPR,
First Aid, and Safety Training Certifications with expiration dates.
182
Copyright©Sports-Tek Software
MEET MANAGER for Swimming
183
Copyright©Sports-Tek Software
MEET MANAGER for Swimming
Seeding Menu
This Section describes the procedures for Seeding Events. Seeding is the computerized assignment
of athletes and relays into heats and lanes. From the Main Menu Bar, click on Seeding to display the
Seeding Menu below.
· The Session List Browser at the top of the Seeding Menu allows you to work with one session's
events or All Events. When a session is selected, only the event rounds for that session are shown
in the Event List. If an event has not been seeded yet, the status will be Un-Seeded. If and event
has been seeded, but does not have full results, the status will be Seeded. If a round has been
completed, the status will be Done. If a round is the final round and the event has been completed
and scored, the status will be Scored.
· Use the Gender and Age Range fields to reduce the event list to one gender or one age group. For
example, click on Male and enter 11 and 12 for the Age Range and MM will show only the Male 1112 events in the Event List Browser.
· To make room to show more events in the event list, you can hide the filter choices by clicking the
View icon
or by clicking View / Show/Hide Filters.
Use the Hide Un-Seeded check box to hide the rounds that are un-seeded.
Use the Hide Seeded check box to hide the rounds that are seeded.
Use the Hide Done check box to hide the rounds that are done or scored.
Use the Hide Zero Entries to hide events that have no entries.
The check box Prompt if a Re-Seed warns you if you attempt to re-seed an already seeded event.
This is used as a precaution to prevent you from accidentally re-seeding an event when you did not
mean to.
· The check box Preview each Event allows you to preview the seeding for each event after each
event is seeded. If you have selected several events to be seeded simultaneously, the preview will
appear before the next event is seeded. This preview is equivalent to clicking the Preview icon and
gives you a chance to adjust the seeding if you want to.
·
·
·
·
·
184
Copyright©Sports-Tek Software
MEET MANAGER for Swimming
Seeding Basics and Tips
Seeding is the computerized assignment of athletes and relays into heats and lanes. An event can
have from one to three rounds. A Timed Final event has one round. A Prelim/Final event has two
rounds. If an event has Semi-Finals in addition to Preliminaries and Finals, then it has 3 rounds. You
specify the number of rounds for an event when you add the event to the database. Click Here for
more information about how to do that in the Events Menu.
The Basics
There are two ways to make those Heat/Lane assignments - Manually or Automatically using the
computer. Another word for Manual Seeding is Deck Seeding.
Click Here to learn about How To Deck Seed an Athlete or Relay.
There are 4 different ways of assigning entries to heats and lanes.
1.
2.
3.
Timed Finals Seeding
The fastest athletes/relays are assigned lanes alternating left/right starting in the center of the
pool. In an 8 lane pool, the lanes typically would be assigned 4-5-3-6-2-7-1-8 with the fastest entry
in the heat in lane 4 and the slowest in lane 8. This type of seeding is used for one round events
and for the final round of a multi-round event.
Circle Seeding
This format is used primarily for Preliminaries and Semis where the fastest swimmers are Circle
Seeded in the last 3 heats using a straight serpentine method. In special cases the circle seeding
is performed on more or less than the last 3 heats. All remaining heats are seeded using the
Timed Finals methods.
Dual Seeding
This type of seeding is usually for meets with two to four teams competing in multiple dual meets.
Each team is assigned specific lanes. Click Here for how to assign lanes in dual meets.
185
Copyright©Sports-Tek Software
MEET MANAGER for Swimming
4.
Masters Championship Seeding
This is seeding by age then time specifically designed for Masters Swimming.
The seeding algorithms used by MEET MANAGER are the ones defined in the USA Swimming,
United States Masters Swimming, and the FINA handbooks that support from 4 to 10 swim lanes.
Seeding Tips and Pointers
1.
Deck Seeding is the manual process of assigning Swimmers and Relays to heats and lanes. You
would do that in the Preview/Adjust Menu.
2. Before seeding, use the Scratch Pad to scratch athletes, relays, and alternates from the seeding
process.
3. When seeding, any entry with SCR or Alt checked WILL NOT be seeded. Any entry with only
EXH or Bonus checked WILL be seeded. The Bonus check box is used for indicating an extra
event for a given athlete that maybe did not meet the qualifying time. If Seed Non-Conforming
Times Last is selected in the Seeding Preferences, the bonus entries will be seeded after the
regular entries.
4. When seeding, any entry with a special character assigned of *, #, !, or $ WILL NOT be seeded.
5. All athletes or relays entered with No Time will be seeded together randomly. This is also
true for those entries entered with the same seed time. If an event is re-seeded, the entries with
the same time will be randomized again, so it is important NOT to re-seed after the Heat Sheets
have been printed.
6. You can re-seed the current round of an event as many times as you wish. Once a round is
completed, that round cannot be re-seeded. For example if the Prelims for a Prelims/Finals event
have been completed, you cannot re-seed Prelims. You can only seed round 2 – the Finals.
7. In no case does re-seeding erase any results previously entered.
8. To prevent an event from being seeded or re-seeded, check the Manual check box for the event.
9. To start an event over, go to File / Purge and select Reset Event Results and Seeding.
10. If a few new entries are received after seeding, consider using the Preview/Adjust Menu to drag
and drop new entries into open lanes, to switch lanes for two entries, or to move a an entry from
one lane into another open lane.
11. When seeding the second or third round of an event, you are alerted when there is a tie for any
slot requiring a swim-off. As an example, in an 8 lane pool with A-B-C finals, there is now a
warning if there is a tie for 8th, 16th, 24th, and 25th (the alternate). A warning is given, but you
can continue with the seeding and the ties will be randomly broken. However, all entries for last
place will be seeded and this will cause an extra heat for finals. Instead of continuing with the
seeding, you should go back to the Run Menu, select the prior round, click the JD button and
break the tie. Ties are usually broken with a swim-off.
Seeding Process
The seeding process is started by clicking the Start Seeding icon
. This will cause MM to seed
each of the selected yellowed events one after the other with no interruption unless you have checked
the "Preview each Event" check box or the "Prompt if a Re-Seed" check box. To select an event, click
the event name or the check box at the beginning of each row. To select all events, click the Select All
icon
. To un-select all events, click the De-Select icon
186
.
Copyright©Sports-Tek Software
MEET MANAGER for Swimming
Please note that MM will seed ONLY those events/rounds that you have selected. Any event with
Manual Seed checked cannot be selected and therefore will not be seeded.
After your selections have been seeded, you can manually "tweak" or adjust the lane assignments by
clicking on the Preview icon
and clicking and dragging Athletes or Relays from one heat/lane to
another. When you subsequently print the Heat Sheet for that event, your changes will be reflected.
Click Here to find out more information about the Adjust Seeding feature.
After seeding the above three events, the same window would look like the one below. Note that the
Heats column now tells you how many heats were created.
If you check the Manual check box for any event, that event cannot be seeded or re-seeded by the
computer. This is useful when you have seeded, but do not want anyone to mistakenly re-seed an
event.
Preview/Adjust Seeding
From the Seeding Menu, select an event and click the Preview icon
.
· Heats alternate in color with odd heats in light yellow and even heats in light blue.
· To show or hide athletes at the bottom of the list, click one of the five radio button choices.
187
Copyright©Sports-Tek Software
MEET MANAGER for Swimming
1. If the event is a relay, the Eligible list at the bottom will be the list of teams entered in the
database.
2. The "+ Swim-Ups" is used to include Athletes in the Athlete List who could "swim up" for this
event - for example all the 12 and unders who might be eligible for a 13 and over 400 meter
free.
3. The Entered Only filters the Eligible list to only those actually entered in the event whether in a
lane already or not.
4. The Alternates Only filters the Eligible list a) to only those who are first round alternates if the
event is the first round or b) if a second round, to only the five fastest who swam prelims, but did
not qualify for finals.
5. The athlete or relay lists can be sorted by clicking on the column header.
· To move an athlete into a lane:
1. Click and drag the athlete from one lane to another lane in any heat. If you drop the athlete
onto another athlete, they will be switched.
2. Double click on an empty lane and then pick a swimmer name from the combo box list of
swimmer names and click OK. If the athlete selected is already in another lane, the athlete will
be removed from that lane and inserted into the new lane.
3. Drag an athlete from the Eligible Athletes list up and drop into an empty lane.
4. Double click an athlete in the Eligible list and the athlete or relay team will be moved to the first
available lane.
· To scratch or remove an Athlete or Relay from a lane, double click on the Athlete or Relay name in
the lane.
· To add a new empty heat, click on the Add Heat icon
. The empty heat will be added at the end.
· To delete any empty heats, click on the Delete Empty Heats icon
. If there are five heats and
heat three is empty, heats four and five will be moved down one and heat five will disappear.
· If you wish to swap heats, click on the Switch Heats icon
and specify which heats you wish to
"swap" and MM will move everyone from say heat 5 into heat 6 and everyone that was in heat 6 into
heat 5.
· After you have completed the adjustment of an event, click on the Save icon
and MM will save
your changes to the database. If you do not Save the changes, the changes will be discarded.
188
Copyright©Sports-Tek Software
MEET MANAGER for Swimming
Scratch Pad
The Scratch Pad allows you to easily see the entries for a given event to make last minute changes
before seeding. It is usually used in conjunction with the Check-in Sheet to remove from seeding those
who did not check in for a particular event.
Highlight the event on the Event List and click the ScratchPad icon
to display the Scratch Pad
Browser such as the one shown below. After making changes in the Scratch Pad, one would normally
proceed to Start Seeding.
· You can sort the list by Athlete Name by clicking the Name column header or by Entry Time by
clicking the Time column header.
· To scratch or un-scratch an entry, click the box in the SCR column. Scratched entries will not be
seeded.
· To mark an entry as an alternate or to remove the alternate status, click on the box in the ALT
column. Alternates will not be seeded.
189
Copyright©Sports-Tek Software
MEET MANAGER for Swimming
· To mark or un-mark an entry for exhibition, click on the box in the EXH column. Exhibition entries
will be seeded.
· To mark an entry as Bonus, check the Bonus check box. Bonus entries will be seeded. The
Bonus check box is used for indicating an extra entry for a given athlete that maybe did not meet the
qualifying time.
· You can also enter or delete any of the Special characters ( *, #, !, and $). Any entry with a special
character will not be seeded.
· MM also offers you the option to Scratch Back to a certain number of entries for the one event. For
example, if you want the event to only seed the top 8 and leave 2 alternates, click on the Scratch
Back icon
, enter 8 for the number to leave un-scratched, and enter 2 for the number of
alternates. See also the Scratch Back Section where you can perform this task on many events at
one time.
· To clear all scratches for the event, click on the Clear Scratches icon
the SCR column will be removed.
and all check marks in
· After you have made changes, click on the Save icon
and MM will save your changes to the
database. If you do not Save the changes, the changes will be discarded.
· For timed final events where the events are being swum in two sessions (such as the 800 / 1500,
and relays), there is a method to allow for marking athletes as swimming Early and these athletes
will be seeded in the first session rather than the later session. Note in the example below that two
athletes would be scheduled to swim in the final heat at night, but have elected to swim Early in the
morning session. The 9th place seed also elected to swim early since with two ahead of him electing
early, he would have moved up into the night final.
190
Copyright©Sports-Tek Software
MEET MANAGER for Swimming
Scratch Back
The Scratch Back feature is available in two places:
1. From the Preview Menu to Scratch Back one event at a time.
2. From the Seeding Menu to Scratch Back more than one event at a time.
The Scratch Back feature is usually used when you have a limit on how many entries can be in an
event. For example, you might have advanced all swimmers and relays from your four State High
School Sectional meets and to reduce the 50 or so entries in each event to only the fastest 24 (3 heats
of 8). Just click on the Scratch Back icon
and enter "24" for the number to leave un-scratched.
You may also indicate the number of Alternates to include, usually 2. If there are 65 entries in an event,
the 25th and 26th entry will have the ALT box checked and 27th through 65th will have the SCR box
checked. When this event is seeded, only 24 will be seeded and the 3 heats will appear on the Meet
Program with the 2 alternates listed.
When using the Scratch Back feature, it will only apply to the events selected (highlighted in yellow) in
the Seeding Menu or to the one event selected in the Scratch Pad. In addition, the Scratch Back from
the Seeding Menu will only be applied to Un-Seeded Events and those events that have been seeded
will be skipped over.
191
Copyright©Sports-Tek Software
MEET MANAGER for Swimming
Scratch Forward
The Scratch Forward feature is available only from the Seeding Menu and only applies to first round
Un-Seeded events.
The Scratch Forward feature might be used to eliminate the top 3 from seeding. Just click on the
Scratch Forward icon
and enter "3" for the number to scratch up to. Regardless of the number of
entries in an event, if 3 is chosen, the top three will be scratched.
When using the Scratch Forward feature, it will only apply to the events selected (highlighted in yellow)
in the Seeding Menu. The Scratch Forward from the Seeding Menu will only be applied to Un-Seeded
Events and those events that have been seeded will be skipped over.
Copy Entries
MM offers a great feature for copying entries from one event (the Source) to another event (the
Target). From the Source event, you can copy all entries or any selected set of entries. Just click on
the Copy icon
from the Seeding Menu to start the process.
192
Copyright©Sports-Tek Software
MEET MANAGER for Swimming
Method
There are two methods:
· Copy the selected entries to the target event and Delete the entries from the source event
· Copy the selected entries to the target event without deleting the entries from the source event.
Note that if both the source and target event match as far as gender, distance and stroke, the seed
times will also be copied. Otherwise, just the entries with no seed time will be copied.
Options
There are two options when copying the entries
· If an entry in the Source event has a Scratched Status, you can have that status transferred. The
default is to not copy the scratched status.
· If an entry in the Source event has a Special Status such as Bonus or needs proof of time, you can
have that status transferred. The default is to not copy the special status.
Combine Entries Between Two Events
If you have two events with very few entries in each, you can have MM combine these two events and
make all the changes to the event itself so that it will still score correctly. For example, assume the
target event is event 9:
· Suppose there are 2 entries in event 9 100 free 11-12 girls and there are 3 entries in event 11 100
free 13-14 girls. The Combine Entries routine will change event 9's age group to 11-14, make it
multi-age group with 11-12 and 13-14 as the multi-age groups, and copy the entries from 11 to 9 just
like the Copy Entries feature would.
· Suppose there are 2 entries in event 9 100 free 11-12 girls and there are 3 entries in event 10 100
free 11-12 boys. The Combine Entries routine will change event 9's gender choice to Mixed, make it
multi-age group with 11-12 as the only multi-age group, and copy the entries from 10 to 9 just like
the Copy Entries feature would.
From the Seeding Menu, click the Combine icon
193
and you will see a screen like the one below.
Copyright©Sports-Tek Software
MEET MANAGER for Swimming
Method
There are two methods:
· Copy the selected entries to the target event and Delete the entries from the source event
· Copy the selected entries to the target event without deleting the entries from the source event.
Options
There are two options when copying the entries
· If an entry in the Source event has a Scratched Status, you can have that status transferred. The
default is to not copy the scratched status.
· If an entry in the Source event has a Special Status such as Bonus or needs proof of time, you can
have that status transferred. The default is to not copy the special status.
Consolidate Meet
The Consolidate Meet feature applies to multi-round events (like Prelims/Finals) in which Prelims
have been completed and it has been decided, maybe because of inclement weather, to not swim the
Finals. MM would move the Prelim results to Finals so that you could go to the Run screen and score
the events and print results and scores.
How to Consolidate
1. From the Main Menu Bar, click on Seeding.
2. Select the Session which contains the Final round events which would follow the completed Prelim
round events.
3. From the list of Final round events, select the events to consolidate.
4. Click the Consolidate icon
and MM will display the following message:
194
Copyright©Sports-Tek Software
MEET MANAGER for Swimming
5. If you click Yes, MM will move the Prelim results into Finals and change the event to Timed Finals
and remove the Prelims from the Session list for all of the events chosen.
6. After the Consolidate a Meet has been completed, go to the Run screen, score the consolidated
events, print Results, and print Individual and/or Team Scores.
Seeding How To's
How to:
Combine Heats
Converting Entry Times
Deck Seed an Entry (Individual or Relay)
How to Manually Seed an Event
Scratch an Athlete or Relay from an Event
Seed "2 to a Lane"
Seed Exhibition Athletes Last
Seed Non-Conforming Entry Times Last
Combine Heats
Suppose you are running a pre-seeded meet in an 8 lane pool and because of athletes not making it to
the meet or getting sick, there are 3 Athletes in the last heat and 5 in the previous heat. Let's also
assume that it's a 200 FREE event with 5 heats that have already been seeded. The Deck referee
may wish to combine those last two heats to save some time - here's how to do it.
Option 1 From the Seeding Screen
Click on Seeding from the Main Menu Bar and then pick the event that you are combining heats
for. Now click on the Adjust/Preview Button and scroll down so both heat 4 and 5 are on the
screen. Click on each of the 3 athletes in heat 5 (one at a time) and drag them to an open lane in
heat 4 - that's it! Now return to the Run screen to run Heat 4 with the 8 Athletes.
Option 2 From the Adjust Menu in the Run Screen
Click on the Adjust Button or press the F8 key from the Run Screen. Scroll down so both heat 4
and 5 are on the screen. Now click on each of the 3 athletes in heat 5 (one at a time) and drag
them to an open lane in heat 4.
Click the Accept button and MM will update the Database with the changes you made.
Converting Entry Times
When entry times are imported or manually entered, they are converted to the meet course as
specified in the Meet Set-up. For example, if the meet is set-up as Long Course Meters and you enter
a time in the Athlete Menu in yards with the Y at the end of the time, such as 1:13.45Y, MM will
automatically convert the time to a LCM time of 1:23.16L. MM stores the actual time entered and the
converted time.
When entries are imported, they are also entered into the database with the actual time and course
and a conversion is computed based on the meet course and this converted time is also stored. The
time used for seeding depends on how you have answered the Seeding Preferences question about
195
Copyright©Sports-Tek Software
MEET MANAGER for Swimming
Seeding Non-Conforming Times Last. If no, then the converted time is used for seeding and if that
seeding preference question is answered yes, then the actual entered times are used for seeding.
See Conversion of Entry Times for the conversion factors built into MM.
Deck Seed an Entry (Individual or Relay)
MM offers you 5 ways to Deck Seed or manually seed an Entry:
1. From the Athlete or Relay Entry Screens
When you choose this method, you may Deck Seed entries for the 1st round ONLY - that is
Prelims in a multi-round event or Finals for a Timed Final event.
Athletes
Click on Athletes from the Main Menu then pick the Athlete and position the cursor on the
Heat/Lane column under Entries in the appropriate row for the event. Now enter the Heat and
Lane in which this Athlete is assigned to swim in the format Heat/Lane - for example, enter "4/5"
for Heat 4 Lane 5.
Relays
Click on Relays from the Main Menu. Next pick the Relay Event and then the Relay Team Entry to
Deck Seed. Now position the cursor on the Heat/Lane column under Relay Team Entries in the
appropriate row. Now enter the Heat and Lane in which this Relay is assigned to swim in the
format Heat/Lane - for example, enter "3/1" for Heat 3 Lane 1.
2. From the Seeding Menu
Click on Seeding then pick an Event then click on the Preview icon
. MM will display all of
the eligible Athletes or Relays for that event. Click on one you wish to Deck Seed and "drag" that
Entry and drop into the appropriate lane. Continue as you require to fill up the heat and then click
on the Add Heat icon to add another heat. Click Here for more methods to Deck Seed athletes
from the Preview Menu.
3. From the Adjust Menu in the Run Screen
Select and event in the Run Menu, click on the Adjust Button, or press the F8 key. MEET
MANAGER will display the Preview menu and from there you have several options to deck seed
athletes or relays.
4. Using the Competitor # from the Run Screen
From the Run Screen, position your cursor in the field under the Competitor # column for the lane
that you wish to Deck Seed the Athlete. Enter a competitor # that was previously setup for the
Athletes. MM will move this Athlete into the lane that you selected. If the athlete was already in
another heat or lane, you will be notified that the athlete will be moved from that position.
5. "Un-Seeded" Mode
As you are setting up your events for the meet, from the Events screen select "Un-Seeded" under
the Assign Lanes heading for the events you wish to Deck or Manual Seed. Then when you go
and Seed that event and subsequently RUN the meet, MM will display all of the Athletes in the
event on the RUN screen sorted Fast-Slow or Slow-Fast as you specified in the Event Set-up.
Then as results are provided to you for the entire event sorted by time, you can quickly find the
swimmers and enter their times on the Run screen. Note: In the Events Set Up screen, the
Manual Seed check box must NOT be checked and you must use the Seeding Menu to seed
the event to take advantage of this feature.
196
Copyright©Sports-Tek Software
MEET MANAGER for Swimming
How to Manually Seed an Event
Event with No Entries (Deck Seed the Event)
If the event has no entries in lanes, from the Preview Menu, MEET MANAGER will display the eligible
Athletes or, in the case of a relay event, all the Teams. If the eligible athletes or teams are not shown,
click the Show Eligible Athletes button or the Show Relays button on the Seed Tool Bar. You can
filter this eligible list for a specific Team by choosing a Team Abbreviation from the Team pick-list on
the Seed Menu Tool Bar. To move an athlete from the Eligible Athlete list, click on an athlete name
and "drag" that person up into an empty lane in the "Name" column slot. If the event is a relay, click on
a team name from the Team list and "drag" that team up into an empty lane in the "Relay" column slot.
Continue as you require to fill up the heat and then click on the Add Heat button to add another heat or
click on the Delete Empty Heats button and MM will delete any empty heats and adjust the heat
numbers appropriately.
Scratch an Athlete or Relay from an Event
There are 4 ways to Scratch an Athlete or Relay from an Event:
1. From the Athlete or Relay Entry Screens
When you choose this method, you may only scratch entries from the 1st round - that is Prelims in
a multi-round event or Finals for a Timed Final event.
Athletes
Click on Athletes then pick the Athlete to scratch. Now click on the SCR box under the Entries
column in the appropriate row for the event. Or, click on the Scratch All button on the
Athletes Tool Bar to scratch the swimmer from all events that have not been swum. If you
have selected a particular Session from the Session Menu selection at the top of the Athlete
Browser, MM will only scratch events from that one Session.
Relays
Click on Relays then pick the Relay Event then the Relay Team Entry to scratch. Now click on
the SCR box under the Entries column in the appropriate row.
2. From the Seed Menu or Seeding Scratch Pad
This option is only available if you wish to scratch an entry from the next Round. For example, if
Prelims have been completed, you can scratch entries from Finals in a 2 round event or from
Semis in a 3 round event.
Click on Seeding from the Main menu Bar and then pick an Event, and then click on the
Scratch Pad Button. MM will display all the Individual or Relay Entries for that event. Then
click on the Scratch Box next to the Athlete or Relay that you want to Scratch.
You have the option of clicking on the Clear Scratches button if you want to clear all the
scratches from the selected event.
You have the option of clicking on the Scratch Back button on the Scratch Pad Menu to
scratch all the swimmers in the selected event after a certain place. For example, you may
want to scratch back to 24th place in an 8 lane pool giving 3 heats to seed and swim and
include 2 Alternates. This is usually done when advancing swimmers from Regionals or
Sectionals for a High School State meet.
3. From the Run Screen
Double click on any Athlete or Relay name and confirm that you wish to Scratch this entry.
4. From the Adjust menu in the Run Screen
Click on the Adjust Button or press the F8 key from the Run Screen and double click any entry on
the list and confirm that you wish to Scratch that entry.
197
Copyright©Sports-Tek Software
MEET MANAGER for Swimming
Seed "2 to a Lane"
Typically, you might want to seed two swimmers to a lane for long distance events in order to
minimize the time required to complete those events. Usually two swimmers in one lane is used only
for a Long Course Meter meet. There are two ways you might want to swim two swimmers in one
lane.
You might want to start one set of swimmers from one end of the pool and a second set from the
other end.
Or, you might want to send a second set of swimmers off say 15 seconds after the first set leaves
the blocks - this form of 2 to a Lane is usually called "chasing".
There are two steps that you must complete in order to set up your Seeding for 2 to a Lane.
Click on Events from the Main Menu bar to actually declare the event as "2 to a Lane" and indicate
if you wish the athlete to have a "choice" to swim either 1 or 2 to a Lane or whether they will be
"required" to swim 2 to a Lane. Click Here to find out more information on how to set this up.
When you set up entries for each Athlete and have declared that event as offering the athlete a
"choice" to swim 2 to a Lane, click on the 2 to a Lane check box to declare that you want that
swimmer to swim as "2 to a Lane" or do not check it if you want the swimmer to be seeded the
normal one to a Lane. If the Event has been set up to "require" that every swimmer entered in that
event swim 2 to a Lane, then checking the 2 to a Lane box is not required.
Now when you go to seed that event, MM will seed it normally but indicate on the Heat Sheet either "A
End" or "B End" next to the heat number to let the swimmers know that they will swim either from one
end of the pool or the other, or that they are first or second in the water if they are "chasing".
Please note that as far as heat assignments and entering results, there is no difference as far
as MM is concerned between one or two in a lane. If it is an 8 lane pool and there are 32
swimmers, it's still 4 heats numbered 1 through 4.
Seed Exhibition Athletes Last
If you are running a Dual or other Timed Finals Meet and you wish to make sure that Exhibition
Athletes are seeded last, click on Set-up from the Main Menu Bar and then click on Seeding
Preferences. Now click on the Seed Exhibition Athletes Last check box.
When you seed event(s), MM will make sure that no matter what the entry time is for Exhibition entries,
that they are always seeded last. Please click Here for a description of how to declare an Athlete as
swimming Exhibition and click Here for a description of how to declare a Relay as Exhibition.
Seed Non-Conforming Entry Times Last
Since conversions are really "estimates" of what a swim time would be in another course, many High
Level meets do not use course conversions for seeding purposes. Therefore, if an entry time does
meet the qualification time to swim in the meet, but has been swum in a different course from what the
meet is being swum, you might want to specify that these "Non-Conforming Times be seeded last.
For example, if you are running a Long Course Meter Meet, then entries in either Yard or Short Course
Meters would be entered as "Non-Conforming times". You might want to tell MM to seed entry times in
the 3 courses as LSY order - that is LC Meters first, then SC Meters, then Yards.
Click on File from the Main Menu Bar, then Set-up, then Seeding Preferences and click on the Prelims
and/or Finals check boxes titled "Seed non-conforming times Last" and then specify the course order
for seeding. Then when you actually seed the meet, MM will honor the non-conforming course order
that you have specified.
198
Copyright©Sports-Tek Software
MEET MANAGER for Swimming
Run the Meet Menu
This Section describes how to enter results and run a meet. From the Main Menu Bar, click on Run to
display the Run the Meet Menu below. The Run the Meet Menu forms the Operations Center for MM.
· The event list is displayed in the upper left window and the event list can be reduced by selecting a
Session using the Session button or pressing F7. You select one event at a time which then
displays one heat at a time in the bottom window.
· The bottom window displays one heat at a time and allows you to enter result times, backup times,
and reaction times.
· The upper right window can show either Splits or Records. To toggle between the two, click Ctrl-I. If
splits are showing, you can toggle between Cumulative Splits and Subtracted Splits.
· Running Team scores are displayed in window below spits / records.
· The even lanes are colored for easier lining up an athlete name with the time.
· The Interfaces choice at the top is where you open the serial port to communicate with a Timing
Console Timer if using one and where you open the serial port to communicate with an
alphanumeric scoreboard if you have one.
· Each window can be resized by dragging one of the three divider bars.
About the Run the Meet Screen
The Run the Meet Menu has four windows, many icons and many buttons. The following links
describe the function of each of these parts.
Event List Window
Records Window
199
Copyright©Sports-Tek Software
MEET MANAGER for Swimming
Splits Window
Team Scores Window
Heat Window
Run the Meet Menu Bar
Run Screen Options Bar
Run Menu Shortcut Keys
Event List Window
The Event List window is the upper left window of the Run the Meet Menu and displays a set of
events.
· This list defaults to being the entire event list in numerical order.
· If a session is selected, the list will contain the events setup for the session from Events / Sessions.
The session order does not have to be in numerical order. In the example below, Session 7 has
been selected. To select a session, click the Sessions button or press F7.
· The event round is shown in the Rnd column.
· The number of heats for each event is shown in the last column.
· As results are entered, the status for each event is updated. The status can be Un-Seeded, Seeded,
Done, or Scored.
Records Window
The Records window displays in the upper right window of the Run the Meet Menu and displays all
records for the selected event.
200
Copyright©Sports-Tek Software
MEET MANAGER for Swimming
· If a result time is entered for a heat that is faster than a record in the list, the record is highlighted in
turquoise. In the example below for the women's 200 IM, the US Open Meet record is broken.
· The Records window can be toggled using Ctrl-I to show the Splits instead.
Splits Window
The Splits window displays in the upper right window of the Run the Meet Menu and displays
cumulative or subtracted splits for the selected heat.
· To toggle between cumulative and subtracted splits, click the button at the upper right of the Splits
window as shown below.
· To print the splits in the Splits window, click the printer icon above the Splits window.
· The Splits window can be toggled using Ctrl-I to show the Records instead.
Team Scores Window
The Team Scores window is the window below the Records window of the Run the Meet Menu and
displays the team scores.
· The team scores window is automatically updated whenever an event is scored from the Run the
Meet Menu.
· This window can display three sets of scores: Combined, Male, and Female.
· The team scores will be the total of the scores up to and including the current event selected in
the Run the Meet Menu. In the example below, the scores include events 1 through 14.
201
Copyright©Sports-Tek Software
MEET MANAGER for Swimming
· At the top of the Run the Meet Menu, you can click Preferences / Team Scores in Run Menu to set
your preferences for which team scores to show.
Heat Window
The Heat window is at the bottom of the Run the Meet Menu. The example below is for an individual
event.
· Results are entered in the Finals Time column. If the round is Preliminaries, there will be a Seed
Time column in place of the Prelim Time column and a Prelim Time column to replace the Finals
Time column where you enter results.
· Start reaction times are entered in the React column. Press Ctrl-T to show/hide the Reaction Times
column.
· DQ codes can be entered in the DQcode column. Press Ctrl-Q to show/hide the DQ codes column.
· If using a timer, the times, backup times, and reaction times can be imported.
· If there is an empty lane, you can enter athlete's competitor number into the Competitor # column
and this will move the athlete into the heat. If the athlete is in another heat, you will receive a
message so saying and you will have the option to move the athlete or not.
· To move an athlete or relay to an open lane in the same heat, you can drag the athlete name or the
relay name and drop it into the empty lane. To switch two athletes or relays within the same heat,
drag and drop it onto another.
· If a timer is being used to Get Times and an athlete or relay is moved from one lane to another in
the heat list at the bottom of the Run Menu, the pad time, the splits, and the backup times are
removed and a warning is presented to use Get Times again. This action of removing the times data
occurs when an athlete is moved using the competitor number column at the left, when dragging one
entry from one lane to another empty lane within the same heat, or when dragging one entry from
202
Copyright©Sports-Tek Software
MEET MANAGER for Swimming
one lane to another lane to switch two entries within the same heat.
· Right clicking on an athlete name brings up a window like the one below with basic information about
the athlete and includes a list of all entries and relays for the athlete. The status and results for each
entry are also displayed. By clicking the print icon, you can print the entry and results information.
· If backup times are showing, the window would expand to also show the three backup button
columns.
· Press Ctrl-B to show/hide the three backup times columns.
· If the event is a relay, an example of the heat window is shown below.
203
Copyright©Sports-Tek Software
MEET MANAGER for Swimming
Run the Meet Menu Bar
At the top of the Run the Meet Menu, you will find a Menu Bar which allows you to go to other menus
such as the Athletes Menu and to run special routines such as Re-Score all events.
Events: Click Events, press Alt-E, or click the Events icon
to display the Events Menu. This is a
fast and easy way to Add, Review, or Edit an event. Note that if you make changes to the event
currently displayed on the Run screen, there are cases where the changes will not be reflected. To
insure the changes are incorporated, change to a different event and come back to the current event.
Click Here to view the Events Menu.
Athletes: Click on Athletes, press Alt-A, or click the Athletes icon
to display the Athletes Menu.
This is an easy way to add a new athlete or to correct the spelling of an athlete's name. Click Here to
view the Athletes Menu.
Relays: Click on Relays or click the Relays icon
to display the Relays Menu. This is an easy
way to add a new relay to any event. Click Here to view the Relays Menu.
Seeding: Click on Seeding, press Alt-S, or click the Seeding icon
to display the Seeding menu.
Any seeding changes made will be immediately reflected in the Run screen. Click Here to view the
Seeding Menu.
Web: Click on Web, press Alt-W, or click the Web icon
to display the set-up menu for Real Time
Results to a web site. This selection requires the Network Pro version of MM. Click Here to view the
Web Real Time Results Setup Menu.
Re-Score: Click on Re-Score, press Alt-O, or click the Re-Score icon
to Re-Score. The Rescore selection gives you the option to re-score every event in the Event List window at the top left of
the Run the Meet Menu. Click Here to see how to re-score events.
Combine: Click on Combine, press Alt-B, or click the Combine icon
to Combine Results from
two events. Both events must be in the first round and must be the same distance and gender. Click
Here to see how to combine results.
Open Water: Click on OpenWater, press Alt-N, or click the OpenWater icon
Water Module.
to display the Open
Reports: Click on Reports or press Alt-R to display a Reports pull-down list.
204
Copyright©Sports-Tek Software
MEET MANAGER for Swimming
Labels: Click on Labels or press Alt-L to go to the Labels pull-down menu list.
Preferences: Click on Preferences or press Alt-P to display the pull-down list of customizing menus
that apply only to the Run the Meet Menu.
Award Labels Preferences
Backup Times Averaging Preferences
Report Preferences
Results Preferences
Run Screen Reaction Times and DQ Codes Preferences
Team Scores in Run Menu Preferences
Web Real-Time Preferences
Interfaces: There are 2 choices under Interfaces:
Timer Interface
Scoreboard Interface
Help: Click on the Help selection from the Run Menu Bar and pick either Contents or Shortcuts. The
Shortcuts selection will display the Keyboard shortcuts available from the Run Menu. You can also
press the F1 function key and MM will display the Help Contents Menu. You can search for "key
205
Copyright©Sports-Tek Software
MEET MANAGER for Swimming
words" or for various "How To" Topics to find the answer to your questions. Click Here for details
about this feature.
Close: Click on the Exit icon
or press Alt-C to go back to the Main Menu. When you return to the
Run, all settings including event and heat selection will be refreshed.
Run Screen Options Bar
The Run Screen Options Bar provides a great deal of flexibility over running the meet. The following
three sets of buttons would actually be in one row left to right in the middle of the screen just above the
listed heat. To see the buttons as they would appear in the Run the Meet Menu, click Here.
In the third set of buttons, note the Heat Buttons row which indicates how many heats are in the event
and allows you to jump from one heat to any other heat very quickly by simply clicking one of the heat
numbers. To get to the next heat, click the right arrow or press F5. To get to the previous heat, click
the left arrow or press F4.
Session F7 Selection
Refresh Ctrl-D Selection
Splits F9 Selection
Relay Names Ctrl-R Selection
Adjust F8 Selection
Awards Ctrl-A Selection
Restore Pads Ctrl-P Selection
Calculate Time Adjustments Ctrl-K Selection
JD Ctrl-J Selection
Unseeded Ctrl-U Selection
Race# F2 Selection
Get Times F3 Selection
List Ctrl-L Selection
Score Ctrl-S Selection
Re-Rank Selection
Re-Score Selection
Previous Event Ctrl-F4 Selection
Next Event Ctrl-F5 Selection
206
Copyright©Sports-Tek Software
MEET MANAGER for Swimming
To customize the event selection in the Event List window, click the Session button or press the F7
key.
.
· The first time you select the Run Menu, no session will be selected and all events will be shown.
· Pick a session and click OK and MM will refresh the Event List window to display only those events
and rounds that have been set up for the particular Session chosen.
· If Downloading Events to a Timer, it is important to select a session because the events
downloaded will be those displayed in the Event List window.
When a database is open in Multi-User mode with the Pro Network option and when two users are
working on the same event in the Run at the same time, the Refresh button is used to update the heat
information.
.
· For example, one computer may be entering results for odd heats and the other computer entering
results for even heats. To refresh the current event, click the Refresh button or press Ctrl-D.
· The Refresh button is also used to refresh the status of the event list.
From the Run Screen, click on the Splits button or press F9 to display the screen shown below.
· If you are using a Timing Console with pads or buttons to time your meet, then splits will
automatically be stored in your MM Database.
· If you are using some other device to time your meet, or you are not connected to the timing
console, or you wish to edit previously stored splits, you can edit splits directly into the sample splits
window below.
· To print a report of the splits of a given heat, click the Printer icon
at the upper left.
· It is important to enter "cumulative" splits, not "subtractive" splits. For example, for a 200 Free, enter
31.99, 1:09.73, 1:48.46, 2:25.01.
207
Copyright©Sports-Tek Software
MEET MANAGER for Swimming
MM will display the Splits table with multiple entries for each lane depending on how many splits there
are for that event and depending on whether you have pads at both ends checked for the event. In the
above example, there were pads at both ends. Position your cursor on the lane and split column and
key-in the split. When you are finished keying in the splits for that heat, click OK and MM will save
those splits in your database. You can always "review" the splits for a heat simply by clicking on the
Splits button at any time.
Note
When printing results, both Cumulative & Subtractive splits may be included in the Results Report.
From the Run Screen, click on the Relay Names button or press Ctrl-R to display the screen shown
below.
· From this menu, an entire heat of relay names can be entered. Just select a relay from the Relay
Teams list and put in the relay names in the Relay Order list.
· If the event is an age group event, say 11-12, the Eligible Athletes list will only contain 11 and 12
year olds. If athletes younger than 11 are eligible, then check the Show Swim-ups check box and all
athletes 12 and under will be displayed.
· You have three ways to assign an Athlete to a position on a Relay Team:
1.Click and drag an athlete from the Eligible Athletes list and drop into the Relay Order list.
2.Double-Click on an eligible Athlete and MM will automatically assign him/her to the next
available slot for the Relay.
3.Type in the competitor number in the Relay Order list.
· If you are recording relay exchange reaction times, enter them in the RT column at the far right for
athletes 2,3 and 4. Lead-off start reaction times can only be added from the Run Menu in the Heat
List. An example reaction time is +0.21 for a good exchange and any negative amount such as 0.15 indicates an early take-off which would indicate a disqualification. An exchange reaction time of
+0.0 indicates a perfect exchange. A blank for the time indicates no exchange was recorded. The
reaction times can be imported directly from several of the more recent timers.
208
Copyright©Sports-Tek Software
MEET MANAGER for Swimming
· When done, click Exit icon
at the top left.
From the Run Screen, click on the Adjust button or press F8 to display the Preview/Adjust Menu.
From this menu you can make many adjustments to the heat assignments, such as:
· You can move entries from lane to lane and heat to heat.
· You can add heats.
· You can insert athletes or relays into lanes.
· You can remove athletes or relays from lanes.
· You can remove empty heats.
· You can swap heats.
The Awards button in the Run the Meet Menu is designed for one-click printing of award labels. This is
a real time saver over using the Award Labels Menu.
· You can have the award labels print directly to the printer immediately, print directly to the printer
when a page is full, or preview to the screen first. Click Here for how to setup the
209
Copyright©Sports-Tek Software
MEET MANAGER for Swimming
Award Label Preferences for the Awards button.
· Award Labels are designed to be printed on standard one inch Avery labels for easy placement on
plaques, ribbons, certificates, etc. The information on these Award Labels reflect a specific
performance by an athlete or relay in a particular event.
· You have two ways to select who gets and award label:
1. Standard - Select this preference when you wish to print Award Labels for each event's top
finishers.
2. By Heat - Select this Preference when you wish to print Award Labels for Each Heat.
When getting times from a timer, the pad times come into the heat and are saved as the heats prelim,
semi, or final times. If any of these times are adjusted because of bad touches based on backup times,
you can restore the original pad times at a later date by clicking the Restore Pads button or pressing
Ctrl-P. This is useful when you think there was a problem and no longer have the timer to see what the
pad times were. In the sample window below, note that lanes in pink have been adjusted to a faster
time than the original pad time.
From the Run Screen, click on the Calc button or press Ctrl-K to display the Time Adjustment screen.
There are two types of adjustments to the pad times:
· Lane Malfunction
· Heat Malfunction
· Dolphin Backup Mode
The Lane Malfunction feature is primarily used with Timing Consoles that are able to send backup
times to MM - namely the CTS 5 (Software Version 3.1 or later) and CTS 6, the Daktronics 6000 and
2000, and the Omega ARES 21 Bi-directional Timing Consoles.
When a lane has a bad pad touch and backup buttons are being used, MM will let you know whenever
any Pad Time is .31 or more seconds different from the Official Backup Time. The Official Backup
210
Copyright©Sports-Tek Software
MEET MANAGER for Swimming
Time is the middle button time if there are 3 buttons, the average if there are 2 buttons and equal to the
button time if there is only one button.
· An Official Backup Time that is 0.31 or more "faster" than a pad time is highlighted in yellow and a
"y" is displayed in the far right column of the Run Screen. This indicates that there may have been a
late touch.
· An Official Backup Time that is 0.31 or more "slower" than a pad time is highlighted in blue and a "b"
is displayed in the far right column of the Run Screen. These lanes default to being unchecked for
use since these often times will not be adjusted.
· If there is a pad time, but no Official Backup Time, then the entry is highlighted in blue indicating that
one should check the watch time for that lane to confirm that the pad time is a good touch.
· If there are two backup times and one is within 0.30 seconds of the pad time, one is more than 0.30
seconds from the pad time, and the Official Backup Time (the average) is more than 0.30 from the
pad time, then the lane is highlighted in green and a "g" is displayed in the far right column of the
Run Screen. These lanes default to being unchecked for use since these times usually will not be
adjusted due to the inaccuracy of the two button times.
· Any backup time that is dark pink is a time that is more than .30 different from the pad time.
MM will display a Time Adjustment Window if you click the Calc button, press Ctrl-K, or click on the
"b", "y", or "g". A sample table is shown below.
This window shows the Primary time (usually the Pad Time) as well as 1 or 2 or 3 button backup times
for all lanes.
· To the right of the button times is the Button Calc column and which shows the Official Backup
Time. If there are 3 backup times, the middle time is used. If there are 2 backup times, the time is
calculated using the rule you choose in the Backup Times Preference in the Run Menu. The choices
are to average and truncate to the nearest thousandth, average and round up to the nearest
hundredth, or use the slow time.
· The Difference column indicates the difference between the Button Calc time and the Primary
time.
· The Adjusted column shows the Official Calculated Time. Depending on whether you are using
USA Swimming rules or FINA rules, the Adjusted time is calculated differently (click here to see how
to choose the appropriate rule). FINA uses the Button Calc time with no adjustments. USA
Swimming computes the Adjusted time by adding the average differential of the non-malfunctioning
lanes to the Button Calc time.
· By clicking the Accept Adjusted button, the Adjusted time will instantly replace the Pad Time for all
lanes where an adjustment was required. Click on the Reject Adjusted and MM will not alter the
previously entered time for the lane.
· Click on the Create Report icon and MM will create a one page report of these backup and adjusted
times for your records.
If you think the pad time for a given lane is good, but the backups are not, uncheck the "Use" box for
that lane. Since a blue indicator means the backup is slower than the pad time (which usually means a
late button), when the Time Adjustment window is displayed, the blue rows are not selected since in
most cases this time should not be adjusted to the slower time. If you still want to use the adjusted
backup (for example, in relays, sometimes a pad is activated early when a swimmer is exiting the
pool), then click on the Use column for a given lane and MM will display the adjusted time. For
example, clicking the Use check box for lane 1 below would cause MM to calculate a Button Calc
time and a Difference amount to be used in the Adjusted calculations.
211
Copyright©Sports-Tek Software
MEET MANAGER for Swimming
There are two types of heat malfunctions:
· Late Start: There is a late start of the electronic timer and valid finishes are recorded with the
pads and/or buttons and watches.
· No Start: There is no start of the timer and there are only watch times with NO pad and NO
button times.
Adjustment for Malfunction Equally Affecting an Entire Heat
If there is an early or late start of the electronic timer and the times from the pads are equally incorrect
for all the lanes in a heat and the order of finish and the absolute difference of the times between the
swimmers is accurate, the times of the primary system shall be adjusted. This adjustment is calculated
by taking the average difference between the primary times (the pads) and the valid backup times (the
watches) and adding or subtracting the difference to the primary time of every lane in the heat.
In the example below, there was a late start for the timer of about 8 seconds. The average watch time
for each lane was entered and the Time Adjustment is made. In the example, 8.03 seconds is added to
each lane. To display the Time Adjustment window, select the heat from the Run Menu and press CtrlK. Then click the 'Show Heat Malfunction' check box. Enter the watch times and then click Accept
Adjusted.
212
Copyright©Sports-Tek Software
MEET MANAGER for Swimming
If Accept Adjusted is chosen, the following message appears:
What to do if there also was a Bad Touch
If in addition to the late start there was a bad touch on a lane, but there was a good button time, go
ahead and make the heat adjustment above and then use then adjust the bad touch lane using the
Lane Malfunction routine.
Adjustment for Timer Failure Affecting an Entire Heat
If there is a total timer failure of a heat where there are no pad or button backup times and you only
have watch times, then the following procedures may be followed:
· Select several heats in the same event or a comparable event and use the Heat Malfunction
method described above to enter the average watch times so that watch differentials can be
calculated. Do this for 3 or 4 heats.
· Compute the average of the average differential from the 3 or 4 heats.
· Add this average to each of the watch times in the heat where the total malfunction occurred and
213
Copyright©Sports-Tek Software
MEET MANAGER for Swimming
manually enter these adjusted watch times into the pad times column at the bottom of the Run
Menu.
When using the Time Adjustment window with Dolphin Backup times, the window will appear like the
sample below.
How to Use the Dolphin Backup Mode
From the Run Screen, click on the JD button or press Ctrl-J. MM will display the finished results
sorted place.
· A Judge's Decision is used at the end of an event or heat to "manually" edit the Placing and/or
Points for a given result. For example, suppose the watch times indicated that Billy finished in 1st
place and George in 2nd place. If the Place/Finish Judge saw it otherwise, you might still want to
enter the watch times but edit the Place and Points for those two Athletes to reflect what the
Place/Finish Judge actually saw.
· From the Run Screen, click on the JD button or press Ctrl-J. MM will display the finished results
sorted by time and place. Use your mouse to edit the Place using the JD PL column or to edit the
Points using the JD Points column. To change an entry's points to "zero points", enter "-1" in the JD
Points column. Click the Reset button to clear the JD PL and JD Points column. After making
changes, click OK.
214
Copyright©Sports-Tek Software
MEET MANAGER for Swimming
· For Timed Final events, you can also edit the place for the Heat Place/Finish. Just click on the JD
Heat PL column and enter the heat place. This "new" Heat Place will show up on Award Labels for
heat finishers as well as the Results Report sorted by heat. Note the JDHeatPL column below which
is not shown in the above window because the above window is for finals after a Prelim has been
run.
215
Copyright©Sports-Tek Software
MEET MANAGER for Swimming
From the Run Screen, click on the Unseeded button or press Ctrl-U. MM will display the Unseeded
module for entering results.
· This module is mainly for Timed Final individual events that are unseeded and is very useful for
meets such as league meets, dual meets, and Open Water swims.
· The module allows you to enter competitor #, time, competitor #, time, etc. in rapid succession. This
is a very quick way to enter results when heats are created on the fly by the clerk of course.
· If the Assign Lanes property for the event is set to Un-Seeded, you can increase the length of the
"heat" to any size. This would mainly be used when lanes don't matter and you just want to get the
results entered.
· If the Assign Lanes property is set to Standard, then the size of the heat will be limited to the
number of lanes assigned to the event. It does not matter if the event is already seeded or not.
· To remove an athlete from the results, replace the competitor number with zero.
If an event has the Assign Lanes property set to Un-Seeded and the number of lanes is set to 8, a
screen such as the following would appear and automatically have 10 extra rows displayed.
216
Copyright©Sports-Tek Software
MEET MANAGER for Swimming
After entering a few results, the screen might look like the following.
· Click the DQ or Exh box where appropriate.
· Enter as many results as needed noting that the Pos order does not matter. The results will be
sorted by time.
· If there are more than 18 in the event, you can increase the rows by clicking Add Rows or clicking
the Add icon.
217
Copyright©Sports-Tek Software
MEET MANAGER for Swimming
The Race # and Get Times buttons are for retrieving times, backup button times, and splits from a
timer that is connected to the MM computer.
· The shortcut key for Race # is F2 and for Get Times is F3.
· Get Times sends a command to the timer to return the results of a specific event number and heat
number which would be the active event and heat in the Run the Meet Menu.
· Race # sends a command to the timer for the results of a specific Race Number. The MM operator
would enter a specific Race number. Race numbers are assigned by the timer and when a timer is
turned on, it resets to Race number 1 which would be assigned to the first race saved since the timer
was turned on.
· When receiving times from a timer, lanes that have no times because the athlete or relay scratched
or missed the race are automatically entered in the Heat List with an NS for No Show.
· Get Times is the preferred method for retrieving data as it assumes the timing operator is entering
the proper event and heat number for each race.
· Using Race # is less safe because you can select any race result regardless of whether the event
matches or not. Normally Race # is used in cases where the incorrect event and/or heat number was
entered in the timer.
· In both Race # and Get Times, after the results are received from the Timer, the data is compared
with the active event and heat number, the number of expected splits, the number of athletes or
relays in the race, and the lanes used in the race. If any of these do not match, you will be so notified
and will have the opportunity to either Accept or Reject the data. In the example below, Race #1
was used to retrieve results for MM Event 7, Heat 1. Because Race #1 contained results for Event
10, Heat 2, the alert below was displayed.
218
Copyright©Sports-Tek Software
MEET MANAGER for Swimming
The List and Score buttons re-rank and/or re-score the event which is active in the Run the Meet Menu
and creates a report.
· The shortcut key for List is Ctrl-L and for Score is Ctrl-S.
· If the event is a finals round with scoring, the Team Scores window is refreshed with the scores
through the current event.
· If the round is prelims or semi-finals, the Score button is inactive.
· Whenever using List or Score, MM checks the splits to verify that the odd numbered splits are not
blank. This occurs if the timer is set incorrectly for far end pads. The following message comes up in
this case:
See also Re-Score Events.
219
Copyright©Sports-Tek Software
MEET MANAGER for Swimming
The Re-Rank and Re-Score buttons are special buttons for Re-Ranking or Re-Scoring the one event
which is active in the Run the Meet Menu. It is a quick way to re-rank or re-score without creating a
report.
· If the event is a finals round with scoring, the Team Scores window is refreshed with the scores
through the current event.
· If an event has more than 20 heats, then the Re-Rank is a good way to update the rankings because
when there are more than 20 heats, rankings are not automatically updated as each result is
entered.
· If the round is prelims or semi-finals, the Score button is inactive.
See also Re-Score Events.
From the Run the Meet Menu, pressing the Previous Event button or pressing Ctrl-F4 causes the
previous event in the Event List window to be selected, while pressing the Next Event button or
pressing Ctrl-F5 causes the next event in the Event List window to be selected.
Run Menu Shortcut Keys
Shortcut Keys
The following keyboard Function keys may be used instead of the mouse for navigation and functional
purposes in the Run the Meet Menu of MM. Click on Help from the Run the Meet Menu Bar and then
Shortcuts to see the following list.
Bold key combinations are NOT shown on the Run the Meet Menu screen.
F1
F2
F3
F4
F5
F6
F7
F8
F9
F11
F12
Help
Use Race # from Timer
Get Times from Timer
Previous heat
Next heat
Place results column in edit mode
Session selection
Adjust heats
Splits edit
Export the results of the current Heat to the Web - Pro Version Only
Export the results of the current Event to the Web - Pro Version Only.
Ctrl-F3
Ctrl-F4
Ctrl-F5
Ctrl-F6
Ctrl-F7
Ctrl-F8
Display a list of Dolphin Wireless Watch .do3 files
Previous event
Next event
Place backup times in edit mode
Scratch a lane
Insert athlete into open lane using competitor #'s
220
Copyright©Sports-Tek Software
MEET MANAGER for Swimming
Ctrl-F9
Ctrl-F10
Ctrl-F11
Ctrl-F12
Ctrl-A
Ctrl-B
Ctrl-D
Ctrl-E
Ctrl-F
Ctrl-H
Ctrl-I
Ctrl-J
Ctrl-K
Ctrl-L
Export Team Scores to Generic Scoreboard
Export Start List for current heat to Generic Scoreboard
Export Compiled Results to Generic Scoreboard in pages (heat 1 is top 8, heat 2 is 9-16,
etc.)
Export Compiled Results to Generic Scoreboard (event does not have to be completed)
Ctrl-P
Ctrl-Q
Ctrl-R
Ctrl-S
Ctrl-T
Ctrl-U
Ctrl-Z
Awards button
Show / Hide Backup times
Refresh Screen from Database in Pro Network Version
Toggle the Enter Results by Lane check box
Flush and print any remaining award labels in the queue
Add Empty Heat
Toggle between showing Splits and Records in the upper right Run Menu window
Judges decision menu
Show Backup Adjustment calculator
Compute placings and List results report (without points listed) based on Run Menu
Preferences for Results
Restore the Pad Times that were originally stored from a timer
Show / Hide DQ Codes
Relay names
Compute team Scores and list results report based on Run Menu Preferences for Results
Show / Hide Reaction Times
Enter results by competitor and time for an Unseeded Event
Show the Report Preferences Menu
Alt-F4
Alt-A
Alt-B
Alt-C
Alt-E
Alt-H
Alt-I
Alt-L
Alt-O
Alt-P
Alt-R
Alt-S
Alt-W
Close report or menu
Open Athlete Menu
Combine Event Results
Close Menu
Open Events Menu
Open Help
Open Interfaces Menu
Open Labels Menu
Re-score all events
Open Run Menu Results and Awards Preferences Menus
Open Reports Menu
Open Seeding Menu
Open Web Real Time Menu
Enter Results for the Meet
If the cursor is not in "edit mode", press F6 and the cursor will be automatically positioned to the first
non-empty lane. You can also click any row in the result column to put that lane in edit mode. You can
press the Tab key or the Enter key after you have entered a result. You may use the Tab and Shift
Tab keys or the Up and Down Arrow keys to navigate from one lane's result to another. The result
may be entered in any of the following ways.
·
·
·
·
·
·
12345 or 123.45 or 1:23.45 for Swimming events
74575 or 745.75 for Diving events
NS or "S" for No Show
DNF or "D" for Did Not Finish
DQ or "Q" for Disqualified or you can click on the DQ check box and still enter a time for the
Athlete or Relay
DFS for Declared False Start. Please note: DFS is NOT considered a DQ.
221
Copyright©Sports-Tek Software
MEET MANAGER for Swimming
You can click on the Exh column to declare the Athlete or Relay in that lane as swimming Exhibition.
You can double click on any Athlete or Relay and MM will ask you to confirm that you wish to Scratch
that entry from the event.
You can enter a Competitor # in the 2nd column to Deck Seed an Athlete into an empty lane provided
you have chosen the "Use Competitor Number" box in the Athletes Preferences screen.
You can also use your mouse and position it over the Athlete or Relay name and drag that
Athlete/Relay to an empty lane. Or you can move that Athlete/Relay to an occupied lane and MM will
Swap Lanes with that Athlete/Relay.
If you clicked on Watch Times on the Timing Console INTERFACE Preferences screen in the Setup Menu, then click on the Show/Backup button and you can enter up to three Watch Times. Click
Here for more information on this feature
After you have entered times for a given heat, press the F5 key or click on the heat number button and
the next event will be displayed.
Note:
Check out the many Function Key shortcut options by clicking on Help from the Run Screen
Menu bar and then click on ShortCuts.
Add an Additional Heat
If your meet has already been seeded and you do not want to reseed to add a new entry, then
click Here to find out your Deck Seed options. If all of the lanes are full, then you can add an additional
heat by clicking the Adjust button in the Run Menu or the Preview or Adjust button in the
Seeding Menu. Once in the Adjust Seeding Menu, click on Add Heat.
Or, from the Run the Meet Menu, just press Ctrl-H and MM will add an empty Heat to the event you
have selected.
Add Late Entries
If you have already seeded the meet and printed the Meet Program, you do not want to make the late
entries and then reseed as then the Meet Program will not be correct for those events that have new
entries. Your only choice then is to Deck Seed those entries.
Click Here to find out your Deck Seed options.
If you have NOT printed the Meet Program then you can proceed normally to enter the new Athletes
and their declared events and then reseed the meet before printing the Meet Program.
Enter Multiple Watch Times
If you are not using a Timing Console with pads or buttons to time your meet, then your only other
option is to have 1-3 watches on each lane. MEET MANAGER can help make this process a little
easier by automatically "calculating" the right time based on the multiple watch times as follows:
2 Watches - MM will use your Backup Times Averaging Preference choice.
3 Watches - MM will choose the middle time.
First click on Set-up from the Main Menu Bar and then Timing Console Interface and then pick Stop
Watch Timing from the list. That selection tells MM that you will not be using a Timing Console for
timing and will help you calculate the correct time from multiple watch times.
222
Copyright©Sports-Tek Software
MEET MANAGER for Swimming
When you are actually running the meet, press Ctrl-B so that you can key in 2 or 3 watch times for
each lane. After those 2 or 3 watch times are entered for each Athlete/Relay Result for that one Heat,
Press Ctrl-K and MM will show you the calculated time for each lane. Click OK and MM will store the
calculated time for each lane into your Database.
Enter Results by Lane
This is a great feature for Summer Leagues and other swim organizations that collect the lane/timer
sheets or cards after each event has been completed. The sheets or cards for all the heats in each
event come to the computer operator stacked by lane. The Enter Results by Lane feature makes it
fast and easy to enter all the lane 1 times, then the lane 2 times, etc.
From the Run the Meet Menu Bar, check the Enter Results by Lane check box.
· The Heat List window at the bottom will switch from a sort by heat to a sort by lane and the heat
buttons will become "lane" buttons.
· Enter Results by Lane is only available if the Timing Console Interface choice is set to Watch
Times. This feature is not designed for use with a timer connected to MM.
An example Run screen might look like the following for an event with 9 heats in a 8 lane pool and
showing all the lane 2 entries.
After the watch times are entered, press Ctrl-K to have the Calculator figure out the average watch
time which is shown in the Adjusted column. If you accept the adjustment, then the yellow lines will
disappear.
223
Copyright©Sports-Tek Software
MEET MANAGER for Swimming
Setup a Swimoff
A SwimOff occurs in a multi-round event, when there is a tie for an advancement to the next round.
For example, if we are running a Championship Meet in an 8 lane pool advancing two heats to the
Final round as an A-Finals and a B-Finals, and there is a tie in Prelims for 7th place, there must be a
way of assigning one of the athletes to the A-Finals and the other to the B-Finals.
In a SwimOff, the athletes that are tied for the advancement must swim the event again. The fastest
time advances to the faster heat in the next round. In our example above, if Sally and Jessica tied for
8th place with a time of 50.11 for event 10, the 100 FREE, they would swim the 100 FREE again with
the winner advancing to the A-Finals and the slower time advancing to the B-Finals.
Set up a new event for the 100 FREE, call it event 10S and click on the Swim-Off Event button in the
Add Event screen. Be sure to specify only one round for this SwimOff event and turn off the Score
Event radio button. Now Deck Seed the tied athletes in Event 10S in the appropriate lanes then wait
for them to swim and print the Heat Sheet for the referee. Enter the SwimOff results in Event 10S
from the Run Screen. Now pull up the Prelim event 10 and use the Judge’s Decision button to edit the
Prelim place for the tied athletes so that when you seed the next round, they will be assigned the
correct Heat and Lane based on their place in Prelims. In our example, if Sally won the SwimOff, you
would edit Jessica's Prelim place and change it from 8th to 9th. Then when MM seeds the next round
for event 10, Sally is assigned the slowest lane in A-Finals and Jessica is assigned the fastest lane in
B-Finals.
224
Copyright©Sports-Tek Software
MEET MANAGER for Swimming
Please Note: After the first round of each event, in the Event Results Report, MM will "flag" any ties
requiring a SwimOff. These "ties" must be resolved before the next round can be seeded.
Re-Score Events
You may want to make a change to a result time or even change the Scoring setup and want to go
back and re-score one or more events. Here's how.
How to Re-Score One Event
Click on Run from the Main Menu Bar and then pick the event that you wish to re-score. Now click on
the Score Event button and MM will re-score the event and print a new Results Report. If you only
wish to re-score the event but not print Results, click on the Re-Score button.
How to Re-Score Multiple Events
Click on Run from the Main Menu Bar and then click on the Sessions button and either select All
Sessions or any one Session. Now click the Re-Score icon
from the Run Menu Bar and MM will
ask you to confirm if you wish to re-score the events in the Event List window. Select Yes and MM will
go through and re-score each event in the Event List window.
Combine Results
Click on Combine, press Alt-B, or click the Combine icon
to Combine Results from two events.
Both events must be in the first round and must be the same distance and gender.
For example, this could be used in meets where the best 6 heats are swum in say event 1 in the
morning and the remaining 7 heats in the afternoon in event 101. The results of event 101 could then
be combined into event 1 where the heats from event 101 are changed to heats 7-13 in event 1. After
the events are combined in this example, event 1 is automatically re-ranked and if a timed final, rescored. If the event is a Prelim round, then the combined event could be seeded for finals.
After clicking the Combine icon, enter the Source event number and the Target event number and
then choose whether or not you want MM to delete the results of the Source event.
225
Copyright©Sports-Tek Software
MEET MANAGER for Swimming
Run Menu Preferences
The Run the Meet Menu has a Preferences Menu which allows you to set preferences for how the Run
Menu operates. Click on Preferences or press Alt-P to display the pull-down list of customizing menus
that apply only to the Run the Meet Menu.
Award Labels Preferences
Backup Times Averaging Preferences
Report Preferences
Results for List and Score Preferences
Run Screen Reaction Times and DQ Codes Preferences
Team Scores on Run Menu Screen Preferences
Web Real-Time Preferences
Award Labels Preferences
From the Run the Meet Menu Bar, click on Preferences / Award Labels to customize how and when
Award labels are printed from the Run Screen.
· You have two ways to select who gets and award label:
1. Standard - Select this preference when you wish to print Award Labels for each event's top
finishers.
2. By Heat - Select this Preference when you wish to print Award Labels for Each Heat.
· You can select from several label types within the Laser / Ink Jet or Dot Matrix choices. The 3x10
Laser is a 5160 Avery number (30 labels per page) while 5161 would be for the 2x10 Laser choice
(20 labels per page).
· There are two Print Methods you can setup:
1. Preview to the screen first: Each time the Award button is pressed in Run, the labels to be
printed will be previewed on screen whether there is one label to print or a 100. This is a
wasteful way to print if using laser or ink jet labels.
2. Print directly to the printer: This method can be very efficient when the Print only when
226
Copyright©Sports-Tek Software
MEET MANAGER for Swimming
page full is activated. MM will accumulate labels to be printed and when there are enough to fill
a page, it will print that page and keep any remainder labels for the next time the Awards button
is pressed. If you want to know each time how may labels are in the queue, check the Warn if
page not full check box. If you are at the end of a session and want to print the remaining
labels left in the queue, press Ctrl-F.
· You can Indicate how many Relay Athletes on each relay that you want to get an award. Generally
this would be four and four labels would be printed for each relay.
· You also have the following choices about how and when you want the labels printed.
· Print Directly to the Printer
· If you choose this option, MM will not display the print preview screen. You may specify if you want
MM to wait until the label page is full before printing Award Labels. For example, you may have
scored Event #1 and are ready to print but the page may have only 6 labels of the 20 labels per page
actually printed. In order not to "waste" blank labels, click on the box for "Print Only When page Full"
and MM will wait until you have 20 labels to actually print the page. You can choose to turn on or off
the Page Not Full Warning message.
· Preview Screen First
· Check this option and MM will show the print Preview Screen each time.
Indicate the number
of Relay Swimmers for which you want Award Labels printed.
·
· In order to tell MM to Print or Preview the Award labels for a specific event that you have just run,
click on the Awards button in the middle of the Run Screen or press the Ctrl-A key.
·
227
Copyright©Sports-Tek Software
MEET MANAGER for Swimming
Backup Times Preferences
From the Run the Meet Menu Bar, click on Preferences / Backup Times to customize how you wish
to handle backup times. average two backup button or two watch times.
Two Backup Buttons or Two Watch Times
There are three ways to average two button or two watch times. Choose the method that matches your
particular swimming organization's Rule Book.
For example:
· For USA Swimming, it is choice 1 to Truncate.
· For Canadian Swimming, it is choice 2 to Round up.
· For Australia and New Zealand, it is normally choice 3 to use the Slowest time.
· For FINA, it is average the two times, but there is nothing in the FINA rule book that says to truncate
or round up.
Time Adjustment Using Average Differential Between Pads and Backups
Time adjustments are required when there is a Lane Malfunction when using a Timing Console. If
there is a bad touch on the pad, an adjustment is needed using backup times. If the backup time is .30
seconds or greater different than the pad time, it is likely there was a bad touch. In USA Swimming, the
backup time is adjusted to account for the variances in the average human reaction in the other lanes
in the heat where the backup time is less than .30 seconds different from the pad time. In FINA, there
is no adjustment made to the backup time. So choose the appropriate method for your organization.
CTS Dolphin Backup Mode
The CTS Dolphin is a wireless stopwatch timing system available for 6 to 10 lanes with up to three
watches per lane. This check box is a quick way to turn on or off the Dolphin Backup Mode. Click Here
for information about the Dolphin Backup Mode.
228
Copyright©Sports-Tek Software
MEET MANAGER for Swimming
Results for List and Score Preferences
From the Run the Meet Menu Bar, click on Preferences / Results for List and Score to customize
Results Reports when List or Score Event is clicked from the Run Screen Options Bar.
· These options are independent of the ones offered in Reports / Results.
· Even though these preferences only apply to one event at a time, the 1 Event per Page and Page
Break when Gender Changes also apply to Multi-Age Group events where each separate age group
and gender is considered a separate event.
· Notice the option to include logos in the footer of the Results report.
Team Scores
· Show team scores after each event: When clicking Score Event in the Run the Meet Menu to
create a results report for a given event, you have the option to show the running team scores at the
end of the results report for the given event. These scores can be Combined Team Scores or the
Team Score matching the gender of the event. If the meet is setup as Divisions by Event, the
team score will be for the division of the event being scored. This score is the total through the
current event that is active in the Run the Meet Menu.
Run Screen Columns
From the Run the Meet Menu Bar, click on Preferences / Run Screen to show or hide the following
columns in the Heat List window at the bottom of the Run Menu:
1. Backup Times Columns (or press Ctrl-B)
2. Reaction Times Column (or press Ctrl-T)
3. DQ Codes Column (or press Ctrl-Q)
4. Toggle between showing Records or Splits in the Run Menu's upper right window (or press Ctrl-I)
5. Set the Cursor to the Backup Column (no hot key)
Showing and Hiding the Columns
· A check mark means the column is showing.
· Each time any one of the three choices is clicked the check mark either appears or is removed.
· If the Reaction Times column is checked, not only will the column appear in the Heat List window,
but also in the Relay Names window. The Relay Names window allows you to enter the reaction
time of the relay exchanges for the last three athletes.
229
Copyright©Sports-Tek Software
MEET MANAGER for Swimming
· The cursor will default to highlighting a cell in the heat window for editing. If no timing system is
active, the default will be the first lane with an entry and the cell will be the result time column. If
there is a timing system active, no cell will be selected. If Watch times are selected for the timing
system, you can select to set the cursor to default to the first lane with an entry and the highlighted
cell will be the first backup column if the backup times column is showing.
From the Run the Meet Menu Bar, click on Preferences / Run Screen to show or hide the Backup
Times columns in the Heat List window.
· A check mark means the column is showing.
· Each time Show Backup Times Columns is clicked the check mark either appears or is removed.
· This showing or hiding setting is retained even when you exit the program.
· Pressing the Ctrl-B key combination also toggles the hiding and showing of the backup times.
The Backup Times columns in the Heat List would appear like the window below.
From the Run the Meet Menu Bar, click on Preferences / Run Screen to show or hide the Reaction
Times column and/or the DQ codes column in the Heat List window.
· A check mark means the column is showing.
· Each time one of the two choices is clicked the check mark either appears or is removed.
· If the Reaction Times column is checked, not only will the column appear in the Heat List window,
but also in the Relay Names window. The Relay Names window allows you to enter the start reaction
time of the lead-off athlete and the take-off reaction times for the last three athletes.
· This showing or hiding setting is retained even when you exit the program.
· Pressing the Ctrl-T key combination also toggles the hiding and showing of the reaction times.
· Pressing the Ctrl-Q key combination also toggles the hiding and showing of the DQ Codes.
230
Copyright©Sports-Tek Software
MEET MANAGER for Swimming
Some timers can send the reactions times to MM just like they do for splits, pad times and backups.
There are four timers with this capability and they are the Colorado Time System 6, Omega ARES 21
Bi-Directional, the latest version of the OSM6, and the OmniSport 2000.
The Reaction Times column and DQ Codes column would look like this in the Heat List window:
In the Relay Names Menu accessed from the Run the Meet Menu, the Reaction Times column would
look like this:
Team Scores on Run Menu Preferences
From the Run the Meet Menu Bar, click on Preferences / Team Scores in Run Menu to customize
which team scores to display in the Team Scores window in the Run the Meet Menu.
231
Copyright©Sports-Tek Software
MEET MANAGER for Swimming
Web Real-Time Preferences
From the Run the Meet Menu Bar, click on Preferences / Web Real-Time to configure the format of
the Real Time Results html files. These result files are uploaded using the Network Pro option's RealTime Results feature. When set-up, pressing F12 from the Run Menu uploads the current event's
result and F11 uploads the current heat only. Note that there are separate preferences for Heat/Psych
Sheets and Results. For information on how to setup Real-Time Results, click Here.
232
Copyright©Sports-Tek Software
MEET MANAGER for Swimming
Team Scores
· Show team scores after each event in the real-time result file: When clicking Score Event in the
Run to create a results report for a given event, you have the option to show the running team scores
at the end of the results report for the given event. These scores can be Combined Team Scores or
the Team Score matching the gender of the event. If the meet is setup as Divisions by Event, the
team score will be for the division of the event being scored. This score is the total through the
current event that is active in the Run the Meet Menu.
How To Run Meets
233
Copyright©Sports-Tek Software
MEET MANAGER for Swimming
Run an A/B/C Type Meet
An A/B/C Meet is a Timed Final meet which is also known as a Divisions by Time Standards meet. The
results for each event are separated into Divisions (groups) based on either the time standard of the
seed time for each swimmer or based on the swum time of each swimmer. The standard A/B/C meet
has 3 groupings based on an A time standard, a B time standard, and a C time standard. The C time
standard is usually blank to indicate that it includes all swimmers slower than the B time. Within each
event there will be three first places, 3 second places, etc.
For example, let's say for the 11-12 Girls 100 FREE the Time Standard groupings are:
A
33.00
B
40.00
C
---If the scoring is based on the Swum Time, this means that every Athlete that swims a 33.00 or faster
will be ranked and scored with the A group. Every Athlete that swims from 33.01 to 40.00 will be
ranked and scored with the B Group. Every Athlete that swims 40.01 or slower will be ranked and
scored with the C Group.
If the scoring is based on the Seed Time, this means that every Athlete that has a seed time of 33.00
or faster will be ranked and scored with the A group. Every Athlete that has a seed time of 33.01 to
40.00 will be ranked and scored with the B Group. Every Athlete that has a seed time of 40.01 or
slower will be ranked and scored with the C Group.
Here is a list of steps for you to follow to setup an A/B/C Time Standard Meet.
1. Click on Set-up from the Main Menu Bar and then Meet Set-up and click on the Time Standard
radio bar under the Meet Type Heading under Divisions - then click OK.
2. Click on Set-up from the Main Menu Bar and then Entry/Scoring Preferences and then click the
Time Stds Meet tab. Here you define how you want to base the assignment of the Time Standard
Groupings - either by the Seed Time or Results Time. Then specify how to want to handle Over
and Under Achievers in terms of Scoring. Click Here for more information on setting this up.
3. Click on Events from the Main Menu Bar and then click on the Time Standards button on the left
panel to set up the Time Standard "grouping" criteria for each event.
Click Here to find How To Set up Time Standards.
4. If the points awarded are different for each time standard grouping, then go to Entry/Scoring
Preferences / Format and check the box that says Different Point System for each Division.
Then go to Setup / Scoring Setup, click the combo box at the bottom left to select the time standard
and enter the points for that time standard. Do this for each time standard grouping.
That's it! Now when you Run and Score the Meet, MM will break out Place/Finish Scoring into the
Time Standard Groups that you have specified for each event. In our example from above, the
rankings might look like this:
A
1st
Janet Bailey
31.44
2nd
Sarah Getsch
31.78
3rd
Mary Glass
32.45
B
1st
Jessica Bording
33.55
2nd
Doris Paine
34.01
3rd
Betty Ross
34.55
C
1st
Alice Kemp
42.43
2nd
Karen Dessler
42.78
3rd
Laura Whiting
43.00
Individual High Point and Team Scores can also be broken out using these Time Standard groupings.
Go to the Scores report and be sure to click on Divisions to request that MM total the points based on
234
Copyright©Sports-Tek Software
MEET MANAGER for Swimming
these Time Standard groupings.
Note: Any Result that does not fit any of the group criteria, or an Under or Over Achiever that is
declared as not eligible to score, will be ranked in a special group called "Non-Award".
Run a BCSSA Meet
The British Columbia Summer Swimming Association (BCSSA) is the largest aquatic association
in British Columbia. When BCSSA is selected for ID Format in the Meet Setup, MM will conform to the
parameters required by the BCSSA swimming rules. The following is a list of features built into MM
when BCSSA is selected.
· In the Meet Setup, the Meet Type must be Divisions by Event, the Base Country must be Canada,
and the Class must be Age Group.
· The Divisions will be built in to match the BCSSA divisions and these divisions cannot be changed.
· Any events may be set up with any event numbers, but it is required to assign a division to each
event.
· Multiple Records can be setup for each event and can be exported to a file that will have a .bcs
extension. Only HY-TEK's MEET MANAGER and TEAM MANAGER can import this exported record
file.
· Multiple Time Standards can be setup and can be exported to a file that will have a .stb extension.
Only HY-TEK's MEET MANAGER and TEAM MANAGER can import this exported time standards
file.
· In the Athlete Menu, all athletes must be assigned either an S for a Summer swimmer or an O for
Winter swimmer. No athlete ages are entered, but a birth date is required. The birth date and the O
or S category determines which division the swimmer must compete in. The registration ID may be
manually entered or can be imported from TEAM MANAGER when importing entries from TM.
· Only one division can be assigned to each event. The Multi-Age Group check box is disabled and
the age range for each event is disabled since the division determines the eligibility of each swimmer
for the event.
· BCSSA meets have the option to run as Divisions by Time Standards under the Divisions by Event
Meet Type. This would allow the BCSSA meet to run like any other Divisions by Time Standards
meet.
· All reports will display the swimmer's two character division code where the age would normally be
displayed.
· MEET MANAGER features for entering athletes, entering individual entries and relays, seeding,
entering results, scoring, and creating reports are the same for BCSSA as for any other meet.
To setup a BCSSA meet, select BCSSA for the ID Format. Divisions by Event is required for Meet
Type and Canada is required for the Base Country. Note the Divisions by Time Std check box in the
Meet Type panel. This is only available for BCSSA meets.
235
Copyright©Sports-Tek Software
MEET MANAGER for Swimming
The BCSSA Divisions for a meet to be run in 2006 are as displayed in the BCSSA Divisions window.
Each event will be required to be assigned to one of these divisions.
236
Copyright©Sports-Tek Software
MEET MANAGER for Swimming
Run a Championship Meet
A Championship Meet is a meet that has more than one round. For example, a typical
Championship meet will have 2 rounds for most events - a Prelim round and a Final round. Or, a
Championship meet may have 3 rounds - Prelim, Semi, and Final. Everyone swims in the Prelims and
then the top 8, 16, 24 advance to the next round. A Championship meet also may have Timed Final
events (1 round). For example, most of the long distance events (like the 1500 Meters or 1650 yards)
are swum as 1 round events (Timed Finals).
In MM, setting up a Championship meet is very straightforward. As you set up each event, declare the
number of rounds that will be swum and how many heats you will be swimming in subsequent
round(s). For example, you may want to swim the 50 FREE as a Prelim event with 2 heats of finals an A-Final and a B-Final. There can be 1, 2, or even sometimes 3 heats of finals. Generally these
Heats are called:
Fastest Heat
Next fastest
Next fastest
A-Final or Finals
B-Final or Consolations
C-Final or Bonus
MM defaults to the name "A-Final", "B-Final", and "C-Final", but you can change them to anything you
want in the Language Preferences / Key Words section. For example, you could change the keyword
B-Final to the word Consolations or Consolation Final.
If there are events with Multi-Age Group where several age groups are swimming together for
preliminaries, but swim in separate finals based on their age group, use the Multi-Age Group check
box in the Event Edit menu. Note that each age group can have a different number of heats for finals
and this is setup in the 3rd column of the Multi-Age Group window. In this situation, the number of
heats for finals in the lower right panel of the add/edit event window is ignored. Click here for
examples to consider.
237
Copyright©Sports-Tek Software
MEET MANAGER for Swimming
As you setup each event, you can specify that you want the heats for the last round run Slow to Fast
or Fast to Slow. If you have 3 heats in the last round of an event, you have the option to customize
the order that these 3 heats are run. For example, you might want the C-Final run first, then the AFinal, and the B-Final run last. Click on the Custom check box in the Event Setup screen and MM will
use the heat order that you specify in the text box next to the Custom radio button, such as CAB.
Once you set up each event and specify how many rounds there will be, MM will take care of
advancing the top 6, 8, 12, 16, ... athletes to the next round when you seed that next round. However,
the next round cannot be seeded until the prior round is completed and has a Done status. Multi-round
events involve 2 types of seeding. Prelim and Semi rounds are "circle seeded". That is for the 3
fastest heats, the athletes are assigned lanes by assigning the fastest entry time to the fastest heat
and the next fastest to the next heat and so on so that the fastest entries are NOT swimming together
in the same heat. For the last round or "Finals", the fastest athletes are assigned lanes in the middle of
the pool next to one another and then subsequent entries fan out to the sides - the slowest being
assigned lanes 1 and the other outside lane.
When you are running a Championship meet, it is important to Set up Sessions so that you may group
what events and what round for each event are being swum. For example, Session 1 may be swum in
the morning with Prelim events and then Session 2 for Finals are swum in the late afternoon or
evening. By setting up Sessions, you will be able to Time Line each group of events so that you will
know approximately what time the prelims will finish. It will also give you an opportunity to simplify the
seeding and running of the meet. For example, after Session 1 has been completed and you do any
scratches for Finals, then go to the Seeding screen, click on Session 2, select all events, and then click
on Seeding. Then print the Meet Program for Session 2. That way, you do not have to "remember"
which events are being swum when. They are already "set up" before the meet starts.
After the meet has been completed, you can print Meet results for a Session or all Sessions, any round
or all rounds in Publication Order or Event Number Order. MM will take care of grouping each
round's results together.
Run a Combined Event Such as a Pentathlon Meet
A Combined Event Meet is one where the cumulative results for multiple events are added up to
determine a winner. The most common type of Combined Event is a Pentathlon where each athlete
swims the same five events in their age group. These events can be any five events from the meet and
is setup in the Combined Events section of MM. Individual Ranking is then based on either the total
time of those five swims added together or the total points scored from those five swims. The
Point System can be any of 8 different point systems where the HY-TEK Points would probably be the
best point system to use.
Notes:
· When using Total Time for the ranking method: If an athlete is DQ'd from one of the events, you
have the option to include that athlete in the Place rankings and Awards for Combined Event if you
have checked the box for Use result time for DQ'd swims if using total time for rankings in the
Scores Report Menu.
· When using Total Points for the ranking method: If an athlete is Scratched, No Shows, or is DQ'd,
the athlete will get zero for the point score for those events. If your requirement is that every event
must be completed to be ranked, then be sure to Un-Check the check box for Include NT's, NS's,
and DQ's in rankings in the Scores Report Menu.
· During the meet and before all events are completed, you can get a temporary ranking of all athletes
regardless of how many events each has completed if you check the box for Include NT's, NS's,
and DQ's in rankings in the Scores Report Menu. This is very useful for listing the results after 3 of
5 events have been completed.
The basic steps to setup and run a Combined Event Meet is as follows:
· From the Events Menu, enter the individual events in any order.
· From the Events Menu, click Combined Events at the top and add a combined event for every age
238
Copyright©Sports-Tek Software
MEET MANAGER for Swimming
·
·
·
·
·
group you want to score such as 11-12 Girls Pentathlon. There is no limit to how many Combined
Events you can create and you can mix Heptathlons, Decathlons, Pentathlons, etc.
Within each Combined Event, drag over the events to be contested within the Combined Event. The
order of the individual events within the Combined Event can be in any order.
Run your meet just like you would any other meet.
To get the running totals during the meet or after the meet, go to Reports / Scores and select
Combined Events instead of Standard Events. Select one or more of the Combined Events and
create your report. A spreadsheet will be created for each event.
The Scoring for the Pentathlon or any other Combined Event is determined by the choice at the
bottom of the Reports / Scores Menu. You can select Swum Time or Spec Pts. If Spec Pts is
chosen, it uses the Special Point System selected in Setup / Entry Scoring Preferences. We would
suggest using HY-TEK Age Group Points unless the Combined Events are setup in Single Year age
groups, in which case we suggest using HY-TEK Single Year Points. .
To create award labels for the Combined Events, click the Combined Event Award Labels tab at the
bottom of Reports / Scores.
Run a Disability Meet
Generally, a Disability Meet has numerous classifications for different types and levels of disability.
Each event result is sorted by the classification swum and so there are multiple first and second places
in each event. In MEET MANAGER for Swimming, we call this "classification" a Division. You can
assign a different division to each entry in order to handle the fact that one person may be in several
different disability classifications, depending on the event.
Here is a list of steps for you to follow to setup a Disability Meet.
1. Click Set-up from the Main Menu Bar and then Meet Set-up. Under Meet Type, click the by Entry
radio button under Divisions and under Class, click the Disabled radio button. Click OK to close
the Meet Set-up Menu.
2. Click Set-up from the Main Menu Bar, click Divisions/Region Names, and click Divisions. You
can set-up any number of Divisions with a three-character abbreviation and up to 20 characters
for the description. For example, it is suggested you make the abbreviation for freestyle,
backstroke, and butterfly S1 to S13, for breaststroke make the abbreviations be B1 to B13, and for
individual medley M1 to M13.
3. From the Events Menu, create the events as Open events.
4. In order to assign a disability Division to an entry, use the Athletes Menu after the athlete is
entered in events. At the bottom of the Athlete Menu, the events are listed and those events in
yellow are entered events. Click under the column labeled Div and a drop down list with the
Divisions will appear for you to pick from. However, if you assign the numbers 1-13 for each of the
three disability categories for each athlete ahead of time (see Adding Athletes), the codes will be
automatically entered with each entry.
5. In order to assign a disability Division to a relay, use the Relays Menu. At the bottom of the Relay
Menu, double click any team to enter a relay for that team. After a relay is entered, click under the
column labeled Div and a drop down list with the Divisions will appear for you to pick from.
That's it! Now when you Run and Score the Meet, MM will automatically break out Place/Finish
Scoring based on the disability Divisions you have specified for each entry.
Run a Double Dual Meet
A Double Dual meet is a Timed Final meet in which 3 or more teams compete. Team Scoring is
computed by having each of the teams compete against each of the other teams. For example, if
there are 3 teams in the meet, Team scores would be computed as if there were 3 dual meets being
swum for each gender.
239
Copyright©Sports-Tek Software
MEET MANAGER for Swimming
Men Team 1 versus Team 2
Men Team 1 versus Team 3
Men Team 2 versus Team 3
Women Team 1 versus Team 2
Women Team 1 versus Team 3
Women Team 2 versus Team 3
Note that the teams/schools competing in the meet must be entered in the database before
going to select the teams/schools in Entry/Scoring Preferences.
Setting up and scoring this type of meet is easy using MM. Click on Set-up from the Main Menu Bar
and then Meet Set-up. Select Meet Type as Standard and Meet Style as 3+ Double Dual.
After setting up the teams/schools that are competing in the meet using the Add Teams menu, to
customize the team pairings to be used in computing the Dual Team Scoring, click on Set-up from the
Main Menu bar and then Entry/Scoring Preferences. Click on the 2 or 3+ Double Dual tab and then
the Select Teams button at the bottom right of this screen and select which Teams and Gender are to
be used in computing the Double Dual Team Scoring.
At any time during the meet, go to the Scoring Report and display or print the Double Dual Team
Scoring for each of the competing teams that you have set up. The Team Scores automatically show
up on the Run Screen and are updated anytime you press the Ctrl-S button. For example, if you
press Ctrl-S when you are running event 4, MM will display the Double Dual Scoring for events 1
through 4.
Please note that MM will NOT include events in the Double Dual Scoring that have been set up as "Not
to Score" in the Event Set-up.
Run a Dual Meet
A Dual Meet is a Timed Final Meet in which only two teams compete. A 3+ Team Dual Meet is where
there are three or more teams competing with multiple dual meets being scored simultaneously. You
can manually Deck Seed the meet, or you can have MM seed based on team lane assignments. But
for College or High School dual meets, many times the coach does not declare who is swimming an
event until right before the event begins. In this case, you would want to Deck Seed the event.
1. From the Main Menu Bar, click Set-up / Meet Set-up. Under Meet Style, select either 2 Team
Dual or 3+ Team Dbl Dual, and then click OK.
2. From the Main Menu Bar, click Set-up / Entry/Scoring Preferences. Select the 2 or 3+ Double
Dual tab, click the command button and pick the team pairings you want for scoring. You may
have multiple teams and only want to score the boys for one pairing and both boys and girls for
another pairing. Click Here for details on selecting the team pairings.
3. If you want to assign lanes to each team for Seeding, from the Main Menu Bar, click Set-up /
Seeding Preferences. Select the Dual Meets tab and drag the teams to the lanes each will be
assigned. Click Here for more details on assigning the lanes.
4. After assigning the lanes and after the athlete entries and relay entries are entered, go to the
Seeding Menu to quickly seed the teams into the lanes you have assigned.
5. Enter results from the Run Menu and the team scores will show on the screen. To show team
scores after each event's result report, from the top of the Run Menu, click Preferences / Results
for List and Score and check the box for Team Scores.
6. To print final results in the standard dual meet format, go to Reports / Results and select Dual
Meet Format at the bottom for the Report Type.
Run an IMX Meet
IMX is USA Swimming's IM Xtreme Challenge program where swimmers are ranked on their
performance in a combination of five or six events. Using MM's Combined Event feature, you can
create these pentathlon and sextathlon setups with the appropriate events and score them using the
HY-TEK Point System.
240
Copyright©Sports-Tek Software
MEET MANAGER for Swimming
The Events and Age Groups for the IMX Extreme are:
· 9 & under and 10 year olds: 200 IM, 200 free, 100 back, 100 breast, and 100 fly
· 11 and 12 year olds: 200 IM, 400/500 free, 100 back, 100 breast, and 100 fly
· 13, 14, 15, 16, 17, and 18 year olds: 400 IM, 400/500 free, 200 back, 200 breast, and 200 fly
To setup your meet to produce IMX scoring, follow these steps:
· Add the above events to the database. You can have any order for the events and you can have
events other than the above mixed in with the meet. The age range for each of the events does not
matter. For example, for the 100 back, you can create a boys 12 & under 100 back or a 10 & under
plus 11-12, or single year events such as 9-9, 10-10, 11-11, etc. Note that a 9 & under event would
allow 8 and unders to participate. Setup the events to whatever is easiest and most efficient to run
the meet.
· Go to Events and click Combined Events at the top. Add a Combined Event for each age group and
gender. The Combined Event number can range from 1001 to 1099. Pick Pentathlon for the 12 &
under events and Sextathlon for the 13 and Over events.
· After the Combined Event headers are added, select one at a time at the top of the Combined
Events window and drag over or double click over the appropriate 5 or 6 events (from left to right).
These Sub Events can be in any order.
· In Setup / Entry Scoring Preferences, use the combo box at the bottom to select HY-TEK Single
Year Age Group Points for the Special Point System.
· During or after the meet, you go to Reports / Scoring, click the Combined Events radio button near
the top and that displays the Combined Event headers. Select any combination of the headers and
create your report. A spreadsheet will be created for each Combined Event with the times and points
for each event and the IMX point total.
· After the meet is over, you can print award labels for the top scorers for each Combined Event.
Select the events and select the Combined Event Award Labels tab at the bottom.
Run an Inter Squad Meet
If you want to use your MEET MANAGER and TEAM MANAGER to run a team inter squad or
scrimmage dual meet, here's how. For example, suppose the name of your team is FAST and you
want to divide your swimmers into a Red team and a Blue team.
MEET MANAGER
Step 1 Set up the events for your dual meet.
Step 2 Export the events that you have set up.
TEAM MANAGER
Step 3 Import the meet setup events from step 2 above.
Step 4 Add two new teams and call them RED and BLUE. DO NOT move any swimmers from
your FAST team into the RED or BLUE team.
Step 5 Using Entries by Name or Entries by Event, first select Team RED and click on the
swimmers you are entering in the meet for the RED team.
Step 6 Again, using Entries by Name or Entries by Event, select Team BLUE and click on the
swimmers you are entering in the meet for the Blue team.
Step 7 Run the Meet Entries Report to make sure you have designated the right swimmers on
the BLUE team and the RED team.
Step 8 Now Export Entries for that meet.
MEET MANAGER
Step 9 Import the entry file created in Step 8.
Step 10 Run your meet.
Step 11 After the meet is completed change the name of the RED team to FAST and export
241
Copyright©Sports-Tek Software
MEET MANAGER for Swimming
results of FAST as Export file #1.
Step 12 Change the name of FAST from above back to RED.
Step 13 Change the name of the BLUE team to FAST and export results of FAST as Export file
#2.
TEAM MANAGER
Step 14 Import Export file #1 from Step 11.
Step 15 Import Export file #2 from Step 13.
Run a Flighted Meet
A Flighted Meet is a Timed Final meet in which each event may have from 2 to 4 levels of scoring - that
is, two to four 1st, 2nd, 3rd, ... places. Each level or grouping is based upon the number of Athletes
that actually swim the event. For example, if there are 46 athletes in the Girls 11-12 50 FREE and you
have selected 2 groups for scoring, the fastest 23 compete against one another and the slowest 23
compete against one another. You may define the minimum number of swims required to score the
event as Flighted. Go to the Entry/Scoring Preferences and specify that minimum. For example, you
may specify that you must have at least 24 Athletes in an Event before it is scored as Flighted. In
addition, you specify whether the flights are to be divided by seed time or by swum time.
Here is a list of steps for you to follow to setup a Flighted Meet.
1. Click on Set-up from the Main Menu Bar and then Meet Set-up and click on the Flighted radio
button under the Meet Type Heading under Divisions - then click OK.
2. Click on Set-up from the Main Menu Bar and then Entry / Scoring Preferences / Flighted and
define the minimum number of Athletes required for a flighted event, the number of flights from 2
to 4, whether DQ's are to be included in the division of the flights or not, and whether the flights are
to be divided by seed time or by swum time.
3. Click on Set-up from the Main Menu Bar and then Division/Region Names then Division and
enter the names of the two to four Flights as Division Codes and Names. For example, enter "G"
and "S" as the Division codes and "Gold" and "Silver" as the Division names. Use only slots 1
through 4 for the Flighted Division names.
That's it! Now when you Run and Score the Meet, MM will break out Place/Finish Scoring into two
groups based on the flighted criteria described above.
Run a Masters Meet
A Masters meet is always a Timed Finals meet in which athletes from ages 18 and older compete in 5
year age groups. Here is a list of some of those age groups: 18-24, 25-29, 30-34, 35-39, ... Relay
Teams can also compete in age groups either based on the age of the youngest athlete for Yard meets
or the total age of the 4 athletes for Meter meets.
Please follow these steps to set up a Masters meet:
1. In the Meet Setup, click on the Masters radio button for the meet Class. Go to Meet Set-up,
Athlete/ Relay Preferences and note the Age-Up-Date and be sure it is the last day of the meet if
short course yards and 12/31/xxxx where "xxxx" is the year of the meet if the course is in meters.
2. Click on Set-up from the Main Menu Bar and then Seeding Preferences. If you are running a
Championship style Masters meets in which some events are going to be seeded by age then
time, then click on the "Seed by Age Group" radio button. Also specify the number of age groups
to skip before a residual heat is added. Please note that the algorithm for seeding by age group
and time is defined by the Championship Committee of United States Masters Swimming.
3. When setting up events, specify the age of the event as Open and MM will automatically configure
the standard Masters Individual or Relay age groups for the event. Specify if you wish to swim "2
to a lane" for the Long Distance events. You can either "require" all athletes entering that event to
242
Copyright©Sports-Tek Software
MEET MANAGER for Swimming
swim 2 to a Lane or you can let them "choose" if they wish to swim in the early heats as 2 to a lane
or swim in the later heats in the standard one to a lane.
4. When you key in the Athletes and their entries, make sure that you click on the "2 to a lane"
column if appropriate or enter an "*" as a Special Character to indicate a 6th event, again if
appropriate. In many Masters meets, if an athlete is going to swim in 6 events, he/she is asked to
indicate their scratch preference if the meet becomes too large and scratches must be made.
5. When you enter Relays, you will be asked to declare the Age Grouping of the Relay. The age
grouping for a Yard meet is based on the age of the youngest swimmer, and for a Meter meet, the
age is based on the sum of the ages of the 4 swimmers in the relay.
6. When seeding, there are two ways to seed:
· By Time
· By Age then by Time
Click on Seeding from the Main Menu Bar and select all the events that will be seeded by Time
only and check the By Time button at the bottom. Then click the Start Seeding button. When that
is completed, click the By Age then by Time button, select the events to be seed this way and
click the Start Seeding button. For Deck Seeded events, you might want to click on Multi-Age
Split check box and MM will rank each age group separately.
7. If you are grouping Team Scoring competition by the size of the teams, be sure to click on Setup then Entry/Scoring Preferences and then click on the Masters Team Scoring button on the
bottom right of the menu to declare the scoring categories based on the team size. You can also
click on the Division / Region Names then Region button. Now enter names for your Team
Groups. For example, you may want to set up the Region Names as Small, Medium, and Large
and specify the minimum number of athletes for each scoring group for Female, Male, and
Combined. That way when you go to run Team Scoring, click on the "by region" radio button and
MM will group the teams according to your specifications.
Run a Meet using a Network
If you are using MEET MANAGER for Swimming with the Pro Option, please click on the topics above
to learn about how to Logon and Setup the Hardware and Software for a peer-to-peer Network system.
As mentioned in the How to Logon the Network section, MM Pro provides 4 levels of access to each
Database as shown below.
Level User Name
Permissions
-------------------------------------------------------------------------------------------------------------------1
Administrator No restrictions at all.
2
Run 1
This level can do everything except Network Administration and Single User
Mode functions.
Run 2
This level can do everything except Network Administration and Single User
Mode functions.
Run 3
This level can do everything except Network Administration and Single User
Mode functions.
3
Clerk 1
This level can do everything Level 2 can do except Run the Meet.
Clerk 2
This level can do everything Level 2 can do except Run the Meet.
4
Report 1
Print Reports/Labels ONLY
Report 2
Print Reports/Labels ONLY
Report 3
Print Reports/Labels ONLY
Here are two examples of how you might setup the computers and printers on the network to run a
meet.
243
Copyright©Sports-Tek Software
MEET MANAGER for Swimming
1.
Single Pool Meet
Of course using this example depends on your space constraints and availability of computers.
Administrator Computer - This would be set up as the main computer that would be used to key
in the swim times or accept them from the Timing Console just as one would normally do. You
might want to set up a local printer for this computer. The Database would be loaded on this
computer.
Clerk 1 Computer - This computer would be set up to do any scratches or reseeding depending
on how your particular meet is run. It could also be used to print various reports.
Report 1 Computer - This computer could be used as the main Report computer for results, heat
sheets, award labels, etc.
Printer 1 - HY-TEK recommends the printer be physically connected to the Printer 1 computer
and be set up in your peer-to-peer network as shared. That way, any of the 3 computers can print
directly to it. It also might be nice to have this printer and the Report 1 computer located closer to
where the spectators, swimmers, and coaches would normally pick up their awards and reports.
2. Double Ended Meet
In this type of meet, one is typically running either:
· Boys at one end - Girls at the other
· Even Heats at one end - Odd Heats at the other.
Administrator Computer - This would be set up as the main computer that would be used to run
one end of the pool - to key in the swim times or accept them from the Timing Console just as one
would normally do. The Database would be loaded on this computer.
Run Computer - This would be set up as the main computer that would be used to run the other
end of the pool - to key in the swim times or accept them from the Timing Console just as one
would normally do.
Clerk 1 Computer - This computer would be set up to do any scratches or reseeding depending
on how your particular meet is run. It could also be used to print various reports.
Report 1 Computer - This computer could be used as the main Report computer for results, heat
sheets, award labels, etc.
Printer 1 - HY-TEK recommends the printer be physically connected to the Printer 1 computer
and be set up in your peer-to-peer network as shared. That way, any of the 4 computers can print
directly to it. It also might be nice to have this printer and the Report 1 computer located closer to
where the spectators, swimmers, and coaches would normally pick up their awards and reports.
Report 2 Computer - This computer could be set out in an area that is accessible for spectators
and used to print the Meet Summary Report for Teams and Individual Swimmers. Both of these
reports can be sold and used a revenue source for the host club.
Please note that if you are running even heats at one end of the pool and odd heats in the other
end, you might want to click on the Data Refresh button or press Ctrl-D to make sure your Run
Screen reflects the latest data from his end of the pool.
There are many variations on these two examples but the main idea here is to be able to set up your
people and computer resources optimally for the particular type of meet you are running and for the
particular space constraints that you have.
244
Copyright©Sports-Tek Software
MEET MANAGER for Swimming
Run a Multi-Age Super Final
A Multi-Age Super Final is a special way of seeding finals in a prelim/final multi-age group event.
Assume the pool is 8 lanes and there is an event that has 13-14, 15-16, and 17 & over. The finals
would have a top 8 heat of the fastest 8 regardless of age, a top 8 heat of the remaining 13-14 year
olds, a top 8 heat of the remaining 15-16 year olds, and a top 8 of the remaining 17 & over athletes.
Any one of these age groups could have been set to 2 finals or 16 athletes in each age group, but the
Super Final itself is always one heat.
There is also an option in the event setup to eliminate the oldest age group. In this example, if the 17 &
over final was set to be eliminated, there would be a Super Final heat, a 13-14 heat and a 15-16 heat.
See Adding Events for details on setting up a Prelim/final event as a Multi-Age Super Final event.
Run an Open Water Meet From the Run Menu
In General, running an Open Water Meet is very similar to running a Pool Meet, but there are a few
differences. Here is a list of the major differences and steps to follow to run an Open Water Meet.
1. Click Set-up from the Main Menu Bar and then Meet Set-up. Under Meet Type, click the
Standard radio button, under Class, pick Open or Age Group.
2. Click Set-up from the Main Menu Bar, click Athlete/Relay Preferences, and check the Enter
Competitor Number check box.
3. From the Events Menu, create an individual event for each race. For team relays, see #5 below.
Create the individual events for a specific age group or as Open and then use the Multi-Age Group
check box to specify your various age groups if you have more than one age group competing in
the same race. For the Event Type at the bottom of the screen, click the Open Water radio button.
Under the Distance column, click on the appropriate distance such as 5k, 10k, or 25k. If the
distance cannot be selected, click the Custom radio button and then enter your Open Water Event
distance - for example, 4000. If the race is Un-Seeded and you just want one large flight, click on
the Un-Seeded radio button in the Assign Lanes section and when you seed the event, it will
create one list. If you want waves seeded, leave the Assign Lanes choice as Standard and enter a
number up to 99 in the number of lanes text box. Seeding the event will create waves (heats)
based on the number of positions per wave. If you do not plan to seed, then set Assign Lanes to
Un-Seeded.
4. From the Run Menu, there are several ways to enter the results for the individual races. If the
event is unseeded, click the Unseeded button to bring up a window which allows you to enter
comp#, time, comp#, time, etc. From the Unseeded menu, you can increase the number of
positions to any number. If you are swimming in waves, you can add waves by pressing Ctrl-H
from the Run Menu and use the Unseeded Menu for each wave. If there are offset times for
waves, enter them at the far right just above the heat listing. Another way to enter results is directly
into the second column from the left to enter the Competitor Numbers for the first 10 swimmers.
Then enter the times for the first 10 swimmers in the Finals column. Click Ctrl-H to add another list
of 10 and enter the 11th thru 20th finishers using the same technique for the first 10. Repeat by
adding new lists as necessary.
5. For Team Relays, just follow the normal steps in setting up a Relay event in the Events Menu with
the Open Water declarations as discussed in #3 above. Each relay event distance must match one
or more of the individual Open Water events. Create a separate relay for each category you plan to
score such as 5K women, 5k men, and 5k mixed. Then go to the Relays Menu to add relay teams
to each event. With each relay, specify from three to four swimmers who are to count for the relay.
You will not have to enter any results for the Team Relays, nor will you have to add up any times.
After the individual races are completed with their results entered, just go to Reports / Scores and
click the Open Water Team Relays radio button. Select the events and click the Create Report
icon. For each relay, all of the individual results will be scanned and the routine adds the times for
the best 3 in each relay and ranks the teams within each event, showing the time for each
individual and the total time. This routine also takes the total time and the points scored and inserts
this data into the relay database so that team scores can be computed with relays and award
245
Copyright©Sports-Tek Software
MEET MANAGER for Swimming
labels can be printed for the relays.
That's it! Now when you Score each individual event and print results, MM will list the swimmer's that
have participated in that Open Water event sorted by age group and gender from fastest to slowest
within each group. From Reports / Scores you can instantly generate the team relay scoring.
Run an Open Water Meet Using the OW Module
Using the OW Module to Enter Results
With this module you can enter the order of finish separately from the times.
Note: The Open Water module uses a separate database from the swimming database and thus the
reports from the regular swimming main menu cannot access the OW data. There is an Update
feature within the OW Module that copies completed results from the OW database over to the
swimming database for use in the various swimming reports.
Follow the steps in how to Run an Open Water Meet From the Run Menu except for step 4 the results
will be entered using the OW Module instead of the Run Menu. To open the OW Module, click Run /
OW Module.
OW Enter Ranks / Read Bar Codes
1. This method allows you to enter the order of finish by competitor number for a given chute. If you
have only one chute, then it is assumed to be chute 1. You can have up to 10 chutes. If using
more than one chute, check the "Using more than one chute" check box . You can only enter the
order of finish for one chute at a time. When you first click on Ranks, there will be no competitors
in the list. To enter results by competitor number, click on the cell in row 1 under Comp# and type
in the competitor numbers in the order in which they finished. If using a bar code reader, click on
the Read Bar Codes button and start reading with the bar code reader. If a bar code can't be read
by the reader, type in the number. In fact you can use this module to manually type in all the
numbers. The list starts out with 160 empty rows. If your list gets filled, click the Increase Rows
button to increase the number of rows. Click Save to save your list.
2. To change to a different chute while in Ranks, Times, or Match, click the upper left button for the
Chute Number and enter a chute number from 1 to 10.
3. Correcting Errors: You have several options available for manipulating the rank order in case you
make an error in entering the rank order. To delete someone from the list, select the row of the
246
Copyright©Sports-Tek Software
MEET MANAGER for Swimming
4.
5.
6.
7.
competitor and click the Delete button. To insert someone in the list, select a row, click the Insert
button and enter the competitor number. To move any competitor from one row to another, edit the
Rank number and change it to the row to be moved to.
Unknown Swimmers: In some cases, there may be a finisher that is temporarily missing his/her
competitor number. Enter a competitor number of -9 to indicate "Unknown" swimmer, and this
place will be reserved for you to later enter the correct competitor number.
If an invalid competitor number is entered, -9 is automatically entered to mark an unknown
swimmer. This feature enables you to proceed to enter the next competitor number in rapid
succession.
To list the rankings of the chute being worked on, click List and a list in rank order will be provided.
Reverse Ranks: In some cases, ranks may be entered in the wrong order. Click on Reverse, and
a pop up box will give you the option to choose a series of ranks to Reverse or "switch".
OW Enter Times / Read Download
1. Click on Times to enter the list of result times for a given chute. To manually enter the times, click
on box under Times in row 1, and add them. If you enter times out of order, they will be sorted by
time. This permits you to enter the times consecutively until you chose to stop; at any time click
Save to save your work. If you have downloaded times from a button finish timer, you can click
Read Times to open a Select Download File dialog box. Highlight the file you want and click OK.
The times will be read from the file and automatically entered for you. If times have already been
entered for the given chute, the times will be over-written by the downloaded times being read in.
These times will be used to match with the corresponding chute's order of finish.
2. If a time is incorrect, you can change it by highlighting the time and typing in the revised time. Click
Increase to add more rows to the list and click Delete to remove a time from the list. You must
click Save to resort the list. To Insert a time, simply add the time to the end of the list and the list
will be resorted when you click Save.
OW Match Ranks and Times
1. Click on Match to match up the separate ranks and separate times lists. In order for this to
happen, you must have already entered the ranks and times. The two lists are lined up sided by
side. This is to be performed for each chute of using more than one chute in a given race.
2. You can manipulate the lists in several ways. You can add an athlete anywhere in the list by
highlighting a row and clicking Insert. This act will move all athletes below the insertion point down
one. You enter the competitor number and the time from the previous athlete will be used. You can
247
Copyright©Sports-Tek Software
MEET MANAGER for Swimming
delete an athlete by highlighting the athlete / row, and clicking Delete. This removes the athlete /
row and the time, and moves all athletes below up one. To list the rankings of the chute being
worked on, click List, and a list in rank order will be created. If the event has male and female, the
ranking will include the ranks by gender as well as the overall rank.
OW Merge All Chutes
1. You only merge chute results if you have more than one finish chute. Note: It is very important to
understand that most changes made to individual chutes (either through enter Ranks or enter
Times) AFTER merging will not be included in the merged files unless you merge all the chutes
again. The only change to individual chutes that will affect a merged file are replacements of
athletes with another athlete. Inserting, switching, or reversing athletes in an individual chute will
not affect the merged file unless you go back to Merge Chutes again. Modifying the Time order of
an individual chute will also not affect the merged list unless you go back to Merge Chutes again.
2. Once all chutes have been merged, you can refine your final results within the Merge Chutes
Menu. However, the intention is to get each individual chute results correctly matched first before
merging. From the merged list, you can insert an athlete or replace an athlete. However, if you
insert an athlete, he/she will be given the same time as the athlete in front of where the insertion
occurs. The inserted athlete will be placed in chute 10. To see the complete results of the merged
list, click List.
OW Select Times
Click on Select Times and you can manually enter a select time and the athlete that goes with the time,
or you can click Read Select Times to read a file that has already been downloaded from a button
finish timer. These times are used to help verify or correct data that has been previously entered for a
given chute. After entering select times, list and print them to see how they compare to the actual
results. Select Times are NOT used for the actual results.
OW Download Times
Click on Download and follow the instructions for the following timers.
Chronomix 737 Timer
Nielsen-Kellerman Interval 2000XC Watch
Omega Power Time
Time Machine
Time Tech Sprint 8
ULTrak L10
FinishLynx File Sharing
If you are using the OmniSport 2000 to download the times, click on Times at the top of the Open
Water Module and then click Read Times. This brings up the Get Times window where you have the
option to request results by Event or by Race Number. The times are then read directly into the Times
Grid.
OW List Order of Finish
Click on List to list the order of finish for posting results. If you are using only one chute, you can get
immediate results after you have entered any part of the order of finish in the Ranks module. You can
later enter the times and match them with the finish order. If you have more than one chute, you
cannot properly use this selection until all chutes have been merged.
OW Update for Reports Menu
Click Update to copy completed results from the OW database into the Swimming database. It is
necessary to perform this update if you want to create Results Reports from the Reports Menu or if you
want to calculate relay teams from the Scores Report. It is also necessary if you are using wave offsets
because wave offsets can only be entered using the Run Menu. The data will be copied over in flights
of 10 for viewing in the regular part of the Run Menu. However, if the event is already seeded, the
seeding and any wave offsets that may have been entered will be preserved. New athletes will be
entered in newly created flights/heats following the existing flights. If you are not using wave offsets
and if there are over 400 athletes in one open water race, updating to the Swimming database is not
248
Copyright©Sports-Tek Software
MEET MANAGER for Swimming
recommended since the Run Menu will take too long to refresh the screen with 40 flights of 10 results
or more. The update cannot be performed if any athletes have been entered with -9 for unknown.
Run a Skins Event
A Skins event is where there are 8 entries for an event and there are four to six elimination rounds.
After the first round, 1 or 2 athletes are eliminated. After the second round, 1 or 2 more athletes are
eliminated. This elimination process proceeds until there is only one athlete left who is declared the
winner. Each race is separated by a few minutes.
Assuming there are 5 rounds in an 8 lane pool with elimination of 2 in the first round, 2 in the second
round, and 1 in each of the next three rounds, here is how you would run it.
· Set up two events such as #10 and #10A. Make #10 be 3 rounds prelims/semis/finals with one semifinal heat and one final heat and #10A be 2 rounds prelims/finals with one final heat.
· Run the first round and list the results.
· Go to Seeding, select the semis of the event, click Scratch Pad and scratch the ones who do not
advance (the slowest 2 in this example).
· Seed the semis.
· Enter results for the semis and list the results.
· Go to Seeding, select the finals round of the event, click Scratch Pad and scratch the ones who do
not advance (the slowest 2 in this example).
· Seed the finals.
· Enter results for the finals and list.
· Enter the advancers from the finals of #10 into #10A using drag and drop from the Adjust Menu.
Select #10A in the Run, click Adjust, click Show Eligible Athletes, and drag the 3 remaining fastest
athletes from the third round into the appropriate lanes.
· Run the prelims of #10A and list the results.
· Go to Seeding, select the finals round of #10A, click Scratch Pad and scratch the ones who do not
advance (the slowest 1 in this example).
· Seed the finals.
· Enter results for the finals and list.
Run a Timed Final Meet
A Timed Final meet is one in which every event has just 1 round - that is, everyone entered in the Boys
11-12 50 FREE swims once and the athlete with the fastest time wins.
As you set up each event, click on the Timed Finals radio button under the "Rounds" heading. Then
when you seed that event, MM will assign the heats and lanes appropriately for Timed Finals seeding that is the fastest athletes are assigned lanes in the middle of the pool next to one another and then
subsequent entries fan out to the sides - the slowest being assigned lanes 1 and the other outside
lane.
Run Time Trials
Time Trials are usually run at National meets to provide swimmers the opportunity to make a particular
"cut" or "qualification time" for the meet or an upcoming meet.
Time Trials can be run on a separate computer, or on the same computer in the same or different
directory as the National meet. Let's review some ways to run Time Trials.
1. Use the current meet database and add events for each day's trials - for example, event 101 would
represent the first event for Day 1. Time Trial event 204 would represent the fourth event for Day
2, and so on. When you add these events, make sure you click on the Time Trials check box so
that reports for those events can be printed separately.
249
Copyright©Sports-Tek Software
MEET MANAGER for Swimming
2. Use the MM Export Roster feature to move Roster Only information from the National meet
database to the Time Trials database and set up the Time Trial events.
3. Use Backup and Restore to copy the National Meet database into a different directory. If you wish,
use the MM Purge feature to remove all of the entries in the Time Trials database. Then, renumber the events to reflect the day of the Time Trials - event 101 being the first event for Day 1,
and so on.
You can even use the Meet Entry Fee Report to collect Time Trial entry fees!
Run a Totally Deck Seeded Meet
A Totally Deck Seeded Meet is one in which you DO NOT want the computer to seed the event by time
- in other words, you want to manually assign every entry for every event their respective heat and
lane. An example of this kind of meet might be a High School or College Dual Meet in which the coach
does not disclose his/her lineup until the events actually begin.
When you set up each event, click on the Manual Seed button so that if you mistakenly tell MM to seed
that event, MM will NOT do it.
Please refer to the Section How To Deck Seed an Entry - MM offers you 5 different options to
manually seed an event. HY-TEK suggests using option 2 or 3 as described in this Section if it is
important to have swimmers in their assigned lanes - for example, you might be using a Timing
Console to import the times and splits where it is critical to have the swimmers assigned to the correct
lanes. For options 2 or 3, use the Adjust feature either from the Seed Screen or the Run Screen. That
way when you go to event 7 the Women's 100 FREE, you have a list of all the eligible Women and you
can click and drag those athletes into the Heat and Lane that you assign.
But if you are not using a Timing Console and do not care about lanes assignments, choose
option 5. As you are setting up your events for the meet, from the Events screen select "Un-Seeded"
under the Assign Lanes heading for the events you wish to Deck or Manual Seed. Then when you go
and Seed that event and subsequently RUN the meet, MM will display all of the Athletes in the event
on the RUN screen sorted Fast-Slow or Slow-Fast as you specified in the Event Set-up. Then as
results are provided to you for the entire event sorted by time, you can quickly find the swimmers and
enter their times right on the Run screen.
Run a Varsity/JV Meet
The idea here is to be able to group Team Scoring so that the Varsity and JV Team Scores are totaled
separately.
In the Meet Setup. Specify Division By Event. Then when you set up each event, click on the Division
arrow button (click here to see How to Setup Divisions) and declare the event as Varsity or JV - that's
it. Then when you go to print Team Scores, MM will total points for the Varsity events together and
then the JV events so that Team Scores will have two totals and two rankings.
Run a Zone Meet
A Zone meet for USA Swimming is simply a meet in which LSCs (Regions for USA Swimming) are
competing against one another in a particular region (zone) of the country. Team Scores are grouped
and totaled by LSC.
If your organization is running a Zone meet, all the entries would still be declared for the swimmer's
team but you would use their LSC code to group them together for scoring purposes. Just make sure
all of the entries have a Team code that also includes an LSC code for that team. To group the Team
Scoring by LSC, choose Reports / Scores and click on the By LSC radio button in the Grouping panel
at the bottom right of the menu. MM will rank each team within the LSC grouping and then total the
points so that each LSC will have a total point score.
250
Copyright©Sports-Tek Software
MEET MANAGER for Swimming
Setup and Run Diving
MM is setup to handle the standard High School and College Diving events for 1 Meter, 3 Meter, and
Platform. You set up the appropriate events, specify who is diving, enter the diving points, and MM will
rank and score the Divers. HY-TEK's MM also supports running a complete Diving Meet by importing
Results and Exporting Entries to eDive.
Here are the steps to follow to run the Diving portion of your meet.
1. Click on Events from the Main Menu Bar and then click on the Add Events buttons; you can
specify either 1 Meter, 3 Meter, or Platform as an event under the Stroke column. You may also
specify the number of rounds - 1, 2 or 3 rounds for Diving.
2. To declare an Athlete in a Diving event, click on Athletes from the Main Menu Bar and highlight
the athlete you are choosing, Then use the Athletes Browser to pick the Diving event. Or if this is a
new Athlete, click on the Add Athletes button and enter the Diver's name, team, etc. and then
specify that he/she is entered in a specific Diving Event. Since there are no "entry times" in Diving,
MM will default to an Entry time of NT.
3. Seed the Diving Event by clicking on Seeding from the Main Menu Bar and then pick the Diving
event(s) and click on Start Seeding. "Seeding" in Diving means to assign a random order for the
participants to make their dives. Therefore, the result of Seeding a Diving Event is not a Heat and
Lane assignment as in Swimming events, but a Rank Order to actually make the dives for a
specific round.
4. After the Divers have been assigned a diving order, click on Run from the Main Menu Bar and pick
a Diving event. Then enter the diving scores for each Diver in the format xxx.xx or xxxxxx.
Examples of diving scores are "113.5", "11350", "114.00". Now click on the Score or List button
and MM will rank the diving results accordingly.
If your meet requires 3 Rounds for Diving and you want to "cut" divers for each round, please check
out the following procedure.
Set up the event to be 3 rounds (prelims/semis/finals). The cut count after prelims is set by the
number of lanes for prelims times the number of heats for semis, so if you want 12 for the 1st cut,
make it 2 heats for semis and 6 lanes for prelims. If you are cutting to an odd number like 11, let it
seed 12 and then scratch the 12th person out by double clicking his/her name in the Preview
Menu. The number to cut to for finals is determined by the number of lanes in finals times the
number of heats in finals.
251
Copyright©Sports-Tek Software
MEET MANAGER for Swimming
Reports Menu
From the Main Menu Bar, click on Reports to display the Reports Menu List as shown below. You
may want to review Report Preferences from the Set-up screen to custom various report setup
options.
When your report is displayed on screen you will see a tool bar like the one below where you can print,
change the printer setup, or export to various formats:
Preview Screen Tool Bar
The Preview Screen Tool Bar is displayed on the top of each report's Preview Window.
Click on the "X" on the upper right side of the window to close the Preview Window.
The left and right arrows allow you to move one page to the left or one page to the right.
252
Copyright©Sports-Tek Software
MEET MANAGER for Swimming
These left and right icons allow you to move to either the first page or the last page.
Click on the Printer icon to actually start printing the report. You will be given the option to
print the current page or a specific set of pages for each report - for example, print only
pages 11-14.
Click on the Export Report icon to export your report to various formats such as Adobe
Acrobat pdf and Microsoft Word doc files.
Click Here for details on how to export to pdf, Word, and other formats.
Click on the Preview Sizing arrow to resize the Preview Window based on a percentage.
It is highly recommended that you NOT use Dot-Matrix printers for reports because the true type fonts
will cause the printer to print very slowly. Using a Dot-Matrix for entry cards and labels should print
quickly as there are specific choices for dot-matrix printers. If you are using a Dot-Matrix printer to
print Entry cards, please set up that printer as your default printer in Windows. To do this, click
on the Windows Start button, then Settings then Printers. Now double click on the Dot-Matrix printer
and then click on the Printer pull-down and click on Set Default.
If you have problems printing on the Dot-Matrix printer, please go to your printer vendor's web site and
download the latest printer driver. Please note that Windows NT does not have drivers for many of the
older Dot-Matrix printers.
Export Results
Any of the above report formats can be exported to products like Microsoft Word, Excel or in a
standard comma delimited format.
MM also provides you the option of exporting Results in other formats as described below.
AP News
Click on this Radio button and MM will export the results in the official AP News format, great for
providing results to Newspapers.
Flat HTML
Click on this Radio button and MM will export the results in a standard Single Column Flat HTML
format for posting on the Internet. This is the preferred HTML format.
Report Exports
After a report is displayed on screen, you have options for exporting the report to various formats. The
PDF export works really well and gives you an exact replica of the report. If desiring to export a report
to Microsoft Word for purposes of editing, select Microsoft Word - Editable (RTF). You will not be
able to edit in MS Word if you use any of the other exports as the formatting will be unusable. When
desiring to edit a Meet Program report, there is a special RTF Export check box which must be used
which creates a specially formatted report which exports nearly perfectly when selecting the Microsoft
Word - Editable (RTF) format.
253
Copyright©Sports-Tek Software
MEET MANAGER for Swimming
You can click on the Export Report icon
window:
which looks like an envelope. This brings up the following
Leave the Destination as Disk File. When you click on the Format combo box, the following options are
available:
Select the format and then click Ok on the Export window shown above. You then are directed to pick
a directory/folder for the file to be copied to. The save to folder will always be My Documents. A sample
window is shown below where you can rename the file. In this case it is a pdf from the Events Report.
254
Copyright©Sports-Tek Software
MEET MANAGER for Swimming
Memorized Reports
From the Main Menu Bar, click on Reports / Memorized and MM will display the Memorized Reports
menu screen.
· To add a report to the Memorized Reports List, you click Memorize at the top of any of the eligible
Report Types or Label Types listed below. At the top of any of these report or label types, you can
also click the Memorize Report icon
.
· Select a report Name and click the Run Report icon
.
· To filter the Report Names list, select any one of the Report Types or Label Types at the right.
· To permanently delete a report from the list, select the report and click the delete icon
255
.
Copyright©Sports-Tek Software
MEET MANAGER for Swimming
Administrative Reports
From the Main Menu Bar, click on Reports / Administrative and there will be the following
Administrative Report choices:
DQ Codes List
· The DQ Code List displays the DQ codes and DQ descriptions used by MM when a DQ is assigned
to a result. There is an option to exclude the two character DQ code. There are three different DQ
Code sets depending on whether you have selected HY-TEK DQ Codes, FINA DQ Codes, or UKASA DQ Codes in the Meet Set-up.
256
Copyright©Sports-Tek Software
MEET MANAGER for Swimming
Award Counts
· The Award Counts report can help you in determining how many awards to order for the meet. For
relays, it figures that you will need 4 awards per relay. Swim-off and Time Trial events are excluded
from the counts. The report will indicate whether the maximum number of awards is listed or whether
it is using the actual entries to count the awards.
PDF Forms
· The PDF Forms Menu will list all pdf documents found in the MM install directory under the folder
PDFForms. Just select the form from the combo box, click Create Report and the pdf document will
be displayed if you have Adobe Acrobat Reader installed on your computer. Once displayed you can
print the document.
· The pdf folder initially starts out with several USA Swimming pdf documents. You can place any pdf
documents you wish in the PDFForms folder.
257
Copyright©Sports-Tek Software
MEET MANAGER for Swimming
Events Report
From the Main Menu Bar, click on Reports / Events and MM will display the Event Reports menu
screen.
Event List
· The Event List is a 2 Column Event List with optional Entry Counts, Heat Counts, and Expanded
Multi-ages.
· The Expanded Multi-ages is a great feature for Masters Meets to get an estimated Medal count.
Detailed Event List
The Detailed Event List is a single column report with more information about each event including
Entry Fees, Event Status, and how finals are setup.
Event Comments
The Event Comments report provides a list of the Event Comments / Sponsors that you have entered
in the Events Menu.
Filters and Sorts
· You can filter the reports by Gender and by Age. For example, you could print a list of all the Boys
11-12 events.
· All three report types can be sorted by Event Number or by Age Group.
258
Copyright©Sports-Tek Software
MEET MANAGER for Swimming
Teams Report
From the Main Menu Bar, click on Reports / Teams and MM will display the Teams Report menu
screen.
· For each report you have various filters and sort options.
· Use the Exclude Teams With No Athletes to shorten your list of teams.
· You may filter any of the reports by Region or Division. You declare a Team's Region and Division
when you first Setup a Team.
· The sort is by team name, team abbreviation, or by team size. The team size feature is especially
useful for USA National Masters meets.
Team Rosters
· Basic: This is a basic single column report that displays the team abbreviation, the full team name,
and the short team name.
· Column: This is a two column report that displays the team abbreviation and the full team name
only.
· Athlete / Entry Count by Team: This is a statistics report that displays in columns the team
abbreviation, the full team name, the number of female athletes, the number of male athletes, the
total number of athletes, the number of individual entries, the number of relay entries, and the total
number of entries for each team.
· Athlete / Entry Count by Country: This is the same statistics report format as the one computed by
team, but instead looks at the "Citizen of" country for each athlete for the athlete count and the
number of individual entries and looks at the country code for each relay team's team to get the relay
entries count. The report is listed by country instead of by team and can be sorted by country or by
number of athletes per country. The By Country check box is not available for the Basic or 2 Column
Format.
Entry Fee Summary
· The Entry Fee Summary provides a simple report of what each team owes or what each athlete
259
Copyright©Sports-Tek Software
MEET MANAGER for Swimming
owes.
· You can specify an Athlete Surcharge, a Team Surcharge, and a Facility Surcharge. MM will use
the surcharges and the meet entry fees you set up for each event and provide a Meet Entry
Summary Report for each Team.
· There are several other options that will change how the entry fees are calculated. You can include
or exclude Scratches, Relay Only Alternates (5th through 8th slots), and Exhibition swims.
· You can even include each athlete's detailed fee summary by clicking on the Include Athlete
Names check box.
· The Separate Page Each Team allows you to provide a simple fee sheet summary to each team.
Contacts / Address List
· For the Contacts and Address List, you a number of choices as to what to include as illustrated
below.
Athlete Rosters Report
From the Main Menu Bar, click on Reports / Athlete Roster and MM will display the Athlete Roster
Report menu screen.
· To Memorize a given set of report settings, click Memorize or click the Memorize con
, provide a
name for the memorized report, and the settings will be saved to the Memorized Reports Menu.
· You may filter the reports by gender, athlete age range, Division, or pick one team. For example, you
could provide the coach for the FAST Swim Team a Roster List of all 13-14 girls; or provide the
coaches in the Southeast Division a list of all of their Athletes.
· The sort is by athlete last name or by athlete age.
260
Copyright©Sports-Tek Software
MEET MANAGER for Swimming
Athlete Rosters
· Basic: This is a single column report with athlete name, team, LSC if US, gender, and age.
Competitor number is optional.
· 2 Column: This is a two column report using a smaller font and contains the same information as
the Basic Report Type.
· Detailed: The detailed report is a single column report that provides more detail on each athlete
such as birth date, registration ID, and entry counts.
· For USA Swimming National Meets, HY-TEK recommends printing the Basic report, sorted by
Team, Include Team Addresses and Include Coaches' names.
· You may customize any of the above three formats further to include items like Scratches or
Alternates in Entry Counts and the Competitor #.
· Click on the Relay Only Athletes radio button to get a list of athletes that are either not entered in
an Individual event or are on a Relay.
· Click on the No Splash Athletes to get a list of swimmers who did not compete either in an
Individual event or in a Relay event. The No Splash Athletes report would be created at the end of a
meet. It includes athletes who were not entered in any events at all or who were entered, but
Scratched or No Showed for all individual events and did not swim any legs in a relay event (note,
the athlete may be listed as an alternate (5th-8th relay slot), but this does not count as a Splash. See
also the Exceptions Report choice for listing No Splash Athletes.
4 Column Roster
· Compact 4 column format with just athletes' Names and Ages and optionally the competitor
number.
· For USA Masters National Meets, HY-TEK recommends printing the 4 column format.
261
Copyright©Sports-Tek Software
MEET MANAGER for Swimming
Address List
· Address List format sorted by Full Team Name or Postal Code.
Session Report
From the Main Menu Bar, click on Reports / Sessions and MM will display the Sessions Report menu
screen.
· After you have set up your Sessions and set up your schedule of events within each session, you will
want to print a list of the information about each Session so that you can post it with or without a
Time-Line. Click Here to find out How To Set up a Session schedule.
· Pick one or more sessions from the Session List by clicking the first column check box.
· Customize your report by checking the appropriate items below.
· If you are printing multiple sessions, you may want to select Separate page each session.
· If you are combining events, you may also want to Exclude events with no entries.
· To include the meet qualifying times with each event, check the Include Qualifying Times check
box. If an event is multi-age group, it will split the event to show the qualifying times for each age
group.
· The Flat HTML choice creates an HTML file instead of a report. This format is a very clean and
simple style that is easy to read and to upload to a web site.
· If you check the box for Include Team List, along with each session will be a list of teams in the
session and the number of athletes and entries for each team. This will be helpful in allocating warmup lane space.
262
Copyright©Sports-Tek Software
MEET MANAGER for Swimming
Time-Line
A time-line is created with the session report if Include event start times is checked.
· The time-line is based on the start time for the session and the Interval between heats for each
session. It also uses any "breaks" that were setup in the session schedule.
· Click on the Each Event Run in two Pools check box and MM will calculate the Time Line for a
double ended pool by assuming that each event is divided amongst two pools. This is most effective
when odd heats are swum in one pool and even heats in the second pool.
· This Report will also display the Number of Swimmers in each session for the purpose of Warm-Ups
as well and the total number of Entries and Heats for the Session. The Session Report also shows
projected heat count for events that are unseeded. These unseeded counts are indicated with a "u"
after the number of heats - for example 4u for 4 heats.
· For unseeded events, MM will use all entry times for a particular event to compute an average time
to use for the Time-Line computation. If all the entry times are NTs, MM will use a canned value
based on the stroke, age, and distance of the event.
· For seeded events, the time-line will be very accurate since it is based on the longest entry time for
each heat plus the session heat interval and any scheduled breaks.
· Please remember, the time-line is an estimate and does not include False Starts and other
unexpected events that may hold up the meet.
· If your time-line is too long for a given session, you can use the Apply Scratch Factor to Unseeded
Events percentage to see how much the time-line changes if for example there is a 10% scratch
factor.
Records Report
Records can be entered by keyboard or can be imported - click on Setup and Use Records to see
how to do either.
263
Copyright©Sports-Tek Software
MEET MANAGER for Swimming
In order to print a report of records that you have entered, click on Events from the Main Menu Bar and
then click on the Records icon. MM will then proceed to load up the Records browser with the
records that you have previously keyed or imported.
You have the option to filter the Records Report as follows:
Filter by Event Gender - Male/Female/Both
Filter by Age Range - For example, print the records for the 11-12 year olds.
Print the Records for ALL tags or highlight a specific record name. For example, you may have set
up records for the Meet, Regional, and State but only want to print the Sate records.
You also have the option to Sort the report by Event Number or by Age Group and then Stroke and
Distance within that Age Group. Click on the Create Report button to begin formatting and printing the
report.
Time Standards Report
Time Standards can be entered by keyboard or can be imported - click on
Setup and Use Time Standards to see how to do either.
In order to print a report of Time Standards that you have entered, click on Events from the Main
Menu Bar and then click on the Time Standard icon. MM will then proceed to load up the Time
Standard browser with the Time Standards that you have previously keyed or imported.
You have the option to Sort the report by Event Number or by Age Group and then Stroke and
Distance within that Age Group. Click on the Create Report button to begin formatting and printing the
report.
Entry Lists Report
From the Main Menu Bar, click on Reports / Entry Lists and MM will display the Entry List Report
menu screen.
· The Entry List Report includes a list of events each Athlete and Relay is swimming.
· The report can contain Entry Times or just event numbers for a more compact report.
· There are 4 Report types. The first 3 are really methods of sorting.
1. By Team: The report is sorted by Full Team Name with each team's athletes sorted according
to one of the three sort choices of alphabetical, by age, or by last entered. If relays are included,
they follow at the end of each athlete list.
2. By Abbr: This the same report as By Team, except that it is sorted by the team abbreviation.
3. By Athlete: This report is sorted by athlete according to the Sort choice regardless of team and
if relays are included, all relays for all teams are listed at the end of the athlete list.
4. Split Sheets: This provides the coaches a split sheet for all athletes on a given team. There are
several options for this report as shown in the window below.
· If By Athlete is selected, you can enter a number for Athletes per page.
1. Enter "1" to list one Athlete per page.
2. Enter "2" to list two Athletes per page.
3. Enter "3" to list three Athletes per page with the format of three 3x5 cards.
· To Memorize a given set of report settings, click Memorize or click the Memorize con
, provide a
name for the memorized report, and the settings will be saved to the Memorized Reports Menu.
264
Copyright©Sports-Tek Software
MEET MANAGER for Swimming
· If you choose 2 or 3 athletes per page and click on the Show Check-in Req box, MM will let you add
a message to be displayed with each athlete's entry, such as "Please check-in 30 minutes before
each event".
· You can customize the items you want included in the report. For example, you may want to include
Scratches and 1st round alternates (2nd round qualifying alternates are not included), but only
include Athletes and no relays. You may want to include or exclude the heat/lane, each athlete's
birth date, and/or each athlete's Registration ID.
· You may also filter what is included in the report by Team, Gender, and Age Group. For example,
the coach for the FAST Swim Team may want to see the entries for the 11-12 Girls only.
265
Copyright©Sports-Tek Software
MEET MANAGER for Swimming
Psych Sheets Report
From the Main Menu Bar, click on Reports / Psych Sheets and MM will display the Psych Sheets
Report screen.
· A Psych Sheet Report is simply a list by event of entries or relays that have been entered in each
event, sorted Fast to Slow, Slow to Fast, or Alphabetically. The alphabetical sort is useful as a
Check-In report for a specific event.
· The Event List can be filtered by gender, event age range, one team or all teams, round, and
individual versus relay events. For example, you might want to look at only the Male Events for the
first round (Prelims or Timed Finals).
· To make room to show more events in the list, you can hide the filter choices by clicking the View
icon or by clicking View / Show/Hide Filters.
· To Memorize a given set of report settings, click Memorize or click the Memorize con
, provide a
name for the memorized report, and the settings will be saved to the Memorized Reports Menu.
· The Flat HTML choice under columns creates an HTML file instead of a report. This format is a very
clean and simple style that is easy to read and to upload to a web site.
· The RTF Export choice under columns is used when you want to export the Psych Sheets or Meet
Program to MS Word for editing. RTF means Rich text Format. The procedure is to select Single,
Double or Triple Column, check the RTF Export box and create the report on screen. Next you click
the Export icon at the top of the report and select 'Microsoft Word - Editable (RTF)'. If you have
selected double or triple column, the report will be displayed in single column with the proper column
width and thus the export in RTF format will be single column. The RTF Export takes into account
the paper size and thus adjusts the column width depending on whether letter, A4 or legal is selected
in MM's Report Preferences. When you open the RTF with MS Word, edit the single column to clean
up anything that looks incorrect. Then change the MS report Format to two or three column as
appropriate and adjust the space between columns as well as the margins for better appearance. If
simply printing a Psych Sheet, do not check the RTF Export.
· Click 1 Event Per Page to start each event list on a new page.
· Click Double Space to add a blank space under each entry listed.
· Click Show Ranks to show the actual rank within the event if slow to fast or fast to slow is selected
for Sort Order. Show Ranks will show tied entries such as two athletes with the 8th fastest time both
being listed 8th and the next athlete being 10th.
· Click Multi-age Split if you want the list separated by age groups for events that are setup with
Multi-Age Groups. If Show Ranks is also selected, an entry might be ninth in the overall event list,
but ranked first in athlete's age group.
266
Copyright©Sports-Tek Software
MEET MANAGER for Swimming
Include in Psych Sheet
· Regardless of whether you choose the 1, 2, or 3 column layout or the Flat HTML, there are number
choices for what to include or not include as shown in the panel below. One to take note of is the
Logos in Footer option. Refer to the logos setup for details on setup of logos.
267
Copyright©Sports-Tek Software
MEET MANAGER for Swimming
Filters / Sort Order / Options
· The Filters choices are handy for getting specific counts on different types of entries. You might want
to know how many alternates or how many bonus entries there are in each event.
· The Sort Order for listing entries gives you three choices. If Alphabetical is chosen, Show Ranks is
ignored if also selected.
Meet Program Report
From the Main Menu Bar, click on Reports / Meet Program and MM will display the Meet Program
Report screen.
· A Meet Program Report is a heat sheet that generally is printed by session in the order of the
session schedule independent of the event number.
· The Event List can be filtered by gender, event age range, one team or all teams, round, and
individual versus relay events. For example, you might want to look at only the 11-12 Male Events for
the first round (Prelims or Timed Finals).
· To make room to show more events in the list, you can hide the filter choices by clicking the View
icon or by clicking View / Show/Hide Filters.
· The Flat HTML choice under columns creates an HTML file instead of a report. This format is a very
clean and simple style that is easy to read and to upload to a web site. When creating a Flat HTML
file one event at a time, each file is given a default name which matches the file named used by the
Real-Time Results (part of the Pro option). This means you can create a set of default files for the
Real-Time results to be either Psych sheets or Heat sheets. You would have to upload these files
manually - please refer to the Pro Option. However, Real-Time Results has a feature whereby you
can upload all the Heat Sheets and Psych Sheets with one mouse click.
· The RTF Export choice under columns is used when you want to export the Meet Program or
Psych Sheets to MS Word for editing. RTF means Rich text Format. The procedure is to select
Single, Double or Triple Column, check the RTF Export box and create the report on screen. Next
you click the Export icon at the top of the report and select 'Microsoft Word - Editable (RTF)'. If
you have selected double or triple column, the report will be displayed in single column with the
proper column width and thus the export in RTF format will be single column. The RTF Export takes
into account the paper size and thus adjusts the column width depending on whether letter, A4 or
legal is selected in MM's Report Preferences. When you open the RTF with MS Word, edit the single
268
Copyright©Sports-Tek Software
MEET MANAGER for Swimming
·
·
·
·
column to clean up anything that looks incorrect. Then change the MS report Format to two or three
column as appropriate and adjust the space between columns as well as the margins for better
appearance. If simply printing a Meet Program, do not check the RTF Export.
The Referee format is a special heat sheet format where the heats are NOT listed by lane, but
rather by time fastest to slowest.
The Ignore Psych check box is used to ignore the Psych Sheet designation defined in the Session
Setup. After seeding an event, this enables you to avoid having to go back to the Session Menu to
change the Report choice from P (Psych) to H (Heat) so that the heats will be printed instead of the
psych list.
If Ignore Psych is not checked and Sessions have some events setup to show the Psych Sheet
instead of the Heat Sheet, then Psych Multi-Age Split check box is applied if you want the age group
ranges listed separately within the entry list.
Depending on whether you pick 1, 2, or 3 columns, the team name used will vary. For example, on 3
column reports, the Team Abbreviation is usually used. If you select the 2 column Report format and
no Time STDs, MM will use the Short Team Name instead of the Team Abbreviation. If no Short
Team Name was entered when your Team was set up, MM will use the Team Abbreviation.
· To Memorize a given set of report settings, click Memorize or click the Memorize con
, provide a
name for the memorized report, and the settings will be saved to the Memorized Reports Menu.
269
Copyright©Sports-Tek Software
MEET MANAGER for Swimming
Include in Meet Program
· Regardless of whether you choose the 1, 2, or 3 column layout or the Flat HTML, there are number
choices for what to include or not include as shown in the panel below.
· If you choose the double column format and then pick time STDs and a Line for Results after the
Seed time, MM will display the Time STDs above each event but will print the line after the Seed
time, and will not print the Time STD designator.
· Round 1 Alternates are those designated as an alternate for the event, but are not seeded in the
first round whether it be Timed Finals or Prelims of a Prelim/Final event.
· Qualifying Alternates are those that are alternates for the second or third round, usually the next
two fastest entries advancing to semis or finals.
· Click on Separate A/B finals to group on the A finals together and then all the B Finals. This feature
is used for many Canadian Championship meets and only works correctly if the events are set up
with 2 finals and with A - Final, B - Final Style selected.
270
Copyright©Sports-Tek Software
MEET MANAGER for Swimming
· One option to take note of is the Logos in Footer option. Refer to the logos setup for details on
setup of logos.
Psych List - Sort Order
· If Ignore Psych is not checked and Sessions have some events setup to show the Psych Sheet
instead of the Heat Sheet, then events that are to have a psych list can be sorted either fast to slow,
slow to fast, or alphabetically.
Check-In Report
From the Main Menu Bar, click on Reports / Meet Check-In and MM will display the Meet Check-In
Report screen.
· The Check-In Report is an alphabetic list of all athletes in a particular gender and age group with an
indication of what events they are swimming. The Check-In Report is used generally for meets in
which a positive check-in is required. For example, it may be required that each athlete "check in"
at least 30 minutes before an event is scheduled to start. This positive check-in requirement
assures the fewest open lanes from No Shows. After Check-In closes for an event, the computer
operator scratches the athletes that did not check in and then seeds the event and prints the Heat
Sheet. This type of meet is also know as a "card less meet".
· Relays are included, but only if an athlete is listed in a relay in positions 1 thru 4. In addition, relays
are only included if you have Sessions setup that include the relay events.
· The Event List can be filtered by gender, event age range, one team or all teams, round, and
individual versus relay events. For example, you might want to look at only the 13-14 Female Events
for the first round (Prelims or Timed Finals).
· To make room to show more events in the list, you can hide the filter choices by clicking the View
icon or by clicking View / Show/Hide Filters.
· Choose how you want the athlete to "check in", that is by writing his/her initials on a line or circling an
"X", event number, or Heat/Lane under the appropriate Event column.
· You can customize the report by requesting that the full event descriptions be printed at the top of
each page, the report be double spaced, or each Age Group be printed on a separate page.
· You can select One Event per Page or One Team per Page format.
· The Check-in Report can also be created with spreadsheet lists By Team with each team on a
separate page. The columns of the spreadsheet that will be created will be in event number order
271
Copyright©Sports-Tek Software
MEET MANAGER for Swimming
unless you check the box Columns in Session Order and then the columns will be in the actual
order of the session.
· If you have a large meet and have check in tables set up by last name range, such as A-G, H-N, and
O-Z, then use the Last Name Alphabet Range to filter the report to a given alphabet range. You
would create three reports for each check-in report by changing the alphabet range at the bottom of
the menu.
· You may also want to use the Psych Sheet Report sorted alphabetically to post as a Check-In
Report for one specific event.
· To Memorize a given set of report settings, click Memorize or click the Memorize con
, provide a
name for the memorized report, and the settings will be saved to the Memorized Reports Menu.
272
Copyright©Sports-Tek Software
MEET MANAGER for Swimming
Lane/Timer Sheets
From the Main Menu Bar, click on Reports / Lane/Timer Sheets and MM will display the Lane/Timer
Sheet Report screen.
· After you have completed your Entries, you may want to print Lane/Timer Sheets so that your meet
watch times may be recorded and passed on the administrative referee or computer person who is
273
Copyright©Sports-Tek Software
MEET MANAGER for Swimming
helping with the meet.
· The Event List can be filtered by gender, event age range, one team or all teams, round, and
individual versus relay events. For example, you might want to look at only the 13-14 Female Events
for the first round (Prelims or Timed Finals).
· To make room to show more events in the list, you can hide the filter choices by clicking the View
icon or by clicking View / Show/Hide Filters.
· There are four Format choices:
1. Continuous means no page breaks for lanes or events. If you choose this option, you can enter
a number such as 4 for # Events Break for Continuous to say how many events you want on a
page before each page break so as to prevent an event spanning the bottom of one page and
the top of the next page. Without this, there is no good time to pick up the lane timer sheets at
the end of an event.
2. 2 Events or Lanes per page.
3. 1 Event per page per Lane.
4. UK Judge's Placing Sheet - select this format for meets in the United Kingdom so that the finish
judge can indicate the place/finish of each lane in every heat.5.
· You also have the option of printing this report for only Odd or Even numbered heats – this is a
great feature for double-ended meets in which the Odd heats are swimming at one end and Even
heats are swimming in the other end.
· Depending on how you want the report sorted, you can choose by Lane then Event, by Event and
then Lane, or by Session Order then Lane. For example, you might want to print Lane/Timer Sheets
in the 2 lanes per page format and include the Entry Times and sort it by Lane.
· If you check the box that you are using a timing system with touch pads, the final column will have a
check box to verify whether the touch was a soft pad touch or not. If you do not indicate that you are
using touch pads, then the final column will be for the Official Time which is usually the average of
the watch times.
· To Memorize a given set of report settings, click Memorize or click the Memorize con
, provide a
name for the memorized report, and the settings will be saved to the Memorized Reports Menu.
274
Copyright©Sports-Tek Software
MEET MANAGER for Swimming
Warm-Up Sheet Report
From the Main Menu Bar, click on Reports / Warm-up Sheet and MM will display the Warm-up Sheet
Report menu screen.
· After you have set up your Sessions and set up your schedule of events within each session, you
may want this report to list the pool warm-up schedule for each session. Click Here to find out How
To Set up a Session schedule.
· Pick one or more sessions from the Session List by clicking the first column check box.
· Customize your report by checking the appropriate items above.
· Enter the number of minutes for the warm-up - this information will be displayed at the top of the
Warm-up Sheet.
275
Copyright©Sports-Tek Software
MEET MANAGER for Swimming
· If you are printing multiple sessions, you may want to select Separate page each session.
· Use the Exclude events with no entries to create a more compact report.
· The Flat HTML choice creates an HTML file instead of a report. This format is a very clean and
simple style that is easy to read and to upload to a web site.
Results Report
From the Main Menu Bar, click on Reports / Results and MM will display the Meet Program Report
screen.
· Results can be printed from this menu or from the Run Screen when you use List or Score Event.
· The Event List can be filtered by gender, event age range, one team or all teams, one LSC or all
LSC's, round, and individual versus relay events. For example, you might want to look at only the 1314 Female Events for the first round (Prelims or Timed Finals).
· To make room to show more events in the list, you can hide the filter choices by clicking the View
icon or by clicking View / Show/Hide Filters.
· The Flat HTML choice under Report Type creates an HTML file instead of a report. This format is a
very clean and simple style that is easy to read and to upload to a web site. Team Scores are
included if desired.
· The Results by Heat format groups results by Heat and the Place within each heat - this is a
commonly used feature in Summer Leagues.
· The Dual Meet Format is only available when the Meet Style in Meet Setup is set to either to 2
Team Dual or 3+ Team Double Dual. For each dual meet pairing selected in
Setup / Entry/Scoring Preferences / 2 or 3+ Dual, the results will be printed with one team on the left
and one team on the right and mimics the result sheet used by most High Schools and Colleges
where there is a running team score. If there is a 3 team double dual with men and women, 6 sets of
results can be printed instantly, one for each dual meet.
· The AP News report type is a standard semi-colon delimited AP News format which is great for
providing results to Newspapers. Team Scores are included if desired. There are two formats
276
Copyright©Sports-Tek Software
MEET MANAGER for Swimming
available.
· The British Ranking report type is an export to several text files in the standard British Swimming
required format. Only one session at time can be chosen for this export.
· Depending on whether you pick 1, 2, or 3 columns, the team name used will vary. For example, on 3
column reports, the Team Abbreviation is usually used. If you select the 2 column Report format and
no Time STDs, MM will use the Short Team Name instead of the Team Abbreviation. If no Short
Team Name was entered when your Team was set up, MM will use the Team Abbreviation.
· MM will print Results Indicators J, X, or x in front of result times to indicate a Judges Decision, an
Exhibition result, or a result that is not eligible for scoring.
· When choosing the Double Column format, the short team name will be used if you elect not to
show time standards or team points. If the short team name is blank, the team abbreviation will be
used.
· To Memorize a given set of report settings, click Memorize or click the Memorize con
, provide a
name for the memorized report, and the settings will be saved to the Memorized Reports Menu.
Include in Results
· Regardless of whether you choose the 1, 2, or 3 column layout or the Flat HTML, there are number
choices for what to include or not include as shown in the panel below.
· If you choose the double column format and then pick time STDs and a Line for Results after the
Seed time, MM will display the Time STDs above each event but will print the line, not the Time STD
277
Copyright©Sports-Tek Software
MEET MANAGER for Swimming
designator, after the Seed time.
· Click on Separate A/B finals to group on the A finals together and then all the B Finals. This feature
is used for many Canadian Championship meets.
· If Special Points are selected, then Time Stds cannot be selected. It is one or the other. Check the
Spec Pts box to use the special points selected in Setup / Entry/Scoring Preferences section,
such as HY-TEK Points.
· The Entry Times check box applies to seed times if first round; prelim times if semis or finals of 2
round; semis if 3rd round.
· Check the "Prior Results (1 col only) check box to include prior round results for each athlete or relay
that did NOT swim in Finals. This is important for showing the points scored from a prior round when
an event is setup to score prelims as an extended final.
· The Points check box is for the points scored by a given individual or relay and if checked will
display next to the time.
· Team scores can be displayed in one, two, and three column results reports as well as in exports in
Flat HTML or AP News format. There are three choices for team scores on what to include:
Combined, Male, and/or Female scores. These scores will be the total through the highest event
number selected in the list of events for creating the results report. If only event 10 is selected for
creating a report, the scores will be the total through event 10. If the meet is Divisions by Event, you
have the option to combine all division's team scores by checking Combine Divisions. Otherwise a
set of scores will be listed for each division.
· If Button Backups is checked, the report will include the result time and the 3 button backup times (or
watch times) in place of the entry time. This is only available for single column. Splits can be shown,
but not with cumulative plus subtracted splits. This report is mainly used for proofing the results to
verify the backups match the result time.
· Important Note: If Top How Many has been set to a number, the results will never include DQ's or
No Shows. To show DQ's and No Shows, the Top How Many box must be blank.
· One option to take note of is the Logos in Footer option. Refer to the logos setup for details on
setup of logos.
Splits / Sort Order / Selected Teams
· There are five choices for splits:
1. None
2. Cumulative or "Running" splits - 29.37, 1:00.13, 1:30.59, 2:01.11
3. Subtracted splits - 29.37, 30.76, 30.46, 30.52
4. Legal splits - 29.37, 1:00.13, 2:01.11 for the 50, 100, 200 of a 400. This option for a backstroke
event may not be "official" if the backstroke turn was not a legal finish.
5. Cumulative / Subtracted splits show BOTH cumulative and subtracted splits simultaneously.
· There are three sort choices for the events:
1. Event Number Order - Example, events 1, 2, 3, and 4
2. Session Order - Using the events and rounds schedule set up in Sessions
3. Publication Order is sorted by gender, age group, stroke then distance - Example, Girls 10 &
Under 25 FREE, 50 FREE, 100 FREE, 25 back, 50 back, etc. This format is typically used to
publish final results and send to magazines or swim organizations for publication and/or
278
Copyright©Sports-Tek Software
MEET MANAGER for Swimming
distribution.
· There is an option to select only a specific set of teams for results. Click the Selected Teams radio
button and a list of all teams in the database will appear and you can check the ones you want
included in the results. So if you have 20 teams and three of those teams are out of town, you could
create a set of results with only those three teams and conversely a set of results with 17 teams
excluding the 3 out of town teams.
Sample Results Report
279
Copyright©Sports-Tek Software
MEET MANAGER for Swimming
Results Indicators
On results reports, MM will print the following prefixes in front of each result time as appropriate:
· "J" - indicates a Judge's Decision where the place has been changed or the points awarded has
been changed using the JD button from the Run Menu. An example would be J2:35.61.
· "X" - indicates the result is an Exhibition Time either because the athlete has been designated as an
exhibition athlete, the team of the athlete or relay has been designated as an exhibition team, or the
user checked the exhibition check box next to the result in the Run Menu or next to the entry time in
the Athlete Menu. An example would be X2:35.61.
· "x" - indicates that 1) the result time did not meet the Qualifying Entry time for the event or 2) the
entry or relay exceeded the maximum number permitted from one team to score. An example would
280
Copyright©Sports-Tek Software
MEET MANAGER for Swimming
be x2:35.61.
Scores Report
From the Main Menu Bar or from the Run Screen Menu Bar, click on Reports / Scores and MM will
display the Scores Report screen. The Scores report is designed with the following features:
1. Print Team Scores or Individual High Point Scores using the Standard Events you select. See
Scores Report - Standard Events
2. Print Combined Event spreadsheets using the Combined Events you select. See
Scores Report - Combined Events.
3. Print Award labels for High Point winners in Standard Events. See High Point Award Labels.
4. Print Award labels for Combined Event winners in Combined Events. See
Combined Event Award Labels.
5. Score and print Open Water Team Relays using the Open Water events you select. See
Scores Report - Open Water Teams
6. Print Quality Club Team Scores.
Scores Report - Standard Events
From the Main Menu Bar or from the Run Screen Menu Bar, click on Reports / Scores and MM will
display the Scores Report screen.
· Click the Standard Events radio button to display only the Standard Events.
· In order for MM to print any totals from the Reports / Scores menu, the only eligible events are those
that have been scored and have the status of "Scored". Just "Done" events are not included. If real
team points are not being used, then simply set all team points in Setup / Scoring Setup to zero and
in the Run Menu score each event anyway so that the status changes to "Scored".
· Customize your report by choosing from the Gender Choices list. For Team Scores, click on
Combined if Both Score for USA Swimming type meets in which a Team is eligible to score
Combined Team Points ONLY if they have scored points in BOTH gender events. Also see the
Grouping / Options panel at the bottom of this page.
· Click on the Use Athletes Age radio button and then click on the Age Criteria button to request that
MM group Individual High Point Scores according to age groups. If you want swimmers that swamup to be included in their age range totals, click on the Include Swim-up and Senior Events check
box. For example, check this box of you want points included that were scored by any 11-12 year
olds that also swam in 13 & Over or Senior events. You can choose to total Individual High Points
using the standard event points or by using Spec Pts such as HY-TEK Points.
· For British meets, check BAGCATS and check Spec Pts to get totals for Individual Results grouped
by British Age Group Categories. In order to score BAGCATS, FINA Points must be selected in
Setup / Entry Scoring Preferences. According to ASA guidelines, BAGCATS are computed using
first round times only which means only times done in prelims or in timed final events will be used.
Note also that Exhibition swims will not be included in the BAGCAT totals.
· If in the Meet Set-up, you declared the Meet Style as 3+ Double Dual, MM will print Team Scores
based on the team pairings you specified in the Entry/Scoring Preferences section.
· The Flat HTML choice creates an HTML file instead of a report. This format is a very clean and
simple style that is easy to read and to upload to a web site.
· To Memorize a given set of report settings, click Memorize or click the Memorize con
, provide a
name for the memorized report, and the settings will be saved to the Memorized Reports Menu.
281
Copyright©Sports-Tek Software
MEET MANAGER for Swimming
Please Note
You can also include Team Scores with every Event Results Report. From the Run Menu, click on
Preferences then Results for List and Score and select your preference Combined Team Scores or
the Team Score matching the gender of the event. Men's/Boy's Team Scores will be printed after
each Men's/Boy's event and Women's/Girl's Team Scores will be printed after each Women's/Girl's
event when clicking Score Event in the Run. This is a great feature for Dual meets.
From Reports / Results you can also have team scores printed at the end of a complete set of results.
Your choices are Combined, Male, and/or Female scores.
Grouping / Options
· If you want MM to group Team or Individual High Point Scores by Team Regions, click on the By
Region radio button under the Grouping panel and MM will total scores and group and rank them
within each Region. You declare what Region a Team is in when you originally setup the Team. If
you want MM to group Team Scores by LSCs (really regions for USA Swimming), click on the By
LSC radio button under the Grouping panel and MM will total Team Scores and group and rank
them within each LSC. You declare the LSC for a Team in the Teams Menu.
· If you want MM to group Team Scores by Divisions, click on the By Division radio button under the
Grouping panel and MM will total Team Scores and group and rank them within each Division. You
declare what Division a Team is in when you originally setup the Team. This option is only available
282
Copyright©Sports-Tek Software
MEET MANAGER for Swimming
if the Meet Type in Meet Setup is set to Divisions by Event or Divisions by Teams.
· You may also limit the report to show only the Top 10 Individuals or Top 20 Teams, for example, by
entering a number in the List Top How Many text box.
· If individual high point is limited to using only say the best 5 scores for each individual out of all
events entered, enter 5 in the Limit Individual High Point to Best Scores in This Many Events
text box.
· If using Special Points for Team Scores or Individual Scores, you can limit the scoring to only those
who score higher than a given place. To do this, enter a number such as 8 or 16 in the Limit Finish
Places for Points When Using Special Points.
· A new idea in Team Scoring is to use the Quality Club Scoring method which ranks teams by the
average score of each athlete. This method is one way to allow small teams to compete with large
teams. If a team has less than 4 athletes, the team is not included in these rankings. There is a
second option for the Quality Club Scoring and this is to only count athletes who score in an
individual event or in a relay. This option is designed to not discourage teams from entering their
slowest athletes.
· When creating an Individual High Point report, you can check the box to Include point break-out
which shows exactly how the point totals were calculated.
· Check the Separate Pages check box on the Format tab to force each High Point age group or
gender to start on an new page.
High Point Award Labels
From the Main Menu Bar or from the Run Screen Menu Bar, click on Reports / Scores and MM will
display the Scores Report screen.
· Click the Standard Events radio button to display only the Standard Events.
· Click the High Point Award Labels tab and check the Create Award Labels check box.
· Pick your label type and enter the place range for the labels.
· Award Labels are only available for individual high points (not team high points) and will be created
using the same data used to create the Individual High Point Report.
283
Copyright©Sports-Tek Software
MEET MANAGER for Swimming
Scores Report - Combined Events
From the Main Menu Bar or from the Run Screen Menu Bar, click on Reports / Scores and MM will
display the Scores Report screen. A Combined Event is a Pentathlon or Decathlon type event where
there are five or 10 sub-events. To display the Combined Events tab, click the Combined Event radio
button at the top of the Scores Report.
· Clicking the Combined Events radio button displays the Combined Event header Events.
· Each of these Combined Events has from 2 to 10 sub-events assigned in the
Combined Events Menu.
· Select your events from the Combined Event List, select the Points method from the Format tab to
either use Swum Time or Spec Pts, click Create Report and a spreadsheet will be created for each
event. The spreadsheet will contain the results for each sub-event within the combined event. If
Spec Pts is chosen, each event will have a point score based on the Point System selected in Setup
/ Entry Scoring Preferences / Scoring and the athletes will be ranked in the spreadsheet based on
their total score of points. If Swum Time is chosen for Points, then the rankings will be by total time.
· The Combined events spreadsheet is only available for individuals since it adds the points scored or
the times swum in each of the sub-events.
· During the meet, you may want to list the rankings of all athletes regardless of how many events they
have swum and maybe you want to see the rankings after two events. Check the Include NT's,
NS's, and DQ's in rankings to include everyone regardless of how many events each has swum.
Once all events have been swum, then uncheck this check box, and only athletes who have
completed every sub event within the Combined Event will be listed.
· If you are using Swum Time as the method for ranking the Combined Event, you have the option to
include the time that a DQ's athlete swam. Check the Use result time for DQ'd swims if using
total time for rankings.
· If you like for a Prelim/Final type event, you can include the best time from prelims or finals by
checking the Use best time from all rounds check box.
· Note: If one of the Combined Events selected has 8, 9 or 10 events, then the report will be displayed
in Portrait. After the report is displayed, click the Printer Setup icon at the top of the report and
change the printer to landscape and then print.
· The Flat HTML choice under Format creates an HTML file instead of a report. This format is a very
clean and simple style that is easy to read and to upload to a web site.
· To Memorize a given set of report settings, click Memorize or click the Memorize con
, provide a
name for the memorized report, and the settings will be saved to the Memorized Reports Menu.
284
Copyright©Sports-Tek Software
MEET MANAGER for Swimming
Options
There are two options when creating reports for Combined Events.
· Check the Separate pages check box to have each Combined Event's results on a separate page.
· You can reduce the list to say the top 10 by enter 10 in the List Top How Many text box.
From the Main Menu Bar or from the Run Screen Menu Bar, click on Reports / Scores and MM will
display the Scores Report screen.
· Click the Combined Events radio button to display only the Combined Events.
· Click the High Point Award Labels tab and check the Create Award Labels check box.
· Pick your label type and enter the place range for the labels.
285
Copyright©Sports-Tek Software
MEET MANAGER for Swimming
· Award Labels will be created using the same data used to create the Combined Events Spreadsheet
Report.
Scores Report - Open Water Teams
From the Main Menu Bar or from the Run Screen Menu Bar, click on Reports / Scores and MM will
display the Scores Report screen.
· Click the Open Water Team radio button to display only the Open Water Team Relay Events.
· The only option for this module is to select the Separate Pages check box under the Grouping /
Options tab to force each event to start on an new page..
· This module computes the team aggregate relay times by scanning all times in all individual events
with the matching distance. For each relay that is entered using the Relays Menu, the routine adds
the times for the 3 athletes listed with each relay and ranks the teams within each event, showing the
time for each individual and the total time. When this report is created, the team points for relays are
computed shown with the report. At the same time the report is created, the total time and the points
scored are added to the relay database so that team scores can be computed with relays and award
labels can be printed for the relays.
· The Flat HTML choice creates an HTML file instead of a report. This format is a very clean and
simple style that is easy to read and to upload to a web site.
· To Memorize a given set of report settings, click Memorize or click the Memorize con
, provide a
name for the memorized report, and the settings will be saved to the Memorized Reports Menu.
286
Copyright©Sports-Tek Software
MEET MANAGER for Swimming
How to Run an Open Water Meet
Meet Summary Report
From the Main Menu Bar, click on Reports / Meet Summary and MM will display the Meet Summary
Report screen.
· This report is normally printed after the meet has been completed to provide meet results for each
team in a format that it is easy to find each Athlete's results.
· The Meet Summary can also be used to produce statistics for the teams, the meet host, and the
swim organization.
· Pick one Session or All Sessions. Customize how you want the report grouped - by Team with each
team's athletes included under their Team or by Athlete with all of the Athletes listed. You can
specify how you wish the Athletes sorted - alphabetically or by age and you can filter the report by
gender, age group, team, and if you want splits listed as well as the splits format - cumulative,
subtracted, both, or just legal splits. For example, you could request the Meet Summary Report for
the team FAST, Girls 11-12 only with both cumulative and subtracted splits.
· The Athlete Count can be customized to include or not include Athletes with no entries.
· You also have the option of printing a one page Meet Summary Sheet for one specific Athlete.
Just select the 1 Athlete radio button for Report Type and then click on the Pick 1 Athlete tab and
pick the Athlete you want. This is a great report for parents of young swimmers for posting their
meet results on their refrigerator. Some meet hosts even provide a separate computer and printer
and offer this report as a source of revenue - for example, $3.00 per Swimmer!
· To Memorize a given set of report settings, click Memorize or click the Memorize con
, provide a
name for the memorized report, and the settings will be saved to the Memorized Reports Menu.
287
Copyright©Sports-Tek Software
MEET MANAGER for Swimming
Detailed Journal
Click on the radio button to display every athlete with their performance listed including seed time and
up to three rounds of swim times - Prelims, Semi's, and Finals. An "*" will be shown beside the Final
Time if the swimmer improved over his/her Seed time.
Summary Totals
Click on this radio button to provide Summary Totals including number of men and women competing
in the meet, number and percentage of improved times, number of Scratches and No Shows, and
number of Record Breakers. If you select the by Team format, MM will provide these Summary totals
for each Team. If you select by Athletes format, MM will show these totals for the entire meet.
1st Round Scratches
Select this format to display only the athletes or totals for the Scratches that were made in the "1st
round" of the meet.
Record Breakers
Select this format and MM will display a list of Athletes that broke any of the Records setup in the
288
Copyright©Sports-Tek Software
MEET MANAGER for Swimming
records section. If you pick by Athlete, this report will be sorted by Event. If you pick by Team, this
report will be sorted by Team and then alphabetically be athlete name. This report also lists the
Heat & Lane of the swimmer that broke the record so that timing console information can be found to
attach to the record information.
Time Standard Over Achievers
Select this option to list all of the Athletes that swam an "improved" Time STD. For example, a
swimmer that entered the meet with a BB time and swam an A time would be included in this list. Click
on the radio button "Use Blank Time Standards" to include improvement for a swimmer that entered
the meet with No Time STD but swam a time which qualified for a Time STD.
Improved Times Over Seed Time
Select this option to list all of the Athletes that swam faster in the meet when compared with their seed
time.
DQ Summary
This selection creates a list of all DQ's from a particular session or from all events. It will include the
DQ description if DQ codes were entered with the results.
1 Athlete
If 1 Athlete is selected from Report Type, then pick an athlete from the combo box next to the 1
Athlete radio button. This gives you a summary for the one athlete selected and is in a special format.
More Options / Splits
You can customize the Meet Summary reports with the options displayed below. The 1 Athlete per
page check box will cause every athlete to be listed on a separate page just as if you had selected the
1 Athlete radio button and picked one athlete from the combo box.
Exceptions Report
From the Main Menu Bar, click on Reports / Exceptions and MM will display the Exceptions Report
screen.
· This report may be printed before the meet, during the meet, or after the meet has been completed
to provide valuable information about "exception" type conditions.
· Pick one or more sessions you wish this report to cover. For example, you may want to check the
entire meet for athlete age verification but only check max entries for Sessions 1 and 2.
· You may customize how you want the report grouped - by Team with each team's athletes included
under their Team or just by Athlete with all of the Athletes listed.
289
Copyright©Sports-Tek Software
MEET MANAGER for Swimming
· You can specify how you wish the Athletes sorted - alphabetically or by age and you can filter the
report by gender and/or age.
· There is a check box to list each Team's exceptions on a separate page.
· The Exception Report is really many different reports as described below. Just click on the
appropriate tab to select from the many choices.
· The include birth date or registration ID applies to Max Entries, Stds/Qual, and Miscellaneous
reports, but does not apply to Reg Ck or Proof of Time reports.
Max Entries
Exceed Maximum Entries per Athlete:
Specify what you want MM to check:
* Max Entries including Relays
* Max Individual Entries ONLY
* Max Relay Entries ONLY
290
Copyright©Sports-Tek Software
MEET MANAGER for Swimming
MM will then check each Session you specified and compare each swimmer's entry count with the
maximums you specified and include those swimmers in the report who exceed those maximums.
You can choose whether or not to include "*" type entries in this check. Usually "*" entries are those
that are defined to not have a proof of time or are declared as a 6th event for Masters meets. This is
a great Report to run before each session's scratch deadline to alert the coach of a possible max entry
infraction. You can also decide whether to include Exhibitions swims when checking for Max Entries.
Swim-off events are not included in the count.
Exceed Maximum Entries per Team per Event:
Specify how many entries are allowed per team in each event and MM will create a report listed by
team and lists each event and the relay or individual entries for each event that has more than the
number entered in the Maximum entries per team text box.
Stds/Qual
Slower Than the Time Standard:
First, select which Time Standard you wish to use for the check from the Time Standard table in the
Exceptions Report menu. Then choose whether you want MM to use each swimmer's Entry time or
the actual Swum time in the actual comparison with the Time Standard. Then click on this radio
button and MM will check all the sessions you specified to see if the entry or swum time is Slower than
the specified Time Standard.
Faster Than or Equal to the Time Standard:
First, select which Time Standard you wish to use for the check from the Time Standard table in the
Exceptions Report menu. Then choose whether you want MM to use each swimmer's Entry time or
the actual Swum time in the actual comparison with the Time Standard. Then click on this radio
button and MM will check all the sessions you specified to see if the entry or swum time is Faster than
or Equal to the specified Time Standard.
Do Not Meet Qualifying Time:
Click on this radio button and MM will check all the sessions you specified to see if the swimmer's entry
or swum time is Slower than the meet entry qualification time. This is a helpful report to list all the
swimmers that did not swim to the Entry Qualification for the purposes of asking for proof of time for
those swims.
Within Qualifying Time:
Click on this radio button and MM will check all the sessions you specified to see if the swum time is
within meet entry qualification time that was specified for each event. This is a helpful report to list all
the swimmers that did swim to the Entry Qualification of the meet.
Exclude Bonus Entries from the 4 Stds/Qual Report Choices:
From any of the 4 Stds Qual report choices, you can check the box to Exclude Bonus Events. This is
useful where you want to list entries that do not meet a qualifying time, but, by definition, bonus events
do not meet a qualifying time and it does not make sense to include them.
291
Copyright©Sports-Tek Software
MEET MANAGER for Swimming
Miscellaneous
Check Valid Registration ID
· Make this selection and MM will check each swimmer's registration ID using the particular
registration algorithm for building the ID. This is a great report for verifying that each athlete
submitted a correct registration ID for your USA Swimming, Australian Swimming, UK, RSA, NZSF,
or SSA meet.
Ages That Are Not Correct:
· Make this selection and MM will check each swimmer's age with their computed age calculated from
the Meet Age-Up-Date and their birth date.
Check Relay Ages:
· Make this selection and MM will check each swimmers age and gender with the particular relay that
they are on to make sure that they have been assigned to the proper relay age group. This is
particularly important for Masters meets.
Event/Athlete Gender/Age Mismatch:
· Make this selection and MM will list all of the Swimmers whose gender and age do not meet the
event gender and age criteria. This report will also list swimmers who are younger than the
minimum age for Open events that was specified in the Athlete Preferences section. For example,
this report would list all swimmers younger than 15 years old if "15" was specified in the Athletes
Preferences as the minimum age for Open events.
No Splash Athletes:
· Make this selection and MM will list all athletes who did not compete in any event. If an athlete was
entered in one or more events and either No Showed or Scratched all events, the athlete will be
listed as a No Splash Athlete with how many individual events were No Showed and how many were
Scratched. No Show means the athlete was assigned a heat and lane, but did not show up for the
race. A DQ for false start or declared false start does count as a splash.
Individual Event No Shows:
· Make this selection and MM will list all athletes who No Showed for one or more individual events.
No Show means the athlete was assigned a heat and lane, but did not show up for the race. The no
show could be for prelims, semi-finals, or finals. This report is useful in meets where there is a
penalty for not showing up for a race in which the athlete was seeded.
292
Copyright©Sports-Tek Software
MEET MANAGER for Swimming
Reg Ck / Proof of Time
Check Athletes Against External Registration Database
· This feature checks the athletes in the MM Database against a semicolon delimited file that has
been provided usually from a National or Regional Registration database. MM will display a list of all
athletes that do not have a registration number that matches any in the external registration file. It
also checks the gender and team abbreviation for compliance. You can also browse this registration
file by clicking on the Browse Reg File button on the Menu screen for this report. You can sort the
information displayed by ID#, last name, first name, or team abbreviation. You have the option to
check ONLY teams that are in the one LSC included in the Registration database for meets that
have participants outside your LSC.
· The feature is currently implemented for LSCs in the United States using USA Swimming's LSC
Registration software LSCDB for Swimming 1.06a.
· If you wish to use this feature to check registration compliance for other registration IDs supported by
MM, please contact HY-TEK for the format of this registration file.
Check Proof of Time for Athletes in the Meet
· This feature checks the athletes in the MM Database against a HY-TEK HY3 Proof of Time file that
has been exported from a TEAM MANAGER 4 Database that your LSC or your organization has
maintained with the best times from all meets.
· MM checks every entry in the MM database against the Proof of Time file and lists all entries which
cannot be proved.
· You have the option to list all entries that are not an exact match of the time in the Proof of Times
file or to only list those entries which have a time faster than the best time.
· You can sort the report by Event by clicking on the Sort by Event check box or uncheck the box to
sort by Athlete name.
· You can browse this POT Export file by clicking on the Browse POT File button on the Menu screen
for this report.
· You can sort the information displayed by ID#, last name, first name, or team abbreviation.
Record / POP Forms
From the Main Menu Bar, click on Reports / Record/POP Forms and MM will display the Record and
POP Forms screen.
· There are three types of forms that can be printed from this menu: Generic Record Applications,
USA Masters Record Applications, and NCAA POP Forms.
· The Event List can be filtered by gender, event age range, one team or all teams, round, and
individual versus relay events. For example, you might want to look at only the 13-14 Female Events
for the first round (Prelims or Timed Finals).
· To make room to show more events in the list, you can hide the filter choices by clicking the View
icon or by clicking View / Show/Hide Filters.
293
Copyright©Sports-Tek Software
MEET MANAGER for Swimming
Record Application
This selection creates a generic record application for any athlete or relay breaking the selected
record. Click Edit Application Details on the Record Application tab to display the Record Application
Information window that allows you to customize parts of the record application.
294
Copyright©Sports-Tek Software
MEET MANAGER for Swimming
US Masters Record Application
This selection creates a nearly completely filled in record application for each record broken in a US
Masters meet. These same records are listed in the Record Breakers report in the Exceptions Report.
There is a great deal of administrative information on this form and most of it can be pre-entered in the
USMS Record Application window displayed below. To display the USMS Record Application window,
you click Edit Application Details on the US Masters Record Application tab. Select the Record to
use from the records combo box in case there are several record tags setup. If there are events
without records and you check the Include Record Breakers for NT Records, every one in the event
will be considered to have broken the record.
295
Copyright©Sports-Tek Software
MEET MANAGER for Swimming
NCAA POP Forms
· This feature provides the NCAA Division I, II, or III Proof Of Performance Form for USA College
meets for either the NCAA A or B Standard.
· First, pick the standards you plan to use for the POP, which NCAA Division meet you are running,
and whether you are using Automatic, Semi-Automatic, or Manual timing.
· Choose from the report's standard filters such as team or gender. If the altitude is 3,000 feet or
more, enter that in the Meet Set-up.
· Select a session, select one or more events and click the OK button and MM will check each
swimmer's performance, and for each one that conforms to the A or B Standard specified, MM will
print an official POP form to be signed by the swimmer's coach and meet referee.
· You can enter the referee's name and phone numbers and the coach's name and phone numbers
296
Copyright©Sports-Tek Software
MEET MANAGER for Swimming
so that only the signatures will be needed.
Point Systems Report
From the Main Menu Bar, click on Reports / Point Systems and MM will display the Point Systems
Report screen.
· The Point Systems Report is a way of ranking swim performances based on any one of nine point
systems instead of by fastest time in the meet.
· The Event List can be filtered by gender, event age range, one team or all teams, round, and
individual versus relay events. For example, you might want to look at only the 13-14 Female Events
for the first round (Prelims or Timed Finals).
· To make room to show more events in the list, you can hide the filter choices by clicking the View
icon or by clicking View / Show/Hide Filters.
· There are three report formats: by Athlete, by Team, or by Event and within each they may be sorted
by Points or by Name.
· If you check the Compare Point Systems by Event check box, there is a fourth report format that is
by event and is like a spreadsheet where the points for each of 8 point systems that range from 1 to
1000 are displayed with each result and makes for easy comparisons. NISCA points are not included
in this comparison since NISCA points only range from 1 to 200 and are only for short course yards.
If you want a separate page for each event, click the Separate Pages check box at the bottom.
297
Copyright©Sports-Tek Software
MEET MANAGER for Swimming
Results Conversions
From the Main Menu Bar, click on Reports / Results Conversions and MM will display the Results
Conversions Report screen.
· The Results Conversions Report displays actual results with a conversion time for the other two
courses. If the result is in Long Course Meters, the conversion to Short Course Meters and Short
Course Yards will be displayed to the right of the actual time, assuming there is a conversion for
each of the other two courses.
· There are four conversion systems available: MEET MANAGER's system, the U.S. High School
system, the NCAA system, and the British Swimming system.
· MEET MANAGER's system can convert from any course to the other two courses.
· The High School system only converts from Short Course Meters to Short Course Yards and Short
Course Yards to Short Course Meters. There are no Long Course Meters conversions in the High
School system.
· The NCAA College system only converts Long Course Meters to Short Course Yards and Short
Course Meters to Short Course Yards. There is no conversion from Yards to Meters in the NCAA
College system.
· The Event List can be filtered by gender, event age range, one team or all teams, round, and
individual versus relay events. For example, you might want to look at only the 13-14 Female Events
for the first round (Prelims or Timed Finals).
· To make room to show more events in the list, you can hide the filter choices by clicking the View
298
Copyright©Sports-Tek Software
MEET MANAGER for Swimming
icon
or by clicking View / Show/Hide Filters.
Medal Count Report
From the Main Menu Bar, click on Reports / Medal Count and MM will display the Medal Count
Report menu screen.
299
Copyright©Sports-Tek Software
MEET MANAGER for Swimming
· This report should be printed after the meet or during the meet to provide a total medal count for
each team.
· You have the option of filtering this report by Combined, Men, or Women and/or a separate report for
each.
· The report will contain a list of teams with the number of Gold (1st place), Silver (2nd place), Bronze
(3rd place) winners, and so on up to 10th place.
· The report is sorted by the Team winning the most Gold Medals.
· To Memorize a given set of report settings, click Memorize or click the Memorize con
, provide a
name for the memorized report, and the settings will be saved to the Memorized Reports Menu.
Export / Import Files Report
From the Main Menu Bar, click on Reports / Export/Import Files Report and MM will display a
window where you select a file of one of the following three file types:
· HY3: Export files that are created by MEET MANAGER and TEAM MANAGER.
· CL2: Export files that are older file formats created by prior versions of MM and TM.
· SD3: Export files that are created by other software vendors.
Notes:
· Only rosters and meet entries are reported.
· MM only imports SD3 files that are of the meet entry type and so only meet entry SD3 files will be
reported.
· If the file is a results file, only a roster or meet entries report can be created.
After selecting a file, you choose how you want the file reported using the screen below.
300
Copyright©Sports-Tek Software
MEET MANAGER for Swimming
Labels Menu
From the Main Menu Bar, click on Labels to display the Labels Menu:
Award Labels
Entry Cards/Labels
Mailing / Registration Labels
Award Labels
From the Main Menu Bar, click on Labels / Award Labels to display the Award Labels screen.
· Award Labels are designed to be printed on standard one inch Avery labels to be stuck on plaques,
ribbons, certificates, etc. The information on these Award Labels reflects a specific performance by
an athlete or relay in a particular event.
· There are two ways to Setup and print Award Labels
1. From the Award Labels Menu as displayed below.
2. From the Run the Meet Screen while you are running the Meet. There is one click Awards button
choice or a hot key Ctrl-A that prints awards with one click.
· The Event List can be filtered by gender, event age range, one team or all teams, round, and
individual versus relay events. For example, you might want to look at only the 13-14 Female Events
for the first round (Prelims or Timed Finals).
· To make room to show more events in the list, you can hide the filter choices by clicking the View
icon or by clicking View / Show/Hide Filters.
· You can easily keep track of which events have had awards printed by clicking the check box in the
Printed column at the right of each event. Those checked will also be highlighted in light blue.
· To Memorize a given set of label settings, click Memorize or click the Memorize con
, provide a
name for the memorized report, and the settings will be saved to the Memorized Reports Menu.
301
Copyright©Sports-Tek Software
MEET MANAGER for Swimming
At the bottom panel you may Customize your Cards or Labels depending on whether you have a
Laser/Ink Jet or Dot Matrix printer.
The laser choices for Award Labels are:
The Dot-Matrix choices are:
All of the label selections are the 1 inch Avery labels on an 81/2 x 11 inch page except for the A4 sizes.
302
Copyright©Sports-Tek Software
MEET MANAGER for Swimming
The A4 size labels are formatted differently for the UK and Australia - the user can pick either format.
Note the various sort options available in the Sort By panel.
Pick the Award Type from this list:
· Standard Award Label: MM will print an Award Label for the top "x" place finishers in each event.
You specify the "default" number of places in the Entry/Scoring Preferences Section from Setup on
the Main Menu bar. You can change the number and range of Award places printed right in this
Award Label Screen by keying in that number or range - for example, print Award Labels for places
9-16.
· Time Standard Achievement: MM will print an Award Label for every athlete that achieved a higher
Time Standard in his/her swim than the one that he/she had when they entered the meet. These are
also called Over-Achievers. For example, Billy would get a Time Standard Achievement Award
printed if he entered the meet with a BB Time Standard in the Boys 11-12 100 FREE but swam an A
Standard for the Boys 11-12 100 FREE. You can optionally create Time Standard Improvement
labels for all those swimmers with an NT for their entry time.
· Personal Best Time (PBT): MM will print an Award Label for every Entry in which the Athlete swam
faster than his entry time. For example, Jessica would get a PBT Award label if she entered the
meet with a 1:22.33 but swam a 1:22.17. You can optionally create Personal Best labels for all those
swimmers with an NT for their entry time.
· By Heat: MM will print. an Award Label for the Top How Many in each heat. The label will contain
the place finish of the athlete in their particular heat.
· Exhibition Swims: MM will print an Award Label for every Exhibition Swim in the meet.
· Participation: MM will print a label for every athlete or relay in the events selected. You can have
MM exclude those who are already getting regular awards by checking the Exclude Place Range
choice (it is greyed out in the screen shot above).
· Record Breaker: MM will print a label for every record broken by athletes or relays in the events
selected.
Sample Award Label
Entry Cards or Labels
From the Main Menu Bar, click on Labels / Entry Cards/Labels to display the Entry Cards/Labels
screen.
· Entry Cards/Labels reflect a specific entry for the meet - an Athlete or Relay and his/her entry time
for a particular event. An Entry Label is a 3 step process - print the label, then stick the label on
something (usually a blank card), and then hand them out to the Athletes and Relays.
· An Entry Card is a 2 step process - print the cards and hand them out.
· The Event List can be filtered by gender, event age range, one team or all teams, round, and
individual versus relay events. For example, you might want to look at only the 13-14 Female Events
for the first round (Prelims or Timed Finals).
· To make room to show more events in the list, you can hide the filter choices by clicking the View
icon or by clicking View / Show/Hide Filters.
· To Memorize a given set of label settings, click Memorize or click the Memorize con
, provide a
name for the memorized report, and the settings will be saved to the Memorized Reports Menu.
303
Copyright©Sports-Tek Software
MEET MANAGER for Swimming
At the bottom left panel you may Customize your Cards or Labels depending on whether you have a
Laser/Ink Jet or Dot Matrix printer.
The laser choices for Entry Cards and Labels are:
304
Copyright©Sports-Tek Software
MEET MANAGER for Swimming
The dot-matrix choices for Entry Cards and Labels are:
All of the Laser/Ink Jet label selections are the 1 inch Avery labels on an 8 1/2 x 11 inch page except
for the A4 size. The A4 size labels are formatted differently for the UK and Australia - the user can
pick either format.
For those customers in Australia and those that can obtain Avery laser postcard stock #L7421, there
is also a choice for deck cards using this postcard stock. The cards have 4 to a page (A4 page size)
and are approximately 3.8" x 5.5". Please set up your printer in Landscape mode to print these cards.
The option of printing cards for 3.5" x 8.5" is available for both Laser/Ink Jet (3 cards per page) and Dot
Matrix printers using tractor feed cards. You can also choose a 6 labels per sheet option, 2 across and
3 down centered on an 8 1/2 x 11 page. There are three choices for the laser 3.5" x 8.5" on 8 1/2 x 11
sheets and they are the same except for the orientation of the watch times and official time. In the
standard 3.5" x 8.5" choice, the 3 watch times and official time locations are horizontal on same line,
while the 3.5" x 8.5" Type 2 and the BCSSA choice lines up the watch times vertically one above the
other in 4 rows. The BCSSA is the same as the Type 2 except that it has the BCSSA logo in it.
For Canadian or UK (United Kingdom) cards there are choices for both laser and pre-printed tractor
fed dot-matrix cards.
There are four choices for the pre-printed Canadian Entry Cards using pre-printed sheets:
1. Use the old tractor fed dot-matrix cards on a dot-matrix printer.
2. and 3. Use the old tractor fed dot-matrix cards on a laser printer, tear them into sheets of three
cards and feed them into a laser printer just like they were regular sheets of paper. There are two
choices here because some sets of these cards were printed with a smaller top margin. Test with
both to see which one lines up best for you.
4. Use the newer laser designed Canadian cards in a laser printer. As of January 2004, these preprinted laser sheets have not been made available.
There are two choices for UK Cards:
1. For dot-matrix there are pre-printed cards of 4 per sheet.
2. For laser, you can use plain A4 paper stock and 4 cards will be printed per page. No need for
anything pre-printed.
Pick the Entry Card/Label Format that you want for your meet:
Heat/lane Number
This format assumes the event is Seeded and will print a Label or Card with the entry's seeded
305
Copyright©Sports-Tek Software
MEET MANAGER for Swimming
heat and lane number.
Rank Order Fast-Slow
This format is typically used for Deck Seeded Events. The entries for an event are sorted by time
and then printed in time order with the fastest entry printed first. Each Entry's Rank is also
included.
Rank Order Slow-Fast
This format is typically used for Deck Seeded Events. The entries for an event are sorted by time
and then printed in time order with the slowest entry printed first. Each Entry's Rank is also
included.
Session Choices (H/P)
This format reflects a combination of seeded and unseeded events based on whether you
specified a Heat Sheet in the Session Setup for an event, or a Psych Sheet.
You can sort these labels/cards by Event Number, by Session order of events, by Lane, or by Team.
Sorting by Team is great for handing out Relay cards to the team coaches.
You many also ask MM to print "blank" Entry cards or Labels for hand entry at the meet. This is great
for filling in entry information for Late Entries. MM defaults to 10 blank Cards/Labels but you can
change that value to whatever you need.
Please note that all formats of the Entry Cards/Labels show the Relay Swimmers if they have been
declared for the Relay.
Sample Entry Card Format for 3.5" x 8.5"
306
Copyright©Sports-Tek Software
MEET MANAGER for Swimming
Sample Format for 3.5" x 8.5" Type 2
Mailing/Registration Labels
From the Main Menu Bar, click on Labels / Mailing/Registration Labels to display the Mailing /
Registration Labels screen.
· To Memorize a given set of report settings, click Memorize or click the Memorize con
, provide a
name for the memorized report, and the settings will be saved to the Memorized Reports Menu.
307
Copyright©Sports-Tek Software
MEET MANAGER for Swimming
MM offers two kinds of Mailing labels as well as a Registration formatted label from which to choose:
Team Mailing labels
These type of mailing labels are usually generated when you want to mail your meet results to the
Teams. The mailing address information for Teams may be entered in the Team Browser.
Athlete Mailing Labels
These type of mailing labels are usually generated when you want to mail your meet results to the
individual Athletes - like for a Masters meet. The mailing address information for each Athlete may
be entered in the Athlete Browser.
Registration Label
This kind of label contains the Athlete's or Coach's Name and Team affiliation and is generally
used to affix to packets that are handed out to each Athlete or Coach/Trainer that is registered in
the meet. This Registration label format may be created for Athletes and Coaches or just Coaches
or just Athletes.
The Mailing/Registration Labels menu can be filtered by Gender, Age Range and Team. You may
also sort the labels by the Full Team Name, Team Abbreviation, or by Athlete and then Alphabetical or
by Zip code. You may Customize your labels depending on whether you have a Laser/Ink Jet or Dot
Matrix printer. All of the Laser/Ink Jet label selections are the 1 inch Avery labels on an 81/2 x 11 inch
page except for the A4 size. The A4 size labels are formatted differently for the UK and Australia - the
308
Copyright©Sports-Tek Software
MEET MANAGER for Swimming
user can pick either format.
309
Copyright©Sports-Tek Software
MEET MANAGER for Swimming
Check for Updates
Periodically, HY-TEK provides Service Pack Updates that include corrections to reported problems.
The Check for Updates feature connects to the HY-TEK web site to determine if there is a newer
update available.
In order to download and install the current MM Service Pack Update, make sure you are connected to
the Internet and then start MM and click on Check for Updates from the Main Menu Bar.
MM will verify the Internet connection and then check the MM Update site to see if you are running the
current release. If you are already running the most current MM 3.0 release, MM will tell you just that
and you click OK and continue. If you are not running the current MM release, MM will download the
latest update for you and show a download progress bar.
After the download has been completed, MM will ask if you want to install it now.
If you click Yes to the above message, MM will install the update, will close MM, and then will restart
MM for you. After MM has restarted, click on Help / Release Notes to check out the new features that
have been included in the update.
If you click on the No button above, nothing will be installed and you can try the Check for Updates
again later as explained in the following message box.
310
Copyright©Sports-Tek Software
MEET MANAGER for Swimming
Since the update file has already been downloaded to your computer at this point, you can install the
update by clicking on File / Install Update and you will get the message shown below. The update file
is named SwimMM3Update.zip and is stored in the Download folder under your installation directory probably c:\hy-sport\SWMM3\Download. Click No in the message shown below will then allow you to
open the SwimMM3Update.zip file which will then install the update the same way Check for Updates
would install the update.
NOTE: Installing an update will not harm your database.
NOTE: If you have Firewall software on the computer you are using to Check for Updates, you may
have to turn the Firewall software off until you have completed the Check for Updates procedure and
then turn the Firewall software back on. If you are unable to get MM to connect to the HY-TEK web
site, you can update to the latest version by ordering a Product Replacement CD, Web Delivery, or
both from the HY-TEK Online Store.
311
Copyright©Sports-Tek Software
MEET MANAGER for Swimming
Pro Option
MEET MANAGER with the Pro Option includes the standard MEET MANAGER product with two very
powerful features:
· Network Option in which two or more computers each running MM can share a common
Database. Click Here for a description of the Software and Hardware necessary to properly use
this feature. Click Here to see how to set up the Logon and Administration functions that
support this feature.
· Real-Time Results to the Web feature in which results of a completed heat or event can be
uploaded via FTP directly to a web site in HTML format. Click Here for more information on this
feature.
The MEET MANAGER with the Pro Option logo is displayed right on the Main Menu if the feature had
been included with your particular product release.
Setup a Network
MEET MANAGER with the Pro option allows you to access a shared database from multiple
computers. The Pro option includes the Network Option as well as the capability to Export RealTime Results to a web site.
MM Pro supports the standard Windows peer-to-peer network configuration. In this type of network
configuration, each computer is connected to a central device called a "hub". The shared MM
Database is loaded on one of the computers so that any of the other computers can access it directly.
For example, suppose we have 4 computers connected to a hub. For the purposes of this discussion,
let's name these computers A, B, C, and D and let's load the MM Database on Computer A.
· The HY-TEK MM product software would be installed on all 4 computers on the hard drive C.
· The folder on the A computer where the database is located must be given full read/write
permissions. To give a folder full read/write permission, use My Computer or Windows Explorer to
right click on the database folder (usually c:\swmeets) and then click Sharing. In the Sharing Menu,
check the box to Share this folder on the network and check the box that says Allow network
users to change my files. You may also give a Share Name to the folder which defaults to the
actual folder name. Rather than just share the database folder, you can also share the entire C Drive
by right clicking on Local Disk (C:).
Hardware that you will need
Example of network component vendors are 3Com, Kingston, and D-Link. Internet sites that you can
order from are www.buy.com and www.pcconnection.com.
· 100 Base TX Hub. The cost for a 5 Port Hub would be about $49.00.
· Most desktop computers come with a network card built in. But if yours does not, you can purchase
a 10/100 Base computer network card for each desktop computer - Cost about $25.00.
· Most notebook computers come with a network card built in. But if yours does not, you can purchase
a 10/100 PCMCIA Card for each notebook computer - Cost about $49.00.
· 10/100 Base TX cable from each computer to the hub. The cables will connect to an RJ-45
connector in the hub and into each computer's network card. The cost is about $10.00 for 25 feet of
cable. Or, you can use a wireless setup with the appropriate Network cards and hub.
So for a 4 computer system network, the hardware cost would be under $200.00.
Software that you will need
312
Copyright©Sports-Tek Software
MEET MANAGER for Swimming
The peer-to-peer network software is included with your Windows 98, 2000, XP, NT, or Vista Operating
System. Please follow the appropriate instructions for setting up your particular network system as well
as the software drivers included with the network card installed on each computer.
Continuing with our example, let's assume that the hard drive on Computer A is the one that is shared.
On Computer A, you would start MM and click on File / Open, select your local Drive C, and select the
database which is probably in c:\swmeets. Now the MM Log-in window appears and you select one of
the nine user levels such as Administrator and click Multi-User at the bottom. When you start up MM
on Computer B, click on File / Open, select the mapped drive from computer A (let's assume
computer B sees computer A's hard drive as the F Drive) and open the database found in f:\swmeets.
The Log-in screen now appears and it shows you that the Admin user is logged-on. You select a user
level such as Run 1 and click Ok. Now computers A and B are accessing the SAME INFORMATION
contained on the hard drive on Computer A. Do the same for computers C and D.
Please note that under the Windows peer-to-peer network configuration, devices like Printers may
also be shared. In the example above, for best performance, HY-TEK recommends running the meet
from Computer A and then printing Results and other information from one of the other computers in
the network. This reduces the load on the CPU and operator on computer A.
MM Pro provides a complete suite of Network Administration features. Please click Here to find out
how to setup the Logon/User ID choices, optional passwords, and permission levels for your system.
Logon the Network
If you are using MEET MANAGER with the Pro option, whenever you Open a Database, MM Pro will
prompt you to logon with one of the User Names shown below. There are four levels of permissions as
shown, so pick the User Name that applies to your needs.
313
Copyright©Sports-Tek Software
MEET MANAGER for Swimming
Level User Name
Permissions
-------------------------------------------------------------------------------------------------------------------1
Administrator No restrictions at all.
2
Run 1
This level can do everything except Network Administration and Single User
Mode functions.
Run 2
This level can do everything except Network Administration and Single User
Mode functions.
Run 3
This level can do everything except Network Administration and Single User
Mode functions.
3
Clerk 1
This level can do everything Level 2 can do except Run the Meet.
Clerk 2
This level can do everything Level 2 can do except Run the Meet.
4
Report 1
Print Reports/Labels ONLY
Report 2
Print Reports/Labels ONLY
Report 3
Print Reports/Labels ONLY
Please note that the logon applies to a specific Database. For example, you could logon to Database
1 as "Run" to edit the results of a previous meet and later logon to Database 2 as "Clerk 2" to reseed
an upcoming meet.
In order to logon, you must first pick from the above list of User Names and then enter an optional
password for that User Name. Only the Administrator User Name has the ability to assign a
Password to one or more of the User Names - please click Here to find out how to set up passwords. .
Please note that an Administrator may set up a set of passwords for one Database and no passwords
for another Database - the set of User Name passwords are associated with each Database, NOT
314
Copyright©Sports-Tek Software
MEET MANAGER for Swimming
with the global system. Passwords consist of from 6 to 16 numbers and letters and can be left blank
if no password is desired. When you logon, MM will display all nine User Names and indicate which
ones are available to use (that is, currently NOT logged on).
If you logon as Administrator, you have the option to Open the Database in Single User Mode or
Multi-User Mode. Click Here for more information about logging on as Administrator for Network
Administration. If you logon as any of the other 8 User Names, the Database will automatically be
opened in Multi-User mode - that is, more than one User can access the database at one time.
The only way to log off and free up your User Name is to exit from MM.
Setup Network Administration
If you are using MEET MANAGER with the Pro option, you can logon as the Administrator and
optionally set up passwords for all four Levels of access as shown below. Only the User Name of
Administrator can perform Network Administration and setup or change the passwords for the
Database that is currently opened.
Level User Name
Permissions
-------------------------------------------------------------------------------------------------------------------1
Administrator No restrictions at all.
2
Run 1
This level can do everything except Network Administration and Single User
Mode functions.
Run 2
This level can do everything except Network Administration and Single User
Mode functions.
Run 3
This level can do everything except Network Administration and Single User
Mode functions.
3
Clerk 1
This level can do everything Level 2 can do except Run the Meet.
Clerk 2
This level can do everything Level 2 can do except Run the Meet.
4
Report 1
Print Reports/Labels ONLY
Report 2
Print Reports/Labels ONLY
Report 3
Print Reports/Labels ONLY
After you have logged on as the Administrator, click on File / Network Administration and MM will
display the nine User Names as shown above and indicate what User Names are currently logged on
and if so, what computer name is associated with that logon. As the Administrator, you can optionally
assign a password to one or more of the nine User Names. Please note that the set of User Name
passwords are associated with each Database, NOT with the global system. In other words, you
can assign passwords for all User Names for Database A but then assign no passwords for access to
Database B. Passwords can consists of from 6 to 16 numbers and letters and can be left blank if no
password is desired.
315
Copyright©Sports-Tek Software
MEET MANAGER for Swimming
As the Administrator, you also have the option of clicking on the Remove all logged in Users except
Admin check box and MM will log-off all users (except Admin) in cases where one or more of the
computers did not log-off properly.
When you logon as Administrator, you have the option to Open the Database in Single User Mode
or Multi-User Mode. You also have the option to switch between Single and Multi-User Mode. To
switch from one mode to the other, just click on File / Switch to Single/Multi-User Mode. If you try to
switch to Single User Mode and there is already a user logged on, MM will not let you switch until all
other Users are logged off. Single User Mode prevents any new users from logging on to the system
as long as the Administrator is logged on. There are two reasons the Administrator might logon or
switch to Single User Mode:
1. To prevent others from logging on while he/she completes changes that are to be made for the
meet.
2. To perform any of the Single Mode functions as follows:
Backup a Database
Restore a Database
Purge a Database
Repair a Database
Import
Delete Athletes and Teams
Install Update
316
Copyright©Sports-Tek Software
MEET MANAGER for Swimming
Real-Time Results Setup
Along with the Network option, the Real-Time Results to the Web optional feature is part of the HYTEK MM Pro option. This export feature is very powerful and complete and provides the capability to
send an index page, initial default meet program pages (heat sheet or psych sheet) for each event,
actual result pages, the last heat completed, and the last event completed to a web site during the
meet as the meet progresses.
Web Site Set-up
In order to use this feature, you must first establish a web site either on a Unix server or Windows NT
sever. You might want to link to this web site from your club's or your swim organization's main web
site so that anyone can access the meet results as the meet is progressing. You must also set up
what is called an ftp account that IS NOT Anonymous so that MM Pro can export the real-time
results of your meet directly to this ftp working directory that you would establish. An example of an ftp
site name is ftp.mywebsite.com.
Log-In Menu
Settings Menu
Click Here for How To Export Real-Time Results to the Web During the Meet.
Log-In Menu
Click on Run from the Main Menu Bar and then click the Web icon
Settings window.
317
to display the Web Log-In and
Copyright©Sports-Tek Software
MEET MANAGER for Swimming
Log-In
· Enter your ftp site address, such as ftp.mywebsite.com or www.mywebsite.com. The address
usually must begin with ftp. in order to connect correctly. However it is possible www.mywebsite.com
could be the address to use. You will need to check with your web site administrator to find out what
they recommend or you can experiment with the address and use the Test Web Site Connection
button to see what works and what does not work.
· The web site must NOT be anonymous which means the site must have a User Name and
Password which you enter in the Web window.
· Enter the name of the Working Directory that has been set up on the web site you are using. An
example of this directory name would be Meets/Results where the slash is a forward slash. This
web server working directory name will be used by MM Pro as the location to ftp and store the RealTime Meet Results files.
1. The Working Directory must already be created on the web site before uploading. MM
Pro will not create folders.
2. The Working Directory cannot have any spaces in it.
3. The Working Directory cannot be blank.
4. The Working Directory is case sensitive as is the User Name and Password.
5. The Working Directory should never have a slash as the first character and only forward
slashes should be used to separate folders.
· Clicking Test Web Site Connection simply tests to see if MM can connect to the web site with the
given address, user name and password. As soon as the connection is made you get a message
box saying successfully connected or not. Right after that, the connection is closed. In fact, after
each session of uploading files, the connection is closed to prevent time-outs and other potential
connection issues.
318
Copyright©Sports-Tek Software
MEET MANAGER for Swimming
· Upload Event Schedule means upload the Main html page and the Event Index containing every
event in your meet based on your choices in the Settings tab.
· To upload default pages for each event, click Upload Default Result Pages. You should do this for
sure the first time you load the event index, otherwise users will click on an event and get a "Page
cannot be displayed" message.
· You only have to upload the Event Schedule one time. But if for some reason that list changes, you
can upload the new event list as many times as you wish. However, many users upload the event
schedule ahead of time and alter it to include a team logo or other information. If this is the case, do
not re-upload the event schedule as it will overwrite the pages with the logo.
· After uploading the Default Result Pages, you could use Upload Heat or Psych Sheets for Rounds
Not Done. When this is done, a Heat Sheet page is uploaded for each event that is seeded, but not
done. If the event is not seeded or the round is not seeded, it will upload the Psych Sheet instead.
When making this selection, you will be given the option to pick one session or all sessions. If you
only want Psych Sheets uploaded, check the box for Upload Psych Sheets Only and psych sheets
will upload for events where a heat sheet would have been uploaded.
· If you get behind or want to be sure you have uploaded all results, you can use the Upload Results
for Completed Rounds. When making this selection, you will be given the option to pick one
session or all sessions.
· If you want to create the html files for Default Result pages, Heat and Psych Sheets, or Completed
Results and NOT upload them, check the Do not Upload; Only create files for choices above
and copy to c:\realtime check box. The html files will be copied to your c:\realtime hard drive folder.
Maybe you want to ftp the files later using your own ftp software and this allows you to do that.
· The layout of the heat sheet and result pages is determined by the Web Preferences in Run /
Preferences / Web.
Settings Menu
Click on Run from the Main Menu Bar and then click the Web icon
Settings window.
319
to display the Web Log-In and
Copyright©Sports-Tek Software
MEET MANAGER for Swimming
Settings
· The Real Time Results page on the web is made up of a split frame:The left side contains a list of
the events in your meet sorted by session, sex/stroke/distance, or by event number. The right side
contains the actual meet results for the event that is selected from the left side frame and optionally
team scores if you made that choice from Run / Preferences / Web Real Time.
· For Mode, it is highly recommended that you leave the default mode as Passive FTP. Passive FTP
bypasses firewall issues on your own PC and uploads faster than Active FTP.
· Enter the refresh rate in total seconds for both the Last Heat results and the Last Event results. For
example, if you enter 30 seconds for the Heat refresh rate, each person that links to your web site
will have their Last Heat results automatically refreshed every 30 seconds. That way, they can watch
the meet progress through each heat.
· Select how you wish the Events sorted for the left side of the web page – by Session, by Event
Number, or by Publication (stroke/distance order).
· You may customize the Index Page, the Heat and Psych Sheet Page, and the Results Page color
for background and for text. It is helpful to users to make the Heat and Psych Sheet color different
from the Results color.
· Click the Enable F11 and F12 from Run check box so that when you press F11 or F12 from the
Run Menu, Real-Time results will be uploaded to your web site. Otherwise, MM will store the heat
and meet result files in the c:\realtime folder on your computer and will not upload the files to the
web site. Note that this has no effect on the check box on the Log-in panel for Do not Upload; Only
create files for choices above and copy to c:\realtime.
· Click on the Include Print button with Results check box and MM will include a Print button in
each real-time results screen so that people viewing the meet results can print the results page that
is on the right side of the screen.
320
Copyright©Sports-Tek Software
MEET MANAGER for Swimming
· Include Link to Home Page will put a link on the left side of the web page with the word HOME so
that users can easily get back to the original site where the real time results was opened.
· Click on the Include Standard Events, Include Time Trials, or Include Swim-Offs check boxes if
you want those events listed. At least one check box must be selected.
How To Export Real-Time Results During the Meet
The Real-Time Results feature allows you to easily upload results to a web site as a meet progresses.
· The first step is to Setup your Web Result Preferences from Run / Preferences / Web Real-Time.
· The second step is to Setup your Log-In Parameters.
1. Setup the address, user name, password and working directory.
2. Test the web site connection.
3. Upload the Event Schedule.
4. Upload the default pages.
5. Upload the Seeded Heat Sheets or the Psych Sheets.
6. If the meet is already in progress and you are behind getting results up, Upload the Results for
any or all sessions.
· The third step is to enter your Settings preferences.
As you are running your meet from the MM Pro Run the Meet screen, you will use the F11 and the F12
key to upload either a current heat result or the complete results for the current event round.
· Press the F11 key to upload the active heat on the Run screen to your Real-Time Results web site.
· Press the F12 key to upload the active event on the Run screen to your Real-Time Results web site.
If you are including team scores, this updates the team scores through the event being uploaded.
· You can re-export heat and event results as many times as you wish.
· If a set of event results has already been exported, the new results for that event will overlay the
"old" results for that event.
· Remember, you must have checked the Enable F11 and F12 check box from the Settings panel of
the Web Menu so that Real-Time results will be uploaded to your web site instead of just being
stored in the c:\realtime directory.
· At any time you can go back to the Web Menu and upload Heat Sheets and/or Psych Sheets for
future events that may have not been seeded at the beginning of the meet. Such would be the case
for the finals of a prelim/final event. So after prelims are over and finals are seeded, you can upload
the heat sheets for the finals session.
321
Copyright©Sports-Tek Software
MEET MANAGER for Swimming
Interfaces
This Section describes how to setup and use the Timing Console INTERFACE, the Scoreboard
INTERFACE, and the Open Water Interface. Both the Timing Console INTERFACE and the
Scoreboard INTERFACE are options for MEET MANAGER which require additional purchases over
the main MM package. The Open Water module uses the Button Finish Interface and requires
purchasing that option.
Timing Console Interfaces
Scoreboard Interfaces
Open Water Button Timer Interfaces
Timing Console Interfaces Overview
HY-TEK's Timing Console INTERFACE software is an optional software product that works directly
with HY-TEK's MM software. When The INTERFACE is ordered from HY-TEK, it is included together
with the MM software on the Installation CD and is automatically installed.
Click Here for information about how to initially specify which timing Console you are using.
A timing console is a hardware device that receives and stores times from two sources:
1. A timing person pushing a button
2. An athlete touching a pad
HY-TEK's INTERFACE product is designed to exchange data through either a straight through serial
cable or a null modem cable connected between your Timing Console port and the MEET MANAGER
computer COM serial port. Click Here for information on the difference between a null modem cable
and a straight serial cable.
For some timers, such as IST and Take Your Mark, the data is shared through network file sharing and
322
Copyright©Sports-Tek Software
MEET MANAGER for Swimming
a cable is not necessary. Click the Get Times button (or press F3) from the Run the Meet Menu to
instantly get the results for the heat displayed on the MM Run screen. Depending on the type of timing
console you are using, splits, backup times, and reaction times will be available as well as the final
time. The results will become visible and the heat places and overall places will be updated. To see
the Splits, click the Splits button (or press F9). To see the Button Backup times, press Ctrl-B. To see
Reaction Times, click Preferences / Run Screen and check the Show Reaction Times Column
choice or press Ctrl-T.
Depending on the type of timing console, you may be able to download the event schedule to the
timing console. The timing consoles that permit the download of the event schedule from MM are:
· Colorado Time Systems 5 and 6
· Daktronics OmniSport 6000 and 2000
· IST
· Omega ARES 21
· Take Your Mark
The following timing consoles do not permit the download of events from MM:
· ALGE SWIM 2000
· BestBET Timing
· Colorado Time Systems 4
· Colorado Time Systems Dolphin
· Daktronics OmniSport 1000
· Incomar Splash 1
· Kyrotech Tech Timer
· Omega OSM6 and ARES 21 OSM6 Simulation
· Omega Power Time
The following timing consoles have the capability to send start reaction times and relay take-off
reaction times to MM:
· Colorado Time Systems 6
· Daktronics OmniSport 2000
· Omega ARES 21 - Bi-Directional (version 2.19m or later)
· ARES 21 in OSM6 mode
ALGE SWIM 2000
Click on Set-up from the Main Menu Bar and then Timing Console INTERFACE. Now click on the
ALGE SWIM 2000 radio button and then OK. Now click on Run from the Main Menu Bar, click
Interfaces then Timer, click Open Serial/Close Port, and choose the COM port that your ALGE
SWIM 2000 is connected to on your computer and then click OK.
Hardware Requirements
The HY-TEK computer is connected to the ALGE SWIM 2000 with a cable provided by ALGE-Timing.
If the HY-TEK computer has a 25 pin COM port, then HY-TEK suggests you purchase a 9 pin to 25
pin converter available at most computer supply stores. Connect the cable to the Printer 2 port on the
ALGE SWIM 2000 and to the 9 or 25 pin male serial port on the HY-TEK computer. The COM port
number for the HY-TEK computer can be any number from 1 to 8, but is normally 1. To verify the COM
port number on the HY-TEK computer, go into Control Panel in Windows and go into System and
check Device Manager. If your HY-TEK computer does not have a serial port, you will need to
purchase a USB to serial adaptor and install the software than comes with the adaptor.
In using the ALGE SWIM 2000 console, The INTERFACE captures the times "in background" and
stores them on your hard drive as you are running the meet. Then, whenever you are ready to request
323
Copyright©Sports-Tek Software
MEET MANAGER for Swimming
them by event/heat or by race number, they are retrieved from the MM computer's stored data files.
Checking Your Connection
The INTERFACE cannot store the data from a race until the timing console operator presses End on
the ALGE SWIM 2000 PC computer or selects a new race on the ALGE SWIM 2000 computer. When
The INTERFACE receives this signal from the timer, that's when the actual data is written to your
computer's hard drive for later retrieval.
Select the "Timing Console Meet"
After you have sent over a test race, click on Interfaces then Timer and click on Select Meet. The
INTERFACE will display a window with the date and time and the number of races that have been
stored for the "data set" that MM is pointing to. Remember, you could be running a three day meet and
The INTERFACE must know what "set of meet data" you want to access.
Click on the Next Meet or Previous Meet buttons to select the appropriate Meet Session or Day. This
is a great feature to use to go back to a previous session's results and pull over a DQ'd athlete's splits
and time.
Reading in Results From the ALGE SWIM 2000
As each athlete touches the pad in his or her lane, a time is stored in the memory of the ALGE SWIM
2000 timer and sent to the MM computer. When a given race has been completed, the finish times, the
split times, and the backup button times are stored on the MM hard drive and are immediately
available for reading into your MM database.
From the Run Menu, there are two ways to read in times from the stored result files received from the
ALGE SWIM 2000 timer:
1. By Event/Heat
OR
2. By Race Number
HY-TEK recommends using method #1 which assumes the timing operator is entering the proper
event and heat number for each race.
1. From the Run screen, press F3 or click the Get Times button to cause MM to scan the result files
for one with the matching event and heat number. If found, the results, splits, and backup button
times will be instantly entered.
2. From the Run screen, press F2 or click the Race# button. Enter a Race# to cause MM to scan the
result files for one with the matching Race number. If found, the results and splits will be instantly
entered. Note that each stored race has a race number with the first one stored being race #1, the
second being race #2, etc. This allows for unique selection of any race in cases where the event
and heat number stored are incorrect.
In both methods above, after a result file is selected, the data in the file is compared with the event and
heat number, the number of expected splits, the number of athletes in the race, and the lanes used in
the race. If any of these do not match, you will be so notified and will have the opportunity to either
Accept or Reject the data.
For example, the meet referee may have allowed an athlete to swim in an empty lane for this heat. The
INTERFACE expected to receive times for 5 athletes but it received times for 6 athletes. The
INTERFACE will let you know about that and you can Accept or Reject the Import.
Please Note
When receiving times from a timing console, lanes that have no times because the swimmer
324
Copyright©Sports-Tek Software
MEET MANAGER for Swimming
scratched or missed the race are automatically entered with an NS for No Show.
ALGE Timy
HY-TEK's Generic INTERFACE product is designed to exchange data through a file sharing interface
with the ALGE Timy TRACKTIMER Program. Results from each race are transferred directly from the
Timy via RS232 to the PC running MM. A utility program available from your ALGE dealer reads the
data and creates a file in the MM database directory without any keyboard data entry. An ALGE RS232
serial cable is required to connect the ALGE Timy with an available RS-232 serial port on the MM PC.
Setting up the ALGE HY-TEK Interface
Install the ALGE HY-TEK Interface and configure your PC's COM (serial) port as instructed then run
the program by selecting it's shortcut from the Windows Start Menu.
You will be asked to clear existing files from the "C:\swmeets" directory which you can do at the
beginning of each meet. If you wish to keep a backup of these files, say no, then copy/move them to a
different location prior to the start of the meet.
You will then be asked to select the current HY-TEK session number. A Data Set is a set of results for
a given meet or session of a meet. Each time a race is completed and saved using the ALGE Timy, the
ALGE HY-TEK Interface creates a result file in the shared data folder and this file has the extension
.gen. The first 3 characters of the file name are numbers from 001 to 999. These three character
numbers define the Data Set number. So when you select a data set, you are selecting a data set of
results based on the first three characters of the result files. It is very important to have selected the
correct data set. It is not necessary to enter the leading zeros they will be added to the file name for
you.
Once the session number has been set, the main window for the ALGE HY-TEK interface will be
displayed. The ALGE HY-TEK Interface should be left opened and running during your entire meet.
325
Copyright©Sports-Tek Software
MEET MANAGER for Swimming
Operating the ALGE Timy
Refer to your ALGE Timy user manual for operating instructions on the ALGE TRACKTIMER program.
You must enter the event and heat number into ALGE Timy prior to each race. Enter the event number
into the first two digits and the heat number in to the second two digits of the race number. E.g. for
"Event 1, Heat 2" enter "0102" as the race number. For "Event 15, Heat 6", enter "1506" as the race
number. Leading zeros will not show on the Timy screen, but you can enter them anyway. The ALGE
HY-TEK Interface will use this information to fill out the event and heat fields on its main screen.
When the race is started, the start time will be automatically entered into the "Race started at:" field. As
each timing impulse is received, the time and rank is entered into the appropriate data grid cell.
Generally you will only have one touch for each race. If you have push buttons at both ends of the pool,
you can record all splits. The number of touches will be automatically calculated based on the number
of impulses received from a single lane. The rank is calculated from the times from the greatest lap
recorded.
If you are operating Preliminary or Semi Final rounds, you will need to select the appropriate radio
button for the round, otherwise all races will assume to be Finals.
Each file created will generate an automatic sequence number which will be used for the last 4 digits of
the file name. Any previous files generated for the same session/event/heat number will be
automatically deleted by the interface.
The race is over and the file is generated when the next event/heat number is entered into the ALGE
Timy. At this point, the file will be available to be read by MM.
326
Copyright©Sports-Tek Software
MEET MANAGER for Swimming
Setting Up The MM INTERFACE for the ALGE Timy
Click on Set-Up from the Main Menu Bar and then Timing Console INTERFACE. Now click on the
Generic Network File Sharing radio button and then OK.
How to Select a Data Set for your Meet in MM
A Data Set is a set of results for a given meet or session of a meet. Each time a race is completed and
saved in TYM, it creates a result file in the shared data folder and this file has the extension .gen. The
first 3 characters of the file name are numbers from 001 to 999. These three character numbers define
the Data Set number. So when you select a data set, you are selecting a data set of results based on
the first three characters of the result files. It is very important to have selected the correct data set.
To select a Data Set, click on Run / Interfaces / Timer and click on Select Data Set stored from
GNET. The INTERFACE will display a window with the date and time and the number of races that
have been stored for the current data set that MM is pointing to. Remember, you could be running a
three day meet and The INTERFACE must know what "data set of meet data" you want to access.
Click on the Next Meet or Previous Meet buttons to select the appropriate data set. Because there is
a date and time shown for when the first file in the data set was created, you can usually figure out
which data set to select. This is handy if you have to go back to a previous session's results and pull
over a DQ'd athlete's splits and time. Just make sure that MM and the ALGE HY-TEK interface use the
same session number. You can enter a new session number directly into the session number field on
the ALGE HY-TEK interface screen when required.
Reading in Results
From the Run Menu, there are two ways to read in times from the stored result files:
1. By Event/Heat
2. By Race Number
HY-TEK recommends using method #1 which assumes the timing operator is entering the proper
event and heat number. From the Run screen, press F3 or click the Get Times button to cause MM to
scan the result files for one with the matching event, heat number, and round (Prelims, Semis, or
Finals). If found, the results and splits will be instantly entered.
From the Run screen, press F2 or click the Race# button. Enter a Race# to cause MM to scan the
result files for one with the matching Race number. If found, the results and splits will be instantly
entered. Note that each stored race has a race number with the first one stored being race #1, the
second being race #2, etc. This allows for unique selection of any race in cases where the event, heat
number, and round stored are incorrect. Each data set starts over with race number #1.
In both methods above, after a result file is selected, the data in the file is compared with the event,
heat number, round, the number of expected splits, the number of athletes in the race, and the lanes
used in the race. If any of these do not match, you will be so notified and will have the opportunity to
either Accept or Reject the data. For example, the meet referee may have allowed an athlete to swim
in an empty lane for this heat. The INTERFACE expected to receive times for 5 athletes but it received
times for 6 athletes. The INTERFACE will let you know about that and you can Accept or Reject the
Import.
Please Note
When reading times from a result file, lanes that have no times because the swimmer scratched or
missed the race are automatically entered with an NS for No Show.
BestBet Timer
The BestBet Timing Console operates the same as the CTS 4 Timing Console in terms of how it
interfaces with HY-TEK's MEET MANAGER for Swimming. One major difference is the fact that the
327
Copyright©Sports-Tek Software
MEET MANAGER for Swimming
BestBet cable MUST BE a Null Modem cable. Click Here for information on the difference between a
null modem cable and a straight serial cable. If your HY-TEK computer does not have a serial port, you
will need to purchase a USB to serial adaptor and install the software than comes with the adaptor.
Colorado Time Systems 4, 5, or 6
Click on Set-Up from the Main Menu Bar and then Timing Console INTERFACE. Now click on the
CTS 4, CTS 5, or the CTS 6 radio button and then OK.
Hardware Requirements
The HY-TEK computer is connected to the CTS 4 or CTS 5 or CTS 6 with a straight through RS 232
serial cable. Some of the early CTS 6 models require a null modem cable. Click Here for information
on the difference between a null modem cable and a straight serial cable. The serial cable should have
9 pin female connector on one end and a 9 pin male on the other end. If the HY-TEK computer has a
25 pin COM port, then HY-TEK suggests you purchase a 9 pin to 25 pin converter available at most
computer supply stores. Connect the serial cable to COM PORT 1 on the CTS 4/5/6 and to the 9 or 25
pin male serial port on the HY-TEK computer. The COM port number for the HY-TEK computer can be
any number from 1 to 16, but is normally 1. To verify the COM port number on the HY-TEK computer,
go into Control Panel in Windows and go into System and check Device Manager and then check
Ports. If your HY-TEK computer does not have a serial port, you will need to purchase a
USB to serial adaptor and install the software that comes with the adaptor.
Checking Your Connection
Click on Run from the Main Menu Bar, click Interfaces then Timer, and then choose Open
Serial/Close Port. MM will ask that you specify the computer COM port that is connected to your CTS
4 or CTS 5 or CTS 6 - you may select COM ports 1-16. Click OK and MM will check the COM port you
have selected and then send a request to the CTS 4/5/6 Timer to verify that the connection is working.
MM will either display the Timer's response which will be the CTS 4/5/6 Version of the software that is
loaded or after five seconds notify you that it did not receive a response back and to check your cables
and connectors. If you get a negative response, the serial port will be reset to 0. After checking the
connections, you will have to reopen the port until you are successful. At any time after the serial port is
successfully opened, you can test the communication by clicking on Timer and then clicking on Test
Communication and MM will again make the Version request to the CTS 4/5/6. If you get a message
that says Port already Open , it means some other program is running and has control over the port.
Sometimes Palm Pilot's HotSync program is running and locks the port and you will need to disable
HotSync.
Downloading Events to the CTS 5 or CTS 6
Select the "Timing Console Meet"
Every time you power on the CTS 4/5/6, it creates a new "meet" defined with the current date and time.
Previous "meets" are stored in the CTS 4/5/6 with their unique date and time. The INTERFACE
defaults to pointing to the most current meet in the CTS 4/5/6. After you have checked the connection
to the CTS 4/5/6, you can change the "meet" that the INTERFACE is pointing to by clicking on
Interfaces then Timer and clicking on Select Meet in CTS 4/5/6. The INTERFACE will display a
window with the date and time for the currently selected meet. Click on the Next Meet or Previous Meet
buttons to select the appropriate set of meet data stored in the CTS 4/5/6. You would only access prior
meet data if you needed to correct a previous session's results to, for example, pull over a DQ'd
athlete's splits and time.
Please Note
HY-TEK recommends that before every meet session, you turn off the CTS 4/5/6 and then power it
back on to force the CTS 4/5/6 to start a new meet. That way each CTS session has its own set of
data. This is especially important in Prelim/Final meets because the CTS 4/5/6 cannot store results
for Prelims and Finals for the same event in the same "CTS meet".
328
Copyright©Sports-Tek Software
MEET MANAGER for Swimming
Reading in Results From the CTS 4/5/6
As each athlete touches the pad in his or her lane, a time is stored in the CTS 4/5/6 timer. When a
given race has been completed and the Timer operator has pressed Store/Print, the finish times, the
backup button times, and the split times are stored in the memory of the CTS 4/5/6 and are
immediately available to MM.
From the Run the Meet Menu, there are two ways to request times from CTS 4/5/6:
1. By Event/Heat using the Get Times button.
2. By Race Number using the Race # button.
Click one of the links below for how to bring times in from the timer.
Get Times Button.
Race # Button
Overview
This feature provides the ability to download the MM event list to the CTS 5 or CTS 6 timing console.
This feature is included when you purchase The INTERFACE option. Note the CTS 4 does not have
the ability to receive event setups. This feature is a great time saver and will be appreciated by your
CTS 5 or CTS 6 timer operator. All events listed in the Run Menu screen can be downloaded, and
once downloaded, the event numbers and event titles will be stored in the timer and can be printed on
the CTS 5 or CTS 6 printer as the event is being run. Note that the number of heats is not downloaded
to the timer. The operator has to increment the heat number when necessary. So, instead of having to
key in meet and event setups into the CTS 5 or CTS 6, like Event 1 BOYS 11-12 100 FREE FINALS,
the INTERFACE provides the information directly with NO data entry and NO mistakes!
The CTS 5 or CTS 6 timer will accept your new setups ONLY if:
1. The timer is in the RESET mode (i.e. not running race and not in Setup mode).
2. The Remote Setup mode has been enabled on your timer. To enable Remote Setups, select
Setups on the CTS 5 main menu and then "down arrow" to the "hardware" selection and "turn on"
the Allow Remote Setup selection. Now select Quit to exit from the Hardware menu.
The INTERFACE will transfer event set-ups ONLY if:
1. Your MM is in the Run module selected by clicking Run from the Main Menu bar.
2. The current session (or All Events) selected does not have the same event listed twice and none of
the events have alpha-numeric event numbers.
Downloading Event Setups
Click on Timer again from the Run Screen Menu Bar and then click Download Events to CTS 5/6. MM
will display the CTS 5/6's 8 slots (Event Sequences numbered 2-9) for storing meet event setups. HYTEK recommends you choose slot 8 or 9. Slots 2-7 will only allow you to download 100 events
whereas slots 8 and 9 allow 240 events. After choosing the slot, click OK and the event set-ups will
download to the CTS 5/6 in 5 to 30 seconds depending on how many events are to be transferred.
After the Download has been completed, review/print your new setups from the CTS 5/6 timer.
Also notify your CTS 5/6 timer operator which Event Sequence slot you have set up for your meet so
that he/she can be properly prepared.
Note that some of the slots are already set up for meets like Girls and Boys High School. Having these
8 slots allows you to set up eight different types of meets and/or sessions. For example you might
choose slot 5 for Masters meets and event 6 for your YMCA Dual meets. The title given to your setups
is the name of the meet that you entered in the Meet Setup section - but you may edit or change this
default name as you wish. For a multi-session meet, you may want the Event Sequence (slot) title to
contain the session number.
329
Copyright©Sports-Tek Software
MEET MANAGER for Swimming
Colorado Time Systems Dolphin
The CTS Dolphin is a wireless stopwatch timing system available for 6 to 10 lanes with up to three
watches per lane. The CTS Dolphin hardware interfaces directly to MEET MANAGER and operates in
either Stand Alone Mode or Backup Mode.
Stand Alone Mode
In this mode, MM treats the Dolphin system as the primary times using stop watches. But instead of
collecting Lane/Timer Sheets or Entry Cards and keying the watch times into MM, you simply press
one key from the run menu and MM imports all of the lane watch times directly into your MM database
for you to review, edit, and/or accept. The CTS Dolphin Stand Alone Mode feature is included with
the MM software at no additional charge.
Backup Mode
In Backup Mode, MM treats the Dolphin system as backup time stop watches supporting either fully
automatic pad times or semi-automatic button times received from your Timing Console running HYTEK's INTERFACE software. But instead of collecting Lane/Timer Sheets or Entry Cards to resolve
pad or button time issues, you simply press one key from the run menu and MM imports all of the lane
watch times directly into your MM database for you to review, edit, and/or accept. The CTS Dolphin
Backup Mode Option can be purchased either Online at www.hy-tekltd.com or by calling the
HY-TEK Sales Office toll free at 866.456.5111.
CTS Dolphin Software Set-up
You must install the Dolphin software using the CD provide by Colorado Time Systems. This CD will
install the program onto your hard drive and install a USB driver.
Hardware Requirements
The Dolphin system has a wireless base unit which connects to the HY-TEK computer through a USB
port. With the HY-TEK computer turned on and with the Dolphin software already installed, plug in the
Dolphin base unit's USB cable.
In the Stand Alone Mode, MM treats the Dolphin system of wireless watches as the primary times for
results. This Interface mode is built into MM at no extra charge.
HY-TEK Software Set-up for Stand Alone Operation
Click on Set-Up from the Main Menu Bar and then Timing Console INTERFACE. Now click on the
Colorado Time Systems Dolphin radio button on the left side and then OK.
Operation
First, plug in the wireless base unit's USB cable. Start the Dolphin software exe. On each wireless
watch and the wireless starter unit, press and hold the Reset button to turn them on. If the system is
operating correctly, the Dolphin software should have a green light on for each lane that has a wireless
watch assigned to it. Minimize the Dolphin software. Start HY-TEK's MEET MANAGER. If MEET
MANAGER was already running, you can start the Dolphin exe from within MM by going to Run /
Interfaces / Timer (CTSD) / Start Dolphin.exe.
To time a race, press the Start/Stop button on the wireless starter unit when the race begins. This
starts all of the wireless watches. The timers only need to stop their watch when the swimmer hits the
finish. When all watches have been stopped, the wireless starter unit should be stopped. As soon as
330
Copyright©Sports-Tek Software
MEET MANAGER for Swimming
the wireless start unit's reset button is pushed, the Dolphin software writes a result file to the
C:\CTSDolphin folder on the computer and the next race can be started.
From the Run Menu in MEET MANAGER, click on Get Times and a list of Dolphin result files for the
current Data Set (see below for information about data sets) will be displayed with the most recent file
at the top. Select the result file and MM will read the data into the proper lanes, putting the times into
the backup columns for the heat. If the backup columns are not showing in the Run menu, press CtrlB. If there is one watch for a given lane, that time will also be placed in the result column. If there are 3
watch times for a given lane, the middle time will be placed in the result column. If there are two
watches for a given lane, the average will be computed and will be placed in the result column. The
average is computed based on the rule choice selected in Run / Preferences / Backup Times. Please
note that if there is more than .3 seconds difference between the two wireless watch times, the
average result time will NOT be computed, a yellow line will show for this lane, and the Download
Alert window will appear indicating athletes and results do not match. This means you must decide
whether to throw out one of the watch times if you determine one of them is way off. If you are ok with
the two times, then click Ctrl-K to display the watch averaging menu and it will compute the average
for you and place it in the result column. If one of the times is no good, delete it and use Ctrl-K, or
simply type in the time for the one good watch.
If you are keeping track of races by Race Number (see discussion below), you can use the Race #
button instead of the Get Times button. This button increments itself by 1 automatically and searches
the data set of results for a matching race number. This is the quickest way to get results if you are
keeping up with the race numbers.
How to Select a Data Set for your Meet
A Data Set is a set of results for a given meet or session of a meet. Each time a race is completed, the
Dolphin system creates a result file in C:\CTSDolphin and this file has the extension .do3. The first 3
characters of the file name are numbers from 001 to 999. These three character numbers define the
Data Set number. So when you select a data set, you are selecting a data set of results based on the
first three characters of the result files. The last 4 characters of each result file has a number from
0001 to 9999 and this is the Race Number. Each file within a data set has a unique race number.
Every time the Dolphin software is started, it starts a new data set by scanning the files in
C:\CTSDolphin to figure out what the highest data set number is and resets the race number back to
0001.
To select a Data Set, click on Run / Interfaces / Timer and click on Select Data Set stored from
CTSD. The INTERFACE will display a window with the date and time and the number of races that
have been stored for the current data set that MM is pointing to. Remember, you could be running a
three day meet and The INTERFACE must know what "data set of meet data" you want to access.
Click on the Next Meet or Previous Meet buttons to select the appropriate data set. Because there is
a date and time shown for when the first file in the data set was created, you can usually figure out
which data set to select.
If new Data Sets with a new data set number have been added since starting MM, you can click
Update Data Set and all data sets will be refreshed for selection.
In the Backup Mode, MM treats the Dolphin system of wireless watches as the backup watches to the
pads and buttons for a primary timing system. This Interface mode requires the purchase of the
Dolphin Backup Mode Option.
HY-TEK Software Set-up for Backup Mode Operation
331
Copyright©Sports-Tek Software
MEET MANAGER for Swimming
Click on Set-Up from the Main Menu Bar and then Timing Console INTERFACE. Now click on the
check box at the bottom for CTS Dolphin Backup Mode. You must also select a timing system from
the list of radio buttons. If you want to use the Dolphin as the primary for races of 25 yards or meters,
then click the Use Dolphin as Primary if event is 25 check box. After selecting a primary timing
system and after checking the CTS Dolphin Backup Mode check box, click OK.
Operation
First, plug in the wireless base unit's USB cable. Start the Dolphin software exe. On each wireless
watch and the wireless starter unit, press and hold the Reset button to turn them on. If the system is
operating correctly, the Dolphin software should have a green light on for each lane that has a wireless
watch assigned to it. Minimize the Dolphin software. Start HY-TEK's MEET MANAGER. If MEET
MANAGER was already running, you can start the Dolphin exe from within MM by going to Run /
Interfaces / Dolphin Backup Mode / Start Dolphin.exe.
There are two ways to start the Dolphin Wireless Watches:
· One is to press the Start/Stop button on the wireless starter unit when the race begins and this
starts all of the wireless watches. The timers only need to stop their watch when the swimmer hits
the finish.
· The second method is for each timer to start their own wireless watch.
When all watches have been stopped, the wireless starter unit should be stopped. As soon as the
wireless start unit's reset button is pushed, the Dolphin software writes a result file to the
C:\CTSDolphin folder on the computer and the next race can be started.
From the Run Menu in MEET MANAGER, press Ctrl-F3 and a list of Dolphin result files for the current
Data Set (see below for information about data sets) will be displayed with the most recent file at the
top. Select the result file and MM will extract the times and place them in a window so that you can see
up to 3 wireless watch times per lane plus the computed average for each lane if there are more than
one wireless watches per lane. If there are 3 watch times for a given lane, the middle time will be
average time. If there are two watches for a given lane, the average will be computed based on the rule
choice selected in Run / Preferences / Backup Times. If you are ok with the times in the window,
click Accept and these times will be stored in the database along with the pad and button times already
stored. To see the pad times, the backup button times, and the backup watch times, press Ctrl-K or
click the Calc: Ctrl-K button. When the time adjustment window is displayed, you can compare the
backup wireless watch times to the pad time and the backup button average to help you decide what to
do if there is a discrepancy between the pad time and then backup button time. Click Here to see a
sample time adjustment window with Dolphin Backup times.
If you are keeping track of races by Race Number (see discussion below), you can use the Race # to
help you select the correct wireless watch file. If things go smoothly, this race number should be the
same for the wireless watch file and the timing console data file.
How to Select a Data Set for your Meet
A Data Set is a set of results for a given meet or session of a meet. Each time a race is completed, the
Dolphin system creates a result file in C:\CTSDolphin and this file has the extension .do3. The first 3
characters of the file name are numbers from 001 to 999. These three character numbers define the
Data Set number. So when you select a data set, you are selecting a data set of backup times based
on the first three characters of the result files. The last 4 characters of each result file has a number
from 0001 to 9999 and this is the Race Number. Each file within a data set has a unique race number.
Every time the Dolphin software is started, it starts a new data set by scanning the files in
C:\CTSDolphin to figure out what the highest data set number is and resets the race number back to
0001.
To select a Data Set, click on Run / Interfaces / Dolphin Backup Mode / Select Data Set. The
INTERFACE will display a window with the date and time and the number of races that have been
stored for the current data set that MM is pointing to. Remember, you could be running a three day
meet and The INTERFACE must know what "data set of meet data" you want to access.
332
Copyright©Sports-Tek Software
MEET MANAGER for Swimming
Click on the Next Meet or Previous Meet buttons to select the appropriate data set. Because there is
a date and time shown for when the first file in the data set was created, you can usually figure out
which data set to select.
If new Data Sets with a new data set number have been added since starting MM, you can click
Update Data Set and all data sets will be refreshed for selection.
Daktronics OmniSport 1000
Click on Set-Up from the Main Menu Bar and then Timing Console INTERFACE. Now click on the
Daktronics 1000 radio button and then OK. Now click on Run from the Main Menu Bar, click
Interfaces then Timer, click Open Serial/Close Port, and choose the COM port that your Daktronics
1000 is connected to on your computer and then click OK.
Hardware Requirements
The INTERFACE software requires that you connect your computer to the Omnisport 1000 using a
standard RS-232 serial cable. Connect one end of the RS-232 serial cable to the serial port of your
computer and the other end to the female 25 pin connector on the top of the Omnisport 1000 labeled
as "PORT 1". If your computer's serial port requires a 9 pin connector, HY-TEK suggests you
purchase a 9 pin to 25 pin converter available at most computer supply stores. If your HY-TEK
computer does not have a serial port, you will need to purchase a USB to serial adaptor and install the
software than comes with the adaptor.
In using the Omnisport 1000, The INTERFACE captures the times "in background" and stores them
on your hard drive as you are running the meet. Then, whenever you are ready to request them by
event/heat or by race number, they are retrieved from the MM computer's stored data files.
Checking Your Connection
For the Omnisport 1000, you should set up a test race and send it over to the MM computer before
you start the meet. HY-TEK suggests you send over event 0 heat 0 for a test. The INTERFACE cannot
store the data from a race until the timing console operator presses the "Reset" button and confirms on
the Omnisport 1000. When The INTERFACE receives this signal from the timer, that's when the actual
data is written to your computer's hard drive for later retrieval.
Select the "Timing Console Meet"
After you have sent over a test race, click on Interfaces then Timer and click on Select Meet in
Daktronics 1000. The INTERFACE will display a window with the date and time and the number of
races that have been stored for the "timing console meet" that MM is pointing to. Remember, you could
be running a three day meet and The INTERFACE must know what "set of meet data" you want to
access.
Click on the Next Meet or Previous Meet buttons to select the appropriate Meet Session or Day. This
is a great feature to use to go back to a previous session's results and pull over a DQ'd athlete's splits
and time.
Reading in Results From the Daktronics Omnisport 1000
As each athlete touches the pad in his or her lane, a time is stored in the memory of the Omnisport
1000 timer. When a given race has been completed, the finish times and the split times are stored on
the MM hard drive and are immediately available for reading into your MM database.
From the Run Menu, there are two ways to read in times from the stored result files received from the
Omnisport 1000 timer: 1) By Event/Heat or 2) By Race Number. HY-TEK recommends using method
#1 which assumes the timing operator is entering the proper event and heat number before pressing
the "Reset" button.
333
Copyright©Sports-Tek Software
MEET MANAGER for Swimming
1. From the Run screen, press F3 or click the Get Times button to cause MM to scan the result files
for one with the matching event and heat number. If found, the results and splits will be instantly
entered.
2. From the Run screen, press F2 or click the Race# button. Enter a Race# to cause MM to scan the
result files for one with the matching Race number. If found, the results and splits will be instantly
entered. Note that each stored race has a race number with the first one stored being race #1, the
second being race #2, etc. This allows for unique selection of any race in cases where the event
and heat number stored are incorrect.
In both methods above, after a result file is selected, the data in the file is compared with the event and
heat number, the number of expected splits, the number of athletes in the race, and the lanes used in
the race. If any of these do not match, you will be so notified and will have the opportunity to either
Accept or Reject the data.
For example, the meet referee may have allowed an athlete to swim in an empty lane for this heat. The
INTERFACE expected to receive times for 5 athletes but it received times for 6 athletes. The INTERFACE
will let you know about that and you can Accept or Reject the Import.
Please Note
When receiving times from a timing console, lanes that have no times because the swimmer
scratched or missed the race are automatically entered with an NS for No Show.
Daktronics OmniSport 2000
Click on Set-Up from the Main Menu Bar and then Timing Console INTERFACE. Now click on the
Daktronics OmniSport 2000 radio button and then click OK.
Hardware Requirements
The HY-TEK computer is connected to the OmniSport 2000 with a straight serial cable. Click Here
for information on the difference between a null modem cable and a straight serial cable. The serial
cable should have 9 pin female connector on one end and a 9 pin male on the other end. If the HYTEK computer has a 25 pin COM port, then HY-TEK suggests you purchase a 9 pin to 25 pin
converter available at most computer supply stores. Connect the serial cable to the RESULTS PORT
on the OmniSport 2000 and to the 9 or 25 pin male serial port on the HY-TEK computer. The COM port
number for the HY-TEK computer can be any number from 1 to 8, but is normally 1. To verify the COM
port number on the HY-TEK computer, go into Control Panel in Windows and go into System and
check Device Manager. If your HY-TEK computer does not have a serial port, you will need to
purchase a USB to serial adaptor and install the software that comes with the adaptor.
Checking Your Connection
Click Run from the Main Menu Bar, click Interfaces then Timer, and then choose Open Serial/Close
Port. MM will ask that you specify the computer COM port that is connected to your OmniSport 2000 you may select COM ports 1-8. Click OK and MM will send a request to the OmniSport 2000 to verify
that the connection is working. If you do not get an immediate response, then it means there is a
problem either with the cable, the serial ports, or the OmniSport not being turned on with the Main
screen selected. MM will wait five seconds for a response before indicating it cannot communicate.
If you get a negative response, the serial port will be reset to 0. After checking the connections, you will
have to reopen the port until you are successful. At any time after the serial port is successfully
opened, you can test the communication by clicking on Interfaces then Timer and then clicking on
Test Communication and MM will again make the Version request to the OmniSport 2000.
Downloading Events to the OmniSport 2000
Select the "Timing Console Meet"
Every time you power on the OmniSport 2000, it creates a new "meet" defined with the current date
and time. Previous "meets" are stored in the OmniSport 2000 with their unique date and time. The
334
Copyright©Sports-Tek Software
MEET MANAGER for Swimming
INTERFACE defaults to pointing to the most current meet in the OmniSport 2000 and Names that
meet "CURRFILE". After you have checked the connection to the OmniSport 2000, you can change the
"meet" that the INTERFACE is pointing to by clicking on Interfaces then Timer and clicking on Select
Meet in DAK2. The INTERFACE will display a window with the date and time for the currently selected
meet. Click on the Next Meet or Previous Meet buttons to select the appropriate set of meet data
stored in the OmniSport 2000. You would only access prior meet data if you needed to correct a
previous session's results to, for example, pull over a DQ'd athlete's splits and time. To point to the
active meet going on in the pool, always point to the meet named "CURRFILE".
Please Note
HY-TEK recommends that before every meet session, you turn off the OmniSport 2000 and
then power it back on to force the OmniSport 2000 to start a new meet. That way each
OmniSport 2000 session has its own set of data.
Reading in Results From the OmniSport 2000
As each athlete touches the pad in his or her lane, a time is stored in the OmniSport 2000 timer. When
a given race has been completed and the Timer operator has pressed Store Print, the finish times and
the split times are stored in the memory of the OmniSport 2000 and are immediately available to MM.
From the Run Menu, there are two ways to request times from the OmniSport 2000:
1. By Event/Heat using the Get Times button.
2. By Race Number using the Race # button.
Click one of the links below for how to bring times in from the timer.
Get Times Button.
Race # Button
Overview
This feature provides the ability to download your currently selected MM "Run the Meet" event or
session list to the OmniSport 2000 timing console. This feature is included when you purchase The
INTERFACE option and is a great time saver which will be appreciated by your OmniSport 2000 timer
operator. All events for the current session will have event numbers and event titles available. So,
instead of having to key in meet and event setups into the OmniSport 2000, like Event 1 BOYS 100
FREE 11-12 FINALS, the INTERFACE provides the information directly with NO data entry and NO
mistakes!
Advantages of the OmniSport 2000 over the OmniSport 6000 When
Downloading Events
There are three new features in the OmniSport 2000 compared to the OmniSport 6000:
The Event Download from MM to the 2000 allows an alpha-numeric event range from 1A to 999Z
while the 6000 only allows event numbers from 1 to 150.
The Event Download from MM to the 2000 allows you to download both the prelims round, the
semi-finals round, and the finals round in the same download where the 6000 would only accept
one round.
The Event Download from MM to the 2000 allows you to download a session with any event
number order and that order will be maintained by the 2000 regardless of the round or number, so
when you press Next Event, you get the next event in the session order and not just the next event
number as you did with the 6000.
Downloading Event Setups
First ready the OmniSport 2000 by turning it on and selecting Swimming as the Program. In MM, click
on Interfaces then Timer from the Run Screen Menu Bar and then click Download Events to DAK2.
335
Copyright©Sports-Tek Software
MEET MANAGER for Swimming
MM will prompt you to click Yes to begin download of events displayed at the top left of the "Run the
Meet" screen. The download will only take a few seconds. If the serial port in MM has not been
opened, then refer to the next section.
Daktronics OmniSport 6000
Click on Set-Up from the Main Menu Bar and then Timing Console INTERFACE. Now click on the
Daktronics OmniSport 6000 radio button and then click OK.
Hardware Requirements
The HY-TEK computer is connected to the OmniSport 6000 with a null modem cable. Click Here for
information on the difference between a null modem cable and a straight serial cable. The null modem
cable should have 9 pin female connector on both ends. If the HY-TEK computer has a 25 pin COM
port, then HY-TEK suggests you purchase a 9 pin to 25 pin converter available at most computer
supply stores. Connect the null modem cable to COM PORT 1 on the OmniSport 6000 and to the 9 or
25 pin male serial port on the HY-TEK computer. The COM port number for the HY-TEK computer can
be any number from 1 to 8, but is normally 1. To verify the COM port number on the HY-TEK
computer, go into Control Panel in Windows and go into System and check Device Manager. If your
HY-TEK computer does not have a serial port, you will need to purchase a USB to serial adaptor and
install the software than comes with the adaptor.
Checking Your Connection
Click Run from the Main Menu Bar, click Interfaces then Timer, and then choose Open Serial/Close
Port. MM will ask that you specify the computer COM port that is connected to your OmniSport 6000 you may select COM ports 1-8. Click OK and MM will send a request to the OmniSport 6000 to verify
that the connection is working. If you do not get an immediate response, then it means there is a
problem either with the cable, the serial ports, or the OmniSport not being turned on with the Main
screen selected. MM will wait five seconds for a response before indicating it cannot communicate.
If you get a negative response, the serial port will be reset to 0. After checking the connections, you will
have to reopen the port until you are successful. At any time after the serial port is successfully
opened, you can test the communication by clicking on Timer and then clicking on Test
Communication and MM will again make the Version request to the OmniSport 6000. If you get a
message that says "Port already Open", it means some other program is running and has control over
the port. Sometimes Palm Pilot's HotSync program is running and locks the port and you will need to
disable Hot Sync.
Downloading Events to the OmniSport 6000
Select the "Timing Console Meet"
Every time you power on the OmniSport 6000, it creates a new "meet" defined with the current date
and time. Previous "meets" are stored in the OmniSport 6000 with their unique date and time. The
INTERFACE defaults to pointing to the most current meet in the OmniSport 6000 and Names that
meet "CURRFILE". After you have checked the connection to the OmniSport 6000, you can change the
"meet" that the INTERFACE is pointing to by clicking on Interfaces then Timer and clicking on Select
Meet in DAK6. The INTERFACE will display a window with the date and time for the currently selected
meet. Click on the Next Meet or Previous Meet buttons to select the appropriate set of meet data
stored in the OmniSport 6000. You would only access prior meet data if you needed to correct a
previous session's results to, for example, pull over a DQ'd athlete's splits and time. To point to the
active meet going on in the pool, always point to the meet named "CURRFILE".
Please Note
HY-TEK recommends that before every meet session, you turn off the OmniSport 6000 and
then power it back on to force the OmniSport 6000 to start a new meet. That way each
OmniSport 6000 session has its own set of data. This is especially important in Prelim/Final
336
Copyright©Sports-Tek Software
MEET MANAGER for Swimming
meets because the OmniSport 6000 cannot store results for Prelims and Finals for the same
event in the same "OmniSport 6000 meet".
Reading in Results From the OmniSport 6000
As each athlete touches the pad in his or her lane, a time is stored in the OmniSport 6000 timer. When
a given race has been completed and the Timer operator has pressed Store Print, the finish times and
the split times are stored in the memory of the OmniSport 6000 and are immediately available to MM.
From the Run Menu, there are two ways to request times from the OmniSport 6000:
1. By Event/Heat using the Get Times button.
2. By Race Number using the Race # button.
Click one of the links below for how to bring times in from the timer.
Get Times Button.
Race # Button
Overview
This feature provides the ability to download your currently selected MM "Run the Meet" event list to
the OmniSport 6000 timing console. This feature is included when you purchase The INTERFACE
option and is a great time saver which will be appreciated by your OmniSport 6000 timer operator. All
events for the current session will have event numbers and event titles available. So, instead of having
to key in meet and event setups into the OmniSport 6000, like Event 1 BOYS 100 FREE 11-12
FINALS, the INTERFACE provides the information directly with NO data entry and NO mistakes!
The OmniSport 6000 timer will accept your new setups ONLY if you prepare it as follows:
1. Press Edit on the OmniSport 6000 Main screen.
2. Press Event Order.
3. Select one of the User Defined Event Order slots.
4. Press Download and confirm with Yes.
5. From the Run Menu in HY-TEK, select Timer / Download Events to DAK6
Please Note
You must already have the serial port open and communicating with the OmniSport 6000 and you
are limited to downloading only events numbered 1 through 150.
The INTERFACE will transfer event set-ups ONLY if:
1. Your MM is in the Run module selected by clicking Run from the Main Menu bar.
2. The current session (or All Events) selected does not have the same event listed twice and none of
the events have alpha-numeric event numbers.
Downloading Event Setups
First ready the OmniSport 6000 by selecting Edit and then Event Order. Now select User Defined 1 or
User Defined 2 by using the down arrow key and then press Select to place an "X" next to your choice.
Press Download and then select "Y" to place the OmniSport 6000 in ready to download status.
In MM, click on Interfaces then Timer from the Run Screen Menu Bar and then click Download
Events to DAK6. MM will prompt you to click Yes to begin download of events displayed at the top left
of the "Run the Meet" screen. The download will only take a few seconds. If the serial port in MM has
not been opened, then refer to the next section.
337
Copyright©Sports-Tek Software
MEET MANAGER for Swimming
Incomar Splash 1
The Incomar Splash 1 Timing Console operates the same as the
Daktronics 1000 Omnisport Timing Console in terms of how it interfaces with HY-TEK's MEET
MANAGER for Swimming.
IST Timer
HY-TEK's Generic INTERFACE product is designed to exchange data through a file sharing interface
with the IST (International Sports Timing) Timing Console. Results from each race are transferred
directly from the timing console and stored as a file in the MM database directory without any keyboard
data entry. No cable is required to connect MM with the IST.
Setting Up The INTERFACE for the IST
Click on Set-Up from the Main Menu Bar and then Timing Console INTERFACE. Now click on the
Generic Network File Sharing radio button and then OK. The IST computer with its TimeWare
software and the MM computer should be networked together and mapped to share the MM database
folder wherever that is. So there are two possibilities.
1. Have IST use the database folder on the MM computer. This means the IST computer would
have to be "mapped" to see the MM data drive and folder. For MM it would most likely be
c:\swmeets. The IST computer most likely would see it as e:\swmeets (or f:\swmeets
depending on what drive letter is mapped).
2. Have MM open its database on the IST computer in the same folder where IST is saving its
result files for MM. This means the MM computer would have to be "mapped" to see the IST
data drive and folder. On IST it might be c:\meetdata. The MM computer would see it as
e:\meetdata (or f:\meetdata depending on what drive letter is mapped).
How to Create the Meet Schedule for the IST
How to Select a Data Set for your Meet
A Data Set is a set of results for a given meet or session of a meet. Each time a race is completed and
saved in IST, it creates a result file in the shared data folder and this file has the extension .gen. The
first 3 characters of the file name are numbers from 001 to 999. These three character numbers define
the Data Set number. So when you select a data set, you are selecting a data set of results based on
the first three characters of the result files. It is very important to have selected the correct data set.
To select a Data Set, click on Run / Timer and click on Select Data Set stored from GNET. The
INTERFACE will display a window with the date and time and the number of races that have been
stored for the current data set that MM is pointing to. Remember, you could be running a three day
meet and The INTERFACE must know what "data set of meet data" you want to access.
Click on the Next Meet or Previous Meet buttons to select the appropriate data set. Because there is
a date and time shown for when the first file in the data set was created, you can usually figure out
which data set to select. This is handy if you have to go back to a previous session's results and pull
over a DQ'd athlete's splits and time.
If new Data Sets with a new data set number have been added since starting MM, you can click
Update Data Set and all data sets will be refreshed for selection.
How to Create Start Lists for the IST
To create start lists for the IST system with an alpha-numeric scoreboard, you must have HY-TEK's
Scoreboard Interface option and select Network File Sharing from MM's Set-up / Scoreboard
Interface menu. When you are ready to start the meet, click Run / Scoreboard (GNET) / Create Start
List and a file named startlist.slx will be created and placed in MM's database folder. MM will create a
338
Copyright©Sports-Tek Software
MEET MANAGER for Swimming
start list file of the whole meet regardless of the status of the events. So if an event is Un-Seeded, but
you have imported or manually entered athletes or relays into lanes, the start lists will still be created
for that event. Note that the only time the start list is updated is when you click Run / Scoreboard /
Create Start List. So, if you make changes to the lanes during the meet, you need to recreate start
lists in order to update the start lists.
Reading in Results
From the Run Menu, there are two ways to read in times from the stored result files:
1. By Event/Heat using the Get Times button.
2. By Race Number using the Race # button.
Click one of the links below for how to bring times in from the timer.
Get Times Button.
Race # Button
HY-TEK recommends using method #1 which assumes the timing operator is entering the proper
event and heat number.
From the Run screen, press F3 or click the Get Times button to cause MM to scan the result files for
one with the matching event, heat number, and round (Prelims, Semis, or Finals). If found, the results
and splits will be instantly entered.
From the Run screen, press F2 or click the Race# button. Enter a Race# to cause MM to scan the
result files for one with the matching Race number. If found, the results and splits will be instantly
entered. Note that each stored race has a race number with the first one stored being race #1, the
second being race #2, etc. This allows for unique selection of any race in cases where the event, heat
number, and round stored are incorrect. Each data set starts over with race number #1.
To create an event schedule for the IST system, you must have HY-TEK's Timing Console Interface
and select Generic Network File Sharing for IST from MM's Set-up / Timing Console Interface
menu. When you are ready to start the meet, click Run / Scoreboard / Timer (GNET) / Download
Events to GNET and a file named generic.sch will be created and placed in MM's database folder. MM
will create a meet schedule of events and event names for all events listed at the top left of the Run
Menu. If you have several sessions, then click the Sessions button at the middle left of the Run Menu
and pick a session before downloading events to GNET.
To set-up IST to load this generic.sch event list, go into the IST TimeWare software and click Utilities /
Event List. Select Import, then type in a name for the list. Then in the next box, select the drive where
the list is found such as E or F, select the folder (probably swmeets), then select the generic.sch file,
then import it.
Kryotech Tec-Timer
Click on Set-Up from the Main Menu Bar and then Timing Console INTERFACE. Now click on the
Kyrotech radio button and then OK. Now click on Run from the Main Menu Bar, click Interfaces then
Timer, click Open Serial/Close Port, and choose the COM port that your Kyrotech Tec-Timer is
connected to on your computer and then click OK.
Hardware Requirements
The INTERFACE software requires that you connect your computer to the Kyrotech Tec-Timer with
connectors and cables supplied by Kyrotech Industries. In using the Kyrotech Tec-Timer, The
339
Copyright©Sports-Tek Software
MEET MANAGER for Swimming
INTERFACE captures the times "in background" and stores them on your hard drive as you are
running the meet. Then, whenever you are ready to request them by event/heat or by race number,
they are retrieved from the MM computer's stored data files. If your HY-TEK computer does not have a
serial port, you will need to purchase a USB to serial adaptor and install the software than comes with
the adaptor.
Checking Your Connection
For the Kyrotech Tec-Timer, you should set up a test race and send it over to the MM computer
before you start the meet. The INTERFACE cannot store the data from a race until the timing console
operator presses the "Reset" button on the Kyrotech Tec-Timer. When The INTERFACE receives this
signal from the timer, that's when the actual data is written to your computer's hard drive for later
retrieval.
Pick The Right "Timing Console Meet"
After you have sent over a test race, click on Interfaces then Timer and click on Select Meet in
Kyrotech. The INTERFACE will display a window with the date and time and the number of races that
have been stored for the "timing console meet" that MM is pointing to. Remember, you could be
running a three day meet and The INTERFACE must know what "set of meet data" you want to
access.
Click on the Next Meet or Previous Meet buttons to select the appropriate Meet Session or Day. This
is a great feature to use to go back to a previous session's results and pull over a DQ'd athlete's splits
and time.
Reading in Results From the Kyrotech Tec-Timer
As each athlete touches the pad in his or her lane, a time is stored in the memory of the Kyrotech TecTimer. When a given race has been completed, the finish times and the split times are stored on the
MM hard drive and are immediately available for reading into your MM database.
From the Run Menu, there are two ways to read in times from the stored result files received from the
Kyrotech Tec-Timer:
1. By Event/Heat
2. By Race Number
HY-TEK recommends using method #1 which assumes the timing operator is entering the proper
event and heat number before pressing the "Reset" button.
1. From the Run screen, press F3 or click the Get Times button to cause MM to scan the result files
for one with the matching event and heat number. If found, the results and splits will be instantly
entered.
2. From the Run screen, press F2 or click the Race# button. Enter a Race# to cause MM to scan the
result files for one with the matching Race number. If found, the results and splits will be instantly
entered. Note that each stored race has a race number with the first one stored being race #1, the
second being race #2, etc. This allows for unique selection of any race in cases where the event
and heat number stored are incorrect.
In both methods above, after a result file is selected, the data in the file is compared with the event and
heat number, the number of expected splits, the number of athletes in the race, and the lanes used in
the race. If any of these do not match, you will be so notified and will have the opportunity to either
Accept or Reject the data.
For example, the meet referee may have allowed an athlete to swim in an empty lane for this heat. The
INTERFACE expected to receive times for 5 athletes but it received times for 6 athletes. The
INTERFACE will let you know about that and you can Accept or Reject the Import.
340
Copyright©Sports-Tek Software
MEET MANAGER for Swimming
Please Note
When receiving times from a timing console, lanes that have no times because the swimmer
scratched or missed the race are automatically entered with an NS for No Show.
Omega OSM 6 or ARES 21
Please note that the Omega ARES 21 can be run in either OSM 6 Mode or in the ARES 21 BiDirectional Mode. If you plan on using the Ares 21 Bi-Directional mode, make sure the software that
is installed on the ARES 21 is version 2.14 or later.
Click on Set-up from the Main Menu Bar and then Timing Console INTERFACE. Now click on the
OSM 6/ARES 21 or the ARES 21 Bi-Directional radio button and then OK. Now click on Run from
the Main Menu Bar, click Interfaces then Timer, click Open Serial/Close Port, and choose the COM
port that your OSM 6 or ARES 21 is connected to on the HY-TEK computer and then click OK. Before
opening the serial port, you can change the port settings by clicking Run from the Main Menu Bar, then
clicking Interfaces / Timer / Configure Serial Port. The standard setting is 9600, E, 7, 1 for the OSM6
and ARES 21 OSM6 mode. However, there are situations when using the ARES 21 simulation of the
OSM6 that you would configure the port opening to be 9600, N, 8, 1. The ARES 21 Bi-Directional
should be set to 9600, N, 8, 1.
Hardware Requirements
ARES 21
The best operational method for the ARES 21 Interface is to connect the HY-TEK computer to the
ARES 21 computer using a standard RS232 null modem cable. This cable connects to the serial COM
port of both computers. If either or both computers do not have a serial port, the computers will need a
USB to serial adaptor. The ARES computer connects to the ARES 21 timer box. If not using an ARES
configured computer with the ARES 21 timer box, the HY-TEK computer can connect directly to the
The ARES GP RS422 port. The ARES GP RS422 port option should only be used if it is necessary to
communicate over long distances and it requires a RS232-RS422 converter.
Downloading Event Setups to the ARES 21 Bi-Directional
OSM 6
The INTERFACE connects to your Omega OSM 6 directly to the timer's Data Handling Port. You will
need either an OSM 6 Marc II and a Data Handling Module (DH-1) with the following hardware:
An RS-232 serial cable with an Omega port connector called a tuchel at the OSM 6 end, and a 25 pin
female connector at the computer end connected to a "20 ma to RS-232" converter to either COM 1 or
COM 2. If your computer's serial port requires a 9 pin connector, HY-TEK suggests you purchase a 9
pin to 25 pin converter available at most computer supply stores.
A "20 ma current loop to RS-232" Converter (supplied by your Omega dealer) connected to your
computer's COM 1 or COM 2 port. You can order the proper cable and connectors from HY-TEK or
your Omega dealer. In case you wish to make up your own cable, the following pin connections must
be made between the tuchel and a 25 pin connector:
A.
B.
Pin 1 of the tuchel to pin 25 of the connector.
Pin 2 of the tuchel to pin 23 of the connector.
In using the OSM 6 timing console, The INTERFACE captures the times "in background" and stores
them on your hard drive as you are running the meet. Then, whenever you are ready to request them
by event/heat or by race number, they are retrieved from the MM computer's stored data files.
Trouble Shooting Note: The COM port settings required for the OSM6 are 9600,E,7,1. If you have
trouble making the Interface work, you may need to go into Device Manager in Windows and change
the COM port settings from 9600,N,8,1 to 9600,E,7,1.
341
Copyright©Sports-Tek Software
MEET MANAGER for Swimming
Checking Your Connection
For the ARES 21 Bi-Directional, when you open the serial port in MM by putting in a COM port
number, the communication is tested and if it works, there will be an almost immediate message
stating communications passed.
For the Omega OSM 5/6 or ARES 21 in OSM6 mode, there is no communication since the OSM6
only sends and does not receive. You should set up a test race and send it over to the MM computer
before you start the meet. HY-TEK suggests you send over event 0 heat 0 for a test. The INTERFACE
cannot store the data from a race until the timing console operator presses the "Lane On" and "Start"
button combination. When The INTERFACE receives this signal from the timer, that's when the actual
data is written to the HY-TEK computer's hard drive for later retrieval.
Select the "Timing Console Meet"
After you have sent over a test race, click on Interfaces then Timer and click on Select Meet. The
INTERFACE will display a window with the date and time and, if the timer is the OSM6, the number of
races that have been stored for the "timing console meet" that MM is pointing to. Remember, you could
be running a three day meet and The INTERFACE must know what "set of meet data" you want to
access.
Click on the Next Meet or Previous Meet buttons to select the appropriate Meet Session or Day. This
is a great feature to use to go back to a previous session's results and pull over a DQ'd athlete's splits
and time.
Reading in Results From the OSM6/ARES
As each athlete touches the pad in his or her lane, a time is stored in the memory of the timer and sent
to the MM computer. When a given race has been completed, the finish times and the split times are
stored on the MM hard drive and are immediately available for reading into your MM database. For the
ARES 21 in Bi-Directional Mode, the times are stored in the Timer itself and downloaded to MM when
requested by the MM computer operator.
From the Run Menu, there are two ways to read in times from the stored result files received from the
OSM6/ARES timer:
1. By Event/Heat using the Get Times button.
2. By Race Number using the Race # button.
HY-TEK recommends using method #1 which assumes the timing operator is entering the proper
event and heat number before pressing "Lane On" / "Start" for the OSM 6 or pressing F12 for the
Ares 21.
Click one of the links below for how to bring times in from the timer.
Get Times Button.
Race # Button
Open the Serial COM Port, click on Interfaces then Timer from the Run Screen Menu Bar and then
click Download Events to ARES 21. MM will prompt you to click Yes to begin download of events
displayed at the top left of the "Run the Meet" screen. The download will only take a few seconds.
Omega PowerTime
Click on Set-up from the Main Menu Bar and then Timing Console INTERFACE. Now click on the
Omega PowerTime radio button and then OK. Now click on Run from the Main Menu Bar, click
Timer, click Open Serial/Close Port, and choose the COM port that your PowerTime is connected to
342
Copyright©Sports-Tek Software
MEET MANAGER for Swimming
on your computer and then click OK.
Please Note
The Top-8 software in the Omega Power Time cannot be version 2.0. If you have version 2.0,
download a later version from the Omega web site at http://www.omegaelectronics.ch/sports/powertime.shtml.
Hardware Requirements
An RS-232 serial cable with 9 pin connector on one end and a phone jack type connector on the other
end can be purchased from Omega along with your PowerTime Controller.
Plug the phone jack end of the RS-232 serial cable into the left side of the PowerTime and connect the
9 pin male connector into your Com port on the HY-TEK computer. If your computer's serial port
requires a 25 pin connector, HY-TEK suggests you purchase a 9 pin to 25 pin converter available at
most computer supply stores. If your HY-TEK computer does not have a serial port, you will need to
purchase a USB to serial adaptor and install the software than comes with the adaptor.
To send results of a race from the PowerTime to the HY-TEK PC, select PC from the "SEND
RESULTS" menu of the PowerTime. The INTERFACE captures the times "in background" and stores
them on your hard drive in a "dataset" as you are running the meet. Then, whenever you are ready to
request them from the Run Menu using the "Get Times" button or the "Race #" button, they are
retrieved from the MM computer's stored data files. Note that the PowerTime does not send splits and
only sends the end of race time.
Take-Your-Mark
HY-TEK's Generic INTERFACE product is designed to exchange data through a file sharing interface
with the Take Your Mark (TYM) Timing Console. Results from each race are transferred directly from
the timing console and stored as a file in the MM database directory without any keyboard data entry.
No cable is required to connect MM with the TYM Console.
Setting Up The INTERFACE for TYM
Click on Set-Up from the Main Menu Bar and then Timing Console INTERFACE. Now click on the
Generic Network File Sharing radio button and then OK. The Take Your Mark computer and the MM
computer should be networked together and mapped to share the MM database folder wherever that
is. So there are two possibilities.
1. Have TYM use the database folder on the MM computer. This means the TYM computer would
have to be "mapped" to see the MM data drive and folder. For MM it would most likely be
c:\swmeets. The TYM computer most likely would see it as e:\swmeets (or f:\swmeets depending
on what drive letter is mapped).
2. Have MM open its database on the TYM computer in the same folder where TYM is saving its
result files for MM. This means the MM computer would have to be "mapped" to see the TYM data
drive and folder. On TYM it might be c:\meetdata. The MM computer would see it as e:\meetdata
(or f:\meetdata depending on what drive letter is mapped).
How to Create the Meet Schedule for TYM
How to Select a Data Set for your Meet
A Data Set is a set of results for a given meet or session of a meet. Each time a race is completed and
saved in TYM, it creates a result file in the shared data folder and this file has the extension .gen. The
first 3 characters of the file name are numbers from 001 to 999. These three character numbers define
the Data Set number. So when you select a data set, you are selecting a data set of results based on
the first three characters of the result files. It is very important to have selected the correct data set.
To select a Data Set, click on Run / Interfaces / Timer and click on Select Data Set stored from
GNET. The INTERFACE will display a window with the date and time and the number of races that
343
Copyright©Sports-Tek Software
MEET MANAGER for Swimming
have been stored for the current data set that MM is pointing to. Remember, you could be running a
three day meet and The INTERFACE must know what "data set of meet data" you want to access.
Click on the Next Meet or Previous Meet buttons to select the appropriate data set. Because there is
a date and time shown for when the first file in the data set was created, you can usually figure out
which data set to select. This is handy if you have to go back to a previous session's results and pull
over a DQ'd athlete's splits and time.
Reading in Results
From the Run Menu, there are two ways to read in times from the stored result files:
1. By Event/Heat
2. By Race Number
HY-TEK recommends using method #1 which assumes the timing operator is entering the proper
event and heat number. From the Run screen, press F3 or click the Get Times button to cause MM to
scan the result files for one with the matching event, heat number, and round (Prelims, Semis, or
Finals). If found, the results and splits will be instantly entered.
From the Run screen, press F2 or click the Race# button. Enter a Race# to cause MM to scan the
result files for one with the matching Race number. If found, the results and splits will be instantly
entered. Note that each stored race has a race number with the first one stored being race #1, the
second being race #2, etc. This allows for unique selection of any race in cases where the event, heat
number, and round stored are incorrect. Each data set starts over with race number #1.
In both methods above, after a result file is selected, the data in the file is compared with the event,
heat number, round, the number of expected splits, the number of athletes in the race, and the lanes
used in the race. If any of these do not match, you will be so notified and will have the opportunity to
either Accept or Reject the data. For example, the meet referee may have allowed an athlete to swim
in an empty lane for this heat. The INTERFACE expected to receive times for 5 athletes but it received
times for 6 athletes. The INTERFACE will let you know about that and you can Accept or Reject the
Import.
Please Note
When reading times from a result file, lanes that have no times because the swimmer scratched or
missed the race are automatically entered with an NS for No Show.
To create an event schedule for the TYM system, you must have HY-TEK's Timing Console Interface
and select Generic Network File Sharing for Take Your Mark from MM's Set-up / Timing Console
Interface menu. When you are ready to start the meet, click Run / Scoreboard / Timer (GNET) /
Download Events to GNET and a file named generic.sch will be created and placed in MM's
database folder. MM will create a meet schedule of events and event names for all events listed at the
top left of the Run Menu. If you have several sessions, then click the Sessions button at the middle left
of the Run Menu and pick a session before downloading events to GNET.
Scoreboard Interfaces
An Alpha Scoreboard (SCBD) is a scoreboard with a computer that can display swimmer names and
team affiliations on the 6, 8 or 10 line scoreboard. If your swimming facility has an Alpha Scoreboard
and you have purchased the Alpha Scoreboard INTERFACE option from HY-TEK, click on Set-up
from the Main Menu Bar then click on Alpha Scoreboard Interface. Or, from the Run menu bar, click
on Interfaces / Setup. Then pick your vendor scoreboard from the list below.
Click Here for more information about how to initially specify which Alpha Scoreboard you are using.
344
Copyright©Sports-Tek Software
MEET MANAGER for Swimming
Please check with your Scoreboard vendor for the exact details on how to connect the Scoreboard
Computer to HY-TEK's MEET MANAGER and how to request Start Lists and Results from MM.
Colorado Time System, Daktronics, or Omega
· If you are using the Daktronics OmniSport 2000 or 6000 or the ARES bi-directional Timing Console,
then select Daktronics as the scoreboard vendor regardless of what scoreboard vendor you are
using. This is because these timers get the start list information from MM and forward the
information to the scoreboard computer. Thus MM is connected to the timer and only uses one serial
port.
· If you are using any other timer other than IST, such as the Colorado Time System 4, 5, or 6, the
MM computer must have two serial ports, one to connect to the timer and one to connect to the
scoreboard computer.
Generic Serial
· If your scoreboard vendor's computer connects to the Meet Manager computer via a serial cable,
you can choose the Generic Serial Scoreboard option if the scoreboard vendor has designed in the
generic serial protocols. If your HY-TEK computer does not have a serial port, you will need to
purchase a USB to serial adaptor and install the software than comes with the adaptor.
· When you are ready to Run the meet, click on Interfaces / Scoreboard (Genser) / Open/Close Serial
Port from the Run Menu Bar and select the Communications COM port to which the Scoreboard is
connected to your PC. Click on Configure Serial Port to customize the COM port to open at 1200,
2400, 4800, or 9600 baud. The parity, data bits, and stop bits can also be set.
· The Generic Scoreboard Interface has the following features which allow the HY-TEK operator to
send data from the Run Menu:
1. To send the current heat start list to the scoreboard by press Ctrl-F10.
2. To send the top 8 results to the scoreboard, press Ctrl F-11 when heat one is highlighted. To
send 9th - 16th results to the scoreboard, press Ctrl F-11 when heat two is highlighted, and
so on.
3. To send the Team Scores for the gender of the event in the Run Menu, press Ctrl-F9.
4. To send the complete compiled list of the results of the current event, press Ctrl-F12. This can
be done at any time such as after two heats of five are completed.
Network File Sharing
· The Network File Sharing protocol supports the International Sports Timing (IST) Scoreboard as
well as the ResulTV product provided by Lynx System Developers.
Please Note
345
Copyright©Sports-Tek Software
MEET MANAGER for Swimming
If your Scoreboard vendor does not currently provide an interface to HY-TEK's MM, please ask the
scoreboard vendor to contact HY-TEK directly and we will be happy to provide either our Generic
Serial or Network file Sharing protocol.
Customizing the Scoreboard
Scoreboards that display names can be customized as to how those names are displayed. From the
Main Menu bar, click Run / Interfaces / Scoreboard / Customize and the screen below will display. If
Colorado or Generic Serial is selected for the Scoreboard Interface, then the check box to Always
display Combined Team Scores is available.
How to Create Start Lists for IST
To create start lists for the IST system with an alpha-numeric scoreboard, you must have HY-TEK's
Scoreboard Interface option.
· Select Network File Sharing from MM's Set-up / Scoreboard Interface menu.
· When you are ready to start the meet, click Run / Interfaces / Scoreboard (GNET) / Create Start
List and a file named startlist.slx will be created and placed in MM's database folder. MM will create
a start list file of the whole meet regardless of the status of the events. So if an event is Un-Seeded,
but you have imported or manually entered athletes or relays into lanes, the start lists will still be
created for that event.
· Note that the only time the start list is updated is when you click Run / Scoreboard / Create Start
List. So, if you make changes to the lanes during the meet, you need to recreate start lists in order
to update the start lists.
ResulTV from Lynx Developers
ResulTV™ by Lynx Developers is a user configurable Windows data display program that can accept
data from MEET MANAGER's Scoreboard Interface and converts the data to be shown on any type
video board such as Diamond Vision, on a TV, or for use by a projection system. It can be used as a
means of producing graphics for television without the need for a Chyron graphics generator.
There are two methods for MEET MANAGER to provide data to ResulTV™, serial and file sharing.
346
Copyright©Sports-Tek Software
MEET MANAGER for Swimming
Serial
HY-TEK's Generic Serial Interface allows you to use a serial cable to connect the COM ports between
the HY-TEK computer and the ResulTV™ computer. In MEET MANAGER, click on Set-up from the
Main Menu Bar then click on Alpha Scoreboard Interface and select Generic Serial. To setup the
Interface, click on Scoreboard (Genser) from the Run Menu Bar and select the Communications COM
port on the HY-TEK PC by clicking on Open/Close Serial Port for GENSER. Click on Configure Serial
Port to customize the COM port to open at 1200, 2400, 4800, or 9600 baud. The parity, data bits, and
stop bits can also be set. The Generic Scoreboard Interface has a feature which allows the HY-TEK
operator in the Run Menu to send the current heat start list to the ResulTV™ computer by pressing
Ctrl-F10. To send the top 8 results to the ResulTV™ computer, press Ctrl F-11 when heat one is
highlighted. To send 9th - 16th results to the scoreboard, press Ctrl F-11 when heat two is
highlighted, and so on.
File Sharing
File Sharing only provides Heat Lists for use by ResulTV™. There currently are no results lists created
for ResulTV™ in this mode. To create start lists for ResulTV™, you must have HY-TEK's Scoreboard
Interface option and select Network File Sharing from MM's Set-up / Scoreboard Interface menu.
When you are ready to start the meet, click Run / Scoreboard (GNET) / Create Start List and a file
named startlist.slx will be created and placed in MM's database folder. MM will create a start list file of
the whole meet regardless of the status of the events. So if an event is Un-Seeded, but you have
imported or manually entered athletes or relays into lanes, the start lists will still be created for that
event. Note that the only time the start list is updated is when you click Run / Scoreboard / Create
Start List. So, if you make changes to the lanes during the meet, you need to recreate start lists in
order to update the start lists.
Open Water Button Timer Interfaces
There are numerous button timers on the market that can be used for Open Water meets. HY-TEK's
Button Timer INTERFACE software is designed to support the following timing systems:
347
Copyright©Sports-Tek Software
MEET MANAGER for Swimming
Click Set-up / Open Water Button Timer Interface and select one of the choices above. Please note
that this INTERFACE permits downloading of result times after an Open Water race is completed. The
downloading of results occurs in the OW Module found in the Run Menu.
Bar Code Readers
If you have the Button Timer INTERFACE you can use bar code readers to read in bar codes in the
order of finish for Open Water Races.
The bar code reader can be of two types:
1. One that plugs into the keyboard port. These keyboard readers usually have a plug-in adaptor
called a "wedge".
2. One that plugs into COM Port also known as a serial port.
Bar codes can be printed on five different size labels and are Code 39 or Code 3 of 9 format. For
some keyboard type bar code readers, the Num Lock key on the key board must be off in order for
the bar codes to read properly.
Operation of the Timers
Be sure the RS232 cable provided with the button machine is plugged into the button machine and one
of your serial COM ports on the HY-TEK computer. Go to the Run Menu and click OW Module. Click
Interfaces / Setup if you have not already selected your timer. After the timer is selected, click
Interfaces / Open Water Button Timer and select Open/Close Serial Port.
The following window appears for specifying a COM serial port number from 1 to 16:
After selecting the serial port, click Download from the OW Module to bring up the Download Menu for
all timers except for the OmniSport 2000. Note that the download of times is performed after the race
is over. Therefore as finishers cross the finish line, begin entering the competitor's numbers in the
order they finished in the Comp # column of the Ranks Menu in the OW Module. After entering the
order of finish, download the times from your button timer machine using the instructions that follow for
your particular timer. Note: The Daktronics OmniSport 2000 does not use the Download function.
Select the link below to see how to download times from the OmniSport 2000.
Time Machine
Sprint 8
348
Copyright©Sports-Tek Software
MEET MANAGER for Swimming
Chronomix 737
Nielsen-Kellerman Interval 2000XC Watch
Omega Power Time
Ultrak L10
FinishLynx File Sharing
Daktronics OmniSport 2000
Reading the Downloaded File
Except for the OmniSport 2000, all machines used to transmit and download data save the data in a
file in your data directory where the database is located. Every time you download a file, it is saved as a
separate file and previously downloaded files are not erased. The downloaded files are given a unique
file name with a file extension that indicates which timer was used. The extensions are .sp8 for the
Sprint 8, .tm2 for the Time Machine, .ch7 for the Chronomix 737, .pw2 for the Power Time, .ul2 for the
Ultrak L10, and .nk2 for the Nielsen-Kellerman watch. Each file will have a unique naming system. For
example, some files will have the event number as the first three characters of the file name followed
by "-01-" and then followed by a four digit Race number. In all cases, the first downloaded file will have
a 4 digit race number of "0001", the 2nd will have "0002", and so on.
To read the transmitted data file into the database, go to the OW Module, select your event from the
list, click Times at the top, and then click Read Times. This will bring up a list of the downloaded data
files with the most recently downloaded file at the top. You will be able to select any one of the
downloaded files and the list of times will be read in and displayed in a scrolling list that you can edit if
necessary.
Time Machine
To download times from the Time Machine, you must be in the OW Module. To select the OW
Module, click Run / OW Module, select an event, and then click Download at the top.
Prepare the Time Machine by pressing the Setup key until the display says [RS232 PORT] and then
press ENTER. Press Setup again until the display says [RE-XMIT DATA]. On the HY-TEK computer,
click the Start Download button from within the MM Download window to move into the mode where
it can receive data. Now press the ENTER key on the Time Machine and the data will be transmitted
and received by Hy-Tek. Note: Be sure the [HANDSHAKE-LINE] is off in the Time Machine.
After the download is complete, see the next section on Reading the Downloaded File at the bottom of
the Open Water Button Timer Interfaces topic.
Sprint 8
To download times from the Sprint 8, you must be in the OW Module. To select the OW Module, click
Run / OW Module, select an event, and then click Download at the top.
Prepare the Sprint 8 by turning it off and then on and then press 2 for Road Running (we are using
Road Running for Open Water). The method for transmitting will depend on the model Sprint 8 you
have and you may have to try both methods as follows.
If you have an older Sprint 8, on the HY-TEK computer, click the Start Download button from within
the MM Download window to move into the mode where it can receive data. Next press 2 on the
Sprint 8 for TRANSMIT.
If you have a newer Sprint 8, first press 2 on the Sprint 8 for TRANSMIT, then on the HY-TEK
computer, click the Start Download button from within the OW Module to move into the mode where
349
Copyright©Sports-Tek Software
MEET MANAGER for Swimming
it can receive data.
If transmission does not start, then click the Start Download button again. Data will be transmitted and
received by HY-TEK and the number of transmissions will be displayed.
After the download is complete, see the next section on Reading the Downloaded File at the bottom of
the Open Water Button Timer Interfaces topic.
Chronomix 737
To download times from the Chronomix 737, you must be in the OW Module. To select the OW
Module, click Run / OW Module, select an event, and then click Download at the top. Then click the
Start Download button from within the MM Download window to move into the mode where it can
receive data. On the Chronomix 737, press B for Baud rate, and press 1 to check the baud rate. It
should say 9600. If it does not, press 1 to select 9600, and then press B again. Now press 3 for
Memory and press 1 for send data to computer only. After transmission is completed, press B again to
place the Chronomix back in its normal timing mode. Then click Close in MM to exit the Download
window.
After the download is complete, see the next section on Reading the Downloaded File at the bottom of
the Open Water Button Timer Interfaces topic.
Nielsen-Kellerman Interval 2000XC Watch
To download times from the Nielsen-Kellerman Interval 2000XC Watch, you must be in the OW
Module. To select the OW Module, click Run / OW Module, select an event, and then click
Download at the top.
Time the race with the watch and stop the watch after the race is over. Place the watch on the NielsenKellerman Interface Module. Then click the Start Download button from within the MM Download
window to move into the mode where it can receive data. If transmission does not start within 10
seconds, click Start Download again.
After the download is complete, see the next section on Reading the Downloaded File at the bottom of
the Open Water Button Timer Interfaces topic.
Omega Power Time
To download times from the Omega Power Time, you must be in the OW Module. To select the OW
Module, click Run / OW Module, select an event, and then click Download at the top.
Time the race with the Power Time timer. On the Power Time, press Esc, then press send results and
then select PC. Next click the Start Download button from within the MM Download window to move
into the mode where it can receive data. Now press Enter on the Power Time and it will download the
times into MM.
After the download is complete, see the next section on Reading the Downloaded File at the bottom of
the Open Water Button Timer Interfaces topic.
Ultrak L10
To download times from the Ultrak L10, you must be in the OW Module. To select the OW Module,
click Run / OW Module, select an event, and then click Download at the top.
350
Copyright©Sports-Tek Software
MEET MANAGER for Swimming
Time the race with the Ultrak L10 timer. On the timer, press the Mode button to select either 1: Track
or 2: Road. Press 2 for Road and the press Enter to select 1 Wave. You can time in either Single chute
mode or Multi chute mode. Skip the Test on the timer and you are ready to time the race. After the
race is over, press the STOP/RESET button. Next click the Start Download button from within the MM
Download window to move into the mode where it can receive data. Now press the SET/RESULT
button on the Ultrak L10 and MM will capture the times coming through the serial report and save the
data in a result file that has the extension .ul2.
After the download is complete, see the next section on Reading the Downloaded File at the bottom of
the Open Water Button Timer Interfaces topic.
FinishLynx File Sharing
There are no times to download since FinishLynx creates the text files which are .lif files. In the OW
Module, click Times and then click Read Times and you will be able to select any .lif file. The results
will be imported into the Times module and the Ranks module simultaneously and you can
immediately go to List to get the results. If using multiple chutes, a heat is the same as a chute, but
after importing more than one chute, you will have to use the Merge Chutes choice to merge the chute
together.
In the FinishLynx File Sharing mode, you have the option to only import the times if you use the Lynx
system to simply record times. MM will recognize that only times exist in the .lif file and will warn you of
such.
To specify the location for MM to look for the .lif files, click Interfaces / Open Water Button Timer FinishLynx and click Change Data Directory. The default directory is c:\swmeets3.
Daktronics OmniSport 2000
For Open Water timing, the OmniSport 2000 must be in Track mode (not Swimming mode). This mode
is selected after you enter the date and time into the OmniSport upon starting the timer.
· After opening the serial port, you can click Interfaces / Open Water Button Timer / Test
Communication to verify that the OmniSport is communicating properly. If communications are
working properly, the version of the OmniSport software will be displayed. You must be using version
9.3 or later.
· The OmniSport 2000 has 3 modes of operation: Lane Mode, Place Mode, and Non-Lane Mode.
You should use Non-Lane Mode for Open Water Races. Only button number 1 is used and it is
pushed each time a competitor crosses the finish line. In the Non-Lane Mode, the timer can hold up
to 660 times for a given race.
351
Copyright©Sports-Tek Software
MEET MANAGER for Swimming
· As the buttons are pressed, the times are being saved in the Timer and are not being sent to MM. To
download the times, click on Times at the top of the Open Water Module and then click Read
Times. This brings up the Get Times window where you have the option to request results by Event
or by Race Number. It is very helpful to enter the correct event number into the OmniSport 2000
timer before pressing Store / Print on the timer. The heat number should always be 1. If the
incorrect event and heat has been saved in the timer with the results, you can use race number
which is a unique number saved with each race in the timer and is shown on the print-out from the
timer.
· You can Read Times from the timer as often as you wish since the times are stored in the memory
of the timer.
Cables
Cables are used to connect the HY-TEK computer's serial COM port to Timing Consoles and other
computers running alpha-numeric scoreboards. Most computers do not come with a serial COM port,
but usually have several USB ports. The best way to add a serial port to a computer is to install a
USB to Serial Adaptor.
Serial Cables
When using HY-TEK with various Timing Consoles and Alpha-numeric Scoreboard computers, the
two systems are connected with a cable which is either a serial cable or a null modem cable. This
cable plugs into a 9 pin male Serial COM port on the HY-TEK computer. Most Timing Consoles will
have either a 9 pin male or 9 pin female port connector. Some older Timing Consoles have 25 pin
ports. Most computers these days do not come with a serial COM port, so you will have to install a
USB to Serial Adaptor.
The serial and null modem cables have nine wires in them, but normally only the 2 and the 3 wires
connected to the 2 and 3 pins are used. The difference between a straight thru RS232 serial cable and
a null modem cable is that the null modem cable makes the 2 and the 3 wires cross (the 2 pin on one
end connects to the 3 pin on the other end). Some timing console devices use straight serial cables
and some use null modem cables. Computer to computer, such as HY-TEK connecting directly to
another computer running an alpha-numeric scoreboard, always uses null modem cables. If you make
your own cable, we recommend wiring pins 2 for send, 3 for receive, and 5 for ground. These cables
are generally available at most computer and electronics stores.
Timers that require straight thru RS232 cables:
CTS 4 and CTS 5 and CTS 6
OmniSport 1000
OmniSport 2000
Incomar Splash 1
Timers that require null modem cables:
CTS 6 (early versions only)
OmniSport 6000
BestBet Timer
Timers that require special cables:
OSM6
ARES 21
Omega Power Time
Kyrotech Tec-Timer
ALGE SWIM 2000
See also USB to Serial Adaptor.
352
Copyright©Sports-Tek Software
MEET MANAGER for Swimming
USB to Serial Adaptor
Most computers these days do not come with a serial COM port, but usually have several USB ports.
Most timers and scoreboards depend on the serial port for communicating with HY-TEK. The best way
to add a serial port to a computer is to install a USB to Serial Adaptor. This adaptor plugs into a USB
port on the computer and has a cable attached with a 9 pin male connector on the other end.
Go to Google and type in "USB to Serial Adapter" to find a site that sells these adaptors or simply go to
your local computer store. Keyspan makes and sells very reliable USB to Serial Adaptors. A CD-ROM
comes with these adaptors that installs the device driver. You MUST install the device driver. During
the installation process it should tell you the number of the serial port, such as COM5. This number will
almost never be 1 and will have nothing to do with the port number on the timer.
How to Find the COM Port Number on your Computer
If you do not know the COM port number, then do the following:
· In Windows XP go to Start / Settings / Control Panel. Look for the System icon. If you do not see it,
you are probably in Category View. Go to the upper left and select Classic View and then System.
Click on Hardware / Device Manager / Ports. Click the + next to Ports.
· In Windows 98, click Start / Settings / Control Panel / System / Device Manager. Click the + next to
Ports.
Under Ports, you should see something like: Keyspan USB Serial Port (COM5). If you do not see any
COM port listed, then the USB to Serial Adaptor is not installed properly.
353
Copyright©Sports-Tek Software
MEET MANAGER for Swimming
Appendix
354
Copyright©Sports-Tek Software
MEET MANAGER for Swimming
Masters Record File Format
As described in the Events Menu, you may choose to Import Records in the Masters format as
described below. Please note that MEET MANAGER REQUIRES that the Masters World and National
records exactly meet the record layout as described below.
Masters Records File Layout:
The File extension must be one of the following:
LCM for Long Course Meters
SCM for Short Course Meters
SCY for Yards
The file name must be one of the following for World and National record formats:
IWRL for Individual World records
RWRL for Relay World records
INAT for Individual National records
RNAT for Relay National records
Examples of legitimate masters Records File names are:
IWRL.LCM
RWRL.LCM
INAT.LCM
RNAT.SCY
If you create your own record formats, you may use file names up to 12 characters plus the file
extension. These files must start with I for individual records and with R for relay records. The format
for the Individual records must be the same as for the National formats below. Only a file with the
name of IWRL or RWRL will use the World Record formats below.
The record file data itself must conform to the following comma delimited record format example and
the records must be provided in ascending age order, first women, then choose men.
World Record Format - Individual
WOMEN,25-29, 50 M. FREE,SARA SHAND,USA ,08-18-91, 26.68
WOMEN,25-29,100 M. FREE,SARA SHAND,USA ,08-18-91, 58.23
WOMEN,25-29,200 M. FREE,SARA SHAND,USA , - -89, 2:07.11
World Record Format - Relay
WOMEN,200 M. FREE,100-119,HOLMES-USA , MARY HOLMES , SUSAN HALFACRE, BETH MAUER, TISH
BUCHER , 08-28-88, 1:53.20
WOMEN,200 M. FREE,120-159,LONE STAR-USA , MONICA BURK, BRIGITTE HEUER, L. MORRISONCASEY, JACKI HIRSTY, 08-24-87, 1:53.05
WOMEN,200 M. FREE,160-199, REGATAS-PERU, C CHANG, B CHANGANAQUI, ROSARIO VIVANCO,
SANDRA CROUSSE, 11-12-95, 1:59.32
National Record Format - Individual
WOMEN,25-29,50 M. FREE,SARA SHAND, 08-18-91, 26.68
WOMEN,25-29,100 M. FREE,SHEILA TAORMINA, 03-18-95, 57.76
WOMEN,25-29,200 M. FREE,SHEILA TAORMINA, 12-02-95, 2:02.06
National Record Format - Relay
WOMEN,200 M. FREE,100-119,OREGON, SHANNON HERINGER, GRACIE GODDARD, LEISSA MILLS,
LINDA FINLEY, 08-23-92, 1:52.47
WOMEN,200 M. FREE,120-159,LONE STAR ,MONICA BURK, BRIGITTE HEUER , L. MORRISONCASEY,JACKI HIRSTY, 08-24-87, 1:53.05
WOMEN,200 M. FREE,160-199,D. C. MASTERS, JACKI HIRSTY, NANCY KIRKENDALL, ANN SVANSON,
SUE HARRINGTON, 08-28-88, 2:03.48
355
Copyright©Sports-Tek Software
MEET MANAGER for Swimming
Hy-Tek Products
Personal SWIM MANAGER
HY-TEK's Personal SWIM MANAGER - Reloaded (PSM-R) has been developed to help the Athlete
track his/her performance, scheduling, and administrative information. Here is a short summary of
product highlights:
Software for the entire Family (up to 4 swimmers).
Package includes BOTH PSM-R for Windows and PSM-R Mobile for Palm OS.
HotSync information back and forth between your Windows desktop and your Palm OS device
Import Meet Results from TEAM MANAGER Online and MEET MANAGER.
Export Entries to TEAM MANAGER.
Interactive Calendar to help with Scheduling of Team Meetings, Workouts, Swim Meets,
Practices, etc. rack Swim Performances and splits with Meet filters, Goal Setting, and Reports.
· Graph Swim Times and Health attributes including Weight, Heart Rate, Wellness, & Sleep)
· Use PSM-R as your own Personal Web Browser with Your "Favorite Sites"and "Email".
· Import Workouts from WORKOUT MANAGER.
·
·
·
·
·
·
Ask about HY-TEK's Team FUND RAISER Opportunity when purchasing 10 or more PSM-R products
for your team!
Check out PSM-R at http://www.hy-tekltd.com/psm/index.html
Sports BUSINESS MANAGER
Sports BUSINESS MANAGER is designed to help coaches, sports team administrators, secretaries,
and bookkeepers to easily and effectively manage the financial affairs of a sports team.
Sports BUSINESS MANAGER will enable you to send your members one invoice which includes
dues, meet entry fees, travel fund, taxable sales, and non-taxable sales. And the printing of this
invoice is a snap. It is specially designed to contain the mailing address and return address so that you
can fold it and place it in a double window envelope for mailing - no need for pre-printed envelopes or
labels.
Sports BUSINESS MANAGER will provide the manager of your team an easy way of keeping up with
the daily operations of the team. Sports BUSINESS MANAGER can print a report of the days
activities including:
·
·
·
·
alphabetical list of transactions and bank deposit summaries
list of corrections to previously entered transactions
list of new families and new athletes
report of total balance due for all accounts
Three optional features are available with Sports BUSINESS MANAGER:
· Automatic Billing
· Check Book
· Email Invoices
Once your fee structure is set up, monthly billing of several hundred athletes becomes easy. The
automatic billing feature has the capability to charge several or all families any annual fee you wish to
356
Copyright©Sports-Tek Software
MEET MANAGER for Swimming
levy. The Check Book option makes it easy to track payments and payroll by category and date. And
the Email Invoices option is a real money-saver - no more stamps and envelops.
Check out PSM-R at http://www.hy-tekltd.com/swim/winbm/index.html
TEAM MANAGER
TEAM MANAGER is designed to automate the clerical tasks associated with managing and coaching
a swim team, including workout management. TM can be used by one team, a swim league, or even a
USA Swimming LSC. Here are a few of the reports and functions that TM can perform:
·
·
·
·
·
·
·
·
·
·
·
Roster Report (Many formats)
Record Keeping (e.g. tracking pool, meet and team records)
Time Standards (Tagging swimmers= times with the appropriate time standards - e.g. AAA, AA, A,
BB, B
Top Times Report (e.g. Top 5 for 50 Free since 4/12/2001)
Mailing Labels and Deck Labels/Cards (for your next meet)
Ribbon Labels (based on the place finish or improvement)
USA Swimming Registration
Graph Swimmer's Performance (over the season)
Conversion from Meters to Yards and Yards to Meters
Recruiting Reports & NISCA Power Points
Set up and manage workouts and training
When you return from a meet, enter your team's results directly into your TM database using your
keyboard or by importing a Meet Result diskette or Email file. You do not have to enter your
swimmers' names – TM will display all the eligible swimmers for a particular event. Just select a
swimmer and enter his/her time.
Before an upcoming meet, use TM's "point and shoot" screen to declare who is swimming what
events. Print a "Meet Entry" report and then click on File then Export to put those entries onto a
diskette to send to the host team.
WORKOUT MANAGER Features
WORKOUT MANAGER is a coach's tool optional feature that has been integrated into TEAM
MANAGER so that, when creating workouts and predicting training paces, it can utilize the already
available athlete rosters and best times without having to move data back and forth between multiple
products. Created with the busy coach in mind, WORKOUT MANAGER is intuitive and time saving
with its easy to use menus and windows navigation features. Most coaches are responsible for 8 to 24
swimmers in anywhere from 2 to 4 lanes in each session. Therefore it is imperative that the coach be
able to create workouts for each lane quickly and easily. WORKOUT MANAGER permits multiple
workout windows to be open at the same time where you can cut and paste between workouts and use
designs from previous workouts. While creating a workout, a running time line, total yardage and the
total stress level is shown to enable you to get the maximum out of a workout. In addition, you can see
the amount of each stroke and the amount of each energy system being designed in. When you assign
a particular workout to a group/subgroup, all swimmers in that group have their attendance and
yardage statistics automatically updated.
With the Training option, you can record any kind of test set and you can predict training paces from
recorded T-30 test sets. The Training option also has been designed to be able to upload statistics on
your swimmers to Web based training programs and then be able to download workouts designed by
those web based program. With the Pace Clock option, you can upload workouts into various pace
clocks that are available in the market place. This is a great time saving feature since it is time
consuming to manually load data into these pace clocks. See more about the Pace Clock option in the
WORKOUT MANAGER options section.
357
Copyright©Sports-Tek Software
MEET MANAGER for Swimming
TM and WORKOUT MANAGER is the latest in swim team automation technology! Check it out at
http://www.hy-tekltd.com/swim/TMII/index.html.
Sales Office
You have a number of options for customer service at HY-TEK.
Web Site Shop Online
To order replacement products, new options or products, please visit our Web Site at www.hytekltd.com and click on the Shop Online Button! Simply fill in the required fields and submit your order.
You will have the option to print a copy of your order.
Telephone
Call the Sales Office Toll Free at 866.456.5111 and speak to a Sales Associate from 9:00 AM to 5:00
PM Eastern Time Monday through Friday (except holidays).
Email
Email our Sales office at [email protected].
Fax
Fax us a Purchase Order Toll Free at 866.471.7847.
Technical Support
Click the this link http://www.hy-tekltd.com/support.html for information about HY-TEK's
Technical Support options.
358
Copyright©Sports-Tek Software
MEET MANAGER for Swimming
359
Copyright©Sports-Tek Software
MEET MANAGER for Swimming
Glossary of Terms
360
Copyright©Sports-Tek Software
MEET MANAGER for Swimming
About
Selecting Help and then About from the Main Menu displays certain information about your product (i.e.
Product Version and Date, etc.).
Advancers
A set of Swimmers and Entry times from a meet that have qualified for the next level meet. For
example, the fastest 3 swimmers for each event in the 4 State Regional meets advance forward to the
State High School Championships. MM can Export Advancers as well as Import those entries into a
Database.
Aggregate Time
A time that is computed by adding together times for individual swims for four athletes to arrive at a
relay time for entry purposes.
Altitude Factor
A factor that will be subtracted from the actual swim time for a specific meet only. This factor is
generally applied to times that have been swum at an altitude of 3,000 feet or above.
Backup
To save copies of files for safekeeping. You can back up files as you work on them to protect your
work in case of a power failure or machine problem.
British Age Group Categories (BAGCATS)
These categories are made up of event groups. There are 5 event groups: 50's, 100's, 200's stroke,
200 to 1500 frees, and IM's. At least one swim must be completed from each event group that makes
up the category. An overall score will be calculated that automatically works out the highest scoring
swim in each event group and adds them together for a total score. For example, if you swim two of
the events in the Sprint group, the computer system will work out which one scores more points and
add it into the overall score with your best scores from the other event groups. The events vary
depending on age and whether the meet is Long Course Meters or Short Course Meters.
As of February 2005, the event groups are as follows:
Long Course Meters
Age 10 Boys and Girls and Age 11 Boys
· Best 100
· Best 200 from back, breast and fly
· Best 200/400 free
· Best 200/400 IM
Age 11, 12, and 13 Girls
· Best 100
· Best 200 from back, breast and fly
· Best 200/400/800/1500 free
· Best 200/400 IM
Age 12, 13, and 14 Boys
· Best 100
· Best 200 from back, breast and fly
361
Copyright©Sports-Tek Software
MEET MANAGER for Swimming
· Best 200/400/800/1500 free
· Best 200/400 IM
Short Course Meters
Age 9 Boys and Girls
· Best 50
· Best 200 from back, breast and fly
· Best 200 free
· Best 100/200 IM
Age 10 Boys and Girls and Age 11 Boys
· Best 50
· Best 200 from back, breast and fly
· Best 200/400 free
· Best 100/200 IM
Age 11 Girls
· Best 50
· Best 100
· Best 200 from back, breast and fly
· Best 200/400/800/1500 free
· Best 100/200 IM
Age 12, 13, and 14 Boys
· Best 50
· Best 100
· Best 200 from back, breast and fly
· Best 200/400/800/1500 free
· Best 100/200/400 IM
Age 12, and 13 Girls
· Best 50
· Best 100
· Best 200 from back, breast and fly
· Best 200/400/800/1500 free
· Best 100/200/400 IM
Cancel
Clicking on this button will Cancel any of the actions you have chosen and take you back to the Main
Menu of MEET MANAGER for Swimming.
Combined Events
A Combined Event is an event that contains 2 to 10 sub-events where the points scored in each of the
sub-events are added up or where the times swum in each of the sub-events are added up. The
rankings for a Combined Event are based on the total points scored, highest to lowest, or on the total
time, lowest to highest.
362
Copyright©Sports-Tek Software
MEET MANAGER for Swimming
Conforming Time
Qualifying time that corresponds to the course that will be competed in a meet.
Consoltation
Competition for the fastest of those who failed to qualify for the finals - also called B-Finals..
Contents Button
A Help button you can use to return to the main Contents screen which helps you quickly navigate
through specific areas of Help.
Conversion Factor
A factor (number) used to convert times from one course to another.
See Conversion Factors for Entry Times for the conversion factors built into MM for entries.
There can also be a conversion factor for results when non-conforming pool sizes such as 22 yards
are used.
See Conversion Factor for Results for details.
Converted Time
A time that has been converted from a time in one course to a time in another course using a
conversion factor.
See Conversion Factors for Entry Times for the conversion factors built into MM.
Course
Designated distance over which a meet is conducted - either Long Course Meters, Short Course
Meters, or Yards.
Database
A collection of data related to a particular topic or purpose. For MM, it's all of the information (athletes,
entries, events, etc) for one specific meet.
Deck Seeded Meet
A meet where all entries are due prior to the first day of the meet and athletes must declare availability
to swim prior to deadlines.
Default
A program's predetermined setting or action that takes effect unless specifically changed.
Directory
An index of filenames and subdirectories. A directory, sometimes called a "folder" can be divided into
subdirectories. A root directory is the main directory of a disk. All other directories branch from the
root.
363
Copyright©Sports-Tek Software
MEET MANAGER for Swimming
DQ
Disqualified. An athlete may be DQ'd for a number of reasons - turn violation, stroke violation, false
start, etc.
Drag
To move text or an object by positioning the pointer on the item you want to move, pressing the mouse
button, moving the mouse, then releasing the mouse button.
Dual Meet
A timed final meet (usually High School, College, or Rec league) in which two teams compete and are
assigned even or odd lanes. A Double Dual meet is one that three or more teams compete but are
scored as if they are swimming against one another in multiple dual meets.
Event
Any race or series of races in a given stroke and/or distance.
Exhibition
A declaration for an athlete or relay that specifies that they are swimming for time but are not eligible
for awards or points.
FAQ's
Frequently Asked Questions.
Field
A field is a single data item in a record. As an example, when you are in the System Menu, the area
where you type the text that you want to appear on your MEET MANAGER Reports is a Field. Any
portion of a screen provided as an area for input represents a Field.
FINA
The world governing body for swimming.
Finals
Any single race which determines the final places and times in an event. There can be 1, 2, or even
sometimes 3 heats of finals. Generally these Heats are called:
Fastest Heat
Next fastest
Next fastest
A-Finals or Finals
B-Finals or Consolations
C-Finals or Bonus
MM defaults to the name "A-Finals" and "B-Finals" but you can change them to anything you want in
the Language Preferences section.
Heats
A set of athletes that race together each in a separate lane of a pool. "Seeding" assigns each athlete a
separate lane in a heat. Multiple heats make up an event.
364
Copyright©Sports-Tek Software
MEET MANAGER for Swimming
Interface Software
Software that allows your timing console to send swim times directly to Meet Manager.
Judge's Decision
A decision on who finished in what place independent of the automatic or manual time that was
recorded.
Lane
The specific area in which the athlete is assigned to swim; i.e., lane one.
Leg
The part of the relay event that is swum by a single team member.
List Box
A box that displays a list of choices. When a list is too long to display all choices, it will have a scroll
bar so that you can view additional items.
LSC
Local Swimming Committee of USA Swimming
Masters
Those athletes who are at least 19 years old for the USA and 25 years old for all other countries.
These athletes compete in five year groups - for example, 25-29, 30-34, 35-39, 40-44, etc.
Meet Entry
The declaration of an athlete or relay in a specific event and entry time. The entry time is usually their
best time that has previously been swum in that event.
Meet Program
The order of events listed by class of competition, gender, age group, distance, and stroke as set forth
in meet announcement. The Meet Program is usually composed of a Heat Sheets and/or Psych
Sheets.
Meet Sanction
A permit issued by an LSC to a USA Swimming group member to conduct a meet in conformance with
the USA Swimming rules.
Non-Conforming Times
Meet entry times that do not correspond to the course that will be competed in a meet. For example,
Yard entry times for a Long Course Meter meet.
NZS
New Zealand Swimming is the governing body for amateur swimming in New Zealand.
365
Copyright©Sports-Tek Software
MEET MANAGER for Swimming
Prelim/Final Meet
A meet in which everyone swims once and then the top finishers swim again in finals.
Preliminary Heats
Competition in which a number of heats are swum to qualify the fastest athletes for the finals where
final placing for the event will be determined.
Race
Any single swimming competition; i.e., Preliminary, Final, Timed Final.
Radio Button
Items preceded by circles are called Radio Buttons. A radio button allows you to select one function
from among a group of functions arranged together inside a group box. These functions are mutually
exclusive - you can select only one button at a time. The radio button you select will be switched on,
while all the other radio buttons will be switched off.
Record
A Record is a best time for a particular event at a particular place. Examples of Records are Pool
Records, State Records, and National Age Group Records.
Relay Leg
The time swam by one of the 4 relay athletes. Only the first leg can count as an official time.
Release Notes
Release Notes contain a list of New Features as well as Corrections for a particular MM release. From
the Main Menu Bar, you would click on Help then Release Notes to display the release Notes for the
particular MM Release you are running.
Reportable Times
Times achieved in conformance with applicable USA Swimming rules.
Restore
Restore means to copy your database from a backup disk(s) onto your hard drive. The Restore utility
will overlay your currently selected database with the database on the diskette.
Sanction
A permit issued by an LSC to a USA-S group member to conduct a meet.
Scoreboard Interface
Software that connects Meet Manager directly to most alphanumeric scoreboard systems.
366
Copyright©Sports-Tek Software
MEET MANAGER for Swimming
Scratch
The process in which an athlete officially removes himself or herself from a specific event before it has
been swum.
Scroll Bars
The bars on the right side and bottom of the window that let you move vertically and horizontally
through a list or graphic by clicking on the scroll arrows.
SDIF
Standard Data Interchange Format
Search Button
A Help button you can use to search for Help topics by typing keywords.
Seeding
The process of assigning athletes or relays to heats and lanes.
Session
Any portion of a meet distinctly separated from other portions by locale, time, or type of competition,
i.e., preliminaries and finals; morning and afternoon or evening; Senior and Age Group, etc.
Split Time
A swim time from an individual or relay event for one or more lengths of the pool. You can have a 25,
50, 100, 200, 400, or event 800 split times. They can be recorded electronically or by a watch. Only
the "lead off" split can count as an official time.
Time Standard or Cut
A Time Standard is simply a set of times that have been established to represent a certain level of
swimming. For example, an "A" time has a certain value for every age, stroke, and distance.
Sometimes these Time Standards or "cuts" are specified as criteria for entering a meet. For example,
an "A Meet" may require that only those athletes who have previously swam an A time can enter the
meet.
Timed Final Heats
Competition in which there is only one round and final placings are determined by the times performed
regardless of the heat swum in.
Unattached
An unattached athlete is one that has no affiliation with a Team. An unattached athlete's points will not
be accumulated towards Team Score, but will count for Individual High Point scores.
When you Add or Edit an Athlete, MM allows you to assign that athlete to an "unattached" team. An
unattached Team is any Team that has the first 3 characters of the Team Abbreviation as "UN-". For
example, "UN-FL" and "UN-CA" would both be unattached Team names. In addition, "UNAT" and
UNATT" are also reserved as Unattached Team Abbreviations. Any athletes on teams using any one
of these Team Abbreviations would be classified as "unattached".
367
Copyright©Sports-Tek Software
MEET MANAGER for Swimming
USA Swimming uses "UN" as their official Unattached designation for Unattached athletes. When
using the Exceptions Report's Registration ID check, it will match the "UN" with any athlete using one
of MM's official unattached team abbreviation codes.
USA Swimming
United States Aquatic Sports
Venue
The location of the meet - usually city/state or city/province.
Version
The version of the software that is installed on your computer can be found in the "About" box
accessed from the Main Menu.
Workout Manager
TEAM MANAGER optional software module designed to develop and analyze daily workouts, predict
training paces, record test sets, etc.
368
Copyright©Sports-Tek Software
Index
MEET MANAGER for Swimming
Affiliation 158, 180
A-Final 99, 138, 237
Age 98, 168, 176
Age Group 158, 264
Age Group Record Applications 293
Age-Up Athletes 94, 176
Age-Up Date 94
Aggregrate Time 361
ALGE SWIM 2000 Timing Console 323
ALGE Timy 325
Alpha Scoreboard 88, 131, 344, 346
Alphabet Check-in 271
Alternate / ALT 170, 177, 189, 264
Alternate Heats 151
Alternate Team Abbreviation 75, 104, 180
Alternate Women/Men Heats 153
Alternative Points 123
Altitude 94
Altitude Factor 361
Aministrator for XP SP2 22
AP News 108, 252
ARES 21 230, 341
Athlete 167, 168, 170, 173, 174, 175, 196, 197
Athlete Contact Information 173
Athlete Email 82
Athlete Information from the Run Menu 202
Athlete Matching 64
Athlete Roster 260
Athlete Status 98, 104
Athlete Surcharge 259
Athlete/Relay Preferences 98
Athletes Menu 167
Athletes Names for Scoreboard 88
AUS 94
AUS Points 111, 117, 297
Australian Swimming 94
Auto Increment Competitor Numbers 98
Automatic Backup 135
Automatic Check for Updates 135
Automatically Age-Up Athletes 176
Averaging Two Backup Times 228
Avery 301, 303, 307
Award Count 256
Award Label Option 32
Award Labels 111, 209, 226, 283, 285, 301
Awards 111, 206
Index
-..hy3 files 65
.sd3 files 65
.tcl files 74
-11.4Q
24
-33+ Dual Meet 121
3x5 Cards 264
-AA Relays Only 98, 111
A/B/C Meet 161, 234
A4 301, 303, 307
About 361
Achiever 234, 287
Acrobat Help File 11
Add a Heat 220
Add Additional Heat 222
Add Athlete 168, 170, 251
Add Combined Event 147
Add Event 138, 224, 251
Add Heat 187
Add Late Entries 222
Add License 62
Add Relay and Enter Athletes 177
Add Session 151
Add Team 39, 180, 281
Address 168, 173, 182
Address List 260
Addresses 180
Adjust 195, 196, 206, 210, 250
Adjust Pad Times with Backup Times Calculation
210
Adjust Seeding 187
Adjustment Rules for Backups 228
Advancers 65, 79, 361
369
Copyright©Sports-Tek Software
Index
MEET MANAGER for Swimming
Change Results Course 155
Change Rounds to Fast-Slow Heat Order 133
Change Rounds to Slow -Fast Heat Order 133
Check for Updates 60, 135, 310
Check-in Report 271
Chronomix 737 Timer 350
Circle Seeding 99, 185, 237
Citizen Of 98, 104
CL2 75, 76, 90, 300
Class 94
Clear Entries 172
Clear Indicators 157, 170
Club Affiliation 88, 168, 180
Coach 182
College 239, 240, 250, 251
Colorado Time Systems 230, 328, 329, 344
COM 328, 329, 333, 334, 336, 337, 339, 341
COM Port 352, 353
Combine Entries 192, 193
Combine Heats 195
Combine Results 225
Combined Events 114, 146, 147, 149, 238, 240,
284, 362
Combined Events - Award Labels 285
Compact a Database 31, 52
Compare Point Systems 297
Competitor Numbers 98, 173, 178, 196, 202, 208
Computing Age 94, 176
ConformingTime 363
Connection 328, 329, 333, 334, 336, 337, 339, 341
Consolation Final 237, 363
Consolidate Meet 194
Contact Information 173, 180
Contact List 259
Contents Button 363
Conversion Factors for Entries 99, 101, 198, 363
Conversion Factors for Results 119, 363
Convert Entry Times 94, 101, 104, 168, 195
Convert Result Times 298
Copy Entries 192, 195
Copy Events 47
Copyright 14
Country 104
Country Code 104
Course 94, 151, 363
Create a Session Schedule 153
Ctrl-A 209, 226
Ctrl-B 222, 230
-BBackup a Database 47, 48, 50, 51, 135, 361
Backup Times 202, 206, 210, 228, 230, 331
BAG Points 115
BAGCAT Points 111, 115
BAGCATS 281, 361
Bar Code Readers 347
Base Country 94
BCSSA Entry Cards 303
BCSSA meet 70, 71, 84, 85, 235, 236
BestBet Timing Console 327
B-Final 99, 138, 237, 363
BG Age Factors 115
Biathlon 146, 147
Birth Year 104
Birthdates 98, 168
Bitmap 135
Blue Line 210
Bonus Entry 99, 170, 185, 189
Bonus Final 237
British Columbia Summer Swimming Association
235
British Swimming ID Format 94
British Swimming OnLine Entries 72
British Swimming Ranking Export 276
Business Manager 356
Button Backup 210
Button Backups Printing 276
-CCable 312, 328, 333, 334, 336, 339, 341
Cables 352, 353
Calculation 210, 222
Canadian 303
Cancel 362
Cardless Meet 271
Cards 303
CD 48
C-Final 99, 138, 237
Championship Meet 99, 174, 224, 237
Change All Event Entry Fees 133
Change Every Standard Event to Score 133
Change Number of Lanes 133
Change Pads at Both Ends 133
370
Copyright©Sports-Tek Software
Index
MEET MANAGER for Swimming
Ctrl-D 207
Ctrl-E 220
Ctrl-F 226
Ctrl-F10 220
Ctrl-F11 220
Ctrl-F12 220
Ctrl-F3 331
Ctrl-F4 220
Ctrl-F5 220
Ctrl-F6 220
Ctrl-F7 220
Ctrl-F8 220
Ctrl-F9 220
Ctrl-H 220
Ctrl-J 214
Ctrl-K 210, 222, 223
Ctrl-L 219
Ctrl-P 210
Ctrl-Q 230
Ctrl-R 208
Ctrl-S 219
Ctrl-T 230
Ctrl-U 216
Ctrl-W 220
Ctrl-Z 220
CTS 4 328
CTS 5 328, 329
CTS 6 230, 328, 329
CTS Dolphin Wireless Watches 32, 214, 228, 330,
331
Cumulative Splits 207, 276
Custom Qualifying Times 161, 164
Customize Entry/Scoring Preferences 111
Customize Meet Preferences 94
Customize Seeding Preferences 99
Customize the Background Picture 135
Customize the Enter Key to Move Between Data
Entry Fields 135
-DDaktronics OmniSport 1000 Timing Console
Daktronics OmniSport 2000 for Open Water
Daktronics OmniSport 2000 Timing Console
334, 335
Daktronics OmniSport 6000 Timing Console
336
Daktronics Scoreboard Interface 344
333
351
230,
334,
371
Data Refresh 243
Database 47, 48, 52, 53, 363
Database Refresh 207
Date 94
Date for Computing Ages 94, 176
Decathlon 146, 147, 238
Deck Seed 185, 187, 196, 222, 250
Deck Seeded Meet 363
Declare 2 to a Lane 141
Declare a Judge’s Decision 214
Declare Foreign Swimmers 174
Declare Unattached Athletes 175
Default 363
Degree of Difficulty 251
Delete a Combined Event 148
Delete a Relay 178
Delete a Session 153
Delete a Team 182
Delete an Entry 172
Delete an Event 146
Delete Athletes with no Entries 54
Delete Interface Files 54
Delete Relay Names 54
Delete Scratched Entries 54
Delete Seniors 53, 54
Delete Teams with no Athletes or Relays 54
Demo 30
DFS 221
Directory 363
Directory Preferences 129
Disability 94, 239
Disability Codes 168, 239
Disabilty Events 138
Disabled 104, 168
Diving 69, 83, 138, 251
Divisions 94, 111, 125, 250
Divisions by Entry 94
Divisions by Event 94
Divisions by Flights 120
Divisions by Teams 94, 125
Divisions by Time Standards Meet 94, 120, 234,
235
Divisions for BCSSA 236
Dolphin Backup Mode 214, 228, 330, 331
Dolphin Stand Alone Mode 330
Dolphin System 330
Dot Matrix 209, 226, 252, 301, 303, 307
Double Dual 94, 239
Copyright©Sports-Tek Software
Index
MEET MANAGER for Swimming
Double Ended Meet 243, 273
Double Space 266
Download Event Setups to the CTS 5 or CTS 6
329
Download Event Setups to the OmniSport 2000
335
Download Event Setups to the OmniSport 6000
Timing Console 337
DQ 104, 202, 221, 364
DQ Codes 94, 202, 230, 256
DQ Summary 287
DQ's in Combined Events 284
Draft Heat Sheet 187
Drag 364
Drag and Drop 185, 187, 196, 202, 208
Dual Meet 94, 99, 101, 121, 239, 240, 241, 364
Dual Meet 3+ 121
Dual Meet Results Format 276
Dual Meet Seeding 102, 185
-EEarly Declaration 189
Edit Athlete 168
Edit Combined Event 147
Edit Event 138
eDive 69, 83
eLessons 34
Eligibility Date 117
Email 65, 75, 82, 173, 180
Email Invoices 356
Empty Lanes 268
End Date 94
English 126
Enter Athletes 170
Enter Coach's Names for a Team 182
Enter Key 135
Enter Multiple Watch Times 222
Enter Relay Names 178, 208
Enter Results 202, 221, 223
Entries 53, 65, 68, 72, 170, 222
Entries Max 289
Entry Cards/Labels 32, 303
Entry Deadline 94
Entry Fees 77, 133, 138, 258, 259
Entry Limits 117, 151, 289
Entry List Check-in 271
Entry Lists Report 264
372
Entry Qualification 161
Entry Time 170, 175, 264, 273
Entry/Scoring Preferences 111, 120
EV3 Format 86
Evaluation Edition 30
Even Lanes 99, 240
Event 138, 364
Event Age 170
Event Comments 156, 258, 268, 276
Event List 200
Event Number 138, 276
Event Sequences 329
Event Setups 337
Event Start Times 262
Events Menu 143
Events Report 258
Excel 252
Exceptions Report 289
Exhibition 99, 104, 168, 170, 175, 177, 189, 198,
202, 221, 301, 364
Export 74
Export a Start List for an Alpha Scoreboard 88
Export Advancers 79
Export Compiled Results to Generic Scoreboard
220
Export Entries for eDive 83
Export Entries for Merge 78
Export Entries for SWIMS 76
Export Entry Fees 77
Export Events for TEAM MANAGER 86
Export Files Report 300
Export Generic Data in MS Access 90
Export Masters Records 84
Export Records 84
Export Reports 252
Export Results for current heat to Generic
Scoreboard 220
Export Results for Disabled Athletes in IPC Format
93
Export Results for MEET MANAGER Merge 81
Export Results to Swimming World Magazine Web
Site 91
Export Results to TM and SWIMS 75
Export Rosters Only 82
Export Start List for current heat to Generic
Scoreboard 220
Export Team Scores to Generic Scoreboard 220
Export Teams Only 82
Export Time Standards 85
Copyright©Sports-Tek Software
Index
MEET MANAGER for Swimming
Export UK Competitors List
Export USA-S Registration
89
89
Global 133
Green Line 210
-F-
-H-
F1 220
F11 220, 321
F12 220, 321
F2 218
F3 218
F4 220
F5 220
F6 220
F7 206
F8 209
F9 207
FAQ 35
FAQ's 364
Fast to Slow 138, 266
Fastest Heat 111
Fastest Heats Swim in Finals 153
Field 364
File Menu 45
File Sharing 344
FINA 185, 364
FINA DQ Codes 94
FINA Points 111, 116, 297
Finals 151, 197, 237, 249, 276, 364
Finals Rained Out 194
Financial 356
FinishLynx For Timing Open Water 351
Flag 158, 161
Flat HTML 262, 266, 268, 275, 281, 284, 286
Flighted Meet 94, 111, 120, 242
Foreigner 104, 111, 168, 174
French 126
Frequently Asked Questions 35
Full Team Name 180
Function Keys 220
Hardware 23, 328, 333, 334, 336, 339, 341
Heat 195, 222, 364
Heat Interval 151
Heat Malfunction 210, 212
Heat Order 138
Heat Sheet 224, 268
Heat Window 202
Heat/Lane 170, 196, 268
Help 11, 34
Heptathlon 146, 147, 238
High Point 123, 281
High Point Award Labels 283
High School 239, 240, 250, 251
Hometown 104
HotSync 356, 357
How to Customize Report Preferences 104, 107,
108
How to Export Advancers Based on a Time Standard
79
How To Export Real-Time Results 321
How to Export Reports 253
How to Get Started 39
How to Run a 3+ Team Dual Meet 240
How to Run a BCSSA meet 235
How to Run a Championship Meet 237
How to Run a Disability Meet 239
How to Run a Double Dual Meet 239
How to Run a Dual Meet 240
How to Run a Flighted Meet 242
How to Run a Masters Meet 242
How to Run a Meet using a Network 243
How to Run a Multi-Age Super Final 245
How to Run a Pentathlon Meet 238
How to Run a Skins Event 249
How to Run a Timed Final Meet 249
How to Run a Totally Deck Seeded Meet 250
How to Run a Varsity/JV Meet 250
How to Run a Zone Meet 250
How to Run an A/B/C Type Meet 234
How to Run an Open Water Meet Using the OW
Module 246
How to Run an Open Water Meet Using the Run
Menu 245
-GGB Points 115
Generic Scoreboard 131
Generic Serial 344
German 126
Get Times 206, 218
373
Copyright©Sports-Tek Software
Index
MEET MANAGER for Swimming
How to Run Inter Squad Meet 241
How to Run Time Trials 249
How to Setup a Network 312
HTML 232, 252, 266, 268, 276, 312, 317
Hub 312
HY3 75, 78, 79, 81, 82, 83, 300
Hy-Tek Points 111, 114, 276, 281, 284, 297
Hy-Tek Products 356, 357
HYV Format 86
-JJ 280
Judge's Decision (JD) 206, 214, 224, 365
Judge's Placing Sheet 273
JV 94, 111, 125, 250
-K-
-IIcons 42
ID Formats 94
Ignore Psych 268
Import British Swimming OnLine Entries 72
Import Exception Report 65
Import Files Report 300
Import Meet Entries 65, 72
Import Menu 64
Import Picture 135
Import Records 70, 158
Import Registration File 73
Import Rosters 68
Import Time Standards 71, 161
Import Track & Field Rosters 74
Import USA Swimming OnLine Entries 72
Improved Times 287
Improvement Points 111, 122
IMX Scoring 240
Incomar Splash 1 Timing Console 338
Increment School Year 133
Indicator 170
Insert athlete into open lane using competitor #'s
220
Install MEET MANAGER 17, 18, 22
Install Service Pack Update 60, 310
Inter Squad Meet 241
Interface 131, 328, 329, 333, 334, 336, 337, 339,
341, 342
Interface for Timer 130
Interface Option 32
Interface Software 365
Internet 252, 312
Introduction 11
IST 338, 339, 344
374
Key Phrases 126
Keyboard Use in Run 220
Keywords 126
Kryotech Tec-Timer Timing Console
339
-LLabels 209, 226, 283, 285, 301, 303, 307
Labels Menu 301
Lane 99, 141, 224, 273, 365
Lane Assignments for Teams 102, 240
Lane Malfunction 210, 212
Lane Preferences 99, 101
Lane/Timer Sheets 273
Language Preference 126
Language Translation 126
Laser 209, 226, 301, 303, 307
Late Entries 222, 303
Leg 365
Legal Splits 276
LEN Points 111, 115, 297
Letter 177
License Agreement 14
License Management 62
Limited Warranty 14
List 206, 276
List Box 365
List of Events 258
Lite 65, 67
Location 94
Locked Database 48, 51
Log-on 313
Logos in Footer 109, 229, 266, 276
Long Course Meter 94, 151, 198
LSC 180, 281, 365
LSC All-Star Meets 98
Copyright©Sports-Tek Software
Index
MEET MANAGER for Swimming
-MMailing Information 180, 307
Mailing/Registration Label Option 32
Mailing/Registration Labels 307
Manual Seeding 138, 186, 250
Masters 94, 99, 175, 177, 242, 259, 260, 365
Masters 6th Event 157
Masters Championship Meet Seeding 185
Masters Minimum Age 103
Masters Record Application 293
Masters Record File Format 355
Masters Record Files 70
Masters Seeding Rules 103
Masters Team Sizes for Scoring 125
Matching Athlete Names 64
Maximum Entries 86, 111, 117, 151, 289
Maximum Team Places 111
Medal Count 256, 299
Meet 234, 237, 238, 239, 240, 242, 243, 249, 250
Meet Class 94
Meet Dates 94
Meet Eligibility 117
Meet Entries 65, 72, 170, 365
Meet Entry Fees 77, 133, 138, 258, 259
Meet Entry Qualification 111, 161, 164
Meet Location 94
Meet Name 94
Meet Program 107, 109, 268, 365
Meet Results 276
Meet Sanction 107, 365
Meet Setup 94
Meet Setup for BCSSA 235
Meet Style 94
Meet Summary Report 287
Meet Type 94
Memorize Reports 255
Merge 78, 81
Merge Entries 68
Merge Results 69
Merge Results from eDive 69
Microsof Word - Exporting To 253
Microsoft Word - Exporting To 266, 268
Military Time 104
Minimum Age for Open Events 117
Monitor Resolution 23, 41
Monitor Size 41
375
Move an MM Database to Another Computer 50
MS Access 90
Multi-Age Group 138, 143, 177, 237, 245
Multi-age Split 266
Multi-Age Super Final 138
Multi-Age Super Seed 138
Multiple MM Licenses 62
Multi-Round 138, 197, 224, 237
Multi-User Backups 48
Multi-User Mode 62, 170, 178, 312, 313, 315
-NNAG Records 70
NCAA 293
Network 62, 243, 312, 313, 315, 317, 319, 321
Network Administration 62, 315
Network Hardware 312
Network Setup 312
New in MEET MANAGER 2.0 24
New Meet 47
Next Event 206, 220, 221
Nielsen-Kellerman Interval 2000XC Watch 350
NISCA Points 111, 115, 276, 281, 297
No Proof of Time 175
No Shows 289
No Splash Athletes 260, 289
Non Conforming Times 99, 111, 198
Non-Award 120, 234
Non-Conforming Times 99, 365
NS 221
NT for Results 119
Null Modem 322, 327, 334, 336, 341, 352
Number of Lanes 138
NZS 365
-OOctathlon 146, 147
Odd Lanes 99, 240
Official Backup Time 210
Omega 342, 344
Omega ARES 21 230, 341
Omega OSM 6 341
Omega Power Time 350
OmniSport 2000 230, 334, 335
OmniSport 6000 337
Copyright©Sports-Tek Software
Index
MEET MANAGER for Swimming
One Meter 251
Open a Database 47
Open Events 108
Open in Multi-User Mode 62
Open Serial Port 353
Open Water 138, 216, 245, 286
Open Water Module 246
Open Water Timers 132, 347
Options Menu 133
OSM 6 341
E ,7 ,1 341
OSM6 230
Over-Achievers 104, 120, 287, 301
Overview 39
OW Module 246
Printer 104
Printer Collating 104
Printer Copies 104
Printer Setup 23, 252
Prior Round Results 268, 276
Pro Option 32, 62, 268, 312
Proof of Time 170, 175, 289
Proof of Time Indicator 157
Psych Sheet 170, 268
Psych Sheet in Meet Program 153
Psych Sheets Report 266
Publication 276
Punctuation 108
Punctuation for Athlete Names 104, 108
Punctuation for Record Holder Names 108
Punctuation for Team Names 108
Purge a Database 53, 54, 55, 56, 57
-PPad Times 210
Pads at Both Ends 94, 133, 138
Palm OS 356, 357
Paper Size 104
Participation Labels 301
Passwords for Pro Option 62, 313, 315
PDF documents 256
Peer-to-peer 312
Pentathlon 146, 147, 238, 240
Personal Best Time (PBT) 301
Personal Preferences 135
Personal SWIM MANAGER 356
Phone Number 180
Place backup times in edit mode 220
Platform 138, 251
Point Systems 111, 114, 115, 116, 117, 122, 297
Points Setup 123
POP Forms 293
Port 328, 329, 333, 334, 336, 337, 339, 341
Positive Check-In 271
PowerTime By Omega 342
Preferences 94, 98, 99, 104, 111, 226
Prelim/Final Meet 366
Preliminary Heats 366
Prelims 151, 197, 224, 237, 276
Preview Screen Tool Bar 252
Preview/Adjust 184, 185, 187
Previous Event 206, 220, 221
Print a Records Report 263
Print Directly 104
376
-QQuadathlon 146, 147
Qualifying Alternates 268
Qualifying Times 161, 164
-RRace 366
Race Number 206, 218, 328, 333, 334, 336, 339,
341
Radio Button 366
RAM 23
Rank Order 251
Reaction Times 202, 208, 230, 322
Read-Only 48, 51
Real-Time Results 232, 268, 317, 319, 321
Real-Time Results Log-in Setup 317
Record Applications 293
Record Breaker Labels 301
Record Breakers Preferences 158
Record Tags 158
Records 53, 70, 84, 158, 200, 355, 366
Records Report 263
Referee Format 268
Regions 125, 281
Registration 73, 94, 289
Registration 3x5 Cards 264
Registration Labels for Athletes 307
Copyright©Sports-Tek Software
Index
MEET MANAGER for Swimming
Re-Install MEET MANAGER 20
Relay 53, 65, 75, 175, 177, 196, 197, 264
Relay Ages 289
Relay Exchange Reaction Times 208
Relay Leg 366
Relay Legs (2-8) 138
Relay Names 138, 177, 178, 206, 208
Relay Preferences 98
Relays Menu 177
Release Notes 366
Remove Blank Splits 53, 58, 219
Remove Data Selectively 53, 55, 56, 57
Re-Numbering Competitor Numbers 173
Re-Numbering Events 138, 156
Repair a Database 52
Replace School Year 133
Report Exports 253
Report Format 104, 108
Report Headers 107
Report Preferences 104, 107, 108, 252
Reportable Times 366
Reports 39, 104, 107, 108, 109, 253, 255, 256,
258, 259, 260, 262, 263, 264, 266, 268, 271, 273,
275, 276, 281, 284, 286, 287, 289, 293, 297, 299,
300
Reports Menu 252
Re-Rank 220
Re-Score 220, 225
Reset Mode in Timer 329
Reset Results 53, 55, 56
Reset Results and Seeding 53, 56
Reset Scores 53, 57
Resizing Menus 41
Restore a Database 47, 48, 50, 51, 366
Restore Pad Times 210
Results 53, 69, 75, 91, 225
Results by Lane 223
Results by LSC 276
Results by Team 276
Results Have Incorrect Course 155
Results Indicators 280
Results Preferences 229
Results Report 276
ResulTV 131, 344, 346
Retain Gender 168
Ribbon Count 256
Rich Text 252
Rookie 104, 168
Roster Report 260
Rosters 68, 82, 260
Round 138
Round 1 Alternates 268
RS-232 328, 333, 334, 336, 339, 341, 352, 353
RTF Export 266, 268
RTF Exports 253
Run Screen 199
Run Screen Columns 229
Run Screen Option Bar 206
Run the Meet Menu Bar 204
-SSales Office 358
Sanction 365, 366
Save As 47
School Year 98
Score 53, 111, 133, 225, 229, 231, 232, 276
Score Event 206
Scoreboard 88, 131, 344, 346
Scoreboard Cables 352
Scoreboard Interface 366
Scores Report 281, 284
Scoring Set-Up 123
Scratch 53, 170, 177, 189, 197, 221, 367
Scratch a lane 220
Scratch an Athlete or Relay from an Event 197
Scratch Back 189, 191
Scratch Entries Selectively 59
Scratch Forward 192
Scratch Pad 184, 185, 189, 197
Scratch Percentage 262
Scroll Bars 367
SD3 300
SDIF 90, 367
Search Button 367
Second Club Name 104, 168
Seed an Event 39, 99, 185, 186, 198, 367
Seed Exhibition Athletes Last 198
Seed Non-Conforming Entry Times Last 198
Seed Times 104, 195
Seeding Menu 184
Seeding Preferences 99
Seeding Process 186
Semis 75, 237
Septathlon 146, 147
Serial Cables 352, 353
Serial Port 352, 353
377
Copyright©Sports-Tek Software
Index
MEET MANAGER for Swimming
Service Pack Update 60, 310
Session 39, 88, 151, 153, 155, 206, 262, 367
Session Changing Event Order 153
Session Report 262
Session Schedule 153
Setup a Desktop Icon 21
Setup a Network 312
Setup a SwimOff 224
Setup and Run Diving 251
Setup Divisions 125
Setup Event Comments/Sponsors 156
Setup Menu 94
Setup Point Scoring 123
Setup Records for the Meet 158
Setup Regions 125
Setup Sessions 151
Setup Time Standards for the Meet 161
Sextathlon 146, 147, 240
Sharing the database 312
Short Course Meter 151, 198
Short Team Name 180, 268
Shortcut Keys 168, 220
Show Ranks 266
Show/Hide Backups 206
ShowBkup 210, 222
Single user Mode 62
Sixth Event 175, 242
Skins 249
Slow to Fast 138, 266
Small x 280
SNZ Points 94, 111, 116, 297
Software 23
Spanish 126
Special Indicators 170, 175, 185, 189
Special Points 111, 276
Split Sheets 264
Split Time 367
Splits 75, 201, 206, 207, 221
Splits Settings 229, 276
Sponsors 53, 156, 258
Sports BUSINESS MANAGER 77, 356
Sprint 8 Timer 349
SSA 94
Standard Lane Preferences 101
Standard Points 123
Start Date 94
Start Lists 88, 344, 346
Start Time 151, 262
Sub-Events 149
Subtracted Splits Problem 58
Subtractive Splits 207, 276
Summary 287
Super Final 245
Super Seed 138
Suppress "A" Relay Designator 104
Suppress "J" 104
Suppress "q" 104
Suppress "x" 104
Suppress Event Distance 138
Suppress LSC Designator 104
Suppress Results not meeting qualifying time
Suppress Splits for DQ's 104
Suppress Stroke Name 138
Suppress Time Standard Designator 104
Surcharge 259
Swimming New Zealand 94, 116
Swimming South Africa 94
Swimming World Magazine Web Site 91
SwimMM2Update.zip 60, 310
Swim-Off 138, 224
SWIMS Database 75, 76
Swim-Ups 187, 196, 208
Switch Heats 187
System Requirements 23
119
-TTab 252
Tag Name 158, 161
Take-Your-Mark Timing Console 343, 344
Team 39, 94, 180
Team Abbreviation 175, 180
Team Address List 259
Team Email 82
TEAM MANAGER 65, 75, 86, 357
Team Pairings 121
Team Report 259
Team Score Eligibility 180
Team Scores 175, 201, 229, 231, 232, 276, 281,
344
Team Scratches After Prelims 59
Team Surcharge 259
Teams Menu 180
Tech Support 358
Tech Support Subscription 358
Telephone Number 173, 182
378
Copyright©Sports-Tek Software
Index
MEET MANAGER for Swimming
Three Meter 251
Tie 224
Ties 185
Ties for Records 158
Time Adjustment 210, 223
Time Line 151, 262, 268
Time Machine Timer 349
Time Standard Achievement 301
Time Standards 53, 71, 85, 111, 161, 234, 264,
268, 276, 367
Time Standards Meet 120
Time Trials 138, 249
Timed Final 99, 196, 249
Timed Final Heats 367
Timed Finals Seeding 185
Timing Console 130, 210, 221, 222, 328, 329, 333,
334, 336, 337, 339, 341
Timing Console INTERFACE 322
TM Lite for Entries 65, 67
Top How Many 281
Touch Pads 94
Trainer 182
Translation 126
Triathlon 146, 147
Two to a Lane 138, 141, 198
-UUK 273, 301, 303
Ultrak L10 Timer 350
Unattached 175, 180, 367
Under 12 104
Under-Achievers 104, 120
Uninstall 21
United States Masters Swimming 185, 242
Unofficial 175
UnSeed an Event 53
Un-Seeded 196
Unseeded Menu 206
Unseeded Results Entry 216
Unzip 52
Update 60, 310
Update License 62
Update Records 158
Upgrading from MM 1.4 31
US Masters Record Application 293
USA Swimming 94, 170, 185
USA Swimming OnLine Entries 72
USAS 368
USA-S 94
USA-S Registration 89
USB to Serial 352, 353
User Permissions 22
USMS 365
-VVarsity 94, 111, 125, 250
Venue 368
Version 368
-WWarm-Up Sheet Report 275
Warn if Entry Limits Exceeded 117
Warn if Times are Out of Range 117
Warranty 14
Watch Times 221, 222, 223, 273
Web 232, 317
Web Delivery 18, 62
Web Site 60, 158, 310
What To Do First 11
Wireless Watches 330
Word for Windows 252
Workout Manager 368
World Records 158
-Xx and X
280
-YYard 99, 151, 198
Yellow Line 210
-ZZip 52
Zip drive 48
Zone Meet 250, 281
379
Copyright©Sports-Tek Software