1
User's Guide
LocateXL Help
© 2012 PrimeThought Software Solutions
2
Contents
Chapter 1
1 Introduction
Chapter 2
1 Videos and Training
Chapter 3
1 LocateXL and SpatialXL
Chapter 4
2 Download and installation
Chapter 5
3 Quick geocoder
Chapter 6
4 Batch geocoder
Chapter 7
5 Analysis of results
Chapter 8
6 Reverse geocoder
Chapter 9
7 LocateXL Ribbon
7 Geocode Data
8
Open
9
Save
9
Save As
10
Settings
29 Custom Data
30
Open
30
Save
30
Save As
31 Geocode
31
Locate All
31
Locate Selected
32
Detailed Locations
32
Zoom on map
39 Geocode or Reverse Geocode
39 Quick Geocoder
40
Task pane
40
Windowed
41 Score
41 Address Columns
43 Structured or not
44 Help About
3
Contents
44 Information
4
Chapter 10
45 LocateXL Context Menu
Chapter 11
45 SpatialXL Ribbon
Chapter 12
46 SpatialXL Context Menu
Chapter 13
46 SpatialXL Thematics
Chapter 14
47 Base data
Chapter 15
47 Technical information
Chapter 16
48 Contact and Support
1
Introduction
LocateXL is a geocoder that is an add-in to Microsoft Excel 2007 or 2010 which works with a mapping addin called SpatialXL.
LocateXL is made up of the following:
Quick geocoder
Batch geocoder
Reverse geocoder
SpatialXL mapping and analytics
Geocode reference data is included
Currently LocateXL is available for the South African market.
Limited data exists in African countries, so please request a specific country should you want to geocode
outside of South Africa.
LocateXL is developed and owned by PrimeThought Software Solutions.
Company website: www.PrimeThought.biz
Product website: www.LocateXL.com
Platform product website: www.SpatialXL.com
To get regular updates on LocateXL, visit the product website at www.LocateXL.com
Follow our tw eets on
"Like" the Prim eThought page on
http://w w w .linkedin.com/company/prime-thought-softw are-solutions
and all our Demo and Training Videos are on
YouTube video:
YouTube video:
YouTube video:
YouTube video:
YouTube video:
YouTube video:
YouTube video:
YouTube video:
Placing 5000 addresses on a map in under 5 minutes
How to download and install LocateXL (and SpatialXL)
LocateXL: Quick Geocoder in Excel
LocateXL: Geocode town centric addresses in Excel
LocateXL: Geocode road centric addresses in Excel
LocateXL: Unstructured Geocoding in Excel
LocateXL: Classification and Complex Geocoding in Excel
LocateXL: Reverse Geocoding in Excel
SpatialXL is an add-in to Microsoft Excel 2007 or 2010, which gives Excel full mapping or GIS functionality.
SpatialXL is needed if you would like to view the data against a map background, because LocateXL
utilises the mapping environment of SpatialXL to place geocoded points and to check that geocodes are
Chapter 1 Introduction
1
LocateXL and SpatialXL
3
done correctly against a map background.
When you purchase the LocateXL product you usually have to either purchase the SpatialXL product
alongside or you will get a free copy of SpatialXL depending on the structuring of the particular sale.
Important: Please use a download manager such as Free Download Manager at http://
www.freedownloadmanager.org to assist with the download. This will give you a much quicker download
and will ensure better quality and less corrupted downloads, especially if you have a slow internet link.
Prerequisites:
1. Admin privileges (speak to IT for this).
2. Excel 2007 or 2010 already installed.
You have to download and install both SpatialXL and LocateXL. Here are the instructions:
To watch the video on How to download and install LocateXL (and SpatialXL) click on
this link to view it in YouTube
To download and install SpatialXL you do the following:
1. Go to http://www.PrimeThought.biz and register on the website or log in if you have already registered.
2. Once logged in, you will see the Download section on the left hand side as one of the tabs.
3. Go to the Download section and download SpatialXL.exe.
4. If you have already installed a prior version of SpatialXL, please go to Add and Remove Programs in
your Control Panel, and remove SpatialXL.
2
Chapter 3 LocateXL and SpatialXL
Download and installation
4
5. Then run SpatialXL.exe, following the prompts.
6. When successfully installed, open Excel 2007 or 2010 and go the the SpatialXL ribbon.
7. Open About SpatialXL by clicking on the button and then click on Update License.
8. Click Load license from file and choose the SpatialXLLicense.lic (or other named license file for
SpatialXL that you received from PrimeThought - it will have the extension .lic) to bring in the key of the
license. Then when you click OK, your license will be valid and you will be able to use SpatialXL.
9. To test that SpatialXL is working, go to the Show Spatial Pane button in the SpatialXL Ribbon and make
sure that your Spatial Pane appears. If it does you have correctly installed and license SpatialXL.
10. Close Excel and continue to the download and installation of LocateXL.
To download and install LocateXL you do the following:
1. To download LocateXL you have to get a download link from PrimeThought Software Solutions. This
might be in the form of an ftp site, or an internet website.
2. You would generally download two files: LocateXL.exe AND RSA-new.gcd (or another gcd file). You
could also download the gcc files called StreetCentric.gcc and TownCentric.gcc.
So in other words you might get links that looks like this: http://www.locatexl.com/temp/LocateXL.exe,
http://www.locatexl.com/temp/RSA-new.gcd, http://www.locatexl.com/temp/StreetCentric.gcc and http://
www.locatexl.com/temp/TownCentric.gcc. These links will be e-mailed to you.
3. If you have already got the latest download of the data (gcd) file, you do not have to download this file
again.
4. If you have already installed a prior version of LocateXL, please go to Add and Remove Programs in
your Control Panel, and remove LocateXL.
5. Then run LocateXL.exe, following the prompts.
6. When successfully installed, open Excel 2007 or 2010 and go the the LocateXL ribbon.
7. Open Help and then About by clicking on the button and then click on Update License.
8. Click Load license from file and choose the LocateXLLicense.lic (or other named license file for
LocateXL that you received from PrimeThought - it will have the extension .lic) to bring in the key of the
license. Then when you click OK, your license will be valid and you will be able to use LocateXL.
9. To test that LocateXL is working, go to the LocateXL ribbon and under Geocode Data, choose open
and then choose the gcd (geocode data file) that you have been provided with. If this data loads, you will
see this information in the ribbon under the information section, then you know that LocateXL has been
successfully installed.
These are the steps to using the quick geocoder:
1.
2.
3.
4.
5.
Install SpatialXL.
Install LocateXL.
Load the geocode data file (.gcd)
Open the quick geocoder as a window or task pane.
If you would like to view the results on a map, read below.
Every field in the quick geocoder serves as a filter for other fields.
It works best if you type in a particular road name or a town etc.
When you then choose other fields, the choices of the other fields will be limited to the correct values for
those areas.
Then click Locate and then if you want to see the location, locate on map.
You can also click Locate and then click Crossing to see if there are any crossings that you can choose
from with that street.
Chapter 4 Download and installation
3
Quick geocoder
5
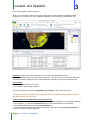
To use the Locate on Map, you should first follow the steps to turn on SpatialXL spatial pane, Set scene
projection, Load background map, turn on crosshair and then you can locate on map. You can zoom in
and out in the map by putting your cursor in the middle of the cross hair, clicking once (to bring the focus
on the map) and then mouse wheeling back and forth.
The steps to use the Batch Geocoder is the following:
1. Install SpatialXL.
2. Install LocateXL.
3. Load the geocode data file (.gcd)
4. Load a geocode custom file if you have any (.gcc)
5. Open your spreadsheet with the address data that you would like to geocode.
6. Choose whether you are going to do a structured or unstructured geocode.
7. Choose the address columns.
6. Make sure your settings are correct for the particular address set that you are using.
7. Choose your rows and Locate Selected or Locate All.
8. Analyse your results.
9. Tweak your settings and re-run if necessary.
10. Handle individual results where necessary.
9.1 Handle by looking at Detailed Location Information.
9.2 Handle by checking Quick Geocoder.
9.3 You can also check out specific records by zooming to them on the map.
9.3 Handle by applying changes and running selected rows again with different settings or
changed data.
11. Place data on map.
To do this you need to follow the steps to turn on SpatialXL spatial pane, Set scene projection, Load
background map, turn on crosshair and then you can right click on the spreadsheet and from the SpatialXL
Context Menu choose Add Layer. You can zoom in and out in the map by putting your cursor in the
middle of the cross hair, clicking once (to bring the focus on the map) and then mouse wheeling back and
forth. You can also right click on the new layer in SpatialXL and Zoom fit to that layer and so on. Full
functionality is in SpatialXL Help.
4
Chapter 5 Quick geocoder
Batch geocoder
6
12. Do thematics or other actions to mapped data. How to do this is described in SpatialXL Help.
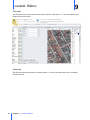
When having completed geocoding in a spreadsheet, LocateXL creates columns for the geocoded number
of the street, the geocoded road, the geocoded suburb, town, province as well as the geocoded status
which tells you whether it geocoded to the street number, the road name, the suburb, the postal code and
so forth and the score as well as the confidence level of the result.
This is what every column represents:
The geocode number: example 93 - This is the street number result. If there is no street number, the
geocode number will be 0.
The geocode road: example Barkly - This is the geocoded roade result. If LocateXL cannot find the
road, but geocodes to suburb or town level, it will return the first road it found for that town in the data.
The geocode extension: example Road. - This is usually road, lane, street etc. This can be blank if the
extension in the base data was left blank.
The geocode suffix: example West - for instance Kei Road West. The West would be the Suffix.
The geocode crossing: example Main - if the data geocoded to a crossing, the second street's name
would be in here and the geocode status would be S for Street.
The geocode suburb: example Galeshwe
The geocode town or city: example Kimberley
The geocode province: example North Cape.
The geocode status: We use codes the following codes for showing the status of the geocoded record.
Chapter 6 Batch geocoder
5
Analysis of results
7
N means it geocoded to the exact street with the street number.
S means it geocoded to street level
0 means it geocoded to suburb level
1 means it geocoded to the city or town level.
I means it geocoded to a point of interest’s location.
P means it geocoded to postal code.
F means the geocode failed.
Geocode score: For a more complete description of geocode score, please look at the Parameters
section:
Example 29 is the score of the geocode. This is calculated out of the total possible score as discussed
previously.
Geocode confidence:
Then we give a percentage confidence which is the score out of the total possible score, expressed as a
percentage, so in this case 82.85 percent.
This way, you can look at lower scoring records, and see if the settings or the records can be refined to
score higher confidence levels.
and of course most importantly, you will get the X coordinate and the Y coordinate of the geocoded
data, so that you may place these on a map.
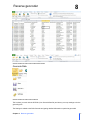
Reverse geocoding is to get address data for X and Y locations.
1. Install SpatialXL.
2. Install LocateXL.
3. Load the geocode data file (.gcd)
4. Load a geocode custom file if you have any (.gcc)
5. Open your spreadsheet with the X and Y coordinates that you would like to reverse geocode.
6. Choose the lat/long columns.
7. Choose your rows and Locate Selected or Locate All.
8. Place data on map.
9. Place data on map.
To do this you need to follow the steps to turn on SpatialXL spatial pane, Set scene projection, Load
background map, turn on crosshair and then you can right click on the spreadsheet and from the SpatialXL
Context Menu choose Add Layer. You can zoom in and out in the map by putting your cursor in the
middle of the cross hair, clicking once (to bring the focus on the map) and then mouse wheeling back and
forth. You can also right click on the new layer in SpatialXL and Zoom fit to that layer and so on. Full
functionality is in SpatialXL Help.
10. Do thematics or other actions to mapped data. How to do this is described in SpatialXL Help.
6
Chapter 7 Analysis of results
Reverse geocoder
8
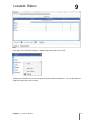
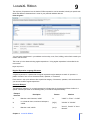
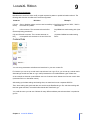
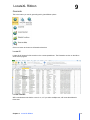
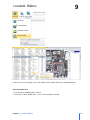
Click on a button to find out m ore about each section.
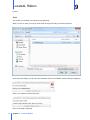
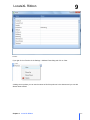
Geocode Data
Click on a button to find out m ore about it.
This is where you work with the GCD file (Your Geocode Data file) and where you set up settings to do the
geocoding with.
The Settings is related to the Bulk Geocode and getting detailed information on particular geocoded
Chapter 8 Reverse geocoder
7
LocateXL Ribbon
9
records.
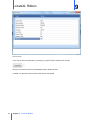
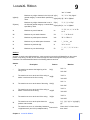
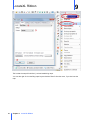
Open
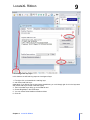
This is what you do before you start doing any geocoding.
When you click on open you must go to the most recent gcd file that you have and open that.
Once this starts loading, you will see in the information section of the Ribbon that the loading is happening.
When it is completed, it will look like this:
Now you are ready to geocode.
8
Chapter 9 LocateXL Ribbon
LocateXL Ribbon
9
Save
You can save your own GCD file if you have made changes to the setting of the file.
The only problem that you might experience, is when we build a new GCD file at PrimeThought due to map
updates, you will lose all these changes as the new GCD file will overwrite the old file.
It is better to save Custom Data. Then you will never lose your changes.
This option is for clients who only work with their own data set or maintain their own data set.
Save As
You can save your own GCD file as another file if you have made changes to the setting of the file.
The only problem that you might experience, is when we build a new GCD file at PrimeThought due to map
updates, you will lose all these changes as the new GCD file is not able to be merged with an old GCD file.
Chapter 9 LocateXL Ribbon
9
LocateXL Ribbon
9
It is better to save Custom Data. Then you will never lose your changes.
This option is for clients who only work with their own data set or maintain their own data set.
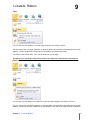
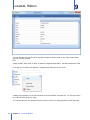
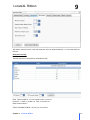
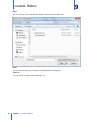
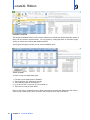
Settings
The geocode data settings sets up scoring weights, soundex weights, points of interest weights and
aliases for road names and other...
All of the settings you can tweak for the best result geocoding are in these tabs.
Click on one of the tabs to find out more about the settings contained therein.
Address Parts
How to set up the settings for geocoding in the Address Parts:
Weight: This is the weight that the match or non match counts in the total geocode score. For instance in
the above example, I have decided that the weight for a road is 10 points. Should a road match exactly
letter for letter the name of the road in the geocode data file, you will get the full 10 points for the road
record. If the road is slightly misspelt, the Soundex might still match.
You use weight for also changing a set to be more suburb or town centric or more road centric. Some rural
areas might have terribly bad names for the roads, in that case your suburb or town weights need to be
much higher than roads! Remember also to bring down the Soundex scores appropriately.
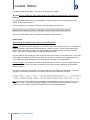
Soundex Weight: The Soundex is an index for sounds like type of names. If you have slightly misspelt a
name, you can still match it in certain circumstances to the original name, depending on how bad the
spelling mistake is.
For instance in the following example, I have Cros Street and Cross Street in Port Elizabeth. They both
geocode to Cross Street, but the one is a Soundex match at 5 points lower than the other:
SQL: These items can be extracted from a database, where available, so there is provision here to put in
the SQL to do that. Our current geocoding is based on shape file loading so this feature is not used
currently, except for clients who have and maintain there own geocoding databases.
10
Chapter 9 LocateXL Ribbon
LocateXL Ribbon
9
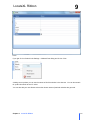
Road
If you right click on Road in the Settings > Address Parts dialog and click on View:
A dialog come up where you can see the names of all of the roads in the data set. You can also search for
a particular road name to see if it exists.
Chapter 9 LocateXL Ribbon
11
LocateXL Ribbon
9
You can also enter aliases for particular roads, for instance Church = Kerk (alias) so that the road name
Kerk will also geocode to Church.
Remember to save the settings when you are done and to save the data as a custom data file, otherwise
the settings will be lost next time you load the map data.
12
Chapter 9 LocateXL Ribbon
LocateXL Ribbon
9
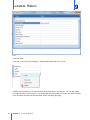
Extension
An extension is for example Road, Lane, Close, Avenue and so forth.
If you right click on Extension in the Settings > Address Parts dialog and click on View:
A dialog come up where you can see the names of all of the extensions in the data set. You can also
search for a particular extension to see if it exists.
Chapter 9 LocateXL Ribbon
13
LocateXL Ribbon
9
You can also add your own aliases for example for Street so that the words st, str, and so forth will also
geocode correctly to Street.
Suffix
A Suffix is North, East, South or West, for instance Langebaan Road West. The West would be the suffix.
If you right click on Suffix in the Settings > Address Parts dialog and click on View:
A dialog come up where you can see the names of all of the suffixes in the data set. You can also search
for a particular suffix to see if it exists.
You can also add your own aliases so that the words S, N and so on would geocode to South and North.
14
Chapter 9 LocateXL Ribbon
LocateXL Ribbon
9
Suburb
If you right click on Suburb in the Settings > Address Parts dialog and click on View:
A dialog come up where you can see the names of all of the suburbs in the data set. You can also search
for a particular suburb to see if it exists.
You can also add your own aliases so that other known names of particular suburbs also geocode.
Chapter 9 LocateXL Ribbon
15
LocateXL Ribbon
9
Tow n
Towns and Cities.
If you right click on Town in the Settings > Address Parts dialog and click on View:
A dialog come up where you can see the names of all of the towns in the data set. You can also search
for a particular town to see if it exists. You can also add your own aliases so that the new names of towns
or the old names of towns and cities are taken into account when geocoding.
16
Chapter 9 LocateXL Ribbon
LocateXL Ribbon
9
Province
If you right click on Province in the Settings > Address Parts dialog and click on View:
A dialog come up where you can see the names of all of the provinces in the data set and you can add
aliases where needed.
Chapter 9 LocateXL Ribbon
17
LocateXL Ribbon
Points of interest
If you click on the View POI button, it will bring up a list of Points of Interest in the country.
Here you can search for POI's in the dataset and put in aliases as well.
LocateXL can geocode to POI if the POI does exist in the dataset.
18
Chapter 9 LocateXL Ribbon
9
LocateXL Ribbon
9
Crossings
LocateXL will geocode to crossings where they exist in the data set. You can set up the list of possible
namings of the crossings in the Crossings tab of the settings.
Projection
The Well Known Text projection of the data is set up in the Projection tab. In this instance we are using
the WGS 84 projection.
Chapter 9 LocateXL Ribbon
19
LocateXL Ribbon
9
Parameters
The geocoding parameters are set up in this tab. Please read this section together with the Analysis of
Results section.
The minimum score out of the total possible score you can set up here, or you can set it up directly in the
ribbon.
As you can see from this example, we require that at least 10 out of 57 scores to have a successful
geocode result. The lower the score the more results will come through, but if the score is too low, lots of
invalid results will be passed as successful.
If the score is too high, then a lot of geocoding might fail instead of being passed successfully, even though
results might be quite accurate.
The geocode score is made up of the following items:
In Address Parts:
The road name score and soundex score (It will be out of the total of the Weight, if it is a Soundex match,
the Soundex weight will count)
The extension score and soundex score
The suffix score and soundex score
The suburb score and soundex score
The town score and soundex score
The province score and soundex score
The point of interest score and soundex score (This will replace the road name, extension and suffix if it is
a POI match)
In the parameters:
The Street number match score
20
Chapter 9 LocateXL Ribbon
LocateXL Ribbon
9
Skip words, maximum match count and street part count are advanced features. You can leave these as
they are.
Example of scoring:
The total maximum score would be calculated like this:
Road: Total possible 20. If it is a soundex match, scores 15.
Extension: 3, Suffix, 2, Suburb, 10, Town 10, Province 10.
Street number match 2.
TOTAL POSSIBLE SCORE: 20+3+2+10+10+10+2=57
Chapter 9 LocateXL Ribbon
21
LocateXL Ribbon
9
POI would replace the 20+3+2+2 with 7 total possible points and take into account the suburb, town and
province scores as well.
Minimum score: 10 (So matches on suburbs and towns will also give a correct match.)
As an example the following address would score like this:
32 Denise Road, Buccleuch, Sandton, Gauteng
It geocodes to
32 Denise Road, Buccleuch, Klipfontein, Gauteng.
It matches on street number (2), Denise (20), Road (3), Buccleuch (10), Gauteng (10)
So the total score is 45 out of a possible of 57. And this is of course a very good score.
Source
These are advanced settings for clients that maintain their own geocode data sources.
Postal codes
Geocode results can be to postal codes as well. The only time that the data will geocode to a postal code
is if there is some variant of "PO Box" in the street address field and a postal code in another column,
marked as postal code. Then the address data will geocode to postal code and the status of that particular
geocode will be "P". For more information on analysing the results, please look at the Analysis of Results
section.
Postal codes are imported into the data set by PrimeThought Software Solutions.
This is an advanced tab in terms of managing postal codes.
22
Chapter 9 LocateXL Ribbon
9
LocateXL Ribbon
The only item of importance here is that the PO Box expression can be amended, should your postal code
fields have different characters than is usual in your particular address data set.
Items to ignore
You can ignore certain items in your address such as shop, room, floor, building, and so forth to make your
results more accurate.
This is set up in the above tab using regular expressions. Using regular expressions is described in the
next section.
Regular Expressions
Regular Expression Language Elements:
A regular expression is a pattern that the regular expression engine attempts to match in input text. A
pattern consists of one or more character literals, operators, or constructs.
Each section in this quick reference lists a particular category of characters, operators, and constructs that
you can use to define regular expressions:
Character Escapes
The backslash character (\) in a regular expression indicates that the character that follows it either is a
special character (as shown in the following table), or should be interpreted literally.
Escaped
character
Description
Pattern
Matches
\a
Matches a bell character, \u0007.
\a
"\u0007" in "Error!" + '\u0007'
\b
In a character class, matches a backspace,
\u0008.
[\b]{3,}
"\b\b\b\b" in "\b\b\b\b"
\t
Matches a tab, \u0009.
(\w+)\t
"item1\t", "item2\t" in "item1
\titem2\t"
Chapter 9 LocateXL Ribbon
23
9
LocateXL Ribbon
\r
Matches a carriage return, \u000D. ( \r is not
equivalent to the newline character, \n.)
\r\n(\w+)
"\r\nThese" in "\r\nThese
are\ntwo lines."
\v
Matches a vertical tab, \u000B.
[\v]{2,}
"\v\v\v" in "\v\v\v"
\f
Matches a form feed, \u000C.
[\f]{2,}
"\f\f\f" in "\f\f\f"
\n
Matches a new line, \u000A.
\r\n(\w+)
"\r\nThese" in "\r\nThese
are\ntwo lines."
\e
Matches an escape, \u001B.
\e
"\x001B" in "\x001B"
Uses octal representation to specify a character
\w\040\w
( nnn consists of up to three digits).
"a b", "c d" in
\nnn
Uses hexadecimal representation to specify a
character ( nn consists of exactly two digits).
"a b", "c d" in
\w\x20\w
Matches the ASCII control character that is
specified by X or x, where X or x is the letter of
the control character.
\cC
Matches a Unicode character by using
hexadecimal representation (exactly four digits,
as represented by nnnn).
\w\u0020\w
\xnn
\cX
\cx
\unnnn
"a bc d"
"a bc d"
"\x0003" in "\x0003" (Ctrl-C)
"a b", "c d" in
"a bc d"
When followed by a character that is not
recognized as an escaped character in this and
other tables in this topic, matches that character.
\d+[\+-x\*]\d+ "2+2" and "3*9" in "(2+2) *
For example, \* is the same as \x2A. This allows
\d+[\+-x\*\d+ 3*9"
the regular expression engine to disambiguate
language elements (such as * or ?) and character
literals (represented by \* or \?).
\
Character Classes
A character class matches any one of a set of characters. Character classes include the language
elements listed in the following table.
Character class
Description
Matches any single character in
[character_group] character_group. By default, the match is
case-sensitive.
Pattern
"a" in "gray"
[ae]
"a", "e" in "lane"
Negation: Matches any single character that
is not in character_group. By default,
[^character_group]
[^aei]
characters in character_group are casesensitive.
24
Matches
"r", "g", "n" in "reign"
[first-last]
Character range: Matches any single
character in the range from first to last.
[A-Z]
"A", "B" in "AB123"
.
Wildcard: Matches any single character
except \n.
a.e
"ave" in "nave"
Chapter 9 LocateXL Ribbon
9
LocateXL Ribbon
"ate" in "water"
\p{name}
Matches any single character in the Unicode \p{Lu}
"C", "L" in "City Lights"
general category or named block specified by
\p{IsCyrillic} "Д", "Ж" in "ДЖem"
name.
\P{name}
Matches any single character that is not in \P{Lu}
"i", "t", "y" in "City"
the Unicode general category or named block
\P{IsCyrillic} "e", "m" in "ДЖem"
specified by name.
\w
Matches any word character.
\w
"I", "D", "A", "1", "3" in "ID
A1.3"
\W
Matches any non-word character.
\W
" ". "." in "ID A1.3"
\s
Matches any white-space character.
\w\s
"D " in "ID A1.3"
\S
Matches any non-white-space character.
\s\S
" _" in "int __ctr"
\d
Matches any decimal digit.
\d
"4" in "4 = IV"
\D
Matches any non-decimal digit.
\D
" ", "=", " ", "I", "V" in "4 =
IV"
Anchors
Anchors, or atomic zero-width assertions, cause a match to succeed or fail depending on the current
position in the string, but they do not cause the engine to advance through the string or consume
characters. The metacharacters listed in the following table are anchors.
Assertio
n
^
$
Description
The match must start at the beginning of the
string or line.
Pattern
Matches
"901-" in
^\d{3}
"901-333-"
The match must occur at the end of the string or
-\d{3}$
before \n at the end of the line or string.
"-333" in
"-901-333"
"901-" in
\A
The match must occur at the start of the string. \A\d{3}
"901-333-"
\Z
The match must occur at the end of the string or
-\d{3}\Z
before \n at the end of the string.
"-333" in
"-901-333"
"-333" in
\z
The match must occur at the end of the string.
-\d{3}\z
"-901-333"
\G
The match must occur at the point where the
previous match ended.
\b
The match must occur on a boundary between a
\b\w+\s\w+\b
\w (alphanumeric) and a \W (nonalphanumeric)
Chapter 9 LocateXL Ribbon
\G\(\d\)
"(1)", "(3)", "(5)" in "(1)(3)(5)[7]
(9)"
"them them" in "them theme
them them"
25
9
LocateXL Ribbon
character.
\B
The match must not occur on a \b boundary.
\Bend\w*\b
"ends", "ender" in "end sends
endure lender"
Grouping Constructs
Grouping constructs delineate subexpressions of a regular expression and typically capture substrings of
an input string. Grouping constructs include the language elements listed in the following table.
Grouping construct
(subexpression)
Description
Pattern
Captures the matched
subexpression and
(\w)\1
assigns it a zero-based
ordinal number.
Captures the matched
(?
(?<double>\w)
subexpression into a
<name>subexpression)
\k<double>
named group.
(?<name1Defines a balancing
name2>subexpression) group definition.
Matches
"ee" in "deep"
"ee" in "deep"
(((?'Open'\()[^\(\)]*)
"((1-3)*(3-1))" in "3+2^((1-3)*(3+((?'Close-Open'\))[^\(\)]*)
1))"
+)*(?(Open)(?!))$
(?:subexpression)
Defines a noncapturing
Write(?:Line)?
group.
"WriteLine" in
"Console.WriteLine()"
(?imnsx-imnsx:
subexpression)
Applies or disables the
specified options within A\d{2}(?i:\w+)\b
subexpression.
"A12xl", "A12XL" in "A12xl
A12XL a12xl"
(?=subexpression)
Zero-width positive
lookahead assertion.
\w+(?=\.)
"is", "ran", and "out" in "He is.
The dog ran. The sun is out."
(?!subexpression)
Zero-width negative
lookahead assertion.
\b(?!un)\w+\b
"sure", "used" in "unsure sure
unity used"
(?<=subexpression)
Zero-width positive
lookbehind assertion.
(?<=19)\d{2}\b
"99", "50", "05" in "1851 1999
1950 1905 2003"
(?<!subexpression)
Zero-width negative
lookbehind assertion.
(?<!19)\d{2}\b
"51", "03" in "1851 1999 1950
1905 2003"
(?>subexpression)
Nonbacktracking (or
"greedy")
subexpression.
[13579](?>A+B+)
"1ABB", "3ABB", and "5AB" in
"1ABB 3ABBC 5AB 5AC"
Quantifiers
A quantifier specifies how many instances of the previous element (which can be a character, a group, or a
character class) must be present in the input string for a match to occur. Quantifiers include the language
elements listed in the following table.
Quantifier
26
Description
Chapter 9 LocateXL Ribbon
Pattern
Matches
9
LocateXL Ribbon
*
Matches the previous element zero or
\d*\.\d
more times.
".0", "19.9", "219.9"
+
Matches the previous element one or
"be+"
more times.
"bee" in "been", "be" in "bent"
?
Matches the previous element zero or
"rai?n"
one time.
"ran", "rain"
{n}
Matches the previous element exactly
",\d{3}"
n times.
",043" in "1,043.6", ",876", ",543", and
",210" in "9,876,543,210"
{n,}
Matches the previous element at least
"\d{2,}"
n times.
"166", "29", "1930"
{n,m}
Matches the previous element at least
"\d{3,5}"
n times, but no more than m times.
"166", "17668"
"19302" in "193024"
*?
Matches the previous element zero or
\d*?\.\d
more times, but as few times as
possible.
".0", "19.9", "219.9"
+?
Matches the previous element one or
"be+?"
more times, but as few times as
possible.
"be" in "been", "be" in "bent"
??
Matches the previous element zero or
"rai??n"
one time, but as few times as
possible.
"ran", "rain"
{n}?
Matches the preceding element
exactly n times.
",043" in "1,043.6", ",876", ",543", and
",210" in "9,876,543,210"
{n,}?
Matches the previous element at least
"\d{2,}?"
n times, but as few times as
possible.
{n,m}?
Matches the previous element
between n and m times, but as few
times as possible.
",\d{3}?"
"166", "29", "1930"
"166", "17668"
"\d{3,5}?"
"193", "024" in "193024"
Backreference Constructs
A backreference allows a previously matched subexpression to be identified subsequently in the same
regular expression. The following table lists the backreference constructs supported by regular
expressions.
Backreference
construct
Description
Pattern
\number
Backreference. Matches the value of a numbered
subexpression.
\k<name>
Named backreference. Matches the value of a named (?<char>\w)
expression.
\k<char>
Chapter 9 LocateXL Ribbon
(\w)\1
Matches
"ee" in
"seek"
"ee" in
"seek"
27
9
LocateXL Ribbon
Alternation Constructs
Alternation constructs modify a regular expression to enable either/or matching. These constructs include
the language elements listed in the following table.
Alternation
construct
Description
Pattern
Matches any one element
separated by the vertical bar (|)
character.
|
th(e|is|at)
Matches
"the", "this" in "this is the
day. "
Matches yes if expression
matches; otherwise, matches the
(?(A)A\d{2}\b|\b\d{3} "A10", "910" in "A10 C103
(?(expression)yes|no) optional no part. expression is
\b)
910"
interpreted as a zero-width
assertion.
(?(name)yes|no)
Matches yes if the named capture
(?<quoted>")?(?
name has a match; otherwise,
(quoted).+?"|\S+\s)
matches the optional no.
Dogs.jpg, "Yiska
playing.jpg" in "Dogs.jpg
"Yiska playing.jpg""
Substitutions
Substitutions are regular expression language elements that are supported in replacement patterns. The
metacharacters listed in the following table are atomic zero-width assertions.
Character
28
Description
Pattern
$number
Substitutes the substring
\b(\w+)(\s)(\w+)\b
matched by group
number.
${name}
Replacement
Input string Result string
pattern
"one two"
"two one"
Substitutes the substring
\b(?<word1>\w+)(\s) ${word2}
matched by the named
(?<word2>\w+)\b
${word1}
group name.
"one two"
"two one"
$$
Substitutes a literal "$".
"103 USD"
"$103"
$&
Substitutes a copy of the
(\$*(\d*(\.+\d+)?){1}) **$&
whole match.
"$1.30"
"**$1.30**"
$`
Substitutes all the text of
the input string before the B+
match.
$`
"AABBCC"
"AAAACC"
$'
Substitutes all the text of
the input string after the B+
match.
$'
"AABBCC"
"AACCCC"
$+
Substitutes the last group
B+(C+)
that was captured.
$+
"AABBCCDD
AACCDD
"
$_
Substitutes the entire
input string.
$_
"AABBCC"
Chapter 9 LocateXL Ribbon
\b(\d+)\s?USD
B+
$3$2$1
$$$1
"AAAABBCCC
C"
9
LocateXL Ribbon
Miscellaneous Constructs
Miscellaneous constructs either modify a regular expression pattern or provide information about it. The
following table lists the miscellaneous constructs supported.
Construct
(?imnsximnsx)
Definition
Example
Sets or disables options such as case insensitivity in \bA(?i)b\w+\b matches "ABA", "Able" in
the middle of a pattern.
"ABA Able Act"
(?
Inline comment. The comment ends at the first
#comment)closing parenthesis.
\bA(?#Matches words starting with A)\w+
\b
# [to end ofX-mode comment. The comment starts at an
line]
unescaped # and continues to the end of the line.
(?x)\bA\w+\b#Matches words starting
with A
Custom Data
You can set up parameters and aliases and save them in your own custom file.
For instance you can set up a road centric set and save it as a gcc file or you can set up a suburb centric
data settings set and save that as a gcc and flip between them to handle different types of data sets.
As an example we have set up two different sets: one for street centric data and one for town centric data
(rural areas with no or bad street names).
After setting up the data settings and testing them, we saved each set as a separate GCC file.
Then, when working with good road data, one would use the RoadCentric.gcc file, and when working with
less than great road data, one would load and work with TownCentric.gcc.
You could also save your own set of aliases for every different address part and save these in a particular
gcc file.
Chapter 9 LocateXL Ribbon
29
LocateXL Ribbon
Open
This you use when you have an already saved gcc file that you would like to use.
Save
You can save the current gcc file that you are working with by clicking save.
Save As
You can save as to create a newly named gcc file.
30
Chapter 9 LocateXL Ribbon
9
LocateXL Ribbon
9
Geocode
This is the button you use for geocoding and it gives different options.
Click on a button to show more information about that.
Locate All
Locate All will locate all of the records on the current spreadsheet. The information section on the ribbon
will show the progress.
Locate Selected
Will locate whatever row that the cursor is on, or if you select multiple rows, will locate the address in
those rows.
Chapter 9 LocateXL Ribbon
31
LocateXL Ribbon
9
Detailed Locations
This will get the detailed locations of the current selected row, and will give various searchable options of
which one can choose to improve results. You can get this by clicking the button on the ribbon or right
clicking on the row and choosing Get detailed locations.
Then by going through the results you can choose a different result.
Zoom on map
To zoom on map you follow these steps
1.
2.
3.
4.
5.
First open up the spatial pane in SpatialXL.
Then make sure your projection is set right.
Then load Bing maps for a background.
If you want to see a cross hair, you can set that up.
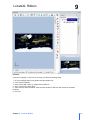
Then zoom on map as shown below.
Now you can zoom to a particular area by either right clicking on a particular address line and clicking
zoom to map or placing your cursor on the line and clicking zoom to map on the ribbon.
32
Chapter 9 LocateXL Ribbon
LocateXL Ribbon
9
If you want to zoom out slightly, click in the middle of the crosshair and roll your mousewheel back.
Open up Spatial Pane
1. First go the the SpatialXL ribbon in Excel.
2. Then click on Show Spatial Pane. You can show it floating or docked.
Chapter 9 LocateXL Ribbon
33
LocateXL Ribbon
Set scene projection
Once the Spatial Pane is showing, set the scene projection if it is not correct to WGS 84.
To do this you do the following:
1
2
3
4
5
6
34
First double click on the scene projection area.
Then the Scene properties dialog opens.
Then click the drop down of the Predefined Projections.
Then choose GCS_WGS_1984 from the drop down list.
Then click Use.
Then click OK.
Chapter 9 LocateXL Ribbon
9
LocateXL Ribbon
9
Load background map layer
In this instance we will load bing maps as a background layer.
1. First right click on the workbook containing layer
2. and choose Add Sub Layer.
(alternatively if you did not have a current open spreadsheet, you could simply right click in the Layer area
and choose Add Layer instead of Add Sub Layer)
3. Then in the New Layer dialog, go to the Data tab and
4. Choose Bing Maps in the Loader area.
5. You can choose either Satellite or Roads and then
6. Click OK.
Chapter 9 LocateXL Ribbon
35
LocateXL Ribbon
9
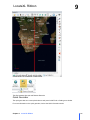
This is what the map will look like if you have loaded bing maps.
You can also right click on the Bing maps layer and select Zoom fit from the menu, if you don't see the
map.
36
Chapter 9 LocateXL Ribbon
LocateXL Ribbon
9
Crosshair
If you want to display a cross hair on the map, you follow the following steps:
1. Go to the settings button in the spatial area and double click.
2. In the Scene Properties
3. Set the Cross Hair colour, by double clicking and then
4. Set it in the Select colour dialog.
5. Then choose to Show Crosshair, make sure the renderer is GDI plus and choose the crosshair
thickness.
6. Click OK.
Chapter 9 LocateXL Ribbon
37
LocateXL Ribbon
38
Chapter 9 LocateXL Ribbon
9
LocateXL Ribbon
9
Geocode or Reverse Geocode
This flips between Geocode and Reverse Geocode.
Quick Geocoder
The quick geocoder can come up docked as a task pane inside Excel or floating as a window.
For more information on the quick geocoder, look at the Quick Geocoder section.
Chapter 9 LocateXL Ribbon
39
LocateXL Ribbon
9
Task pane
This will open the quick geocoder as a task pane and dock it inside Excel. For more information look at
the Quick Geocoder section.
Windowed
This will show the quick geocoder as a floating window. For more information have a look at the Quick
Geocoder section.
40
Chapter 9 LocateXL Ribbon
LocateXL Ribbon
9
Score
The minimum and maximum score is also displayed for ease of reference on the LocateXL ribbon.
You can also change the minimum score directly on the ribbon.
How these scores are calculated is further discussed in the Parameters section.
Address Columns
Address columns are applicable to the following:
1. Reverse Geocode
The address columns for the reverse geocode is where you choose the Lat/Long columns.
Chapter 9 LocateXL Ribbon
41
LocateXL Ribbon
9
2. Structured Batch Geocode.
With a structured geocoder, you choose each column to be an exact match.
3. Unstructured Batch Geocode.
With an unstructured batch geocode, the data that you are geocoding is not exactly placed per column in
the data, the suburbs and towns might be mixed up, or the towns and provinces might be mixed up.
Therefore there is not a structured approach, but an approach of putting together each row, adding the
columns together and working through each address working out more possible options for the best match.
Unstructured geocodes are slower than structured, but it is very workable where cleaning data would be
very time consuming and tedious to still get a good result.
With an unstructured geocode, you simply choose each column that you are using in the geocode.
42
Chapter 9 LocateXL Ribbon
LocateXL Ribbon
9
Structured or not
1. Structured Batch Geocode.
With a structured geocoder, you choose each column to be an exact match.
2. Unstructured Batch Geocode.
With an unstructured batch geocode, the data that you are geocoding is not exactly placed per column in
the data, the suburbs and towns might be mixed up, or the towns and provinces might be mixed up.
Therefore there is not a structured approach, but an approach of putting together each row, adding the
columns together and working through each address working out more possible options for the best match.
Unstructured geocodes are slower than structured, but it is very workable where cleaning data would be
very time consuming and tedious to still get a good result.
More information of how to choose the correct columns are in the Address columns section.
You can tick Structured Geocoding on or off on the LocateXL ribbon.
Chapter 9 LocateXL Ribbon
43
LocateXL Ribbon
9
Help About
In the Help and About section, you get the help documentation and you can also update license
information related to SpatialXL.
Information
The information section of the LocateXL ribbon, shows information about the loading progress of the
geocode data file, the geocode custom file, the reverse geocoding progress or the geocoding progress,
depending on what action you are performing at that particular time.
44
Chapter 9 LocateXL Ribbon
LocateXL Context Menu
10
The context menu matches up with functionality in the LocateXL ribbon.
When you right click on a particular row you can
Get Locations of All
Get Locations of Selected Rows
Get Detailed Location Info of Current Row
Zoom to Current Row on Map
Functionality for SpatialXL is fully covered in the Help for SpatialXL section.
However, the basic functionality for geocoding includes the following items:
1.
2.
3.
4.
5.
First open up the spatial pane in SpatialXL.
Then make sure your projection is set right.
Then load Bing maps for a background.
If you want to see a cross hair, you can set that up.
Then zoom on map from the Quick Geocoder or a row in the Spreadsheet after geocoding.
Chapter 10 LocateXL Context Menu
45
SpatialXL Ribbon
11
You can also add all of the addresses on a map once you have X and Y locations, but clicking inside the
spreadsheet and clicking Add Excel Layer on the Ribbon or right clicking and then SpatialXL > Add Layer.
This will put all of the data on the map.
Now you can do thematics in SpatialXL.
For detailed help on SpatialXL, please visit SpatialXL online help.
The SpatialXL context menu (right clicking on the spreadsheet row(s)) matches the functionality in the
ribbon.
Please note that these menu items will only be effective if the data has been added to the map using the X
and Y locations to locate them.
Thereafter you can zoom to selected, center selected, highlight selections and so forth.
Once you have added a layer from the X and Y data in the spreadsheet, you can perform various actions
such as thematic colouring and so on.
This is all described fully in the SpatialXL help.
46
Chapter 11 SpatialXL Ribbon
SpatialXL Thematics
13
The base data set that is used for LocateXL comes from our data partners, MapIT (www.MapIT.co.za)
This data set is included in the LocateXL product.
The postal codes are currently sourced from a different provider but all the national address registry data
used for geocoding and reverse geocoding originates from MapIT.
Our map data partners MapIT provides data for South Africa and African countries depending on the need of
the client.
The map data and the cost of map data is included in the price for LocateXL.
TECHNICAL INFORMATION ABOUT LOCATEXL
LocateXL is an add-in to Excel, and is written using the C# language.
You need the Microsoft .NET 4 environment on a machine running SpatialXL.
Admin rights are needed to install LocateXL.
Standard Microsoft .MSI install procedures are used for the installation.
Windows XP service pack 3 or above is fine for user machines.
Requires Excel 2007 or 2010. Will NOT work in Excel 2003.
The licence is locked to the machine name.
The software can run on 32 bit or 64 bit versions of Windows.
You need to have SpatialXL installed to have full functionality in terms of mapping.
TECHNICAL INFORMATION ABOUT SPATIALXL
SpatialXL is an add-in to Excel, and is written using the C# language.
You need the Microsoft .NET 4 environment on a machine running SpatialXL.
Admin rights are needed to install SpatialXL.
Standard Microsoft .MSI install procedures are used for the installation.
Windows XP service pack 3 or above is fine for user machines.
Requires Excel 2007 or 2010. Will NOT work in Excel 2003.
The licence is locked to the machine name.
The software can run on 32 bit or 64 bit versions of Windows.
Chapter 13 SpatialXL Thematics
47
Contact and Support
For any bugs, support or any type of assistance, please contact us.
Tel: +27 (0) 46 624 8654 (HQ)
Tel: +27 (0) 11 275 0172 (Joburg Office)
Cel: +27 (0) 83 395 3484 (Technical Support)
Cell: +27 (0) 72 049 8091 (Sales & Client Liaison)
For sales: [email protected] or [email protected]
[email protected] for Product support.
Company website: www.PrimeThought.biz
Product website: www.LocateXL.com
Platform product website: www.SpatialXL.com
48
Chapter 16 Contact and Support
16
© © 2012 PrimeThought Softw are Solutions.
All rights reserved.
Product and company names mentioned in this
manual may be trademarks or registered
trademarks of their respective companies.
Mention of third-party products is for
informational purposes only and constitutes
neither an endorsement nor a recommendation.
The author assumes no responsibility w ith
regard to the performance or use of these
products. All understandings, agreements, or
w arranties, if any, take place directly betw een
the vendors and the prospective users. Every
effort has been made to ensure that the
information in this manual is accurate. The author
is not responsible for printing or clerical errors.
The product described in this manual
incorporates copyright protection technology that
is protected by
method claims of certain U.S. patents and other
intellectual property rights.
This user manual w as created w ith Help &
Manual.