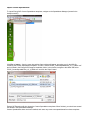
1
1. ECI Hosted Clients . . . . . . . . . . . . . . . . . . . . . . . . . . . . . . . . . . . . . . . . . . . . . . . . . . . . . . . . . . . . . . . . . . . . . . . . . . . . . . . . . . . . . . . . . . .
1.1 Installing Release 6.3 for the First Time (ECI Hosted) . . . . . . . . . . . . . . . . . . . . . . . . . . . . . . . . . . . . . . . . . . . . . . . . . . . . . . . . . . .
1.2 Upgrading to Release 6.3SP2 (ECI Hosted) . . . . . . . . . . . . . . . . . . . . . . . . . . . . . . . . . . . . . . . . . . . . . . . . . . . . . . . . . . . . . . . . . . .
2. Self Hosted Clients . . . . . . . . . . . . . . . . . . . . . . . . . . . . . . . . . . . . . . . . . . . . . . . . . . . . . . . . . . . . . . . . . . . . . . . . . . . . . . . . . . . . . . . . . .
2.1 Upgrading to Release 6.3 from 6.2 or older (Self-Hosted) . . . . . . . . . . . . . . . . . . . . . . . . . . . . . . . . . . . . . . . . . . . . . . . . . . . . . . . .
2.2 Upgrading to Release 6.3 SP2 from 6.3 (Self-Hosted) . . . . . . . . . . . . . . . . . . . . . . . . . . . . . . . . . . . . . . . . . . . . . . . . . . . . . . . . . . .
2.3 Installing Release 6.3 for the First Time (Self Hosted) . . . . . . . . . . . . . . . . . . . . . . . . . . . . . . . . . . . . . . . . . . . . . . . . . . . . . . . . . . .
2.4 Upgrading to Release 6.3 in Detail (Self Host) . . . . . . . . . . . . . . . . . . . . . . . . . . . . . . . . . . . . . . . . . . . . . . . . . . . . . . . . . . . . . . . . .
2
2
13
20
21
24
26
53
ECI Hosted Clients
Installing Release 6.3 for the First Time (ECI Hosted)
EnergyCAP® EnterpriseRelease 6.3
12/07/2012
Installation Instructions
ECI-hosted Database
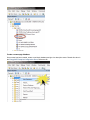
Contents
1 Introduction
2 EnergyCAP Software Dependencies & Requirements
2.1 EnergyCAP Client Requirements
3 Downloadable EnergyCAP Components
4 Installation
4.1 Complete the EnergyCAP Enterprise Configuration Sheet
4.2 Install EnergyCAP Enterprise Software
4.2.1 Determine PCs for EnergyCAP Client Installation
5 Initial Launch of EnergyCAP Enterprise
5.1 Initial Login
5.1.1 Software Validation
5.1.2 Create New Administrative User
5.2 Second Login & Administrative Tasks
5.2.1 Import Greenhouse Gas Factors
5.2.2 Install ECE Audits
5.2.3 Import Custom Spreadsheets
5.2.4 Update ENERGY STAR Schema
5.2.5 Create Additional User Accounts
6 APPENDIX A: EnergyCAP Enterprise Configuration Sheet
Introduction
This document contains instructions for installing EnergyCAP Enterprise (ECE) Release 6.3 with an ECI-hosted
database.
The instructions in this document apply to EnergyCAP licensees for whom ECI hosts their databases.
If you already have a version of EnergyCAP installed on your server then please do not use this document.
The document detailing the steps to perform an upgrade to EnergyCAP version 6.3 for self-hosted clients is
named "EnergyCAP ECE 6.3_UPGRADE_ECIHost.docx" and can be found on our website here: http://www.e
nergycap.com/support/releases/energycap-enterprise-6.3-released
EnergyCAP Software Dependencies & Requirements
EnergyCAP Client Requirements
PCs intended to run the installed EnergyCAP Enterprise client should satisfy the following hardware and software
requirements (for additional information, please consult the topic "EnergyCAP Enterprise System Requirements" in
the User Manual).
Minimum Hardware Requirements
1 GHz processor (minimum) or faster (recommended)
4 GB RAM (minimum) or more (recommended)
100 MB free disk space (minimum) or more (recommended for reports)
Additional Recommendations:
Small font size
1024x768 pixels desktop area
Supported Operating Systems:
Windows 7
Windows XP Home/Professional
Windows Vista Home Basic/Business/Ultimate
Windows 2003 Server
Note: Minimum system requirements may vary depending on the operating platform installation (Desktop or
Network), and the anticipated size of the organization database. Please contact EnergyCAP, Inc. with specific
questions regarding your implementation.
Downloadable EnergyCAP Components
The files needed to install EnergyCAP Enterprise are located on the EnergyCAP Releases web page at the following
URL:
{+}http://www.energycap.com/support/releases/energycap-enterprise-6.3-released+
Click the "Download the new release" link and save the installation file ece_setup6-3-XX-XX.exe to the computer
desktop. This file contains the components to install the latest build of EnergyCAP Enterprise.
At this point, you should have downloaded:
1. ece_setup6-3-XX-XX.exe (ECE installation package)
If you have downloaded the file(s) listed above, you are ready to proceed with the EnergyCAP Enterprise
installation.
Installation
Complete the EnergyCAP Enterprise Configuration Sheet
After reading completely through this install document, please complete the EnergyCAP Enterprise Configuration
Sheet found in the Appendix of this document. Prompts to record specific values in this sheet as well as
explanations of the values are scattered throughout the document.
When finished filling out the sheet, you may review it with your EnergyCAP Project Manager to ensure that your
understanding of the install and configuration steps is accurate and complete.
Install EnergyCAP Enterprise Software
Determine PCs for EnergyCAP Client Installation
Determine the computers (PCs) upon which you will install the EnergyCAP Enterprise client.
Have an administrator complete the installation wizard upon each PC by running the installation package ece_setup
6-3-XX-XX.exe. When finished, you will be prompted to reboot your system. Click OK to restart the computer.
EnergyCAP Enterprise client has now been installed, but cannot yet connect to the EnergyCAP database.
Initial Launch of EnergyCAP Enterprise
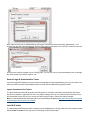
Initial Login
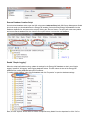
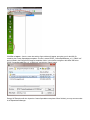
To log into EnergyCAP Enterprise for the first time, click the EnergyCAP icon which was created on your desktop
during installation. A login window should appear. At this login screen, enter the username " system" and the
password "system".
Your EnergyCAP, Inc. project manager should have created your database and provided you with configuration
information to ensure that your database appears in the "Datasource" dropdown list. Record your database name in
the EnergyCAP Enterprise Configuration Sheet, Reference #7. Select your database and continue by clicking "OK."
Note: Make sure the "Internet" radio button is selected next to "Connect to Datasource Via".
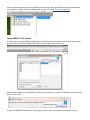
Software Validation
Immediately, you will see a window requesting your EnergyCAP user number and activation code. These may be
found in the client setup sheet provided to you by your ECI project manager, and should be located in References
#1 and 2 in the EnergyCAP Enterprise Configuration Sheet. Once you have entered your user number and
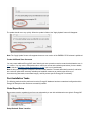
activation code, click "OK" to continue.
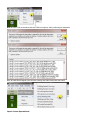
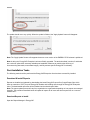
Create New Administrative User
Once EnergyCAP finishes loading, you should see the Users module with two default users named "ECI" and
"SYSTEM".
You may also see a pop-up window named "Checking Upgrade Availability". EnergyCAP, Inc. will release periodic
software updates to the EnergyCAP Enterprise client. These updates must be manually installed. Whether or not a
client receives the "Checking Upgrade Availability" pop-up window is EnergyCAP user-specific, so if a
non-administrative user un-checks the box, the administrative user will continue to receive the upgrade notifications
if he or she has the box checked.
Please create an administrative user for your organization by clicking the "New User" button in the upper right corner
of the screen.
First, enter the User ID and Full name for the administrative user, and select a password.
Next, make the new user an Administrator by clicking the "Permissions" tab and selecting "Administrator – Full
Access" from the User roles dropdown list. Click the "Set" button to activate the role, and "OK" to save the new user.
Once the user has been created, log out of EnergyCAP. You may now use your new administrative user to manage
the users instead of the default "system" user.
Second Login & Administrative Tasks
Log into EnergyCAP Enterprise using the username and password for the administrative user you just created. You
must now perform a series of administrative tasks to install various additional EnergyCAP features.
Import Greenhouse Gas Factors
To import Greenhouse Gas (GHG) factors into EnergyCAP for emissions calculations, download the GHG factor
files from our website or request the file from your project manager when you are ready to perform this step. There
are several XMLs in the ZIP so if you are not sure which file(s) to import, consult your project manager.
Note: You may download the GHG factors file from the following web address ( http://www.energycap.com/support/r
eleases/energycap-enterprise-6.3-released).
Install ECE Audits
To install EnergyCAP Enterprise audits, navigate to the Audit Manager by clicking Audits under the Analysis module.
Select Audits >> Install from the top menu bar and begin to follow the prompts.
Note: DO NOT click the checkbox that says "Remove Orphans" when performing this installation.
Now, all audits should appear in the list when creating new Audit Groups and new Audits.
Import Custom Spreadsheets
To import EnergyCAP Custom Spreadsheet templates, navigate to the Spreadsheet Manager (located in the
Analysis module).
Click File >> Import… from the menu bar and the Open window will appear, prompting you for the XML file
containing the Custom Spreadsheet templates. This file is named "ECAP_CustomSpreadsheets_v6_X_DBXX.xml"
and is located in the EnergyCAP Enterprise installation folder. In the window, navigate to this folder and select
"ECAP_CustomSpreadsheets_v6_X_DB64.xml" and click the "Open" button.
EnergyCAP Enterprise will then import the Custom Spreadsheet templates. When finished, you should see several
new nodes in the Spreadsheet Manager.
Custom Spreadsheets have now been installed, and users may create new spreadsheets from these templates
(instructions are available in the User Manual under the topic "Designing a Custom Spreadsheet").
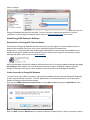
Update ENERGY STAR Schema
To update the most recent ENERGY STAR schema for building submittal, navigate to the Facility Manager under
the Setup module. Click the "ENERGYSTAR" button in the top right corner of the screen.
Enter an email address to receive ENERGY STAR submission results. You may use a distribution list for this email
address if you desire.
To apply the ENERGY STAR schema, click the "Apply Update" button in the bottom left corner of the pop-up
window.
The update should occur very quickly. When the update is finished, the "Apply Update" button will disappear.
Note: The "Apply Update" button will reappear whenever a new version of the ENERGY STAR schema is published.
Create Additional User Accounts
You may create additional EnergyCAP users following the same procedure used to create the administrative user in
5.1.2 above. You may use the Permissions tab to control user access and read/write permissions (for more details,
please visit the "Assigning Custom Permissions to a User" topic in our User Manual).
h1.APPENDIX A: EnergyCAP Enterprise Configuration Sheet
This is a place to store all of the information you will need for your EnergyCAP Enterprise installation. Please contact
your project manager or sales contact with questions. Suggested default values are included in the table below.
Reference #
Item
Sample Value
Suggested Default
1
User Number
12345
Assigned by ECI
2
Validation Code
XX-XXXX-XXXX-XX
X
Assigned by ECI
7
ODBC Data Source
Name
energycapinc
[database name]
8
Physical Location of
ECE LAN Reports
\\fileShareSrv1\ece\r
eports
9
ECE Administrative
User
admin
Client Value
10
ECE Administrative
Password
admin
Upgrading to Release 6.3SP2 (ECI Hosted)
EnergyCAP® Enterprise Release 6.3 SP2
Upgrade Instructions
ECI-hosted Database
Contents
1 Introduction
2 EnergyCAP Software Dependencies & Requirements
2.1 EnergyCAP Client Requirements
3 Downloadable EnergyCAP Components
4 Installation
4.1 Complete the EnergyCAP Enterprise Configuration Sheet
4.2 Install EnergyCAP Enterprise Software
4.2.1 Determine PCs for EnergyCAP Client Installation
5 Initial Launch of EnergyCAP Enterprise
5.1 Initial Login
5.1.1 Software Validation
5.1.2 Create New Administrative User
5.2 Second Login & Administrative Tasks
5.2.1 Import Greenhouse Gas Factors
5.2.2 Install ECE Audits
5.2.3 Import Custom Spreadsheets
5.2.4 Update ENERGY STAR Schema
5.2.5 Create Additional User Accounts
6 APPENDIX A: EnergyCAP Enterprise Configuration Sheet
Introduction
This document contains instructions for upgrading EnergyCAP Enterprise (ECE) Release 6.3 with an ECI-hosted
database.
The instructions in this document apply to EnergyCAP licensees for whom ECI hosts their databases.
If you have not yet installed a version of EnergyCAP then please do not use this document. The document
detailing the steps to perform a first time installation of EnergyCAP version 6.3 for ECI-hosted clients is
named "EnergyCAP ECE 6.3_FirstTimeInstall_ECIHost.docx" can be found on our website here: http://www.
energycap.com/support/releases/energycap-enterprise-6.3-released
EnergyCAP Software Dependencies & Requirements
EnergyCAP Client Requirements
PCs intended to run the installed EnergyCAP Enterprise client should satisfy the following hardware and software
requirements (for additional information, please consult the topic "EnergyCAP Enterprise System Requirements" in
the User Manual).
Minimum Hardware Requirements
1 GHz processor (minimum) or faster (recommended)
4 GB RAM (minimum) or more (recommended)
100 MB free disk space (minimum) or more (recommended for reports)
Additional Recommendations:
Small font size
1024x768 pixels desktop area
Supported Operating Systems:
Windows 7
Windows XP Home/Professional
Windows Vista Home Basic/Business/Ultimate
Windows 2003 Server
Note: Minimum system requirements may vary depending on the operating platform installation (Desktop or
Network), and the anticipated size of the organization database. Please contact EnergyCAP, Inc. with specific
questions regarding your implementation.
Downloadable EnergyCAP Components
The files needed to upgrade EnergyCAP Enterprise are located on the EnergyCAP Releases web page at the
following URL:
{+}http://www.energycap.com/support/releases/energycap-enterprise-6.3-released+
Click the "Download the new release" link and save the installation file ece_setup6-3-XX-XX.exe to the computer
desktop. This file contains the components to install the latest build of EnergyCAP Enterprise.
At this point, you should have downloaded:
1. ece_setup6-3-XX-XX.exe (ECE installation package)
If you have downloaded the file(s) listed above, you are ready to proceed with the EnergyCAP Enterprise
installation.
Installation
Complete the EnergyCAP Enterprise Configuration Sheet
After reading completely through this install document, please complete the EnergyCAP Enterprise Configuration
Sheet found in the Appendix of this document. Prompts to record specific values in this sheet as well as
explanations of the values are scattered throughout the document.
When finished filling out the sheet, you may review it with your EnergyCAP Project Manager or a Technical Support
staff member (http://support.energycap.com) to ensure that your understanding of the install and configuration steps
is accurate and complete.
Install EnergyCAP Enterprise Software
Determine PCs for EnergyCAP Client Installation
Determine the computers (PCs) upon which you will install the EnergyCAP Enterprise client.
Have an administrator complete the installation wizard upon each PC by running the installation package ece_setup
6-3-XX-XX.exe. When finished, you will be prompted to reboot your system. Click OK to restart the computer.
EnergyCAP Enterprise client has now been installed, but cannot yet connect to the EnergyCAP database.
Initial Launch of EnergyCAP Enterprise
Administrative Tasks
Log into EnergyCAP Enterprise using the username and password for an administrative user. You must now
perform a series of administrative tasks to upgrade various additional EnergyCAP features.
Import Greenhouse Gas Factors
To import Greenhouse Gas (GHG) factors into EnergyCAP for emissions calculations, download the GHG factor
files from our website when you are ready to perform this step. There are several XMLs in the ZIP so if you are not
sure which file(s) to import, consult your project manager or Tech Support ( http://support.energycap.com).
Note: You may download the GHG factors file from the following web address ( http://www.energycap.com/support/r
eleases/energycap-enterprise-6.3-released).
Install ECE Audits
To upgrade EnergyCAP Enterprise audits, navigate to the Audit Manager by clicking Audits under the Analysis
module. Select Audits >> Install from the top menu bar and begin to follow the prompts.
Note: DO NOT click the checkbox that says "Remove Orphans" when performing this installation.
Now, all new audits should appear in the list when creating new Audit Groups and new Audits.
Import Custom Spreadsheets
To upgrade EnergyCAP Custom Spreadsheet templates, navigate to the Spreadsheet Manager (located in the
Analysis module).
Click File >> Import… from the menu bar and the Open window will appear, prompting you for the XML file
containing the Custom Spreadsheet templates. This file is named "ECAP_CustomSpreadsheets_v6_X_DBXX.xml"
and is located in the EnergyCAP Enterprise installation folder. In the window, navigate to this folder and select
"ECAP_CustomSpreadsheets_v6_X_DBXX.xml" and click the "Open" button.
EnergyCAP Enterprise will then import the Custom Spreadsheet templates. When finished, you should see several
new nodes in the Spreadsheet Manager.
Custom Spreadsheets have now been installed, and users may create new spreadsheets from these templates
(instructions are available in the User Manual under the topic "Designing a Custom Spreadsheet").
Update ENERGY STAR Schema
To update the most recent ENERGY STAR schema for building submittal, navigate to the Facility Manager under
the Setup module. Click the "ENERGYSTAR" button in the top right corner of the screen.
Enter an email address to receive ENERGY STAR submission results. You may use a distribution list for this email
address if you desire.
To apply the ENERGY STAR schema, click the "Apply Update" button in the bottom left corner of the pop-up
window.
The update should occur very quickly. When the update is finished, the "Apply Update" button will disappear.
Note: The "Apply Update" button will reappear whenever a new version of the ENERGY STAR schema is published.
h1.APPENDIX A: EnergyCAP Enterprise Configuration Sheet
This is a place to store all of the information you will need for your EnergyCAP Enterprise installation. Please contact
your project manager, Tech Support (_GoBack" class="external-link" rel="nofollow">http://support.energycap.com),
or sales contact with questions. Suggested default values are included in the table below.
Reference #
Item
Sample Value
Suggested Default
1
User Number
12345
Assigned by ECI
2
Validation Code
XX-XXXX-XXXX-XX
X
Assigned by ECI
7
ODBC Data Source
Name
energycapinc
[database name]
8
Physical Location of
ECE LAN Reports
\\fileShareSrv1\ece\r
eports
9
ECE Administrative
User
admin
10
ECE Administrative
Password
admin
Self Hosted Clients
Client Value
test edit
Upgrading to Release 6.3 from 6.2 or older (Self-Hosted)
Instructions for Upgrading to Release 6.3 from 6.2
EnergyCAP® Enterprise Release 6.3
12/14/12
These instructions are for upgrading from EnergyCAP Enterprise Release 6.2 to Enterprise Release 6.3 with a
client-hosted database.
Note: If you are upgrading from an EnergyCAP release other than Release 6.2, contact Technical support for
upgrade assistance. If you are not certain which Release is currently installed on your system, login to EnergyCAP
and click Help > About.
The new release is 6.3.69.xxx, where 69 is the database version and xxx represents the current build number (57 or
higher).
Overview
EnergyCAP Enterprise Release 6.3 installation is simple and quick.
Here is an overview of the upgrade process:
1. Download the EnergyCAP Setup files (see the Release Notesweb page).
2. Back up your current EnergyCAP database to a safe archive location and then execute the SQL script
database upgrade per instructions.
3. Execute the Setup file to install EnergyCAP Release 6.3 on each workstation.
4. Use one workstation to perform Post-Installation Actions:
Update Reports
Update Custom Spreadsheet
Update GHG factors
Follow all of the steps indicated below for each process. Some steps may require IT assistance.
Database Upgrade Prerequisites
1. Database Backup: Before updating your EnergyCAP database, back up the database to a secure location.
Caution: Failure to properly back up your database before upgrading is not covered by normal technical
support. If an upgrade fails and you cannot restore a current backup, there will be an hourly expense charge
for any support requests for database repair associated with the upgrade.
2. SQL Server 2005 or greater: EnergyCAP no longer supports SQL Server 2000. The database must be
upgraded to at least SQL Server 2005.
Database Upgrade Procedure
1. In your current version of EnergyCAP, close any open bill entry batches and export any bills awaiting export.
2. Verify your current DB version # (Help > About in EnergyCAP Enterprise).
3. Download all required installation files, including the SQL upgrade script(s) referenced on the Release Notes
web page. Depending on your current DB version number (determined above), you may have to execute two
scripts on your database sequentially.
If your database version = 64, execute the following scripts in order: . upgrade64to67.sql, then .
upgrade67to69.sql
Otherwise, if your database version = 67, only execute the following script: . upgrade67to69.sql
Note: If your database version is something other than 64 or 67, please contact technical support for further
assistance.
4. All users should exit EnergyCAP. Back up your current database and label it appropriately.
5. Run the appropriate database upgrade script(s) on your database in sequence from your current DB number
to the latest DB number using the SQL Server Management Studio. Script filenames indicate the relevant
database version. This process will usually take from one to ten minutes, depending upon database size.
The script database update procedure is outlined in the example below:
a. Open the SQL Server Management Studio or other SQL database tool.
b. Connect to your database via the appropriate Server and Authentication.
Note: The user must be a member of the “sysadmin” group to perform the upgrade. The default
EnergyCAP user, “esuser”, does not have this level of permission and will not be able to successfully
upgrade the DB.
c. Select the EnegyCAP database and run required scripts. Procedures may vary slightly depending on
your database administration tool.
Note: A number of SQL messages during the upgrade process are normal and anticipated.
EnergyCAP strongly recommends retaining a copy of any SQL messages received in case diagnostics
or technical support become necessary.If the message says, “Query executed successfully,” then the
database upgrade was successful. If the message says the query was completed with errors, you must
restore your backup copy of the database and contact Technical Support for further assistance.
EnergyCAP Enterprise Installation Procedure
After upgrading your database, install the new EnergyCAP software application on user workstations using the
Setup file provided:
1. If you have not already done so, download all required installation files and installation instructions per the
instructions in Release Notes.
2. Double-click the Setup file to run the installation.
3. Follow the installation wizard prompts to complete the installation.
a. You can install Release 6.3 in the same program folder as your previous 6.2 release (recommended).
b. Accept setup default options. The database engine option should remain unchecked.
c. Click Finish… You will receive a prompt to reboot your system when done. Click OK to restart the
computer.
4. After your PC has finished rebooting, launch EnergyCAP.
5. Login via your usual procedure. The new EnergyCAP release should load normally.
6. Click Help > About to verify that you are using the most current release. The version number of EnergyCAP
6.3 is 6.3.dd.xxx, where dd is the database version number and xxx is the number of the current build.
This concludes the EnergyCAP installation procedure.
Post-Installation Actions
These Post-Installation Actions perform various database maintenance tasks and must be completed once from one
workstation by a user with “admin” user rights in EnergyCAP. There is no need to perform these tasks from each
workstation.
1. Report Updates: Reports are updated by downloading the latest EnergyCAP report files (Crystal Reports
.RPT files) from the EnergyCAP website and installing them into the user report folder(s). Update EnergyCAP
reports per the procedures below:
1.
Note: The report update process will vary from organization to organization depending on how reports are
managed internally. The procedure below will update all reports for all users who share report files on a
common network drive. Individual users who wish to maintain private reports on their local hard drive will
need to update their workstation using a similar procedure. The individual user’s report path can be specified
from the Report Manager (Tools > Options - This Manager).
a. Determine the final location(s) for the downloaded report files. To view the global report default
location settings in EnergyCAP, click Tools > Options - Global. The Options window will open. Then
click the Reports tab to display the current Reports path.
b. To download and install the reports in EnergyCAP, navigate to the Report Manager (Reporting >
Reports).
Note: If the Reports icon is not among the available options under the Reporting menu bar, you may
be connected to the database via an internet connection. You must connect to the database via a LAN
connection in order to update reports.
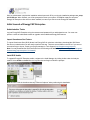
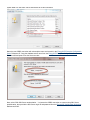
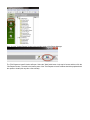
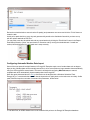
c. Click Update Reports shortcut button from the Report Manager. The Pick Reports to Install window will
open.
Note: You may have to resize the Pick Reports… window to view all window options.
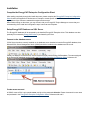
d. Select the Update from Web radio button; then click the Get Reports button.
e. Wait for file download—it may take a few minutes. When ready, the Pick Reports to Install window will
be populated with report names.
f. Ensure that checkbox settings for Options match those on the image above (check the Update all
users… checkbox and the Include only new & revised files checkbox).
Note: If you fail to check the Update all users…checkbox during the initial report update, it will be
necessary to update reports for each EnergyCAP user individually. Reports are listed in order by
Modified date, latest at the top. The report list will automatically default to include only reports that are
new or have been revised since the last report update.
g. Click OK to begin the report installation process. New and updated report RPT files will be installed
into the directory specified in the Reports Path and the reports will be registered in the database for
designated user(s). Report stored procedures will be updated in the database.
Note: This process may take a long time if you have many users to update.
h. When the report update is complete, click Close to close the Logwindow.
Reminder: If all users are accessing the same common Reports Path on a shared network folder, no
further action is required (assuming that reports were installed with the Update all users checkbox
option). However, if any users access reports from a Reports folder on their local hard drive, the
reports installation must be repeated on these individual user workstations, leaving the Update all
users… checkbox unchecked.
Note: Reports are updated monthly. To keep up to date on what reports have been modified from
month to month, please see the online list at www.EnergyCAP.com/reportupdates.
2. Custom Spreadsheet Updates: Spreadsheets are updated by importing the latest .xml spreadsheet template
file into EnergyCAP. The new .xml file was placed in the EnergyCAP program directory during the installation
process. To import the Custom Spreadsheets into EnergyCAP:
a. Navigate to the Spreadsheet Manager (click Analysis > Custom Spreadsheets). The Spreadsheet
Manager will be displayed.
b. Right-click on any spreadsheet node in the Custom Spreadsheets tree.
c. Choose Import from XML. Or click Import from the File menu. The Open window will appear.
d. Browse to the program directory and select the .xml file you wish to import. The file associated with
this release is ECAP_CustomSpreadsheets_v6_2_DB64.xml.
e. After selecting the desired file, click the Open button.
f. Repeat steps d. and e. for the second XML file named ECAP_EnergyStar.xml
Note: The import process will import the spreadsheet design, including filters and output columns, to
the new database. The list of available spreadsheet templates will be updated with the options.
3. Update GHG factors: EnergyCAP has provided an updated file containing updated GHG factors used in
calculating emissions throughout the application.
a. Download the GHG file to your computer from the release notes page.
b.
3.
b. From the Facility Manager top menu, click Greenhouse Gases and select the Import GHG Factors
option from the drop-down menu.
c. From the Open window, select the GHG emission factor file.
d. Click Open. The factor selected will be imported.
Congratulations! You have completed the installation. Please read the Release Notes web page to familiarize
yourself with the changes.
Upgrading to Release 6.3 SP2 from 6.3 (Self-Hosted)
Instructions for Upgrading to Release 6.3 SP2 from 6.3
EnergyCAP® Enterprise Release 6.3 P2
These instructions are for upgrading from EnergyCAP Enterprise Release 6.3 to Enterprise Release 6.3 SP2 with a
client-hosted database.
Note: If you are upgrading from an EnergyCAP release other than Release 6.2, contact Technical support for
upgrade assistance. If you are not certain which Release is currently installed on your system, login to EnergyCAP
and click Help > About.
The new release is 6.3.69.xxx, where 69 is the database version and xxx represents the current build number (57 or
higher).
Overview
EnergyCAP Enterprise Release 6.3 SP2 installation is simple and quick for users that already have a prior release of
6.3 installed.
Here is an overview of the upgrade process:
1. Download the EnergyCAP Setup files (refer the Release Notes).
2. Back up your current EnergyCAP database to a safe archive location and then execute the SQL script
database upgrade per instructions.
3. Execute the Setup file to install EnergyCAP Release 6.3 on each workstation.
4. Use one workstation to perform Post-Installation Actions:
Update Reports
Update Custom Spreadsheet
Update GHG factors
Follow all of the steps indicated below for each process. Some steps may require IT assistance.
Database Upgrade Prerequisites
1. Database Backup: Before updating your EnergyCAP database, back up the database to a secure location.
Caution: Failure to properly back up your database before upgrading is not covered by normal technical
support. If an upgrade fails and you cannot restore a current backup, there will be an hourly expense charge
for any support requests for database repair associated with the upgrade.
2. SQL Server 2005 or greater: EnergyCAP no longer supports SQL Server 2000. The database must be
upgraded to at least SQL Server 2005.
EnergyCAP Enterprise Installation Procedure
Install the new EnergyCAP software application on user workstations using the Setup file provided:
1. If you have not already done so, download all required installation files and installation instructions per the
instructions in Release Notes.
2. Double-click the Setup file to run the installation.
3. Follow the installation wizard prompts to complete the installation.
a. You can install Release 6.3 SP1 in the same program folder as your previous 6.3 release
(recommended).
b. Accept setup default options. The database engine option should remain unchecked.
c. Click Finish… You will receive a prompt to reboot your system when done. Click OK to restart the
computer.
4. After your PC has finished rebooting, launch EnergyCAP.
5. Login via your usual procedure. The new EnergyCAP release should load normally.
6. Click Help > About to verify that you are using the most current release. The version number of EnergyCAP
6.3 SP1 is 6.3.dd.xxx, where dd is the database version number and xxx is the number of the current build.
This concludes the EnergyCAP installation procedure.
Post-Installation Actions
These Post-Installation Actions perform various database maintenance tasks and must be completed once from one
workstation by a user with “admin” user rights in EnergyCAP. There is no need to perform these tasks from each
workstation.
1. Report Updates: Reports are updated by downloading the latest EnergyCAP report files (Crystal Reports
.RPT files) from the EnergyCAP website and installing them into the user report folder(s). Update EnergyCAP
reports per the procedures below:
Note: The report update process will vary from organization to organization depending on how reports are
managed internally. The procedure below will update all reports for all users who share report files on a
common network drive. Individual users who wish to maintain private reports on their local hard drive will
need to update their workstation using a similar procedure. The individual user’s report path can be specified
from the Report Manager (Tools > Options - This Manager).
a. Determine the final location(s) for the downloaded report files. To view the global report default
location settings in EnergyCAP, click Tools > Options - Global. The Options window will open. Then
click the Reports tab to display the current Reports path.
b. To download and install the reports in EnergyCAP, navigate to the Report Manager (Reporting >
Reports).
Note: If the Reports icon is not among the available options under the Reporting menu bar, you may
be connected to the database via an internet connection. You must connect to the database via a LAN
connection in order to update reports.
c. Click Update Reports shortcut button from the Report Manager. The Pick Reports to Install window will
open.
Note: You may have to resize the Pick Reports… window to view all window options.
d. Select the Update from Web radio button; then click the Get Reports button.
e. Wait for file download—it may take a few minutes. When ready, the Pick Reports to Install window will
be populated with report names.
f. Ensure that checkbox settings for Options match those on the image above (check the Update all
users… checkbox and the Include only new & revised files checkbox).
Note: If you fail to check the Update all users…checkbox during the initial report update, it will be
necessary to update reports for each EnergyCAP user individually. Reports are listed in order by
Modified date, latest at the top. The report list will automatically default to include only reports that are
new or have been revised since the last report update.
g. Click OK to begin the report installation process. New and updated report RPT files will be installed
into the directory specified in the Reports Path and the reports will be registered in the database for
g.
designated user(s). Report stored procedures will be updated in the database.
Note: This process may take a long time if you have many users to update.
h. When the report update is complete, click Close to close the Logwindow.
Reminder: If all users are accessing the same common Reports Path on a shared network folder, no
further action is required (assuming that reports were installed with the Update all users checkbox
option). However, if any users access reports from a Reports folder on their local hard drive, the
reports installation must be repeated on these individual user workstations, leaving the Update all
users… checkbox unchecked.
Note: Reports are updated monthly. To keep up to date on what reports have been modified from
month to month, please see the online list at www.EnergyCAP.com/reportupdates.
2. Custom Spreadsheet Updates: Spreadsheets are updated by importing the latest .xml spreadsheet
template file into EnergyCAP. The new .xml file was placed in the EnergyCAP program directory during the
installation process. To import the Custom Spreadsheets into EnergyCAP:
a. Navigate to the Spreadsheet Manager (click Analysis > Custom Spreadsheets). The Spreadsheet
Manager will be displayed.
b. Right-click on any spreadsheet node in the Custom Spreadsheets tree.
c. Choose Import from XML. Or click Import from the File menu. The Open window will appear.
d. Browse to the program directory and select the .xml file you wish to import. The file associated with
this release is ECAP_CustomSpreadsheets_v6_2_DB64.xml.
e. After selecting the desired file, click the Open button.
f. Repeat steps d. and e. for the second XML file named ECAP_EnergyStar.xml
Note: The import process will import the spreadsheet design, including filters and output columns, to
the new database. The list of available spreadsheet templates will be updated with the options.
3. Update GHG factors: EnergyCAP has provided an updated file containing updated GHG factors used in
calculating emissions throughout the application.
a. Download the GHG file to your computer from the release notes page.
b. From the Facility Manager top menu, click Greenhouse Gases and select the Import GHG Factors
option from the drop-down menu.
c. From the Open window, select the GHG emission factor file.
d. Click Open. The factor selected will be imported.
Congratulations! You have completed the installation. Please read the Release Notes web page to familiarize
yourself with the changes.
Installing Release 6.3 for the First Time (Self Hosted)
EnergyCAP® EnterpriseRelease 6.3
12/07/2012
Installation Instructions
Client-hosted Database
Contents
1 Introduction
2 EnergyCAP Software Dependencies & Requirements
2.1 Database Server Requirements
2.2 EnergyCAP Client Requirements
3 Downloadable EnergyCAP Components
4 Installation
4.1 Complete the EnergyCAP Enterprise Configuration Sheet
4.2 Setup EnergyCAP Database on SQL Server
4.2.1 Connect to the database server
4.2.2 Create esuser account
4.2.3 Create a new empty database
4.2.1 Execute Database Creation Script
4.2.2 Enable "Simple Logging"
4.3 Install EnergyCAP Enterprise Software
4.3.1 Determine PCs for EnergyCAP Client Installation
4.3.2 Create Connection to EnergyCAP Database
5 Initial Launch of EnergyCAP Enterprise
5.1 Initial Login
5.1.1 Software Validation
5.1.2 Create New Administrative User
5.2 Second Login & Administrative Tasks
5.2.1 Import Greenhouse Gas Factors
5.2.2 Install ECE Audits
5.2.3 Import Custom Spreadsheets
5.2.4 Update ENERGY STAR Schema
5.2.5 Create Additional User Accounts
6 Post-Installation Tasks
6.1 Global Report Setup
6.1.1 Setup Network Share Location
6.1.2 Update the Global Report Path
6.2 Download & Install Reports
6.2.1 Download Reports to Install
6.2.2 Update Reports for All Users
6.2.3 Complete Report Installation
6.3 Configuring Report Distribution
6.3.1 Configure rpttsk.exe
6.3.2 Target rpttsk.exe with a Windows Scheduled Task
6.4 Configuring Automatic Weather Data Import
7 Database Maintenance
7.1.1 Create SQL Server Jobs
8 Installing EnergyCAP Online
9 APPENDIX A: EnergyCAP Enterprise Configuration Sheet
Introduction
This document contains instructions for installing EnergyCAP Enterprise (ECE) Release 6.3 with a client-hosted
database.
The instructions in this document apply to EnergyCAP licensees who host their own databases on their own SQL
Server instance.
If you already have a version of EnergyCAP installed on your server then please do not use this document.
The document detailing the steps to perform an upgrade to EnergyCAP version 6.3 for self-hosted clients is
named "EnergyCAP ECE 6.3_UPGRADE_ClientHost.docx" can be found on our website here: http://www.en
ergycap.com/support/releases/energycap-enterprise-6.3-released
EnergyCAP Software Dependencies & Requirements
Database Server Requirements
You will need to identify a database server (or servers) to host Microsoft SQL Server. You will be hosting the
EnergyCAP Enterprise database on this server.
The following software products are required to host an EnergyCAP Enterprise database.
Microsoft SQL Server 2005 or greater (2008R2 recommended)
Windows Server 2003 or greater (2008 recommended)
For hardware requirements, please see Microsoft's hardware recommendations for these software products.
If your company does not have SQL Server expertise on staff, please speak with EnergyCAP, Inc. about our
convenient database hosting options
EnergyCAP Client Requirements
PCs intended to run the installed EnergyCAP Enterprise client should satisfy the following hardware and software
requirements (for additional information, please consult the topic "EnergyCAP Enterprise System Requirements" in
the User Manual).
Minimum Hardware Requirements
1 GHz processor (minimum) or faster (recommended)
4 GB RAM (minimum) or more (recommended)
100 MB free disk space (minimum) or more (recommended for reports)
Additional Recommendations:
Small font size
1024x768 pixels desktop area
Supported Operating Systems:
Windows 7
Windows XP Home/Professional
Windows Vista Home Basic/Business/Ultimate
Windows 2003 Server
Note: Minimum system requirements may vary depending on the operating platform installation (Desktop or
Network), and the anticipated size of the organization database. Please contact EnergyCAP, Inc. with specific
questions regarding your implementation.
Downloadable EnergyCAP Components
The files needed to install EnergyCAP Enterprise are located on the EnergyCAP Releases web page at the following
URL:
{+}http://www.energycap.com/support/releases/energycap-enterprise-6.3-released+
Click the "Download the new release" link and save the installation file ece_setup6-3-XX-XX.exe to the computer
desktop. This file contains the components to install the latest build of EnergyCAP Enterprise.
In addition to this client installation package, you will need to download the SQL scripts required for the initial setup
of the EnergyCAP Enterprise database. These scripts can be downloaded at the following link:
{+}http://www.energycap.com/support/releases/energycap-enterprise-6.3-released+
At this point, you should have downloaded:
1. ece_setup6-3-XX-XX.exe (ECE installation package)
2. EnergyCAP DB Scripts.zip (inside is the makenewXX.sql database creation script)
If you have downloaded the files listed above, you are ready to proceed with the EnergyCAP Enterprise installation.
Installation
Complete the EnergyCAP Enterprise Configuration Sheet
After reading completely through this install document, please complete the EnergyCAP Enterprise Configuration
Sheet found in the Appendix of this document. Prompts to record specific values in this sheet as well as
explanations of the values are scattered throughout the document.
When finished filling out the sheet, you may review it with your EnergyCAP Project Manager to ensure that your
understanding of the install and configuration steps is accurate and complete.
Setup EnergyCAP Database on SQL Server
The EnergyCAP database will be accessed by the installed EnergyCAP Enterprise client. This database can also
optionally be accessed by EnergyCAP Online, if purchased by the client.
Connect to the database server
If SQL Server has been correctly installed on the database server intended to host the EnergyCAP database, then
Microsoft SQL Server Management Studio (SSMS) should be installed on the database server as well.
Please use SSMS to access the SQL Server instance that will host the EnergyCAP database. The name assigned
to the EnergyCAP database can be found in the EnergyCAP Enterprise Configuration Sheet, Reference #6.
Create esuser account
In SSMS, create a SQL Login named esuser, and give it the password e2isnotis. Please document this user name
and password in the EnergyCAP Enterprise Configuration Sheet, References #4 and 5.
Create a new empty database
Once esuser has been created, create a new blank database and give it a descriptive name. Record this value in
the EnergyCAP Enterprise Configuration Sheet, Reference #6.
Execute Database Creation Script
Once the blank database exists, open the SQL script named makenew70.sql with SQL Server Management Studio
(this is the script you downloaded from the EnergyCAP website). Select the blank EnergyCAP database from the
database dropdown list, and execute the script by clicking the "Execute" button. The query will create many tables
and ensure that the esuser SQL User has the correct permissions to access the new database.
Enable "Simple Logging"
When the script has finished running, update the settings for the EnergyCAP database so that it uses "simple
logging" instead of "full logging" when logging database actions. This will reduce the size of the EnergyCAP
database files, making database backups more efficient.
To enable "simple logging," right-click the database and click "Properties" to open the database settings.
Next, click the "Options" button and then choose "Simple Recovery Model" from the dropdown list. Click "OK" to
save the changes.
At this point, your
EnergyCAP database should be fully configured. For more information regarding best practices for long-term
maintenance of your EnergyCAP database, please consult the Database Maintenance section below.
Install EnergyCAP Enterprise Software
Determine PCs for EnergyCAP Client Installation
At this point, the EnergyCAP database should be correctly set up and configured. The next installation step is to
determine the computers (PCs) upon which you will install the EnergyCAP Enterprise client.
EnergyCAP, Inc. recommends that users install EnergyCAP Enterprise on both the SQL Server database server
hosting the EnergyCAP database and any application servers which will run EnergyCAP external tasks (such as
WthrTask and rpttsk), which may be set up post-installation.
Have an administrator complete the installation wizard upon each PC by running the installation package ece_setup
6-3-XX-XX.exe. When finished, you will be prompted to reboot your system. Click OK to restart the computer.
EnergyCAP Enterprise client has now been installed, but cannot yet connect to the EnergyCAP database.
Create Connection to EnergyCAP Database
You must next set up an ODBC connection to the EnergyCAP database and then verify that EnergyCAP Enterprise
is able to connect with that connection. To do this, please follow the instructions below from any PC upon which
EnergyCAP Enterprise client has been installed.
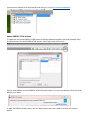
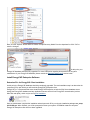
First, open the ODBC Data Source Administrator by clicking Start >> Run and typing in "odbcad32.exe". Click
"OK" to run this command.
Next, click Add, and select SQL Server (do not select the SQL Server Native Client). Follow the prompts to create a
system DSN or a user DSN—either should allow for a valid connection.
Name the new ODBC connection with a descriptive name and record it in the EnergyCAP Enterprise Configuration
Sheet, Reference #7. Copy the database server name from the EnergyCAP Enterprise Configuration Sheet,
Reference #3 and paste it into the Server text box.
Next, select "With SQL Server authentication…" to instruct the ODBC connection to connect using SQL Server
authentication, then provide the SQL Server login ID and password from the EnergyCAP Configuration Worksheet,
References #4 & 5.
Next, you will need to change the default database from "master" to the name of the EnergyCAP database as
recorded in the EnergyCAP Configuration Worksheet, Reference #6.
You may click "Finish" until you reach the end of the wizard and see the "Test Data Source" button. You may wish to
click this button to test the connection which, if successful, will display the message "TESTS COMPLETED
SUCCESSFULLY!" in the pop-up window.
Once you have clicked the final "OK" button in the wizard, your new ODBC connection should appear in the User
DSN or System DSN tabs in ODBC Data Source Manager.
The ODBC connection for your EnergyCAP Enterprise database is has now been successfully created, and you are
ready to log into EnergyCAP Enterprise for the first time.
Initial Launch of EnergyCAP Enterprise
Initial Login
To log into EnergyCAP Enterprise for the first time, click the EnergyCAP icon which was created on your desktop
during installation. A login window should appear. At this login screen, enter the username " system" and the
password "system". The ODBC connection you created in 3.3.2 above should display in the "Datasource"
dropdown list. Select it and continue by clicking "OK."
Note: Make sure the "Use catalog server" checkbox is not selected.
Software Validation
Immediately, you will see a window requesting your EnergyCAP user number and activation code. These may be
found in the client setup sheet provided to you by your ECI project manager, and should be located in References
#1 and 2 in the EnergyCAP Enterprise Configuration Sheet. Once you have entered your user number and
activation code, click "OK" to continue.
Create New Administrative User
Once EnergyCAP finishes loading, you should see the Users module with two default users named "ECI" and
"SYSTEM".
You may also see a pop-up window named "Checking Upgrade Availability". EnergyCAP, Inc. will release periodic
software updates to the EnergyCAP Enterprise client. These updates must be manually installed. Whether or not a
client receives the "Checking Upgrade Availability" pop-up window is EnergyCAP user-specific, so if a
non-administrative user un-checks the box, the administrative user will continue to receive the upgrade notifications
if he or she has the box checked.
Please create an administrative user for your organization by clicking the "New User" button in the upper right corner
of the screen.
First, enter the User ID and Full name for the administrative user, and select a password.
Next, make the new user an Administrator by clicking the "Permissions" tab and selecting "Administrator – Full
Access" from the User roles dropdown list. Click the "Set" button to activate the role, and "OK" to save the new user.
Once the user has been created, log out of EnergyCAP. You may now use your new administrative user to manage
the users instead of the default "system" user.
Note: For security, you may wish to change the password for the default system user at this time.
Second Login & Administrative Tasks
Log into EnergyCAP Enterprise using the username and password for the administrative user you just created. You
must now perform a series of administrative tasks to install various additional EnergyCAP features.
Import Greenhouse Gas Factors
To import Greenhouse Gas (GHG) factors into EnergyCAP for emissions calculations, download the GHG factor
files from our website or request the file from your project manager when you are ready to perform this step. There
are several XMLs in the ZIP so if you are not sure which file(s) to import, consult your project manager.
Note: You may download the GHG factors file from the following web address ( http://www.energycap.com/support/r
eleases/energycap-enterprise-6.3-released).
Install ECE Audits
To install EnergyCAP Enterprise audits, navigate to the Audit Manager by clicking Audits under the Analysis module.
Select Audits >> Install from the top menu bar and begin to follow the prompts.
Note: DO NOT click the checkbox that says "Remove Orphans" when performing this installation.
Now, all audits should appear in the list when creating new Audit Groups and new Audits.
Import Custom Spreadsheets
To import EnergyCAP Custom Spreadsheet templates, navigate to the Spreadsheet Manager (located in the
Analysis module).
Click File >> Import… from the menu bar and the Open window will appear, prompting you for the XML file
containing the Custom Spreadsheet templates. This file is named "ECAP_CustomSpreadsheets_v6_X_DBXX.xml"
and is located in the EnergyCAP Enterprise installation folder. In the window, navigate to this folder and select
"ECAP_CustomSpreadsheets_v6_X_DB64.xml" and click the "Open" button.
EnergyCAP Enterprise will then import the Custom Spreadsheet templates. When finished, you should see several
new nodes in the Spreadsheet Manager.
Custom Spreadsheets have now been installed, and users may create new spreadsheets from these templates
(instructions are available in the User Manual under the topic "Designing a Custom Spreadsheet").
Update ENERGY STAR Schema
To update the most recent ENERGY STAR schema for building submittal, navigate to the Facility Manager under
the Setup module. Click the "ENERGYSTAR" button in the top right corner of the screen.
Enter an email address to receive ENERGY STAR submission results. You may use a distribution list for this email
address if you desire.
To apply the ENERGY STAR schema, click the "Apply Update" button in the bottom left corner of the pop-up
window.
The update should occur very quickly. When the update is finished, the "Apply Update" button will disappear.
Note: The "Apply Update" button will reappear whenever a new version of the ENERGY STAR schema is published.
Create Additional User Accounts
You may create additional EnergyCAP users following the same procedure used to create the administrative user in
4.1.2 above. You may use the Permissions tab to control user access and read/write permissions (for more details,
please visit the "Assigning Custom Permissions to a User" topic in our User Manual).
Note: At this point, EnergyCAP Enterprise has been officially installed. The tasks described in section 5 and below
are a series of optional but extremely valuable post-installation measures to maximize the efficiency of
time-consuming data tasks, ensure data integrity, and fully activate specific EnergyCAP functionality.
Post-Installation Tasks
The following tasks should be performed once the EnergyCAP database has been created and configured and the
EnergyCAP Enterprise client has been successfully installed.
Global Report Setup
Report setup must be completed once from one workstation by a user with administrative user rights in EnergyCAP.
Setup Network Share Location
Choose a file server and a folder on that server to contain the EnergyCAP Enterprise report files. These files will be
shared over the Local Area Network (LAN). Record the file server name and the folder path in the EnergyCAP
Configuration Worksheet, Reference #8.
When you have created the folder on the server, have a system administrator give read/write access to the folder for
every Windows user in the organization which will be running EnergyCAP.
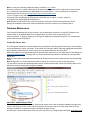
Update the Global Report Path
To update the global Reports Path, open EnergyCAP Enterprise and click Tools >> Global Options from the menu
bar. Click on the "Reports" tab.
In the "Reports" tab is a setting named "Reports path". This setting specifies the folder path where the report files
will be stored for use by EnergyCAP.
Copy the value from the EnergyCAP Configuration Worksheet, Reference #8 and paste it into the "Reports path"
setting. Click "OK" to save your changes.
At this point, the global Reports Path setting should be configured, and the EnergyCAP LAN reports may be
downloaded and installed.
Note: If the Reports icon is not among the available options under the Reporting menu bar, you may be connected
to the database via Internet Connection instead of the Local Area Connection. You must connect to the database via
a LAN connection in order to update reports.
The decision to connect via Internet Connection or LAN Connection is made at the EnergyCAP Enterprise login
screen.
Download & Install Reports
Reports are installed and updated by downloading the latest EnergyCAP report files (Crystal Report files, which
have an extension of .RPT) from the EnergyCAP website and installing them through the EnergyCAP Enterprise
client. The downloaded report files will be installed into the report folder which you configured earlier in section 5.1.
Note: The report update process will vary from organization to organization depending on how reports are managed
internally. The procedure described below will update all reports for all users who share report files on a common
network drive.
Download Reports to Install
Open the Report Manager in EnergyCAP.
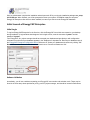
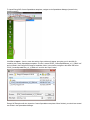
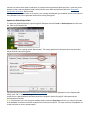
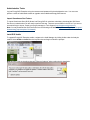
Next, click the "Update Reports" button in the top right corner of the Report Manager.
The "Pick Reports to Install" window will open. Select the "Web" radio button in the top left corner and then click the
"Get Reports" button. The table in the bottom pane of the "Pick Reports to Install" window should be populated with
the reports to install (this may take a few minutes).
Note: The steps above have only retrieved a list of reports to install; the reports have not been installed yet!
Update Reports for All Users
If it is not already checked, mark the checkbox named "Update all users who share network report files". This will
ensure that reports will be updated for all users.
Note: If you choose not to check the "Update all users…" checkbox during report installation, it will be necessary to
update reports for each EnergyCAP user individually.
Also mark the checkbox named "Include only new & revised files" to make sure you retrieve the most recent
versions of all reports. Your settings should be identical to the screenshot below.
Complete Report Installation
Once the checkboxes above have been checked, click the "OK" button to begin the report installation. New and
updated report RPT files will be installed into the directory specified in the Reports Path and the reports will be
registered in the database for the designated users. SQL stored procedures to be used by the reports will also be
installed directly into the EnergyCAP database.
While the reports are installing, you may notice status messages being displayed at the bottom of the EnergyCAP
window.
Note: Report installation may take several minutes if you have many users to update.
When the report update is complete, click "Close" to exit the Log window. All reports should now be installed and
up-to-date.
Note: When performing report updates on specific reports (as opposed to a global report update), please note that
the reports are listed in order by "modified date" with the most recently modified reports displayed at the top of the
list. If the "Include only new…" checkbox has been selected, the report list will automatically default to include only
reports that are new or have been revised since the last report update. It is important to be "up-to-date" with all the
reports so as not to miss any new reports or bug fixes.
Configuring Report Distribution
Batches of EnergyCAP reports can be set up to be automatically run on a recurring basis. The report results are
saved as PDF files and are attached to emails which are addressed to distribution lists.
Configuration for Report Distribution Manager is very flexible, and exact details of implementation should be
determined by the client organization. This section will specifically deal with configuring rpttsk.exe; an external,
scriptable task which runs the reports and emails them to the distribution lists.
Note: Detailed instructions on how to create a Distribution List and add contacts to an existing Distribution List are
available in the EnergyCAP Enterprise User Manual, as are instructions for creating Report Email Batches.
Configure rpttsk.exe
Rpttsk connects to your SMTP email server and your EnergyCAP database in order to execute report distribution.
Detailed instructions regarding how to configure rpttsk.exe for Report Email Batches are available in the EnergyCAP
Enterprise User Manual.
Note: To configure rpttsk, you will need References #7, 9, and 10 from the EnergyCAP Enterprise Configuration
Sheet.
Target rpttsk.exe with a Windows Scheduled Task
It is beyond the scope of this document to provide full instructions for creating a Windows Scheduled Task, but the
following steps should suffice.
Create a new Windows Scheduled Task, and schedule the Trigger to run "Daily". Have the Task "Start a program"
and provide the full path to the rpttsk.exe file, passing in the -a parameter to indicate that the task should run
automatically. If you wish, you may add the optional parameters provided by rpttsk.exe to create a log file containing
a summary of the actions performed by rpttsk.
Review the scheduled task to ensure that the file path(s) and parameters are correct and click the "Finish" button to
create the task.
At this point, rpttsk should run every day and generate daily emails to the distribution lists which you have set up
with the reports attached as PDF files.
You may wish to test the scheduled task and any report batches by clicking the "Email Now!" button in the Report
Email Setup Wizard to "prime" the report batch for execution and by running the scheduled task. If emails are
received by the distribution list, then rpttsk.exe is setup correctly.
Configuring Automatic Weather Data Import
Some of the most powerful analysis features in EnergyCAP Enterprise make use of weather data such as degree
days per day. Weather data can be manually entered, but it is far more efficient to import weather data automatically
using one of EnergyCAP's external tasks. This section will deal with configuring WthrTask.exe; an external,
scriptable task which automatically imports weather data into EnergyCAP.
Much like rpttsk (discussed above in 5.3.2), WthrTask must be targeted with a Windows Scheduled Task.
EnergyCAP, Inc. recommends that weather data be imported on a nightly basis, so the task must recur daily. Unlike
rpttsk, WthrTask requires a number of command line parameters, shown below.
To use WthrTask, an ODBC datasource must be created which points to the EnergyCAP Enterprise database.
Note: You may have already created this ODBC connection in 3.3.2 above.
Once this connection is in place, WthrTask can be called with a command similar to that shown in the box below.
The –d parameter corresponds to the ODBC data source name and the –u and –p parameters correspond to
References #9 and 10 from the EnergyCAP Enterprise Configuration Sheet.
c:\>cd "C:\Program Files (x86)\EnergyCAP Enterprise 6.3"
C:\Program Files (x86)\EnergyCAP Enterprise 6.3>WthrTask.exe -d ecapinc -u ecuser -p abc123
C:\Program Files (x86)\EnergyCAP Enterprise 6.3>
Note: Results for WthrTask.exe are best if the script file or Scheduled Task first changes directory to the
EnergyCAP installation folder before calling the WthrTask command, as shown in the example above.
Database Maintenance
Your EnergyCAP database will quickly increase in size as data enters the system. EnergyCAP Enterprise must
maintain many of its database tables on a consistent basis, and some of this maintenance can be
resource-intensive. To properly maintain your EnergyCAP database by following EnergyCAP, Inc. best practices,
please follow the instructions below.
Create SQL Server Jobs
In the EnergyCAP database are several tables which provide data to the EnergyCAP PowerViews, Cost Avoidance,
custom spreadsheets, reports, and charts. These tables are "summary" tables, containing aggregated values which
are periodically refreshed with up-to-date values as more detailed data flows into the system.
While these tables can be regenerated based on programmatic events such as user login (see the User Manual for "
PowerView Refresh Options"), EnergyCAP, Inc. recommends that these tables be refreshed via automated SQL
Server jobs.
Note: It is assumed that the steps described below will be performed by a user having expertise with Microsoft SQL
Server.
Note: EnergyCAP, Inc. recommends that all jobs run nightly, when there are no users using the system.
You will need to use SQL Server Management Studio to create automated SQL jobs for the following tasks on the
SQL Server instance hosting the EnergyCAP database.
SQL Job #1: Update Staging Tables
The "staging tables", as mentioned above, provide quick access to the rollup information displayed by higher-level
nodes in the Facility and Cost Center trees in EnergyCAP. Because the data in the lower-level nodes is always
changing, the data for the upper-level nodes necessarily changes as well.
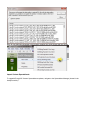
Use the script in the box below as the content for your SQL Server job, listing the SQL commands in the order given:
EXEC CB2
GO
EXEC generateBillSummaryTables
GO
EXEC generateGHGSummaryTables
SQL Job #2: Recalculate Calendarization & Normalization
EnergyCAP makes use of sophisticated calendarization and normalization of data to spread out utility data usage
over the space of a calendar month, normalized according to imported weather data and a baseline year.
To regenerate the tables which power calendarization and normalization, use the script in the box below as the
content for your SQL Server job:
EXEC regressandcalendarizeallmeters NULL, 1
Note: Weather data must exist in the database to perform this task. You can schedule the automatic import of
weather data by following the steps in section 5.4 above.
SQL Job #3: Automatic Backups
EnergyCAP, Inc. strongly recommends the creation of a SQL job to back up the EnergyCAP Enterprise database on
a nightly basis. This enables quick turnaround with minimal bill entry data lost in case of server or software
malfunctions and catastrophic user error.
Please see "Database Backup for EnergyCAP Enterprise" in the User Manual for additional details.
Installing EnergyCAP Online
EnergyCAP Online is a web-only version of EnergyCAP which incorporates much of the same functionality as
EnergyCAP Enterprise, but without the administrative overhead of an installed application.
If your organization has purchased EnergyCAP Online, you may install it by referring to the detailed instructions
available in the PDF file named "EnergyCAP_Online_2_12_FirstTime_Install_Instructions_with updates.pdf". It
is beyond the scope of this document to further discuss EnergyCAP Online installation.
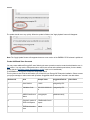
APPENDIX A: EnergyCAP Enterprise Configuration Sheet
This is a place to store all of the information you will need for your EnergyCAP Enterprise installation. Please contact
your project manager or sales contact with questions. Suggested default values are included in the table below.
Reference #
Item
Sample Value
Suggested Default
1
User Number
12345
Assigned by ECI
2
Validation Code
XX-XXXX-XXXX-XX
X
Assigned by ECI
3
SQL Server
Instance Name
\\dbSrv1\SQLSERV
ER
4
SQL Server User
Name
esuser
esuser
5
SQL Server User
Password
e2isnotis
e2isnotis
6
EnergyCAP
Database Name
ece_energycapinc
ece_[database
name]
Client Value
7
ODBC Data Source
Name
energycapinc
8
Physical Location of
ECE LAN Reports
\\fileShareSrv1\ece\r
eports
9
ECE Administrative
User
admin
10
ECE Administrative
Password
admin
[database name]
Upgrading to Release 6.3 in Detail (Self Host)
EnergyCAP® EnterpriseRelease 6.3
12/07/2012
Upgrade Instructions
Client-hosted Database
Contents
1 Introduction
2 EnergyCAP Software Dependencies & Requirements
2.1 EnergyCAP Client Requirements
3 Downloadable EnergyCAP Components
4 Installation
4.1 Complete the EnergyCAP Enterprise Configuration Sheet
4.1.1 Execute Database Upgrade Script
4.1.2 Enable "Simple Logging"
4.2 Install EnergyCAP Enterprise Software
4.2.1 Determine PCs for EnergyCAP Client Installation
4.3 Administrative Tasks
4.3.1 Import Greenhouse Gas Factors
4.3.2 Install ECE Audits
4.3.3 Import Custom Spreadsheets
4.3.4 Update ENERGY STAR Schema
5 Post-Installation Tasks
5.1 Download & Install Reports
5.1.1 Download Reports to Install
5.1.2 Update Reports for All Users
5.1.3 Complete Report Installation
5.2 Configuring Report Distribution
5.2.1 Configure rpttsk.exe
5.2.2 Target rpttsk.exe with a Windows Scheduled Task
5.3 Configuring Automatic Weather Data Import
6 Database Maintenance
6.1.1 Create SQL Server Jobs
7 Installing EnergyCAP Online
8 APPENDIX A: EnergyCAP Enterprise Configuration Sheet
Introduction
This document contains instructions for upgrading to EnergyCAP Enterprise (ECE) Release 6.3 with a client-hosted
database.
The instructions in this document apply to EnergyCAP licensees who host their own databases on their own SQL
Server instance.
If you have not yet installed a version of EnergyCAP or setup your EnergyCAP database then please do not
use this document. The document detailing the steps to perform a first time installation of EnergyCAP
version 6.3 for self-hosted clients is named "EnergyCAP ECE 6.3_FirstTimeInstall_ClientHost.docx" can be
found on our website here: http://www.energycap.com/support/releases/energycap-enterprise-6.3-released
EnergyCAP Software Dependencies & Requirements
EnergyCAP Client Requirements
PCs intended to run the installed EnergyCAP Enterprise client should satisfy the following hardware and software
requirements (for additional information, please consult the topic "EnergyCAP Enterprise System Requirements" in
the User Manual).
Minimum Hardware Requirements
1 GHz processor (minimum) or faster (recommended)
4 GB RAM (minimum) or more (recommended)
100 MB free disk space (minimum) or more (recommended for reports)
Additional Recommendations:
Small font size
1024x768 pixels desktop area
Supported Operating Systems:
Windows 7
Windows XP Home/Professional
Windows Vista Home Basic/Business/Ultimate
Windows 2003 Server
Note: Minimum system requirements may vary depending on the operating platform installation (Desktop or
Network), and the anticipated size of the organization database. Please contact EnergyCAP, Inc. with specific
questions regarding your implementation.
Downloadable EnergyCAP Components
The files needed to install EnergyCAP Enterprise are located on the EnergyCAP Releases web page at the following
URL:
{+}http://www.energycap.com/support/releases/energycap-enterprise-6.3-released+
Click the "Download the new release" link and save the installation file ece_setup6-3-XX-XX.exe to the computer
desktop. This file contains the components to install the latest build of EnergyCAP Enterprise.
In addition to this client installation package, you will need to download the SQL script required for the upgrade of
the EnergyCAP Enterprise database. This script can be downloaded at the following link:
{+}http://www.energycap.com/support/releases/energycap-enterprise-6.3-released+
At this point, you should have downloaded:
1. ece_setup6-3-XX-XX.exe (ECE installation package)
2. EnergyCAP DB Scripts.zip (inside is the upgradeXXtoXX.sql database upgrade script)
If you have downloaded the files listed above, you are ready to proceed with the EnergyCAP Enterprise installation.
Installation
Complete the EnergyCAP Enterprise Configuration Sheet
After reading completely through this install document, please complete the EnergyCAP Enterprise Configuration
Sheet found in the Appendix of this document. Prompts to record specific values in this sheet as well as
explanations of the values are scattered throughout the document.
When finished filling out the sheet, you may review it with your EnergyCAP Project Manager or a Technical Support
staff member (http://support.energycap.com) to ensure that your understanding of the install and configuration steps
is accurate and complete.
Execute Database Upgrade Script
Before continuing, MAKE A BACKUP OF YOUR EXISTING DATABASE in case of an error in the Database
upgrade process.
Open the SQL script named upgradeXXtoXX.sql with SQL Server Management Studio (this is the script you
downloaded from the EnergyCAP website). Select the EnergyCAP database from the database dropdown list, and
execute the script by clicking the "Execute" button. The query will upgrade the EnergyCAP database to be
compatible with the most recent installed client.
Verify that the script completed without any errors. SQL Management Studio indicates the success or failure of a
SQL Script at the bottom of the query messages window. If the SQL script runs properly, it should say the following,
"Query executed successfully."
Enable "Simple Logging"
Note: This step is related to database maintenance and may have been performed during your original EnergyCAP
database installation.
When the script has finished running, update the settings for the EnergyCAP database so that it uses "simple
logging" instead of "full logging" when logging database actions. This will reduce the size of the EnergyCAP
database files, making database backups more efficient.
To enable "simple logging," right-click the database and click "Properties" to open the database settings.
Next, click the "Options" button and then choose "Simple Recovery Model" from the dropdown list. Click "OK" to
save the changes.
At this point, your
EnergyCAP database should be fully upgraded. For more information regarding best practices for long-term
maintenance of your EnergyCAP database, please consult the Database Maintenance section below.
Install EnergyCAP Enterprise Software
Determine PCs for EnergyCAP Client Installation
At this point, the EnergyCAP database should be completely upgraded. The next installation step is to determine the
computers (PCs) upon which you will install the EnergyCAP Enterprise client.
EnergyCAP, Inc. recommends that users install EnergyCAP Enterprise on both the SQL Server database server
hosting the EnergyCAP database and any application servers which will run EnergyCAP external tasks (such as
WthrTask and rpttsk), which may be set up post-installation.
Have an administrator complete the installation wizard upon each PC by running the installation package ece_setup
6-3-XX-XX.exe. When finished, you will be prompted to reboot your system. Click OK to restart the computer.
EnergyCAP Enterprise client has now been upgraded.
Administrative Tasks
Log into EnergyCAP Enterprise using the username and password for the administrative user. You must now
perform a series of administrative tasks to upgrade various additional EnergyCAP features.
Import Greenhouse Gas Factors
To import Greenhouse Gas (GHG) factors into EnergyCAP for emissions calculations, download the GHG factor
files from our website when you are ready to perform this step. There are several XMLs in the ZIP so if you are not
sure which file(s) to import, consult your project manager or Tech Support ( http://support.energycap.com).
Note: You may download the GHG factors file from the following web address ( http://www.energycap.com/support/r
eleases/energycap-enterprise-6.3-released).
Install ECE Audits
To upgrade EnergyCAP Enterprise audits, navigate to the Audit Manager by clicking Audits under the Analysis
module. Select Audits >> Install from the top menu bar and begin to follow the prompts.
Note: DO NOT click the checkbox that says "Remove Orphans" when performing this installation.
Now, all new audits should appear in the list when creating new Audit Groups and new Audits.
Import Custom Spreadsheets
To upgrade EnergyCAP Custom Spreadsheet templates, navigate to the Spreadsheet Manager (located in the
Analysis module).
Click File >> Import… from the menu bar and the Open window will appear, prompting you for the XML file
containing the Custom Spreadsheet templates. This file is named "ECAP_CustomSpreadsheets_v6_X_DBXX.xml"
and is located in the EnergyCAP Enterprise installation folder. In the window, navigate to this folder and select
"ECAP_CustomSpreadsheets_v6_X_DBXX.xml" and click the "Open" button.
EnergyCAP Enterprise will then import the Custom Spreadsheet templates. When finished, you may see new nodes
in the Spreadsheet Manager.
Custom Spreadsheets have now been upgraded, and users may create new spreadsheets from these templates
(instructions are available in the User Manual under the topic "Designing a Custom Spreadsheet").
Update ENERGY STAR Schema
To update the most recent ENERGY STAR schema for building submittal, navigate to the Facility Manager under
the Setup module. Click the "ENERGYSTAR" button in the top right corner of the screen.
Enter an email address to receive ENERGY STAR submission results. You may use a distribution list for this email
address if you desire.
To apply the ENERGY STAR schema, click the "Apply Update" button in the bottom left corner of the pop-up
window.
The update should occur very quickly. When the update is finished, the "Apply Update" button will disappear.
Note: The "Apply Update" button will reappear whenever a new version of the ENERGY STAR schema is published.
Note: At this point, EnergyCAP Enterprise has been officially upgraded. The tasks described in section 5 and below
are a series of optional but extremely valuable post-installation measures to maximize the efficiency of
time-consuming data tasks, ensure data integrity, and fully activate specific EnergyCAP functionality.
Post-Installation Tasks
The following tasks should be performed the EnergyCAP Enterprise client has been successfully installed.
Download & Install Reports
Reports are installed and updated by downloading the latest EnergyCAP report files (Crystal Report files, which
have an extension of .RPT) from the EnergyCAP website and installing them through the EnergyCAP Enterprise
client. The downloaded report files will be installed into the shared report folder.
Note: The report update process will vary from organization to organization depending on how reports are managed
internally. The procedure described below will update all reports for all users who share report files on a common
network drive.
Download Reports to Install
Open the Report Manager in EnergyCAP.
Next, click the "Update Reports" button in the top right corner of the Report Manager.
The "Pick Reports to Install" window will open. Select the "Web" radio button in the top left corner and then click the
"Get Reports" button. The table in the bottom pane of the "Pick Reports to Install" window should be populated with
the reports to install (this may take a few minutes).
Note: The steps above have only retrieved a list of reports to install; the reports have not been installed yet!
Update Reports for All Users
If it is not already checked, mark the checkbox named "Update all users who share network report files". This will
ensure that reports will be updated for all users.
Note: If you choose not to check the "Update all users…" checkbox during report installation, it will be necessary to
update reports for each EnergyCAP user individually.
Also mark the checkbox named "Include only new & revised files" to make sure you retrieve the most recent
versions of all reports. Your settings should be identical to the screenshot below.
Complete Report Installation
Once the checkboxes above have been checked, click the "OK" button to begin the report installation. New and
updated report RPT files will be installed into the directory specified in the Reports Path and the reports will be
registered in the database for the designated users. SQL stored procedures to be used by the reports will also be
installed directly into the EnergyCAP database.
While the reports are installing, you may notice status messages being displayed at the bottom of the EnergyCAP
window.
Note: Report installation may take several minutes if you have many users to update.
When the report update is complete, click "Close" to exit the Log window. All reports should now be installed and
up-to-date.
Note: When performing report updates on specific reports (as opposed to a global report update), please note that
the reports are listed in order by "modified date" with the most recently modified reports displayed at the top of the
list. If the "Include only new…" checkbox has been selected, the report list will automatically default to include only
reports that are new or have been revised since the last report update. It is important to be "up-to-date" with all the
reports so as not to miss any new reports or bug fixes.
Configuring Report Distribution
Batches of EnergyCAP reports can be set up to be automatically run on a recurring basis. The report results are
saved as PDF files and are attached to emails which are addressed to distribution lists.
Configuration for Report Distribution Manager is very flexible, and exact details of implementation should be
determined by the client organization. This section will specifically deal with configuring rpttsk.exe; an external,
scriptable task which runs the reports and emails them to the distribution lists.
Note: Detailed instructions on how to create a Distribution List and add contacts to an existing Distribution List are
available in the EnergyCAP Enterprise User Manual, as are instructions for creating Report Email Batches.
Configure rpttsk.exe
Rpttsk connects to your SMTP email server and your EnergyCAP database in order to execute report distribution.
Detailed instructions regarding how to configure rpttsk.exe for Report Email Batches are available in the EnergyCAP
Enterprise User Manual.
Note: To configure rpttsk, you will need References #7, 9, and 10 from the EnergyCAP Enterprise Configuration
Sheet.
Target rpttsk.exe with a Windows Scheduled Task
It is beyond the scope of this document to provide full instructions for creating a Windows Scheduled Task, but the
following steps should suffice.
Create a new Windows Scheduled Task, and schedule the Trigger to run "Daily". Have the Task "Start a program"
and provide the full path to the rpttsk.exe file. If you wish, you may add the optional parameters provided by
rpttsk.exe to create a log file containing a summary of the actions performed by rpttsk.
Review the scheduled task to ensure that the file path(s) and parameters are correct and click the "Finish" button to
create the task.
At this point, rpttsk should run every day and generate daily emails to the distribution lists which you have set up
with the reports attached as PDF files.
You may wish to test the scheduled task and any report batches by clicking the "Email Now!" button in the Report
Email Setup Wizard to "prime" the report batch for execution and by running the scheduled task. If emails are
received by the distribution list, then rpttsk.exe is setup correctly.
Configuring Automatic Weather Data Import
Some of the most powerful analysis features in EnergyCAP Enterprise make use of weather data such as degree
days per day. Weather data can be manually entered, but it is far more efficient to import weather data automatically
using one of EnergyCAP's external tasks. This section will deal with configuring WthrTask.exe; an external,
scriptable task which automatically imports weather data into EnergyCAP.
Much like rpttsk (discussed above in 5.3.2), WthrTask must be targeted with a Windows Scheduled Task.
EnergyCAP, Inc. recommends that weather data be imported on a nightly basis, so the task must recur daily. Unlike
rpttsk, WthrTask requires a number of command line parameters, shown below.
To use WthrTask, an ODBC datasource must be created which points to the EnergyCAP Enterprise database.
Note: You may have already created this ODBC connection in 3.3.2 above.
Once this connection is in place, WthrTask can be called with a command similar to that shown in the box below.
The –d parameter corresponds to the ODBC data source name and the –u and –p parameters correspond to
References #9 and 10 from the EnergyCAP Enterprise Configuration Sheet.
c:\>cd "C:\Program Files (x86)\EnergyCAP Enterprise 6.3"
C:\Program Files (x86)\EnergyCAP Enterprise 6.3>WthrTask.exe -d ecapinc -u ecuser -p abc123
C:\Program Files (x86)\EnergyCAP Enterprise 6.3>
Note: Results for WthrTask.exe are best if the script file or Scheduled Task first changes directory to the
EnergyCAP installation folder before calling the WthrTask command, as shown in the example above.
Database Maintenance
Your EnergyCAP database will quickly increase in size as data enters the system. EnergyCAP Enterprise must
maintain many of its database tables on a consistent basis, and some of this maintenance can be
resource-intensive. To properly maintain your EnergyCAP database by following EnergyCAP, Inc. best practices,
please follow the instructions below.
Create SQL Server Jobs
In the EnergyCAP database are several tables which provide data to the EnergyCAP PowerViews, Cost Avoidance,
custom spreadsheets, reports, and charts. These tables are "summary" tables, containing aggregated values which
are periodically refreshed with up-to-date values as more detailed data flows into the system.
While these tables can be regenerated based on programmatic events such as user login (see the User Manual for "
PowerView Refresh Options"), EnergyCAP, Inc. recommends that these tables be refreshed via automated SQL
Server jobs.
Note: It is assumed that the steps described below will be performed by a user having expertise with Microsoft SQL
Server.
Note: EnergyCAP, Inc. recommends that all jobs run nightly, when there are no users using the system.
You will need to use SQL Server Management Studio to create automated SQL jobs for the following tasks on the
SQL Server instance hosting the EnergyCAP database.
SQL Job #1: Update Staging Tables
The "staging tables", as mentioned above, provide quick access to the rollup information displayed by higher-level
nodes in the Facility and Cost Center trees in EnergyCAP. Because the data in the lower-level nodes is always
changing, the data for the upper-level nodes necessarily changes as well.
Use the script in the box below as the content for your SQL Server job, listing the SQL commands in the order given:
EXEC CB2
GO
EXEC generateBillSummaryTables
GO
EXEC generateGHGSummaryTables
SQL Job #2: Recalculate Calendarization & Normalization
EnergyCAP makes use of sophisticated calendarization and normalization of data to spread out utility data usage
over the space of a calendar month, normalized according to imported weather data and a baseline year.
To regenerate the tables which power calendarization and normalization, use the script in the box below as the
content for your SQL Server job:
EXEC regressandcalendarizeallmeters NULL, 1
Note: Weather data must exist in the database to perform this task. You can schedule the automatic import of
weather data by following the steps in section 5.4 above.
SQL Job #3: Automatic Backups
EnergyCAP, Inc. strongly recommends the creation of a SQL job to back up the EnergyCAP Enterprise database on
a nightly basis. This enables quick turnaround with minimal bill entry data lost in case of server or software
malfunctions and catastrophic user error.
Please see "Database Backup for EnergyCAP Enterprise" in the User Manual for additional details.
Installing EnergyCAP Online
EnergyCAP Online is a web-only version of EnergyCAP which incorporates much of the same functionality as
EnergyCAP Enterprise, but without the administrative overhead of an installed application.
If your organization has purchased EnergyCAP Online, you may install it by referring to the detailed instructions
available in the PDF file named "EnergyCAP_Online_2_12_FirstTime_Install_Instructions_with updates.pdf". It
is beyond the scope of this document to further discuss EnergyCAP Online installation.
APPENDIX A: EnergyCAP Enterprise Configuration Sheet
This is a place to store all of the information you will need for your EnergyCAP Enterprise installation. Please contact
your project manager, Tech Support (_GoBack" class="external-link" rel="nofollow">http://support.energycap.com),
or sales contact with questions. Suggested default values are included in the table below.
Reference #
Item
Sample Value
Suggested Default
1
User Number
12345
Assigned by ECI
2
Validation Code
XX-XXXX-XXXX-XX
X
Assigned by ECI
3
SQL Server
Instance Name
\\dbSrv1\SQLSERV
ER
4
SQL Server User
Name
esuser
esuser
5
SQL Server User
Password
e2isnotis
e2isnotis
Client Value
6
EnergyCAP
Database Name
ece_energycapinc
ece_[database
name]
7
ODBC Data Source
Name
energycapinc
[database name]
8
Physical Location of
ECE LAN Reports
\\fileShareSrv1\ece\r
eports
9
ECE Administrative
User
admin
10
ECE Administrative
Password
admin