1
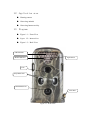
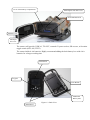
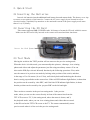
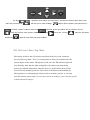
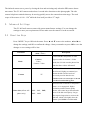
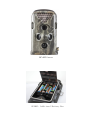
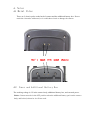
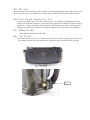
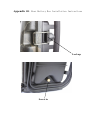
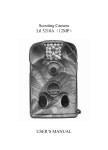
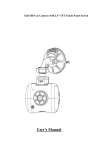
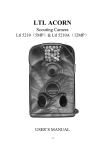
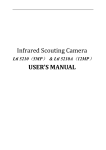
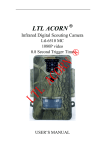
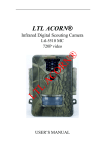
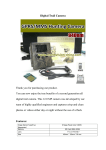
Infrared Trail Hunting Camera
GC-002
User Manual
Content
1.
2.
Quick
1.1
1.2
1.3
Introduction:
Features
Application Area
Diagram
Quick Start
2.1
2.2
2.3
2.4
Inserting the Batteries
Inserting the SD Card
TEST Mode
Infrared Shooting Mode
3.
Advanced Settings
3.1 Function Keys
3.2 File Format
4.
Notes
4.1
4.2
4.3
4.4
4.5
4.6
Metal Poles
Power and Additional Battery Box
SD card
Video Length and Battery Life
850nm IR LED
The Tripod
5. Limited Warranty
Appendix 1. Technical Specification
Appendix 2. Parts List
Appendix 3. Rear Battery Box Installation Instructions
1. Quick instruction:
The GC-002 series hunting camera has substantially increased the total time of
shooting video. The structure was further improved around the battery case. It is the
basic principle of the pyroelectric infrared sensors (PIR) to respond to infrared signals
of animals or the human body where an automatic trigger takes photos or video.
Features
1.1
● 12MP/8MP/5MP /3MP/1MP quality photo options
● 1280 x 720P/D1/VGA/QVGA video
● About 1 second trigger time
● 2.36 TFT color screen preview function
● Photo + video feature takes a photo before shooting video
● Pair of regional remote sensors activate the camera and immediately takes a picture
of an object entering the lens range
● The day or night mode auto-switch takes the color photos in the day and black and
white at night
● Low standby current, lengthy standby time, and a waterproof shell for longer working
time in the field
● Low operation temperature; lowest temperature is -22oF
● Runs on a minimum of 4 AA alkaline batteries. The back panel takes 4 AA batteries
as an additional power to last longer in the field
● The IR LED’s distance;65 ft or 20m
● Period force shooting (Time Lapse) for observing cold blooded animals,
vegetation, or landscape changes
●
Letters and numbers can be entered to set the serial number of camera. The serial
number can then be printed onto the photographs. A 4 digit combination can be applied
to record the location of the photos
● Date, time, temperature, and moon phase can be imprinted in every photo
●
Set up a password to protect your camera from unauthorized users
●
Support the camera with a tripod
1.2 Application area
●
Hunting camera
●
Observing animals
●
Observing human activity
Diagram
1.3
●
Figure 1.1:Front View
●
Figure 1.2:Bottom View
●
Figure 1.3:Back View
LED IR Flash
Light Sensor
Motion Indicator
Lens
Prep PIR Sensor
Main PIR Sensor
Lock Hole
Figure 1.1: Front View
Cover of the Battery Compartment
Push Open/Close the Cover
Power/Mode Switch
Bottom Cover
Pull Open
Figure 1.2: Bottom View
the Cover
The camera will provide: USB 2.0, TV OUT, external 6V power socket, SD cassette, tri-location
toggle switch (OFF, ON, TEST)
The camera holds 4 AA batteries; Highly recommend adding the back battery box with 4 AA
batteries for a longer working time
LCD Screen
Keypad
Lock Buckle
Additional
Battery Box
Hand Screw
Figure 1.3: Back View
2. Quick Start
2.1 Inserting the Batteries
Insert 8 AA batteries into the additional back battery box and camera body. The battery cover tips
to ensure correct polarity of the batteries. Connect the 6V power supply by an external access to
electrical outlets. (Optional) Pay attention to the maximum current if the power supply needs more
than a 1A (6 V) battery.
2.2 Inserting the SD Card
This camera supports 8MB~32GB SD cards. It is better to format the SD card with this camera.
Make sure the SD card is fully inserted or the camera will sound and then shut down.
Insert the Card Upward
2.3 Test Mode
Moving the switch to the TEST position will set camera to the preview testing mode.
When the device is in this mode, you can manually take pictures, videotape, view existing
photos and videos and adjust the parameters just like using an ordinary camera. You can
also test the PIR (Pyro-electric Infrared) function by the following operations: First, make
sure the camera is in preview test mode by looking at the position of the switch, and then,
in the range of 3 to 20 meters (10 to 65 feet), walk slowly back and forth along the direction
that is exactly perpendicular to the camera lens. If the red LED indicator light flashes, it shows that
the position can be sensed by “take PIR”, and if the blue LED indicator light flashes, it shows
that the position can be sensed by the “prepare PIR” on the left and right.
There are three scenarios in the preview testing mode: 1) the preview
mode, where you can see the scenes directly in front of the camera lens from the
TFT LCD screen or TV, 2) the setting mode, where the menu is shown, and 3)
the playback mode, where you can view existing photos and videos that are stored
in the SD card on the TFT LCD screen or the TV. The camera automatically enters
preview mode when it is first set in the preview testing mode.
The keys
,
under the preview mode,
symbolize “shoot video” and “take photo”, and they are shortcut keys. When used
will lead you to video condition,
is pressed, a photo or video is taken, and
is pressed, photos and videos can be reviewed. The key
zooms into pictures under preview condition and the key
and the key
leads to photo condition, and when the key
zooms out. The key
plays the first photo
plays the next under play view condition.
2.4 Infrared Shooting Mode
Moving the switch to the ON position would set the device in the Automatic
Infrared Shooting Mode. There is a waiting time of about 10 seconds before the
system adjusts to this mode. During this period, the red LED indicator light will
keep flashing. After that the light extinguishes, the camera can start taking
pictures by infrared inducement. Once the device is in this mode, there will be
no need for any manual operations. The camera will function automatically by
taking pictures or videotaping the subjects such as animals, persons, or cars that
enter the camera sensor range. If you want to shoot according to your own idea, please
read the advanced settings.
The infrared camera saves power by closing the lens and activating only when the PIR sensors detect
movement. The GC-002 camera needs about 1 second after detection to take photographs. The side
sensors help detect animals that may be moving quickly across the camera detection range. The total
scope of the sensors is 100 – 120o while the lens itself provides a 51o angle.
3. Advanced Settings
The GC-002 trail camera comes with preset manufacturer settings. You can change the
settings to meet your requirements. Please make sure the camera is in the test mode.
3.1
Function Keys
Press “MENU” key to OK/exit the menu. Press ▲ and ▼ to move the markers, ◄ and ► to
change the settings, and OK to confirm the change. Always remember to press OK to save the
changes or new settings will be lost.
Parameter
Settings
(Bold = default)
Description
Select whether still photos or video
Mode
Camera,
Video,
Camera + Video
clips are taken. In Camera + Video
mode, the GC-002 can take photos first
and then shoot videos afterward.
OK
Format
Photo Size (affects still
1MP,3MP,
photos only)
8MP,12MP
5MP,
All files will be deleted after formatting
the SD card. Highly recommend you
format the SD card if it has been
previously used in other devices.
Caution: make sure wanted files on the SD
card have been backed up first!
Select desired resolution for still photos
from 1 to 12 megapixels. Higher
resolution produces better quality
photos, but creates larger files that take
more of the SD card capacity. Larger
files require longer time to write to the
SD card, which will slightly slow the
shutter speed. 5MP is recommended.
Video Size (affects
video clips only
Set Date/Time
1280*720P
D1
VGA
QVGA
OK
Picture No. (affects
still photos only)
01 Photo, 02 Photos,
03 Photos
Video Length (affects
video clips only)
Avi 10s, optional from
1s to 60s
Interval
Sense Level
1 Min, optional from
1S to 60M
Normal, High, Low
Select video resolution (pixels per
frame). Higher resolution produces
better quality videos, but creates larger
files that take more memory on the SD
card. 640×480 is VGA mode in
standard 4:3 format.
Press OK to set up date and time.
While in Camera Mode, select the
number of photos taken in sequence per
trigger. Please refer to the Interval
Parameter.
Videos are in AVI format and can be
played back on most video players.
Select the shortest length of time that the
camera will wait until it responds to any
subsequent triggers from the PIR sensor
after a game is first detected. During the
selected interval, the camera will not
take pictures/videos. This prevents the
SD card from filling up with too many
redundant images.
Select the sensitivity of the PIR sensor.
The High setting suits indoors and
environments with little interference,
while the Normal/Low suits outdoors
and environments with more
interference. Temperature also affects
the sensitivity. The High setting is
suitable when the ambient temperature is
warm while the Low setting is helpful in
cold weather.
Date Stamp (affects
still photos only)
Off, Date, Date/Time
Timer
On ,Off
Password Set
Off, On
Serial No.
Time Lapse
Off, On
Off, On
Select On if you want the date & time
imprinted in every photo.
Select On if you only want the camera
to work within a specified time period
every day. For instance, if the starting
time is set at 18:35 and the ending time
at 8:25, the camera will function from
18:35 the current day to 8:25 the next
day. Outside the time period the
camera will not be triggered or take
photos/videos.
Set up a password to protect your
camera from unauthorized users.
Select On to assign a serial number to
each camera you have. You can use
the combination of 4 letters and/or
numbers to record the location in the
photos (e.g.YSP1 for Yellow Stone
Park). This helps multi-camera users
identify the location when reviewing
the photos.
If set to On, the camera will
automatically take photos/videos
according to the set interval, regardless
of whether the PIR sensor has detected
any game. This is helpful when
observing cold-blooded animals like
snakes, or the process of flowering,
etc.
Side PIR
On ,Off
The default setting is On. The two side
prep PIR sensors provide wider
sensing angle and detect more
potential triggers. In some situations,
you only want to monitor a narrow
spot. Too many irrelevant triggers by
the side sensors outside of that spot
will keep the camera on and off, which
drains the battery power. In some
situations, you may have difficulty
removing the interfering branches, or
avoiding the sunlight. If so, you have
the option to turn off the side sensors.
Default Setting
No,Yes
The default setting is No. It will reset
all settings to default
Delete One
NO/ Yes
Delete One Picture
Delete All
NO/ Yes
Delete All Pictures
Slide Show
Auto Playback Pictures
Protect
The protected pictures will not be
Deleted
3.2 File format
The camera stores photos and videos in the folder \DCIM\100MEDIA in the SD card. Photos are saved
with filenames like PICT0001.JPG and videos like VIDO0001.AVI.
In the TEST mode, you can use the provided USB cable to download the files to a computer. (Select
Mass Storage, Press Ok) You can also put the SD card to a SD card reader, plug it into a computer, and
browse the files on the computer without downloading.
The AVI video files can be played back on most popular media players, such as Windows Media
Player, QuickTime, etc.
GC-002 Camera
GC-002 - Additional Battery Box
4. Notes
4.1 Metal Poles
There are 2 electric poles on the back of camera and the additional battery box. Do not
touch the electrodes with metal, or it could short circuit or damage the camera.
Don’t touch with
metal objects
4.2 Power and Additional Battery Box
The working voltage is 6V in the camera body, additional battery box, and external power.
Notice: Camera must be in the OFF position when the additional battery pack on the camera
body, and locked, otherwise it will not work.
4.3 SD card
Because there are many kinds of SD card,We can only guarantee that most of the SD card can
be used on the device. If bad photos are taken, please format the SD card with this camera.
4.4 Video Length and Battery Life
In order to lengthen the service life of the battery, it is strongly recommended to shoot
videos with 8 alkaline batteries. It can shoot most segments of animals, the total period of
number 2 ~ 3 times more than similar products. Pay attention in a cold environment; the
capacity of the batteries will decline and the length of video will decrease accordingly.
4.5
850nm IR LED
This camera can fit 850nm IR LEDs
4.6 The Tripod
This camera can be fit onto a 1/4 inch tripod stud. Notice: When using a tripod, make sure
the bottom camera cover and bolt-lock are fastened to prevent the lid from opening.
The Tripod
Lock
5. Limited Warranty
We take great pride in our products. We always stand behind our promises. We provide a
leading warranty term and service. When buying a GC-002 product, you are covered under a
limited warranty.
We guarantee our products to be free of defects in materials and workmanship for the original
purchase date. This warranty does not cover consumer caused damages such as misuse, abuse,
improper handling, installation, or repairs attempted by someone other than our authorized
technicians.
We will, at our option during the warranty period, repair your camera or replace it with the
same or comparable model free of charge. This warranty only extends to the original retail
buyer from our authorized dealer. Purchase receipt or other proof of the date of the original
purchase is required to receive warranty benefits. The warranty on any replacement product
provided under the original warranty shall be for the remaining portion of the warranty period
applicable to the original product.
This warranty extends solely to failures due to defects in materials or workmanship under
normal use. It does not cover normal wear of the product.
If you need to return a GC-002 product under this warranty, please contact your dealer or our
distributor.
Appendix I:
Technical Specification
Model
Parameters
Image Sensor
5 Mega Pixels Color CMOS
Max. Pixel Size
Lens
2560x1920
F=3.2; FOV=51°; Auto IR-Cut
IR Flash
65 Feet/20 Meters
LCD Screen
1-7/8" x 1-7/16”; (48mmx35.69mm)
Operation Keypad
480(RGB) x 234DOT; 16.7M Color
Memory
SD Card (8MB ~32GB)
6 Keys
12MP/8MP/5MP/3MP/1MP=
Picture Size
2560X1920/4000X3000/ 3264 x 2448/2048 x 1536/1280X960;
Video Size
1028 x 720,30fps;720 x 480,30fps;640x480,30fps; 320x240,
30fps
PIR Sensitivity
PIR Sensing
Distance
Prep PIR
Sensing Angle
Main PIR Sensing
Angle
Trigger Time
High/Normal/Low
65ft/20m(Below 77°F/25°C at the
Normal Level)
Left and right light beams form an angle
of 100°; Each lens covers 10°
20°
1.2 Second (When using the 2G SD card)
Trigger Interval
0sec. - 60min; Programmable
Shooting Numbers
1, 2, 3 picture burst
1-60 sec.; Programmable
Video Length
Camera + Video
First takes a picture then video
Playback Zoom In
Date Stamp
1~8 Times
Off,Date,Date/Time;Include serial no., temperature and moon
phase
Timer
On /Off; Time Set Programmable
Password
ON/OFF;4-Digit Numbers
Serial No.
4 digits and 26 alphabets set by yourself
Time Lapse
ON/OFF
Low Battery
1 Second ~ 24 Hours
Send“Battery Low”
Power Supply
4xAA; Expandable to 8xAA (With
additional battery box)
External DC
Plug Size: 4.0 x 1.7
6~12V(2~1A)
Power Supply
Stand-by Current
0.4mA
Stand-by Time
3~6 Months(4xAA~8xAA)
Auto Power Off
Auto power off in 2 minutes while no
keypad controlling
Power
150mA (+230mA when IR LED lights up)
Consumption
Low Battery
Alarm
Interface
4.2~4.3V
TV out (NTSC); USB; SD Card Slot; 6V
DC External
Mounting
Strap; Tripod Nail
Waterproof
Operation
IP54
-22~+158°F/-30 ~+70°C
Temperature
Operation
Humidity
Certificate
5% ~ 95%
FCC & CE & ROHS
Appendix II. Parts List
Part name
Quantity
Digital camera
1
Additional battery box
1
TV AV IN cable
1
USB cable
1
Strap
1
External DC cable
(optional)
1
2G SD Card
1
Appendix III: Rear Battery Box Installation Instructions
Lock up
Screw in