1
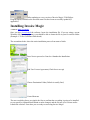
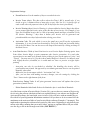
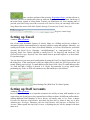
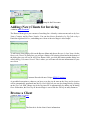
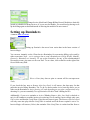
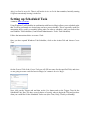
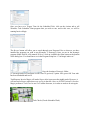
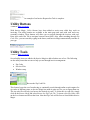
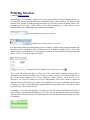
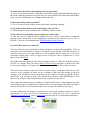
User Manual =-=-=-=-=-=-=-=-=-=-=-=-=-=-=-=-= Billing software Version 2.10.7 Software by Powernet Inc www.invmagic.com Disclaimer: The software is designed specifically for invoicing solutions in accordance to law and Company will not be responsible for any misuse, whatsoever, of this software. Preface: Invoice Magic is an advanced billing solution for any type of business. Whether you are running a small company or a large corporation, this software is equipped with many advanced features to help make billing tasks more efficient and less tedious, especially with the new automated email and printing options. Doyle Goss, Owner of Powernet, Inc. had grave understanding of hassles the big and small companies have to go through while managing invoices hence, he put his efforts in writing a software to help suffering businesses seek solid solutions, the Invoice Magic. In addition to Invoice Magic, Doyle Goss under trademark of Powernet, Inc. has programmed following software. SkyCat Maxtel Wireless Powernet ISP TeleMenu TechAlley (Catalogue software) (Billing Software) (Billing software) (Menu Ordering Software) (ISP Billing Software) This manual was primarily designed to teach users how to use Invoice Magic with simple illustrations and instruction. If for some reason you need more assistance or have any questions or suggestions concerning the use of this software, please feel free to contact our 24/7 Customer Support. Click here to view the Version History. Table of Contents Getting Started with Invoice Magic Installing Invoice Magic Registering Invoice Magic Email Setup Setting Up Staff Accounts Adding Clients for Invoicing Browse A Client Setting up Reminders Setting up a Scheduled Task Utility Buttons Utility Tools Printing Invoices FAQs Getting Started With Invoice Magic Getting started with Invoice Magic is simple! If you haven’t already downloaded the software, please do so now by visiting http://www.invmagic.com; scroll down to the bottom of the page and look for the Download Now button under Step 1. On the Download page you will be asked for some general contact information. This is only for our records and done so that we might better meet your needs. Invoice Magic will never share, post or sell this information to anyone ~ Ever! Once you click the Submit button you will be redirected to another page with a link to download the Demo Version of the Invoice Magic. After Installing Invoice Magic, and if you decide that you would like to keep a copy and enjoy some of the Advanced Features, you can simply Register the Software, which has also been made automated so there is no waiting around for some human to find the time to check their email. In fact, the entire process can be completed in approximately five minutes, more or less. We do hope that you will enjoy Invoice Magic and suggest it to all of your friends, colleagues and co-workers. Check out the New Auto Update Feature Program Group in the Start Menu Programs (Start/All Programs/Invoice Magic/Check for Updates) ~ never easier to update these days! After updating to a new version of Invoice Magic, IVM (Before: Program Open) confirms to the user that some files have been successfully updated (If applicable). Installing Invoice Magic << Back to Table of Contents Once you have downloaded the software, locate the installation file. If you are using a recent Windows OS (Operating System), you should be able to locate the file in your Downloads folder (Example: C:\Users\UserName\Downloads). The screenshots below show the entire installation process from start to finish: Press Next to proceed or Cancel to Abandon the Installation. End User License Agreement (Check box to accept) Choose Destination Folder (Default is usually fine!) Create Shortcuts The next two dialog boxes are simple; the first to confirm that everything is going to be installed to your specifics (optional Back Button to make changes) and the last one is to Activate and/or Launch the software. From here you are ready to start using Invoice Magic! Registering Invoice Magic << Back to Table of Contents Although Invoice Magic can be freely downloaded and installed for sampling and testing purposes, you must register the software to take advantage of many of the Advanced Features offered in the paid version (you can keep record of only five clients using the Unregistered “Demo” Version), and Registration is fast, simple, and as previously mentioned, now it is automated on the server so that you can almost instantly own a registered copy of this awesome billing software. It is also advised that you have set up a valid email account and connected to the Internet before entering your Registration Information. In this way, your copy will automatically be Activated (Don’t forget to enter the Activation Code sent in the email!). Setup & Activation main Company Information Tab As of Version 2.0, Invoice Magic has not only simplified the Registration & Activation process, the IVM Settings has also been integrated into the main Company Information Tab. You now have access to more settings including the form to enter the Activation Code which would have been sent to the user by email after registering your copy. You can use the Register Button in the upper right-hand corner of the software’s main interface to Register Invoice Magic. After successful purchase, you will be sent an email with a Purchase Code (or receipt #), separate from the Transaction ID, thanking you for purchasing software. Then you will be given a link to activate the software in the email, and that takes you to a form where you will fill out company info (It is very important to get the info correct there and is cAsE sEnSiTiVe!). Based on the company name & address, and then one place at the bottom is for the purchase code that you just received in email. After link is submitted, server processes info, checks validity of purchase code and then generates activation code which is then sent to the user’s email. Below is an example of that email: Thank you for your purchase of Invoice Magic! Your purchase code has been accepted and your activation code has been successfully generated. Below you will find the specific account details from which your activation code was generated. From the registration screen of IVM enter your company information exactly as follows. Please note that the information is case SeNsItIvE. Dealer name: Your Company Name Address: Your Address City,State,Zip: Your City, State. Zip Phone: (123) 456-789 Activation Code: 12345678 Setup & Activation main Company Information Tab. HTML Templates & their Variables; revisiting the Company Information Tab once more you will notice several settings (broken down in detail below). Just below where the user would enter the Activation Code sent to them by email, the user can set a number 1-5 (or more) HTML Templates. Inside of each HTML Template you will see some HTML coding and some IVM default Variables. Users can now easily choose a default Template to use for All HTML Invoices. In addition, users can also create & design their own HTML Templates. Think of Variables as the IVM Programming Code to call on information from a Database where information for each Client is stored. Users can easily design the HTML Templates using their own custom HTML styling. -------------- Customer Variables **Cus FName** - Customer First Name **Cus LName** - Customer Last Name **Cus CusNum** - Customer Number **Cus Credit** - Customer Credit **Cus Company** - Customer Company **Cus Name** - Customer full name (first and last) **Cus Address** - Customer address **Cus City State Zip** - Customer city, state and Zip code **Cus Phone** - Customer phone number **Email** - Customer email address ------------- Body Table **Body** - Body (Table) of the invoice. Items or services. Quantity, Description and Price ---------------- Invoice Variables **Invoice Total** - Total amount of invoice **Payments** - Total payments made to invoice **Current Balance** - Current balance remaining on invoice **INVNum** - Invoice Number **Date** - Date invoice was generated **Due Date** - Due date of invoice ------------------- Company Variables **Con Company Name** - Your company name **Con Address** - Your company address **Con CityStateZip** - Your city, state and zip code **Paypal** variable that will place the paypal pay now button on the invoice (New!) There is also an option in Setup & Register to Send Zero Balance (Paid) Invoices; this allows the user to send an Invoice to verify that the bill has a Zero Balance. Send Zero Balance (Paid) option. As Invoice Magic constantly evolving as users review and make suggestions by sending back User Feedback (24/7 Technical Support) about the features they like, dislike or wish to see in future versions, the HTML Invoice Feature will assuredly evolve as well. To create a Custom HTML Template, the user would just open a blank text (.txt) file in a Text Editor like Notepad or Notepad++ and style it to their liking using their own custom HTML code and the Variables listed above. It is recommended not to edit the actual HTML Templates provided in the IVM Root folder, but you can certainly copy the code from any of them and past/edit the code in Notepad. The next step would be to Save As the newly created test file into the (Main) Root Directory (Example: C:\invmagic. Inside the Root Folder/Directory you will see the provided HTML Templates (invoice1.html, invoice2.html, invoice3.html, invoice4.html, invoice5.html, etc). HTML Template (Examples). In addition, now users can also create their own HTML Templates by adding their own HTML Designs, and as mentioned above, so long as the user preserves the actual Variable Call. Variables can be placed anywhere within the user’s HTML Coding. You can choose different HTML Templates for particular Clients on the main Changing a Customer Record from the Browse Menu. Here you can set the HTML Template from 0-5 (or more), but choosing “0” (0=No Override) will make it use the Default Template set on the Company Information Tab. Email Setup Tab (See: Setting up Email). Invoice Notes (Notes here will be Printed on ALL Text Invoices but NOT on HTML Invoices!). HTML Notes (Notes here will be Printed on ALL HTML Invoices but NOT on Text Invoices!). Also new in IVM 2.0 is the convenient PayPal Button on the Company Information tab. Using HTML Templates, this allows you to send clients a convenient means of making their payment. New PayPal Button (Adds PayPal Button to HTML Invoices). PayPal Button on Invoice (Secure means of making payment). The Invoice Notes & HTML Notes Tabs; anything listed in HTML Notes will print on ALL HTML Notes. Anything listed on Invoice Notes will print on ALL Text & NOT on HTML Invoices. The Setup & Activation Settings Tab (Deprecated in Version 2.0). Since (Version 2.0), the Settings configuration has been integrated into the Main Screen and the Tabs are now located at the bottom of the Setup & Activation main Company Information Tab (Company Information, Email Settings, Invoice Notes & HTML Notes). The Registration Code was renamed to Activation Code and now resides on the newly updated Company Information Tab. HTML Templates have also been added, and as of Version 2.0, the client (End User) now has the ability of creating their very own Custom Designed Templates. Updated Settings on Company Information Tab. Registration Settings: Resend Invoices: List the number of days to resend the invoice. Invoice Terms (days): This date reflects when the Client’s Bill is actually due, if you decide to give a customer/client so many days to pay. Like Net 30 (“A specific type of trade credit where the payment is due in full 30 days after the item is purchased) Invoice Warning (days): Invoice Warning is a feature added to Invoice Magic that allows you to prepare/generate invoice prior to the due date of next invoice. For example; if you have next scheduled invoice due on 15th of upcoming month and have scheduled it with IW (Invoice Warning) 7 days than it means your invoice will be generated and printed/emailed seven days before due date alerting your client. Activation Code: The code which is sent to the email once you fill out the registration information. It is now located on the main/first Tab of the Setup and Activation dialog box in the File Menu. You can also access the Setup & Activation by clicking on Setup on the Main Screen. Auto Print Invoices: Think of Auto Print Invoices as a Preview Before Printing option. Auto Print allows Invoice Magic to print statements after Invoice generation. It is used when reports/invoices are made to be printed, before printing it gives you the option of “print” and “Cancel”. You may cancel it, if you do want to make changes or discard it. It cannot be used with Nightly-Invoices (scheduled, as it would make no sense to preview at night before printing. - Auto-print can also be un-checked or disabled. On disabling the invoice will be generated but not printed. On approval by user/admin generated invoices can be printed manually, afterwards. - Make sure you do not temper with the “Activation Code” box. - After, you are done with making necessary changes, save the settings by clicking the “Save” button at the right bottom of the form. Print Invoices During Tasks: It will print generated invoices and will update date of next generation of model-invoice. - Delete Reminder After Send: Deletes the Reminder after it sends Email Reminder. As of the latest revision of Invoice Magic (Version 2.0), you now have two means of Registering & Activating the software (the basic means was explained above); now when a user Registers & Activates the software, the email with your Activation Code will arrive with an attached Reg.txt file with all of your Registration Information contained. All you have to do is to extract/Save the attachment to the main root folder of your Invoice Magic software (Example: C:\invmagic). This might make registering the software much easier for some users. Registering is only done by one means or the other, meaning that you would “either” register as explained above OR you would save the Reg.txt file in the invmagic root folder (NOT BOTH!!!). Once you have performed the necessary Registration Steps, and the software is Activated, you will see a dialog box come up with your Registered Company listed. On the top of the main screen, instead of seeing Demo Version, you should now see your company name if you had your Email Setup correct & connected to the Internet. Now you can simply click on the Setup Button for access to all of the Default Settings (Customer Info, Email, Notes, etc). Register is now Setup! Setting up Email << Back to Table of Contents One of the most invaluable features of Invoice Magic as a billing and invoice software is automation, and the Automated Email is extremely simple to setup and configure. Basically, you would just fill in the Account Name (Your Email Address), a Password (Password to your email account), the Email Server (Example: “mail.bellsouth.net” or “smtp.gmail.com,” etc), the Outgoing Email Port Number (Default is usually Port 25 for Outgoing) and check the “SSL (Secured Socket Layer) Required” box if the email client or provider requires it, as does Gmail. It’s just that simple! You can also test your new email configuration by using the Send Test Email form to the left of the dialog box. If the email doesn’t send you might wish to check the SSL Required box and resend. Simply put in a Reply To email address in the From: field, a Send To email address in the To: field and add a Subject if desired. It is Highly Recommended to set up email before performing any Tasks, as IVM will continue to try and send Reports (See Below). Email Settings Tab (With Send Test Email option). Setting up Staff Accounts << Back to Table of Contents Invoice Magic allows you to set up multi-accounts to be used by as many staff members as you want so that you do not have to buy separate Invoice Magic software for different staff members. Adding additional Staff Members is also a breeze; you simply enter a User Name, a unique Password for that new Staff Member and check the box next to Admin if they are to have Administrative Privileges. Otherwise, the new Staff Member will just have a Standard User Account. When signed into any Staff Account, everything they do will be stamped with their name on it. Setup for Staff Accounts. Adding (New) Clients for Invoicing << Back to Table of Contents The Browse Menu gives you a means of searching for a client by various means such as by Last Name, Company and by Phone Number. You can also Browse Reminders, by Zip Code or by a Particular registered Service, and adding new clients to Invoice Magic is also simple! To add a new client simply click on the Browse Menu and choose Browse by Last Name. On the Browse the Client File dialog box you will get a listing of all existing clients and at the bottom of the dialog box you will see an Add Client button. Once you click this button another dialog box called Adding a Customer Record. This is where you will enter all relevant information for your new client. Customer Record with new Unique HTML Templates. As an added convenience, whatever you have set as the city & state on the Setup and Activation will be automatically populated into the Zip Code field, but you can also change this by clicking on the Zip Code field, change zip & the city/state fill in automatically by adding zip & hitting Enter. Remember, the Enter key in Invoice Magic is sort of like the Tab key in many instances. Browse a Client << Back to Table of Contents The first tab is for the client’s basic information. Another new addition to IVM Version 2.0 is the addition of Browse by Category. You can now add Categories to the Client’s Account Information. Browse Client by Category. The second tab is Client History. When a statement is emailed, printed, etc via the Task Scheduler, the history will keep a record of it, auto added by the system!!! Insert History Details. Insert Client Notes (These notes will not be printed on invoices). Change Quote. If quote is checked the Invoice Magic software will overlook the invoice as a bill, or alternatively it can be changed to a full invoice by un-checking it. (Notes here will only print for this record only and not globally, disregarding it as a regular invoice. This is particularly helpful if sending someone a quote and not an invoice. Change Invoice Model and Change Billing Record. Models are basically geared to schedule recurring invoices; if it were not for Models, you would end up having to set up the billing again each month instead of allowing the model to be auto-created. Setting up Reminders << Back to Table of Contents Setting up Reminders has never been easier than in the latest version of Invoice Magic. You can now instantly set the Client Invoice Reminders for reoccurring billing cycles and by either a one time (None – you’re setting a date to send a Reminder once) or by Weekly, Monthly, Quarterly, Biannually or Annually. To set up the Reminders for any of the aforementioned reoccurring events, you must set a Resend Date. To set a date, click on the Box to the right of the Resend form entry field. Select a Date (Any date set prior to current will be sent upon next Task). If you check the box next to Remove After Last Send, it will remove the data entry for that particular invoice billing Reminder. The Yes & No choices under Active basically allows you to either set the Reminder to Active (Invoice will send depending on your date configuration) or by choosing No, you can essentially Turn off Reminders for this Client’s Billing Invoice. Additionally, if you set a reminder to Active (Whether Remove After Last Send is checked or not), it will continue to send the invoices (in recurring; Weekly and up). Invoice Magic only cares if it is Active and that the Cutoff Date (if any) has not come to pass. The Remove After Last Send will only come into play after the Cutoff Date is reached and if the Remove option is set to Yes. Invoice Magic will remove (Delete) the reminder if the Cutoff Date is reached and the Remove After Last Send is set to No. Then it will set the Active to No for that reminder, basically turning it Off but conveniently leaving it in the list. Setting up Scheduled Task << Back to Table of Contents Using Windows Task Scheduler in combination with Invoice Magic allows you to schedule tasks that it will be performed at a desired time and on a preset schedule. This is especially useful for automating daily, weekly or monthly billing tasks. In order to schedule a task you need to first run Windows Task Scheduler (Control Panel\Administrative Tools\ Task Scheduler). Follow the instructions below to create a Task: Once you have opened Windows Task Scheduler, click on the Action Tab and choose Create Task. On the General Tab of the Create Task you will fill in a name for the specified Task, and since we are going to create a task for Invoice Magic, let’s name it Invoice Magic. Next, click on the Triggers tab and then on the New button and set the Trigger Time for the Scheduled Task. Here you have several choices of exactly when to begin the Task and just how often you would like for the Scheduled Task to run (One Time, Daily, Weekly or Monthly). Once you have set a Trigger Time for the Scheduled Task, click on the Actions tab to tell Windows Task Scheduler what program that you wish to run, and in this case, we will be running Invoice Magic. The Browse button will allow you to search through your Program Files or wherever you have installed the program you wish to run (Example: C:\invmagic). Once you are in the invmagic program folder look for a file named Task.exe, click on it and hit the Open button at the bottom of the dialog box. You should now see in the Program/Script box “C:\invmagic\tasks.exe.” Copy the location of Invmagic folder (C:\invmagic\tasks.exe) and paste it with “Start In (optional)” option. Now, press OK. Your task has been scheduled and saved. Task Reports: Invoice Magic will send a Report after it processes the nightly tasks. However, it will not send a Report unless there was activity in the task. Also, as of IVM Version 2.0, Invoice Magic performs a Task Check to see if a Task has been run, is overdue or needs to be run again. Task Check (Checks Scheduled Task). An example of an Invoice Report after Task is complete. Utility Buttons << Back to Table of Contents With Invoice Magic, Utility Buttons have been added to assist users while they work on invoicing. The utility buttons are available at the main page and work with each and every secondary window. These buttons will allow you to navigate through the invoices with ease. Enter also works like Tab to navigate between form fields. Also, when searching through Zip Code Files, you can search by typing in the letters, and Invoice Magic automatically searches as you type. Utility Tools << Back to Table of Contents Several utility items are added with Invoice Magic to add to further ease of use. The following are the utility items that are sure to help you out through invoice management. Zip Codes Services Files Window setup Browse the Zip Code File. This feature keeps the user from having to continually search through online search engines for zip codes of different states, as Invoice Magic has made it quite easy for you to figure them out. The zip code file will help you browse the desired zip code. To locate the zip code file, simply click on the Browse Menu and select Browse the Zip Code File. To insert a new Zip Code, click on the Insert button and fill out the form. Now that Zip Code will be forever listed within Invoice Magic. You can Add/Insert a new Zip Code but Invoice Magic already has all of the United States Zip Codes added for you. Browse the Services File. Another Utility Tool that has been added to Invoice Magic is the ability to Browse Services File. This tool will help you save time as you assign numeric numbers to specific Services you are rendering, and at the time of making invoices you just have to fill in the number and here you go with auto-filling of other sections. This feature is particularly convenient if you plan to offer a service to multiple clients, meaning you can assign a unique number to a Service and retain all of the entered information instead of having to reenter everything for each client. For instance, you may wish to offer a Service for Auto Detail with a set price of $25.00, 7% Tax and offer a 10% Discount. By setting a unique Service #, you only have to call on that number and all of the information will be auto-filled for the next client. Auto Detail is now registered as a new Service File. Window Setup (Cascade Arrangement). Window Setup is another utility tool made available with the Invoice Magic. On the Window Menu, as in your Windows Operating System, Invoice Magic offers you the ability to arrange dialog boxes. The above illustration shows the dialog boxes in Cascade arrangement. Printing Invoices << Back to Table of Contents Invoice Magic gives complete support for Printing and Sending Statements (Reports/Invoices). You can print invoices through the printer attached properly to your computer. The software also provides four options for making statements (that you can setup at time of adding client). The statement types are Paper, Email, Both or None. When looking for a single invoice in the Reports Menu, you would simply type in the Invoice Number. Invoice Number (without the commas!). Single Invoice (Enter Invoice # to Print). It is important to note/stress that printing invoices requires a printer being properly attached and the correct drivers installed in order for the invoices to be printed on paper. Service files in the reports cannot be printed. Below is a screenshot of what an invoice will look like for printing and there is a Printer Icon in the upper left header. Report Preview of Single Invoice (with Printer Icon ) This is also what makes the Browse Menu one of the most critical elements to being able to efficiently create and work with invoices. In order to print an invoice, you must first Browse by one of the given categories (Last Name, Company, Phone Number, Client Number, etc). Reminders, Zip Code Files and Service Files are not printable. The Invoice Number is listed on under Invoices on the Change a Customer Record dialog box, but you can print directly from the Changing a Customer Record dialog box without having to open the Invoice. You will see check boxes for Paper, Both, Email & None. For instance, if you check the Email box, the invoice will send at the scheduled Invoice Date set in the Change Customer Record dialog box. This way you can immediately send it to the printer, email it, print and email it (both) or do nothing in the case that the client doesn’t need any form of statement. Frequently Asked Questions << Back to Table of Contents Q: What if I put wrong information at the time of submitting my request at the website? A: You can write our customer support team containing proper information. We will update our data and will register you will issued registration number. Q: Where Can I get registration number? A: After you fill in your information and pay for Invoice Magic, we will email you the registration number on the email address provided by you at the time of submitting purchaserequest. Q: Is there any expiration of registration code? Answer: No. A registration code is good for life time. Once you have purchased the registration code, your software is to work as long as you want it to work. Q: Can I change the “Destination folder” at the time of software installation. A: Yes. You can do this by simply clicking the browse button and choosing the destination folder as per your need. Q: What is difference between Admin and Staff account? A: Under Admin Account you have access to all key folders like registration and settings however, with staff accounts the access is restricted. Q: Can I use the same registration code at multiple computers? A: Yes. You can use the same registration code at multiple computers with same data. Also, it is networkable, so you could actually create a peer to peer network & run it over a local network Q: how many staff members and admin accounts can I make? A: You can make as many admin and staff accounts as you want. There is no limit to it. Q: How many clients can I add? A: You can add as many clients as you want, there is no limit to it. Q: How can I change user? A: You can change user by clicking the Change User button at the main page and then putting in the correct User Name and Password and then clicking OK. Q: Can I delete an invoice while keeping rest for a same client? A: Yes. You can delete an invoice of the same client while keeping other information by going to the client’s data page and browsing the invoice you want to delete and clicking the delete button. Next, you click save button to save changes made to the data. Q: Does this software auto-send email? A: Yes. You can set Invoice Magic to auto send emails containing warnings. Q: My utility buttons do not work on main page, what can I do? A: Utility buttons are only available when a secondary window is open. Q: My software is not printing reports and invoices, what to do? A: This may not be a software related problem however, check if your printer is connected properly or not. Ensure that you are attempting to print an invoice and not a Service File or Reminder. Click here for information on Troubleshooting Printer Problems. Q: Can IVM be used over a network? Yes! One of the most powerful features of Invoice Magic is its network compatibility. IVM can be shared over a local network or using a VPN shared over the internet. IVM offers the peace of mind that your data is safe and sound on a local computer and not setting on a web server somewhere. When using a VPN we suggest a low cost service such as Logmein.com. To visit their website Click Here. One of the most asked questions that will arise using a network is, “How do I share the resources of IVM?” It’s simple! First you need to Map the Network Drive and place its path as the "Start in" directory (Example: X:\invmagic\invoice.exe, assuming “X” is the drive letter you select). This will tell the computer where the files for Invoice Magic are located. IVM also uses the resources of the computer in which you are working to send email thus freeing up the host computer. You will need to run the email setup on all computers one time to configure them to send locally. You will need to copy a file from the host computer called SMTPSetup.exe. Run this one time and give it the correct settings for the computer and you are set. One of the most common errors is sending of a blank emailed invoice. If this happens the cause is most likely going to be that the host computers drive was not mapped. The tasks can only be run from the host pc as well and does not have to be set up on all computers accessing it. For more information on mapping a network drive consult your computer manual or your IT professional. You may also view more information by visiting this web site or Google.com "Mapping a Network Drive". Here’s another link that has some easy to understand instructions.