1
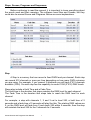
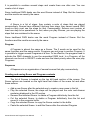
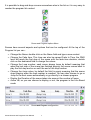
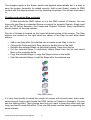
How to create Scenes and Programs
User Manual
(V.1.0)
Create Scenes and Programs User Manual
1
Summary:
P. 3
P. 3
P. 4
P. 6
P. 7
P. 8
P. 10
P. 12
Patch and Controls
Fixture selection
Channels and Preset window
Using the Selections and Presets
Steps, Scenes, Programs and Sequences
Creating and saving Scene and Program contents
Creating and saving Step contents
Glossary of Terms
Picture Index:
P. 4
P. 5
P. 6
P. 7
P. 9
P. 9
P. 10
Fixture position and location in Editor
DMX Cursor Control
DMX Preset Control
List of Scenes and Steps
Scene and Program option ribbon
Scene and Program configuration
Step option ribbon
Create Scenes and Programs User Manual
2
This chapter describes how to easily and quickly create Steps, Scenes and
Programs with the software.
Steps, Scene and programs are the basis of the DMX programming. You must
understand what there are and what they can do before programming your show.
You must start the software and apply the DMX Patch before beginning to create
Scenes and Programs. Please refer to the user manuals How to create Profiles and
How to Patch Profiles to execute these actions effectively.
Patch and Controls
Good programming always start with a good Patch. A good patch always starts
with good Profiles. You need to make sure that your profiles are correct and match
the light features, then you must check that the DMX addresses set up in the patch
match the light itself.
Please refer to the user manual How to create Profiles to learn about this aspect
and refer to the user manual How to Patch Profiles to learn everything about the
patch function.
When the Patch is done, you need to test it and check that the Controls and
Commands of the fixtures are correct.
Fixture selection
In the 2D area you can select the fixtures from their displays. Left click on a
fixture to select it or left click on several fixtures to select them. You can also left click
anywhere in the area and hold it to select several fixtures at a time.
When you select a light its channels and presets will appear in the Preset Window
below the 2D area. You can see all the profile channels that you defined earlier using
the Profile Editor.
If you select 2 or more different fixtures that use a different profile then the software
will only display the common channels. For example, if you select 2 different fixtures
with a RGB function, the software will show the RGB Color Palette. If the 2 fixtures
have both a Pan and Tilt option, the software will display the Pan and Tilt Palette. If
they both have a dimmer, the software will display the dimmer. But if only one of
them has the RBG the software won’t display the RGB Color Palette and so on for
the other channels.
The common channels that can be displayed are RGB, CMY, RGBY, RGBA, Pan,
Tilt, Dimmer, Focus, Iris and the Zoom.
Create Scenes and Programs User Manual
3
You can deselect all of the profiles by clicking on the 2D area. When you have locked
the position of the fixture in the 2D area you can deselect the fixtures by clicking on
them a second time.
DMX level and preset values are activated only on the selected fixtures in the 2D
area. Make sure that you select the right fixture every time.
Fixture position and location in Editor
Channels and Preset window
Below the 2D area there is the window for DMX controls. You have 2 possible
types of control.
Create Scenes and Programs User Manual
4
CHANNEL mode
The first one is the Channel mode and uses a traditional cursor table for each
of the 512 DMX channels.
DMX Cursors Control
Click anywhere on a cursor level to assign a DMX value to the channel. The DMX
value is displayed in the DMX field located above the cursor. You can adjust the DMX
value by scrolling with the mouse or with the DMX field.
Above the DMX field there is a picture which shows the current preset selection.
When you right click on the image a list of possible DMX levels and images are
displayed: these are the presets and you define them with the Profile Editor. When
you select a preset from the list its DMX value will be applied to the cursor. A
complete and accurate list of presets is the base of a good show.
At the top of the cursor area there is the name of the channel that has been set using
the Profile Editor.
At the right of the cursor window you can see the Universes selection. The software
can manage 4 DMX universes of 512 channels each so users have the possibility to
switch from 1 universe to another.
There are 2 colors on the channels to distinguish the odd and even fixture channels.
PRESET mode
The second and most important control is the Preset mode. It is the default
mode used by the software. It uses cursors with DMX presets and powerful tools like
the Color Palette and the Pan Tilt Palette. If no fixtures are selected, the presets are
not displayed and the preset area is empty.
Create Scenes and Programs User Manual
5
DMX Preset Control
The software displays the profile channels. Each channel has a main cursor and a
list of Presets located in the left hand section. Each Preset has a default DMX value;
clicking on a preset will automatically affect the DMX value. When the preset is
selected the main cursor can move from the minimum to the maximum DMX value of
the preset (refer to the user manual: How to create Profiles). You can click on the
Preset image a second time to deselect it and return to the DMX value 0.
The software has a Color Palette for the RGB, RGBW, RGBA and CMY channels.
The color palette can save customized color: select a color item, change the color
from the palette and click on the save icon so you will be able to recall the colors.
The software also has a Pan and Tilt Palette for the XY channels. The Pan and Tilt
Palette can save some XY positions: select an item position, change the Pan and Tilt
values on the palette and click on the save icon. You can recall and modify the
recorded positions anytime you want.
The Preset mode can automatically manage the DMX universes. You do not need to
switch from one DMX universe to another one like in the Chanel mode.
Using the Selections and Presets
By selecting the fixtures in the 2D area and using the Preset functions and their
DMX levels you can see your lights reacting and changing state. This means that the
DMX communication is established and the software is communicating with the
lights. It is very useful to use the selections and Presets to do a functioning test of
your lights.
Now that everything is working well and you have become familiar with the
fixture selection and the control windows you can start creating scenes and
programs for the show.
Create Scenes and Programs User Manual
6
Steps, Scenes, Programs and Sequences
Before continuing to read the manual, it is important to know everything about
the words used and their meaning. The software uses Step and Scenes, but they
could also be named Scene and Programs. Below are some explanations.
List of Scene and Step
Step
A Step is a memory that can record a fixed DMX level per channel. Each step
can record 512 channels or more per time depending on how many DMX universes
you are using. For example, if you connect 2 interfaces you will have 2*512 channels
available (1024). So each step has the capability to record 1024 (2*512) DMX levels.
Steps also include a Hold Time and a Fade Time.
The Hold time is the duration that steps maintain the DMX level for each channel.
The Fade Time is the duration that steps take to reach the DMX level for each
channel.
For example, a step with channels 1, 2 and 3 set to level 255, a hold time of 2
seconds and a fade time of 5 seconds will play like this: The starting DMX values are
0, so the DMX level will fade from 0 and reach 255 within 5 seconds, then the step
will maintain the level 255 for the 3 channels for 2 seconds.
Create Scenes and Programs User Manual
7
It is possible to combine several steps and create them one after one. You can
create a list of steps.
Some traditional DMX desks use the word Scene instead of Step. But the functions
and the results are exactly the same.
Scene
A Scene is a list of steps; they contain a suite of steps that are played
consecutively. Scenes have different functions than steps, they cannot record DMX
levels so they must use the steps for that. Consequently, Scenes must contain at
least one step to be operational. In fact, when you play Scenes, you are playing the
steps that are contained in the scene.
Some traditional DMX desks use the word Program instead of Scene. But the
functions and the results are exactly the same.
Program
A Program is almost the same as a Scene. The 2 words an be used for the
same functions and the same results. Programs can not jump to another Program. It
is possible to trigger several Programs at a time. To be effective, the program need to
activate the DMX channels to use the associated DMX level. In a Program, all the
channels can be set in ON/OFF mode and use the latest priority when the user play
Programs.
Sequence
A Sequence is an organisation of several scenes that play consecutively.
Creating and saving Scene and Program contents
The list of Scenes is located on the top left hand section of the screen. The
Scene options are located on the right hand tool ribbon of the scene list and allow
these actions:
• Add a new Scene after the selected one to create a new scene in the list
• Play the selected Scene; the steps will be played and the color and dimmer
rendering displayed in the 2D section
• Remove the selected Scene: to delete a Program definitively from the list
• Cut the selected Scene: to delete a Program definitively from the list and
record it in the computer buffer
• Copy the selected Scene: to copy the Scene content in the buffer
• Paste the selected Scene: to add the Scene after the selected Program
Create Scenes and Programs User Manual
8
It is possible to drag and drop a scene somewhere else in the list so it is very easy to
reorder the program list content.
Scene and Program option ribbon
Scenes have several aspects and options that can be configured. At the top of the
Program list you can :
• Change the Name: double click on the Name field and type a new content
• Change the Fade time. This time can also be named Fade In Time, the DMX
level will reach the first step of the scene with the fade time duration; double
click on the dedicated field to change the values
• Change the Loop number; each scene always loops by default meaning that
when the last step of the scene has finished playing, the scene comes back to
play the first step and so on until the end of the loop number
• Change the Jump value; by default the field is empty meaning that the scene
stops playing when the loop number is reached. You can also choose to go or
Jump to the next scene automatically or go directly to a chosen program
• Display the Duration of the scene takes into account the number of loops.
• Active LB, so you can choose to display, or not, the program in the Live Board
mode
Scene and Program configuration
Create Scenes and Programs User Manual
9
The changes made in the Scene section are applied automatically but it is best to
save the project frequently for added security. Add a new Scene, create its DMX
content with the steps and work on it by choosing its options. You will see how easy it
is.
Creating and saving Step contents
A Step records the DMX values so it is the DMX content of Scenes. You can
have only one Step in a standard Scene or several for dynamic Scenes. Steps react
with the 2D fixture Selection, the Preset and Channel Controls. Every modification
has an impact on the step content.
The list of Scenes is located on the lower left hand section of the screen. The Step
options are located on the right hand tool ribbon of the Step list and allow these
actions:
•
•
•
•
Add a new Step after the selected one to create a new Step in the list
Change the Fade and Hold Time values or double click on the field
Remove the selected Steps; to definitively delete Steps from the list
Cut the selected Steps; to definitively delete Steps from the list and record
them in the computer buffer
• Copy the selected Steps; to copy the Steps content in the buffer
• Past the selected Steps; to add the Steps after the selected one
Step option ribbon
It is very user friendly to create the content of scenes with several steps. Add a step,
select several fixtures and choose the DMX values on Presets or Channels. You can
see the lighting effect. Then choose how long you want to keep this effect and how
long you need to reach this effect. Then you can create another step by repeating the
same process.
Create Scenes and Programs User Manual
10
You can simulate your steps sequence with the Play button of the Scene option
ribbon.
Multi-selections are possible in the list of Steps, the modifications directly effect the
programming because each selected Step can be modified on their DMX levels and
also on their options. Multi selection is possible with the mouse and also with the
CTRL or SHIFT keys. You can also use the shortcut CTRL+ A to select all the steps
of the list. For example, if you want to change and adjust the Focus of the fixture for
the scene, select all the steps, select the fixture that you wish to adjust the Focus of
and change the DMX value from the Preset Control Window. The new DMX level will
be automatically applied to the selected steps.
With this manual you have read the basics to start programming a show. Each
show is unique and will be programmed in a different way. The software is the perfect
tool because it can manage the different changes. Now it is your time to use the
software and program Scenes, step by step, for your show.
You can also create some amazing visual effects with the Effects Generator tool. The
software includes a powerful effects engine for Colors, RGB, Dimmer and Pan Tilt
movements. Refer to the manual How to use the Effects Generator to learn
everything about the effects engine.
Create Scenes and Programs User Manual
11
Glossary of Terms
DMX512: DMX is a shortened form of Digital MultipleX. It describes a standard
method of data transmission that allows the interconnection of lighting control
equipment by different manufacturers. The DMX512 protocol was developed in 1986
by a committee of the USITT (United States Institute for Theater Technology) to
provide a standard interface with which to control dimmers from lighting consoles. It
allows a maximum of 512 channels per DMX line and each channel can reach 255
levels. Channels have a dimming function with 255 values.
Fixture: A predefined DMX device containing channels. It is used for any type of
lighting device like spot, moving head, scanners, lasers, follow spot or visual effect
devices like smoke machines.
Channel: A DMX or analogue output. It can use 255 digital values. Also known as
DMX channel, which, for the purposes of this guide, is synonymous with DMX
address. Any DMX light show, including shows designed with the software, sends
data to the lights using up to 512 separate channels. The DMX Channel Number
assigned to a light in the software must match the DMX address on the light itself.
Since each light uses three channels, (one each for red, green, and blue,) the DMX
Channel number indicates the first of three consecutive DMX channels that the light
receives.
Address: A digital number from 1 to 512 for a channel or a fixture. Address numbers
define which channel is concerned.
Universe: A group of 512 DMX channels, or the group of three analogue channels
on the rear of the product.
Profile: A overview of the fixture channels functions and descriptions. The Profile
shows all the channel presets and channel numbers and defines the fixture type.
Profile Editor: A tool to create new Profiles and give the user more control options.
Patch Editor: A tool to assign different channels to the fixtures and create matrix
configurations. It is composed of several universes with 512 channels each.
RGB: Acronym for red, green, blue. In the RGB color model, all colors are produced
by combining various levels of red, green, and blue. The software includes an RGB
color picker. A lighting feature for Red Green Blue color.
Step : A target state for one or more channels which will fade to the new values over
a preset time. More than one scene may be active simultaneously.
Scene or Program : A number of steps, recalled automatically over time. More than
one sequence may be running simultaneously.
Create Scenes and Programs User Manual
12
Fade: Fade effect is a smooth transition, back and forth, between two colors. The
effect slowly increases the intensity of one color of light while simultaneously
reducing the intensity of the other color.
Triggers : An input in to the system that recalls a scene or sequence. Triggers
include user-mode buttons, the real-time-clock and the three configurable inputs on
the rear of the product.
Brightness / Dimmer: Also known as intensity or luminance. A measure of the rate
of flow of light energy (luminous flux) per unit area leaving a surface in a particular
direction. A lighting feature to modify the intensity of the lamp.
Color: The impact of light source colors is determined by the combination of three
factors: hue, saturation, and luminance. Hue indicates whether a color looks red,
orange, yellow, green, blue, violet, etc. Saturation represents how pure a color is,
and luminance (brightness) identifies how strong the color is. The software includes a
color picker to help you choose from over 16.7 million possible colors.
Strobe: The Strobe effect produces a series of light flashes. Very short, bright
flashes can produce a “stop action” effect, where actions seem intermittent. Strobe
rate Refers to the number of flashes per second, or how many times in one second
the light is illuminated.
Drag and Drop: This action allows you to move objects to a different part of the
software. Click on the object you wish to move then, holding down the button, move
the mouse to a different area to bring the object to this place, then release the button
to drop the object.
Shutter: A lighting feature that quickly opens or closes the light beam.
Preset: A DMX range or part of the 255 values available in the channels. For
example a preset can inscribe the channel values from 20 to 51 with a specific
function.
Default Preset: This preset is used to setup a default level for the channels. One
default preset per channel is allowed. If no default preset is defined with the Profile
Editor, the software will use the value 0 as its default preset.
Create Scenes and Programs User Manual
13