1
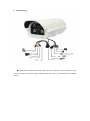
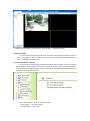
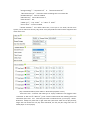
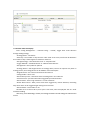
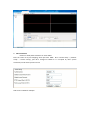
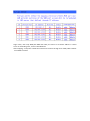
IPC series IP camera user manual 1. Product introduction IPC series IP camera applied embedded RTOS system design, Dual-core T architecture 32-bit TI Da Vinci chip (DSP) , Super storage capability, which support high definition resolution (1080P、 720p) and CIF real-time&dual-stream transfer, It can achieve high definition storage and fluent& stable transfer. Large capacity hard disk can be installed in front end, perfect client software in rear-end for NVR. The camera is suitable for all kinds of high definition remote surveillance and control 2. Specifications Specification IP2 series IP3 series IP5 series IP8 series System Embedded ROST design, Dual-core 32-bit DSP(T architecture) Memory 32M FLASH、128M DDR2 Image compression Resolution MPEG coding、AVI storage D1(704*576) H.264 coding、AVI storage 720P(1280*720) 960P(1280*960) 1080P(1920*1080) Frame 1-30 Frame/s Audio 1-CH audio input(pickup) ,1-CH output (earphone) port Network port 1 10/100M Adaptive Ethernet Network function FTP/PPPOE/DHCP/DDNS/NTP/UPnP.etc Front end storage MicroSD、USB Outer connector RS422/485 port Alarm port 1-CH switching value input, 1-CH switching value output Power DC12V / 1.5A 3. System requirements CPU: Intel Pentium E 2.8G; Memory: 1G; Video Card: Intel GMA X3100、Geforce 9600GT、ATI Radeon HD 4350; Hard Disk: 80G(can add to suit channel number and video storage) ; Monitor: 17 inch; Operation System: Windows XP;Windows 7; System Setup: DirectX 9.0;Resolution 1024×768 or above;True Color(32 bit); 4. Port illustration: ◆Reset Button: Push the button when power off→ turn on power→ 15 seconds later→ stop push the button ( the system reset, IP address and user name & password return to default value) 5. Browser: Default IP address: 192.168.0.123;Default user name:admin;Password:123456 5.1 IE Browser. First make sure the computer and camera are connected to the same network segment, Then enable unsigned Active X in your browser as following steps: (1) Open your internet browser (2) Click on the “tools” menu at the top of screen and select “Internet options…” (3) Select the security tab from the internet options menu (4) Click the “Custom level” button and enable or prompt unsigned Active X features in the list using the radio buttons Enter the IP address of camera in the browser address field, and the login screen will appear English and Chinese are supported, Default language is Chinese, The language can switch to English when click “English” at the bottom of Login screen Enter your user name and password, then click “Login” button, the Active will installed automatically;(Default user name:admin; Password:123456) Select different scream at bottom right of screen to adjust high or low resolution monitor; Change IP address and WEB port: When camera IP address segment is different from computer, Change camera IP usually, First connect the camera to an computer, of which IP address was set as same network segment as 192.168.0, Then enter into camera operation screen through IE browser, click “network setup” →“Ethernet Setup” in the left menu bar. If there are many IP cameras in one net, Every camera IP address should be set to be different In the network transmission, port 80 will often be reserved or shielded by network operators, you can change the port to 81 or 800 and others except 80 according to the following steps: click“network setup” →“Stream Setup”→change Web Access Port, Once the port 80 is changed, you have to enter IP address http:// manually and add :port number in the end of address when using IE browser, eg: http://192.168.0.123:81 Software. Software installation: Insert supplied CD into your CD drive, execute UC file (file suffix: setup.exe) in the root file of CD, Follow the on-screen instructions (select langue when install) After installation, click UC icon to operate client program, enter your user name and password (Default user name:admin; Password:123456) Enter software“Config management”to add equipment, manual or automatic operation for optional Manual add(Device config box) : “Group Name” :select “default group” or add group; “Device Name” :user define; “Protocol Type” :select “TCP”; “Device type” :select IPC; “Device IP” :Device IP or domain name; “Video Port” :default 554, Input changed port if it is changed “PTZ Port” :Default 8091, Input changed port if it is changed “Login name” :Device user name; “password” : Device user password; Click “add” button after setup, and device will show in the left menu bar Automatic search add Click “search device” button in “Device config box”, Software will search the equipment in the network automatically. Include equipments with same IP or different segments. It is also can change IP address. Cameras IP must be different but in the same segment, so that all the cameras can be accessed in the same time. After equipment search, select required equipment and click “batch add” button, the device will show in the left menu bar Enter “Video View” interface after device is added, Left click corresponding IP camera in the left menu bar and hold down the left mouse button to drag it to the black screen box, If you want to view multi equipments, select “multi-split screen” first and drag every device to the black screen box. (Camera icon introduction: gray (off line) blue (on line) red (connect view) 6. video and replay IP camera video recording includes front-end video and remote local video. Front-end video is recording in U disk or mobile hark disk connected to the equipment. Remote local video is recording in local hark disk 6.1 Front-end video and replay: Connect IP camera with U disk or mobile hard disk (mobile hard disk must have external power supply), Enter network video server through IE browser, click “Record and Replay” menu and select “storage manage”, U disk or mobile hark disk should be formatted when it is used in IP camera for the first time. Enter “Record Setup” menu for video plan setup “local storage” :must be enabled; “Storage Media” :Auto select; “storage strategy” : “stop when full” or “Overwrite when full” “Max Time Each File” :continuous video recording time in one video file “Schedule Record” :must be enabled; “Video Stream” :select video stream 1; “video Format” :AVI; “Media type” : “only Video” or“video & audio” “save to local” :must be enabled; “Record Schedule” :user define video time, Time cycle is one week, 24-hour time system, can set video time of every day, Check “every day 00:00 to 24:00” and the equipment will video all the time play or download video (search video in “Record file play back” menu) select start time、end time and video type in “Query Conditions” box (suggest select “unlimited” in “Min Len”&“Max Len”), Click “search” button and all the matching video files information (file name、size、start time) will show in medium file list, you can play、delete、 download、backup any video file in right menu bar (short-time video file can play directly, longer than 10 minutes file can play after download, You can play file using tools such as media player or storm player) 6.2 Remote Video and Replay. Enter “Config Management” →“Record Config” →“Detail”, Trigger timer record function through adding strategy “Strategy Name”: user define “Save Day”: the number of days that the video need to be saved, old file will be deleted if the number of day is full though the hard disk is under full “Storage Strategy”: “Overwrite when full” or “stop when full” “Trigger Method”: “Schedule Record” or “Motion Detect Record” “Storage Path”: three paths for optional “Strategy Device”: Add original device to strategy device, Device can operate only when in strategy device, the strategy device can be added or removed anytime “Original Device”: the camera connected to the network “Config enable”: select “Yes” “Record time per file”: continuous video recording time in one video file “Prerecord time”: prerecord time when triggered by motion detection “Record video”: select “high resolution” or “low resolution” “Detect Record Time”: Delay record time when triggered by motion detection, Recording stop when alarm not be triggered again during the record time “Record Audio”: record audio or not Schedule set is as same as IE set, time cycle is one week, select everyday 00:00 - 23:59 for continues recording After set up, click “add strategy” function, the strategy will show in the left strategy bar and start work at once (Insure the video stream of all strategy device is already connected. Judge the connection status through the icon in front of video stream) Enter video search & replay interface after click “video Query” First select camera you want to search, then select video configuration, such as time range、 record type、media type、resolution (file source include local record and front-end record), click “search” button and properly record will show. Local record will play when double click current window, front-end record need be downloaded to the local disk (select file → click “start download”) before play. Pay attention to the download path that show when click “start download”, you can find the file through this path and make file-backup or replay 7. Wan connection Please use fixed public network IP or other DDNS Enter the router to do port mapping, check port 554、8091、80 in “stream setup ” (“network setup” — “stream setup”), port 80 is changed to 8200 as it is occupied by other system sometimes, media access protocol is TCP Take router TL-R410 for example: Login router, then map WEB port 8200 and video port 554 to a IP camera address in virtual server or forwarding rules, such as: 192.168.0.123 After mapping, a computer outside the network can monitor through enter fixed public network IP or DDNS in IE field