1
Manual: Hello Engines! Professional
5.0
Copyright 2004 by AceBIT GmbH
AceBIT GmbH, Darmstaedter Str.1, 64354 Reinheim
Copyright 2004 by AceBIT GmbH
All rights reserved. No part of this documentation may be reproduced,
stored in a retrieval system, or transmitted in any form or any means
electronic or mechanical, including photocopying and recording for any
purpose other than the purchaser’s personal use without written
permission of AceBIT GmbH.
Introduction
Thanks for purchasing Hello Engines!. Hello Engines! is an awardwinning tool which submits your websites with only a few mouse clicks
to almost all important search engines (e. g. Google, AltaVista etc.)
and directories (e. g. Yahoo etc.). With Hello Engines! you can
increase the success of your websites, as most of the Internet users
(about 80 %) use search services to find information on the Internet.
Being listed at search services is important for the success of your
website. If you advertise your website using classical promotion, you
need to pay for each visitor. Search services, however, are usually free
of charge and promise better chances of success.
Many of these so-called 'website promotion tools' equate website
promotion with spamming. As a result, your website is submitted to all
search engines without making a choice. This may lead to your website
being set on an 'index'. Whereas Hello Engines! only includes
carefully selected and high-quality search services. As a result, you do
not find search services with a shared database or free-for-all link lists,
where only dubious providers are listed, in the Hello Engines! search
service database. With Hello Engines! you can quickly and easily
submit your website(s) manually, as well as automatically. By the way,
search services do not see a difference whether you submit your
websites using Hello Engines! or 'manually'.
In addition to the functions of the Standard version, the
Professional version of Hello Engines! includes other functions to
optimize your websites, e. g. Site Checker functions and a ranking
analysis module. To find the characteristics of the Standard and
Professional version go to the Hello-Engines! website.
For questions or comments, do not hesitate to contact us. Note: On
the Hello-Engines! website, you find upgrades of Hello Engines!,
FAQs and interesting articles on website promotion.
1
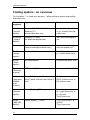
Tips for submitting your website
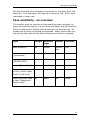
A few useful design tips
Would you like to hear our (subjective) opinion on "good websites"?
We could give you lots of advice on how to design a website. But we
think it is more efficient to tell you how you should not do it!
A simple rule of thumb: Take a close look at every single element of
your website and ask yourself: "Does it really have to be on this site?"
If you are not sure, remove it! You will be surprised to see how "clean"
and professional your website will look afterwards.
If you do not want to follow our rule of thumb, make sure you avoid
the following.
"Please click here to enter the site": why such an introductory
page? There is neither a rule, nor a reason for it. Get to the
point straightaway, and do not bother your visitors with such
"politeness".
Music: we bet every user is annoyed by it! First of all, it takes
ages until the music file is finally loaded. Second, browsers
usually crash. And third, if your music taste does not go down
well, you are stranded anyway.
Unnecessary images: there are websites which cannot do
without images (e.g. product catalogues). However, if they
are used without proper reason they are annoying, like music
files, and increase loading time of your website.
Images and broken links: make sure your images are
displayed properly, and your links are not broken. Links
pointing nowhere create the impression that the website is
not updated regularly.
3
Manual: Hello Engines! Professional 5.0
Typing errors and grammar mistakes: If you do not take the
Slow pages: you have free web space from Geocities, for
time to write properly, do not expect visitors to read properly.
example, and have uploaded your 1 MB website? Visitors will
be gone long before your website is completely displayed in
their browsers.
Unnecessary Java applets: get rid of them if they are not
really useful. The same applies to scrolling texts created with
JavaScript - they are outdated and show you are an amateur.
Colored text on colored background or patterned wallpaper:
you are on the Internet and your visitors cannot even read
your site!
More than one ad banner per page: visitors will click the best
Extremely large pages: your whole site is composed of just on
banner and probably never return!
3 MB page? Books have chapters - websites should have
them, too.
Trite content: only show your cat if it has five legs, for
example. Do not show it because it is nice. If there is no good
reason to put it on the Internet, don't do it :-)
What you should know about search services ...
Search services attract visitors
Are you disappointed that you do not have many hits? You will be
surprised how the number of hits will increase once you have
submitted your website successfully!
4
Tips for submitting your website
We suppose every website has been created to attract as many
visitors as possible. Webmasters think about that. So, steps have to be
taken so that visitors find us - if possible, cheaply. Sales (success) is
usually preceded by marketing - this is true for the Internet, too. It is
surprising to see many companies and private persons panic because
they fear to be out of the Internet race, and spend a lot of money and
work on designing a website. Then they launch their website and wait
one or two months and realize that they have not sold anything via the
Internet.
If you ask these companies what has been done to promote the site,
you will often hear: "I thought this happens automatically." Although
no-one believes that someone phones a company without knowing its
phone number, many people assume that websites attract lots of
visitors although their address is not promoted.
Submission to search services: not optional, but a
must!
The first and most important step to attract visitors is to submit a
website to one of the numerous search services. Without that, your
website will not be noticed by the Internet community.
It is widely known that between 70 % and 85 % of all information
research on the Internet is done via search services.
Of course, not all services are equally important. Yahoo alone, the
best-known service, accounts for almost 70 % of search engine traffic.
AltaVista, InfoSeek, Lycos, and German services like Fireball,
AllesKlar, Web.de or Dino - to mention but a few-, follow. It is
correct that, according to estimations, the 10 most important services
account for two thirds of all hits. But if you consider that, every day,
several billion hits are generated via search services, you can easily
imagine that the remaining third also generates several millions of hits
- so the "less important" services need to be considered when aiming
at more hits.
5
Manual: Hello Engines! Professional 5.0
Thus, it is a must (not a nice-to-have) for every website to be listed in
search services. Every form of promotion or marketing of a website
should not be considered before it has been submitted successfully.
Generally, search services offer the advantage that submission is free
of charge. The disadvantage, and one of the main reasons why
webmasters neglect this important task, is that submitting a site is
very time-consuming. Especially when you get to services like Yahoo
where it does not suffice to simply enter the URL (this is only the case
for pure engines), but you have to fill in long forms. Finally, you do not
remember a service's address when you want to submit your site. So
you have to use the services you know to find the services you do not
know.
Do you want many visitors?
Submitting to a search service is very important, for the simple reason
that it attracts "qualified" visitors, i.e. visitors find you because they
have used a search service. (Of course, you have to enter relevant
keywords and descriptions when submitting.)
Topics like "qualified visitors" are surely important when it comes to
placing ad banners with costs, for example. When submitting this point
should play a minor role. A visitor does not cost us anything! Neither is
it the case that thousands of users send their emails and questions
daily, and bind your resources. When we send an ad letter via direct
marketing, we think about the quality of addresses - the same should
apply for submission of a website. Enter relevant, correct keywords
and meta tags, and "user quality" will not be an issue.
Do not forget that a visitor leaves your site after seconds, if they do
not find your site of interest.
Now that we have dealt with this issue, we should try to submit our
website to as many services as possible. But beware: Not every
"search service" is a real search service. So we should first look at the
differences before submitting!
Search engines, directories, FFA link lists ...
Before submitting your website to search services, it is important to
explain and understand a few basic terms. The generic term search
services comprises all websites which help users locate information.
6
Tips for submitting your website
Often, the term search engine is misused to describe pure search
engines, as well as directories and even free-for-all link lists. In
fact, these are not identical; the difference lies in the way result
listings are generated. Especially free-for-all link lists have got
nothing to do with search engines and directories.
Search engines
Search engines, also referred to as spiders or web crawlers,
regularly visit websites to create catalogues of web pages. Search
engines like Altavista create their result listings automatically. They
simply crawl over the web and let humans check the search results.
This enables engines to automatically detect changes which you might
have made to your website. Website changes influence the way your
site is listed in the search result pages. Many elements can play a
decisive role here: page titles, text blocks, or other page elements. As
engines work automatically and index a large amount of web pages,
they often find information not listed in directories (see below). Search
engines usually accept all submitted websites.
Directories
In contrast to search engines, directories are not created
automatically, but by editors. Here, a website is submitted and linked
to one or more meaningful categories. As directories are usually
created by experienced editors, they generally produce better (at least
better filtered) results. The best-known and most important directory
is Yahoo.
In directories like Yahoo, result listings are influenced by humans.
Either you enter a short description of you website, or the editors
discussing our site will do that. When searching, only these
descriptions are scanned for matches, so that website changes do not
affect the result listing at all. Criteria which improve your ranking in a
search engine's listing are not necessarily useful to improve your
position in a directory's listing. Usually only websites which comply
with certain quality standards are accepted. A good site (with quality
content) has better opportunities than a "bad" site (with poor content).
7
Manual: Hello Engines! Professional 5.0
Hybrid search engines
To make this matter even more complicated, some engines also have
an integrated directory linking to them. They contain websites, which
have already been discussed or evaluated. When sending a search
query to a hybrid engine, the sites already discussed are usually not
scanned for matches; the user has to select them explicitly. Whether a
site is added to an engine's directory generally depends on a mixture
of luck and (content) quality. Sometimes you may "apply" for a
discussion of your website, but you do not get any guarantee that it is
done.
Free-For-All link lists
Free-for-all link lists (short: "FFA") are pages which list website
links together with a short description of the respective site. Website
owners usually submit URL and description themselves, and the entry
is added without further editorial check. Such lists are frequented
(almost exclusively) by shady providers. What started as a good idea
has now turned into an area for swindlers, sharpers, and other shady
figures. FFA often offer things like "Rich without working!", "450 MHz
Pentium with 21" monitor for only $80", etc. The reasons why
untrustworthy offer are so frequent on such lists is obvious.
Submissions are not checked, they are added immediately, and they
are free of charge. As such offers would not be admitted to editorially
checked search services, they focus on services where submissions are
not checked.
In addition, untrustworthy companies use FFAs and mailing lists as a
source for new email addresses. You will receive tons of junk ad mails.
You may take legal action against unsolicited email, provided you can
identify the (original) sender. Any serious company will refrain from
sending unsolicited email advertising, and you should therefore
ALWAYS ignore such messages (especially if it looks interesting at a
first glance)! If you send a reply, you only confirm that your email
address is valid. This is an incentive for the sender to continue sending
unsolicited mail, and to pass your email address on to others.
We advise customers against submitting data to FFAs. Just imagine
visiting such a "free-for-all" page and seeing your company between
numerous shady offers ("Rich without working - GUARANTEED!", "We
get you into Yahoo's Top 10 - FOR FREE" or "Naked celebrities")! What
would be your impression?
8
Tips for submitting your website
An interesting English article on FFA and programs "submitting" to
such lists can be found at URL Submissions and the SCAM!
(http://www.a2zsol.com/archive/ffa.htm).
Other services
Apart from the above mentioned, there are numerous other forms of
websites which try to facilitate information retrieval. For example,
there are various so-called Award services which present awards to
certain websites. The idea is to award good websites - and in return
you have to place a banner on your website. This is a complex topic.
We recommend Ralf Sturm's German website. He won 38 (!) awards
with his website Webhexe although the website never existed! As is
often the case, many providers just want to place their banners for
free, and an easy way to do that is present "awards".
We should not forget to mention the so-called Hit counters. These
are sites which present very popular websites. Visitors are introduced,
for example, to the 100 most-visited sites. Apart from a link to the
site, these counters usually mentions the number of visitors to that
site so far. This system is also based on links (banners) pointing to the
counter site which you have to place on your website. These links
cause the counter to count all your visitors.
In theory this system sounds tempting, too. In fact, these sites are
subject to manipulation. For example, there are some utilities which
users may use to push their own sites. Such programs cheat the
counter by sending it "different" IP addresses and thus increase the
number of visitors. Of course, this manipulation is aiming at getting a
high ranking among the most-visited sites.
Due to the various possibilities of manipulation, you should not focus
on Award services and Hit counters to promote your website. A
save method to avoid untrustworthy providers is to never add ad
banners or (shady) links to your own website. If someone wants to
"award" you that is nice. But if you have to place a banner on your
page in return, you should be distrustful.
Submission to 1158 search services by
"professional Internet promoter"?
Now that we have dealt with the differences between the various
search engines, we will look at offers by Internet promoters, frequent
on the Internet.
9
Manual: Hello Engines! Professional 5.0
We still want to submit our site to as many services as possible. So,
the offer of, partly free, promoters sound tempting.
On the Internet, like in "real life", there are many offers which try to
get money out of your purse without offering anything in return.
Almost all Internet promoters, promising to submit your website to
hundreds or thousands of search services, fall into that category.
Do not believe offers like Submission to 1158 search engines by
"professional Internet promoter". Such offers are not trustworthy, as
such Internet promoters cannot know 1158 search engines because
there are no 1158 search engines! They are deliberately comparing
apples and pears. In fact, your website will be submitted to so-called
"free-for-all" link lists which are of no use to your website and might
even damage your reputation.
There are three types of "Internet promoters":
Promoters who offer "free" submission: if you take a closer
look, you will see that the offer is either not completely free
or it involves placing a banner (or links) on your site in
return. In some cases, "free" is only used to attract customers
who are then charged afterwards.
Promoters who allegedly aim for "quality": you have to pay
for submission, but apart from a few proper search engines,
your site is only submitted to the same useless free-for-all
link lists.
Promoters who are really for free and only use this offer to
promote their other offers (here sites are often only
submitted to FFAs).
The audacity of some providers is illustrated by the allegation that
submission is very complicated and time-consuming, and that placing
a banner is a fair service in return. This sounds as if the "poor guy"
would spend hours submitting your website manually. In fact, websites
are submitted - if at all - with the help of scripts and programs - a
matter of minutes.
10
Tips for submitting your website
Some providers also offer the extra service - of course, liable to coststo optimize your website, so that it gets onto the first search results
page. Sounds good, as we all know that found matches are sometimes
distributed over hundreds of pages, and usually only the first two
pages are read. But no-one can guarantee a top ranking! The only
thing one can do is try to optimize the result, if you know the special
features of a service, by using all allowed methods and "tricks". But
still no-one can tell beforehand whether your site will be ranked as
number 1 or 1230 in the search results.
The majority of these providers use the term "free" to attract
attention. You will frequently come across this offer: "You only have to
place our banner on your website in return!" The result is that you are
advertising for these promoters for free without getting anything in
return (at least nothing useful!). Mostly, these promoters do not
submit your website at all (but they will send you a log anyway), or
they submit to useless free-for-all link lists. It might also happen that
your website is banned from a (real) search service completely
because it has been submitted too often! Submitting your website is so
vital that you should always control it yourself!
The best protection against untrustworthy offers is common sense! If
you see a "top offer for free", ask yourself why someone should work
for you free of charge.
Submitting successfully
How to do it correctly:
Now that we have dealt with the differences between search engines,
directories, FFA link lists ... , and the dangers of using shady services
in section Submission to 1158 search engines by "professional Internet
promoter" , the main problem - how to submit successfully - remains .
Follow a few simple steps when submitting your website.
Do not submit your website before it is finished and tested.
Especially in directories, never submit website which are
"Under Construction". Editors will surely ignore such a
submission.
11
Manual: Hello Engines! Professional 5.0
Once you have finished your website, think about strategic
keywords. These are keywords which a user might type in to
find your website in a search service. Make sure they relate
directly to your website's content.
Do not try to attract visitors by entering irrelevant keywords.
Try to use general terms as keywords (Just type in "software"
under AltaVista - you will be surprised about the number of
matches.)
Add meta tags to your website. This helps search engines
If you use frames, make sure you add a <NoFrames> section
index your site.
to your page(s). If possible, avoid dynamically generated
pages and other obstacles for search engines like image maps
and images.
After completing these basic tasks, you can submit your website. As
these issues are so vital to a successful submission and your website
in general, we summarize them under Basics 1 to 5.
Basics 1: HTML code
Before submitting your website, make sure it is technically correct:
Your website does not trigger any error messages (e.g. it runs
under standard browsers like Netscape Navigator and Internet
Explorer).
12
File sizes of images are optimized.
Pages/site have meta tags and titles.
There is a Noframes section (only if you are using frames).
Your links work properly.
Tips for submitting your website
etc.
This topic has been discussed in detail. Although these basics are
nothing new, they are often ignored.
TIP: Hello Engines! Professional, for example, includes such a
tool. Use Site Checker to check your website for possible errors
before you submit it to search services.
Basics 2: Content
The most important part of your website is its content - no surprise.
Good, current content guarantees that users return. Instead of wasting
valuable time on tricks and manipulation, you should rather focus on
keeping your content up-to-date and interesting. Share your knowhow with the world. You will be rewarded with loyal visitors, many
recommendations and links to your site. There are a lot of interesting
articles on this topic, e.g. on our website (see Design tips).
Basics 3: Design
Apart from content, design is one of the most important ways to
attract visitors. This topic is too complex, so we avoid
recommendations. But there are many experts on the Internet. A very
interesting article on this topic was published at Webmonkey.
Basics 4: Specialize your site
Do not try to put all information in one huge HTML file, but specialize
your pages. If your website deals with animals, create one page for
elephants, one for tigers etc. A page with little content, in which the
word "elephant" is mentioned frequently, will be ranked higher than a
3 MB HTML file, in which "elephant" is just one word among
thousands. This little step can help be ranked considerably higher! In
addition, your pages are much easier to read.
13
Manual: Hello Engines! Professional 5.0
Basics 5: Use tag <title>, meta tags and file
robots.txt
All search engines search the <title> tag to generate result listings!
However, there are many websites without a proper title. In addition,
use the meta tags "description" and "keywords". If a page only deals
with the topic "elephant", it is advisable to use only this as keywords
meta tag. Create a file robots.txt. It helps search engine robots to
index your site properly.
Submit now
The safest, but most time-consuming way to submit your website
successfully is to use manual submission for all search services. But
hardly no webmaster will do that!
Apart from the big search services (Yahoo, AltaVista, Infoseek etc.),
there are about 600 more or less important search services worldwide.
In Germany alone, there are about 30 important services. Apart from
the fact that finding all URLs would take ages, submitting your site
manually to only the 100 most important services would be extremely
time-consuming.
Thus, you need a software to do the work for you. Hello Engines!
submits your website to more than 700 real search services, and saves
search service replies as if you had just submitted your site manually.
The advantage is obvious: you do not have to rely on logs, but you see
exactly what happened to your submission. Hello Engines! includes
one of the most complex search service databases and a number of
important search services. Apart from submission, the program has an
integrated Metatag Generator to add valid meta tags quickly and easily
and a Robots Generator to create a correct robots.txt file.
Hello-Engines! offers you full control, as websites are submitted from
your PC. Additionally, you can view the replies of search services and
submit to every services individually. Moreover, you can submit one or
multiple sites simultaneously. With other services, every submission is
charged.
14
Getting started
Before using Hello Engines!
Before submitting your websites to search services with Hello
Engines! it is important to know the most important functions of the
program. To get information about the program, read this manual. If
you want to start working with Hello Engines! straight away, refer to
the chapter Quick start, or step through the tutorial where you find a
demonstration of the program's main functions.
To get help on a specific topic, do the following:
Search for respective term in the index of this manual.
Search for respective term in the online help.
For context sensitive help while executing Hello Engines!
press F1 or click a Help button.
TIP: Most program elements also have tool tips. These are
displayed automatically, when the mouse pointer is positioned at the
item for a few seconds. In addition, the status bar (bottom line in
the program window) contains useful context related hints and tips .
You can find additional information in the info bar. If you position
the pointer at an element a short description is displayed.
Technical support
In case of problems or questions, registered users may turn to:
FAQ with answers to frequently asked questions
Support Forum
Support by email (for registered users only)
HINT: Note that we can only answer questions directly related to
the Hello Engines! software.
15
Manual: Hello Engines! Professional 5.0
Installation
System requirements
To run the program on your computer, you need at least 32 MB RAM.
The program runs under Windows 95, Windows 98, NT4 and Windows
2000. You need at least a standard VGA card with a resolution of
800x600 and 16 bit colors. Of course, you also need Internet access.
In the following section, you get to know how you install Hello
Engines! on your computer.
Setup
To install Hello Engines! on your computer, do as follows:
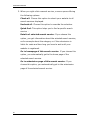
1. Go to the Hello-Engines! website, click Software / Download
and select the desired version of Hello Engines!.
2. Click one of the indicated download links.
3. Then select the folder where you wish to save the file
henstd.exe (Standard version) or henpro.exe (Professional
version) respectively (n replaces the current version number,
for example, the file name for the Professional version 4.1
would be he41pro.exe).
4. Run the saved EXE file to start the installation.
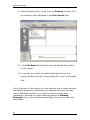
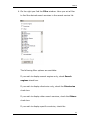
5. When you start the program for the first time, the User
registration dialog box opens. Enter your valid Unlock code
you received by email to unlock the program.
6. If you do not have a valid code click Test only to start the
program in shareware mode. You can unlock Hello Engines!
later.
16
Getting started
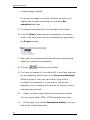
7. After successful installation, always go to the Update
manager. This way, you make sure that you are using the
latest version of Hello Engines!.
Enjoy Hello Engines! and good speed!
Ten important hints
Although Hello Engines! makes submitting your website quick and
easy, it is recommended to read the following hints to make your
submission a success.
A basic rule is that search services are intended to provide
information for users, and to facilitate navigating the Internet enter
only relevant keywords! Do not enter keywords which have no
relevance to your website. (Some webmasters believe that by entering
certain keywords, e.g. "sex", "crack", "mp3" etc., they will increase
their websites' ranking and/or hits. We advise you not to do that.).
Before submitting your website, you should think about strategic
keywords. These are keywords that a user might type in to find your
website in a search service (see user manual, chapter 2.5.1 "Selecting
strategic keywords").
Use the integrated Meta Tag Generator to generate valid meta
tags, and add them to your web pages. Meta tags are nothing
mystical, but very easy to understand. Every single page of your
website should have an appropriate descriptions and suitable
keywords. This might be time-consuming, but it is vital to the success
of your website.
Think about your website's position in the result listings of search
services, but do not worry about it! There is a difference. Do not try to
change your website's position through so-called "insider tricks" or
"ranking optimizers". Simply follow the hints in this help file (How to
do it correctly and Basics 1 to Basics 5 ).
17
Manual: Hello Engines! Professional 5.0
It is advisable to provide high-quality content, rather than waste time
on "ranking optimizers". Such programs are useless and only lead you
into using methods which are either completely meaningless (e.g.
placing ad texts in robots.txt) or not very popular with search service
providers (e.g. using doorway pages). Often, these programs are so
bad that their manufacturers ridicule themselves by ordering fake
evaluations or expert reports (e.g. from polytechnics) and publishing
them on their websites...
It may take up to 6 weeks before your website is actually listed in
the search engine. Especially in directories, you should wait at least 6
weeks before resubmitting your website. (Some search services might
reject your submission if you do not comply with their criteria). Only
submit your website once to directories (e.g. Yahoo). Then wait at
least 6 weeks. Check whether you are listed. If yes, do not resubmit
your site. In search engines, you can submit individual pages of your
website (e.g. http://www.myserver/index.htm and
http://www.myserver/xyz/index.htm). You can resubmit your website
to search engines regularly, for example, when you have made
important changes.
Apply filter option Top 100 search services (under Search service
selection/ Apply filter), and check whether you are listed in all
search engines a few weeks after submission. Do not submit your
website too often, as this might lead to your website being removed
from the search service!
Do not submit your website before it is finished and tested.
Especially in directories, do not submit websites which are "Under
Construction". Providers will surely ignore such a submission!
18
Getting started
Never use website, which promise to submit your site to hundreds
or even thousands of search services for free. Often, these websites
"only" ask you to place a banner on your website. But the result is:
you are advertising for these promoters for free and do not get
anything in return (at least nothing useful). In most cases, these
promoters do not even submit your website (but they send you a log
anyway) or they submit your website to useless free-for-all link lists. It
might happen as well that your website is banned from a search
service altogether because it has been submitted too often! Submitting
your website is so vital that you should always control it yourself. That
is why Hello Engines! saves search engine replies. If your website is
submitted too often, e.g. because you are using "services" of several
free "promoters", this might be considered spamming (see user
manual) be most search services. Usually, this leads to your website
being banned.
Use meta tag Index,follow and submit only the main (home) page
of your website. This ensures that almost all search engines also list all
sub pages of your site automatically. Additionally, you can submit
important pages to engines. In directories, you should only submit the
main page of your website.
Many "promoters" promise the impossible. It is not trustworthy
(because it is impossible) to guarantee that a submitted site will figure
among the Top 10 search results in a certain search service. There
cannot be such guarantee (at least if only such methods are used
which are accepted by search service providers)! It might be possible,
knowing all the special features of a search service and using all
acceptable methods and tricks, to reach the best possible result. But if
your ranking is 1 or 1.230 cannot be predicted. (Only exception:
"purchasing" a certain ranking directly from a search service.)
Submission to 1158 search engines by "professional Internet
promoter"? Such offers are not trustworthy, as such Internet
promoters cannot know 1158 search engines because there are no
1158 search engines! They are deliberately comparing apples and
pears. In fact, your website will be submitted to so-called "free-for-all"
link lists which are of no use to your website and might even damage
your reputation. Just imagine visiting such a "free-for-all" page and
seeing your company between numerous shady offers ("Rich without
working - GUARANTEED!", "We get you into Yahoo's Top 10 - FOR
FREE" or "Naked celebrities") ! What would be your impression?
19
Manual: Hello Engines! Professional 5.0
Using such promoters mostly puts you on a slippery road. Such shady
free-for-all lists are used by companies to get new email addresses
they can send their spam mails to. You can take legal action against
such spam mails, if you manage to find out the (proper) sender of the
message. Serious companies would never send unsolicited email
advertising. Therefore, you should ALWAYS ignore such ads (especially
if it looks interesting at a first glance).
Some webmaster believe they can cheat search services by
placing a website on different servers, by entering different keywords,
and by submitting these otherwise similar sites. This is intended to
cover numerous keywords. We consider this not serious and
recommend to avoid such or similar spamming methods.
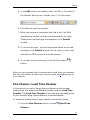
Quick start
You want to start immediately without reading the entire user manual?
The following instructions will help you:
Make sure that your website has no mistakes and is optimized
before you start submission. The Site Checker tools will help you.
Fill in all fields in the Project/Data and Project/Websites
sections. Save your data to be able to use them later.
In the Tools/Metatag Generator section you can generate meta
tags for each individual HTML document of your website using the
integrated Metatag Generator.
To insert meta tags into one or several HTML documents, select a
folder with several HTML files. Then click Insert from the toolbar and
upload the HTML files with the new meta tags to your web server.
Return to details under Project/Websites and click Site analyzer
in the toolbar. This feature checks your website to ensure that it does
not contain any mistakes.
In the Submission/Automatic section select the search services
you wish to submit your website to.
Connect to the Internet.
20
Getting started
Click the Submit button from the toolbar to prepare submission.
Now the program checks if submission is possible to all selected search
services.
Now your website is submitted to all selected search services.
Select Manual, to submit your website to all search services which
do not support automatic submission. Double-click on a search service
to open its submission site.
21
Working with Hello Engines!
What does Hello Engines! do?
Hello Engines! is a tool which dramatically facilitates submitting your
website to the most important search services worldwide.
Hello Engines! submits your website as you would do manually. This
means, there is no visible difference for the search service between
submitting a website manually or submitting it via Hello Engines!.
The user interface
Hello Engines! is a powerful application comprising many features.
One of the design objectives for the user interface was to automate as
many processes as possible, so that handling the program is as easy
for users as possible.
New project wizard
Welcome to the New project wizard!
This wizards helps you with creating your projects. He assists you
during all the steps that are necessary for submitting your website
with Hello Engines!. That way you make sure not to forget an entry or
to give the wrong information. In the following the steps of the wizard
are explained.
Step 1: Company information
In the first step of the wizard you enter the following information
about your company:
1. In the Company field enter the name of the company.
2. From the drop down list Country choose the country where
the company is located.
23
Manual: Hello Engines! Professional 5.0
3. Then fill in the fields State / county, Address, Postal code,
City, General E-Mail, Phone, Fax and Mobile.
Please notice that some operators of search services use your
information entered for other purposes. It might happen that
you get mass advertising via email. However, if you enter a
wrong (not valid) email address on purpose, some search
services ignore your submission. Therefore, establish a new
email address, for example at Yahoo or Hotmail, which you
only use for passing to search services.
4. In the Toll-free field enter your toll-free service number, if
available.
5. In the Products field enter your most important products.
However, only few search services use this field.
6. Then click Next, to go to the next step of the wizard.
Step 2: Contact details
In the second step of the wizard you enter your first name, last
name, salutation, title and age. If you cannot fill in the Title field,
enter a slash "/".
Then click Next, to go to the next step of the wizard.
Step 3: Webmaster information
In the third step of the wizard you enter information concerning the
webmaster. To do so, proceed as follows:
1. Fill in the fields Name and Email.
24
Working with Hello Engines!
2. In the Password field enter a new password. Do not use a
FTP or other access password. At some search services you
need to open a user account before you submit your website.
The password entered here is then assigned to these search
services. Now you can log in at these search services using
the specified password.
3. Then click Next, to go to the next step of the wizard.
Step 4: Websites
In the fourth step of the wizard you enter information concerning your
website. To do so, click on the arrow next to the Add button and select
between the following options:
Add: Select this option to fill in the fields of the Details
Local file: Select this optoin to add the information of an
URL: Select this option to add the information of an online
column manually.
existing HTML page.
URL.
Then click Next, to go to the next step of the wizard.
Step 5: URLs
In the fifth step of the wizard you enter the URLs for your websites. To
do so, click on the arrow next to the Add button and select between
the following options:
25
Manual: Hello Engines! Professional 5.0
Add: Select this option to fill in the URLs in the URLs column
manually. Enter the complete URL into the URL field, e.g.
http://www.mysite.com, and click the Add button next to the
field.
Local file: Select this optoin to add the URL from an existing
URL: Select this option to add the URL of an online URL.
HTML page.
To delete the website click Delete. Then click Next, to go to the next
step of the wizard.
Step 6: Wizard completed
In the last step of the wizard you can add the entered information to
your project. To do so click the Finish button. If you wish to correct
your entries, click the Back button.
Project section
Project
Under Project enter the data and URL of your project.
The Project section is divided into the following three sections which
are explained below:
Data
Websites
Metatags
Data
Enter your website's details.
26
Working with Hello Engines!
All information entered must refer to the owner of the website to be
submitted.
Data is divided in three sections:
Company
Person
Webmaster
NOTE: You must be aware that you enter private information under
Data which might be abused by a few search service providers for
other purposes (mainly mass advertising via email). For example, if
you deliberately enter a wrong (invalid) email address, it may
happen that your submission is ignored by most services.
If you receive unsolicited email advertising, never reply to it (do not
even complain)! If you reply, you confirm to the sender that your
email is valid and used - and that it can be handed over to others. You
may take legal action against unsolicited emails, if you manage to
determine the real sender.
Set up a new email account (e.g. at Hotmail) which you only use for
the purpose of registering with search engines. So your corporate
email address is protected from spam mails (unfortunately, they will
arrive sooner rather than later...). Only enter data that you would
otherwise make accessible to the wider public (e.g. do not submit your
private phone number).
Save and
load data
After filling in all fields, you should save the data. Click File/Save.
27
Manual: Hello Engines! Professional 5.0
Websites
The
Project/Websites section is divided into the two sections
Data and URL List. Here you enter the details and URLs of your
website. You can use multiple websites with multiple URLs. Enter the
respective details for each newly added website. If you leave fields
empty, you get an error message when submitting your website.
Metatags
In the
Project / Metatags section, you can add meta tag files to
a project. This is necessary especially when you have several (big)
projects.
Select a meta tag file (*.mtg) from the Explorer window and add this
file to the project by double-clicking it.
To remove a meta tag file from the project, double-click the desired
entry in the list of the related files.
In the File Content window you can preview the selected meta tag file
(*mtg).
Submission section
Submission
The Submission section offers the following four methods for
submitting your websites to search services. These are explained in
the next sections:
Automatic
Manual
Multi-Express
Multi-Detail
28
Working with Hello Engines!
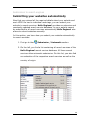
Automatic submission
Lists all Search services to which Hello Engines! offers automatic
submission. You may select Apply filter to restrict the selection of
search services (e.g. only English search services).
Under Sites select the websites you wish to submit automatically.
Select all websites to be submitted there.
Click the Submit button and start to automatically submit your website
(as you have configured it through the details) to the search services
listed here. The program checks whether you can submit your data to
all search services. Possible errors or warnings are displayed.
Connect to the Internet before clicking Submit.
A Status report is displayed after submission.
NOTE: All reply pages from search engines are saved in the
directory \HTML (or the one you selected under program options)
after automatic submission. Double-click file in Windows Explorer to
view.
These files are saved in subdirectories, depending on your program
options, and may be reloaded at any time.
Manual submission
Lists all search services for which Hello Engines! only offers manual
submission.
But you may also submit manually to search engines to which Hello
Engines! normally submits automatically. This may be useful for
submitting your site to a more specialized category of a directory.
Possible reasons why Hello Engines! cannot submit automatically:
search service is not free of charge.
search service is highly specialized, and thus only interesting
for special websites (automatic submission would be
spamming and not of your interest).
29
Manual: Hello Engines! Professional 5.0
search service provider has asked us to stop automatic
search service requires far more information than usual which
search service has special submission method, e.g. creating
search service requires a code displayed in a picture.
submission.
can only be given by website provider.
user account, etc.
Double-click an entry in the search services selection in order to open
the submission site of this search service in the integrated browser
window.
Multi-Express Submission
If you manage several sites and want to submit them simultaneously
to search engines (not directories), this is the right tool for you.
In contrast to Multi-Detail Submission no saved detail files are used.
Instead, you just need to create a simple text file listing the URLs of
the sites to be submitted. The URLs need to be written below one
another, so that the program can identify them - only one URL per
line.
TIP: Use Site Scanner to create text file with all documents of a
site.
Multi-Detail Submission
This feature enables you to submit multiple detail files to the selected
services simultaneously. This is a useful tool, if you manage several
sites and want to submit them with Hello Engines! simultaneously.
In contrast to Multi-Express Submission, this feature uses saved detail
files (*.sit). It submits all detail files from the current directory.
30
Working with Hello Engines!
NOTE: This feature requires completely and properly filled detail
files. Before submission, Hello Engines! checks whether the
selected file contains the necessary information. If this is not the
case, the file is displayed and removed from the list.
Status section
Status report
The Status tab contains status information in three different formats
(Table, HTML, RTF) on concluded submissions of a project. This
information is saved in the details file, if you have saved this file after
every submission.
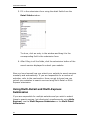
To view the status of the last submission, proceed as follows:
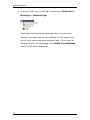
1. Select the date of the last submission from the Submission
History.
2. Select All reports in order to view the status information
about every submission carried out during this project.
3. Select an existing report under Report view.
4. The list box displays immediately, if a submission was
successful. Hello Engines! decides according to the status
code whether a submission was successful or not.
To display the status of the last submission, activate check box Only
current submissions. If this check box is deactivated also older
submissions are displayed.
Select an existing report under Show status report.
The list box displays immediately if a submission was successful. Hello
Engines! decides according to the status code whether a submission
was successful or not.
31
Manual: Hello Engines! Professional 5.0
Search service reply
Double-click a listed item or right-click View HTML reply page to
view the original reply from the respective search service. This is the
safest method to establish whether a registration has been successful
or not. All reply pages are saved in the \HTML folder or the folder that
you selected in the options dialog box.
Print reports
Click the Print button to print a simple report.
Table
Select Table from the menu in order to view the status information in
a clear table view.
HTML
Select HTML from the menu in order to view the status information in
the HTML format. You can save the report as an HTML file by clicking
the Export the report button in the tool bar.
RTF
Click the RTF report button to view and print a detailed report in RTF
format. In this format, you can edit and/or print the report with the
integrated editor. The report can also be saved in RTF format and
subsequently edited with a word processor like MS Word.
Create your own template for RTF reports, and determine the
directory. To get information on how you create templates, refer to the
section Create RTF templates.
32
Working with Hello Engines!
NOTE: Note the difference between transfer (i.e. connection) and
submission (i.e. registration). It is theoretically possible that a
transfer (connection) was successful while the registration failed.
This however only occurs in the rare case when a search engine has
modified its registration procedure, and Hello Engines! has
transferred incorrect data (such incorrect transfers are ignored by
the search services, there is no danger that your website is
incorrectly registered with the engine!). It is therefore important
that you regularly check whether a new version of the search
services database is available.
XML
Select XML from the menu in order to create a detailed report in XML
format. By clicking the Export the report symbol you can save the
report in an XML file.
PDF
Select PDF in the Status section to generate a PDF file of your report.
The PDF file uses the formatting of the RTF template. If you did not
create a template the default template is used.
Incorrect registration
Possible reasons for a failed registration:
search service is not available at the moment.
connection exceeded time limit (timeout error).
search service paths, parameters, or URL have changed.
Create RTF templates
RTF templates are simple RTF files with several parameters. When the
status report is created, Hello Engines! replaces these parameters
with the current values of this submission.
33
Manual: Hello Engines! Professional 5.0
Possible parameters:
#D: creation date of report.
#U: submitted URL.
#T: title of submitted website.
#E: number of successful submissions.
#F: number of failed submissions.
#O: list of successful submissions.
#X: list of failed submissions.
NOTE: Use file schablone.rtf as example. It can be found in the
Hello Engines! program directory and altered according to your
wishes.
Site Checker section
Site Checker
Site Checker checks your website for possible errors before
submitting it with Hello Engines!. The following four tools are
available which are explained below:
Link Checker
HTML Validator
Load Time Checker
Code Shrinker
Link Checker
Link Checker checks your entire website for any kind of broken links:
Select the Go button in the toolbar of Hello Engines! or double-click
the local HTML document to be checked in Site Checker.
34
Working with Hello Engines!
In the toolbar select:
Save Site Checker HTML report.
Find URL.
Show URL properties.
Navigate to selected URL.
View Broken links only.
HTML Validator
The HTML Validator checks source code of HTML documents for
superfluous or wrong attributes and commands, automatically created,
for example, by some WYSIWYG editors (WYSIWYG = What You See Is
What You Get). They affect loading time, especially in bigger
documents, or even cause mistakes on the site.
Enter a URL and click Go in the Hello Engines! tool bar or doubleclick the local HTML document to be checked in Site Checker.
Errors and warnings are displayed in the Details window. On the
right-hand side of the window, you can view and edit the HTML source
text of the site. The status bar displays the number of errors and
warnings.
In the tool bar you can:
Save report.
Edit HTML file.
Find a term.
View selected item in browser.
View properties of selected item.
35
Manual: Hello Engines! Professional 5.0
Load Time Checker
The Load Time Checker uses file and image sizes to determine the
average loading time of a site with different speeds.
Enter a URL and click Go, or double-click the local HTML document to
be checked in Site Checker.
The result is displayed in the middle section of the window. A summary
of the currently displayed site is shown below the window.
From the toolbar select:
Save Site Checker HTML report.
Find URL.
View selected URL in Browser.
View URL properties.
Code Shrinker
The Code Shrinker simplifies HTML code, so that better loading times
are achieved due to smaller files. Like HTML Validator , it deletes
unnecessary HTML code.
Enter a URL and click Go in the Hello Engines! tool bar or doubleclick the local HTML document to be checked in the Explorer window.
After reading and compressing the files, the compression report is
displayed in the main window.
In the tool bar select:
Save report.
Find URL.
Navigate to selected URL.
Preview compressed HTML in Browser.
36
Working with Hello Engines!
Save compressed HTML.
Upload selected HTML to FTP server.
Tools section
Tools
In the Tools section you find the following sections which are explained
below:
HTML Editor
Metatag Generator
ROBOTS Generator
Site Scanner
Ranking
HTML Editor
The integrated HTML Editor uses syntax highlighting, which facilitates
reading HTML code. By default, it displays HTML errors in red, what
makes correcting errors quick and easy.
It is a useful tool, if you want to edit HTML documents, e.g add meta
tags generated with Hello Engines!.
Metatag Generator
Metatag Generator will soon become a valuable tool to generate
meta tags quickly and easily. This version allows you to generate
meta-tags in Dublin Core format . Use the Insert button to add meta
tags to HTML documents quickly and easily.
37
Manual: Hello Engines! Professional 5.0
Every single page of your site should have individual meta tags
referring to the respective content of that page. In contrast to the
details (see Project section), meta tags describe a single document
and not the entire website.
Meta tags ensure that every single page of your website is indexed
correctly at search engines.
NOTE: Meta tags are mainly used by search engines (e. g. Fireball
or Google) and almost never by directories (e. g. Yahoo).
Robots Generator
Generates a Robots.txt file using your details.
Choose the agents you wish to refuse access to a specific directory
from the list and add them to the list of selected agents.
You can add your own agents or choose popular agents from the list.
Use Site Scanner to read the structure of your site and select
directories to be locked for selected agents.
To add a directory to the disallow list, double-click the specific
directory, or click the button on the tool bar. Thus, the agents from
the list of Selected Agents have no access to this directory.
NOTE: You can only refuse access to complete directories and their
contents. HTML documents can always be accessed.
The following buttons are available in the tool bar:
Creates a new Robots.txt project.
Opens an existing Robots.txt project.
Saves current Robots.txt project.
Generates content of Robots.txt file from Disallow List.
Uploads the created robots.txt file to the web server using the
integrated FTP Client or Wise FTP 3.0.
Adds new agent to selected category.
38
Working with Hello Engines!
Deletes selected agent from the list.
Edit selected agent.
Adds selected agent to the list of selected agents.
Deletes selected agent from list of selected agents.
Clears list of selected agents.
Add disallow path for agents from the list of selected agents
manually.
Add a directory chosen from the Site Content window as a disallow
path for the agent selected from the list.
Edit selected disallow path.
Delete selected disallow path.
Delete disallow list.
Site Scanner
Use Site Scanner to read all links and HTML documents of a site. This
might be useful, if you, for example, want to clean your web server
and quickly determine unused documents. This tool is also useful, if
you want to create a URL list for Multi-Express Submission.
To use the Site Scanner, select Site Scanner from the Tools section,
and proceed as follows:
1. In URLs to scan, type in the root URL to be read.
2. Determine the Scan depth. If you enter, for example, 100,
the program will not only check the start page (the selected
URL), but will also check linked pages to a depth of 100.
39
Manual: Hello Engines! Professional 5.0
3. Determine Max. pages, i.e. the number of scanned
documents. Note that this might take quite long, if you enter
a high value, and the option Internal links only is
deactivated.
4. Select whether the program should check HTML files only, or
other files as well, e.g. php, cgi, asp. To ignore external links
(e.g. ad banners, partner sites, etc.), activate Internal links
only.
5. Under Links to scan, determine which HTML areas are to be
checked, e.g. links within tables, linked images, etc.
6. Then click Scan to start the reading process. The amount of
time needed depends on the complexity of your site and the
speed of your connection.
7.
When the scan has finished, all found links are displayed.
Ranking Analyzer
This feature checks whether your site is listed in search services and
how it ranks. The more specialized the search string and your
website's topic, the greater the possibility to be listed on the first
pages.
To use the Ranking Analyzer, proceed as follows:
1. Under Rank Details enter the URL of your website(s) and
click Add. If you want to add further sites, repeat the process.
2. Choose one or several domains to be searched from the list.
3. Determine which search services are to be analyzed. Choose
<All> or a selection of search services from the list.
40
Working with Hello Engines!
4. Under Keywords type in keywords a user would use to find
your site. Make sure you enter a comma or space character
after each keyword. Sentences must be in double quotation.
Please make sure you also use quotation marks for the words
included in the sentences.
NOTE: To save entries and reuse them later, click the Disc icon
in the toolbar.
5. Then click the Rank button. The following report displays all
matches found, and the respective ranking.
6. If you have checked Use History in the Ranking options,
you can view previous ranking analysis. Simply choose a date
from the list in order to display the report.
Wizards section
Wizards
This section provides wizards which help you carry out tasks quickly
and easily.
The following wizards are available:
One-Minute Wizard
This wizard guides you through the first steps of entering the most
important website and personal details needed for submission.
Note that the wizard will only submit your website to spider search
engines. To register your website with directories, fill in all detail
fields in the program and click Submit.
41
Manual: Hello Engines! Professional 5.0
Metatag Wizard
This wizard helps you create metatags. Meta tags are necessary as
most of the search engines index the pages of websites using the
keywords you enter via meta tags. Using this wizard you can create
completely new meta tags or import meta tags from existing HTML
files. In addition, you can insert the created meta tags directly into
your HTML documents.
Import Wizard
This wizard helps you to import project data from a text file submitted
by your clients.
Site Scanner
This wizard reads your website and comprises all sub-sites of your
website. The result is displayed in a detailed list and can be exported
to a text file.
42
Database Editor
Introduction
The Database Editor for the search service database helps you to
add search services to the database. The database can be integrated
into Hello Engines! enabling you to use the search services you
defined for the submission of your own websites. Ranking Toolbox
can also access this database so that you can use the search services
of this database for the ranking of your websites.
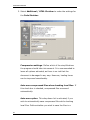
The main window of the Database Editor is divided into several parts.
On the top you find the menu bar and below the navigation bar. On
the left of the window there is the engine's selection list. Here you can
select search engines that already exist in the database to change
their settings. On the right there are the forms where the settings of
the search services are made. On the bottom of the window there is
the status bar which informs you which database and which database
record is edited. You can also determine the Filter here.
1
Working with the Database Editor
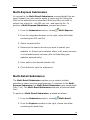
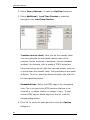
Database Manager
In the Select database dialog box you can open existing databases,
create new databases with the content of the dictionary list and
manage all the databases.
Available databases - Lists all the existing database folders.
... (Edit) - Allows to select the folders for creating the
Create DB - Creates a new database in the folder selected in
Clone - Copies the selected database to the defined folder.
Check - Checks if the selected folder contains valid database
Add - Adds the selected folder to the list of available
Replace - Replaces the selected item of the database list with
Delete - Deletes the selected item from the database list.
Properties - Displays properties of the selected database
Explore - Opens the Windows Explorer.
databases or to use a database from the corresponding folder.
the Edit field.
files.
databases.
the item in the Edit field.
folder.
2
Introduction
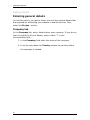
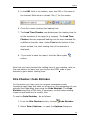
Create new database
1. Select the path of the new database in the field that is placed
directly below the Available databases list and enter a
name (without file extension).
2. Then click Add and Create DB.
3. Done! By clicking OK you open the new database.
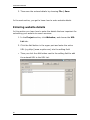
Open existing database
1. Click the ... button to select the directory of the database.
2. Click Add to add the selected database to the list.
3. Then click Check to make sure that the database is without
errors.
Clone database
1. Select a database from the Available databases list.
2. Click Clone to duplicate the content of the database into a
new folder.
3. Then a dialog box opens where you enter the path and name
of the database that is to be created.
NOTE: You cannot change the database used by Hello Engines! or
Ranking Toolbox. You can only edit your own databases!
3
Printed Documentation
User Interface
Main Window
The main window of the Database Editor is divided into several parts:
On the top you find the menu bar and below the navigation bar. On
the left of the window there is the engine's selection list. Here you can
select search engines that already exist in the database to change
there settings. On the right, there are the forms where the settings of
the search services are made. On the bottom of the window there is
the status bar which informs you which database and which data
record is edited.
Main Menu
The main menu consists of the following sub-menus:
Database menu
Dictionary menu
4
Introduction
Data Set menu
Tools menu
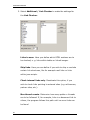
Database menu
DB Manager: Opens the Select database dialog box. Here you can
select the database you wish to modify or create new databases,
deleting or duplicate existing ones.
Filter: You can use the filter if you do not wish to have all the search
services displayed in the list of search services. In the Filter dialog box
you can set the filter according to many criteria. You can also access
the filter via the funnel symbol on the bottom of the window.
Exit: Exits the Database Editor.
Dictionary menu
Here you have the chance to manage a dictionary for the Database
Manager. The texts that are used in the Database Manager can be
found divided into the categories Languages, Countries, Categories,
Web types, Engine types, Importances, Status, Fields. Navigation is
the same as in the main window. For further information refer to the
description of the navigation bar.
Data Set menu
In this menu you find some of the buttons from navigation bar which
can be used to navigate through the database. For more information
see Description of navigation bar.
Tools menu
Options: Opens the Options dialog box where you can make the basic
program settings.
Compact Database: Optimizes the database to downsize it and to
accelerate access on it.
5
Printed Documentation
Check engines availability: This function checks the search services
of the database on there availability. Note that you cannot check if the
information concerning the search services is correct but if the search
services are accessible on the internet.
Verify engines CRC: Checks the CRC check sum which is saved to
the search services. That way you can check if the page of a search
service has changed. If yes the corresponding check sum will differ
from the previous check sum.
Import engines status from XML: This function imports the status
of the search services from a file in XML format.
Export engines header to XML: Exports the status of the search
services into an XML file.
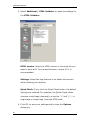
Navigation bar
In the following you find descriptions of the buttons of the navigation
bar:
Database Manager: Here you can select the database you
wish to modify or create new databases, deleting or duplicate
existing ones.
6
Engines List: Using this button you can show or hide the list
First: By clicking this button you get to the first database
Prior: By clicking this button you get to the previous
Next: By clicking this button you get to the next database
of search services.
record of the search service database.
database record of the search service database.
record of the search service database.
Introduction
Last: By clicking this button you get to the last database
Search: When you enter one or more characters the search
record of the search service database.
engines list on the left side displays the database record
which corresponds to the search.
Insert: Using this button, you add a new data record, which
Delete: Using this button, you delete a database record,
Edit: Click this button to change a database record. This is
Post: Click this button to save the changes you made. This
is a new search service, to your database.
which is a search service, out or your database.
optional, as you can also change the search service directly.
step is also optional, as the settings you made are saved
automatically, if you did not cancel them.
Cancel: By clicking this button you delete the changes you
made instead of saving them. This is only valid for the
currently selected database record and not for changes that
have been made on other search services.
Options: This opens the dialog box where you can make
basic program settings. For more information see Options.
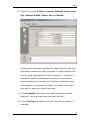
Forms
General form
On this page you enter general details concerning the search service:
7
Printed Documentation
Name: The name of the search service as it appears in the program's
selection list.
Extension: This is the so-called top level domain of the search
service, i. e. the extension like "com", which, however, is used in the
Database Editor for internal purposes only. That is why it is not
relevant for Hello Engines! or Ranking Toolbox.
URL: This is the URL under which you find the search service.
Normally this is the URL you enter into the web browser if you like to
query a search service.
Type: This is the type of search service. Here it is differentiated
between:
Search service: an authentic search service, also called
"spider engine" or "crawler", which queries the submitted
website regularly and updates to your own data set.
Directory: directory which includes statistic information of a
registered page. Often these are smaller and more specific
services.
Submit costs: In case of search services with costs this is the fee
which is raised by the search service operator for the submission. In
most of the cases you will find the value "0,00" as most of the search
services are free of charge.
CRC: This is the checksum which is used to automatically recognize if
a search service has changed the URL of the submission page of a
search service. The Database Editor estimates this checksum thus
recognizing if a search service parameter should be checked again.
Importance: Here you define the importance of a search service.
However this can be very subjective, especially if you have added
search engines by your own. Well-known search service like e.g.
Google or Yahoo have a high importance due to their data set and
distribution, while minor directories are less important.
Status: This is the status of the search service. In general you find
"OK" here. But if, for example, a search service is not accessible or
deactivated you can select from a number of reasons.
8
Introduction
Country: Specifies the country in which or for which the search
service is operated. This is the country to which the search results are
most relevant.
Language: This is the language which is used on the pages of the
search services.
Encode URL: For most of the search services it is necessary to
convert characters like blanks, commas and other special characters
included in the URLs that are to be submitted into HTML encoded
characters. For example " " (blank) is submitted as "%20". Here you
can define if such a conversion should be performed.
Comments: Here you can enter comments concerning this search
service. This comment does not have an effect on the functioning of
the software. It only serves for information purposes.
Submission form
Here you enter all the information Hello Engines! needs to submit
your website to a search service.
URL: URL with the script that is responsible for the submission, e. g.
http://www.google.de/addurl
Method: This is the transfer method ("get" or "post" of the HTTP log)
which is used to transfer the submission form to the search service. To
find out the right method, have a close look at the source text of the
submission page at the HTML FORM element of the corresponding
form. Usually you also find an element here in which either the text
"method=post" or "method=get" appears. Sometimes it helps to just
try it out as in most of the cases both methods work.
Params: Here you enter statistic parameters which are necessary all
the time. If the search service does not require statistic parameter
leave this field empty.
Manual URL: Enter the URL which can be used to submit manually to
a search service, e. g. http://www.google.com/addurl.html
Reference: If you go from website A to website B, A is the reference.
Some search engines have a look at the reference to block "external"
submissions. In Hello Engines! you can fake the reference, which is
to define a wrong reference, in order not to be excluded.
9
Printed Documentation
Last verified: This date helps to schedule a new verification of a
search service.
Form number: Some submission forms consist of several forms
(HTML FORMS). Under some circumstances Hello Engines! can not
recognize which form really performs the submission. If you know the
number of the form that is responsible for the submission you should
enter it here. This value is required for the import of the form fields.
Comments: Here you can mention specialties. The content of the
field has no influence on the functioning of the software. It serves for
information purposes only.
Wait for submission response in days: Estimations which are
displayed in the details of search service. They tell you how long it will
take until a submitted page can be really found with the help of the
search service.
Test submission: Performs a test which helps to check if the current
entries will submit a search service to Hello Engines! correctly.
Only manual submission: Defines that this search service is only
available for manual submission in Hello Engines!.
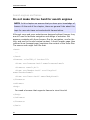
Ranking form
Here you make all the settings that are necessary to find out the
ranking of a URL that is used in the program. A database record in the
database of a search service includes the following information
concerning the ranking: (obligatory fields are marked with *):
Start URL *): This is the URL of the result page which is delivered by
a search service for the specified search terms.
Next URL *): URL of the result page which is delivered for the
specified search terms if the user clicks on the link or button for
displaying the next page (normally the next 10 result pages).
Match item start *): A well-defined text by which the start of a new
data record is identified in the result page. To find such a text - in
most of the cases in can be found in the HTML tag - you need to
search in the source text of the result page. For Google this text is for
example "p class=g>". You find a more detailed description here.
10
Introduction
Results per page *): This is an integer value which is used to
calculate an offset for the "Next page" URL. In general this value
corresponds to the number of search results per result page (10, 15,
20 etc.)
Next page start *): Integer value or floating point value which is
also required for calculation the offset for the "Next page" URL. For
more information refer to here.
Reset counter: This check mark needs to be made if the numbering
of the matches on the following page(s) start with 1.
Max. Results: This is the value which describes the maximum
number of search results per query to the search service. Some search
services are limited to a number of search terms and in some cases it
is difficult to assess how to get more results. In both cases it is
recommended to define an upper limit for the number of the search
results.
Match area start: A well-defined text which indicates the beginning
of the block to be analyzed on the result page. In the case of Google
this text is "<font color=#000000><b>Web</b></font>". All the text
IN FRONT this paragraph is not investigated for results by the
software.
Match area end: A well-defined text which indicates the endof the
block to be analyzed on the result page. In the case of Google this text
is "<<font size=-1>result page: </font>". All the text AFTER this
paragraph is not investigated for results by the software.
Parameter mark*): This defines an ASCII symbol (character) which
does NOT appear in the URLs of the search results. Generally the use
of the dollar character "$" is a good choice here. For more information
see Template parameters.
Params: Here you find additional parameters which should be used
for composing the URLs.
Last modified: Here you can enter the date when you modified the
settings of a search service for the last time. This value serves for
information purposes only.
Last accessed: This value is an internal date which is used by Hello
Engines! or Ranking Toolbox.
Last verified: This value is an internal date which is used by Hello
Engines! or Ranking Toolbox.
11
Printed Documentation
Test with keyword: If you click this button, you can test if the
ranking works with the settings you made. The Database Editor
connects to the search service and tries to do a search query.
Language, Countries, Categories, Web types,
Fields
All these sub-pages work according to the same principle:
Here you can allocate a field that is required by a search service a to a
field in Hello Engines!. Which means that you allocate a parameter
which is transmitted during submission of a page.
A simple example from Google: The Google field (which is the FORM
element that is transmitted as parameter) "q! of the Google
submission page http://www.google.com/addurl.html contains the URL
of the page to be submitted. That is why under Fields the HE field
"URL" should be allocated to the Google field "q".
The same happens to the other fields. These five pages have the
following meaning:
Language: If a search service supports to define the
language of the page to be submitted, you can set the
corresponding parameter here.
Country: If a search service supports to define the country of
the page to be submitted, you can set the corresponding
parameter here.
Categories: Here you configure parameters by which the
category of the website to be submitted is transmitted.
Categories are for example Computer, Retailers, Beverages
etc.
Website types: Here you set the parameters by which the
type of the website to be submitted (Private, Commercial
etc.) is transmitted.
12
Introduction
Fields: Here you find all the information which you enter in
Hello Engines!. For example the URL (see example) or the
details fields of the search engines operator, which is email
address, phone number etc.
Options:
In this window, you can make the basic settings for the Database
Editor. Here you find the following sections:
General: Here you can make the following settings:
Language: Here you select the language in which you wish to
Reference: Here you enter a so-called referer. In general, this
use the Database Editor.
is the internet address of a website which led the user to the
currently visited page. Some search services prevent
submissions from websites which specified certain programs
as referer. You can enter here another URL which should also
be transmitted to the search services.
You can select if you wish to use the wizard for adding new
search services to the database.
Proxy: On this page you can make the settings if you are using a
proxy server.
Specify the address of the proxy and the port on the internet
that will be accessed.
13
Tutorial
This is what you learn in the tutorial
In this tutorial you get to know how to work with Hello Engines! step
by step. This tutorial consists of three parts.
In the first part, you get to know, how to enter details that are
important for submitting your website to search services.
Entering general details
Entering website details
Checking websites before submission
In addition to that you learn how to generate meta tags using Hello
Engines! and how to work with them:
Using the Metatag Generator
Adding and removing metatag files
In the second part you get information about the submission to search
services:
Submitting your websites automatically
Submitting your websites manually
Using Multi-Detail and Multi-Express Submission
In the third part you learn how to optimize your websites using Hello
Engines!. If you wish to optimize your websites, use these functions
before submitting your websites.
Site Checker: Link Checker
Site Checker: HTML Validator
Site-Checker: Load Time Checker
Site Checker: Code Shrinker
15
Printed Documentation
Getting started
Entering general details
In this first section, you get to know, how to enter general details that
are required for submitting your website to search services. First,
select the Project section.
Company tab
In the Company tab, enter details about your company. If you do not
want to publish all of your details, enter a slash "/" in the
corresponding field:
1. In the Company field enter the name of the company.
2. From the drop down list Country choose the country where
the company is located.
16
Tutorial
3. Then fill in the fields State / county, Address, Postal code,
City, General E-Mail, Phone, Fax and Mobile.
Please notice that some operators of search services use your
information entered for other purposes. It might happen that
you get mass advertising via email. However, if you enter a
wrong (not valid) email address on purpose, some search
services ignore your submission. Therefore, establish a new
email address, for example at Yahoo or Hotmail, which you
only use for passing to search services.
4. In the Products field enter your most important products.
However, only few search services use this field.
5. In the Toll-free field enter your toll-free service number, if
available.
17
Printed Documentation
6. Then save your project details by selecting Save as from the
File menu.
7. Choose a folder and a name and click Save. Your details are
saved to a SIT file and you can reopen them by clicking
Open.
8. Then go to the Person tab.
Person tab
In the Person tab, enter details about the person that is responsible
for the website. This has not to be the webmaster.
1.
Fill in the fields First name, Last name, Salutation, Title
and Age. If you do not have a title, enter a slash "/" into the
title field.
18
Tutorial
2. Choose Save from the File menu, to save the details to a SIT
file
3.
Then go to the Webmaster tab to enter details about the
webmaster.
Webmaster tab
In the Webmaster tab, enter details about the webmaster.
1. Fill in the fields Last & first name and Email.
2. In the Password field enter a new password. Do not use a
FTP or other access password. At some search services you
need to open a user account before you submit your website.
The password entered here is then assigned to these search
services. Now you can log in at these search services using
the specified password.
19
Printed Documentation
3. Then save the entered details by choosing File / Save.
In the next section, you get to know how to enter website details.
Entering website details
In this section you learn how to enter the details that are important for
submitting your website to search services:
1. In the Project section, click Websites, and choose the URL
List tab.
2. Click the Add button in the upper part and enter the entire
URL (e.g.http://www.mysite.com) into the editing field.
3.
20
Then you click the Add button next to the editing field to add
the entered URL to the URL List.
Tutorial
4. Now go to the Data tab, and fill in the following fields:
Title: Enter a short title that represents your website.
Companies should include the company name in the title.
Description (short): Enter a short description of your
website (not more than 60 characters). In this description you
can define the topic of your website or the field of your
company or association.
Description (long): Enter a detailed description of your
website (not more than 255 characters). Here you can further
describe your website, company or association.
Keywords: Enter the terms, Internet users may type in the
search field of search engines to find your website. As search
engines only read keywords from the meta tags and
directories only accept very few entries, you only need to type
in 5 to 10 keywords. The Keywords field is not an editable
field. Click the Keyword-Assist... button next to the field and
enter your keywords into the opening dialog box.
Language: Choose the language of your website.
Site typ: Choose the type of your website. For example,
companies should always choose Commercial as Site type.
Category: Choose from the specified entries the category
that best represents your website. To quickly and easily find
21
Printed Documentation
the corresponding category, in spite of the many categories
available, click the Select... button. The Select value dialog
box opens where you enter a search term or define a filter.
5. Then you can save your data for reusing them. Choose Save
As... from the File menu, and select a folder as well as a
name.
In the next section you learn how to check your websites before
submission.
Checking websites before submission
In this section you learn how to check your website before submitting
it to search services using the Site analyzer.
To use the Site analyzer, do the following:
1. From the Project section, choose Websites.
2. Click the URL List tab and select the URL you wish to check.
3. Then click
, and your website is checked.
4. After checking your website, a Site analyzer report is
displayed showing you tips and hints how to optimize your
website.
In the next section you learn how you quickly and easily generate
meta tags using the Metatag Generator.
22
Tutorial
Using the Metatag Generator
In this section you learn how to generate meta tags using Hello
Engines!. Meta tags are necessary, because many search engines
index the pages of websites by means of the keywords you enter via
meta tags. Each HTML document of your website should have meta
tags that refer to the content of the corresponding document. To
generate meta tags, do the following:
1. From the Tools section, select Metatag Generator.
2. Then you can choose between the following options:
Start a new meta tag project
Open an existing meta tag project
Import meta data from a website details files, from current
Hello Engines! project or from a HTML file.
If you want to generate meta tags for each page, do the following:
1. If you want to work with the entered information in the
Project section, click the Import
button from
the toolbar. You can also generate meta tags without using
the entries of the details form.
23
Printed Documentation
2. From the folder tree on the left, choose either Dublin Core
Metatags or Standard tags.
The Dublin Core format of meta tags allows to give more
detailed information about your website. In this tutorial you
get to know how to generate standard tags. (If you want to
generate Dublin Core Metatags, click Dublin Core Metatags,
and fill in the fields displayed).
24
Tutorial
3. Click Standard tags and enter the required information:
Author: Enter the name of the responsible person.
Companies may also enter the company name
Copyright: Enter the name of the holder of the copyright.
Topic: Enter the topic of your website.
Keywords: Enter the keywords, divided by comma, directly
into the field. Make sure you have defined keywords that are
relevant for the respective page.
Description: Enter a description of the page. Avoid
repetitions, superlatives and capital letters.
Page-Type: From the drop down list choose a category that
best represents your website.
Audience: From the drop down list, choose the user group
you are aiming to address through your website.
Indexing: Define the way the robots of search engines
should index your website. Robots (also called spider or
crawler) are automatic programs that search through the
Internet for new websites and enter these into the database
of a search engine. You can choose between four options:
Index, follow: The robots follow all links on this page and read
25
Printed Documentation
the content of the HTML file and linked files. Then the robots
index these and enter them into the database of a search
engine.
Index, no follow: Index of this page is created and linked
pages are ignored.
No index, follow: No index is created, linked pages are
analyzed.
No index, no follow: No index is created, linked pages are
ignored. This option prevents your HTML document from
being included in a search database!
Expires (valid until): Check one of these fields to give
information about the content of your website, e. g. if the
content is only valid until a specific date.
4. Then click Generate in the folder tree to display the meta
tags and choose the tags that are to be generated.
5. Click the
tags in the preview.
button in the toolbar to display the meta
6. Then you can copy the generated meta tags to clipboard by
clicking the Copy
26
button from the toolbar.
Tutorial
7. Open the HTML file for which you have generated the meta
tags and insert the meta tags generated with Hello Engines!
into the Head section (between "<HEAD>" and "</HEAD>").
Or use the Insert function from the folder tree to
automatically insert the meta tags into the HTML files.
NOTE: To generate meta tags you can also use the Metatag
Generator Wizard. To do so, choose Metatag from the Wizards
section and follow the steps of the wizard.
In the next section you learn how to add or remove existing meta tag
files to or from your project.
Adding and removing meta tag files
After creating meta tags and saving them to a MTG file, you can add
them to your project in the
Project / Metatags section. The
clipboard function is especially helpful when you are working with
major projects. To add meta tags to your project, do the following:
1. From the Project section, choose Metatags.
27
Printed Documentation
2. Select a meta tag file (*mtg) from the Explorer window. The
file content is then displayed in the File Content field.
3. In the File Name field, double-click the desired file to add it
to the project.
4. If you wish to remove the added meta tag file from the
project, double-click the corresponding file in the list of added
files.
In the first part of this tutorial you have learned how to enter and save
the details required for submitting your websites to search services,
how to add meta tag files to a project or how to remove them
respectively, and how to create meta tags using the Metatag
Generator. If you have followed these steps, you can now start the
Submission.
28
Tutorial
Submission to search engines
Submitting your websites automatically
Now that you entered all the required details about your website and
each HTML file has its individual meta tags, you can submit your
website to search services. Hello Engines! provides an extensive and
constantly updated search service database. As your website cannot
be submitted to all search services automatically Hello Engines! also
allows to submit websites manually.
In this section, you learn how you submit your website automatically
to search services:
1. First go to the
Submission / Automatic section.
2. On the left, you find a list containing all search services of the
Hello Engines! search service database. All these search
services allow automatic submission. On this list, you also find
an evaluation of the respective search services as well as the
country of origin.
29
Printed Documentation
3. When you right-click a search service, a menu opens offering
the following options:
Check all: Choose this option to submit your website to all
search services displayed.
Uncheck all: Choose this option to override the selection.
Quick find: This option helps you to find a specific search
service .
Details of selected search service: If you choose this
option, you get information about the selected search service,
as for example about the category or if the submission is
liable for costs and how long you have to wait until your
website is registered.
Go to homepage of this search service: If you choose this
option, you automatically get to the home page of the
selected search service.
Go to submission page of this search service: If you
choose this option, you automatically get to the submission
page of the selected search service.
30
Tutorial
4. On the right you find the Filter window. Here you set a filter
to find the desired search services in the search service list.
The following filter options are available:
If you wish to display search engines only, check Search
engines check box.
If you wish to display directories only, check the Directories
check box.
If you wish to display other search services, check the Others
check box.
If you wish to display specific countries, check the
31
Printed Documentation
corresponding countries.
If you wish to display only search services, to which your
website has not been submitted yet, check the Not
submitted check box.
5. To enable the selected filter click the Apply filter button.
6. From the Sites window choose the website(s) you wish to
submit. You can choose one of the websites you specified in
the Project section.
7. Now, after having selected the desired search services and
website(s), submit your website(s).
8. Click the
button from the toolbar.
9. If an error is located or if you did not fill in the fields required
for the respective search service, the Errors and warnings
dialog box opens. Then you can choose if you wish to
continue the submission or if you wish to submit your
website(s) only to those search services for which no errors
and warnings occurred.
10.
Finally, you get a report about the submission process.
11.
On the right, you find the Submission History. Here you
You can choose table, HTML or RTF format for the report.
find all the made submissions.
32
Tutorial
12.
To display a report of a past submission, click the
corresponding entry.
In the next section, you get to know how to submit your websites
manually.
Submitting your websites manually
After learning how to submit your website automatically, you now get
to know how you submit your website manually. Most of the search
services require manual submission, which can be done quickly and
easily with the help of Hello Engines!.
1. First go to the
Submission / Manual section. This
section resembles to the
section.
Submission / Automatic
2. If necessary, apply a filter and select the website(s) you wish
to submit. To do so, follow steps 2 to 5 from the section
Submitting your websites automatically.
3. In the search service list, double-click the desired search
service.
4. Then the submission page of the corresponding search service
opens in the integrated browser.
33
Printed Documentation
5. Fill in the submission form using the detail fields from the
Detail fields window.
To do so, click an entry in the window and drag it to the
corresponding field in the submission form.
6. After filling in all the fields, click the submission button of the
search service displayed to submit your website.
Now you have learned how you submit your website to search services
manually and automatically. If you are responsible for a number of
websites, refer to the next section. Here you get to know how you
submit your websites to search services using Multi-Detail or MultiExpress submission.
Using Multi-Detail and Multi-Express
Submission
If you are responsible for multiple websites and you wish to submit
these to search engines (not directories) simultaneously using Hello
Engines!, use the Multi-Express Submission or the Multi-Detail
Submission.
34
Tutorial
Multi-Express Submission
In contrast to the Multi-Detail Submission no saved detail files are
used. Instead, you just need to create a simple text file listing the
URLs of the websites to be submitted. Write the URLs you wish to
submit into a text file - one URL per line-, and save the file. To
perform a Multi-Express Submission, proceed as follows:
1. From the Submission section, choose
Multi-Express.
2. From the integrated browser on the right, select the folder
containing the URL text file.
3. Select the desired file.
4. Determine the search services you wish to submit your
websites to: Submit your websites either to all search services
or to selected search services (refer to Submitting your
websites automatically).
5. Enter path to the desired selection file.
6. Click Submit to start the submission.
Multi-Detail Submission
The Multi-Detail Submission enables you to submit multiple
websites to search services simultaneously. In contrast to the MultiExpress Submission the Multi-Detail Submission uses saved detail
files (*.sit). The Multi-Detail Submission submits all selected detail
files.
To perform a Multi-Detail Submission, proceed as follows:
1. From the Submission section, choose
Multi-Detail.
2. From the Explorer window on the right, choose the folder
containing the detail files.
35
Printed Documentation
3. Double-click the desired file to add it to the list of files to be
used for submission.
4. Repeat the last step until all the desired files are added to the
list. If you wish to remove files from the list, double-click the
corresponding file.
5. Determine the search services you wish to submit your
websites to: Submit your websites either to all search services
or to selected search services (refer to Submitting your
websites automatically).
6. Enter path to the desired selection file.
7. Click Submit to start the submission.
NOTE: The Multi-Detail Submission requires correctly and
completely filled in detail files. Before submission, Hello Engines!
checks, whether the selected file contains the necessary
information. If this is not the case, the file is displayed and removed
from the list.
In this second part of the tutorial you have learned, how you submit
your websites to search services automatically and manually and how
you use the Multi-Express and Multi-Detail functions to submit
multiple websites. In the third and last part of this tutorial you will
learn how you optimize your website using the Site Checker functions.
36
Tutorial
Using Site Checker functions
Site Checker: Link Checker
In the last part of the tutorial you will learn how you use the Site
Checker functions of Hello Engines! to check and optimize your
website before submitting it to search services. In this section, you
learn how to check your website for broken links using the Link
Checker function:
1. From the Site Checker section, choose
Link Checker.
2. Select View /Options... to open the Options dialog box.
37
Printed Documentation
3. Select Additional / Link Checker to make the settings for
the Link Checker:
Links to scan: Here you define which HTML sections are to
be checked, e. g. links within tables or linked images.
Skip links: Here you can define if you wish to skip or exclude
certain link structures, like for example mail links or links
within java scripts.
Check internal links only: Deactivate this option, if you
wish to check links pointing to external sites (e.g. ad banners,
partner sites, etc.).
Max thread counts: Determine how many paths or threads
are to be followed. If, for example, links in a document link to
others, the program follows this path until no more links can
be found
38
Tutorial
4. Click OK, to save your settings and to close the Options
dialog box.
5. In the URL field in the toolbar, enter the URL or file name to
be checked. Make sure to include "file://" for file names.
6. Then click the Go button. You can stop the process at any
time by clicking the Stop button.
7. Then all links are listed. If you wish to display broken links
only, click the Broken links only
button.
8. If you wish to save the report, click the Save report
button.
Now that you know how to check your links, you learn in the next
section, how you check your website for faulty HTML code.
Site Checker: HTML Validator
In this section you learn how you use the HTML Validator to find
faulty HTML code of your website. This function uses the common
HTML standard which is supported by all browsers. This way the HTML
Validator also finds HTML tags that are not supported by all browsers.
To check your website for faulty codes, proceed as follows:
1. From the Site Checker section, choose
HTML Validator.
2. Select View /Options... to open the Options dialog box.
39
Printed Documentation
3. Select Additional / HTML Validator to make the settings for
the HTML Validator.
HTML version: Select the HTML version or the script file you
want to work with. For current browsers, version 4.0.1 is
recommended.
Settings: Select the tags that are to be taken into account
while checking your website.
Quick Check: If you click the Quick Check button, the default
settings are restored. For example, the Quick Check option
removes invalid tags (elements), as well as "<" and ">", i. e.
single tags or empty tags, from the HTML code.
4. Click OK, to save your settings and to close the Options
dialog box.
40
Tutorial
5. In the URL field in the toolbar, enter the URL or file name to
be checked. Make sure to include "file://" for file names.
6. Click Start to start the process.
7. When the process is completed you find a list of all URLs
including the number of errors and warnings on the right.
These errors and warnings are displayed in the Details
window.
8. If you click an entry, you find information about errors and
warnings in the Details window. On the right, you can view
and edit the HTML source text of the website.
9. If you wish to save the report, click the Save report
button.
Now you have learned how to remove faulty code from your website.
See the next section to learn how you can check the loading time of
your website.
Site Checker: Load Time Checker
In this section you get to know how you determine the average
loading time of a website at different speeds using the Load Time
Checker. The Load Time Checker checks the average loading time
of your website using several different simulated speeds.
To check the loading time of your website, proceed as follows:
1. From the Site Checker section, choose
Checker.
Load Time
41
Printed Documentation
2. Select View /Options... to open the Options dialog box.
3. Select Additional / Load Time Checker to make the
settings for the Load Time Checker.
Transfer rates to check: Here you set the transfer rates.
You can customize the simulated transfer rates of the
program. Values are given in bytes/sec. Current standard
modems, for example, offer a speed of 57600 bytes/sec.
Using the buttons on the right you can add, delete, move up
or move down the transfer rates. The specifications are made
in Byte/s. To do so, select the desired transfer rate and click
the corresponding button.
Embedded links: Define the HTML tags of the intergrated
links. This is to specify the HTML sections that are to be
checked, e. g. tables <table> or images <img>. To add
further HTML tags or delete tags from the list, click the
corresponding button.
4. Click OK, to save your settings and to close the Options
dialog box.
42
Tutorial
5. In the URL field in the toolbar, enter the URL or file name to
be checked. Make sure to include "file://" for file names.
6. Click Go to start checking the loading time.
7. The Load Time Checker now determines the loading time for
all the elements of the page (e.g. images). The Load Time
Checker lists the expected loading time for each checked file
at different transfer rates. Under Total at the bottom of the
report window, the total loading time of the website is
displayed.
8. If you wish to save the report, click the Save report
button.
Now that you have checked the loading time of your website, refer to
the next section to learn how you shorten the HTML code of your
website to get a better loading time.
Site Checker: Code Shrinker
In this section you learn how you remove unnecessary code,
formatting tags (tags that have no influence on the appearance of your
website) and redundant tags using the Code Shrinker. The Code
Shrinker simplifies HTML code, if necessary, so that better loading
times are achieved due to smaller files.
To use the Code Shrinker , do as follows:
1. From the Site Checker section, choose
Code Shrinker.
2. Select View /Options... to open the Options dialog box.
43
Printed Documentation
3. Select Additional / HTML Shrinker to make the settings for
the Code Shrinker.
Compression settings: Define which of the simplifications
the program should take into account. It is recommended to
leave all options activated, as there is no risk that the
document is damaged in any way. However, loading times
can be improved considerably.
Auto-save compressed files when checking local files: If
this check box is checked, compressed files are saved
automatically.
Auto-save option: This drop down list is activated, if you
wish to automatically save compressed files while checking
local files. Define whether you wish to save the files in a
44
Tutorial
subfolder or change the file extension. If you wish to change
the file extension, enter the desired extension into the
Extension field.
Default Document Name: Enter the name of the document.
By default, index.html is suggested.
4. Click OK, to save your settings and to close the Options
dialog box.
5. In the URL field in the toolbar, enter the URL or file name to
be checked. Make sure to include "file://" for file names.
6. Click the Go button to start scanning and compressing files.
7. When the process is completed you get a compression report.
Now you can select a compressed file from the report to
display it in the integrated HTML editor.
8. Then click the Save button to save the file locally. You can
choose if you want to save single or all files. You can also
upload files directly to a remote server. To do so, click the
Upload button.
9. If you wish to save the report, click the Save report
button.
45
Printed Documentation
This completes the tutorial. You now know the most important
functions of Hello Engines! Professional you need for submitting
and optimizing your website. If you have questions concerning the
functions, or if you are interested in further program functions, like for
example the Robots Generator or the Ranking Module, refer to the
Online help or your manual.
46
Search services tips
Understanding search services
How search services work
In this chapter of the manual you get to know how search engines find
and evaluate websites. In addition to that, you get to know how your
website is displayed at search services.
For most Internet users, search services are the most important tool
to find websites. A website that is ranked highly in result listings is
likely to increase its number of visitors.
Of course, every website wants to be ranked highly. Unfortunately,
many websites are not evaluated properly or they are not even listed,
because webmasters did not pay attention to how search services
work. Many of these website can achieve a better ranking, if the
respective webmaster has a little more knowledge about the design of
search services.
This manual, created especially for webmasters, offers hints,
techniques and basic knowledge about the way search services work.
Use this information wherever appropriate and the numbers of your
visitors will increase.
This manual is not intended as a guide on how to cheat search
services, as there are really no secret tricks you could use to improve
your website's ranking (see also chapter Do not cheat search
services). Sometimes only a few small changes can produce surprising
results. There may be some tricks you might use, but you are always
running the risk to be banned from the service, if they discover your
cheating.
Important search services
Have you often asked yourself, which of the numerous search services
are really important? Usually the ones that are well-known and used
most often.
47
Printed Documentation
From a webmaster's point of view, result listings in a search engine
that promotes itself successfully and has strong business connections
will perhaps generate more traffic than a less well-known engine. If an
engine is mentioned on Netscape's NetSearch page, for example, it is
more likely to be used. Consequently, websites which have been
evaluated or reviewed by such services will certainly get more traffic.
In general, services which are well-known and supported commercially
produce more reliable results, as they are better maintained and
frequently upgraded to keep pace with the fast-growing web.
Components of a search engine
Search engines consist of three main components, the spider (also
called crawler) being the most important. Spiders visit websites, index
them and follow the links to the other pages of a website. We also talk
of 'spidering' or 'crawling' a site. Spiders come back in regular
intervals - every second month, for example - to look for changes on a
website.
Everything that spiders find is directly transferred to the second
component of an engine, the index. You can think of the index,
sometimes also referred to as the catalogue, as a huge book with
copies of all websites that the spider has found. If a website changes,
the book is updated.
Sometimes it may take a while until changes found by the spider are
added to the index. It may well be that a page has been spidered, but
has not been indexed yet. As long as this has not happened, i. e. the
page has not been added to the index, it cannot be found by users.
The third component of an engine is its software. The software is a
program that searches through the millions of indexed pages for
results matching and sorts them by relevance.
All engines contain the components described above. Nevertheless,
they differ in the way how these components have been set. This is
why the same search hardly ever produces identical results in different
engines.
48
More power tools by AceBIT
Design tips for search engines
Design tips for search engines
Usually, a query in a search engine produces hundreds or even
thousands of results. Of those results the ten most relevant are
displayed first.
Of course, everyone who has a website wants to be among the top ten
of the results listing, because most users find the result they have
been looking for in this top ten. If a website is listed on position eleven
or below, users normally do not visit it.
The following section is intended to help you get closer to your aim
with the use of keywords and word combinations.
Selecting strategic keywords
What do you think how will users search for your website? Exactly,
they enter the corresponding search term into a search engine and
wait for the results listing. These search terms are your strategic
keywords.
For example, if your website deals with the sale of pens and you want
to be in the top ten every time a user searches for 'pen sale', these are
your strategic keywords. Each individual page of your site has its own
keywords according to the content. If, for example, one page of your
site deals with production costs of pens, the strategic keywords for
that page could be 'pen production cost'.
TIP: Your strategic keywords should always consist of at least two
words. If you only enter one word, e. g. 'pen', too many other
websites will be relevant as well.
Position your keywords correctly
Make sure your strategic keywords appear at important positions on
your websites. Pay special attention to the page title. One of the main
reasons why so many relevant pages do not rank highly is that there
are no strategic keywords in the title. In addition, search services
prefer websites where the keywords are mentioned as early in the
document as possible. Thus, it is recommended to add strategic
keywords to the page title and to use them in the first paragraph.
49
Printed Documentation
Remember that your keywords might be pushed down on the page by
tables, which makes them less relevant than keywords mentioned
right at the top of the page. The reason for this is that search services
split tables when reading them. This problem can only be solved by
inserting meta tags for search services that use them. This should,
however, not lead you into designing pages entirely without tables.
Larger blocks of JavaScript code may have the same effect as tables,
as search services read this information first. This moves the HTML
text further down the page. Therefore, it is recommended to insert
scripts at the end of your HTML files. You can also use meta tags.
Pay attention to relevance
Changing the page title and adding meta tags is completely useless
concerning strategic keywords if the keywords you have used have no
direct connection to the page content. It is important that your
keywords refer to the content of your website.
This means that you need HTML text on your page. If your website
primarily uses images, these may look nice but they cannot be read by
search services. The result is that text, which would make your site
more relevant, is overlooked. Apart from meta tags, some engines also
index alternative (ALT) texts or comments, but it is advisable to use
HTML text.
Make sure your text is well readable. Some designers try to cheat
engines by repeating keywords in a very small font size or in the same
color as the background, so that browsers cannot display this text.
However, search services pay attention to such tricks. You can assume
that text, which is invisible in browsers, cannot be indexed.
TIP: Expand your text references wherever possible. If you have a
page about collecting stamps, for example, you may add references
to 'collector' and 'collect'. If you add references to 'stamp collector'
and 'collect stamps', you reinforce your strategic keywords in a
natural way. In fact, your website is dealing with collecting stamps,
but it may be that the editors have reduced their relevance by
coincidence.
50
More power tools by AceBIT
Avoid elements which may cause difficulties
There are search services that see the web like a very old browser, e.
g. they cannot interpret image maps or frames. This may lead to the
fact that websites cannot be indexed properly. Therefore pay attention
to the following:
Use HTML links! Very often, designers only use image map
links to referenced pages. Engines that are not able to follow
such links cannot get to the 'interior' of the site. Usually, the
most relevant contents are found on the 'inner' pages, and
not on the home page. You can solve this problem by adding
HTML links to your home page which you place at the bottom
of the page. Engines will then find and index them.
Create a site map! A site map provides an overview of all
documents of a site, including text links to these pages. This
will make it easier for engines to get to the interior of the
website.
Beware of frames! Some search services cannot interpret
frame links. Make sure you provide an alternative method (e.
g. meta tags), so that services can index your site. For more
information refer to chapter Search engines and frames.
Avoid dynamic pages! Are your pages created using CGI or
dynamic databases? Some search engines cannot index such
pages. Think about using static pages whenever possible.
Only use the database to update pages and not to create
them on the fly. In addition, avoid symbols in your URL, e. g.
the ? symbol, as they can cause problems.
51
Printed Documentation
Use meta tags
As mentioned before, meta tags can help to avoid problems with
tables, frames, and other difficult elements. In addition, they can help
you control descriptions of your website in services which use them.
Use meta tags, but remember that they do not guarantee a top
ranking! Using meta tags does not prevent bad evaluation once and
for all. For more information read How to use meta tags.
Do not cheat search services
Cheating search services does not always work. It can, on the
contrary, turn against you. Search services may trace your tricks and
ban your website.
Most tricks are intended to achieve a top position with very frequent
keywords. Of course, you can start to enter a battle against other
websites, but you should not be surprised if you have to spend a lot of
time on defending your position in the list. It is perhaps wiser to spend
this time on improving your website and looking for other forms of
publicity.
If these practical reasons are not enough, perhaps ethical reasons will
help to convince you. The content of a website should be good enough
to determine its relevance. If webmasters repeat keywords endlessly,
users will start to hate websites which use such methods.
Moreover, think of email cheating, i. e. junk mail. Nobody likes junk
mail. And nobody likes result listings which contain no websites that
are relevant to the search query.
Submit your key pages
Most engines index pages by following the links on the submitted
page. Sometimes engines make mistakes. Thus it is recommended to
submit two or three top pages which represent your website well. Do
not submit more than two or three top pages, as this extends the
process. If you submit an alternative page, from which search engines
can start indexing, you avoid the risk that search engines have
difficulties with the actual page.
52
More power tools by AceBIT
Some engines provide an instant spider service. It is recommended to
submit all your key pages, not just two or three. It may take up to two
months until the pages you have submitted are really listed in the
services and it may occur that some engines do not list all of the pages
of your website.
Methods to check whether your website is listed are described in
chapter Check your URL's listing. As soon as your pages are listed, you
should check at least every two weeks if they can still be found, as
pages can disappear from the catalogue, or links are suddenly broken.
Beware of such problems and resubmit your pages if anything similar
should happen.
Moreover, note that some services have localized versions for each
country. Mostly, sites are filtered according to their domain. Thus, the
German version might only list German domains ('de'), whereas a
German website ending in 'com' might be rejected. If this may affect
you, inform the search services, so that they add your site manually.
Always resubmit your site if you have made major changes. Engines
visit your pages regularly, but some are as intelligent to know that
certain websites only change their content once or twice a year and
wait longer before their next visit. Resubmitting after major changes
helps to keep the indexed information about your website up to date.
Search services and beyond
Take some time and think about how to make your website 'search
service friendlier'. Sometimes even little changes can be helpful. If
neither your strategic keywords, nor other methods have helped to get
your website into the top ten, you should think of further possibilities.
Sometimes even an additional word makes a website more relevant.
Another possibility might be to ask websites in the top ten to add a
link to your site, and vice versa. Some of these websites might be your
competition, but you will be surprised how many webmasters will be
prepared to link your site in return for a link on your site. The result
may be that soon your website figures among the top ten, as links are
the best way to attract visitors.
Search services are important but they are not the only way to find
websites. Others ways include mouth-to-mouth publicity, normal
advertising, traditional mass media, news groups, web directories, and
links to other websites, as mentioned before. Thus, pay attention to
our tips but do not overrate the ranking of your website.
53
Printed Documentation
Search engines and frames
Do not make life too hard for search engines
NOTE: In this chapter we assume that you have prior knowledge of
frames. At the end of the chapter, there are general links about this
topic for user who have not worked with frames before.
Although more and more websites are designed without frames, they
are still used to facilitate navigation and design of websites. We
assume a website with three frames: One for navigation, one for the
title, and one for the site's actual content. A fourth master page (also
referred to as frameset page) combines the content of the three files.
The source code might look like that:
<head>
...
</head>
<frameset cols="50%,*" border="1">
<frame src="content.html" name="contentframe">
<frameset rows="*,4*">
<frame src="header.html" scrolling="no"
name="headerframe">
<frame src="intro.html" name="bodyframe">
</frameset>
<noframes>
<body>
You need a browser that supports frames to view this site!
</body>
</noframes>
</frameset>
</html>
54
More power tools by AceBIT
However, most search engine spiders only see the master page, as
they cannot interpret the commands that create the frames layout. As
a result, frames are ignored, and only the information in the
NOFRAMES section is displayed. Thus, an engine that has problems
with frames will see the following:
You need a browser that supports frames to view this site!
This description is less than satisfactory! We need to provide a better
description of our website. Another problem is that the NOFRAMES
section contains no links to other pages. Thus, engines cannot spider
beyond this master page. We may have hundreds of pages packed
with information which would simply be invisible to search engines due
to this simple mistake.
The NOFRAMES tag
A simple solution to this problem could be to insert meta tags on the
master page (read more in chapter How to use meta tags). However,
meta tags only provide a partly solution to the problem as they are not
supported by all search engines. In addition, meta tags are no help to
your human visitors with older browsers. However, you can solve this
problem through little changes of the design. Have a look at the
following example:
<head>
...
</head>
<frameset cols="50%,*" border="1">
<frame src="content.html" name="contentframe">
<frameset rows="*,4*">
<frame src="header.html" scrolling="no" name="headerframe">
<frame src="intro.html" name="bodyframe">
</frameset>
<noframes>
<h2> My nice homepage</h2>
If you can read this text, your browser does not support frames. All
pages can be accessed via the content page.
55
Printed Documentation
<a href="content.html">Content</a>
</body>
</noframes>
</frameset>
</html>
The page looks like our initial example, but not to an older browser or
engine. We have added further information for them in the NOFRAMES
section:
My nice homepage If you can read this text, your browser does not
support frames. All pages can be accessed via the content page.
Content ...
The problem has been solved. Now we have some descriptive text
which can be interpreted by all engines, not only by those that support
meta tags. In addition, we have established a possibility to get to the
interior of the site with the link (content.html). When clicking this link,
users will see the information that is usually displayed in the
navigation frame. Search engines can spider from there.
You may insert the NOFRAMES section immediately below the first
frameset definition, but not above it, as this causes problems in
Netscape Navigator. The Internet Explorer is not affected, it displays
the frames correctly.
BODY tags in the NOFRAMES section usually work with all browsers.
This helps to ensure that engines, which need the BODY tags, find
them. Do not forget to enter a title for each frame, although they are
not displayed in the frames context. Titles are one of the most
important elements for search engines. This is why all of your pages
should have a title.
Re-establish the frames context
One problem remains: search engines can index all pages, but they
are not displayed in the frames context for the use, i. e. users do not
see three frames, but just the individual page, which may cause
problems.
56
More power tools by AceBIT
There are webmasters who do not pay attention to this issue. Their
pages lack links to other pages of the site, so that inexperienced
surfers are virtually caught on a page. This may also occur if you did
not pay attention to our advice to make websites search engines
friendlier.
The reason for this is that some engines, like AltaVista, cannot handle
frames. They spider a site and index all pages, so that users can
access a site without the appropriate context! Fortunately, there is a
simple solution to this problem: you only have to place a 'Home' link
on each page. See the following example:
<head>
...
</head>
<h2> Curriculum vitae </h2>
<a href="index.html" target="_top">Home</a>
</body>
</html>
Users can click the link to get back to the 'framed' start page of your
site. Make sure the link contains 'target=_top', so that the referenced
page is displayed on top of the old window content.
A second method uses JavaScript. Insert this code somewhere
between that HEAD or BODY tags. See the following example:
<script language="JavaScript">
<!-- if (top == self) self.location.href = "NAME OF
FRAMESET PAGE"; // -->
</script>
Replace NAME OF FRAMESET PAGE with the name of your master page
that contains the necessary frameset information. In our example, this
would be the file index.html.
<script language="JavaScript">
<!-- if (top == self) self.location.href = "index.html"; //
-->
</script>
57
Printed Documentation
Conclusion: If you use frames and follow the simple hints given here,
your site will be better accessible for both users with older browsers
and search engines.
Frames - interesting links
Framing the Web
http://webreference.com/dev/frames/
Excellent introduction and tutorial on using frames.
W3C Frames in HTML documents
http://www.w3.org/TR/REC-html40/present/frames.html
Official specification for frames in HTML 4.0. The usage of
body tags for noframes sections is not dealt with, but it is
always good to have, and use, the specification.
Frames and Framesets: Netscape HTML Tag Reference
http://developer.netscape.com/docs/manuals/htmlguid/tags1
1.htm
Information by Netscape about frames.
A Compendium of HTML Elements
http://www.htmlcompendium.org/
Compendium of HTML tags, including frames tags.
58
More power tools by AceBIT
Search engines and case sensitivity
Many people spend lots of time thinking about case sensitivity,
especially in connection with meta tags. The reason is that some
search services are case sensitive, so that searching for
'Entertainment' produces different results than searching for
'entertainment'.
As nobody wants to lose traffic, some people have added every
possible form of a word to their meta tags. They might use the
following keywords:
entertainment, Entertainment, ENTERTAINMENT
The problem with such repetitions is that some services consider this
cheating. Just imagine the following forms of 'golf courses':
golfcourses, Golfcourses, GolfCourses, golfCourses,
GOLFCOURSES,GOLFcourses, golfCOURSES
It gets even worse if you want to add singular and plural forms - but
that is different topic.
What can we do? The simple answer: use lower case! The reasons are
that most users enter their search query in lower case, and that there
are only two search engines which are completely case sensitive.
Case sensitivity in use
The following example was taken from an existing website. Search
string was a company name. Ranking for all results was identical, no
matter if search term was entered in lower or upper case. The table
lists the number of clicks recorded over four days in January 1998. For
reasons of secrecy, the company name has been replaced by 'name',
but the forms, that have been used, are still clearly recognizable.
Word
Searches
%
name
1 011
82 %
Name
128
10 %
NAME
86
7 %
59
Printed Documentation
'name'
8
0.6%
'Name'
3
0.2%
'NAME'
2
0.2%
total
1 238
100
%
Do you still believe you need to add every possible form of a word to
your keywords? At the worst, you miss 18% of user traffic.
A few remarks to the table. The word 'name' refers to a search using a
word combination. You cannot influence this with your meta tags, so
that 'name' really is a search for everything in lower case.
Do not forget that, grammatically speaking, names are case sensitive.
Obviously, people ignore this rule when searching, at least in this
example. Therefore, it is highly likely that users pay even less
attention to this issue when searching for terms which are not case
sensitive. The following table provides evidence. The example refers to
the same company, but this time searches have been conducted with a
word combination which has been replaced by 'golfcourse'.
Word
Searches
%
golfcourses
233
84 %
GOLFCOURSES
15
5 %
GolfCourses
13
5 %
Golfcourses
8
3 %
'golfcourses'
6
2 %
GolfCourses
1
0.4 %
total
276
100%
Here, you see a slightly higher percentage of searches in lower case.
But the percentage in upper case has increased too. As this is only a
small example, figures should not be overrated.
60
More power tools by AceBIT
We also know five other examples of searches for the name from that
same site. In all examples, the majority of searches (85 - 90%) were
conducted in lower case.
Case sensitivity - an overview
This chapter gives an overview of case sensitive search services. As
some services also support a mix of lower and upper case (BuenaVista,
NeXt) or other forms, further spelling varieties are listed as well. 'all'
means that all forms of spelling are accepted. 'exact' means that only
the spelling that matches the entered keywords exactly is accepted.
Type
Google
Northern
Light
HotBot
AltaVista
case sensitive?
no
mixed
mixed /
title
yes
lower case
('buenavista')
all
all
all
all
upper case
('BUENAVISTA')
all
all
all
exact
mixed ('BuenaVista')
all
exact
exact
exact
lower and upper case
in title ('Pacific Coast
Pacific Coast Hwy')
all
exact
all
exact
lower and upper case
in text ('Buenavista
Pacific coast')
all
exact
all
exact
61
Printed Documentation
Bridge or entry pages
What is a bridge or entry page?
Sometimes, webmasters are advised to submit so-called 'bridge' or
'entry' pages to search engines to increase traffic. In the following
paragraphs, we will explain how these pages are implemented
technically, and which problems they may cause.
Bridge pages are created to improve results when searching for certain
word combinations. They are also known as portal, jump, or gateway
pages. No matter how you call them, their characteristics are that they
are primarily created for search engines and not for humans.
Low tech method
There are different methods to create bridge pages. The low tech
method is to create and then submit a page for a specific word
combination. Some people take this one step further, and create pages
for each individual word combination and search engine.
Usually, the problem with such pages is that they tend to be rather
general. You can easily copy and edit them, and then submit them
from your own site to increase traffic through imitation. In addition,
pages may be so similar that they are treated as copies and deleted
from the result listings.
A further problem is that users are not taken to the actual target page.
We assume you are searching for 'golf clubs' and the bridge page is
displayed. You click through the page but you cannot find enough
details. To get to the actual content page, webmasters normally use a
larger 'Click here' link or a meta refresh. Actually, this is where the
name bridge or jump page comes from, as these pages bridge the gap
between entry and target page. Some search engines no longer accept
pages with a too quick meta refresh to reduce the misuse of bridge
pages. To avoid this, webmasters sometimes submit an 'ordinary' page
and replace it with a bridge page once they have reached a certain
ranking. This is referred to as 'code swapping', which is sometimes
also used to hinder others from finding out how a good ranking has
been achieved. The disadvantage is that ranking can worsen again, as
the engine may come back and index the bridge page.
62
More power tools by AceBIT
NOTE: Simply removing meta tags from a page does not guarantee
a good ranking. In fact, resubmitting the page from a different
location can worsen the position of the initial page.
Agent method
The next step consists of creating a bridge page which is only
accessible by search engines. Engines reveal their 'agent' names like
browsers reveal their names. Chapter Finding spiders - an overview
lists agent names of different engines, mainly to let you check whether
your pages have been spidered or not.
The advantage of this method is that you create an ideal page for
engines, but you still send users to the content they wish to see. Thus,
you get rid of the whole bridge problem easily. In addition, your code
is protected from curious users. Well, not entirely! Users could still try
to dial into your web server with telnet and use the agent name of a
search engine. Then they could see what exactly you are providing.
But some engines do not always use the same agent name, mainly to
help users stay on the right track.
IP method
Instead of delivering according to an engine's agent name, you can
also use its IP address. You only need to create and maintain a list of
IP addresses.
Anyone who accesses a website leaves his or her IP address, which is
resolved to a host name in most cases. For example, a site might visit
you during an AOL session, giving the IP 199.204.222.123 (just an
example). The web server might resolve this IP address to
www.tb03.proxy.aol.com.
If you deliver according to IP addresses, make sure only visitors with
the exact IP address can see your page. However, bridge pages may
also cause difficulties, if you misuse them.
63
Printed Documentation
Using meta tags
How to use meta tags
Before we start, we would like to point out that meta tags cannot work
miracles! They are a useful method to determine and control the
description of you website in certain search engines.
In addition, meta tags help provide keywords and descriptions for
pages which do not contain much text for various reasons. Such pages
might be splash and frames pages. Under certain circumstances, meta
tags may increase your site's relevance, but they cannot guarantee
that your site makes it into the top ten of every engine.
There are a number of meta tags. The most important ones for search
engines are 'description' and 'keywords'. 'description' enables you to
enter a review of your website. Otherwise the engine will create one.
'keywords' provides the engine with the keywords to be registered
together with your site. Instead of going into more detail, we assume
you have created a page without meta tags. The page is called My
World and its title is Welcome to my world. Moreover, it contains a
huge image and a link at the bottom, saying Enter here!. Search
engines listing this page would list the following:
My World
Welcome to my world
Let's take a closer look. We assume that My Word is the home page of
a site dealing with collecting stamps. Visitors find information about
stamp prices, selling and buying of stamps, stamps history etc. Now,
we use meta tags to get all this information across without having to
destroy your nice image. Meta tags are placed between the <HEAD>
tags.
<HEAD>
<TITLE>My World</TITLE>
<META name="description" content="Everything you always wanted
to know about stamps, from history to current prices.">
<META name="keywords" content="stamps, collect stamps, history of
stamps, price, stamps for sale">
</HEAD>
64
More power tools by AceBIT
The search engine listing would look like that now:
My World
Everything you always wanted to know about stamps, from history to
current prices.
As you will have realized, the description is the same as the text
entered for the 'description' tag. This is the advantage of meta tags:
you can control the description that is displayed to the user: What
does 'keywords' do now? When someone searches for a word you have
entered here, e. g. collect stamps, your site will be displayed in the
results listing. Without this tag, there would be no chance for your site
to get into the listing, as collect stamps is neither mentioned on the
page nor under 'description'.
Do you use different word forms in your keywords? This may be an
advantage in some search engines, but not in others. Collect stamps
as individual keyword as opposed to stamps and collect can be useful
if users search exactly for this combination. In general, you should not
worry too much about these things, as you cannot cover all possible
forms for all engines, e. g. those that do not use a thesaurus.
Remember that these tags are only intended to make up for missing
text on a page, not to cover all possible keyword combinations a user
might enter.
A further meta tag worth mentioning is 'robot'. You can use it to
control how a page is indexed.
<META NAME='ROBOTS' CONTENT='NOINDEX'>
Not all search engines support this tag. Alternatively, all important
engines support the use of the robots.txt file to block indexing.
You can use 'description' and 'keywords' unhesitatingly on your
website. Some search engines reward it with slightly higher relevance.
Do not expect that this is sufficient to get you into the top ten. Meta
tags are a design element to engines index pages with little
information.
65
Printed Documentation
Meta tags - interesting links
A Dictionary of HTML META Tags
http://vancouver-webpages.com/META/
A description of almost all meta tags once seen or used on the
web.
Dr Clue‘s HTML Guide - Meta Tags
http://www.drclue.net/F1.cgi/HTML/META/META.html
Short tutorial of important meta tags, apart from 'keywords'
and 'description'. Review of the Meta Maker.
Back to Basics: meta tags
http://www.webdeveloper.com/categories/html/html_metatag
s.html
Excellent overview of all important meta tags.
Robots
Have you been wondering why the error log of your web server
regularly contains messages like
[error] [client 204.62.245.187] File does not exist:
/usr/local/etc/httpd/htdocs/meinesupersite/robots.txt
66
More power tools by AceBIT
If you submit your site to search engines, the engine's spider will visit
your site to index it. Usually, most engines automatically look for a file
called robots.txt. If the file does not exist, the above error message is
generated.
It is not absolutely necessary to use the robots.txt file. Alternatively,
you may use the meta tag 'robots'. If you have submitted your site to
hundreds of engines (e. g. with Hello Engines!), you will be surprised
how often this occurs. Note that some engines visit your site daily!
Thus, the error.log will soon be filled with irrelevant error messages.
The robots.txt file helps you exclude those pages of your site that are
not to be indexed. Note that engines will only take into account a
robots.txt on your server; it must be on top level. On UNIX server, the
directory might be
/usr/local/etc/httpd/htdocs/robots.txt
The syntax of the robots.txt file is quite simple:
User-agent: *
Disallow: /cgi-bin/
Disallow: customerdata/
In this case, two directories will not be indexed. You have to add a
separate 'Disallow' line for each directory that should not be indexed.
To disallow indexing for all robots or to disallow indexing of your entire
website, type in the following lines:
User-agent: *
Disallow: /
If you want to allow indexing of a certain robot (and exclude all other
robots):
User-agent: *
Disallow:
If you want to block access of a certain robot, type in
User-agent: Yahoo
Disallow: /
67
Printed Documentation
If you want to allow indexing of a certain robot (and exclude all other
robots):
User-agent: Yahoo
Disallow:
User-agent: *
Disallow: /
You may also disallow indexing of certain pages:
User-agent: *
Disallow: /customerdata/passwords.html
Checking URLs
Check your URL's listing
Some search services make it easy for you to check whether your web
pages are listed in their catalogue. In others, this is quite difficult. The
following chapter describes the best methods to figure out whether
your pages are listed or not.
AltaVista
Checking your listing is easy in AltaVista. Simply type your URL into
the search field.
url:inprise.com
url:ourworld.compuserve.com/homepages/mysite/
url:members.aol.com/mysite/mypage.htm
The first example helps find all pages below the root domain. If your
site is located below another domain, you should use the second
method to limit search to your own web space. The last example helps
you find a specific page.
68
More power tools by AceBIT
Note that the URL has to be entered without the prefix www. You can
use it, but it might happen that no pages are displayed if AltaVista has
indexed your pages without the prefix. Anyway, it is safer to leave out
www, as well as http://.
Excite
In Excite, it is more difficult to check your URL's listing. The best way
is to enter your URL without the prefix http://:
www.minisoft.com/news.html
Note that all pages containing this URL will be displayed now. It cannot
be guaranteed that your pages are listed first, but if they are in the
catalogue, they are very likely to be displayed near the top.
You can search for the root domain, so that all your pages are
displayed closer to each other. Enter your URL as follows:
www.minisoft.com
and select List by website.
Lycos
Lycos provides its own service to check for listed pages:
http://www.lycos.com/addasite.html
Unfortunately, this service only confirms that the Lycos spider has
visited a page. This, however, does not necessarily mean that the
pages have been added to the index yet. To check whether your site is
really listed, you have to apply more sophisticated methods,
e. g. searching for your root domain:
minisoft.com
Normally, some of your pages should be displayed now, e. g.:
minisoft
If this has not worked either, try to search for specific pages, e. g. by
searching for specific text mentioned on that page or words used in
the page title. Remember not to use too general terms, as it will be
difficult to find your page among the other sites matching the search
term.
69
Printed Documentation
WebCrawler
As in Lycos, you have to search with sophistication to check your
listing. If you enter your URL you may get all kinds of results but not
the desired ones. Try to search for specific text or words used on your
pages.
Spider
Tracing spiders
Search engines send out their spiders, crawlers, or robots to visit and
index web pages. Like ordinary users, these robots leave traces in
your access log. If you know what exactly you are looking for, you can
determine when a spider has visited your site.
In addition, you will be able to check which pages have been visited by
the spider and which not, and you can filter out robots which
frequently request pages from your site; this either increases
attractiveness of your site, or reduces server performance.
Searching for spiders
How can we identify a spider? Spiders of important search engines can
often be identified according to their host names, which often contain
part of the engine's or provider's name. One of the WebCrawler host
names, for example, is spidey.webcrawler.com.
A better way is to look for their agent or browser names. Like browser,
spiders have their own names. Netscape, for example, can be
identified by the name Mozilla, AltaVista's spider is called Scooter and
HotBot calls its spider Slurp.
A list of host or agent names of the most important search engines can
be found in chapter Finding spiders - an overview. Nevertheless, it is
always useful to know how we can trace unknown robots, as names
may change and new robots may appear.
70
More power tools by AceBIT
Robots.txt - our point of reference
Start your search in the robots.txt file. This file tells robots which
pages of a site they may index and which not. Not all robots follow the
conventions of the robots.txt, but most do. This file is almost always
requested by a spider, robot or agent.
Usually, you will be able to trace the robots of most important search
engines by their host names when checking which files have been
requested. The robots, in turn, will reveal their current agent names to
you. You will be surprised to see how many smaller search engines,
personal agents, and other robots frequent your site.
WebCrawler can easily be identified as WebCrawler/3.0 Robot
libwww/5.0. HotBot is operated by Inktomi, and its spider is called
Slurp/2.0. Architext hosts Excite. Therefore, a visit of ArchitextSpider
means that Excite has indexed your pages.
Additional tips
A good search engine should visit your site regularly, and request a
large number of pages, even if this may take a few days. This would
be characteristic of a 'polite' engine that does not overstrain your
server. Always take a close look at what the spider has requested, and
do not simply add up requests. You may be surprised.
A strange thing may happen with search engines that use 'instant
indexing' like AltaVista and WebCrawler: they start indexing your site
immediately after submission (although it takes much more time in
WebCrawler until your pages have been added to the index).
Sometimes, people assume that all pages have been added to the
index because the spiders have requested one or two pages. In fact,
the spider needs to come back to index your site completely. Check
your logs to find out when they have done that.
Additional sources: BotWatch; Perl script that helps to analyze log files
and create reports about visits of robots.
71
Printed Documentation
Finding spiders - an overview
In this table, * is used as a dummy. *altavista.com means everything
altavista.com
Search
engines
Agent names
Host names
AltaVista
(normal
spider)
Scooter/2.0 G.R.A.B. X2.0
Scooter/1.0
[email protected]
[email protected]
e. g.: scooter3.av.pax.dec.com
AltaVista
(instant
spider)
Scooter/1.0 Addurl.altavista.digital.com
ww2.altavista.digital.c
om
Euroseek
Arachnoidea
([email protected])
*.euroseek.net e. g.:
infra.euroseek.net
Excite
(mega
spider)
ArchitextSpider
Crawl*.atext.com e.
g.: crawl2.atext.com
Excite
(fresh
spider)
ArchitextSpider
Crimpshrine.atext.com
Fireball
(German
engine)
KIT-Fireball/2.0
Heavymetal.fireball.de
Inktomi
(operates
HotBot
and
others)
Slurp/2.0 ([email protected];
http://www.inktomi.com/slurp.h
tml)
*inktomi.com e. g.:
j2001.inktomi.com or
j10.inktomi.com
Lycos
(normal
spider)
Lycos_Spider_(T-Rex)
Lycosidae.lycos.com
or *.pgh.lycos.com e.
g.: sjc-fe41.sjc.lycos.com
Lycos
(add URL
spider)
Lycos_Spider_(T-Rex)
*.sjc.lycos.com e. g.:
sjc-fe41.sjc.lycos.com
72
More power tools by AceBIT
Northern
Light
Gulliver/1.2
taz.northernlight.com
WebCrawl
er
served by Excite spiders
served by Excite
spiders
Measuring link popularity
The best way to figure out how users find your website is to check link
logs. Those who do not know how to do that may also use search
services to find out how popular search services consider your site to
be. This is important, especially in those services which use link
popularity as criterion to rank sites. In the following, you find
examples of AltaVista, Excite and HotBot.
AltaVista
To search for pages linking to your site, enter your URL like that:
link:calafia.com
AltaVista displays all pages that contain the text calafia.com. The list
may look like that:
http://calafia.com/services/
http://calafia.com/webmasters/
http://calafia.com/webmasters/resources.htm
You can limit the search to a specific URL by entering more details.
http://calafia.com/webmasters/resources.htm
Some of your site's pages may have links to each other. You can
eliminate them by adding -host:
link:calafia.com/ -host:calafia.com
Note that the URLs entered after link do not use the prefix www. It is
not necessary, as all links - with or without the prefix - will be found.
The prefix http:// is also not necessary.
73
Printed Documentation
Excite
Simply enter your URL in the search field. Unlike AltaVista, Excite
produces different results with and without the prefix www. Try both
searches.
HotBot
Enter your URL in the search field and change the default setting all of
the words to links to this URL.
What is spamming?
Spamming means creating or editing a document to cheat an
electronic catalogue or archive. There are web authors who use such
techniques to have their sites appear more often or higher ranked in
search result lists. We recommend not to do that.
Those who try to manipulate or cheat an index repeatedly may be
banned from that index forever. Legal action is taken against extreme
or repeated breaking of the rule.
The keywords used to describe a site should be related to its content.
Many search engines recognize common tricks and punish those who
use them. Unfortunately, this sometimes leads to the punishment of
valid sites. To avoid this, do not use the following techniques:
repeating keywords
using keywords which are not relevant to the content
using a very quick meta-refresh
using the same color for text and background
duplicating pages with different URLs
These are just a few methods. There are a lot more which may cause
problems.
74
A
Automatic submission
B
Basics
Bridge page
C
Case sensitivity
Checking
Code Shrinker
Components
search engine
Components
Country
Create RTF templates
D
Database
Database editor
Load Time Checker
29
12, 13, 23
62
59
22
36, 43
48
48
16
33
1
Design tips
49
Dublin Core
23
Details
E
20
Entering
general details
16
Entry page
62
Entering
F
Frames context
Re-establish
Frames context
G
Generate
H
16
56
56
37
17
HTML Editor
37
HTML Validator
I
Important hints
Introduction
IP method
L
Link Checker
Links
M
Manual submission
Meta tags
Metatag Generator
Metatag Generator Wizard
use
Metatag Generator Wizard
Metatags
Multi-Detail Submission
Multi-Express
use
Multi-Express
Multi-Express Submission
N
12
35, 39
17
1
63
37
66
62
29
52, 66
37
23
23
28
30
34
34
30
NOFRAMES tag
55
Options
37
Position
49
Quick start
20
Ranking Analyzer
40
Relevance
Pay attention
50
O
P
Q
R
Recommendations
Hints
HTML code
Low tech method
36, 41
Relevance
Report
Robots
Robots Generator
Robots.txt
RTF
S
Setup
Site Checker
use
Slurp/2.0.
Spamming
Spiders
Searching
Spiders
Status report
submission
13
50
31
66
38
66, 71
33
16
34
71
74
70
70
31
33
75
Printed Documentation
Submission Assistant
System requirements
T
33
16
Technical support
15
tricks
17
Tools
Tutorial
U
Unlock
76
37
15
16
URL
28
Using
Metatag Generator
23
User interface
Using
W
23
23
WebCrawler
71
Websites
28
Website Scanner
Wizards
39
41