1
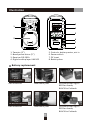
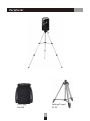
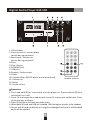
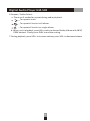
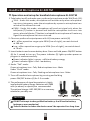
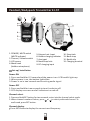
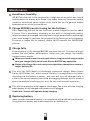
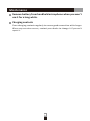
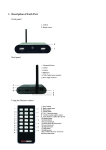
UHF
40W
Wireless Portable Bluetooth
Sound System
System Family:
GPA-650B (Lead-Acid battery powered)
GPA-660B (Ni-MH battery powered)
GPA-670B (Lithium battery powered)
User Manual
Preface
Thank you for the purchase of Wireless Portable Bluetooth Sound System
GPA-650B and its family product GPA-660B and GPA-670B. This manual will
give comprehensive instructions and operation. Please read it over before you
r use to perform this unit well.
All peripheral and accessories are subject to order. Components in the
package might be different by demand.
Contents
Product mix …....................................................................… 1
Illustration ……...................................................................... 2
Peripheral …....................................................................…… 3
Controls and operation ......................................................... 4
Wireless receiver DR-501A …............................................… 5
Digital audio player UM-502 …..........................................… 6-7
Handheld microphone EJ-501TM …................................… 8-9
Pendant/Bodypack transmitter EJ-5T ….........................… 10-12
Troubleshooting …............................................................… 13
Maintenance …................................................................… 14-15
Specifications …...........................................................… 16-17
Product Mix
GPA-650B is powered by Lead-Acid battery; its family product GPA-660B and
GPA-670B are respectively powered by Ni-MH and Lithium battery. They are
all compatible with same receiver and audio player. The available mix are
presented as below.
GPA-6X0B
GPA-6X0BU
GPA-6X0BW1
Portable Powered Speaker
Portable Powered Speaker,
1 audio player built-in
Wireless Portable Sound
System, 1 receiver built-in
GPA-6X0BWU
GPA-6X0BW2
Wireless Portable Sound
System, 1 receiver and
1 audio player built-in
Wireless Portable Sound
System, 2 receiver built-in
X is the variable for 5, 6 and 7; battery type dependant
Illustration
3
1
4
5
2
6
7
8
1. Tweeter (1”)
2. Neodymium driver (5”)
3. Receiver DR-501A
4. Digital audio player UM-502
5. Controls, battery meter, mic in
6. Power switch
7. DC input
8. Battery door
Battery replacement
Lead-Acid battery
Get screws off
Take battery out
Get connection right –
RED for Anode;
BLACK for Cathode
Take battery out
Get connection right –
RED for Anode;
BLACK for Cathode
Ni-MH/Lithium battery
Get screws off
Peripheral
Carry Bag
CB-650
Folding Tripod
ST-35
Controls and Operation
1
2
3
4
AUX
5
6 7
8
9
10
11
12
1. Master
2. Treble
3. Bass
4. Battery meter
5. Voice priority :
when it is activated, an
indicator (6) will light up.
6. Voice priority indicator
7. Bluetooth(indicator)
8. Aux in / Bluetooth control
9. Aux in, 3.5 mm
10. Aux out, 3.5mm
11. Mic (wired) in control
12. Mic in, 6.5mm XLR jack
Bluetooth
1.Press or hold (7) in 2 seconds to switch Bluetooth on/off.
2.You will hear a tone and the indicator will light blue. The indicator will also
flash blue to indicate that it is ready to pair with Bluetooth device.
3.When it's in pairing mode, activate a Bluetooth connection scan on your
smartphone or tablet device. When the search is complete, select a device
named “Portable PA” from the pairing list and get it connected.
4.When the devices have successfully paired, it will sound a prompt tone again.
The indicator will light steady blue.
5.You are now ready to stream audio via the Bluetooth connection from your
smartphone or tablet as it's connected.
6.If a phone call is incoming during playback, the audio stream will be interrupted
for the user to take the call. When the call is finished, the Bluetooth module will
be relinked automatically and audio files will recommence playback from where
they were interrupted.
7.When a user moves out of range for the Bluetooth connection, the audio stream
will be severed until the user returns to a location within range of the module.
8.When Bluetooth is switched off, you will hear a prompt tone again.
Wireless Receiver DR-501A
1. LCD window
2. Antenna A and B indicator
3. RF signal indicator
4. AF signal indicator
5. Synchronization button
6. Channel up/down adjustment
7. Receiver power on/off control
and volume adjustment
Operation
Turn receiver power on/off control (7) clockwise until a click occurs. A text of
“
” will appear on LCD window for about 2 seconds and it follows a
channel number. The turn on is successfully. To turn it off, just turn the control
counterclockwise until a click occurs. A text of “
” will appear on LCD
window and will disappear after 2 to 3 seconds.
How SYNC works
“
” function can find a clean channel and assign it to transmitter in the
range, about 3 m. Just turn on your microphone or transmitter first and
press SYNC button, in few seconds the progress will be done. During
synchronization, the RF indicator will blink.
Change channel manually
Press and hold UP or DOWN button (6) for 1 second until channel number is
blinking. Select a desired number through UP or DOWN (6) button. A selected
channel number will be confirmed in 1 second if no more adjustment made to it.
Please complete channel setup in one receiver first and then a second one
when you have more than 1 receiver.
Be sure to give different channel number to each receiver.
Digital Audio Player UM-502
1. LCD window
2. Previous track / volume down
(works during playback)
3. Next track / volume up
(works during playback)
4. Stop
5. Play / Pause
6. SD/MMC port
7. USB port
8. Repeat / Folder select
9. Power
10. Volume down (MUTE when in minimum level)
11. Volume up
12. Mute
13. Folder select
remote control
Operation
1. Press and hold (9) for 1 second to turn this player on. Press and hold (9) for 1
second to turn it off.
2. Press (2) to play previous audio track; press (3) to play next audio track. Press
(4) to stop any playback.
3. Press (5) to Play or to Pause any audio track.
4. When both SD card and USB are installed, USB has higher priority to be readout.
5. Do not pull SD card out directly or it might be damaged. Just push it a bit forward
and it will be ejected.
Digital Audio Player UM-502
6. Repeat / Folder Select:
a. There are 3 modes for repeat during audio playback.
To repeat a track.
To repeat all tracks in all album.
To repeat all tracks in a single album.
b. When not in playback, press (8) to select a desired folder/album with NEXT,
PREV buttons. Finally press PLAY to end the setting.
7. During playback, press VOL+ to increase volume; press VOL- to decrease volume.
Handheld Microphone EJ-501TM
1. Mesh head
2. Handheld tube
3. Power indicator
4. Power ON/OFF button
5. LCD screen
(channel, battery energy)
6. Channel adjustment and
setup button
7. Talk/Mute button
8. Power Hi/Low switch
9. Battery room
10. Battery door
11. Talk/Push mode switch
12. Charging contacts
Insert battery
Open battery door and insert 2 AA 1.2 V (Ni-MH 1600mAh)
or 2 AA 1.5 V Alkaline batteries. Make sure the batteries are
allocated in correct direction.
Handheld Microphone EJ-501TM
Operation and setup for handheld microphone EJ-501TM
1. Take batteries off and make your preferred microphone mode Talk/Push (11).
TALK - Under this mode, microphone will activate only when microphone
icon turns into green; mute the microphone by a press to microphone icon
which will be turned into red.
PUSH - Under this mode, microphone will send out signal only when the
talk/mute (7) button is pressed and held-the microphone icon turns into
green; when talk/mute (7) button is released the microphone will mute any
signal-the microphone icon turns into red.
2. Choose a preferred output power with Hi/Low power switch (8)
Hi - offers operation range up to 60 M (line-of-sight); current drained
at 100 mA.
Low - offers operation range up to 30 M (line-of-sight); current drained.
at 70 mA.
3. Insert batteries and resume battery door. Press and hold power ON/OFF button
(4) for 1 second to turn on. The power indicator (3) lights up when power on
progress is made successfully.
Power indicator lights in green - sufficient battery energy
Power indicator lights in red - low battery
4. Under “Talk” mode:
Green microphone icon - Talk; Red microphone icon - Mute
Under “Push” mode:
Green microphone icon - Talk; Flashing red microphone icon - Mute
5. Turn off handheld microphone by pressing and holding
power ON/OFF button (4) for 2-3 seconds.
6. The performance of signal transmission is highly
involved with battery energy. Batteries with 1600
mAh (or above) in capacity are recommended.
The optional charger HDC-502/503 is an economy
soluton for you daily use.
CAUTION!!
DO NOT attempt to charge Alkaline battery. It will lead to battery
leakage or even explosion!
Take out batteries when the devices won’t be operated in a long time.
Pendant/Bodypack Transmitter EJ-5T
1. POWER / MUTE switch
(MUTE indicator)
2. Channel / Volume switch
3. LCD screen
4. Mesh head
(hidden microphone)
5. External mic. Input
6. Hidden charging indicator
7. Aux input
8. Neck Strap hole
9. DC charging input
10. Strap hole
11. Neck strap
12. Buckle clip
13. Charging terminal
Set up/ Installation
Power ON
1. Press and hold for 0.5 second and the power is on. LCD backlit lights up.
2. When power is on, the button lights blue.
3. Power is on in two seconds and receiving audio signal.
Power OFF
1. Press and hold for two seconds to turn the device off.
2. OFF display on screen and all indicators turned off.
Channel select
1. Press and hold SET button for two seconds; enter into the channel select mode.
2. When channel numbers flashes, press or to select preferred channel. To
confirmed, press SET button.
Channel display
Press SET button to display the current used frequency.
Pendant/Bodypack Transmitter EJ-5T
Select output power/Maximum available channels
1. On OFF mode, press SET and POWER button to enter into the selection mode.
2. LCD screen will display maximum available channels; 640 -664 MHz, 794-806
MHz and 863-865 MHz. Press or to select preferred channel.
3. Press SET button to confirm and select, or it will confirm in 5 seconds without
any keys pressed.
4. LCD screen will display Hi / Lo, press or to select preferred output power.
5. Press SET button to confirm and select or to wait for 5 seconds without any
keys pressed.
Volume switch
LCD screen will display current used volume level when press
1 ~ 3).
or
(VOL.
Charging mode
1. LED lights red when charging.
2. LED lights green when battery is fully charged.
3. When device is slot into a charger stand, will off the power.
4. Battery error: LED status lights red and flashes when charging,
LCD battery symbol lights flashes, and it caused by:
(1)The battery charge temperature is exceeded 60 o C.
(2)The duration of charging time for charger stand is exceeded seven hours.
(3)The battery is defected.
Frequency synchronization
1. When power is on, it will synchronize frequency or switch off without receiving
audio signal when exceeded upto ten minutes. When synchronization, MUTE
indicator lights blue / flashes and LCD backlit lights up.
2. Press MUTE button when channel is displayed on screen, enter into the synchronization mode or off without receiving audio signal exceeded upto twenty
seconds.
3. When succeed, it will switch to MUTE mode and LED lights red.
Others
To reset mode, press
/
at the same time and switch the power on.
Pendant/Bodypack Transmitter EJ-5T
※ Caution
1. DON’T operate the device in the rain or in humid circumstance to prevent
failure.
2. Prevent the device from dropping.
3. Apply factory recommended power supply to this system only. It is dangerous
and risky when employing a not qualified power.
Troubleshooting
Failed to Power On
Be sure batteries are allocated and put in correct direction.
Be sure power adapter is plugged well.
No Sound Output
Be sure transmitter and receiver stay at same channel.
Be sure volume control on transmitter and receiver are turned properly.
Be sure Master is turned properly.
Be sure Mute button is not on.
Check if transmitter and receiver stay at same frequency band.
Check if there is huge air interference nearby.
Maintenance
Avoid heat, humidity
DO NOT put the unit in the sunshine for a long time, or any other hot, humid
environments or places with flame. Stay away from any occasions where
situation mentioned above might occur. Store the unit in general indoor
temperature or in cool circumstance.
Charge BEFORE you start using for the fist time
After unpacking the unit for the first time, please charge the unit for about
8 hours. This is absolutely necessary as the built-in rechargeable battery
might have been discharged naturally due to long transportation and storage
time, even though it has been fully charged in the factory prior to shipment.
To secure a longer life for battery, please MUST execute this IMPORTANT
process.
Charge fully
Ensure battery is fully charged BEFORE you store the unit. To remain a longer
battery life and better performance, make sure you charge the battery
regularly every month.
When you need to use the unit again after a long period of stogare,make
sure you charge if fully for at least 8 hours BEFORE any operation.
Please also charge this unit every time right after operation to secure a
longer battery life.
This unit has DOD (depth of discharge) protection design. When Power
Switch LED flashes red - which means there isn’t enough electricity (when
operating via the battery’s power - this unit will turn off automatically in
a short time secure battery from deep-discharging damage. At this moment
please immediately recharge your unit, do not continue with operation.
This unit has protection circuit against overcharge. The circuit will stop charging
when battery is fully charged even power cord is plugged.
Useful hint: You can still operate during charging.
Replacing battery
Make sure the substitute battery is in compliance with qualified specifications.
Using incorrect battery may lead to explosion or malfunction.
Maintenance
Remove battery from handheld microphone when you won't
use it for a long while.
Charging contacts
Clean charging contacts regularly to ensure good connection with charger.
When any corrosion occurs, contact your dealer to change it if you can't
repair it.
Notice: The changes or modifications not expressly approved by the party responsible for compliance
could void the user's authority to operate the equipment.
IMPORTANT NOTE: To comply with the FCC RF exposure compliance requirements, no change to
the antenna or the device is permitted. Any change to the antenna or the device could result in
the device exceeding the RF exposure requirements and void user's authority to operate the
device.
Consumer Alert
Most users do not need a license to operate this wireless microphone system. Nevertheless,
operating this microphone system without a license is subject to certain restrictions: The system
may not cause harmful interference; it must operate at a low power level (not in excess of 50
milliwatts); and it has no protection from interference received from any other device. Purchasers
should also be aware that the FCC is currently evaluating use of wireless microphone systems, and
these rules are subject to change. For more information, call the FCC at 1–888–CALL–FCC (TTY: 1–
888–TELL–FCC) or visit the FCC's wireless microphone Web site at http://www.fcc.gov/cgb/
wirelessmicrophones.
Specifications
Wireless Portable Bluetooth Sound System GPA-6X0B
Output power
40 W (RMS) @ 4 Ω
Speaker
5” Neo driver, 1” tweeter
supports USB disk and SD card (optional)
Digital audio player
Receiver
plug-in receiver with ACS (Auto Channel Synchronization),
supports 2 receivers maximum.
Audio input
mic in (combo jack); aux in (stereo mixed, 3.5 mm)
Audio output
aux out (stereo mixed, 3.5 mm)
Controls
Master, Tone, Mic, Aux in
Power supply
AC switching power adapter 100 〜 240 V, 20V/3.25A
Battery
Lead-Acid, Ni-MH, Lithium rechargeable battery (model dependant)
Charging time
8 〜 12 hours (battery dependant)
Running time
3 〜 6 hours (battery dependant)
Dimensions (DxWxH)
200 x 170 x 276 mm
Weight
3.7 kg (Lithium battery included)
Wireless Receiver DR-501A
Carrier frequency
640 〜 865 MHz (country dependant)
Channels
16 〜 96 (frequency dependant)
LCD window
Channel adjustment
channel, frequency
select through UP and DOWN
Frequency modulation
24 MHz (max.)
Ambient temperature
-10 °C 〜 +50 °C
100 dB
Dynamic range
T.H.D.
< 0.5 %
Pre-emphasis
50 μs
Frequency response
70 Hz 〜 16 kHz
Wireless coverage
25 〜 50 meter (RF power dependant)
※ Specifications are subject to change
Specifications
Digital Audio Player UM-502
Frequency response
20 Hz 〜 20 kHz
Power requirement
DC 12 V
Display
Output level
backlit LCD
600 mV
MPEG Layer 3
Format supported
S/N ratio
T.H.D.
> 60 dB
<1%
Remote range
>3m
Controls
Play, Stop, Repeat, Next, Prev.
External audio supported
USB disk, SD card
Pendant/Bodypack Transmitter EJ-5T
Microphone capsule
condenser
Antenna
internal
RF output power
Audio input
10 mW@H i / 3 mW@Low
Mic in jack
3.5 mm
Audio control
Mute, Hi/Mid/Low sensitivity
Lithium (1200 mAh)
Battery
Mic in, Aux in
Running time
12 〜 16 hours
Dimensions (DxWxH)
32 x 52 x 88 mm
81 g (battery included)
Weight
Wireless Handheld Microphone EJ-501TM
Microphone capsule
condenser
Antenna
internal
RF output power
Audio control
10 mW@H i / 3 mW@Low
Talk / Mute button
2 AA 1.2 V (Ni-MH, 1600 mAh); or 2 AA 1.5 V (Alkaline)
Battery
Running time
Dimensions (D x L)
15 (Ni-MH) / 20 (Alkaline) hours, typical
37 x 200 mm
Weight
140 g (battery included)
11/13