1
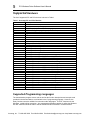
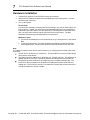
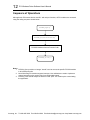
PCI Windows Driver Software
User’s Manual
ACROMAG INCORPORATED
30765 South Wixom Road
P.O. BOX 437
Wixom, MI 48393-7037 U.S.A.
Copyright 2003-2013, Acromag, Inc., Printed in the USA.
Data and specifications are subject to change without notice.
Tel: (248) 295-0310
Fax: (248) 624-9234
9500-280M
2
PCI Windows Driver Software User’s Manual
The information in this document is subject to change without notice. Acromag, Inc., makes no
warranty of any kind with regard to this material and accompanying software, including, but not
limited to, the implied warranties of merchantability and fitness for a particular purpose. Further,
Acromag, Inc., assumes no responsibility for any errors that may appear in this document and
accompanying software and makes no commitment to update, or keep current, the information
contained in this document. No part of this document may be copied or reproduced in any form,
without the prior written consent of Acromag, Inc.
Copyright 2003-2013, Acromag, Inc.
All trademarks are the property of their respective owners.
Acromag, Inc. Tel:248-295-0310 Fax:248-624-9234 Email:[email protected] http://www.acromag.com
3
PCI Windows Driver Software User’s Manual
Contents
Contents .............................................................................................................. 3
Introduction ......................................................................................................... 4
Supported Hardware ................................................................................................. 5
Supported Programming Languages ....................................................................... 5
Getting Started .................................................................................................... 6
Software Installation ................................................................................................. 6
Installed Software ................................................................................................................. 6
Program Menu Shortcuts ............................................................................................................... 6
Installed Files .................................................................................................................................. 6
Hardware Installation ................................................................................................ 7
PCI Enumeration Utility............................................................................................. 8
Demonstration Programs.......................................................................................... 8
Where to Go From Here ............................................................................................ 8
Software Overview .............................................................................................. 9
Function Format ........................................................................................................ 9
Status Codes ....................................................................................................................... 10
Sequence of Operations ......................................................................................... 12
Interrupts ................................................................................................................. 13
Callback Functions ............................................................................................................. 13
Synchronization .................................................................................................................. 14
Base Address Pointers ........................................................................................... 14
Using the Library with Visual C++ ................................................................... 15
32-bit application ..................................................................................................... 15
64-bit application ..................................................................................................... 16
Deploying Applications to Target Systems .................................................... 17
Kernel Driver Installation ........................................................................................ 17
Application and DLL Installation ............................................................................ 17
DLL Location Notes................................................................................................. 17
Modifying the PATH setting ............................................................................................... 18
Windows XP, Vista, 7 and 8 ..........................................................................................................18
Acromag, Inc. Tel:248-295-0310 Fax:248-624-9234 Email:[email protected] http://www.acromag.com
4
PCI Windows Driver Software User’s Manual
Introduction
PCI Windows Driver Software consists of low-level drivers and Windows Dynamic Link Libraries
(DLLs) that facilitate the development of Windows applications accessing Acromag PMC I/O
module products (e.g. PMC730), PCI I/O Cards (e.g. APC730), CompactPCI I/O Cards (e.g.
AcPC730) and PCI Express XMC I/O modules (e.g. XMC-VLX85).
Notes:
The convention of this document is to refer to the above hardware devices using
the generic name “PCI module.”
“PCIe” is used when it’s necessary to distinguish PCI Express modules from their
PCI counterparts.
The software includes kernel drivers and DLLs for both 32 and 64-bit versions of Windows.
Applications developed to run on 32-bit versions of Windows use the 32-bit kernel drivers and 32bit DLLs. Applications developed to run on 64-bit versions of Windows use the 64-bit kernel
drivers and either the 32-bit or 64-bit DLLs. Except where noted otherwise, the usage of the 32bit and 64-bit DLLs is identical.
Notes:
64-bit versions of Windows support running both 32-bit and 64-bit applications.
32-bit applications run within the WoW64 subsystem. A 32-bit application must
use the 32-bit DLLs and a 64-bit application must use the 64-bit DLLs. The 64-bit
kernel driver is always used on 64-bit versions of Windows.
The “bitness” of the Target system is important. The bitness of the Development
system is not. For example, you can install PCISW-API-WIN on a 32-bit Windows
system and use it to develop an application that will run on a 64-bit Windows
target.
DLL functions use the Windows _stdcall calling convention and can be accessed from a number
of programming languages.
This document covers general information on hardware and software installation, programming
concepts, application development and deployment issues. Also included in the PCI Window
Driver documentation is a set of Function Reference documents for each Acromag PCI module
DLL. After reviewing this user’s manual, readers will next want to consult the Function Reference
document specific to their hardware.
The older, 32-bit only versions of PCISW-API-WIN were based on a third party, 32-bit only kernel
driver. To support 64-bit versions of Windows, new kernel drivers were developed and all the
DLLs were updated. For a time PCISW-API-WIN was split into separate 32-bit and 64-bit
products (PCISW-API-WIN32 and PCISW-API-WIN64). If you are updating
from -WIN32, -WIN64, or an earlier version of PCISW-API-WIN, please review the Migrating
from previous software versions document. This document describes the differences between
the various versions of the software, and outlines how to upgrade applications written against the
old libraries.
Acromag, Inc. Tel:248-295-0310 Fax:248-624-9234 Email:[email protected] http://www.acromag.com
5
PCI Windows Driver Software User’s Manual
Supported Hardware
The list of supported PCI and PCIe devices is shown in Table1.
Table 1: Acromag PCI and PCIe Modules
Model
Description
PCI230
8 Ch., 16-Bit DAC Outputs
PCI330
16 Bit (16DE/32SE) Analog Input Module
PCI341
12/14 Bit (16DE) Simultaneous Analog Input Module
PCI408
32 Non-Iso. Digital Inputs/Outputs (Low Side Sw.)
PCI424
Differential I/O Counter Timer Module
PCI464
Digital I/O Counter Timer Module
PCI482
10 16-bit counters – TTL
PCI483
4 16-bit counters – TTL and 4 32-bit counters – RS422
PCI484
6 32-bit counters – RS422
PCI520
8 Channel, Serial 232 Communication
PCI521
8 Channel, Serial 422/485 Communication
PCI730
Multi-Function Input/Output Board
PCIDX501
Reconfigurable, 500K gates, 64 TTL I/O
PCIDX502
Reconfigurable, 500K gates, 32 Differential I/O
PCIDX503
Reconfigurable, 500K gates, 24 Differential, 16 TTL I/O
PCIDX2001
Reconfigurable, 2M gates, 64 TTL I/O
PCIDX2002
Reconfigurable, 2M gates, 32 Differential I/O
PCIDX2003
Reconfigurable, 2M gates, 24 Differential, 16 TTL I/O
PCILX40
User-configurable Virtex-4 FPGA with 41,472 logic cells
PCILX60
User-configurable Virtex-4 FPGA with 59,904 logic cells
PCISLX150
User-configurable Spartan-6 FPGA with 147,433 logic cells
PCISX35
User-configurable Virtex-4 FPGA with 34,560 logic cells
PCIVFX70
User-configurable Virtex-5 FPGA with 71,680 logic cells and PowerPC Core
PCIVLX85
User-configurable Virtex-5 FPGA with 82,944 logic cells
PCIVLX110
User-configurable Virtex-5 FPGA with 110,592 logic cells
PCIVLX155
User-configurable Virtex-5 FPGA with 155,648 logic cells
PCIVSX95
User-configurable Virtex-5 FPGA with 94,208 logic cells
PCIe6VLX240
User-configurable Virtex-6 FPGA with 240k logic cells, no front I/O
PCIe6VLX240F User-configurable Virtex-6 FPGA with 240k logic cells, SFP front I/O
PCIe6VLX365
User-configurable Virtex-6 FPGA with 365k logic cells, no front I/O
PCIe6VLX365F User-configurable Virtex-6 FPGA with 365k logic cells, SFP front I/O
PCIeSLX150
User-configurable Spartan-6 FPGA with 150k logic cells
PCIeVLX85
User-configurable Virtex-5 FPGA with 85k logic cells
PCIeVLX110
User-configurable Virtex-5 FPGA with 100k logic cells
PCIeVLX155
User-configurable Virtex-5 FPGA with 155k logic cells
Supported Programming Languages
The demonstration program source code as well as the function descriptions and example code
provided in the documentation, are all written in the C programming language. However, the
library functions are also callable from numerous other languages. The DLL functions use the
Windows _stdcall calling convention. Any programming language capable of calling the Windows
API DLL functions should be able to call the PCISW-API DLL functions in a similar manner.
Acromag, Inc. Tel:248-295-0310 Fax:248-624-9234 Email:[email protected] http://www.acromag.com
6
PCI Windows Driver Software User’s Manual
Getting Started
Software Installation
To install the PCI Windows Driver software on the development system, insert the software disk
into the CD drive and run Setup.exe. Note that administrative rights are required to perform the
installation.
Note:
The installation CD is used to install the complete driver software package on the development
system (the system where your application will be written and built). Often, the target system (the
system where your application will run) will be different than the development system. If your
development and target systems are different, you will also want to read the Deploying
Applications to Target Systems section of this document.
INSTALLED SOFTWARE
Program Menu Shortcuts
Shortcut to installation directory (see below)
Shortcut to this manual
Shortcut to Enumeration utility (optional)
Shortcut to executable demonstration programs (optional)
Installed Files
The default installation directory is C:\Acromag\PCISW_API_WIN.
Subdirectory
c_examples
c_include
c_lib
config_files
docs
redist\DLLs
redist\Driver
redist\Driver\i386
redist\Driver\amd64
utility
Microsoft Visual C++ example projects with source code.
Prebuilt 32-bit and 64-bit executables are in each project’s
Release directories
Header files
32-bit and 64-bit COFF format import libraries (segregated into Win32
and Win64 subdirectories)
Example VHDL object code for reconfigurable FPGA I/O Modules
User’s manual, DLL references, revision history, application notes
32-bit and 64-bit DLLs (segregated into Win32 and Win64
subdirectories)
INF and catalog files for each board
32-bit device driver and co-installer DLL
64-bit device driver and co-installer DLL
32-bit and 64-bit PCIEnum utilities (segregated into Win32 and Win64
subdirectories)
Acromag, Inc. Tel:248-295-0310 Fax:248-624-9234 Email:[email protected] http://www.acromag.com
7
PCI Windows Driver Software User’s Manual
Hardware Installation
1. Configure any jumpers on the PCI/PCIe module as necessary.
2. With power off, install the module into an available slot on the target system. Connect
any field wiring at this time.
3. Turn on the system.
XP and Vista:
You will receive a dialog box shortly after boot-up asking if you want to install a driver for
the new device. Answer yes and direct the New Hardware Wizard to the “redist\Driver”
subdirectory (see table above) or to the optical drive containing the PCI Windows Driver
disk or to some other directory with the required files (see note below). The New
Hardware Wizard will copy and install the kernel mode driver.
Windows 7 and 8:
a. Launch Device Manager from the Control Panel (or type devmgmt.msc in the Search
Box)
b. Locate and right-click the “PCI Data Acquisition and Signal Processing Controller,”
select Update Driver, and browse to the driver files as described for XP and Vista.
Note
If you want to install the driver from a custom location (e.g. a flash drive) the following files must
be present.
The INF file for the board (e.g. PciLX60.inf). The same INF file is used to install both the
32-bit and the 64-bit drivers.
The platform specific catalog file for the board (e.g. PciLX60_x64.cat). The catalog file is
digitally signed by Acromag. It should be placed in the same directory as the INF file.
The platform specific kernel driver (acrmgpci.sys) and co-installer (acrmgcls.dll). The
kernel driver and co-installer must be placed in a subdirectory relative to the INF and
catalog files. The 32-bit files must be in a subdirectory named “i386” and the 64-bit files
must be in subdirectory named “amd64.”
Acromag, Inc. Tel:248-295-0310 Fax:248-624-9234 Email:[email protected] http://www.acromag.com
8
PCI Windows Driver Software User’s Manual
PCI Enumeration Utility
PCI Windows Driver Software includes a command line utility, PCIEnum.exe which may be run to
display basic information about all installed Acromag PCI modules. Running this utility is a quick
way to verify that the device driver and boards are properly installed. The displayed information
includes the board name, board number, and the address and length of each memory range
present. The board number is the value passed to the PCIXXX_Open function to open a
connection to the device. (See the Sequence of Operations section below.)
Demonstration Programs
Console demonstration programs (source code provided) are included for each Acromag board.
Each demo project can be built as both a 32-bit and a 64-bit application. Use the demo program
to test your board and to become familiar with how it operates.
Tip:
Some of the more complicated demos include instructions on the main menu to walk you through
some basic operations. Rather than jump back and forth between the instructions and the other
menus, open two instances of the program and use one to display the instructions and the other
to communicate with the board.
In some cases the main demo source file (PCIxxxDemo.c) will include comments with additional
information necessary for running the demo (e.g. how channels should be wired together).
Where to Go From Here
1. Read the remainder of this document. It covers general concepts for using the software.
2. Read the function reference document for the library you will be developing with.
3. Study the source code for the demonstration program corresponding to your board. You
can use this code as a starting point for your custom application.
Acromag, Inc. Tel:248-295-0310 Fax:248-624-9234 Email:[email protected] http://www.acromag.com
9
PCI Windows Driver Software User’s Manual
Software Overview
The software includes 32-bit and 64-bit DLLs for each Acromag PCI module. In most cases the
name of the DLL matches the name of the PCI module. For example the PMC464 is used with
PCI464.dll. There are a few exceptions, however, where groups of similar PCI modules are
supported by a single DLL. These include:
PCI Modules
DX Series
LX and SX Series
PCI VLX and VSX Series
PCIe SLX Series
PCIe VLX Series
PCIe 6VLX Series
Shared DLL
PCIDX.dll
PCILX.dll
PCIVLX.dll
PCIeSLX.dll
PCIeVLX.dll
PCIe6VLX.dll
The DLLs provide the Application Programming Interface (API) used to access the hardware.
Each DLL is written in C and contains functions using the _stdcall calling convention. The DLL is
loaded and linked at runtime when its functions are called by an executable application. Multiple
applications can access the functions of a single copy of a DLL in memory.
Tip:
The 32-bit and 64-bit DLLs share the same names and are installed into separate Win32 and
Win64 directories on the development system. If you ever have a “loose” DLL and need to
determine its type, right-click the file and view its Properties. The Version Description indicates
whether the DLL is 32 or 64 bit.
Function Format
All PCI DLL functions have the following form:
status = PCIXXX_FunctionName(arg1, arg2, ... argn)
The “PCIXXX” portion of the function name indicates the PCI module the function is used with
(e.g. PMC464). Note that functions for PCI Express modules have a “PCIeXXX” prefix.
Every function returns a 32-bit status value. This value is set to 0 when a function completes
successfully or to a negative error code if a problem occurred. The following Status Codes
section describes the values that may be returned from the DLL functions.
For most functions, arg1 is an integer “handle” used to reference a specific PCI module. (See
the Sequence of Operations section below.)
Acromag, Inc. Tel:248-295-0310 Fax:248-624-9234 Email:[email protected] http://www.acromag.com
10
PCI Windows Driver Software User’s Manual
STATUS CODES
The table below summarizes the 32-bit status codes that may be returned from the DLL functions.
Please note the return code of any failing functions if you should need to contact Acromag for
technical support.
Value
0
-1
Mnemonic
ERR_OK
ERR_INVALID_HNDL
-2
ERR_BOARD_IN_USE
-4
ERR_CONNECT
-5
ERR_MAPMEM
-8
ERR_OUTOFHANDLES
-9
ERR_BAD_PARAM
-10
ERR_INSUF_
RESOURCES
-13
ERR_CONFIG_READ
-14
-15
ERR_TIMEOUT
ERR_CONFIG_SET
-16
-17
ERR_CALIB
ERR_BUFFER
-18
ERR_CONFIG_WRITE
-19
ERR_DMA_MAP
-20
ERR_EEPROM_ACK
-21
-22
-23
-24
-25
ERR_EEPROM_
READBACK
ERR_FILE_OPEN
ERR_FILE_FORMAT
ERR_FILE_READ
ERR_CONFIG_DONE
-26
ERR_EX_DESIGN
Description
Operation Successful
Returned if no board is associated with the specified
handle. Applies to most functions.
Returned by PCIXXX_Open() if board is already open.
This can occur if the board is in use by another application.
Returned by PCIXXX_Open() if an error occurred
connecting to the device. This will occur if the specified
card number is invalid or if the kernel mode drivers are not
properly installed or configured.
Returned by PCIXXX_Open()if an error occurred mapping
the devices physical memory into the virtural address
space.
Returned by PCIXXX_Open() if the maximum number of
handles have already been allocated.
Returned by a function if it received an invalid parameter.
This typically means the parameter was outside of the
expected range or the function received a NULL pointer.
Consult the individual function descriptions for other
possible reasons for this error.
Returned by a function if there were insufficient resources
to create a required data structure or carry out an
operation.
Returned by PCIXXX_ReadPCIReg if an error occurred
while reading data from the device’s PCI configuration
space.
Returned by a function if it timed out before completing.
Returned by a Configuration function if the current settings
used by this function do not represent a valid configuration
Indicates an error generating or using calibration data.
Indicates an error occurred accessing a user defined data
buffer
Returned by PCIXXX_WritePCIReg if an error occurred
while writing data to the device’s PCI configuration space.
Returned by a DMA function if a DMA buffer is not mapped
into the process
Returned by EEPROM access functions if an Acknowledge
is expected but not received
Returned by EEPROM write if the value read from the
EEPROM does not match value written
Returned if a file cannot be opened
Returned if file contents are not in the expected format
Returned if a file cannot be read
Returned by functions if the configuration of a reconfigurable board is not complete
Returned by functions if a re-configurable board is not
configured with the Acromag supplied example design
Acromag, Inc. Tel:248-295-0310 Fax:248-624-9234 Email:[email protected] http://www.acromag.com
11
PCI Windows Driver Software User’s Manual
-27
-28
ERR_HARDWARE
ERR_FLASH_BUSY
-29
ERR_UNSUPPORTED
-30
-31
ERR_CHECKSUM
ERR_HANDLER
-35
ERR_INVALID_
CTRLHNDL
Returned if a hardware malfunction is detected
Returned if a flash operation cannot be carried out because
the flash chip is busy
Returned if the device does not support the requested
action
Returned if a checksum mismatch is detected
Returned if the function requires an interrupt handler and
one has not yet been attached..
Returned if the kernel driver control handle is invalid
Acromag, Inc. Tel:248-295-0310 Fax:248-624-9234 Email:[email protected] http://www.acromag.com
12
PCI Windows Driver Software User’s Manual
Sequence of Operations
Although each PCI module has its own DLL with unique functions, all PCI modules are accessed
using the calling sequence shown below.
PCIXXX_Open()1
PCIXXX_SetUserCallback()2
PCIXXX Hardware Access Function Calls
PCIXXX_Close()3
Notes:
1. PCIXXX_Open provides an integer “handle” used to access the specific PCIXXX module
in all subsequent calls.
2. Not all Acromag PCI modules support interrupts. User callbacks are used to implement
custom interrupt service routine logic for reconfigurable boards.
3. PCIXXX_Close should always be called for each “open” PCI module prior to terminating
the application.
Acromag, Inc. Tel:248-295-0310 Fax:248-624-9234 Email:[email protected] http://www.acromag.com
13
PCI Windows Driver Software User’s Manual
Interrupts
PCI Windows Driver Software supports callback functions for allowing your application to respond
to interrupts generated in the hardware. Callback functions execute synchronously with the
internal interrupt service routines (see below).
Each PCI DLL that supports interrupts has its own predefined internal interrupt service routine.
(DLLs for reconfigurable boards are a special case. See note below.) The specifics of each
routine are outlined in the PCI module’s corresponding Function Reference document. If you
choose to implement a callback function, you have the option of overriding this routine. This is
done by setting a “Replace” parameter when designating the callback. (See Callback
Functions below.)
When an interrupt occurs the following sequence of events takes place:
1. The kernel level driver disables the board’s Interrupt Enable bit and signals the DLL’s internal
interrupt service routine (ISR).
2. At this point three things can happen
a. If no callback was configured, the ISR simply processes the interrupt and then reenables the board’s Interrupt Enable bit.
b. If a callback function was configured but should not override the internal ISR, the
internal ISR processes the interrupt, re-enables the board’s Interrupt Enable bit and
then invokes the callback.
c. If a callback function was configured to override the internal ISR, the ISR invokes the
callback and then immediately returns without further processing. It is then the
responsibility of the callback function to process the interrupt and re-enable the
Interrupt Enable bit.
Note
The DLLs for user programmable FPGA boards include only a bare-bones ISR. When using
interrupts, applications for these boards must include a callback function to implement the custom
ISR logic. In other word, overriding the internal ISR is mandatory.
CALLBACK FUNCTIONS
When using the callback mechanism your application defines a function that the DLL will call from
its internal interrupt service routine. The format of this function must exactly match that expected
by the DLL. This format is hardware specific and is given in the PCIXXX_SetUserCallback topic
in the PCI module’s Function Reference document.
This format, however, will be some variation of the following:
C:
void _stdcall YourIsrName (int Handle, BYTE Status)
The Handle argument identifies the board that caused the interrupt. If the function is not
overriding the internal ISR, the Status variable(s) will contain data allowing you to determine the
cause of the interrupt (e.g. the value read from a status register by the internal ISR). If the
function is overriding the internal ISR, the Status variable(s) will be zero since the internal ISR did
not read any registers prior to invoking the callback function.
Acromag, Inc. Tel:248-295-0310 Fax:248-624-9234 Email:[email protected] http://www.acromag.com
14
PCI Windows Driver Software User’s Manual
SYNCHRONIZATION
The DLL’s interrupt service routine (ISR) executes on a different thread than that of your
application. Within the DLL the ISR (which includes the call to any callback function) is delimited
as a device critical section. PCIXXX_StartIsrSynch and PCIXXX_EndIsrSynch can be used
to synchronize other application threads with the ISR thread and to synchronize multiple threads
within an application with each other.
Bracketing a section of code between calls of PCIXXX_StartIsrSynch and
PCIXXX_EndIsrSynch defines that code as a device critical section. Two threads within a
single process cannot execute critical section code simultaneously. PCIXXX_StartIsrSynch
should be called by your application before it attempts to access data or device memory that can
be accessed by another thread. Remember to call PCIXXX_EndIsrSynch when finished
accessing these shared resources.
Base Address Pointers
Each DLL provides a function that returns the base address of the user mode mapping of the PCI
module’s memory space.
C and C++ programmers can cast the returned value to a pointer and access memory using
normal pointer mechanisms. This method can be used to write additional functions that
complement those provided through the DLL.
Example
/* Read PMC408 Digital Input Channel Register A */
UINT64 base_address;
volatile BYTE* pbase_addr;
WORD chan_val;
if (PCI408_GetBaseAddress(Handle, &base_address) == 0)
{
pbase_addr = (BYTE*)base_address;
chan_val = *(PWORD)(pbase_addr + 0x200);
}
Acromag, Inc. Tel:248-295-0310 Fax:248-624-9234 Email:[email protected] http://www.acromag.com
15
PCI Windows Driver Software User’s Manual
Using the Library with Visual C++
This section describes the basic steps to add a PCI Windows Driver dynamic link library to a
Visual C++ project. These instructions are based on the Microsoft Visual Studio 2010
development environment.
32-bit application
1. Open a new or existing Visual C++ project.
2. Open the project’s property pages
3. Confirm the Platform drop-down is set to “Win32” and the Configuration drop-down is set
to “All Configurations.”
4. Add the path to the necessary header files (PCIXXX.h, PCIErrorCodes.h) to the project.
To do this, open the Configuration Properties | C/C++ | General property page and
modify the Additional Include Directories property. This can be a relative path.
e.g.
..\..\..\c_include;
Add the path to the 32-bit import library (PCIXXX.lib) to the project.
To do this, open the Configuration Properties | Linker | General property page and
modify the Additional Library Directories property. This can be a relative path.
e.g.
..\..\..\c_lib\Win32
5. Select the Configuration Properties | Linker | Input property page and add the import
library to the Additional Dependencies property
e.g.
PCI408.lib
6. Include the windows.h, PCIXXX.h and PCIErrorCodes.h header files at the beginning of
your .c (C source code) or .cpp (C++ source code) files.
e.g.
#include <windows.h>
#include “PCI408.h”
#include “PCIErrorCodes.h”
Acromag, Inc. Tel:248-295-0310 Fax:248-624-9234 Email:[email protected] http://www.acromag.com
16
PCI Windows Driver Software User’s Manual
64-bit application
1. Open a new or existing Visual C++ project.
2. Open the project’s property pages
3. Confirm the Platform drop-down is set to “x64” and the Configuration drop-down is set to
“All Configurations.” (If x64 is not available, you will need to create the new platform in
Configuration Manager.)
4. Add the path to the necessary header files (PCIXXX.h, PCIErrorCodes.h) to the project.
To do this, open the Configuration Properties | C/C++ | General property page and
modify the Additional Include Directories property. This can be a relative path.
e.g.
..\..\..\c_include;
Add the path to the 64-bit import library (PCIXXX.lib) to the project.
To do this, open the Configuration Properties | Linker | General property page and
modify the Additional Library Directories property. This can be a relative path.
e.g.
..\..\..\c_lib\Win64
5. Select the Configuration Properties | Linker | Input property page and add the import
library to the Additional Dependencies property
e.g.
PCI408.lib
6. Include the windows.h, PCIXXX.h and PCIErrorCodes.h header files at the beginning of
your .c (C source code) or .cpp (C++ source code) files.
e.g.
#include <windows.h>
#include “PCI408.h”
#include “PCIErrorCodes.h”
Acromag, Inc. Tel:248-295-0310 Fax:248-624-9234 Email:[email protected] http://www.acromag.com
17
PCI Windows Driver Software User’s Manual
Deploying Applications to Target Systems
This section outlines how to move your custom application from the development system to a
target system where the driver software is not currently installed.
Kernel Driver Installation
The kernel driver for the Acromag board is installed on the target using the procedure outlined in
the Hardware Installation section. The complete driver software package does not need to be
installed on the system. Direct the New Hardware or Update Driver Software wizard to the PCI
Windows Driver disk or to some other directory where the required files can be found.
The acrmgpci.sys driver will be installed to the \windows\system32\drivers directory.
Application and DLL Installation
The following files must be installed on the target machine.
Your application program
All DLL’s corresponding to the PCI modules you are using. Copy these from the
\redist\DLLs folder on the development system. These are typically installed in your
application’s directory.
The PCI DLLs are dependent upon the Microsoft C Runtime Library (msvcr100.dll). If
this file is not already present on the target, it can be copied from the
\redist\DLLs folder on the development system Place the file in your application’s
directory.
If your application program is dependent on additional components, those will need to be
installed on the target system as well.
DLL Location Notes
To reduce the likelihood of “DLL Conflict” issues Microsoft recommends that DLLs be installed to
the application directory with the program executable. This is the preferred location when running
a single executable. However, if several applications will be simultaneously sharing a PCI DLL it
is recommended that the DLL be placed in a common directory.
In order for the operating system to find a DLL, its location must be part of the Windows search
order. The typical search order is as follows:
1.
2.
3.
4.
5.
The directory from which the application is loaded
The current directory
The Windows system directory (e.g., C:\Windows\system32 or C:\Windows\SysWow64)
The Windows directory (e.g., C\Windows)
The directories listed in the PATH environment variable
The easiest solution to sharing a DLL is to place it in the Windows system directory. However,
many applications store DLLs in these directories so using these locations creates the most risk
for DLL conflict issues.
The technique used by the PCI Windows Driver Software installer is to append the common DLL
directory (typically C:\Acromag\PCISW_API_WIN\redist\DLLs\Win32 or
Acromag, Inc. Tel:248-295-0310 Fax:248-624-9234 Email:[email protected] http://www.acromag.com
18
PCI Windows Driver Software User’s Manual
C:\Acromag\PCISW_API_WIN\redist\DLLs\Win64) to the PATH environment variable. This
allows the appropriate DLL to be located when running each example project.
MODIFYING THE PATH SETTING
Use the following steps if you wish to modify the PATH setting on a target machine.
Windows XP, Vista, 7 and 8
1. Launch the System applet from the Windows Control Panel.
2. Select the Advanced link (or tab) and then click the Environment Variables button.
3. Locate “Path” in the User Variables or System Variables. The PATH is a series of one or
more directories separated by semicolons.
4. Edit the variable by appending the path to the common DLL directory to the right of the
existing value.
5. Click OK
Acromag, Inc. Tel:248-295-0310 Fax:248-624-9234 Email:[email protected] http://www.acromag.com