1
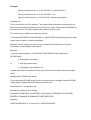
UPS-Management Software
User manual
Release 56
Limited Warranty
This software and the enclosed materials are provided without warranty of any kind. The
entire risk as to software quality, performance of the program, media free of defects, faulty
workmanship, incorrect use of the software or UPS, error free documentation and
enclosed material is assumed by the user. We do not take any warranty to the correct
functions of the software and the security of your system nor files, that might be damaged
to due to possibly not correct function of our software. No warranty to correct functions of
the software with the operating systems, loss of data or interruption of work processes,
other UPS problems or to other errors that may occur out of this combination.
Copyright
The information contained in this manual is non-conditional and may be changed without
due notice. The software manufacturer undertakes no obligations with this information.
The software described in this brochure is given on the basis of a license contract and an
obligation to secrecy (i.e. an obligation not to further publicise the software material). The
purchaser may make a single copy of the software material for backup purposes. No parts
of this manual may be transferred to third persons, either electronically or mechanically, or
by photocopies or similar means, without the express written permission of the software
manufacturer.
The UPS-Management software includes a license key for each license. This license is
valid for using the UPS service on one server with one UPS and an unlimited number of
connected UPSMON-WINDOWS workstations. For operation on several servers a license
for every new server is required, disregarding the fact if UPS service runs at that location
or if the server is halted by an UPS service via remote command RCCMD. The same
regulations are applicable to the use of remote send/receive modules RCCMD and
multiserver shutdown under Windows OS, MAC OS and Unix. The service programs are
generally delivered as a single license. If there is more than one disk in one package all of
them have the same serial number and must not be used for future installations. To use a
single CD-ROM for several multiserver shutdown installations you have to purchase
additional CD license keys.
Copyright of the European Union is effective (Copyright EU).
Copyright (c) 1995-2007 GENEREX GmbH, Hamburg, Germany.
All rights reserved.
(Rel. 56 ENG)
Table of contents
1 What is the UPS-Management Software?
2 Network Shutdown with RCCMD
3 How to install/configure the UPS Management Software?
3.1 Preparation of the Installation
3.2 Windows 95/98/NT/2000/XP/VISTA UPSMAN
3.2.1 Installation of the UPS-Management Software
3.2.2 Configuration of the UPSMAN
3.2.2.1 Select UPS Model and Connection Type
3.2.2.2 Additional configuration data
3.2.2.3 System parameter: System Shutdown
3.2.2.4 System parameter: UPS Shutdown
3.2.2.5 Files
3.2.3 Configuration of the JOBS
3.2.4 Configuration: EVENTS
3.2.5 e-mail to SMS
3.2.6 Example Job configurations
3.2.6.1 Execute program with parameters
3.2.6.2 send Email
3.2.6.3 RCCMD Mail ID
3.2.6.4 Send RCCMD execute to remote client
3.2.6.5 WOL
3.2.7 Executing own scripts: Examples variables
3.2.8 Start the UPS-Management Software
3.2.9 Multiple installations under Windows NT /2000/98/ME
3.2.10 UPSMAN directory
3.2.11 Stop the USV-Management Software
3.2.12 RCCMD for Windows NT/2000/XP
3.2.13 RCCMD on Windows 95/98
3.2.14 Testing the RCCMD connection
3.2.15 Testing the RCCMD 2 connection
3.2.16 RCCMD 3 group redundancy settings
3.2.17 Shutdown.bat file (example)
3.2.18 RCCMD client as relay station
3.2.19 RCCMD in Windows NT/2000/XP only network
3.3 Novell NetWare UPSMAN
3.3.1 Installation Modules for a Windows NetWare Station
3.3.2 Configuring a Windows 95/98/NT/2000/XP Workstation
3.3.3 Configuration of JOBS
3.3.4 Configuration of EVENTS
3.3.5 Execution of Scripts
3.3.6 Command syntax for NetWare UPSMAN/ SHUTCMD
3.3.7 Command syntax for Novell NetWare System moduls
3.3.8 Start of the UPS-Management Software
2
5
6
8
8
9
10
14
14
16
18
19
20
21
25
32
34
36
39
40
41
41
42
43
44
45
46
46
47
48
48
49
51
51
52
53
53
53
54
54
54
54
55
56
3.3.9 Stop the UPS-Management Software
3.3.10 RCCMD on NovellNetWare
3.4 Unix
3.4.1 Installation of the UPS-Management Software
3.4.2 Configuration of the UPSMAN
3.4.3 Configuration of Jobs
3.4.4 Configuration of Events
3.4.5 Start of the UPS-Management Software
3.4.6 Multiple-Start UPSMAN on Unix:
3.4.7 Shut down of the USV-Management Software
3.4.8 Unix UPSMON
3.4.9 RCCMD version 1 on Unix
3.4.10 Configuration of Rccmd V2
3.4.11 UNIX WEB-Server
3.5 DEC VMS
3.5.1 Installating the UPS-Management Software, UPSMAN
3.5.2 Configuring the UPS Management Software
3.5.3 RCCMD
3.6 OS/2
3.6.1 UPSMAN Installation
3.6.1.1 CID Method
3.6.1.2 DOS Method
3.6.2 Configuration of the UPS-Management Software
3.6.3 Start UPS-Management Software
3.6.3.1 Start with OS/2 2.x and Warp
3.6.3.2 Start with Lan Server
3.6.4 Stop UPS-Management software
3.6.4.1 Stop with OS/2 2.x and Warp
3.6.4.2 Stop with Lan Server
3.6.5 UPSMON OS/2
3.6.6 RCCMD for OS/2
3.7 Apple MacIntosh
3.7.1 UPSMAN Installation
3.7.2 UPSMAN Configuration
3.7.3 RCCMD under MAC OS 9 / MAC OS 10.X
3.8 RCCMD AS400-Client
4 How to use the UPS-Management Software?
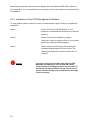
4.1 UPSMON for Windows with gCHART
4.2 Connecting with UPSMAN
4.3 UNMS – UPS Network Management System
4.4 The Displays
4.4.1 The Status display
4.4.2 Status Chart
4.4.3 Event List
3
57
57
61
61
64
73
74
80
80
81
81
84
87
99
100
100
103
105
108
108
108
110
110
115
115
116
116
116
116
116
117
118
118
119
121
125
125
125
126
127
127
127
128
128
4.4.4 Scheduler
4.4.5 Functions
4.4.6 Voltage- and Frequence-Chart
4.4.7 Textlog
4.4.8 Mail-Events
4.5 UPSMAN Web-server and JAVAMON
4.6 UPSMON for the command line
4.7 Simple Network Management Protocol (SNMP)
4.7.1 UPSMAN with SNMP on NovellNetWare
4.7.2 UPSMAN with SNMP on OS/2
4.7.3 UPSMAN with SNMP on Windows NT/2000/XP
Appendix
A Supported Systems
B Know-How Pool
C Error codes (UPSMAN)
D Cable types
E Picture catalog
4
128
129
130
130
130
131
133
135
135
137
137
140
140
140
148
149
152
1 What is the UPS-Management Software?
The UPS-Management Software is a client/server application for networks and local
workstations. The server module of the UPS-Management Software is UPSMAN, which
communicates via RS-232 cable with the UPS. When UPSMAN begins, it collects the
messages sent from the UPS as a background program. UPSMAN also interprets
received messages and makes them available to the client module, the UPSMON and to
any SNMP station. The data communication to the UPSMON is achieved via TCP/IP, IPX,
Named Pipes or SNMP.
The protocol of UPSMAN with UPSMAN.MIB is a special private MIB type 1, the UNIX
UPSMANB corresponds to the MIB 2 standard RFC 1213 & 1628. All UPSMAN
programmes are using the GENEREX own communication protocol UPSMON, which is
provided as an API to all OEM customers in order to create own applications.
If UPSMAN detects voltage variations or a power loss it can execute different system
event routines (EVENTS), which, for example, may shutdown the server or send warnings
to connected users. These system event routines, which are part of the UPS-Management
Software, are fully customisable.
UPSMON is used for operating and monitoring the active UPSMAN software connected to
an UPS. You can program UPS-Routines (e.g. define dates for automatic UPS-tests,
shutdown the system at defined dates, etc.), check the status of the UPS, execute
different UPS-tests or create power quality statistics. With UPSMON you can also
constantly monitor and evaluate the event protocol (log file) that is permanently updated
by UPSMAN.
RCCMD ("Remote Console Command") is an additional module which executes a
command on a remote system, similar to the Remote Shell-Program (RSH) known in the
Unix environment. RCCMD is used to provide a simultaneous shutdown of several servers
that are all supported by the same UPS.
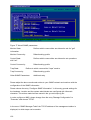
The following listed features depend on the UPS model. Please ask your UPS dealer
which of these functions are available with your UPS model. The following list shows you
the maximum variety of features of the current UPS-Management Software.
Client/server software for heterogeneous networks with one and three-phased UPS.
"Look & feel" is identical on all platforms.
Supports most kinds of UPS of all major UPS manufacturers with serial (RS-232) or
contact UPS protocols.
Integrated SNMP agent for NetWare, MS-WINDOWS™ NT/2000, Linux and SUN
Modular structure; optional it is possible to extend the system for multi-UPS
surveillance via UNMS. External modules (hardware) allow for a variety of system
5
extensions such as: TempMan, UPS Dialer (modem solution), UPS Switcher, UPS SNMP
Watch, JAVAMON HP OpenView UPSMON and others.
Supports all important network protocols for the graphical control of the UPS from
every Windows Station in the network.
Automatic unattended shutdown of local and remote computers in networks
(Master/Slave via RCCMD module)
Low battery warning, on-screen autonomy time, battery time countdown, Low battery
warning, UPS temperature such as battery and internal temperature, defect battery
warning, time and date stamp event logging, extensive logging of all UPS activity and user
messaging.
Battery management, surveillance and counter for power events.
SMTP compatible system with messaging service for E-mail, E-mail to SMS or other
external services.
Menu for several UPS test functions, such as economy mode, UPS temperature,
battery load, power socket switching and UPS emergency cut-off.
Shutdown and test functions can be executed with a Scheduler
Graphic display of quality of incoming power load frequency in minimum-maximum or
average values.
Also monitors UPS systems, via SNMP connection.
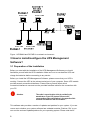
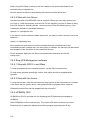
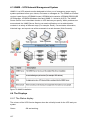
2 Network Shutdown with RCCMD
The program RCCMD is designed to execute a command on a remote system in a TCP/IP
network. RCCMD works like the Remote Shell (RSH) known in the Unix environment.
Inside the UPS-Management Software RCCMD is used to shutdown several servers that
are all powered by a single UPS. For this job, one of these computers is configured as
UPS-master server.
Install the UPS-Management Software UPSMAN on your UPS server and connect it to the
UPS. Alternatively, a SNMP adapter CS-111 or CS-121 can be used for this as well. The
other servers are only connected to the UPS power supply, no RS-232 connection is
necessary. On these remote systems, install RCCMD (copy the modules) and create a
shutdown routine for every system. This shutdown routine may be a batch file, shell script
or ncf-file, that contains the down and other commands for this system. After that, add
RCCMD to the shutdown job or to the EVENT configuration of the computer running as
UPS master server.
So now you have a computer in your server network supervising the UPS. The other
servers execute RCCMD and wait for the RCCMD signal of the UPS server. If a power
6
failure forces the master computer to shutdown the server-network, the shutdown-job of
the UPS-server will start RCCMD. RCCMD now sends the RCCMD-signal to all computers
in its list. The computers receive this signal and the installed RCCMD will execute the
programmed command.
Please note that RCCMD must always installed in two different operating ways:
1.
as a sending process on the UPS-server,
(RCCMD –s) (send)
2.
as a receiving process (background-process) on the receiving computers.
(RCCMD –l) (listen)
In contrast to the RSH, RCCMD does not include the command that is to be executed in
the sending process but instead deposits the command with the receiving process. This
provides a security advantage in comparison to the RSH. Furthermore the receiving
process may check which computer sends the RCCMD-signal and determines whether to
accept it or not.
Attention:
If a name resolution is achieved via DNS, please always use the
IP-address (and not the computer name) for a network
shutdown with RCCMD. In case the DNS is not available, the
network shutdown will not work, if this method is not used.
RCCMD Version 2
The extended Version of RCCMD is also able to execute commands on remote
computers, execute the shutdown batch in the same TCP/IP port 6003, execute an e-mail
batch, enable log file entries etc. The RCCMD 2 sender (UPSMAN or CS121 SNMP
adapter) sends the corresponding RCCMD signal and the RCCMD 2 client starts the
corresponding batch file, which then lead to the execution of the net send message.
The initial command will always come from the UPSMAN or CS121 where as the
execution will always be on the RCCMD client side.
Example: The CS121 should send a net send (network message) to a Windows NT
network. The CS121 can be programmed so that during the event “Power fail” a “RCCMD
message” is send. The text of the message can be entered by the user.
Upon on receiving the message by the RCCMD 2 client, the client is starting a batch file
and sends the net send message. Sender of the message will bet he client and initiator is
the UPSMAN or CS121.
This way it is possible to send messages, e-mail etc. in the different networks and
operating systems, initiated by an UPS alarm.
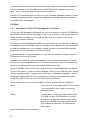
7
Figure 1 UPSMAN and RCCMD in a network environment
3 How to install/configure the UPS Management
Software?
3.1 Preparation of the Installation
Before you start with the installation of the UPS-Management Software you should
familiarise yourself with the UPS installation. Make sure not to overload the UPS and
charge the batteries before connecting to any device.
Before you install the UPS-Management Software, please ensure that your UPS is
working. Connect the UPS to the relevant serial port of your computer. Some UPS models
provide several connections/interfaces. Please inform yourself about which
connection/interface to use and use the provided interface cable for the connection with
your PC.
Attention:
This cable is a special cable, which is provided by the
manufacturer of your UPS system. Please see the
corresponding cable configurations in the appendix of this
technical user manual of the UPS hardware.
This software also provides a number of updates and patches for your system. If you are
unsure as to whether your system software has outdated modules (Patches, DLL’s) you
can use the enclosed updates/patches for your operating system. Please note that a
8
reboot is necessary after a system module upgrade. For Novell NetWare, additional
modules (Error correction status as provided by Novell) may be required for a current
patch level status in contrast to the ones automatically provided on our CD.
In case problems occur we recommend to obtain NetWare drivers and patch levels from
the Internet, other providers, your manufacturer or dealer in order to ensure perfect
operation.
Updates and patches for your copy of the UPS-Management Software, or other Models
that are no longer part of the CD-ROM (”no longer supported systems”) can be
downloaded from the Internet. Please note that only 1 UPSMAN and 1 RCCMD (1
RCCMD sender and receiver) are allowed to run simultaneously on a network –RCCMD is
mostly optional. Your UPS Dealer will provide you with additional licenses or simply visit
(www.generex.de), if you wish a faster delivery.
3.2 Windows 95/98/NT/2000/XP/VISTA UPSMAN
General
The UPSMAN for 95/98/NT/2000/XP is a real background service and has no graphical
output. The UPSMAN is the only necessary process for all UPS monitoring. The UPSMON
module is responsible for the graphical administration, but not compulsory for normal
operation.
Installation
The UPS-Management Software is distributed on a CD-ROM or as full version download
from the web site of the UPS manufacturer (license key required) The Windows
95/98/NT/2000/XP part of the software is found in the root directory and is started
automatically or via the SETUP command. This SETUP process copies the desired UPS
files to your local hard drive.
Licensing
The first input window is the license key of the CD (license = license key = key-code). This
key code can be found in every printed user manual or on the backside of the bundling
UPS software Jewel cases. For the multiserver shutdown additional RCCMD licenses are
needed. The additional (optional) key codes are available depending on the number of the
ordered licenses.
Every CD-ROM gives the customer the permission to install 1 UPSMAN software with RS232 communication and/or RCCMD modules for the multiserver shutdown.
(The RCCMD send function is already integrated into the UPSMAN. For every computer to
perform a shutdown using RCCMD, additional license keys are necessary. Additional
RCCMD installations can be executed from the same CD, using the additional license
keys.)
9
Beside copy protection, the license key distinguishes the different OEM UPS customers
from each other. It is not permitted to use any other license key than the one provided with
the software.
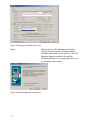
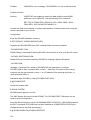
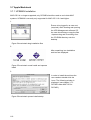
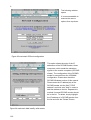
3.2.1 Installation of the UPS-Management Software
To start, please make sure that you have full administrator rights in order to complete the
installation.
Step 1:
Put the CD into the CD-ROM drive of your
computer or download the software into a specific
directory.
Step 2:
Please execute the installation program
setup.exe in order to copy the files to your system
and chose a desired setup language.
Step 3:
Please enter your license key an choose your
corresponding Windows OS from the list. The
used license determines, which module can be
installed.
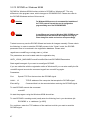
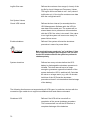
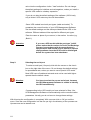
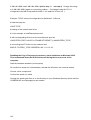
Attention:
10
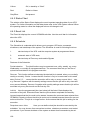
If you enter a wrong license number at this stage, the UPSManagement software will be set to a 30 day trial version.
Please contact your UPS dealer for the full, correct license if it
was not with the original CD-ROM. You may enter the correct
license in the main window of the configuration at a later stage.
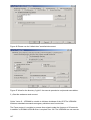
(Please see picture)
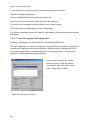
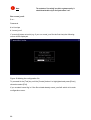
Figure 2 thirty-day trial without key code
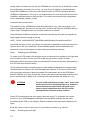
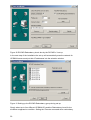
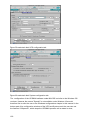
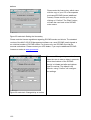
Step 4:
Starting with the UPS Management Software
version 5 Windows users can select between
UPSMAN and the Mini driver software. The UPS
Minidriver adds the model list of the OEM
UPSMAN software to the energy options menu in
the Windows control panel.
Figure 3 UPS Management or Minidriver
11
Figure 4 Windows control panel UPS with Minidriver
Figure 5 Other UPS Management Modules
Other modules can be installed later from the same set-up file by using other license keys.
UPS Dialer: The UPSDIALER software is able to monitor UPS devices and other
device via a the telephone network.
UPS SNMPWatch: This software enables the monitoring of parallel redundant
connected UPS systems, with a lot of Event configuration options.
HP OpenView: Graphical monitoring tool, which is integrated as a snap-in tool into
the HP OpenView interface.
UPS Temperature Manager: This software measures temperature, humidity and other
sensor data via a hardware-measuring unit and visualises the data with the UPSManagement software.
RCCMD multiserver shutdown module: This module is used for the multiserver
shutdown. It will run as a service (LISTENER/SLAVE) on the client computer and as a
foreground program (SENDER/MASTER) for the server computer.
12
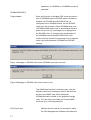
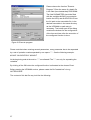
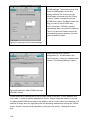
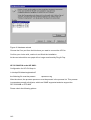
Step 5:
After proceeding the installation of the UPS Manager.
A check box selection dialogue is presented for
choosing the desired components of the installation.
Figure 6 Component selection dialogue
UPS MANAGER: This is a background process (UPSMAN), which maintains the
direct UPS RS-232 connection with the computer.
UPS Monitor Windows 32bit Client: This is the remote Windows client software. This
may also be installed on remote clients in order to monitor the UPS remotely. In most
cases it can be installed on the local UPS protected Windows computer together with the
UPSMAN software.
UPS Network Management system: This is a limited version of the UPS network
management software (9 UPS max.), which is able to display the statistics of the UPS
installed in the network. This limited version is also available as customised version
without restrictions.
UPSMAN Webserver: This is a graphic UPSMON variation, which supports the new
JAVA script based Internet browser, such as Netscape Communicator 4.6x and 6.x, MSInternet Explorer 5.x. The JAVAMON tool can connect to a SNMP adapter or UPSMAN
process from all platforms, with an Internet browser. All UPSMAN/UPSMON functions and
features are available with the JAVAMON. A remote configuration is hence possible
without user access rights on the remote computer.
MS-Word help files
PDF Help files
After the desired options have been chosen, the files are copied (default) into the
c:\programfiles\ups\. Directory. Here the files of the UPSMAN, UPSMON and
UPSJAVAMON have subdirectories.
13
Attention:
We recommend not to use any subdirectory name(s) e.g.
Program files \UPSMAN 10kva\ or "SYS\UPS\U P S\" with < >
(blank spaces). This may cause problems within the
customised configuration.
The customer may change the default program group name UPS SOFTWARE into any
other name, if desired.
After the files have been copied, a README.TXT file is opened that shows all the latest
news about this software and the ERROR codes. It is helpful to have the configuration
data and the error codes at hand when calling the support hotline.
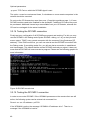
Parallel the UPSMAN.BAT or UPSCONF.BAT (Novell) file is executed. This batch file has
to be started with every update of the UPSMAN.EXE or UPSMAN.NLM software (RESET
of the system), because it is executing the NT/95/98/2000/XP registry entry at the local
computer. In a DOS windows you can see that the batch file is executing the following:
To find out if SIEMENS NIXDORF SERVERVIEW is installed on your computer. If so, an
entry is made into the registry, which results in a special button inside the SNI Serverview
software. This button will start the UPSMON client. Additional the SNI Serverview
Application may use the UPSMAN SNMP communication directly.
Stopping and removing any older UPSMAN processes from the registry
To install/reinstall the new UPSMAN into the registry and starts the UPSMAN
configuration program.
Installs and starts the UPSMAN Web-server
All these actions are done via the UPSMAN.EXE program with additional start parameters;
e.g. UPSMAN -config starts the configuration from any directory, identical to the UPSMAN
configuration icons. Using NetWare, the configuration is done via a DLL, which is
executed on a Windows 95/98/NT/2000/XP Workstation.
Info: Start ”UPSMAN.EXE –Debug” if you want to see the background action of the
UPS/UPSMAN communication.
Step 6:
After all files have been copied onto the hard
drive, the configuration starts automatically.
3.2.2 Configuration of the UPSMAN
3.2.2.1 Select UPS Model and Connection Type
The configuration window is opened automatically and the user has to choose the correct
UPS model. (manual: call "UPSMAN –CONFIG) This is the most important part of the
configuration because with the model name the correct UPS RS-232 protocol is linked. If a
14
wrong model is chosen from the list, the UPSMAN can not start. If you would like to enter
the configuration at a later point in time, you may do so by logging on as administrator.
Select the UPSMAN icon from the control panel section (or from the program directory
UPSMAN configuration). This icon is only available from the user account from which the
installation was performed in the first place. From other user accounts the configuration
can be started with upsman_config.
Automatic start at server boot
The default of every UPSMAN is to start automatically at every new server boot. If you
want to change this, go to the NT control panel, services and mark the UPSMAN Service
under "Start". Change the start up now from automatic to manual.
Using Windows 95/98 this procedure is achieved manually by using the tool regedit.exe.
Start regedit.exe and change to the key
HKEY_LOCAL_MACHINE\SOFTWARE\Microsoft\Windows\Current\Version\Run
and delete the entry current entry there. An automatic is possible by making a shortcut to
upsman.exe in the auto start folder. Under NetWare please insert a load call for the
upsman.nll into to the autoexec.ncf (after testing successfully) manually.
Step 1:
Selecting the UPS-Model
To select your UPS-model, click with the mouse on the scroll box symbol on the right side
of the model list. Next, choose the UPS model that you want to install. All other
adjustments which correspond with your selected UPS model will be done automatically, if
the UPS has serial communication.
UPS models with serial connections do not need additional adjustments, because these
models transfer all values to the UPS-Management software. If you have a UPS-model
with a port-type cable which does not transfer the connected Load to the UPS-Management Software, you have to enter the values of the actual load manually. Add the input
power requirements in Watts of all connected units and calculate the Watt/0,8 (= VA)
ATTENTION:
If you use a UPS-model with the port-type "cable", please notice
that the values for Hold- and Recharge time are in accordance
with the manufacturers specifications and should only be
altered in special configurations since the UPS could be
discharged before the system has been shutdown.
Some UPS models have both port types (cable and serial). To guarantee the correct
function of your UPS-Management Software use the default settings and the cable
provided with the UPS or the software. Different cables will be required for different port
types.
Enter the name or place of your server, in the section Location (e.g. ”Berlin”)
Step 2:
15
Selecting the serial port
To select a serial port (Comport) click with the mouse on the COM checkbox on the right
side. The communication parameter will be set automatically, corresponding to the in step
1 selected UPS model. Normally these settings do not have to be changed by the user.
Possible problems with older versions (CD 4.17 /UPSMAN before V. 4.50)
A critical installation is possible under Windows and NetWare, with the use of ”cable 2”
UPS types. The service will start in any situation, but will shutdown the computer
immediately if the cable is not correct or the wrong com port has been chosen. If a cable 2
UPS is installed on a NT computer, the customer should set the automatic start of the
UPSMAN service to ”manual” before trying to start the UPSMAN. In this case a wrong
configuration does not cause constant up and down of the system, just because the cable
is defect of the user has just tried all kind of cables. Most UPS work with serial
communication, so this problem is rarely the case.
The Comports are in most cases already installed and activated. See in the Control Panel
if the COM ports exist. The baud rate mentioned here is not important for the UPSMAN,
the UPSMAN has its own internal baud rate settings.
In case your system is continuously starting and stopping, because of wrong settings with
the cable type 2, please restart your system in the DOS-mode (via disk or F8 key during
the boot procedure.) and rename the UPSMAN.EXE file.
ATTENTION:
The selection of the serial interface has to be carried out
manually, since the UPS-Management Software cannot detect
which comport the UPS is connected to.
The configuration is now completed. Please click ”OK” in the dialog window; the new
configuration settings will be stored in the registration database. The UPSMAN
configuration will ask you, if you wish to start the UPSMAN service now. If you like to
return to the old, pre-set configuration values, please click on the button ”Restore factory
settings”.
3.2.2.2 Additional configuration data
All configuration data in the menus have "tool tips" in the corresponding language. Every
menu feature will be explained "online", please find identical information also in the
following chapter of this user manual.
System
UPSMON Password:
Default - no password - The user may enter a
password here, which will be asked when
UPSMON connect is executed. Without this
16
password, no UPSMON or JAVAMON connect is
permitted.
UPSMAN/RCCMD 2
Traps enabled:
When this function is activated UPS events are sent in
form of UPSMAN traps to RCCMD clients, whether or
whether not RCCMD (send RCCMD ID etc.) is
configured in the UPSMAN events. On the RCCMD
client side, two functions „Check UPSMAN alive“ and
„RCCMD2/UNMS traps“ have to be activated. When a
power fail occurs e.g. a message box is displayed on
the RCCMD client. In contrast to the configuration of
the UPSMAN events (Send RCCMD ID etc.) thsi
function has the benefit of not causing to much network
traficc with polling between UPSMAN and RCCMD
client(s).
Figure 7 Message on RCCMD client when UPSMAN event has occurred.
Figure 8 Message on RCCMD client when event is over.
The UNMS trap functions in the same way, with the
difference that not a message is send to teh recieves,
but the usual UNMS trap, which makes teh
UPSMAN/Location symbol on the graphical change
color. The user may now initiate the normal UNMS
functions up on receiving the alarm.
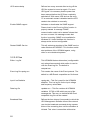
UPS Check rate
Defines the time-interval (in seconds) in which
the UPS-Management Software polls data from
17
the UPS. The system will be slowed down if this
value is too small, because of continous
communication with the UPS. If the value is too
high the system will react more slowly in case of
a power failure. For continous use we
recommend a relativ high value of between 15
and 30 seconds.
3.2.2.3 System parameter: System Shutdown
Enable System Shutdown
Defines if the system will start the shutdown
routine in the event of a shutdown call from the
UPS during a power failure.
In the case of a shutdown, the internal event routine will close down all active applications,
which allow this. The Windows-program will also be closed. This mechanism is not
supports by the Windows95/16-bit version. In order to make this mechanism work for the
16-bit version, the shutdown-routine needs to be replaced with the provided program
exitw32.exe, shutcmd.exe or shutcmd.nlm. If you have installed the Windows95 version of
the UPSMAN software, these settings are automatically pre-configured by default.
ATTENTION:
Downtime
Make sure that the checkbox "System Shutdown enabled" is
always active if you do not want to use a user-defined
shutdown-job. If not, the UPS might be turned off during a
power failure before the system has been shutdown properly.
Defines how many minutes before the UPS
battery is discharged, that the shutdown
procedure begins. This time interval has to be
large enough to guarantee a proper shutdown of
the system before the UPS is turned off. Ensure
that this value is calculated on a large scale: (e.g.
with 10 minutes hold time of the UPS, start the
shutdown procedure at least 3 minutes before the
batteries are exhausted [=default]).
Enables local shutdown
(Default = on) When OFF, the UPSMAN
computer will not execute a shutdown.
Initiate shutdown always
after x minutes
Determines how many minutes after power fail
the UPSMAN computer is performing a
shutdown.
Configure shutdown
The type of shutdown can be selected here.
Please note that the UPS can not boot the
18
computer after power returned when
POWEROFF. (ATX boards) Default is Shutdown.
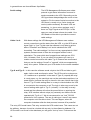
UPSMAN CONFIG extension:
In the new Shutdown-Configuration users can add self-
defined actions to the shutdown sequence via the ADD CUSTOM APPLICATION button.
In addition users can determine the shutdown sequence order in the same fashion that
has already been implemented by RCCMD.
ATTENTION:
Be sure to use the “start” initiative for using EXE programs
within batch files (i.e. “start notepade.exe). Also use the “call”
initiative for using other batch files within batch files (i.e. “call
mybatch.bat”).
Figure 9 Windows UPSMAN shutdown sequence configuration
3.2.2.4 System parameter: UPS Shutdown
The following functions are not supported by all UPS. In particular, devices with the
connection-type cable do not support a schedule-controlled down and restore function.
Enable UPS shutdown
Defines if the UPS will be turned off after the
completion of the shutdown procedure of the
server.
UPS down delay
Defines how many seconds after beginning the
shutdown procedure (see Downtime) that the
UPS will turn off.
19
UPS restore delay
Defines how many seconds after turning off the
UPS the system is turned on again. For most
UPS types it is necessary that the power has
been restored before the UPS has completely
switched off. With some UPS devices the entry
"0" an automatic restart is disabled and the UPS
needs to be switched on manually.
Enable SNMP support
Activates or deactivates the SNMP support.
Please check in the Event log if this function is
properly started. A message "SNMP
communication could not be started" shows that
an error occurred. No message means that
function is working. SNMP is not available for
Windows 95. Under NetWare this function is
always active and not configurable.
Restart SNMP Service
This will activate a stop/start of the SNMP service
under Wndows NT/2000/XP. This function avoids
start problems of the UPSMAN agents, using
older or not maintained systems.
3.2.2.5 Files
Editor Log file
This UPSMON feature determines (configureable
only when disconnected) which editor is used to
view the Event log file. The default is
notepad.exe.
Event Log file upslog.csv
This creates the name of the Event protocol. The
default is a MS-Execel compatible csv file format.
Input Line Statistics
upslog.dat – This file is used for the UPSMON
statistics. This is a log file for the input voltage
and frequency values/data.
Data Log file
upsdata.csv – This file contains all UPSMAN
variables ID 700 or 800 which are part of the
message.dat. This way, an individual MS-Excel
compatible Log file can be created.
Broadcast Rate
Defines the time interval (in seconds) in which the
UPS-Management Software informs the network
user via the broadcast command during a power
failure of the remaining time until the shutdown is
initiated. This value is overwritten with entries
20
made in the EVENT configuration. Please note
that EVENT configuration always overwrites the
default settings.
Logfile Update Rate
Defines the interval (in seconds) in which the
UPS-Management Software logs the Input
Voltage and Frequency Values. The standard
entries into the text file are meade every 15
minutes, if no unusual events occur. If "0" is
enterd, no logfile is made.
Logfile Size min.
Defines the minimum time range (in hours) of the
log file for Input Voltage and Frequency Values.
Logfile Size max.
Defines the maximum time range (in hours) of the
log file for Input Voltage and Frequency Values.
The log file will be set back to min. size (value of
log file Size min.) if the log file contains more data
than the configured value.
3.2.3 Configuration of the JOBS
This part of the configuration exists only because of compatibility to older version of this
software. All Alarms and Jobs are controlled and configured via the EVENT section of the
configuration. Because of certain system events, the software makes the execution of jobs
(*.bat-file or *.ncf) available to enable you to adjust the UPS-Management software to your
requirements. As standard the UPS-Management Software executes internal system
event routines (Default: no entry, corresponds to the parameters "own" or ”default” in older
versions of the software.) These jobs are by default without no entries, as the functionality
is entirely controlled by the user or the Event configuration.
Broadcast
1. This job is executed during a power failure in the time-interval Broadcast Rate (see
System parameter: Timeframe/Broadcast Rate)
2. The system informs the user about the remaining uptime of the server. ("own")
Power failure
1. This job is executed immediately after a power failure has been detected.
2. The system informs the user that the power supply is interrupted.
Pwr Restored
21
1.
This job is executed when the power has returned.
2.
The system informs the user that the power has been restored.
Shutdown 1.
This job is executed at the moment the system starts the shutdown
(see System parameter: Downtime).
2.
The system will be shutdown and the UPS may be switched
off, if configured.
Under NetWare an adjustment of the path name in the UNC syntax is necessary, e.g.
\\netwareserver\sys\ups\upsman\myscript.ncf
Attention:
If you created your own shutdown-job, you have to make sure
that it has a down command at the end of your script; otherwise
the system will not be shutdown. Please use the provided
shutcmd.exe program for this.
Attention:
the UPSMAN program delays the shutdown, in case a script is
entered here. Every script will be executed first and then the
shutdown will be initiated.
Special: Special Jobs
These special jobs allow the execution of own programs and batch files. These jobs can
be set in the time frame when the UPS is running on battery mode. As soon as the UPS
”Remaining Time” is equal or less to the pre-set value, the program or batch procedure is
started.
Attention:
In the Event configuration the user can configure, if a JOB is
executed when the Event occurs or after a certain delay. The
corresponding event has to be selected from the configuration,
using the EDIT button and selecting the option “do after x
seconds”. Please refer to the EVENTS configuration section in
this manual.
Once the checkbox is active, the user is able to enter a PATH\COMMAND of the
corresponding program or batch file, for the desired script. This script will be started once
the Remaining Time ([m] in minutes) is reached.
For example: Different network-server should perform a shutdown via the shutdown script,
depending on the importance of each computer. In this case more UPS time can be
provided for the more important components of the system.
Additionally, up to four different JOBS can be executed time controlled
Job #1, #2, #3 #4
These jobs will be executed if the remaining time
is lower or equal than the configurated values. All
jobs are executed again and again until the last
job (shutdown) is executed. Usually these
22
”remaining related jobs” are used for the
sequenced multiple computer shutdown in larger
networks. So the first group of computers in the
network will be shutdown at e.g. 20 minutes
remaining time, the next group of computers at
15 min, etc. If these remote computers have a
ATX Board or are able to shut-off after the
system is down, the load of the UPS will be
reduced. Now the UPS will have more
autonomytime than before, so the more important
computers or group of computers are still
working, until the next job #2 is executed (see
picture)
Figure 10 Special jobs
Hint: Analog to this, for a sequencial execution of Jobs a Event group can be used.
Additional module
During the installation of the UPSMAN-Management Software for Windows
95\98\NT\2000/XP the module:
- QBlat
is also installed. Qblat is the UPSMAN software integrated SMTP E-mail tool and is
configured via the Event configuration. This module can be used via the Event windows
and command line and is only suitable for use with MS-Outlook Express. Please check the
following screens:
23
Figure 11 Extra Jobs Power fail
Figure 12 Insert RCCMD Shutdown
In the right window the user can configure a job, responding to an event (Button: Insert)
which then sends an e-mail (see left window) to all entered e-mail addresses. Please see
also the example configurations.
Please enter qblat.exe, to see the syntax.
The UPSMAN offers an own address book in order to send E-mail to groups of users.
Please select this address book and create one or more groups. The Outlook Express will
show you the standard E-mail address book, where only single addresses can be
selected.
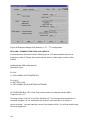
Configuration of Qblat.exe
A valid mail server/E-mail address, SMTP authentication has to be entered in the
UPSMAN configuration, in the menu card Mail Server in order to use the mail service.
Please check screen shot.
24
Figure 13 Mail Server
Once this process is completed, the Qblat can send E-mails from every script or batch file
directly. If this e-mail should be sent manually and not from the UPSMAN service, the
UPSMAN service rights have to be altered.
Start the UPSMAN under a user-account (control panel->service->UPSMAN->start up>account). This user should have valid e-mail access.
Restart UPSMAN and test the mail service. If errors occur, please check first if Qblat.exe
executes the mail using the command line.
3.2.4 Configuration: EVENTS
The UPS Events enables the user to utilise and configure the different applications of a
UPS. Depending on the matter of use, via Events (Event messages of the UPS) certain
actions (Jobs) can be executed with the UPS-Management software. Via an Event it is
possible to transfer measured values, status messages to own processes, in order to
process those even further (e.g. load statistics etc.).
Attention:
Different to previous versions (up until version 4.16) all Events
will executed one by one, top-down, meaning that the user has
to make sure that e.g. RCCMD signals are send to the remote
client before the local RCCMD sender is executing a shutdown.
The order of the Event jobs can be sorted using the drag & drop
method with the mouse.
Which Events are configurable depends on the type of UPS. The standard messages,
which can be used, can be found in the file "message.dat" in the UPSMAN directory.
The following section explains the pre-settings.
25
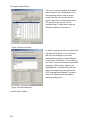
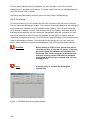
The register card Events
The event overview displays all available
events and the user configuration of the
corresponding actions. With a simple
mouse click the user is guided to the
register card of the corresponding event.
The specific event actions can be
configured here. Please also check the
following chapters of the manual.
Figure 14 Event overview
In order to configure the Event, please click
Advanced User Button. For every Event
there are pre-settings. In the above
example there are three Jobs configured
for the Event „UPS Alarm – Power fail has
occurred!“ Two Jobs will send out standard
messages, which can be edited in the
"Message.dat", whereas the third Event
writes a message into the log-file of the
UPS- Management Software. In order to
add a Job, please click Insert and the
following dialog opens.
Figure 15 Advanced button
Insert Function Dialog
26
Please choose the desired function and set
when and how often this function should be
executed. Please note listed functions
depend on the used operating system and
not all of them might be available. In this
case please refer to share or freeware
programs, which allow the desired function.
Figure 16 Insert action dropdown menu
The following functions are available:
Send a Shutdown UPS Signal
Switches the UPS off after a pre-set time. Please
be aware that the UPS is not being switched off
before a system shutdown is executed, as
otherwise important data may get lost.
This shutdown signal only executes the switch
off, of the UPS, but not the shutdown of
connected computers. The user can configure a
delay (in seconds) before the switch off is
executed. This is recommendable when a
switching off of an UPS is necessary because of
over-heating etc.
Send Message box with text
Sends a network message. Enter a user name or
use the "*" character (not with NetWare), in order
to send the message to all users. Please note
that the Windows 95/98 Clients NT message can
only be only received if Winpopup.exe or another
message service is active. Please also consider
that "net send * <text> "with Windows 95/98 does
not function correctly. Instead of the " * " a
respective machine name e.g. "Workstation1"
must be entered. In order to send messages to
several users a "Send Message" job must be
inserted per user. Please note that the Windows
NT user database is not empty and that the
computer belongs to a domain, as otherwise the
network messages can not be sent.
Send RCCMD SHUTDOWN to
27
RCCMD (remote console command) is a
remote client
program used for the execution of executable
files via network. This tool transmits a TCP/IP
signal that is absorbed of the recipient module
(RCCMD client software) on another computer.
This function is normally used for sending a
shutdown command (call of shutdown.bat) over
the network to another computer, of any
supported operation system. (starting from CD
4.17).
From RCCMD Version 2.0 it is possible to use
the (*) wildcard or other syntax. For example
192.255.255.255 will send the signal to all
computers in the corresponding sub nets. A
RCCMD –s –a 192.168.200.255 will send the
signal to all computers in the sub net 200. The
entry of a IP address or hostname will send
RCCMD only to those named. If it is required to
shutdown more than one client, additional event
jobs can be configured. Hint: If the number of the
additional RCMD clients is too high, a batch file,
which contains the RCCMD –s commands can
be used instead. This much faster and also
easier to handle than the a long list of event job
list. This batch can be executed from the
SPECIAL or EVENTS EXECUTE PROGRAM
function.
Please note that RCCMD should always be
additionally configured in the “UPS Battery low”
Event and if the Event “UPS/shutdown
imminent....” is used, RCCMD must always be
located before the “shutdown UPS in default
seconds” command. For moving the command
lines, “click” with the left mouse on the line, hold
the button and now move the command.
Send email
Sends an E-mail. Please enter the E-mail
address and the corresponding text into the field.
Please note that you need a configured SMTP
server on the RCCMD client computer. A
RCCMD message is send to the client computer,
which make RCCMD client to start the Qblat
module with an e-mail. The RCCMD client
computer is therefore acting as e-mail relays.
28
Send RCCMD EXEUTE to
remote client
This action initiates the execute.bat on a defined
remote client (IP-address). This bat file can be
configured individually by the user. The user may
execute a random program on the remote client
computer, where the execute.bat is located. It is
also possible to attach parameters, whereas
these parameters must be added to the
execute.bat which is executed as described
above.
Send RCCMD MESSAGE ID to
In this menu the user can send an ID from the
remote client
messages.dat to other users. These IDs are set
to default in the UPSMAN directory originally, but
the text entries can be altered with an editor. The
edited text is then given out in a textbox.
Start Alarm Beeper with
This event function displays a message box with
Message box
an acoustic warning on the screen, if a certain
configured event occurs. The acoustic signal
stays active until the return key is pressed.
Send RCCMD MAIL ID to
Similar to RCCMD message ID, a message ID is
remote client
send, which is then send as an e-mail to the
corresponding receivers. The user can pick the
ID message at random, whereas an editor can
be used to alter the default ID messages in the
messages.dat.
Send RCCMD MAIL TXT to
Like the send e-mail function, an e-mails send to
remote client
configured receiver and the text content is
entered by the user a plain text in the function
field configuration.
Send RCCMD LOG TXT to
A text is send to the remote client, which is
remote client
written into the log file of he RCCMD client
computer.
Send RCCMD LOG ID to
Similar to the message ID, a message ID is send
remote client
from the messages.dat, which is then written into
the log file of the defined RCCMD remote client.
The user may choose a random ID from the file.
Again, an editor can be used to modify message
IDs in the default messages.dat.
Send RCCMD MESSAGE to
In this menu the user can connect and configure
remote client
a text message with a RCCMD event. Text
messages maybe send to RCCMD receivers. It
29
is possible to send a RCCMD 2 message from
the CS121 to a Windows 2000 or Unix computer,
which then transmits these messages as “net
send” and “wall” to the network. The problem of
sending messages to different operating systems
is now solved.
Execute Program
Executes a configured program. Please enter the
full path to the executable file. Is the desired
executable in the same directory as the
upsman.exe or *. nlm, no path entry is
necessary. The handling of other variables is
explained further on in this chapter.
Write to Log file UPSLOG.CSV
Writes the Event into the local log file of the
UPSMAN computer
Send default messages IDs
Sends pre-set network messages, using the
from file messages.dat
receiver name and message id. This standard
message can be configured in the "message.dat"
Open the file with an editor (e.g. Ultraedit) in
order to change or check the text of the
corresponding message ID. A separate "send
message" job has to be inserted for every user, if
messages should be send to several users.
Write to MS Event Viewer
When a certain Event occurs, an entry into the
Windows NT/2000/XP event viewer system
program can be made in addition to the
UPSMON event log file (upslog.csv). The event
jobs in the UPS-Management software can
therefore be integrated if e.g. a warning message
during a power fail should be written to the event
viewer. The user can utilise the Windows
standard event viewer entries by choosing the
type (informational, warning and error) and by
adding text to the event viewer entries also.
Entry EVENTVIEW. The list of the default entries
for the Microsoft event list, can be changed,
deleted or extended up on demand in the
configuration.
Fixed messages/entries in the Microsoft event
list are:
30
Information
8
Upsman Stopped
Information
7
Upsman Started
The following Microsoft event list messages can
be deleted or changed (from the default
settings):
Figure 17 Microsoft event list
Send RCCMD trap message
This function enables UPSMAN
by ID
/RCCMD2/UNMS traps, which show the UPS
status as a trap message. If activated it will
display a local message when the UPS status of
the UPSMAN/RCCMD server is changing. This
function will display a message from the ID file
(messages.dat), which can selected via the
browse button in the insert function menu. (This
function is only available for UPSMAN 5.2.6.7x
or later)
Please also note that the “RCCMD/UNMS trap
enabled“ box is activated in the RCCMD Wizard
on RCCMD clients and in the UPSMAN
configuration under “SYSTEM”.
Send RCCMD trap message
This function enables UPSMAN
/RCCMD2/UNMS traps, which show the UPS
status as a trap message. If activated it will
display a local message when the UPS status of
the UPSMAN/RCCMD server is changing.
(Attention: this function will not be executed in
the order entered with the other insert functions
and is only available for UPSMAN 5.2.6.7x or
later)
Please also note that the “RCCMD/UNMS trap
enabled“ box is activated in the RCCMD Wizard
on RCCMD clients and in the UPSMAN
31
configuration under “SYSTEM”.
3.2.5 e-mail to SMS
In order to send a SMS message as an event message, the E-mail to SMS method is
recommended. This method is nowadays standard in most GSM networks and very
reliable compard to Modem solutions. Please refer to the examples configurations.
Using this method, an E-mail address of a mobile phone user is configured as receiver
and the UPS event messaging is achieved as an SMS on receiver side.
Examples
GSM Provider T-Systems D1
Receiving
e.g. your D1 E-mail address will be [email protected] (e.g.:[email protected]) Please note that you enable receiving E-mail on your phone. This is done by
sending a SMS with the message “OPEN”, to the number 8000.
Sending:
In order to send a SMS via mobile phone to E-mail addresses worldwide, please attach
the E-mail address of the receiver at the beginning of the SMS message
to be followed by the actual message.
It is possible that some characters of an E-mail address may not be entered via mobile
phones. The following list give alternatives and replacement characters.
Alternatives:
“at“ character @
wildcard *
Under score _
double minus sign –
Up to now, only the subject or the text field of the E-mail have been transferred as a SMS.
160 characters from the subject and text field, will now be send generally.
If the message has been sent from a D1 mobile phone, the reply function of the mail
program can be used. The message starts with “Re:” or “AW:”. The D1 system will
recognise the command and transfer the content of the text field as SMS.
Is the e-mail the answer to an SMS that is originally from your phone, the content of the
reply-to field of the E-mail program will be transferred as sender address. Other e-mail
programs will transfer the data of the original field in the envelope of the e-mail –if not
present- the content of the “from” field as sender address.
Close Gateway:
Important: please note that when receiving E-mail via D2 Message Plus, costs will occur. If
you want to stop receiving e-mail, please send a SMS to the number 8000, with the text
CLOSE.
32
(If at a later time you want to enable the e-mail transfer again, just send a message to the
number 8000, containing the text OPEN, as described above.)
GSM Provider D2
Receiving
e.g. your D2 E-mail address will be [email protected] (e.g.:[email protected]) Please note that you enable receiving E-mail on your phone. Sending a SMS
with the message “OPEN”, to the number 3400 does this.
Sending
In order to send a SMS via mobile phone to E-mail addresses worldwide, please attach
the E-mail address of the receiver at the beginning of the SMS message to be followed by
the actual message.
It is possible that some characters of an E-mail address may not be entered via mobile
phones. The following list give alternatives and replacement characters.
Alternatives:
“at“ character @
wildcard * Under score _
double minus sign –
Up to now, only the subject or the text field of the E-mail have been transferred as a SMS.
160 characters from the subject and text field, will now be send generally.
If the message has been sent from a D2 mobile phone, the reply function of the mail
program can be used. The message starts with “Re:” or “AW:”. The D2 system will
recognise the command and transfer the content of the text field as SMS.
Is the e-mail the answer to an SMS that is originally from your phone, the content of the
reply-to field of the E-mail program will be transferred as sender address. Other e-mail
programs will transfer the data of the original field in the envelope of the e-mail –if not
present- the content of the “from” field as sender address.
Close Gateway:
Important: please note that when receiving E-mail via D2 Message Plus, costs will occur. If
you want to stop receiving e-mail, please send a SMS to the number 3400, with the text
CLOSE.
(If at a later time you want to enable the e-mail transfer again, just send a message to the
number 3400, containing the text OPEN, as described above.
GSM Provider E-Plus
Receive:
Please send a SMS to the following number: S-M-S-M-A-I-L (7676245)
Please enter the text: START only. You will be sent an SMS with the
following information: Ihre e-mail Adresse lautet:
[email protected] (Your e-mail address is: ....)
33
Sending:
In order to send an e-mail from your mobile phone, please enter the address of the e-mail
account in the format: [email protected].
It is possible that some characters of an E-mail address may not be entered via mobile
phones. The following list give alternatives and replacement characters.
Alternatives:
“at“ character @
wildcard * Under score _
double minus sign –
Up to now, only the subject or the text field of the E-mail have been transferred as a SMS.
160 characters from the subject and text field, will now be send
generally.
Up to now, only the subject or the text field of the E-mail have been transferred as a SMS.
160 characters from the subject and text field, will now be send in general. In order to do
this, the text “Body#” should inserted in the subject line of the e-mail and the message can
now be written in the text field. However, sending more than 160 characters is not
possible.
Close Gateway:
Please send an SMS to the number: S-M-S-M-A-I-L (7676245) Please also enter the text
message text „STOP“. You will now receive the following confirmation: “E-Plus Info: Ihr
Handy is für den e-mail Empfang gesperrt.
Please repeat the procedure from above, if you want to receive e-mails again.
Die standard setting of the e-mail incoming gateway is „STOP“ for all E-Plus users. In this
setting you can only send e-mail, but not receive e-mail.
E-Plus has no information, what the current gateway status of its customers is.
Other providers
Please ask your mobile phone network provider for information about e-mail to SMS
settings.
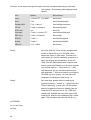
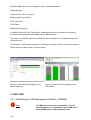
3.2.6 Example Job configurations
The number of available events and jobs are both dependent on the UPS and other
devices that are possibly installed like a Tempman or SensorManager. Although each
event and job is different the general configuration process for each job is the same.
Different event files can be saved and loaded for backup purposes or for simply having
alternative configurations. In general, most every job can be broadcasted and relayed from
a machine within its own segment.
34
Figure 18 RCCMD signal broadcast
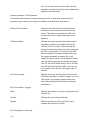
When the target of the command is “USER” and not “Address” the following entries can be
made:
Value
Parameter
USER
username
connected user
USER
*
connected user
USER
/domain:*
connected user
USER
local
server console
35
Description
sends the message to the
sends the message to every
sends the message to every
prints the message to the
Figure 19 Load Save jobs
To set-up a job for an occurring event, the following steps are as follows:
Start the UPSMAN configuration.
Click the ADVANCED button and enter the Events tab.
Double click any of the events to open the Extra Jobs dialogue.
The Jobs list can be altered by clicking either, Insert, Delete or Edit.
The buttons Insert and Edit open the Insert Job dialogue.
The following examples explain the usage of a few different jobs for becoming familiar with
the system.
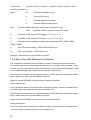
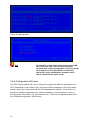
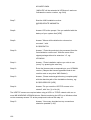
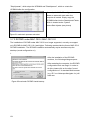
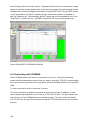
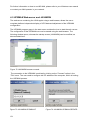
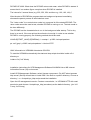
3.2.6.1 Execute program with parameters
Creating a load statistic via UPS EVENTS on Windows 95/98/NT/2000
The log file Datalog.csv constantly creates the current MS-Excel compatible log file with all
important UPS data and can also be extended or adjusted via the messages.dat ID 700
file (single-phased UPS) or messages.dat ID 800 (three-phased UPS). In the following
example, how load statistics can be configured.
On the register card Events, please
choose the Event "UPS has started
successfully“. Next click on the Insert
button, right of the Job field.
Figure 20 Insert job instructions
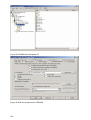
36
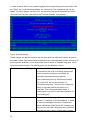
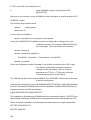
Please choose the function "Execute
Program". Enter the name of a batch file
in the field (here laststat.bat) PROGRAM.
The field PARAMETER should be filled
with the variables #LOAD (connected to
load to the UPS) and #LOCATION. Enter
the full path to the executable file. Is the
desired executable in the same directory
as the \UPSMAN no path entry is
necessary. The bottom part of the dialog
contains the buttons for the configuration
of the time and how often the execution of
the configured function is done.
Figure 21 Execute program
Please note that when entering several parameters, every parameter has to be separated
by a set of quotation marks separated by one space " " “. See the following example:
#LOAD“ “#LOACATION“ “#INVOLT
At the beginning and at the end no " " " are allowed! The " " " are only for separating the
variables.
By clicking of the OK button the configured function is allocated to the chosen Event.
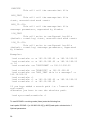
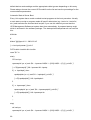
Before starting the UPSMAN service, please create the file "laststat.bat" via e.g.
NOTEPAD.EXE
The content of this bat file may look like the following:
37
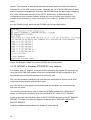
Figure 22 Laststat.bat using an text editor
Start the Upsman service. If you have followed the above example now every 20 seconds
the file "Load statistics.txt, containing the current values of the UPS load, is created and
updated.
38
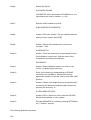
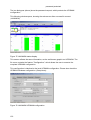
3.2.6.2 send Email
The send email job can send
notifications to receivers or
receiver groups defined in either
the Upsman address book or
the Outlook address book. The
text of the email can be filled
with information contained in
the system variables of Table 1
System Variables on page 43.
Figure 23 send email
The UPSMAN address book
makes it easy to organise
recipients into groups. The read
and write function allow the user
to make back ups of the
address book.
Figure 24 UPSMAN address book
39
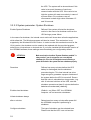
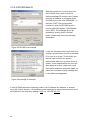
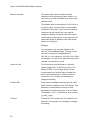
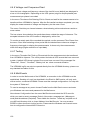
3.2.6.3 RCCMD Mail ID
With this function an e-mail is send from
the RCCMD client, which includes a
defined message ID from the user. Please
enter the IP address or hostname of the
RCCMD client in the field “ADDRESS”. In
the field “PORT” the port should be
entered on which the RCCMD client is
receiving RCCMD signals. The standard
port is 6003. The message ID can be
selected by clicking on the “Browse”
button. Please also check the following
screenshot:
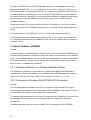
Figure 25 RCCMD mail example
In the row „Recipient“ the e-mail receiver is
entered, which will then receive a message
ID in form of an e-mail. This function can
also be used to inform the system
administrator about a e.g. power failure or
similar. In the window above the user can
also adjust as to when (within the event)
the function should be executed. Again, an
editor can be used to modify message IDs
in the default messages.dat.
Figure 26 message ID example
For all RCCMD actions the following is valid: If an IP address as “address” is entered,
using the “Insert“ function, it is possible to send messages or execute event actions on/ to
all recipients in the subnet by adding (.255) e.g. 192.168.255.255.
40
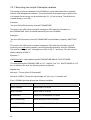
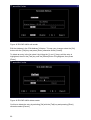
3.2.6.4 Send RCCMD execute to remote client
This action initiates the execute.bat on a
defined remote client (IP-address). This bat
file can be configured individually by the
user. The user may execute a random
program on the remote client computer,
where the execute.bat is located. It is also
possible to attach parameters, whereas
these parameters must be added to the
execute.bat which is executed as described
above.
In this example the execute.bat file is
executed on remote client (IP Address
192.168.202.156), on port 6003. The entry
made in the parameter field will be sent
Figure 27 RCCMD execute example
from UPSMAN as a parameter to
execute.bat and in this way “myprogram.exe” is started.
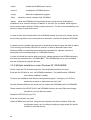
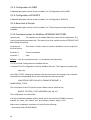
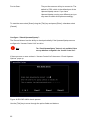
3.2.6.5 WOL
This job will cause hibernating or
sleeping computers to go back online.
The receiving computers of this signal
must have network cards, and
operating systems that support this
function. The Mac address can be
determined in dos consoles by entering
the command:
ipconfig /all
at the dos prompt.
Figure 28 Wake-On-LAN signal
41
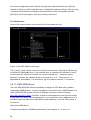
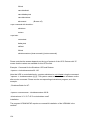
3.2.7 Executing own scripts: Examples variables
The transfer of internal variables of the UPSMAN to self-created batch files is possible
with the UPS-Management software. The normal batch file programming is used for this.
In the batch file the values can be selected with %1, %2 etc as usual. The definition is
created directly in the JOB
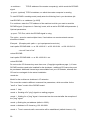
Example l:
”net send GX9 UPS autonomy time #AUTONOMTIME”
This entry in the JOB sends a network message to GX9 with the information on
#AUTONOMTIME, which is transferred directly from the UPSMAN.
Example 2:
”net send GX9 autonomy time #AUTONOMTIME minutes Battery Capacity #BATTCAP
%”
This entry in the JOB sends a network message to GX9 with the information on UPS
Autonomy time and battery capacity, which are transferred directly from the UPSMAN.
The receiver GX9 gets this: ”message from GX 0 to GX 9”: ”Autonomy Time 46 minutes
battery capacity 85.000 %”
Example 3 :
JOB Power fail: c:\ups\mybatch.bat #AUTONOMTIME #INVOLT #OUTPOWER
This entry defines #AUTONOMYTIME as ”%1”, #INVOLT as ”%2”, #OUTPOWER as ”%3”
etc. In the batch file itself, the following can be configured:
Mybatch.bat
Net send * ”Power fail at UPS detected!!”
Net send <USER> ”Power fail! Inputvoltage %2 Volt, only %1 minutes left!”
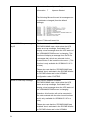
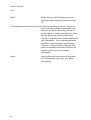
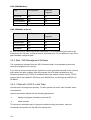
Every UPSMAN provides at least the following variables
Variable
Function
#OUTPOWER
Actual load in % at the
#OUTPOWER
Actual load in % at the
#TEMPDEG
Actual UPS temperature in Celsius
#AUTONOMTIME
Actual autonomy time in minutes
#LASTTSTBUPT
Last tested BACKUPTIME (UPS test) in minutes
#STATUS
Actual UPS Status in minutes
42
#LASTERR
Last error
#TIMEUNTILSHTDWN
Actual Remaining time (remaining battery time until SD)
#RUNTIME
Actual Remaining time (remaining battery time until SD)
#INCURR
Voltage input power
#BATTVOLT
Battery load in Volt (V)
#INFREQ
Input frequency in Hz
#OUTFREQ
Output frequency in Hz
#CNT_PF
Counter for power failure
#CNT_BL
Counter for battery low
#CNT_SD
Counter for shutdown
#CNT_SA
Counter for summary alarms
#CNT_TF
Counter for test errors
#INVOLT
Current Input voltage in Volt (V)
Table 1 System Variables
For the special UPS integration into the UPSMAN software, more variables can be
provided. Please ask your UPS dealer/manufacturer for more information on additional
variables.
3.2.8 Start the UPS-Management Software
Upsman.exe is a Windows service/ Windows 95/98 application. The configuration
parameter are read from the Windows registration database.
Please start the upsman.exe via the control panel with the help of the service icon.
Alternatively start the UPSMAN with a command line: net start Upsman. To use the
UPSMON (graphical interface), please install the TCP/IP protocol on your system. When
using just Windows NT, ”NT pipes” can also be used.
Attention:
Windows 95/98 always needs a TCP/IP installation, if the
UPSMON module is used.
Upsman.exe can also be started from the command line as foreground process. The
following parameter are supported:
43
-install
installs the UPSMAN as a service
-remove
uninstalls the UPSMAN service
-config
starts the configuration program
-libver
shows the version release of the UPSMAN
-debug
starts the UPSMAN as foreground process (not as service) and displays
windows for error function analysis. In addition a “line.raw” file is created, which logs the
entire communication between COM port and end device. The file can be decoded by your
service in order to track down errors.
In order to allow an automatic start of the UPSMAN module at server boot; please set the
service start-up status in the control panel to automatic. (=default for Windows NT/95/98)
In case the service needs to be removed or deactivated, please change the start-up status
in the control panel section SEVICES to manual. In case an automatic start under
Windows 95/98 is not wanted, please enter the command line: Upsman -remove or
deactivate via the corresponding icon "UPSMAN Remove".
In order to reinstall the service after removing it, please change to the UPSMAN directory
and enter the command line: "UPSMAN.BAT". The UPSMAN service is now reinstalled
and the configuration program will start.
3.2.9 Multiple installations under Windows NT /2000/98/ME
Please insert the CD and start setup.exe, if the automatic start does not work.
Enter the first CD-Key for your 1st UPSMAN Installation. The UNMS and/or UPSMON
tools can be installed if needed.
Continue the installation and start the configuration program. Configure your UPS but
answer the question to start the service with "NO”.
Use the Windows Explorer (or similar tool) to rename the UPSMAN path into UPSMAN2.
Please open the file UPSCFG.INI in the UPSMAN directory with any Editor and change
the path to your new directory name.
Restart the SETUP from your CD
Enter the 2nd license key code.
Install UPSMAN only this time, using the same directory as before (default). When the
configuration starts, do not configure anything, simply press OK and do
not allow to start the service.
44
Open a DOS prompt and change to the UPSMAN-Directory. Enter „Upsman.exe –remove“
<Enter> and after this „Upsman –install –n1“ <Enter>. Start the
configuration program with „Upsman –config –n1“ <Enter>. Now press
again OK and do not start the service, (you do not have to configure
your UPS now, this will happen later.)
Please open another DOS prompt and change to your UPSMAN2-directory. Enter
„Upsman –install –n2“ <Enter>. Start the configuration program
„Upsman –config –n2“ <Enter>. Now press OK and do not start the
service, (the user does not have to configure your UPS at this stage!)
Please start the REGEDIT.EXE
(For NT/2000/XP OS only) Change in REGEDIT to
HKEY_LOCAL_MACHINE > SYSTEM > CurrentControlSet > Services. Here the user will
find 2 UPSMAN-entries. Delete the extensions –n1 and –n2 in the
ImagePath.
Open any editor and change in both directories UPSMAN and UPSMAN2 the file
UPSCFG.INI. Please change the setting „Registry=1“ to „Registry=0“.
Please save both changes.
It is possible to configure both services via a DOS prompt using the command „Upsman –
config“ <Enter> from any directory. Note: make sure that every
UPSMAN has a different com port and listen port (for UPSMON
connection). Please confirm your settings with OK. You will not be
asked to start the service.
(For NT/2000 OS only) Please start both services via the control panel – services. A
start via command line using “NET START UPSMAN –n1 or –n2” is not
possible.
If the user wants to use the UPSMON; the UPSMAN can reached via the corresponding IP
address and the listen port, Example: Enter in UPSMON
“127.0.0.1:5770“ for a UPSMAN running with listen port 5770.
The user can also create links from your desktop to avoid the configuration from the DOS
prompt.
In order to remove the services: Enter from a DOS prompt of every UPSMAN directory
„Upsman –remove –n1“ <Enter> or „Upsman –remove –n2“ <Enter>.
3.2.10 UPSMAN directory
The local UPSMAN directory contain send.bat, log file entries, messages.dat which are
part of the event configuration, are file is existing. Using a editor all of these files can
edited and modified. The event configuration however enables a complete configuration
of these files.
45
3.2.11 Stop the USV-Management Software
In order to stop the UPSMAN service, a command line with the command: net stop
Upsman can be entered. Also, the control panels (services) in the Windows 95/98
UPSMAN Icon in the status panel can be used.
3.2.12 RCCMD for Windows NT/2000/XP
The RCCMD (remote console command) is a program that allows the execution of
programs on remote computers. This tool is part of all UPSMAN supported operating
systems with the exception of Windows 3.x.. With this tool it is possible to connect
different operating systems. Is the UPS-Management Software installed on a Windows
NT/2000/XP computer and should a remote shutdown be executed on a computer with a
different operating system in heterogeneous network, the RCCMD tool is necessary.
RCCMD Version 1 can only send a shutdown signal, whereas RCCMD version 2 can also
act as a message gateway between different operating systems and RCCMD version 3
has redundancy functions (see 3.2.16 RCCMD 3 group redundancy settings).
The RCCMD tool works in two different modes. The module works like a normal program
start, as "Send mode" in order to send RCCMD commands –s –a to other computers. In
the so-called ”Listen” mode, installed as a NT/2000/XP service, the program (as
background process) waits for a command from the ”Send” mode, of the RCCMD module.
In the ”Listen” mode the RCCMD module waits for the ”ping” signal. After reception of this
signal the module executes a batch file or program.
Attention:
For first time users we do recommend the use of the RCCMD
Wizard, which makes the configuration easier. Please start the
RCCMD Wizard from your program group.
Attention:
Please do not use the wizard and manual settings at the same
time.
Eventually, the RCCMD Service must be allocated with special system priviledges if
certain commands and programs like messaging using “net send”, shutting down
databeses and the like are to be executed. The RCCMD start-up parameters in the control
panel must be set to the administrator /superuser account (enter password twice) together
with the correct password. If you are not allowed to use the administrator account you
have to create an account who has all the rights to shutdown this NT/2000 computer.
Change to the control panel and mark the RCCMD in the list, change the start-up
parameters to ”this account” and enter the any administrative account.
Now the RCCMD has been installed and configured to execute C:\ups\shutdown.bat.
46
3.2.13 RCCMD on Windows 95/98
RCCMD for Windows 95/98 functions similar to RCCMD on Windows NT. The only
difference is the program name, which changes to RCCMD95.EXE. Please also refer to
the RCCMD Windows section of this manual.
Attention:
For Windows 95/98 users we do recommend the installation of
the TCP/IP protocol first and then run the configuration
program making use of the RCCMD WIZARD.
Attention:
In case Winpop.exe is used on Windows 95/98, RCCMD can not
be started on port 6003 otherwise the computer will hang-up.
Please change the sender and receiver call up accordingly.
Trained users may use the RCCMD Wizard and enter all changes manually. Please check
the following: In order to start the RCCMD process in the ”Listen” mode, the RCCMD
parameter have to be entered in the registration database. Please enter:
regedit.exe rccmd95.reg or simply start rc_init.bat
The parameters are now located under the registration-key
HKEY_LOCAL_MACHINE\CurrentControlSet\Services\RCCMD95\Parameters
Start regedit.exe again if you want to reconfigure RCCMD.
If you are unfamiliar with the registration editor of Windows 95 you can also modify the file
rccmd95.reg and execute the command regedit.exe rccmd95.reg again.
Parameters:
Port
Special TCP-Port that receives the RCCMD signal.
Addr1... 10
TCP/IP address of the computer that accepts the RCCMD-signal.
ExecutePrg
Command that is to be executed when receiving the RCCMD-signal.
To start RCCMD execute the command:
rccmd95
Or start the program using the Windows 95/98-launch bar.
To start RCCMD in sending-mode (send) enter the following line in your shutdown-job:
RCCMD95 -s -a <address> [-p 6003]
For <address> enter the TCP-address of the machine to which you want to send the
RCCMD-signal.
47
Optional parameters:
-p <port> TCP-Port on which the RCCMD-signal is sent
The option –a can be used several times, if a shutdown on more remote computers in the
network should be executed.
Do not use the CD License key more than once. (Copyright regulations page 1). If more
RCCMD modules need to be installed for the shutdown, additional CD license key must
be purchased. Additional license keys are available from your UPS dealer, whereas the
CD can be used again for the actual installation.
3.2.14 Testing the RCCMD connection
Finally test your configuration if all RCCMDs are present and working. For this you may
use the RCCMD in the Debug mode Syntax RCCMD –debug –s/l –a), so that you have
screen output. ”PING” every remote computer with the command ”ping [hostname] [IP
address]”. If the PING works fine, you can now start to test the RCCMD connection with
the Debug mode. If everything works fine, you will see that a connection is established
and closed again. This means that the remote RCCMD received your signal. It does not
mean that the RCCMD will now executed a program. Please see the following graphic for
more information:
Figure 29 RCCMD console test
3.2.15 Testing the RCCMD 2 connection
In order to see under RCCMD 2 if the UPSMAN processes on the remote client are still
active, the following syntax can be entered via command line:
Rccmd –sc –ac <IP address> -pc5769
If the UPSMAN is active, the message “UPSMAN <IP address> alive”. There is no
message if the UPSMAN is inactive.
48
C:\RCCMD>rccmd -?
usage: rccmd
[param]
rc_init install service and set default parameters
param: -i
install service
-u
uninstall service
-v
display version info
-debug start as a console app for debugging (listenMode)
-bs filepath set filepath for shutdown-event (listenMode)
-ba filepath set filepath for upsmanNotAlive-event (listenMode)
(ATTENTION: this will override registry-settings)
-s ... start as a console app for sending mode
-sc
check upsman
-cr
connect retries for every check (default 5)
-se "command [parameter]" ...
valid commands: SHUTDOWN, EXECUTE, MSG_ID, MSG_TEXT
MAIL_ID, MAIL_TEXT, LOG_ID, LOG_TEXT
...-a 192.10.200.99 [-a 192.10.200.98] (max. 15)
-ac ... [-ac ...] upsman adress (max 15)
-p[r] portaddr rccmd (default 6003)
-pc portaddr check-upsman (default 5769)
-t[r] timeout rccmd (default 10 sec)
-tc timeintervall check-upsman (default 30 Min)
-rc max retries for check-upsman (default 0 (infinite)
3.2.16 RCCMD 3 group redundancy settings
The Windows version of RCCMD version 3 allows users to mix and gather up to any 4
UPSMAN managed UPS in the local network into a grouped redundant UPS system. This
way even UPS systems from different manufacturers can be turned into one parallel
redundant unit. Simply set the “Use RCCMD group/redundancy” check box during set-up.
49
Figure 30 RCCMD Redundancy check box by the RCCMD v.3 set-up
In the next step of the installation the set-up will automatically scan the network for
UPSMAN servers and put their IP addresses into the selection window.
Figure 31 Setting up the RCCMD Redundancy group during set-up
Simply select up to four different UPSMAN IPs and the Redundancy Level for the
shutdown suppression condition. Setting the “Execute command when redundancy
50
suppresses a shutdown” will cause the RCCMD services to enact either the default
ShutdownSuppressed.bat or another user defined command when a received shutdown
command from one of the UPSMAN servers has been suppressed.
3.2.17 Shutdown.bat file (example)
Now you have to check that this batch works properly: The shutdown.bat of the RCCMD
may look like the following on NT. On other platforms a UNIX ”init 0” or Novell ”DOWN” is
executed. On Windows NT/2000 the SHUTCMD.EXE tool is used or any other NT
shutdown program. Call Shutcmd -? for Syntax help.
An example SHUTDOWN.BAT is copied into the UPS directory, which will assist you
further.
ATTENTION:
If your configuration works fine in the DEBUG mode, does not
necessaryly mean that it works also with the RCCMD as NT
service. Please ensure that the RCCMD as service has been
started in a user account with administrative rights, otherwise it
may happen that only non-restrictive programs may be
executed (like notepad.exe) but no Shutdown. (This will result
in the NT error message ”Adjust Token Privileges failed”.) If a
program has in fact started or not can be seen in Taskmanager
window (ALT+CTRL+DEL), because a service does not a started
program in the current user session due to non-interactive
transaction with the desktop.
The full command syntax for the NT consol for RCCMD in <Listen mode>:
rccmd [–debug] -l [-a IP adress] [–h hostname] [-p port] "command"
where the option in brackets are optional. The command can be either a program or a
path for another batchfile to be found on this computer. The command file should be given
with full path. The -p port option can be included if you want to start rccmd more than once
at a single computer to proceed different commands for different events. The default port
number is 6003, use any other availabe port number for different RCCMD commands.
RCCMD in the send mode :
rccmd [–debug] -s [-a IP adress] [-h hostname] [-p port]
This command is regularly used in the Senders batchfile (Shutdown.bat) and sends a
"ping" to the computers IP adress or hostname. If this ”ping” has been transferred, the
next command RCCMD –s may be executed, etc.
3.2.18 RCCMD client as relay station
In order to reach a bigger number of RCCMD receivers, the adapter needs to be operated
as relay station. The receiver will be configured so that it will receive a RCCMD signal and
this signal is then used to start a batch file, which then starts even more RCCMD sender
51
signals. This computer is then sender and receiver at the same time and is therefore an
important link in the UPS monitoring chain. Generally the use of an RCCMD client as relay
stations makes the management of several 100 RCCMD clients far easier than configuring
this via the Webbrowser interface of the CS121. Additionally, all Webrowser Event
configurations have a certain limitation so that you have to use the relay function if the
number of jobs exceed e.g. 50 per event at the CS121 HW 131, at older CS121s even
earlier.
See the following script, which lets the RCCMD-client act as relay station:
Figure 32a Example: Batch file to let the RCCMD act as relay station
3.2.19 RCCMD in Windows NT/2000/XP only network
In a smaller, plain NT network, it may be useful to shutdown the remote NT computers by
using the SHUTCMD.EXE instead of the more complicated RCCMD configuration. But
beware that there are several restrictions and security risks:
The user who sends the shutdown call must have an administrative account on all other
computers and must have administrative rights.
Any user with this name and the correct password can shutdown any computer at any
time from any place.
The following example shows how to install the UPSMAN software on a Windows NT
server and configure a shutdown for a second BACKUP NT server in a NT Network:
Create a user with administrative rights on the NT SERVER and also on the NT BACKUP
SERVER. This user must have the rights to shutdown the NT SERVER AND the NT
BACKUP SERVER.
Install the software as described in the chapter 2 in this manual.
52
Change to the SPECIAL card in the UPSMAN configuration and change the following
parameters: Enable JOB 1 (or 2 or 3) and enter 15 minutes for execution. Delete ”own”
and enter the path of your shutdown.bat file: e.g. c:\ups\upsman\shutdown.bat. (This will
now execute the job shutdown.bat, which closes the NT BACKUP Server at 15 minutes
rest battery capacity in the UPS). If you want that the shutdown is initiated simultaneously
as the shutdown of the NT SERVER, enter this job in the section FILES. Start the
UPSMAN software.
Please enter a job of your desire and test it with the command line. This job can enter in
the FILES section in the UPSMAN configuration if it is working. Please use the following
syntax:
c:\ups\shutcmd.exe \\NT_BACKUP /T:15 /C /Y "UPS Alarm Remote shutdown !"
If the shutdown works fine, please test it with the UPS. (Force a power failure and wait –
or – change the downtime of the UPSMAN for this test to the needed values to perform a
shutdown earlier.
3.3 Novell NetWare UPSMAN
General
In order to load the UPS-Management Software onto your Novell-System a MS-Windows
95/98/NT/2000 Workstation is required, which has access to the hard drive of the network
server. The UPSMAN files are copied onto the Novell NetWare server when installing from
a Windows computer. Please ensure that you have administrator rights on the network
drive in order to complete the installation.
3.3.1 Installation Modules for a Windows NetWare Station
The installation of NetWare is executed from a Windows 95/98/NT/2000 Workstation
vorgenommen. Please see chapter 3.2.1 Installation of the UPS-Management Software.
Please also note that the network drive is connected to the server e.g.: F:\SYS
3.3.2 Configuring a Windows 95/98/NT/2000/XP Workstation
General
The UPS-Management Software can only be configured using Windows 95 or higher.
Please compare the chapter 3.2.2 Configuration of the UPSMAN in this manual. In order
to get detailed information to certain parts of the configuration.
To start the utility please start Icon in the UPS program group. Instead the file upsconf.bat
may be started manually from the UPS NetWare directory. Which also starts the
configuration.
A detailed description can be found in chapter 3.2.2 Configuration of the UPSMAN
53
3.3.3 Configuration of JOBS
A detailed description can be found in chapter 3.2.3 Configuration of the JOBS
3.3.4 Configuration of EVENTS
A detailed description can be found in chapter 3.2.4 Configuration: EVENTS
3.3.5 Execution of Scripts
A detailed description can be found in chapter 3.2.7 Executing own scripts: Examples
variables
3.3.6 Command syntax for NetWare UPSMAN/ SHUTCMD
upsman.nlm
The upsman.nlm is loaded without the command line parameter. E.g.
load sys:ups\upsman\upsman.nlm. This start line is to be copied into the AUTOEXEC.NCF
after testing succesfully.
shutcmd.nlm
This modul is used in order to enable a shutdown out of a script from
the local server.
shutcmd –f
Forces a shutdown
shutcmd -?
Help
Beispiel: load sys:ups\shutcmd.nlm –f (=immediate local shutdown)
TCP/IP minimal Configuration for NetWare Server
A minimal TCP/IP configuration exists for NetWare Servers. This happens by loading the
tcpip.nlm
with LOAD TCPIP. Loading the network card drivers works in this example via a network
card and the corresponding driver of the manufacturer epro.Ian Syntax:
LOAD EPRO PORT=340 INT=A FRAME=ETHERNET_II
NAME=EPRO_TCPIP
The connection to the IP Protocols to the network card is achieved via:
BIND IP TO EPRO_TCPIP ADDRESS=192.168.10.1
The configuration is now finished.
List of the NetWare loadable moduls (NLM), which are used by UPSMAN: aiocomx,
mathlib, aio, snmp, clib, clibaux, spx, ipxs, streams, nwsnut, tcpip, tli, lib0.
After correct installation, autoexec.ncf looks like the following:
search add SYS:\UPS\UPSMAN
54
LOADING UPSMAN.NLM
load upsman.nlm
RCCMD MULTIPLE SERVER SHUTDOWN CLIENT
THIS SOFTWARE IS OPTIONAL AND HAS TO BE INSTALLED WITH A VALID RCCMD
LICENSE CODE
THE FOLLOWING EXAMPLE IS THE STARTUP OF AN RCCMD CLIENT WITH
IMMEDIATE SHUTDOWN AFTER
RECEIVED ANY RCCMD CALL FROM UPSMAN/RCCMD SENDER.
LOADING RCCMD.NLM -L(LISTENER) -A(IP ADRESS OF UPSMAN/CS111/RCCMD
SENDER) COMMAND(COMMAND TO BE EXECUTED)
EXAMPLE:
LOAD RCCMD.NLM -L -A 192.168.10.2 LOAD DOWN.NCF
load rccmd.nlm -l -a load down.ncf
Long file names:
In order to use long file names on a Netware partition, the following has to be entered
using Netware 3, 4 and 5 at the server console:
load long
(the module "long" is loaded into the memory)
add name space long to volume sys ("long" is added to the volume "sys")
Please note that the volume name actually has to exist in order for this procedure to
work. Please also note that for every volume, the name space has to be added
individually.
3.3.7 Command syntax for Novell NetWare System moduls
aiocomx.nlm
The aiocomx.nlm is responsible for the proper functionality of the serial interfaces of a
NetWare server. This module is often changed by software that uses the serial interface
e.g. Arcserve, Faxware. Not using the original aiocomx.nlm in conjunction with UPSManagement Software, that is distributed by Novell, could cause problems, when installing
UPS-Management Software. To prevent such problems, it is possible to load for each
serial device it´s own aiocomx.nlm from different directories.
55
aiocomx.nlm
<port=W> <int=X> <name=Y> <node=Z> <force> <nofifo> <rxt=A>
<txq=B> <maxrate=C>
where,
force
W
is the port I/O address (hex)
X
is the port IRQ (hex)
Y
overrides default board name
Z
overrides default board number
overrides default test which verifies, that a COM port exists
nofifo
overrides 16550 to operate in non-FIFO mode
A
overrides 16550 receiver FIFO trigger – 1(*), 4 (**), 8, 14
B
overrides 16550 transmit FIFO queue – 1(*), 4, 8, 12, 16(**)
C
overrides devices capable of higher than rated speed 9600, 19200, 38400,
57600, 115200
(*)
Non-FIFO mode setting – 8250/16450/16550 device
(**)
FIFO mode default – 16550 device only
Example: load aiocomx.nlm port=0x2f8 int=3 nofifo
3.3.8 Start of the UPS-Management Software
The upsman.nlm is started from the fileserver console. Select the system console and
enter load load <volume>:ups\upsman\upsman.nlm (for <volume> enter the name of your
volume, e.g. sys). Upsman.nlm needs for its execution more Novell standard NLMs. These
will be loaded automatically, if there are not already in the memory.
After the start of upsman.nlm the program reports it's UPS information status with a status
screen and a user menu and the following functions:
display of current UPSMON connections from Windows terminals
ending upsman.nlm
For an automatic start of upsman.nlm when booting the system, enter the command load
<volume>:ups\upsman\upsman.nlm into the autoexec.ncf.
56
3.3.9 Stop the UPS-Management Software
Please choose the UPSMAN screen and then Exit. Please ensure that there is no active
UPSMON connection when exiting.
The upsman.nlm can also be closed by using the command unload upsman.nlm. Upon
stopping the UPSMAN, the server is not protected anymore.
Attention:
Explanation for the UPSMON modul of the UPS-Management
Software can be found in the How to use UPSMAN section of
this manual.
3.3.10 RCCMD on NovellNetWare
The following text is presented when entering RCCMD with the help parameter “?” inside a
NovellNetWare console:
Possible parameters:
-l
listen. waits for a command from RCCMD sender
-s
sends a ping to a listening program
-se <command> <param>
sends a command to a listening program
-p
<port>
Portadress (Defaultadress = 6003)
-a
<ipaddress>
Address in IP Format. Ex. -a 192.10.20.30 (max.
10)
-t
-?
<timeout>
Time in Seconds (Defaulttimeout = MAX_TIMEOUT)
this help
Supported Commands (for use with -se argument):
SHUTDOWN
This will call the configured shutdownbatchfile (default: shutdown.bat)
57
EXECUTE
This will call the execute.bat file
MSG_TEXT
This will call the message.bat file
<text, unrestricted word count>
MSG_ID <ID>
This will call the message.bat file
<message parameters, seperated by blanks>
LOG_TEXT
This will write to configured log-file
(default: rccmd.log) <text, unrestricted word count>
LOG_ID <ID>
This will write to configured log-file
(default: rccmd.log) <message parameters, seperated
by blanks>
Examples:
load rccmd.nlm -s -a 192.10.200.52 -a 192.10.200.53
load rccmd.nlm -s -a 192.10.200.52 -a 192.10.200.53
-t 10
load rccmd.nlm -se "SHUTDOWN" -a 192.10.200.52
load rccmd.nlm
load rccmd.nlm
192.10.200.52
load rccmd.nlm
load rccmd.nlm
load rccmd.nlm
-se "EXECUTE" -a 192.10.200.52
-se "MSG_TEXT this is a message" -a
-l
-l -a 192.10.200.52 -a 192.10.200.53
-l -a 192.10.200.52
If you have added a search path i.e.: "search add
sys:rccmd",
otherwise you have to use the absolute path.
load sys:rccmd\rccmd.nlm -l
To start RCCMD in receiving-mode (listen) enter the following line:
load <path> RCCMD -l [-a 192.200.100.10] [-p 6003] load <path> shutcmd.nlm –f
Optional parameters:
58
-a <address>
TCP/IP address of the master computer(s), which sends the RCCMD-
signal.
-p <port> (optional) TCP-Port address, on which the master computer is sending
To start RCCMD in sending-mode (send) enter the following line in your shutdown-job:
load RCCMD -s -a <address> [-p 6003]
For <address> enter the TCP-address of the machine to which you want to send the
RCCMD-signal. (Computers in "listening" mode, with an active RCCMD with parameter -l)
Optional parameters:
-p <port> TCP-Port, which the RCCMD-signal is using.
The option -a can be used multiple times, if a shutdown on remote network servers
should be initiated.
Example: (Example path <path> = sys:\ups\upsman\rccmd.nlm)
load <path> RCCMD.NLM –s –a 192.168.210.3 -a 192.168.210.4 -a 192.168.210.10
...etc.until ”end of line”
unload RCCMD
load <path> RCCMD.NLM –s –a 192.168.210.8...etc.
unload RCCMD
Do not use the CD License key more than once. (Copyright regulations page 1). If more
RCCMD modules need to be installed for the shutdown, additional CD license key must
be purchased. Additional license keys are available from your UPS dealer, whereas the
CD can be used again for the actual installation.
rccmd.nlm
Modul for the multiserver shutdown in IP-networks.
The rccmd.nlm contains different command line parameters, which are either for the
”send” or ”listen” modul of the RCCMD modul.
rccmd -? Help
rccmd -s Sending off a ”ping” signal to a waiting program
rccmd -l Waiting for a ”ping” signal. A command can be executed after the reception of
the ”ping” signal.
rccmd –p Setting the port address (default = 6003 ).
rccmd –a Address in IP format e.g. 192.168.202.1
rccmd –t Time in seconds until a connection will be established. (default timeout = 10)
59
Example:
load sys:ups\rccmd.nlm -s -a 192.168.202.1 [-a 192.168.202.1]
load sys:ups\rccmd.nlm -s -a 192.168.202.1 -t 10
load sys:ups\rccmd.nlm -l -a 192.168.202.1 shutcmd.nlm [/para]
rccmdipx.nlm
This is a modul for just IPX networks. This modul sends a shutdown command (or any
other console command) directly to every IPX server name. Please start RCCMDIPX on
all Novell consols. The modul needs to be loaded on both servers.
This modul has to loaded on on both servers first
(1. Rename RCCMDIPX to RCCMS.NLM 2. Load RCCMD The following syntax is valid:
rccmd <server name> <console command>
Whereas <server name> is a valid server in a network enviroment and <console
command> a valid NetWare command is.
Example:
1. load sys:ups\rccmdipx (or load RCCMD if RCCMDIPX.NLM is renamed to
RCCMD.NLM)
2. rccmd gnw1 forcedown
or
1. load sys:ups\rccmdipx
2. rccmd gnw1 sys:ups\down.ncf
Instead of the down command for older clib.nlm files, the forcedown command maybe
used.
Multiple-start RCCMD unter Novell
The multiple start RCCMD under Novell is relatively easy to manage. Several RCCMD
clients may be started with the following command line:
load rccmd.nlm -l -a load down.ncf
whereas the syntax goes as follows:
LOADING RCCMD.NLM -L(LISTENER) -A(IP adress of UPSMAN/CS121/RCCMD
SENDER) COMMAND (COMMAND TO BE EXECUTED)
Example:
LOAD RCCMD.NLM -L -A 192.168.10.2 LOAD DOWN.NCF
In this scenario the “down.ncf“ file is executed, which leads to an immediate shutdown of
the client computer, if the RCCMD call from the RCCMD server (sender) is received.
Other . ncf or .nlm (executables) files may be executed too.
A group of 8 .ncf example files can be found in the UPSMAN installation directory. Please
note that these example files ma have to be adjusted by user/administrator according to
the configuration of the system.
3.4 Unix
3.4.1 Installation of the UPS-Management Software
To copy the UPS-Management Software into your Unix-system you need a CD-ROM drive
and a CDFS filesystem driver (ISO 9660). If there is no CD-drive on the system where the
software could be installed from, you can use any other Unix-system or PC (via a
network) to install the software.
The Unix part of the management software can be found in the Unix directory. As there is
no standard binary executeable format for the different Unix systems we use a shell script
to install the software onto your computer. Usually this shell script should have execute
permisions; if so you can start it direct from CD-ROM.
If you do not have a CD-drive available, you may order the software on disks or tapes in
TAR-format from your UPS dealer.
Otherwise use a DOS- or Windows workstation in your network and insert the CD there.
Now you can copy the software (e.g. via FTP) to the hard drive of your Unix-system, /tmp
directory. For that purpose, copy the complete Unix-directory-tree.
Only the UPSMAN modul command line based version of the UPSMON will be installed
on your Unix system. In order to use the Windows version of the UPSMON modul, please
start the installation again, using the second CD-key on a Windows workstation. ("Install
Windows NT//95/98/2000/XP") It is not necessary to install the Windows version of the
UPSMON modul to make use of the UPS server power protection.
Please make sure you have root user rights in order to proceed with the installation.
Step 1:
Insert your CD. If the reading of the CD file format
is not supported by your system, proceed as
described above.
Step 2:
The first step you have to do after inserting the
CD-ROM into your CD-ROM drive is to mount
this device, i.e. give the system accsess to the
files at the CD-ROM. The usual command at al
Unix systems to mount the CD-ROM has the
follwing form
mount cd-rom-device mount-directory
61
However, there are serveral specific options for this command depending on the used
Unix system. The following table displays these
options:
Unix
options
device name
Linux
-o mode=777 -t iso 9660
/dev/cdrom
Sinix
-F hs
/dev/ios0/sdisk(id)s0
Reliant UNIX
-F hs –o dos,ro
/dev/ios0/device/cdrom
HP UX
-F cdfs -o cdcase,ro
/dev/dsk/c0t(id)d0
SCO Unix
-oro
/dev/cd0
Unixware
-F cdfs –r o fperm=777
/dev/cdrom/c0b0t(id)l0
DEC Unix
-f cdfs -o noversion
/dev/rz(id)a
SPARC
-F hsfs –r
/dev/dsk/c0t(id)d0s2
Solaris
-F hsfs –r
/dev/dsk/c0t(id)d0s2
IBM AIX
-o ro -v cdrfs
/dev/cdrom
Step 3:
(id) is the SCSI-Id. There are two possible case
modes of filenames at your CD-ROM: all file
names are upper or lower case. This has to be
noted when you call the installation programm or
when you change the subdirectory at the CDROM. The ISO 9660 specification supports also
version numbers at filename, so at some systems
you will find suffixes ";" (semicolon) or "." (dot)
with filenames. As you can abbrivate filnames
with wildcards "*". After successfully mounting the
CD-ROM into your system, you can start with
installation by calling the install script, i.e.
Step 4:
As a next step, please start the install script
install by entering: (”./install” or ”../install” from the
CD/Unix directory). In case your CD file system
does not support the execution please copy the
complete Unix directory tree to e.g. /TMP and
change with CHMOD the execution rights of the
install script. Start the the installation with ./install
again. The procedure can look like this for e.g.:
cd /CDROM
cp -pr unix/ /tmp
cd /tmp
62
chmod +700 inst*
./inst*
Step 5:
Please enter your CD-key at this point and
choose the desired operating system from the
list.
The installation script will copy all required files into the directory /usr/ups. If you don’t
want to have the software at this directory you
can move the whole subdirectory /usr/ups to
another directory. Please note that the so called
start-up- script must edited in the directory
”/etc/rc2.d” together with the scripts ”S99upsman”
and ”K99upsman”. This is necessary because
these files contain reference to the directory
”/usr/ups”. In case the above mentioned files
have to be relocated into another directory this
reference would have to be changed
appropiately.
Step 6:
After the files have been copied to the system,
the configuartion program ups_conf starts
automatically.
63
3.4.2 Configuration of the UPSMAN
After a successful first installation of the UPS-Management Software the configuration
starts automatically. If you want to start the configuration program at a later stage, start
./ups_conf. The file ups.cfg contains the configuration data and has to be in the same
directory as that in which the UPSMAN process is started from. The file ups.cfg is an
ASCII-file and may be configured with any editor.
Within the configuration program the
?-key
is available to read the help texts and the
Esc-key
is available to close the menu.
Figure 33 UNIX configuration menu
64
A possible problem is the indentification or correct serial device name on Unix. The
following table gives the usual device names for different UNIX systems.
Unix system
Normal device name for the
first interface
Linux
/dev/ttyS0
HP UX
/dev/tty0p0
SPARC
/dev/ttya
Solaris
/dev/ttya
Unixware
/dev/tty00
SCO Unix
/dev/tty1a
IRIX
/dev/ttyd0
IBM AIX
/dev/tty0
Sinix
/dev/term/ser0
DEC Unix
/dev/tty00
When using the CS122 UPS network adapter instead of the serial port of the UPS the
following procedure must be followed:
Set the IP adress of the CS122 using ar webbrowser or telnet as described in the
Quickstart set-up for the CS122.
Start "ups_conf".
Go into the "Set UPS values" screen.
Replace all of the values in the field "COM port Options" uptil the colon with with the
CS122 connection:
For example: replace the Linux-Comport "/dev/ttyS0:2400,n,8,1" by the virtual CS122Comport "[email protected]:2400,n,8,1"
Note that the values for the baudrate and other values following the colon will
automatically be set when changing the UPS model.
65
Figure 34 setting the CS122 virtual comport in the UPS values – NOT for CS121 ! The
CS121 does not need to communicate with any UPSMAN software, the UPSMAN is part
of the CS121 !
The configuration program ups_conf is based on the so called ”Curses Library”. The most
important entries are:
1.
Com port options
2.
Ups cable
3.
UPS model name
These entries have to done in a correct manner, otherwise the UPS will not start. The
entry UPS com port options contains also the information about the settings of the com
port, i.e. baud rate, parity, data bits, etc. This informations must be included after a colon
(":") with this entry, otherwise the UPSMAN program will not start. The entry UpsDevice
has the follwing stucture:
UPS Com port options=device:baud,parity,data,stop
66
where device is the device name, parity is either e (=even), o (=odd) or n (=no), data is the
number or data bits (7 or 8) and stop is the number of stop bits respectively.
Usually it is not nessecary to change the default entries for the serial port settings,
because these are depending on the UPS model which is used. These options are read
off the data basis which comes with the software. Only if you are sure that there is a
mistake you should change the defaults.
Attention:
The baudrate settings and the corresponding parameters are
changed to the correct settings automatically, by choosing the
correct UPS model from the drop-down list. Please do not
changed the baudrate settings of the UPS settings, unless you
have changed the pre-programed settings of the UPS
previously. (UPS usually have fixed baudrate settings!)
Make sure that that there is no "active" entry (getty process) within your system file inittab
concerning the device which should be connected to the UPS. If there is an entry with the
same device name, this entry must be disabled (commented or respawn), otherwise the
UPS-Management Software will not work.
If you are not sure if you are connected to the right device, you can find it out with the
following procedure:
Choose cable settings to "Type O"
Plug a serial 1-1 cable to your computer
Start the software at the directory /usr/ups: ./upsman
Shorten the pins 2 and 3 with a paper clip. If you don’t see a message like "powerfail ...",
you are using the wrong device. In this case choose another device name and repeate the
procedure above.
Step 1:
Selecting a serial port
To select a serial port (Comport) enter the name of your TTY-device in the field COM port
options. Use the default settings for the UPS model communication parameters (baud
rate, parity, data length and stop bits).
Example: /dev/tty01:2400,n,8,1
Attention:
Please ensure you have to entered the correct serial port device
name because the UPS-Management Software cannot identify
to which com port the UPS is connected.
Corresponding to the UPS model you have selected in Step 1 the UPS-Management
Software has automatically set the UPS parameters. Usually you do not have to alter
these settings unless you want to customise the system.
67
In general there are three different UpsCables:
Serial setting:
The UPS-Management Software uses a data
protocol to get status information from and to
send commands to the UPS. Depending on the
UPS type these data packages are more or less
extensive. For the case of serial connection to the
UPS there is usualy only a 2 wire (send and
receive) cable necessary. But some UPS are
answering, i.e. give a return package, only if
there is a "high" signal at the DTR pin. In this
case you need at least a three wire cable. Your
UPS dealer will be able to provide the correct
cable settings.
Cable 2 to 9:
With these settings the UPS-Management Software uses modem
control connection to get the status from the UPS, e.g. the UPS sets a
signal "high" or "low". In this case the software is only able to get the
status "Powerfail" and "Battery Low" and to shutdown the UPS
immediatly. The cable settings 2 to 9 are not very appropriate for UNIX
systems, because some of them do not support modem control
exploitation. The ones which don’t support these settings are: SCO
Unix, Unixware, Sinix. If you use other Unix systems you can try a
modem control connection with cable Typ 2. However we recommend
that you use the settings ”closed” or ”opened”, which are supported by
every Unix system. Please ask your UPS dealer for the correct standard
cable.
Typ O and Typ C: In this case the software sends a byte to the UPS and tries to get it
again via the usual send/receive wires. The UPS must be a relays one,
i.e. it switches a on powerfail. In the case of Type O (=opend) the relay
is usualy open, e.g. the send byte can not be received except there is a
power failure, because the relay is closed in this case. Notice that in the
case of "Typ O" cable setting there is no way to check whether the UPS
is connected to the computer or not! The logic is other way round in the
case of setting cable type to Typ C (=closed). I.e. the relay is usualy
closed and the software will notice the power failure on opening the
relay. UPS interface without relays (dry contacts) can therfore not be
operated with Typ 0 or C. We do recommend to use ”real” RS-232
protocols for Unix systems. The use of cable type “closed” may cause
the computer not to be able to boot. This can happen, when the
computer shutsdown afetr the boot process, because off a powerfial.
The entry UPS model name This entry contains the UPS model name. This name can not
be arbitrary, because it must be coincide with an entry in the software’s database. If a
UPS model is not found in the data base you will get an "set-up" error. Furthermore the
68
default device mode settings and the appropriate cable type are depending on this entry.
Please always choose the correct UPS model from the list and use the pre-settings for the
communication parameters.
Automatic Start at Server Boot
Every Unix system has a certain method to start programs at the boot procedure. Usually
a main start-up script or program reads off specific directories (e.g. /etc/rc1.d, /etc/rc2.d,
etc.) and executes the enclosed shell scripts. If you use this method you can start the
UPS-Management Software at system boot time automaticaly. A prepared startup script
which is enclosed in the software package. The startup shell startupsman.sh can look like
this:
#!/bin/sh
#
#ident "@(#)ups 4.21 - 2001/12/14"
[ -x /usr/ups/upsman ] || exit 0
PATH=/sbin:/usr/sbin:/bin:/usr/bin
case "$1" in
start)
CD /usr/ups
upsmanpid=`ps -e | awk '$4 ~ /upsman/ && $4 !~ /[0-9]/ && $2 ~ /[?|-]/ { print $1 }'`
[ -z "${upsmanpid}" ] && ./upsman && ./upstcp
if [ -x ./upshttpd ]; then
upshttpdpid=`ps -e | awk '$4 ~ /upshttpd/ { print $1 }'`
[ -z "${upshttpdpid}" ] && ./upshttpd.sh
fi
if [ -x ./upssnmpd ]; then
upssnmpdpid=`ps -e | awk '$4 ~ /upssnmpdpid/ { print $1 }'`
[ -z "${upshttpdpid}" ] && ./upssnmpd.sh
fi
;;
stop)
cd /usr/ups
upsmanpid=`ps -e | awk '$4 ~ /upsman/ && $4 !~ /[0-9]/ && $2 ~ /[?|-]/ { print $1 }'`
69
[ -x ./upshttpd ] && upshttpdpid=`ps -e | awk '$4 ~ /upshttpd/ { print $1 }'`
[ -x ./upssnmpd ] && upssnmpdpid=`ps -e | awk '$4 ~ /upssnmpd/ { print $1 }'`
[ -n "${upsmanpid}" ] && ./upsman -s
[ -n "${upshttpdpid}" ] && kill ${upshttpdpid}
[ -n "${upssnmpdpid}" ] && kill ${upssnmpdpid}
;;
*)
echo "Usage: $0 start|stop"; exit 1
;;
esac
exit 0
~
The directory change CD /usr/ups is necessary for the UPSMAN modul to find its
configuration file. The alternative version is to call UPSMAN with the option "-c": upsman c /usr/ups/ups.cfg. By doing this all file names have to be configured with absolute pathes,
e.g give /usr/ups/ups_log.txt instead of ups_log.txt, etc.
Most Unix systems use a general nomen clature for the names of the startup scripts. The
scripts may look like this:
SnnName and KnnName, where S stands for start and K stands for kill, respectively.
Name and nn are arbritray names and numbers, respectively. Sometimes there are links
in the startup directories refering to the scripts, which can be found in a different directory.
If your system uses such a naming, you should rename the file ups.rc, e.g. mv ups.rc
S99upsman, cp S99upsman K99upsman. You can include the auto startup of upstcp into
the file mentioned above as well.
UPSTCP
This program connects the remote Windows or Java UPS monitoring software using the
local UPSMAN program. It must be started, if the you want to "connect" with the UPSMON
software to UNIX controlled UPS. This can be done within the ups.rc startup script. The
upstcp program is based on the TCP/IP network protocol. Any UNIX system has these
protocol implemented; there is no need to install TCP/IP separatly. UPSTCP has to be
started, if UPSMON for the graphical UPS monitoring is used.
Additional configuration:
70
In the next next section you will find explanations and additional for further configuration
data.
Set UPS Values:
Step 1:
Selecting the UPS-Model
To select your UPS-model, click with the mouse on the scroll box symbol on the right side
of the model list. Next, choose the UPS model that you want to install. All other
adjustments which correspond with your selected UPS model will be done automatically, if
the UPS has serial communication.
Other UPS models with "cable" connections need additional adjustments. If you have a
UPS-model with a port-type cable which does not transfer the connected Load to the UPSManagement Software, you have to enter the values of the actual load manually. Some
UPS show the actual load on a display in % or in VA. Otherwise add the input power
requirements in Watts of all connected units and calculate the Watt into VA (Watt/0,8 =
VA). Enter this calculated load value into the configuration via the "load" selection. Do not
change the default settings for hold time and recharge time, unless you install a specific
UPS model or a battery expansion.
If you do not alter the default settings of the software (100% load), only a limited UPS
autonomy time will be available.
Some UPS models have both port types (cable and serial). To guarantee the correct
function of your UPS-Management Software use the default settings and the cable
provided with the UPS or the software. Different cables will be required for different port
types.
Enter the name or place of your server, in the section Location (e.g. ”Berlin”).
Attention:
If you use a UPS-model with the port-type "cable", please notice
that the values for Hold- and Recharge time are in accordance
with the manufacturers specifications and should only be
altered in special configurations since the UPS could be
discharged before the system has been shutdown.
Configuration Parameters
Standard Values
Write to logfile
Defines the time-interval (in seconds) the UPSManagement Software logs the Input Voltage and
Frequency Values. The standard entry to the text
file (Ok status) are done every 15 minutes, if no
unusual Events occur.
Logtime min.
71
Defines the minimum time-range (in hours) of the
Logfile for Input Voltage and Frequency Values.
Logfile Size max.
Defines the maximum time-range (in hours) of the
log file for Input Voltage and Frequency Values.
The log file will be set back to min. size (value of
logfile size min.) if the log file contains more data
than the configured value.
Set System Values
Check UPS interval
Defines the time-interval (in seconds) that the
UPS-Management Software polls the UPS for
new data via the serial port. The system will be
slowed down due to permanent communication
with the UPS if the value is too small. If the value
is too high the system will react more slowly if a
power failure occurs.
Enable shutdown
Defines if the system will start the shutdown
procedure in case of a power failure.
ATTENTION:
System downtime
Make sure that this entry needs to be ”yes” at all times, if there
are no customised shutdown jobs configured. This is to avoid
that the UPS switches off before the system has performed a
shutdown proberly.
Defines how many minutes before the UPSbattery is discharged the shutdown procedure is
initiated. This time-interval has to be large
enough to guarantee a graceful shutdown of the
system before the UPS is switched off. Calculate
the value on a large scale: (e.g. with 10 minutes
hold time of the UPS start the shutdown
procedure at least 3 minutes before the discharge
of the battery).
The following functions are not supported by all UPS types. In particular, devices with the
connection-type cable do not support a scheduled down and restore command.
Shutdown UPS
Defines if the UPS will be turned off on
completion of the server shutdown procedure.
This command will turn off the UPS before a
complete discharge of the batteries.
72
UPS shutdown delay
Defines how many seconds after beginning the
shutdown procedure (see Downtime) that the
UPS will turn off.
UPS restore delay
Defines how many seconds after turning off the
UPS the system is turned back on again. For
most UPS types it is necessary that the power
has been restored before the UPS has
completely switched off.
Enable fixed shutdown
Defines if a shutdown needs to be initiated after a
power fail, independent from the remaining time
of the UPS and the configured system down time.
Fixed shutdown delay
Defines after how many minutes a fixed
shutdown should be initiated.
The configuration is now complete. Exit the configuration program by choosing the menue
entry Save Configuration & Exit, as only this way the configuration data is saved in the
ups.cfg file. The UPSMAN may be started now.
3.4.3 Configuration of Jobs
The Special Jobs allow for the xecution of own programs, e.g. shell scripts at a defined
point of time during the discharge of the battery. As soon as the UPS transmitts a
"Remaining Time" which equal or lower than the configured value, the corresponding
procedure is executed.
As soon as the "Enable Extra Job“ is set to "yes“, the program name or shell script of the
desired job can be entered in the "Extra Job x (Path)“ line. This script is than started at a
certain set Remaining Time of [m] minutes.
Example: Different network servers should be stopped at different times via shutdown
script, depending on the importance. This way it is possible to provide (depending on the
circumstances) more autonomy time for the important components.
Set job values
Additionally 3 jobs can be executed time controlled.
Path for textfile
Defines the filename and path of the event log.
Path for datafile
Defines the filename and path of the log file for
Input Voltage and Frequency Values.
Path for custom file
73
Defines the file name and path of the custom file
Figure 35 defining paths
Note
The custom file contains values, which can be used as an MSExcel file at a later stage. This file contains information
(measured data) from the messages.dat file. In this file changes
can be made in line 700 (2-phased UPS or line 800 (three
phased UPS). Using a standard editor, parameters can be
edited or deleted from the default version.
3.4.4 Configuration of Events
The UPS Events enables the user to utilise and configure the different applications of a
UPS. Depending on the matter of use, via Events (Event messages of the UPS) certain
actions (Jobs) can be executed with the UPS-Management software. Via an Event it is
possible to transfer measured values, status messages to own processes, in order to
process those even further (e.g. load statistics etc.). The Event configuration starts from
the UPSMAN configuration. (see picture)
74
Figure 36 UNIX entering the events menu
In this part of the configuration, the event parameter will be configured. The user can now
choose a event, which needs configuring. (see picture below)
Which Events are configurable depends on the type of UPS. The standard messages,
which can be used, can be found in the file "message.dat" in the UPSMAN directory.
Eventlist:
Figure 37 UNIX event list
In order to process the Events, please go to the Eventlist in the UPSMAN configuration.
There is a pre-set (default) for every Event. In the above example, the event “UPS/System
shutdown imminent...“ is configured with 3 default jobs. The first will send a standard
message (message id 603), which can be edited in the messages.dat file. The second job
will write the event into the log file of the UPS-Management software, whereas the third
job will execute a shutdown after x minutes (default).
Add Event Job:
75
In order to add a Job to event, please highlight the corresponding event and confirm with
the “Enter” key. In the following window, the “Add Job to List” a additional job can be
added. By using “Delete Job from List“, a single event job can be deleted from the list.
“Exit menu” will take the user back to the Eventlist windows. (see picture)
Figure 38 UNIX add job
Please choose the desired function and set when and how often this function should be
executed. Please note listed functions depend on the used operating system and not all of
them might be available. In this case please refer to share or freeware programs, which
allow the desired function. The following jobs can be added to a event.
Send a Shutdown UPS Signal
Switches the UPS off after a pre-set time. Please
be aware that the UPS is not being switched off
before a system shutdown is executed, as
otherwise important data may get lost.
This shutdown signal only executes the switch
off, of the UPS, but not the shutdown of
connected computers. The user can configure a
delay (in seconds) before the switch off is
executed. This is recommendable when a
switching off of an UPS is necessary because of
over-heating etc.
Send Message box with text
Sends a network message. Enter a user name or
use the "*" character (not with NetWare), in order
to send the message to all users. Please note
that the Windows 95/98 Clients NT message can
only be only received if Winpopup.exe or another
message service is active. Please also consider
76
that "net send * <text> "with Windows 95/98 does
not function correctly. Instead of the " * " a
respective machine name e.g. "Workstation1"
must be entered. In order to send messages to
several users a "Send Message" job must be
inserted per user. Please note that the Windows
NT user database is not empty and that the
computer belongs to a domain, as otherwise the
network messages can not be sent.
Send RCCMD SHUTDOWN to
RCCMD (remote console command) is a
remote client
program used for the execution of executable
files via network. This tool transmits a TCP/IP
signal that is absorbed of the recipient module
(RCCMD client software) on another computer.
This function is normally used for sending a
shutdown command (call of shutdown.bat) over
the network to another computer, of any
supported operation system. (starting from CD
4.17).
From RCCMD Version 2.0 it is possible to use
the (*) wildcard or other syntax. For example
192.255.255.255 will send the signal to all
computers in the corresponding subnets. A
RCCMD –s –a 192.168.200.255 will send the
signal to all computers in the subnet 200. The
entry of a IP address or hostname will send
RCCMD only to those named. If it is required to
shutdown more than one client, additional event
jobs can be configured. Hint: If the number of the
additional RCMD clients is too high, a batch file,
which contains the RCCMD –s commands can
be used instead. This much faster and also
easier to handle than the a long list of event job
list. This batch can be executed from the
SPECIAL or EVENTS EXECUTE PROGRAM
function.
Please note that RCCMD should always be
additionally configured in the “UPS Battery low”
Event and if the Event “UPS/shutdown
imminent....” is used, RCCMD must always be
located before the “shutdown UPS in default
seconds” command. For moving the command
77
lines, “click” with the left mouse on the line, hold
the button and now move the command.
Send eMail
(only some Windows
95/98/NT/2000/XP and some
UNIX Variations)
Sends an E-mail. Please enter the E-mail
address and the corresponding text into the field.
Please note that you need a configured SMTP
server on the RCCMD client computer. A
RCCMD message is send to the client computer,
which make RCCMD client to start the Qblat
module with an e-mail. The RCCMD client
computer is therefore acting as an e-mail relais.
Send RCCMD EXEUTE to
This action initiates the execute.bat on a defined
remote client
remote client (IP-address). This bat file can be
configured individually by the user. The user may
execute a random program on the remote client
computer, where the execute.bat is located. It is
also possible to attach parameters, whereas
these parameters must be added to the
execute.bat which is executed as described
above.
Send RCCMD MESSAGE ID to
In this menu the user can send an ID from the
remote client
messages.dat to other users. These IDs are set
to default in the UPSMAN directory originally, but
the text entries can be altered with an editor. The
edited text is then given out in a textbox.
Start Alarm Beeper with
This event function displays a message box with
Message box
an acoustic warning on the screen, if a certain
configured event occurs. The acoustic signal
stays active until the return key is pressed.
Send RCCMD MAIL ID to
Similar to RCCMD message ID, a message ID is
remote client
send, which is then send as an e-mail to the
corresponding receivers. The user can pick the
ID message at random, whereas an editor can
be used to alter the default ID messages in the
messages.dat.
Send RCCMD MAIL TXT to
Like the send e-mail function, an e-mails send to
remote client
configured receiver and the text content is
entered by the user a plain text in the function
field configuration.
78
Send RCCMD LOG TXT to
remote client
A text is send to the remote client, which is
written into the log file of he RCCMD client
computer.
Send RCCMD LOG ID to
Similar to the message ID, a message ID is send
remote client
from the messages.dat, which is then written into
the logfile of the defined RCCMD remote client.
The user may choose a random ID from the file.
Again, an editor can be used to modify message
IDs in the default messages.dat.
Send RCCMD MESSAGE to
remote client
In this menu the user can connect and configure
a text message with a RCCMD event. Text
messages maybe send to RCCMD receivers. It
is possible to send a RCCMD 2 message from
the CS121 to a Windows 2000 or Unix computer,
which then transmits these messages as “net
send” and “wall” to the network. The problem of
sending messages to different operating systems
is now solved.
Execute Program
Executes a configured program. Please enter the
full path to the executable file. Is the desired
executable the same directory as the
upsman.exe or *. nlm, no path entry is
necessary. The handling of other variables is
explained further on in this chapter.
Write to Log file UPSLOG.CSV
Writes the Event into the local log file of the
UPSMAN computer
Send default messages IDs
Sends pre-set network messages, using the
from file messages.dat
receiver name and message id. This standard
message can be configured in the "message.dat"
Open the file with an editor (e.g. Ultraedit) in
order to change or check the text of the
corresponding message ID. A separate "send
message" job has to be inserted for every user, if
messages should be send to several users.
Write to MS Event Viewer
When a certain Event occurs, an entry into the
Windows NT/2000/XP event viewer system
program can be made in addition to the
UPSMON event log file (upslog.csv). The event
jobs in the UPS-Management software can
therefore be integrated if e.g. a warning message
79
during a power fail should be written to the event
viewer. The user can utilise the Windows
standard event viewer entries by choosing the
type (informational, warning and error) and by
adding text to the event viewer entries also.
3.4.5 Start of the UPS-Management Software
The UPSMAN is started from the command line. As a standard the UPSMAN uses the
configuration file ups.cfg.
To start / stop the UPSMAN process use always the prepared script ./startupsman. For
starting the UPSMan with all its necessary processes and services type
./startupsman start
To stop the processes call the script with the parameter stop as follows:
./startupsman stop
(Please do not make use of killing UPSMan processes manually.)
3.4.6 Multiple-Start UPSMAN on Unix:
Copy the directory: /usr/ups to /usr/ups1
Change to /usr/ups1 and start UPS_CONF, please change the UPS parameter for the
second device and also change under EVENTS the devices, which still refer to the original
path.
Please change the file UPS_EXE path and program calls according to the changes.
Please open the file UPS.CFG with an editor (e.g. Ultraedit) und check if all paths refer
correctly to the new directory and also correct wrong entries.
The two UPSMAN processes need to be started differently: e.g. ”usr/ups/upsman –n1” will
start UPSMAN with the /usr/ups/ups.cfg configured settings on e.g. TTY0. A second call:
”usr/ups1/ upsman –n2” will start a second UPSMAN on e.g. TTY1 from the /usr/ups1
directory. Two UPSMAN processes now run simultaneously on the same Unix machine
and read data from the corresponding UPS parallel.
If the user requires UPSTCP to be active for the monitoring of Windows
UPSMON32.EXE, the following parameters –n1, bzw. –n2 need to be started from the
corresponding directories e.g. ”usr/ups1/upstcp –n1 –p 5000”. These will start the
UPSTCP on the port address 5000 on the Unix machine: A second cue
”usr/ups2/upstcp –n2 –p 5999”
80
will start the second network deamon on a different port address. As soon as both
UPSTCP are running, every system can be directly communicated with via the UPSMON
for Windows. The UPSMON for Windows is started and TCP/IP is activate in the
command line with the following syntax.
”192.168.202.16:5770”. The UPSMON will now establish a connection to the UPSTCP on
IP Address 192.168.202.16 and display the UPSMAN on port 5770.
If the user wants to use the UPSMAN Webbrowser in order to monitor both UPSMAN
processes, the following method is recommended:
Please check if both UPSMAN are active and also check the shared memory areas.
Commands like e.g. icps show that the UPSMAN processes reserve the shared memory
area n=1:0x0034b203 and n=2:0x0034b204, demonstrating that 2 UPSMAN processes
are active.
Please check where the first Web-server upshttp is running. Using netstat –a a running
upshttp on port 8081 can be seen as active.
In order to start thesecond Web-server, the port has to be changed to e.g. 8082 in the
upshttp_conf of the 2 UPSMAN. The Web-server may now be started.
Using a Web-browser the corresponding UPSMAN can be displayed:
e.g. <IP-address>:8081/upsman.html?n=1
(for the first UPSMAN upsman -n 1 and upshttpd -p 8081
e.g. <IP-address>:8081/upsman.html?n=2
(for the second UPSMAN upsman -n 2 and upshttpd -p 8082)
3.4.7 Shut down of the USV-Management Software
To stop the UPSMAN processes use always the prepared script ./startupsman. For
canceling the UPSMan with all its necessary processes and services call
./startupsman stop.
3.4.8 Unix UPSMON
The UPSMON for Unix is a simple monitoring tool for the display of the current UPSMAN
data and for the programming of own scripts for further processsing UPS information.
In addition all UPS functions and UPS tests can be activated by UPSMON:
Parameter for UPSMON
usage: upsmon {-vicdtrh} [-n start-number]
-v
81
Program information
-i <value> Query of a UPS-measurement
-c <ups command> Execution of a UPS-function
-d <ups command with duration> <seconds>
-t <ups test>
Execution of a timed UPS-function
Execution of a UPS-test function
-r <ups test result> Query of a UPS-test functions result
-h
Display of extended help
-n <start-number>
Is a definite number, if more than one UPSMAN is running on the
Unix-machine (several UPS at one computer)
<values>: -i
status
inputvolt
inputcurrency
battvolt
temperature
autonomietime
autotime
battcap
batterycapacity
outputpower
inputfrequenz
outputfrequenz
<ups command>: -c
canceltest
cancelbatterytest
cancelshutdown (only certain UPS supporting this command)
alarmreset
bypassmode
shutdownrestore [down seconds] [restore seconds]
switchoutlet [0=off|1=on] [outlet nr]
82
<ups command with duration>: -d
shutdown
restore
cancelbypass
outputoff
<ups test>: -t
customtest
batterytest
selftest
fulltest
<ups test result>: -r
customtest
batterytest
selftest
fulltest
Example:
Command for read "autonomy time":
"./upson -i autonom"
Response from upsman :
"upsmon: Inquiry (autonomietime)
Command for Shutdown UPS and Restore
-/upsmon –d shutdownrestore 90 120
83
ups answer: 25.48
Note:
More information about the UPSMON modul is given in part III
of this manual.
Unix commands
Some of the most common Unix commands are listed here. On all UNIX systems you will
find an explanation to these commands via the man pages by typing "man command". The
output can be redirected with the ">" sign to any filename or device, e.g. cat ups.cfg
>/dev/lp0 (print file ups.cfg).
Function
UNIX command
options & comments
Change directory
CD directory
List directory entries
ls
Show file
cat filename
Show file page by page
more filename
type q to quit more
Find files
find
-name, -print –ctime
-l (long) with date and size
e.g. find all files which begins with
"ups": find / -name "ups*" -print
Copy files
copy source target
-r include subdirectories
-p use date and time of source file
Rename files
mv source target
Edit a text file
vi filename
The vi is a editor with different modes:
input-, replace- command mode, etc.
To escape from a certain mode type
ESC. To quit the vi editor change to
command mode (type ":") and q
Search for a string in a
grep "string"
-i (case insensitive)
file
filename
Handle archive files
tar vtf archive
list an archive
tar xvf archive
extract files from an archive
3.4.9 RCCMD version 1 on Unix
The RCCMD (remote console command) is a program that allows the execution of
programs on remote computers. This tool is part of all UPSMAN supported operating
84
systems. With this tool it is possible to connect different operating systems. E.g. is the
UPS-Management Software installed on a Unix computer and should a remote shutdown
be executed on a computer with a different operating system in heterogene network, the
RCCMD tool is necessary.
The RCCMD tool is based on the TCP/IP protocol. During the installation, the TCP/IP
protocol should be installed in the first place.
The RCCMD tool works in two different modi. In the so called ”Listen” modus, the program
(as background process) waits for a command from the ”Send” modus of the RCCMD
modul.
To start RCCMD in receiving-mode (listen) enter the following line:
<path>/rccmd –l {-a IP Address or Host Name][-p portaddress]”command”
Example
/usr/ups/rccmd –l –a 192.200.100.10 -p 6003 /usr/ups/sups_exe 3
Optional parameters:
-a <address>
Computer, which accepts the RCCMD-signal.
-p <port> TCP-Port, which receives the RCCMD-signal.
The ”command” file should be given in the full path. The –p port option maybe used, if you
want to start the RCCMD modul on more the one computer, in order to execute different
commands for different Events. Please check the following example, also note that the
default port is 6003.
To start RCCMD in sending-mode (send) enter the following line in your customised script:
(see chapter 4.1.3) for reference:
RCCMD -s -a <address> [-p 6003]
For <address> enter the TCP-address of the machine to which you want to send the
RCCMD-signal.
Optional parameters:
-p <port> TCP-Port from which the RCCMD-signal is sent, in this case default 6003
The option -a (address) can be entered several times in case you want to shutdown
several remote server.
Example:
The UPS Management Software is running at computer UPS-host. It should shutdown the
database at server data-host at UPS powerfail and shutdown the server data-host and the
85
host users at the end of battery capacity. The doshutdown script at UPS-host can look
like:
# powerfail
1)
sleep 1
${MSGTOALL}<<-!
UPS ALARM / UPS POWERFAIL!
Stop applications and log out!
!
/usr/ups/rccmd -s -a ups-host -p 6000
;;
...
# powerdown
3)
sleep 1
${MSGTOALL}<<-!
UPS ALARM / NOW SYSTEM SHUTDOWN !
!
/usr/ups/rccmd -s ups-host -p 6003
/usr/ups/rccmd -s users
sync; sync; sync
/etc/init 0
;;
And at data base server data the rccmd programs should be started as
/usr/ups/rccmd -l -p 6003 -a ups-host "/usr/ups/db-down" (shutdown)
/usr/ups/rccmd -l -p 6001 -a ups-host "/sbin/init 0". (warning)
86
Note:
Do not use the CD License key more than once. (Copyright
regulations page 1). If more RCCMD modules need to be
installed for the shutdown, additional CD license key must be
purchased. Additional license keys are available from your UPS
dealer, whereas the CD can be used again for installations.
UNIX RCCMD multiple sender configuration:
In case the user wants to utilise more than one sender address the rccmd.sh has to be
modified like this:
#! /bin/sh
# You may specify a sender IP to accept signals from,
# default is everyone.
SENDER="-a 10.55.52.82 -a 10.55.52.83 -a 10.55.52.84"
# You may change the port to listen on,
# default is 6003.
PORT=
# You must define a command to be executed upon
# receiving signal.
SCRIPT=/usr/ups/doshutdown.sh
# test -z $SENDER || SENDER="-a $SENDER"
test -z $PORT || PORT="-p $PORT"
# to start:
./rccmd -l $SENDER $PORT $SCRIPT
3.4.10 Configuration of Rccmd V2
Note:
This section does not apply to rccmd V1 for Unix, in addition it
only applies to rccmd running in 'Listen' mode.
Rccmd V2 running in 'Listen' mode may be configured using a Configuration file. By
default rccmd will look for a file named 'rccmd.cfg' in its startup directory (usually
'/usr/ups'). This file may be generated using rccmd_conf. Rccmd_conf is a small cursesbased utility which runs on the console or a Terminal or a Terminal-Emulation under the X
Window System (e.g. xterm).
87
Note:
The contents of 'rccmd.cfg' are vital to system security. It
should be writeable only for the System User 'root'.
Run rccmd_conf:
$ su Password:
# cd /usr/ups
# ./rccmd_conf
if 'rccmd.cfg' does not exist (e.g. if you run rccmd_conf for the first time) the following
notice will be displayed:
Figure 39 Making the configuration file
To proceed hit the [Tab] key until the [Create] button it is highlighted and press [Enter],
otherwise select [Exit].
If you created 'rccmd.cfg' or if the file existed already rccmd_conf will switch to its main
configuration menu.
88
Figure 40 RCCMD Configuration menu UNIX
To switch between the menu entries use the [Tab] key and/or the arrow keys [←], [→], [↑]
and [↓]. To select an entry press [Enter].
It is not necessary to work from top to bottom, you may configure the menu items in any
order. In fact it is not necessary to configure anything at all, if you just select [save]
'rccmd.cfg' will be written with default values sufficient to run rccmd. To use all features of
rccmd and/or improve security it is however strongly suggested to customize 'rccmd.cfg'.
Configure “Rccmd Network Options”
In this screen you may configure network related options of the rccmd listener. To switch
between the option-fields and buttons use the [Tab] key.
89
Figure 41 RCCMD UNIX Network Options
Bind on Interface:
This option tells rccmd on which network
interface it binds its main tcp listen socket. You
may enter any valid IP address your host can be
reached under.
The default value for this option is 0.0.0.0, this is
a working value, it means 'listen on all possible
interfaces of this host'. If your host has a dial up
connection to the Internet you may want to
change the default, to ensure rccmd will not be
connected from the Internet. In this case you will
enter the primary IP address of the host rccmd
listener is running on.
Example:
Your company runs a private network in the
192.168.1.0/24 address range. The host rccmd
listener is running on is assigned the IP
192.168.1.9. You may enter 192.168.1.9 for “Bind
on Interface”, to ensure only host from the private
network can connect to rccmd.
Listen on Port:
This is the port rccmd will listen to. Allowed
values range from 1 to 65535 (inclusive). The
default is 6003. If you change the port of the
rccmd listener you will also have to switch the
port of the rccmd sender in order to enable a
connection. It is normally not necessary to
change this setting.
Enable UDP:
If this opion is enabled rccmd will open an UDP
Listen Socket in addition to the TCP Socket. This
allows the rccmd listener to receive rccmd
broadcasts. Possible values are 'true' and 'false'.
The default is “true”. To switch the value use the
[↑] and [↓] keys.
Timeout:
Timeout for TCP connections. The default is 10
seconds. It is normally not necessary to change
this setting.
90
To reset all values to their defaults select the [Default] button by hitting the [Tab] key, then
press [Enter].
To leave the Screen select either [Ok] or [Cancel] with the [Tab] key and press [Enter],
[Ok] means accept all values as displayed on the screen, [Cancel] means discard all
changes made to the screen.
Configure “Access Control List”
“Access Control List” contains a list of valid sender addresses. A valid sender address is
the IP address of an rccmd sender that is allowed to connect to the rccmd listener. Initially
the List is empty.
Note:
An empty Access Control List means everyone is allowed to
connect.
To switch between the entries in the list use the [↑] and [↓] keys, to switch between the
buttons use the [Tab] key. To select an entry press [Enter].
Figure 42 RCCMD UNIX add sender
To add an IP address hit the [Tab] key until the [Add] button is highlighted, then press
[Enter].
91
Figure 43 RCCMD UNIX sender example
Enter the IP address of the host you want to be able to connect, then press [Enter].
Figure 44 RCCMD UNIX sender overview
To edit an entry in the list select it by hitting the [↑] and [↓] keys until the entry is
highlighted, then hit the [Tab] key until the [Edit] button is highlighted, then press [Enter].
92
Figure 45 RCCMD UNIX edit sender
Edit the Address in the “Edit Address” Window. To keep your changes select the [Ok]
button with the [Tab] key and press [Enter] otherwise select [Cancel].
To delete an entry in the list select it by hitting the [↑] and [↓] keys until the entry is
highlighted, then hit the [Tab] key until the [Delete] button is highlighted, then press
[Enter].
Figure 46 RCCMD UNIX delete sender
Confirm to delete the entry by selecting [Ok] with the [Tab] key and pressing [Enter],
otherwise select [Cancel].
93
To leave the Screen select either [Ok] or [Cancel] with the [Tab] key and press [Enter].
[Ok] means accept the list as displayed on the screen, [Cancel] means discard all changes
made to the list.
Scan for Upsman/Upstcp:
This screen allows you to scan your network for Upsman/Upstcp servers. You may want to
add the detected IP addresses to the “Access Control List”.
Note:
The options on this screen do not directly affect rccmd.
However, the results of a network scan may be transferred to
the “Access Control List”.
Figure 47 RCCMD UNIX sender scan
lowest/highest IP:
On startup rccmd_conf tries to determine the
hosts primary IP address. From this address a
corresponding Class C network range is derived.
These are the default boundaries for the network
scan. If you want to scan another network or
adjust the range, move to the desired entry
(lowest and/or highest IP) using the [Tab] key and
change the address as apropriate.
94
Port to Scan:
The port the scanner will try to connect to. The
default is 5769, which is the default port of the
Upsman/Upstcp server. If you have
Upsman/Upstcp running on a different port you
may want to switch this option accordingly.
To start the scan select [Scan] using the [Tab] key and press [Enter], otherwise select
[Cancel].
Configure “Check Upsman/Upstcp”:
The Rccmd listener has the ability to check periodically if the Upsman/Upstcp servers
configured in “Access Control List” are alive.
Note:
The “Check Upsman/Upstcp” feature is only available if there
are any addresses configured in the “Access Control List”.
If there are one or more entries in “Access Control List” the screen “Check Upsman
Options” pops up.
Figure 48 RCCMD UNIX check upsman
Use the [Tab] key to move through the option-fields and buttons.
95
Enable check Upsman/Upstcp feature: Possible values are “true” and “false”, “false” is
the default. To change the value use the [↑] and
[↓] keys.
Enter the interval for upstcp connects in minutes:
Interval to connect Upsman/Upstcp servers in
minutes. Default is 30 minutes. To change
overwrite the value in the options field.
File to execute:
This file will be executed if rccmd is not able to
connect one (or more) of the configured
Upsman/Upstcp servers, asuming that either the
host is down or the Upsman/Upstcp process is
not running. Default is
'/usr/ups/rccmd_notalive.sh'. You may change
this value by overwriting the string in the optionsfield or by selecting a file in the file-browser. To
invoke the file-browser hit the [Tab] key until the
[Browse] button is highlighted, then press [Enter].
To reset all values to their defaults select the [Default] button by hitting the [Tab] key, then
press [Enter].
To leave the Screen select either [Ok] or [Cancel] with the [Tab] key and press [Enter],
[Ok] means accept all values as displayed on the screen, [Cancel] means discard all
changes made to the screen and switch back to the previous state.
Configure “Logfile Options”:
The rccmd listener is able to write and maintain a logfile. It will log events such as startup
and shutdown of the program, accepted and denied network connections and executed
commands. Some parameters may be configured on this screen.
96
Figure 49 RCCMD UNIX logfile options
Enable logging to file:
Possible values are “true” and “false”, “true” is the
default. To change the value use the [↑] and [↓]
keys.
Select maximum size of logfile:
The logfile will not grow larger than this size. If
the size of the logfile would exceed this limit
rccmd will automatically shrink it by 10% before it
continues write to the log. The file will be shrinked
from the start, so older entries will be removed
first. The default size is 1024 Kb. To change the
value use the [↑] and [↓] keys. The special value
'0' means the file will not be shrinked.
Logfile name:
This option specifies the name and location of the
logfile. The default is “/usr/ups/rccmd.log”. You
may change this value by overwriting the string in
the options-field or by selecting a file in the filebrowser. To invoke the file-browser hit the [Tab]
key until the [Browse] button is highlighted, then
press [Enter].
To reset all values to their defaults select the [Default] button by hitting the [Tab] key, then
press [Enter].
97
To leave the Screen select either [Ok] or [Cancel] with the [Tab] key and press [Enter],
[Ok] means accept all values as displayed on the screen, [Cancel] means discard all
changes made to the screen and switch back to the previous state.
Configure “Shutdown Options”:
Figure 50 RCCMD UNIX shutdown options
File to execute:
This file will be executed if rccmd receives the
“SHUTDOWN” command from the network.
Default is /usr/ups/rccmd_shutdown.sh. You may
change this value by overwriting the string in the
options-field or by selecting a file in the filebrowser. To invoke the file-browser hit the [Tab]
key until the [Browse] button is highlighted, then
press [Enter].
To reset all values to their defaults select the [Default] button by hitting the [Tab] key, then
press [Enter].
To leave the Screen select either [Ok] or [Cancel] with the [Tab] key and press [Enter],
[Ok] means accept all values as displayed on the screen, [Cancel] means discard all
changes made to the screen and switch back to the previous state.
Exit rccmd_conf:
98
In the main configuration menu “Rccmd Configuration” select either [Save] or [Exit] by
hitting the [Tab] key until the desired button is highlighted and press [Enter]. [Save] means
'rccmd.cfg' will be written according to the actual values of the Configuration screens,
[Exit] will just exit the program, leaving 'rccmd.cfg' untouched.
The File Browser:
Some of the screens above use a small build-in file browser like this:
Figure 51 RCCMD UNIX file browsing
The [↑] and [↓] keys may be used to move the list up and down. Pressing the [Enter] key
will select the highlighted entry. If the selected entry is a directory the browser wil move
into this directory and list its contents. As usual the double dot '..' means the parent
directory. File types are indicated similar to the output of 'ls -F'. This means a '*' is
appended for executables, '/' for directories, '@' for symbolic links and '=' for sockets.
3.4.11 UNIX WEB-Server
The Unix WEB SERVER offers the possibility to display all UPS data with a platform
independent WEB-Browser. In order to establish a connection from a WEB-Browser to a
UNIX WEB SERVER, please enter the IP address and a port number. Example:
http://192.168.202.91:8081. Port 8081 is used as a standard at the start up of the server.
Please adjust the script /usr/ups/upshttpd.sh, if you would like to use a different port. It is
possible to start the Web-server with different port addresses, if several UPS monitor a
Unix server.
Start of the WEB-Server:
Configure and start the UPSMAN as described in the chapters 4.1.2 and 4.1.3
99
Start the WEB-Server by executing the script /usr/ups/upshttpd.sh
Displayed data:
Capacity of the UPS in percent
Battery capacity in percent
UPS- Input load
UPS-Status
Battery remaining time
In addition the button "Get TextLog File“ transfers the log file which has been written by
the server and displays the information via the WEB-Browser.
The button "JAVAMON“ starts the JAVAMON, which displays the UPS data analog to the
Windows-client.
The display for both kinds of displays is depending on the typ of UPS one or three-phased.
Please see the graphics also on the next page.
Figure 52 UNIX UPS data (display of the
Figure 53 UNIX UPS data (display fo the
internet explorer)
JAVAMON)
3.5 DEC VMS
3.5.1 Installating the UPS-Management Software, UPSMAN
Note:
100
The VMS license is not part of the standard CD; It is to be
ordered separately. It is not permitted to use the VMS version
and its RCCMD modules without registered license.
General
Before the installation you should make sure that you know the logical device name of the
serial interface, which communicates with the UPS. Make sure that no other process is
executed over this interface (e.g. TTA0 or TTB0). Please refer to the instructions of the
following paragraphs. If you need further assistance on this topic, look up the
Troubleshooting section in this manual. Also contact your UPS dealer for further
information.
Attention:
The alpha version was created with OpenVMS 7,1. For
OpenVMS 6.x you should select the version 6.x manually, on
the subdirectory on the CD, e.g.: DKA200:[vms.alpha.6x ]
Installation:
Step 1:
Please insert the desired medium in its
corresponding drive.
Step 2:
Connect UPS cable between UPS and the
computer serial interface. Login to VMS system
via the SYSTEM login.
Step 3:
Mount the CD ROM:
MOUNT/OVERRIDE=IDENT DKA200: UPS UPS: (replace DKA200 with the name of your
CD-ROM device)
Step 4:
Please copy the archiv VMSA.ZIP (Alpha
directory) and UNZIP.EXE into a temporary
directory on your system.
SET DEF UPS:[VMS.ALPHA]
COPY VMSA.ZIP SYS$SCRATCH
COPY UNZIP.EXE SYS$SCRATCH
Step 5:
Switch into the temporary directory and set a system
variable for the unzip program:
SET DEF SYS$SCRATCH
MYUNZIP = "$SYS$SCRATCH:UNZIP"
Step 6:
101
Unpack the zipped data:
MYUNZIP VMSA
(VMSA.ZIP will be extracted to UPSAxxxx.A and xxxx
indicates the version number, eg. 0441)
Step 7:
Start the VMS installation routine:
@SYS$UPDATE:VMSINSTAL
Step 8:
Answer YES at the prompt: "Are you satisfied with the
backup of your system disk [YES]"
Step 9:
Answer "Where will the distribution volumes be
mounted: " with:
SYS$SCRATCH
Step 10:
Answer: " Enter the products to be processed from the
first distribution volume set." With the name of the
zipped package without its extension “.A”, eg.:
UPSA0441
Step 11:
Answer : "Enter installation options you wish to use
(none):" by pressing the enter key.
Step 12:
Enter the license code corresponding to your UPSMAN
version. (Respect the license agreement and do not
use this code on any other VMS Station!)
Step 13:
Answer: „Please enter target directory (complete path)“
with the absolute path of the installation directory, eg.:
SYS$SYSDEVICE::[UPS]
Step 14:
Answer: "Do you want the UPSTCP servers to be
started", with Yes (Y) or No (N)
The UPSTCP servers are required when using a UPS in a TCP/IP network with one or
more MS-WINDOWS UPSMON clients. Should monitoring the UPS on a Windows client
not be necessary answer ”N” at the prompt and continue with step 16.
Step 15:
Answer: ”How many simultanious tcp connections
should be possible (1-99)”
102
Entering a „0“ at this prompt is equivalent to disabling this function all together.
Otherwise, enter the number of MS-WINDOWS UPSMON clients that should be allowed
to monitor the UPS at the same time.
Step 16:
Leave the VMSINSTAL process by pressing the enter
key at the prompt”Product:”
The following problems may arise:
Problem:
VMSINSTAL error message: "UPSA0441.A is not a valid save-set"
Possible solution:
Solution:
UNZIP.EXE was unable to extract the data with the correct RMS
attributes out of VMSA.ZIP. Use the following DCL command:
SET FILE /ATTRIBUTES= (RFM:FIX, LRL= 32256, MRS= 32256, ORG=SEQ, RAT=NONE) UPSA0441.A
Consult the VMS documentation or system administrator if trouble arises when using the
mount command for your device.
3.5.2 Configuring the UPS Management Software
Establish and go into the UPS target directory, eg.:
SET DEFAULT SYS$SYSDEVICE:[UPS]
Start the UPS Management Software configuration by executing UPS_CONF.EXE :
RUN UPS_CONF.EXE
Please consult the UNIX section of the user manual for important information regarding
the use of the configuration program, UPS_CONF. While using the unix syntax be sure to
use the typical VMS naming conventions for the sreial devices, for example TTAx, “x”
indicating the (TTA0:2400,n,8,1). Do not change the baud rate specified by the
manufacturer unless modifications have been made to alter these settings.
We recommend setting the ”check UPS interval(s)” to somewhere between 11 and 30
seconds. The UPSTCP process will not permit for shorter intervals on a UPSMON Client.
Check the UPS_EXE.COM script for correctnes in the events of Power fail, battery-low
and etc. Any necessary changes can be made with a text editor. Make sure that the
”shutdown” command has been activated and that the system can be shutdown without
any further input. Note: If the serial interface used for monitoring by the UPSMAN
process uses a SET TERM command then the initial line of the VMSStartup-file must be
changed. For example:(Sample out of SYSTARTUP_V5.COM, System Startup File)
SET TERMINAL TTA1: /PERMANENT /NOAUTOBAUD /SPEED=9600
/PROTOCOL=DDCMP
103
If TTA1 is the UPS, then delete this line!
a.
Strart UPSMAN to begin monitoring the UPS:
@UPSSTART
After one or two minutes, use the UPSMON to check the status of upsman and the UPS:
UPSMON –i status
The following output should result:
upsmon:
Inquiry(status)
ups answer: ok
An error will be indicated by:
upsmon: ups daemon not in progress, start upsman
Check the SYS$OUTPUT file (Make sure that it is ended with a closing point) in the
installation directory (For example, DKA100:[UPS]) for
error messages. The usual entries are as follows:
upsman: coming up...
upsman: cannot open UpsDevice
Error(4605) : Connection : Timeout failure : error(65535)
upsman: not started
Check the configuration (cable, Baudrate, Port) and the connection to the UPS, make
sure that the configured port and the used port
correspond with one another. Also try using an
alternative port (TTA0 <-> TTB0) and consult the
Troubleshooting section of the manual.
The VMS Startup file should initiate UPSMAN. The UPSSTART.COM script can be used
to set this configuration.
Insert the the following line into the SYS$MANAGER:SYSTARTUP_VMS.COM file before
the EXIT command (If UPSMAN has not been installed as SYS$SYSDEVICE:[UPS] the
change the device and Path accordingly):
$ @SYS$SYSDEVICE:[UPS]UPSSTART
The installation is finished once UPSMAN has been successfully started. If UPSTCP has
been started, a Windows UPSMON client can graphically monitor and operate the UPS.
After a successful installation, the following commands remove no longer needed files:
SET DEF SYS$SCRATCH
DELETE VMSA.ZIP
104
DELETE UPSA0441.A
DELETE UNZIP.EXE
3.5.3 RCCMD
The UPS-Management-Software CD contains the RCCMD software. The VMS RCCMD
installation can be done by following the UNIX installation instructions in this manual and
all of the steps are the same.
Rccmd uses TCP-Port 6003 per default. If this port is for some reason not available
another port can be defined by calling the RCCMD Daemon using the following option:
Option –p <port>.
Please pay attention to the following steps for the installation:
Important:
The Alpha-Version is linked to OpenVMS 7.1. For
OpenVMS 6.x use the Version 6.x in the following
CD directory (ex. DKA200:[VMS.ALPHA.6X]).
Installation:
Step 1:
Insert the CD.
Step 2:
Login into the VMS System using SYSTEM login.
Step 3:
Mount the CD-ROM device (if DKA200 is the device
name of the CD-ROM):
$ MOUNT/OVERRIDE=IDENT DKA200: UPS UPS:
Step 4:
Copy the RCCMD.ZIP and UNZIP.EXE files from the
ALPHA directory on the CD to a temporary destination
on your system:
$ SET DEF UPS:[VMS.ALPHA]
$ COPY RCCMD.ZIP SYS$SCRATCH
$ COPY UNZIP.EXE SYS$SCRATCH
Step 5:
Go into the temporary directory and set a system
variable for the program unzip:
$ SET DEF SYS$SCRATCH
$ MYUNZIP = "$SYS$SCRATCH:UNZIP"
105
Step 6:
Extract the Zip file:
$ MYUNZIP RCCMD
(RCCMD.ZIP will be extracted to RCCMDAxxx.A, xxx
representing the version number, i.e. 031)
Step 7:
Start the VMS installation routine:
$ @SYS$UPDATE:VMSINSTAL
Step 8:
Answer YES at the prompt: "Are you satisfied with the
backup of your system disk [YES]"
Step 9:
Answer "Where will the distribution volumes be
mounted: " with:
SYS$SCRATCH
Step 10:
Answer " Enter the products to be processed from the
first distribution volume set." With the name of the
extracted file excluding the extension:
RCCMDA031
Step 11:
Answer "Enter installation options you wish to use
(none):" by pressing the enter key.
Step 12:
Enter your license key corresponding to RCCMD
Version for this installation. (Respect the license
agreement and do not use this code on any other VMS
Station!)
Step 13:
Answer „Please enter target directory (complete path)“
by entering the absolute installation path followed by
pressing the enter key, ie.:
SYS$SYSDEVICE:[UPS]
Step 14:
Answer YES to ”Would you like to start the RCCMD
Module automatically on your system“
Step 15:
End the VMSINSTALL routine by pressing RETURN at
the ”* Product:” prompt.
The following problems may arise:
106
Problem:
VMSINSTAL error message: "RCCMDA031.A is not a valid save-set"
Possible solution:
Solution:
UNZIP.EXE was unable to extract the data with the correct RMS
attributes out of VMSA.ZIP. Use the following DCL command:
SET FILE /ATTRIBUTES= (RFM:FIX, LRL= 32256, MRS= 32256, ORG=SEQ, RAT=NONE) RCCMDA031.A
Consult the VMS documentation or system administrator if trouble arises when using the
mount command for your device.
Configuration
Enter the RCCMD installation directory.
$ SET DEFAULT SYS$SYSDEVICE:[UPS]
Together with RCCMD.EXE three DCL command files have been installed:
- RCCMDSTART.COM:
Default Startup Command for starting RCCMD, alter this files to suite your specific needs.
- RCCMD_SHUTDOWN.COM:
Default Execute Command called by RCCMD for initiating a System Shutdown.
- RCCMD.COM
„Wrapper“ Command File, called by RCCMD.EXE with parameters. Configure
RCCMD.COM so that it is started with „rccmd -l“. Optionally, the name of the sending
computer can be also entered („rccmd -l –a <IP-address of the sending computer> -p
<port (standard 6003)>“).
Afterwards start RCCMD by calling RCCMDSTART.COM:
$ @RCCMDSTART
Check the process with:
$ SHOW SYSTEM
RCCMD should appear in the list.
The VMS Startup file should initiate RCCMD. The RCCMDSTART.COM script can be
used to set this configuration.
Insert the the following line into the SYS$MANAGER:SYSTARTUP_VMS.COM file before
the EXIT command (If RCCMD has not been installed as SYS$SYSDEVICE:[UPS] the
change the device and Path accordingly):
$ @ SYS$SYSDEVICE:[UPS]RCCMDSTART
107
RCCMD will now be automatically started.
After a successful installation, the following commands remove no longer needed files:
SET DEF SYS$SCRATCH
DELETE RCCMD.ZIP
DELETE RCCMDA031.A
DELETE UNZIP.EXE
3.6 OS/2
3.6.1 UPSMAN Installation
General
The OS/2 development has been discontinued 1998. The UPS-Management Software
version 3 however remain included in the delivery of the standard CD –only devices that
where part of the programm 1998 will be supported.
The UPS-Management software is only working for specific UPS models. Please consult
your UPS dealer for more information.
3.6.1.1 CID Method
Before you copy the UPS-Management software via CID onto your system, please
execute the following job first.
1.
Install TCP/IP for OS/2 and WinOS/2 (The latter is recommended in
order to use the UPSMON module under Windows. However, not
needed for the stand-alone operation.)
Note:
2.
The UPSMON module is not required for just UPS monitoring
and shutdown.
Please write down the CD-ROM drive letter and the future installation
directory. You may start CIDSTART from the CD-ROM now
3.
4.
Choose between WARP and LAN SERVER installation.
Install "All components" and enter the
installationpath. Please notice this path, because
you will be asked for it afterwards during the
license key installation.
5.
The files will be copied now. Leave the
installation at the end of this process via F3 or via
"close".
108
6.
The License Key is requested now. Please enter
your correct CD ROM drive letter (eg. "g:" ), enter
your installation directory path (eg.
"c:\UPS\UPSWARP"), enter the correct License
Key Code of your CD ROM. (eg.
"6K01xxxxxxxx").
7.
Afterwards a new folder "UPS Software OS/2
WARP or LANSERVER" with several icons will
be created.
8.
"UPS Config WARP bzw. LANSERVER" is the
configuration program that has to be started to
configure your UPS. Follow the configuration
instructions in the user manual chapter 6.2
9.
The icon "UPSMAN WARP or LANSERVER" is
the background task for the UPS monitoring.
After a correct configuration you may start this
process now. WARP: If no error message occurs,
the configuration is correct and the UPSMAN
process now active. LANSERVER: The box
"UPSMAN: COMING UP..." will appear. Please
notice that you have to make an entry in the
IBMLAN.INI (See user manual) to be able to start
the UPSMAN as network service. You may test
your configuration and simulate a powerfail. A
messagebox will appear. Under LANSERVER the
UPSMAN will be started as a background
process, using "net start UPSMAN" and using
"net stop UPSMAN" to stop the UPSMAN
process.
10.
The icon UPSTCP starts the process UPSTCP,
which needs an active UPSMAN and a correct
TCP/IP configuration to start. When this process
is active, you may monitor the UPSMAN and use
the grafic management tools from any Windows
computer with TCP/IP
Note:
11.
UPSTCP is not required for normal UPS monitoring and
shutdown.
The icon UPSMON16 starts this Windows 16-bit
Monitoring Programm, which may now connect
109
via TCPIP with the UPSMAN. You may start this
program also from a windows OS/2 shell.
12.
The icon UPSMON is a commandline driven
program, which shows the actual UPS data of the
UPSMAN monitoring process. This tool may be
used to check the actual UPS data and if the
UPSMAN process is still running. UPSMON runs
only on the local computer, no network
connection possible.
13.
The installation and configuration is now finished.
The UPSMAN and UPSTCP may be now entered
into your automatic cold boot routine of OS/2.
3.6.1.2 DOS Method
Alternativ, the DOS installation program install.bat may be used. However, we recommend
the CID method.
3.6.2 Configuration of the UPS-Management Software
After a successful first installation of the UPS-Management Software the configuration
program starts automatically. Load the existing configuration file (ups.cfg) found in the
UPS directory. The file ups.cfg contains the configuration-data and is located in the actual
program-directory where upsman.exe is started.
For configuration of UPS-Management Software for OS/2 two configuration programs are
available. One program is ups_conf.exe which is a windows program, the other one is
upsconf.exe which is a MS-DOS program. We recommend the use of the Windows
version.
Step 1:
Selecting the UPS-Model
To select your UPS-model, click with the mouse on the scroll box
symbol on the right side of the model list. Next, choose the UPS
model that you want to install. All other adjustments which correspond
with your selected UPS model will be done automatically, if the UPS
has serial communication.
Other UPS models with "cable" connections need additional
adjustments. If you have a UPS-model with a port-type cable which
does not transfer the connected Load to the UPS-Management
Software, you have to enter the values of the actual load manually.
Some UPS show the actual load on a display in % or in VA. Otherwise
add the input power requirements in Watts of all connected units and
calculate the Watt into VA (Watt/0,8 = VA). Enter this calculated load
110
value into the configuration via the "load" selection. Do not change
the default settings for holdtime and rechargetime, unless you install a
specific UPS model or a battery expansion.
If you do not alter the default settings of the software (100% load),
only a limited UPS autonomy time will be available.
Some UPS models have both port types (cable and serial). To
guarantee the correct function of your UPS-Management Software
use the default settings and the cable provided with the UPS or the
software. Different cables will be required for different port types.
Enter the name or place of your server, in the section Location (e.g.
„Berlin“).
Attention:
Step 2:
If you use a UPS-model with the port-type "cable",
please notice that the values for Hold- and Recharge
time are in accordance with the manufacturer´s
specifications and should only be altered in special
configurations since the UPS could be discharged
before the system has been shutdown.
Selecting the serial port
To select a serial port (Comport) click with the mouse on the check
box on the right side of the menu. Do not change the default settings
for speed/baud rate, unless you want to use a special UPS model.
Most UPS have a fixed baud rate and must not be used with higher
speeds than the default values.
Attention:
You have to select the correct serial port, because
the UPS-Management Software is unable to identify
the UPS automatically.
Corresponding to the UPS model you have selected in Step 1 the
UPS-Management Software will automatically set the communication
parameters. Usually you do not have to change these settings.
With this step the configuration is completed. With a mouse-click on OK you exit the
menu. Save the new configuration into the file ups.cfg in the directory of the upsman.exe.
Upsman.exe can be started now.
111
Custom Parameters
System parameter: Timeframe
UPS Check Rate
Defines the time-interval (in seconds) in which
the UPS-Management Software polls data from
the UPS. The system will be slowed down if this
value is too small. If the value is too high the
system will react more slowly in case of a power
failure.
Broadcast Rate
Defines the time interval (in seconds) in which the
UPS-Management Software informs the network
user via the broadcast command during a power
failure of the remaining time until the shutdown is
initiated. NB. LAN Server only.
Logfile Update Rate
Defines the interval (in seconds) in which the
UPS-Management Software logs the Input
Voltage and Frequency Values.
Logfile Size min.
Defines the minimum time range (in hours) of the
log file for Input Voltage and Frequency Values.
Logfile Size max.
Defines the maximum time range (in hours) of the
log file for Input Voltage and Frequency Values.
The log file will be set back to min. size (value of
log file Size min.) if the log file contains more data
than the configured value.
System parameter: System Shutdown
Enable System Shutdown
Defines if the system will start the shutdown
routine in the event of a shutdown call from the
UPS during a power failure.
Attention:
Downtime
Make sure that this checkbox is active if you do not
want to use a user-defined shutdown-job. If not, the
UPS might be turned off during a power failure
before the system has been shutdown.
Defines how many minutes before the UPS
battery is discharged, that the shutdown
procedure begins. This time interval has to be
large enough to guarantee a proper shutdown of
the system before the UPS is turned off. Ensure
that this value is calculated on a large scale: (e.g.
112
with 10 minutes hold time of the UPS, start the
shutdown procedure at least 3 minutes before the
batteries are exhausted).
System parameter: UPS Shutdown
The following functions are not supported by all UPS. In particular, devices with the
connection-type cable do not support a schedule-controlled down and restore.
Enable UPS shutdown
Defines if the UPS will be turned off after the
completion of the shutdown procedure of the
server. This feature will enable the UPS to be
turned off before a complete discharge of the
batteries.
UPS down delay
Defines how many seconds after beginning the
shutdown procedure (see Downtime) that the
UPS will turn off. Caution: Take care that the
system is down before this count down ends and
the UPS is switched off. The timer for the UPS
down command is initiated simultaneously with
the system shutdown command. Eg. If the
system shutdown starts 3 minutes before battery
end, the UPS down delay is started at the same
time. So if the UPS down delay is set to 120 sec.,
the UPS will be switched off after 2 minutes. So
your system has to finish it's shutdown within 2
minutes.
UPS restore delay
Defines how many seconds after turning off the
UPS that the system is turned on again. For most
UPS types it is necessary that the power has
been restored before the UPS has completely
switched off.
File Configuration: Logging
Editor
Defines which editor is used for viewing the event
protocol file.
Textfile
Defines the event protocol filename.
Datafile
Defines the filename of the log file for Input
Voltage and Frequency Values.
File Configuration: Scheduler
113
Termin File
Defines the filename in which the data of the
scheduler will be saved.
Job Configuration: Jobs
The software makes the execution of jobs (*.ncf-file) available to enable you to adjust the
UPS-Management software to your requirements. As standard the UPS-Management
Software executes internal system event routines by the parameter "own".
Broadcast
1.
This job is executed during a power failure in the time-interval
Broadcast Rate (see System parameter: Timeframe/Broadcast
Rate), as long as the UPS is running on battery.
Powerfail
2.
The system informs the user about the remaining up-time of the
server, if parameter "own" is used.
1.
This job is executed immediately after a power failure has been
detected.
Restored
2.
The system informs the user about the problem.
1.
This job is executed when the power has returned and the UPS
switched back to normal mode.
2.
The system informs the user that the power has been restored.
1.
This job is executed at the moment the system starts the shutdown
.
Shutdown
(see System parameter: Downtime).
2.
The system will be shutdown and the UPS may be switched off (if
configured and the UPS is capable of accepting this command).
Attention:
If you created your own shutdown-job, you have to make sure
that it has a down-command at the end of your script, otherwise
the system will not be shutdown. In order to utilise this
function, please use the provided OS/2 program shutcmd.exe
With the OS/2 modules for WARP and LAN Server it is not possible to execute all
programs and commands. The following table(s) is showing programs and commands,
which can be executed with the UPSMAN and which not. “PM” stands for Presentation
manager (Programs). The “PM” programs can be all kinds of OS/2 commands. None “PM”
programs are batches, DOS commands or other comnands, which are not supported by
OS/2. It is not possible to execute a batch file (*.cmd) from UPSMAN WARP. Please use
the original OS/2 commands (not batch files) or utilise the LANSERVER UPSMAN
114
OS/2 UPSMAN Warp:
Job
PM-Programs
None-PMPrograms
Power fail
yes
No
NetMessage
yes
No
PowerRestore
yes
No
Shutdown
yes
Yes
OS/2 UPSMAN LanServer:
Job
PM-Programs
None-PMPrograms
Power fail
yes
yes
NetMessage
yes
yes
PowerRestore
yes
yes
Shutdown
yes
yes
All Jobs can now be called up with the parameters. The corresponding job needs to be
entered with the full path, so that job can be executed, even it is not entered in one of the
path-variables configured path.
3.6.3 Start UPS-Management Software
The upsman.exe is started from the OS/2 command shell. As a standard upsman.exe
uses the configuration file ups.cfg.
If you want to communicate with the upsman.exe from a windows terminal in the network,
start upstcp.exe after upsman. With this program the UPS data is available for any
Windows upsmon using TCP/IP for Windows within the network. Notice that the TCP/IP
protocol has to be installed in OS/2 and your WIN/OS2 for connecting from WIN/OS2 to
UPSMAN.
3.6.3.1 Start with OS/2 2.x and Warp
Upsman.exe is a background process. To start upsman.exe enter "start upsman" at the
command line.
upsman.exe can be started with the following parameters:
-v
display of program information (process ID)
-s
stops Upsman
To execute an automatic start of upsman.exe when booting the system, enter the
command start upsman into the OS/2 file startup.cmd.
115
When using OS/2 Warp a reference can be created in the system start folder for an
automatic start of upsman.exe.
Use the same procedure for auto-starting the network module upstcp.exe.
3.6.3.2 Start with Lan Server
Upsman.exe within LAN SERVER runs as a service. Before you can start upsman.exe
you have to install the program as a service. For this purpose you have to make an entry
to the file ibmlan.ini, directory ibmlan, section services. Enter the following lines, if you
installed the software in the default directory:
upsman = c:\ups\upsman.exe
If you want to use the network module upstcp.exe, you have to enter a second line to the
ibmlan.ini.:
upstcp = c:\ups\upstcp.exe
Now upsman.exe and upstcp.exe may be started from the command line by the
commands net start upsman resp. net start upstcp. In addition, the services can be started
and stopped via the servicelist or the commands net stop.
For an automatic start enter the above mentioned start commands into the file
startup.cmd.
3.6.4 Stop UPS-Management software
3.6.4.1 Stop with OS/2 2.x and Warp
To stop Upsman enter the command upsman -s at the OS/2 command line.
To stop upstcp proceed accordingly. Notice, that upstcp should be stopped before
Upsman.
3.6.4.2 Stop with Lan Server
To stop the Upsman, enter the command net stop upsman at the command line. Proceed
in the same way for upstcp. Notice, that upstcp should be stopped before Upsman.
Otherwise both services can be stopped with the servicelist.
3.6.5 UPSMON OS/2
UPSMON for OS/2 is a simple tool for displaying the UPS data being managed by
UPSMAN.
Start UPSMON from the command line. The current UPS status is shown on screen.
Press any key to update the display and exit the program by pressing the E key.
116
Note that commandline UPSMON can only be executed on the computer running
UPSMAN. Inorder to use the network capabilities of UPSMAN the Windows version of
UPSMON must be used.
3.6.6 RCCMD for OS/2
To start RCCMD in the receiver mode (listen), please enter this line:
RCCMD -l [<address>] shutcmd.exe
Optional Parameter:
<address>
Computer, from a RCCMD signal is accepted
To start RCCMD in the send mode (send), please enter this line into the ups_exe.cmd:
RCCMD -s <address>
Please enter the TCP address of the computer to which you want to send a RCCMD
signal in the field <address>. The batch waitups and sendups might also be used. The
option –a maybe used several times, if a shutdown should be initiated on a remote
network server.
Do not use the CD License key more than once. (Copyright regulations page 1). If more
RCCMD modules need to be installed for the shutdown, additional CD license key must
be purchased. Additional license keys are available from your UPS dealer, whereas the
CD can be used again for the actual installation.
117
3.7 Apple MacIntosh
3.7.1 UPSMAN Installation
MAC OS 9 is no longer supported, only RCCMD should be used on such older MAC
systems. UPSMAN is currently only supported for MAC OS X 10.4 and higher.
1.
Ensure to be logged in as user root.
(required). After inserting and opening
the UPS-Management software CD,
the user should drag or copy the files
./upsman.dmg and rccmd.dmg from
the CD-ROM directory onto the
desktop.
Figure 54 macintosh dmg installation files
2.
After unpacking, two installation
archives are displayed:
Figure 55 macintosh rccmd install and upsman
install
3.
In order to install the archives the
user needs to double-click the
icons. The following window is
displayed: (see chapter 3.7.3
RCCMD under MAC OS for
RCCMD )
Figure 56 macintosh upman install startup
118
4.
By confirming the dialogue, the entry of the
license key is requested by the software.
After entering the correct licenses, the
software installs into the following
directory:
Figure 57 macintosh installation directory
5.
We recommend to create an alias from the
UPSMAN and the UPSMAN configuration.url.
The icons should be placed in the Apple
menue or the desktop for easy access.
Figure 58 macintosh upsman alias
3.7.2 UPSMAN Configuration
The configuration under MAC OS is executed via a web-browser (Internet Explorer,
Netscape Navigator). Please start the alias upsmanconfiguration.url by double-clicking the
mouse on the icon. The following dialogue opens:
119
Figure 59 macintosh html UPS configuration tab
Figure 60 macintosh html System configuration tab
The configuration of the UPSMAN software under MACOS is similar to the Windows OS
versions. However the menue "Special" is not available under Windows. We would
therefore like to refer the user to the Windows configurations chapter in this manual. In the
bottom part of he configuration windows of the UPS and System card, the user can use
the features "KillIpsman", which stops the UPSMAN process until a restart is done,
120
"StopUpsman", which stops the UPSMAN and "StartUpsman", which re- starts the
UPSMAN after the configuration.
Generally, the MAC OS configuration
allows an automatic start when the
computer is booted. Simply copy the
UPSMAN alias into the Startobjects-Folder,
which is located under: System
folder>Start objects (see picture)
Figure 61 macintosh upsman auto start
3.7.3 RCCMD under MAC OS 9 / MAC OS 10.X
The installation of RCCMD under MAC OS 9 is no longer supported, currently we support
only RCCMD for MAC OS X 10.4 and higher. Following we describe the former MAC OS 9
RCCMD installation The RCCMD installation automatically copies an alias ontop the
desktop (rccmd configuration.url)
1.
After the installation of the RCCMD
archives , the following dialogue opens:
After restarting the computer, the RCCMD
configuration tools can begin. In order to
do this, please click on the alias "rccmd
configuartion.url" A standard Web-browser
(e.g. IE 5.x or Netscape Navigator 4.x) will
start now.
Figure 62 macinosh RCCMD install startup
121
2.
The following window
opens
It is recommendable to
execute the menue
options from top down.
Figure 63 macintosh RCCmd configuration
This option allows the entry of the IP
addresses of the RCCMD sender, those
computers, which sends the shutdown
signals to the remote computers (RCCMD
clients). The configuration of the RCCMD
sender is executed from the UPSMAN
configuration. Please also check the
RCCMD Windows section of this manual.
Please enter the IP address(es) of the
RCCMD sender into the field TCP/IP
address" and click onto "Add" in order to
add the address to the list. Repeate this
method if several RCCMD sender should
be in the list. To delete, simply highlight
the IP address of a RCCMD sender from
the list and click the "Delete" Button.
Figure 64 macintosh Add/ modify valid remote
122
stations
Please enter the license key, which came
with the copy of your CD or the separate
purchased RCCMD license (additional
license). Please confirm your entry by
clicking on "Confirm" The "Back" button,
will take the user back to the RCCMD
main menue.
Figure 65 macintosh Setting the licensekey
Please note the license regulations regarding RCCMD sender and clients. The standard
version of the MAC OS UPS-Management software can send RCCMD (send) signals to
an unlimited number of RCCMD clients. Per license only one RCCMD client can be
execute a shutdown. Please contact your UPS dealer, if you require additional RCCMD
licenses or order at www.generex.de.
The menue "Change delay on action"
allows the user to enter a delay in seconds,
before the shutdown of the RCCMD
client(s) is initiated and after a shutdown
signal is received. The default is 60
seconds –using "Confirm" will configure
your settings.
Figure 66 macintosh Change delay on action
123
This window shows the user the current
RCCMD settings. The access control field
shows RCCMD sender, which have
sending authority, the license key, the
current delay in seconds from the "Delay
on action" feature, followed by the last
RCCMD error report. The Back" button will
bring you back to the RCCMD main
menue. Generally, RCCMD is started
automatically after a successful installation.
If this is not required. Please remove the
corresponding system extension from the
system extensions folder.
Figure 67 macintosh View current settings
Please start the alias „upsman
configuration.url“, as described in the
previous section, using your standard webbrowser. The following dialogue opens:
Figure 68 macintosh Add RCCMD receivers
(RCCMD Clients)
Please enter the IP address(es) of the RCCMD clients in the field "TCP/IP address" and
click "Add", in order to add the addresses to the list. Please repeat the method, if several
IP addresses/RCCMD clients need to be added to the list. On the other hand, deleting a IP
address is simply done by highlighting the corresponding address and clicking the "Delete"
button. Please note the license regulations in the previous section "Setting the license
key"
124
Equal to the UPSMAN Windows configuration, we recommend to limit the group/number
of RCCMD receivers, because without a entry into the receiver list, all RCCMD receivers
(clients) in the network will perform a shutdown (depending on license status), when a
RCCMD sender signal is executed. The RCCMD configuration is now complete.
Installation under MAC OS 10.X:
•
•
•
•
•
•
•
Ensure to be logged in as user root. (required)
Open ./rccmd.dmg (on CD ROM in directory <MAC_X/UPSMAN>).
Call rccmd.pkg to start the setup procedure.
Choose the desired installation volume.
Enter the licence key for MAC OS (The continue button is unabled unless a
valid licence key has been entered).
Choose the desired language and start the installation process.
Continue with the configuration of RCCMD as described for MAC OS 9.
3.8 RCCMD AS400-Client
RCCMD for AS 400 an iSeries is not described in this manual, but has identical functions
as any other RCCMD . RCCMD for AS 400 comes with a separate user manual with the
product.
4 How to use the UPS-Management Software?
4.1 UPSMON for Windows with gCHART
The UPSMON is used to operate and monitor of the UPSMAN software. Once connected
with a server, the UPSMON responds with the main screen, allowing all features to be
operated.
After a connection has been established, the status main screen shows several windows,
which are described below. For further information about working with Windows please
refer to your MS-Windows manual or use the help site of UPSMON.
In the top part of the UPSMON screen you will find the menu- and the toolbar. The toolbar
shows buttons for connecting to and disconnecting from a UPS server, adjusting the
windows, printing, help, and information about the server-name. The type of UPS and the
location where the UPSMON is connected to is shown in the title bar.
At the bottom of this window, the status bar is displayed. Actual UPS-status will be
presented as text information.
The tool bar and status bar can be either hidden or in the foreground by choosing Toolbar
and Statusbar from the menu View.
The Windows Installation of UPSMON implements gCHART, a dynamic log file visualising
controller. This is a graphical log file viewer that is started after retrieving the log file data
from the UPSMAN server by pressing the “get data log” icon. After which the data can be
visually examined by Zooming-in with the mouse (CTR+left mouse button) and Panning
125
and Scrolling (Shift+Left mouse button). The graphical chart can be customized to a large
degree to suite the viewing preferences of the user by selecting the options that are made
available when clicking the right mouse button in the gCHART area. The gCHART feature
is also supported by the CS121 adapters and an online demonstration is available at
http://q01.generex.de/. The necessary gCHART plugin can be downloaded for free in the
“Download > Firmware CS121 > gCHART controller for IE” area at www.generex.de.
Figure 69 gCHART for UPSMON Windows
4.2 Connecting with UPSMAN
When UPSMON starts it will ask for a connection to a server. Choose the operating
system and the transmission-protocol that you want to work with. TCP/IP is recommended
as a communication protocol and is required for Windows 95/98/NT/2000, Novell and DEC
VMS.
To start a connection click on the button Connect.
To build a connection to different processes enter the port and the IP-address, or host
name respectively separated by a comma (e.g. 5769,192.10.200.6. The port address can
also be left out, if the UPSMAN has been started normally. The entry of the IP address
(191.10.200.6) is enough. We recommend using the TCP/IP protocol as a communication
protocol.
126
4.3 UNMS – UPS Network Management System
UNMS II is a UPS network monitor designed to inform you of emergency power supply
systems problems before your clients, end-users or managers do. The UNMS as a limited
version is part of every UPSMAN license (UPSMAN suite contains UPSMAN RS232/USB
UPS Manager, UPSMON Windows client and UNMS 2 – limited to 9 UPS). The UNMS
Server Service runs intermittent checks on UPS devices you specify. When problems are
encountered, the UNMS Server Service can send notifications out to administrative
contacts in a variety of different ways (For example: Email). Current status information,
historical logs, and reports can all be accessed via a web browser (Web Console).
Figure 70 UNMS-Installation
4.4 The Displays
4.4.1 The Status display
The colours of the UPS-Service diagram show the criticality levels for the UPS and your
system.
Green:
127
OK and working.
Yellow:
Ok, in stand-by or "Alert"
Red:
Defect or Alarm
Grey/Blue:
Not present
4.4.2 Status Chart
The window of the Status Chart displays the most important operating data of your UPSsystem. For further information on this data please refer to the UPS-system manual. When
the operating status is critical the displayed colours will change to red.
4.4.3 Event List
The Event list displays the current UPSMON-activities. Use the scroll bar for information
about the UPS.
4.4.4 Scheduler
The Scheduler is a calendar which allows you to program UPS tests, commands,
shutdowns, and start/stops of the system. The Scheduler is used for following functions:
1.
start and stop of the UPS- and the computer system at programmed times;
2.
automatic start of UPS tests;
3.
start and stop of Economy mode and/or Bypass
Features of the Scheduler
Period-selection
The jobs/functions may be executed once, daily, weekly, e.g. every
Wednesday, or monthly at a programmed time. The command time lets you set the required time and date for this program execution.
Recurse This function defines at what day the desired job is started, when you use daily,
weekly or monthly. Choice 1 means that the function is only to be executed on this exact
date. Choice 2, 3, ... means that the execution will be only on every second, third, ... day,
e.g. Recurse 2 together with the weekly settings means that the job will be only executed
every second Monday. Recurse 3 together with monthly settings means that the job will be
executed only every third month on the first day. Etc.
Job-list
Here the programmed jobs (see below) will be listed. State displays the
execution of the jobs. Executed shows that the job has been completed successfully.
Ignored means that the job could not be started because the command was rejected from
UPSMAN. Played out means that this job could not be started because the server was not
active at this time. This job is no longer active. Active means that this job is waiting for the
execution.
Drop-down menu Jobs
Here you can define what jobs should be executed by the
scheduler. You may choose from several test routines, shutdown procedures, and restart
procedures. If you choose shutdown of the system a restart time command may be set.
128
As soon as all adjustments are completed, you can Add them to the Job-list. Later
changes can be updated using Change. To delete a date from the list, highlight/mark this
job in the list and click on Delete.
Ascending and Descending sorts the jobs in the list by date correspondingly.
4.4.5 Functions
To execute tests of your UPS system choose UPS Functions from the menu Functions.
The results will be displayed in a table. The outcome of the tests depend on the settings of
the manufacturer. Selftest is a UPS hardware check. Battery Test is a short test of the
UPS working on battery. Custom Test switches the UPS on battery mode and will keep
discharging the batteries until the "downtime" has passed. With this command you may
check your batteries to see if they are still capable of supplying your system with the
"downtime" configured autonomy. Full UPS test is a deep discharge of the batteries and is
used for calibrating the battery. Tests should only be carried out if no user users are
active. Some tests may be deactivated depending if the UPS supports those features.
Attention:
When running a UPS Full test, please note not to
interrupt the test, as long as it is active. If the test
gets interrupted, the software will configure the
autonomy time as the time-span of which the test
has been running on the UPS before it has been
interrupted. A test can be re-started after a 8 hour
waiting period.
Note:
A manual reset is possible by starting the
upsman.bat.
Figure 71 UPSMON device command window
129
4.4.6 Voltage- and Frequence-Chart
Here the input voltage and frequency values of the last 24 hours (default) are displayed in
a bar or line chart/graphic. Depending on the UPS system (single or thriple-phased) one
measurement per phase is recorded.
In the menu File choose Get DataLog-File for Charts and wait for the measurements to be
transferred from UPSMAN to Upsmon. After the file transfer has been completed, you may
display the measurements of voltage and frequency via the menu Chart.
The menu Chart lets you choose between a chart showing minimum/maximum-results or
mean values.
The bar colours show whether the results have been outside the range of tolerance. The
accepted tolerance of the UPS-rectifier is displayed by a blue-line.
To monitor a certain part of the recorded time period, use the command Time Frame from
the menu Chart. After selecting a time period with the desired frame choose a voltage or
frequency chart again to display the measurements. It shows only the measurements
within this range (higher resolution of input data).
4.4.7 Textlog
In the menu File select Get TextLog-File and wait for the measurements to be transferred
from UPSMAN to Upsmon. The event-protocol includes all UPS events that have occurred
to date. A default UPS dump is printed if no errors have occurred. Only messages like
"Power fail", "Alarm", "Overload", "Battery low" etc. show a unusual situtation.
The UPSMAN log file can also be opened directly from the UPSMAN directory, please use
any standard text editor for this.
4.4.8 Mail-Events
In order to use the Mail events of the UPSMON, a conenction to the UPSMAN must be
established. Sending of e-mail, as described in the Email to SMS section, will only work
with an active, connected UPSMAN. Please read the example configurations for help with
the syntax of "Qblat.exe".
To send a message at any event choose Enable from the Mail-Service menu and enter
your Windows user name and password for the Mail server.
Now choose Configuration from the menu Mail-Service and select the UPS event for
which you want to send a message (Select). Now enter a message text (Message to
send) and the address (Recipient). Then enable the function. To add any recipient out of
your MS mail directory click on Insert Address from Mail-Service. You may create a
WORD or other document via this function. Please see the Windows user manual to see
how to configure the internal MS-FAX service.
130
For further information on how to use MS-Mail, please refer to your Windows user manual
or contact your Mail operator in your network.
4.5 UPSMAN Web-server and JAVAMON
The web-server containing the JAVA applet using a web-browser, allows the user a
complete platform independent display of UPS data and adjustment of the UPSMAN
configuration.
The UPSMAN program group in the start menu contains the icon to start the web.-server.
The configuration of the UPSMAN can now be started using the web-browser. The
following window opens, whereas the startup screen (JAVAMON) can be modified, as
demonstrated here:
Figure 72 JAVAMON browser console
The connection to the UPSMAN is achived by clicking on the "Connect" option in the
"File" menu. The user need to configure teh UP address of the computer, which is hosting
the USPMAN process.
Figure 73 JAVAMON UPSMAN IP
131
Figure 74 JAVAMON UPSMAN SERVER
password protected
The two dialogues (above) show the password request, which protects the UPSMAN
configuration.
This following window opens, showing the web-server after a succesful connect.
(JAVAMON)
Figure 75 JAVAMON status display
This screen reflects the same information, as the well-known graphic tool UPSMON. The
file menu contains the feature "Configuration", which allows the user to execute the
complete UPSMAN configuration.
This configuration is identical to the local UPSMAN configuration. Please also check the
UPSMAN Windows configuration. (See picture):
Figure 76 JAVAMON UPSMAN configuration
132
4.6 UPSMON for the command line
The Upsmon for Windows 95/98/NT/2000 is a command line programm which can be
used in batch programs. All UPS values can be displayed and used for programming of
batch files and scripts for the processing UPS information further. Also, the Upsmon
activates all UPS functions and UPS tests. Because of this, UPS commands can be
transferred from other applications to the UPSMAN. This interface allows the access to
every UPSMAN in the TCP/IP network and the control of all connected UPS devices.
Parameter for the Upsmon
usage: upsmon <hostname or IP adress> <-vicdtrh>
-v
Program information
-i <value>
Query of a UPS-measurement
-c <ups command>
Execution of a UPS-function
-d <ups command with duration> <seconds>
Execution of a timed UPS-function
-t <ups test>
Execution of a UPS-test function
-r <ups test> <values>
Query of a UPS-test function result
status
(4= OK)
inputvolt
battvolt
temperature
(in celsius)
autonomietime
(in minutes)
autotime
(in minutes)
battcap
(in %)
batterycapacity
(in %)
outputpower
(in %)
inputfrequenz
(in Hz)
outputfrequenz
(in Hz)
<ups command>
testbatt
batterytest
133
fulltest
canceltestbatt
cancelbatterytest
cancelshutdown
alarmreset
(Buzzer off)
<ups command with duration>
shutdown
restore
<ups test>
customtest
batterytest
selftest
fulltest
shutdownrestore [down seconds] [restore seconds]
Please note that the answer depends on the typ of protocol of the UPS. Returns with "0"
means that the values are available for this UPS model.
Example: Command for the Shutdown UPS and Restore:
./upsmon –d shutdownrestore 90 120
Note that UPS is controlled directly, a system shutdown is not initiated using the command
"upsmon –t shutdownrestore [x] [x]“ The system needs to initiate its own shutdown routine
after such a command. Please use the corresponding shutcmd.exe program, as in this
example:
; Shutdown Batch for NT:
;
./upsmon <servername> -t shutdownrestore 60 90
./shutcmd.exe /L /Y /C /T:05 "Local shutdown now!"
Installation:
The program UPSMON.EXE requires a successfull installation of the UPSMAN in the
network.
134
Please copy the program with the Dlls MSVCRT.DLL and MSVBD60.DLL into a directory
on your Windows 95/98/NT/2000/XP computer. As soon as the UPSMAN is active via the
TCP/IP connection, the program is ready for use.
The use of the UPSMON API with own software is possible, please contact your software
support or the Generex directly.
4.7 Simple Network Management Protocol (SNMP)
The Simple Network Management Protocol (SNMP) is a worldwide standard
communication protocol. It is used to monitor any device in the network via simple control
language. The UPS-Management Software also provides its data in this SNMP format.
The file upsman.mib in your UPSMAN directory describes the data that can be requested
via SNMP. Upon til now. The software works with a private MIB, whereas Version 4.3x is
using the standard MIB RFC 1628 (last quarter 2002, which already exists in most SNMP
applications and does not need to be compiled.
With any SNMP-Management software (e.g. HP-OpenView, Novell NMS etc.) capable of
compiling an external MIB it is possible to connect to the UPSMAN SNMP agent and
execute/react to UPS-specific functions. For this, the operating system on which you are
using UPSMAN must be SNMP-compatible.
The UPSMAN software supports the SNMP interfaces from Windows NT/2000, Windows
98 (from 1999) OS/2 and NovellNetWare. On all other operating, supported by the
UPSMAN a SNMP access to the UPS is not possible. An adapter (SNMP-adapter) must
be used in those cases.
4.7.1 UPSMAN with SNMP on NovellNetWare
In order to send UPSMAN traps via the SNMP protocol, SNMP must be installed on the
Novell server. The following example shows a basic configuration under NetWare 4.11.
Change to the system console and enter "load sys:inetcfg.nlm"
The programm for the configuration of network components will be loaded afterwards.
Please choose the entry "Manage Configuration"
Please choose the entry "Configure SNMP Parameters"
Here the SNMP parameter "get" and "set" and the "Trap Targets" (NMS) have to be
adjusted.
Please see the following window:
135
Figure 77 Novell SNMP parameters
Monitor State:
information.
Defines which communities are allowed to ask for "get"
Monitor Community:
Default setting: public
Control State:
Defines which communities are allowed to set operations
with ”set”.
Control Community:
Trap State:
Default setting: public
Defines to which communities ”traps” send to.
Trap Community:
Default setting: public
Other SNMP Parameters:
Additional entry
Please adjust the above mentioned entries to your SNMP network and continue with the
configuration of the SNMP information.
Please choose the entry "Configure SNMP Information". In this entry general settings for
the hardware, location and the system administrator are configured with informativ
character. The entries made here are saved in the sys:etc\snmp.cfg file.
In order configure a NMS, please change from the entry ”Manage Configuration" to
"Protocols" and choose TCP/IP.
In the menu "SNMP Manager Table" the TCP/IP address of the management station is
displayed, to which traps can be send to.
136
4.7.2 UPSMAN with SNMP on OS/2
To be able to connect to the UPS-functions via SNMP you have to install and configure
the OS/2-support for SNMP (SystemView Agent for OS/2) and the TCP/IP-networkprotocol first.
Configure the address of your management station that is able to access the SystemView
Agent. Here you can enter a single IP-address or a complete net. Additionally configure
your management station as the trap-target.
SNMP / Upsagent under OS/2 Warp Version 4
Install the SNMP demon as described in the OS/2 manual and configure the service with
the following values:
Protocol: UDP
Name: public
IP-Address:
e.g. 192.10.200.0. The SNMP Demon can
receive information from all stations.
e.g. 192.10.200.52. The SNMP Demon can
receive information from all stations.
SNMP Parameter:
-transport udp -dpi tcp
If the installation has been completed successfully you should receive a cold boot-trap on
your management console. In addition you will be able to access the Systemgroup data.
SNMP-support is not included in upsman.exe. Start the SNMP-component upsagent.exe
after loading upsman.exe. Enter the following command line to start upsagent.exe:
upsagent.exe -h <address> -c <comunity name>
-h <address>
Address of the computers that you installed the SystemView Agent
on.
-c <comunity name>
Comunity String. (z. B. ”public”)
4.7.3 UPSMAN with SNMP on Windows NT/2000/XP
To be able to connect to the UPSMAN via SNMP you have to install and configure the
Windows NT/2000-support for SNMP (Control panel, network settings, services, SNMP
service) and the TCP/IP network protocol first.
Choose the icon network from Systemcontrol and then add components.
After the SNMP service has been installed you have to configure the SNMP service via
the control panel icon Network. Enter the community string of your management station
and the address of the trap target and enter the Systemgroup.
137
Note:
The Generex UPS-Management software also supports nongenerex SNMP adapter. A connection to the UPS maybe via
SNMP adapter is possible, whereas actual SNMP software is not
required. SNMP adpter from other manufacturers are also
supported.
Start the SNMP-service from the command line by
net start snmp
or start the SNMP service with the help of the icon Services from the control panel. If the
installation has been completed successfully you should receive a cold boot trap on your
management console. In addition you can access Systemgroup data.
In order to connect the UPSMAN software and an SNMP adpter is it required to start the
SNMP service. The UPSMAN computer needs to be configured in the SNMP adapter.
Please also refer to your SNMP adapter installation manual.
138
UPSMAN Configuration
The SNMP adpter can easily be selected from the list in the UPSMAN configuration. The
UPSMAN computer must have the IP of the designated adapter with community code
placed into its address and vice versa, the address of the UPSMAN computer must be
placed in the SNMP communities table with a matching communities code and with both
read and write priviledges. The UPS Check rate (see right-hand picture) should be
lowered once the UPSMAN is connected with the SNMP adapter otherwise, the default
settings in the UPSMAN will cause high network traffic.
Figure 78 UPSMAN model type SNMP adapter
Figure 79 UPSMAN System UPS check rate
139
Next, select the icon UPSMAN from system controls and activate the check box of the
SNMP-service (Enable SNMP Support). Check that UPSMAN starts correctly and SNMP
communication is established. See System Event Viewer or the UPSMAN log file for this
information. If you receive a display message ”SNMP communication cannot be started”,
please stop the UPSMAN software and the SNMP service manually. Start both again
(SNMP first, then UPSMAN) and check the information about the start of the UPSMAN
SNMP service. You can also check with the text log file, which is containing this
information.
Note:
Please refer to Troubleshooting section in this manual, which
gives solutions to problems and advice on how to use the
UPSMAN software under Windows NT/2000.
Appendix
A Supported Systems
The UPS Management Software supports all current operating systems. Please use our
internetsite for updates and additional information. http://www.generex.de
B Know-How Pool
In this section you will find a collection of know-how informationof different operating
platforms and operating systems. Please note that an update of to the latest version of the
UPS-Management software will solve many problems and minor "bugs". Please contact
your UPS dealer or visit our webs ite under http://www.generex.de The free update to the
latest version of the UPS-Management software is available from CD version 4.17.
Change UPSMAN Window start-up in the registry
This can be done by changing the script, please change the path:
Hkeylocal_miachine\systtem\currentcontrolset\services
in the registry and find the entry start. This enrty should be set to 0x2 (automatic) by
default, 0x3 (manual) and 0x0 means that the driver will be loaded by the Kernel loader at
startup. However, 0x1 means that the dribver will be loaded by ethe I/O subsystem at
Kernel startup.
Example settings SUN Solaris 2.6, 2.7 : TTY configuration
Settngs of the serial interface with the admintool:
140
Figure 80 Example settings SUN Solaris 2.6, 2.7 : TTY configuration
DEC UNIX / COMPAQ TRUE UNIX with CABLE 2:
A comprehensive test seies had the following result. This demonstrates that Unix is
supporting "cable 2" Please also check with the section "Cable types" section of this
manual.
UpsModel=No UPS model defined
UpsCable=Typ 2
Pin 2+4:
=> UPS ALARM / UPS POWERFAIL!
Pin 2+4+5:
=> BATTERY LOW
=> UPS ALARM / NOW SYSTEM SHUTDOWN!
HP OPENVIEW Bug_ RFC 1628 Trap receiver does not interprete correct MIB 2
Traps from CS 111.
This bug is know in HP OV 5 and 6 for Windows NT. The moment the trap definition is
manually changed, HP OV transforms the version 2 trap indentifier in to version 1.
How to override: You can manually correct in the trapd.conf file. You will see that the trap
ID has changed from
141
1.3.6.1.2.1.33.2.1 to 1.3.6.1.2.1.33.0.1 (this is trap 1 ! - not trap 2). Change this string
to 1.3.6.1.2.1.33.2.1 again to correct this problem. – Or change inside the CS 111
configuration the MIB 2 trap default to MIB 1. (Or await for fix from HP. )
Example: TCP/IP minimum configuration for NetWare 3.12 Server
# load the tcpip.nlm
LOAD TCPIP
# laoding of the network card driver
# in this example, a IntelEtherexpress card
# with corresponding driver from the manufacturer epro.lan
LOAD EPRO PORT=340 INT=A FRAME=ETHERNET_II NAME=EPRO_TCPIP
# connecting the IP Protocol to the network card
BIND IP TO EPRO_TCPIP ADDRESS=192.111.112.113
Disabling the Plug´n Play search process on serial interfaces at Windows 95/98.
This recommend when the UPS switches off during the boot process of the
computer.
Start the hardware assistent (control panel)
Do not allow a search for new hardware, activate the NO button for a manual search.
Choose „other components“
Confirm the search on a disk
Change the search path from A: to the directory on your Windows directory where the files
COM9598.INF and Sampappl.txt.are located.
142
Figure 81 Hardware wizard
Choose the Com port from the list where you want to connect the UPS to.
Confirm your choice with „continue“ and finish the installation .
At the next reboot this com poprt will no longer monitored by Plug & Play.
HP OV SNAP IN under HP UNIX:
Configuration for HP-OV-Snap-in:
in /etc/opt/OV/share/registration/C
the following file must be present:
upsmonov.reg
After the reboot, the process upsmonov must be present in the process list. This process
incorporates normally all objects, which are SNMP supported and also support the
RFC1628-MIB or PPC-MIB.
Please check the following picture:
143
Figure 82 Configuration for HP-OV Javamon
in /etc/opt/OV/share/registration/C the following file must be present: upsmon.reg
The following must be configured in the symbol properies for the object:
Figure 83 Symbol/ object properties
144
RCCMD HP UNIX: What does the RCCMD return code mean, when RCCMD is started. It
seems that it is a random figure everytime when RCCMD is installed.
The interval is 2 several times (e.g. 250, 252, 254; and then e.g. 180, 182, 184) ?
After the start of RCCMD the program starts as background process immediatley,
whereas the parent process is terminated as usual.
The "return code" is no actual return code, but a process id of the started RCCMD. The
return code cannot be used to test, whether RCCMD is running or not. The test needs to
be done differently:
The RCCMD has the characteristics to run in the background after startup. This is why
there is no result, if the user quiries the exitcode via a script. In order to see whether
RCCMD is running properly, the following method should be used:
LANG=${START_LANG} ${CMDStart} -l -a aatap1 -p 6003 /usr/ups/upsalarm
ps -eaf | grep '-p 6003 /usr/ups/upsalarm' > /dev/null RTC
UNIX information to UPSMAN Autostart at SGI IRIX:
To start the UPSMAN automatically the start and stop scripts should be inside rc2.d
directory or
inside rc3.d ("nfs" Mode)
Installation instructions for UPS Management Software/JAVAMON into a MS Internet
Information Server (IIS) environment.
Install UPS Management Software, select Upsman component. (Do NOT select upsman
http server!) Set-up will ask later to install ONLY the files to a specific directory. Choose a
directory, i.e. c:\inetpub\ups_http and proceed the installation.
Open the IIS management console. Create a new website, i.e. UPSMAN HTTP with read
permission and choose c:\inetpub\ups_http (see above) as the default directory. (pic. iis51.bmp, iis5-2.bmp)
145
Figure 84 UPSMAN and Windows IIS
Figure 85 Web site properties for UPSMAN
146
Figure 86 Please use the "default.htm" as default document:
Figure 87 Allow for the directory "cgi-bin" the execute permission scripts and executables:
3.) Start the webserver and connect.
Online Yunto Q – UPSMAN is not able to initiate a shutdown of the UPS The UPSMON
Windows extended commands emergency shutdown won't work either.
The Poser protocol is not able to process timer signals under the frequenz of 60 seconds.
In addition a UPSMAN UPSLIB driver is required over 196. The UPSMON can not execute
147
a emergency shutdown of the Yunto Q Poser, because the delay timer is working under
signal frequency of 60 seconds. Please execute a update in order to avoid this problem.
C Error codes (UPSMAN)
List of the UPSMAN Error codes, which consist of 4 digits e.g. 4603 indicates an error at
the serial interface.
Severity information codes:
0xxx
Success information
1xxx
Severity informational
2xxx
Minor error, warning
4xxx
Major error, process stopped
Error type:
x1xx
Unknown error
x2xx
Out of heapspace
x3xx
Module not installed
x4xx
UPS protocol failure
x5xx
Locked, failure during operation
x6xx
Connection failure
x7xx
Capability failure
x8xx
UPS database error
Extended error information:
xxx1
Unknown error
xxx2
Error in installation
xxx3
Error at serial interface
xxx4
No communication with UPS,
but COM port could be opened
148
xxx5
No answer from UPS within 3 seconds
xxx6
Incorrect data from UPS received
xxx7
Header of UPS protocol is missing or defect
xxx8
Checksum error in protocol string of UPS
xxx9
Unspecified error
xxxA
UPS did not accept the command
xxxB
End of command string or byte was missing
xxxC
COM port could not be opened
The following error codes in table are displayed when the UPSMAN software fails to start.
Error
Error name
Description
ENOENT
No such file or directory
code
2
This happens if the device name is not found. The
reason can be a missing colon (":") at the end of the
device name
5 or 6
EIO /
No such device or address. I.e. the device name
ENXIO
exists, but the physical device does not. E.g. the
device name is /dev/ttyS2, but the computer has only
two serial devices.
22
EINVAL
Invalid argument. The serial port driver of the UNIX
system does not support a function call the UPSMAN
programm.
25
ENOTTY
Not a serial device. Please choose a device name
which is not a serial device.
D Cable types
UPS
(Normal c.c. 3+4)
Powerfail
2
4,7KOhm
4
O.K.
Battery Low
UPS Shutdown
3
5
NOVELL COMPUTER
O.K. Powerfail Batt. Low
1 High Low
Low
4 + 12 V
4,7KOhm
4,7KOhm
9 Low
High
High
8 High
High
Low
6
7 Output
7
5 GND
Figure 88 Cable typ 6
This cable typ is used for Windows, NetWare but not for Unix.
149
Settings in the configuration menu: cable 6
This cable typ is used for Windows, NetWare but not for Unix. The difference to cable typ
6 is, that there is no contact closure when UPS is in normal mode. (Cable break
recognition)
(Normal c.c. 3+4)
UPS
NOVELL COMPUTER
O.K. Powerfail Batt. Low
Powerfail
2
1
4,7KOhm
4
O.K.
Low
9
Low
High
High
8
High
High
Low
6
7
Output
7
5
GND
5
UPS Shutdown
Low
4 + 12 V
3
Battery Low
High
4,7KOhm
Figure 89 Cable type 2
Settings in the configuration menu: Cable 2
Figure 90 Cable typ X34
This typ is for use with UNIX and VMS, but can also used for Windows and Novell.
Settings in the configuration menu: R-Open or R-Close
R-Open for contact open when main supply off
R-Close for contact open when main supply off
5.
Interface-Specifications
25 pin contact (male at computer side)
Pin #
1
Signal
GND
Name
Ground
2
TxT
Transmit Data
3
RxD
Receive Data
4
RTS
Request To Send
5
CTS
Clear To Send
150
6
DTR
Data Terminal Ready
7
GND
Ground
8
DCD
Data Carrier Detect
20
DTR
Data Terminal Ready
22
RI
Ring
9 pin contact (male at computer side)
Pin #
Signal
Name
1
DCD
Data Carrier Detect
2
RxD
Receive Data
3
4
TxD
DTR
Transmit Data
Data Terminal Ready
5
GND
Ground
6
DSR
Data Set Ready
7
RTS
Request To Send
8
CTS
Clear To Send
9
RI
Ring
151
E Picture catalog
Figure 1 UPSMAN and RCCMD in a network environment ................................................ 8
Figure 2 thirty-day trial without key code ........................................................................... 11
Figure 3 UPS Management or Minidriver .......................................................................... 11
Figure 4 Windows control panel UPS with Minidriver ........................................................ 12
Figure 5 Other UPS Management Modules....................................................................... 12
Figure 6 Component selection dialogue ............................................................................ 13
Figure 7 Message on RCCMD client when UPSMAN event has occurred. ...................... 17
Figure 8 Message on RCCMD client when event is over. ................................................. 17
Figure 9 Windows UPSMAN shutdown sequence configuration ....................................... 19
Figure 10 Special jobs ....................................................................................................... 23
Figure 11 Extra Jobs Power fail......................................................................................... 24
Figure 12 Insert RCCMD Shutdown .................................................................................. 24
Figure 13 Mail Server ........................................................................................................ 25
Figure 14 Event overview .................................................................................................. 26
Figure 15 Advanced button................................................................................................ 26
Figure 16 Insert action dropdown menu ............................................................................ 27
Figure 17 Microsoft event list............................................................................................. 31
Figure 18 RCCMD signal broadcast .................................................................................. 35
Figure 19 Load Save jobs.................................................................................................. 36
Figure 20 Insert job instructions......................................................................................... 36
Figure 21 Execute program ............................................................................................... 37
Figure 22 Laststat.bat using an text editor......................................................................... 38
Figure 23 send email ......................................................................................................... 39
Figure 24 UPSMAN address book..................................................................................... 39
Figure 25 RCCMD mail example ....................................................................................... 40
Figure 26 message ID example......................................................................................... 40
Figure 27 RCCMD execute example ................................................................................. 41
Figure 28 Wake-On-LAN signal......................................................................................... 41
152
Figure 29 RCCMD console test ......................................................................................... 48
Figure 30 RCCMD Redundancy check box by the RCCMD v.3 set-up............................. 50
Figure 31 Setting up the RCCMD Redundancy group during set-up ................................ 50
Figure 32a Example: Batch file to let the RCCMD act as relay station ............................. 52
Figure 33 UNIX configuration menu .................................................................................. 64
Figure 34 setting the CS122 virtual comport in the UPS values – NOT for CS121 ! The
CS121 does not need to communicate with any UPSMAN software, the UPSMAN is
part of the CS121 ! ..................................................................................................... 66
Figure 35 defining paths .................................................................................................... 74
Figure 36 UNIX entering the events menu ........................................................................ 75
Figure 37 UNIX event list................................................................................................... 75
Figure 38 UNIX add job ..................................................................................................... 76
Figure 39 Making the configuration file.............................................................................. 88
Figure 40 RCCMD Configuration menu UNIX ................................................................... 89
Figure 41 RCCMD UNIX Network Options ........................................................................ 90
Figure 42 RCCMD UNIX add sender................................................................................. 91
Figure 43 RCCMD UNIX sender example ......................................................................... 92
Figure 44 RCCMD UNIX sender overview ........................................................................ 92
Figure 45 RCCMD UNIX edit sender................................................................................. 93
Figure 46 RCCMD UNIX delete sender............................................................................. 93
Figure 47 RCCMD UNIX sender scan ............................................................................... 94
Figure 48 RCCMD UNIX check upsman ........................................................................... 95
Figure 49 RCCMD UNIX logfile options............................................................................. 97
Figure 50 RCCMD UNIX shutdown options....................................................................... 98
Figure 51 RCCMD UNIX file browsing............................................................................... 99
Figure 52 UNIX UPS data (display of the internet explorer) ............................................ 100
Figure 53 UNIX UPS data (display fo the JAVAMON) .................................................... 100
Figure 54 macintosh dmg installation files....................................................................... 118
Figure 55 macintosh rccmd install and upsman install .................................................... 118
Figure 56 macintosh upman install startup ...................................................................... 118
153
Figure 57 macintosh installation directory ....................................................................... 119
Figure 58 macintosh upsman alias .................................................................................. 119
Figure 59 macintosh html UPS configuration tab ............................................................ 120
Figure 60 macintosh html System configuration tab........................................................ 120
Figure 61 macintosh upsman auto start .......................................................................... 121
Figure 62 macinosh RCCMD install startup..................................................................... 121
Figure 63 macintosh RCCmd configuration..................................................................... 122
Figure 64 macintosh Add/ modify valid remote stations .................................................. 122
Figure 65 macintosh Setting the licensekey .................................................................... 123
Figure 66 macintosh Change delay on action ................................................................. 123
Figure 67 macintosh View current settings...................................................................... 124
Figure 68 macintosh Add RCCMD receivers (RCCMD Clients) ...................................... 124
Figure 69 gCHART for UPSMON Windows..................................................................... 126
Figure 70 UNMS-Installation............................................................................................ 127
Figure 71 UPSMON device command window................................................................ 129
Figure 72 JAVAMON browser console ............................................................................ 131
Figure 73 JAVAMON UPSMAN IP .................................................................................. 131
Figure 74 JAVAMON UPSMAN SERVER password protected ...................................... 131
Figure 75 JAVAMON status display ................................................................................ 132
Figure 76 JAVAMON UPSMAN configuration ................................................................. 132
Figure 77 Novell SNMP parameters ................................................................................ 136
Figure 78 UPSMAN model type SNMP adapter .............................................................. 139
Figure 79 UPSMAN System UPS check rate .................................................................. 139
Figure 80 Example settings SUN Solaris 2.6, 2.7 : TTY configuration ............................ 141
Figure 81 Hardware wizard.............................................................................................. 143
Figure 82 Configuration for HP-OV Javamon .................................................................. 144
Figure 83 Symbol/ object properties ................................................................................ 144
Figure 84 UPSMAN and Windows IIS ............................................................................. 146
Figure 85 Web site properties for UPSMAN .................................................................... 146
154
Figure 86 Please use the "default.htm" as default document: ......................................... 147
Figure 87 Allow for the directory "cgi-bin" the execute permission scripts and executables:
.................................................................................................................................. 147
Figure 88 Cable typ 6 ...................................................................................................... 149
Figure 89 Cable type 2 .................................................................................................... 150
Figure 90 Cable typ X34 .................................................................................................. 150
155