1
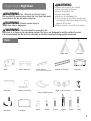
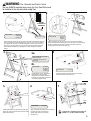
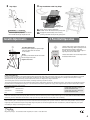
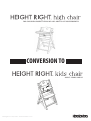
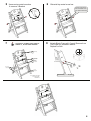
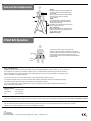
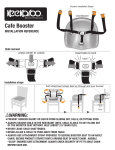
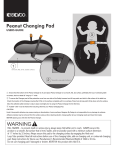
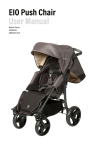
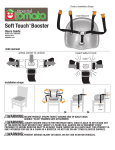
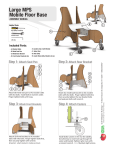
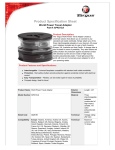
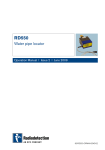
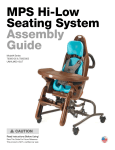
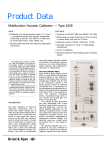
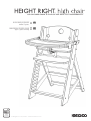
FOR CHILDREN UNDER 3 YEARS OF AGE. ABLE TO SIT INDEPENDENTLY
HIGH CHAIR ASSEMBLY 2 US
under 3 years
CONVERSION TO KIDS CHAIR 5 US
ages 3 years and up 4
Conforms to
ASTM F-404
Safety Standards
© Bergeron Companies www.keekaroo.com
!
Height Right High Chair
!
WARNING: The J-Bracket and Plastic Crotch
!
WARNING
!
WARNING: The child should be secured in the
Bar are ALWAYS required when using the Tray. Seat Plate must
be installed in the top slot while using Tray.
: Prevent serious injury or
death from falls or sliding out.
WARNING:
• Always secure child in the restraint
• Never leave child unattended
• Always keep child in view
• Secure straps tightly
• Never use as a stepping stool
• The front edge of the footrest should never
extend beyond the bottom edge of the front
supports at floor level
• Always use chair on smooth level surface
high chair at all times by the restraining system. The tray is not designed to hold the child in the chair.
It is recommended that the chair be used only by children capable of sitting upright unassisted.
Parts
Right Side
Back
2 Back Supports
Allen Key
Plastic Crotch Bar
Front Support
(shorter than back supports)
2 Metal Cross Bars
d
e
c
Seat Plate
Foot Rest
8 pcs.
Seat Pad
Right + Left Tray Clip
Tray & Plastic Cover
a
Left Side
J-Bracket
f
b
4 pcs.
5 pcs.
8 pcs.
6 pcs.
1 pcs.
2
!
WARNING: The J-Bracket and Plastic Crotch
Bar are ALWAYS required when using the Tray. Seat Plate must
be installed in the top slot while using Tray.
1
2
c
c
e
a
HARDWARE
FRONT
SUPPORT IS
SHORTER
d
a (3pcs.)
d (3pcs.)
e (3pcs.)
a
3
a (1pcs.)
d (1pcs.)
c (2pcs.)
HARDWARE
Logos this side
Insert a Wooden Dowel (e) into the larger hole in each of the Back Supports
and Front Support. Insert a Wood Nut (a), as shown into the inner holes of
the 3 Supports. Attach the 3 Wooden Supports as shown and insert Long
Screws (d). Loosely tighten the Long Screws into Wood Nuts through the
Left Side with the Allen Key. Labeling on the Rear Supports should be
visible.
d
Insert a Wood Nut (a), as shown into the inner holes of the Back.
Attach the Seat Back to left leg as shown and insert a Long Screw (d).
Attach the 2 Metal Cross Bars as shown and insert Screws (c).
Loosely tighten all screws with Allen Key.
4
3a.
Slide J-Bracket onto upper
metal cross bar.
(J-Bracket facing forward
as shown)
d
3b.
c
c
d
d
HARDWARE
d
a (4pcs.)
d (4pcs.)
c (2pcs.)
e (3pcs.)
HARDWARE
Repeat steps 1 & 2 for Right Side.
Insert the rest of the Dowels,
Wood Nuts, and Screws as shown
to attach the Right Side of the chair.
Do Not fully tighten screws.
c (1pcs.)
c
Install the Plastic Crotch Bar as shown to bottom
of Seat Plate and insert Screw (c).
Back Rest
5
6
3
7
Top Metal
Cross Bar
5
4
Back Leg
Supports
f
2
Bottom
Metal
Cross Bar
Front
Support
1
HARDWARE
Install Seat Plate in top slot and Foot Rest just
below top metal cross bar. (See Seat & Footrest
Adjustment section)
f (1pcs.)
Align J-Bracket with Plastic Crotch Restraint
rear bolt hole and insert Screw (f).
Tighten both Screws (c) & (f) with
the Allen Key.
TIGHTEN ALL SCREWS (BOTH SIDES) IN
ORDER 1-5 _DO NOT OVER TIGHTEN!
3
8
9
Tray Clips
Tray Installation with Tray Clips
FRONT
“C
LIC
9b
Second
Safety Latch
Engaged.
HARDWARE_
b (4pcs.)
Attach the Right Tray Clip as shown above
with 2 Small Screws (b). Repeat for Left.
K”
Primary
9a Spring Lock
Tray is properly installed an
9a When
audible “click” will be heard from primary lock.
the second safety Latch Lever by
9b Engage
pushing it forward into the primary spring lock.
Growth Adjustments
Foot Rest Adjustment
• The foot plate is placed at optimal height
when the child’s foot can rest flat
on it’s surface.
3 Point Belt Operation
Lap Strap
Depth
• For safety, the footrest should not exceed
the front legs of the chair.
“CLICK”
• Place child in seat. Crotch strap comes up
between child’s legs. Both Lap Straps come
around child from center of back and
“CLICK” into Crotch Strap. Adjust length of
Lap straps to secure child in seat.
• Press center button on Crotch Strap buckle
to release child from belt.
• Tighten all screws.
Crotch
Strap
5 Year Limited Warranty
Bergeron by Design warrants to the original retail purchaser of the Height Right High Chair product, that if any part or component proves defective in material
or workmanship within five years of the purchase date, the defective part will be repaired or replaced (at Bergeron by Design’s discretion) free of charge.
Warranty service may be performed by an authorized service center or at Bergeron by Design’s discretion.
This warranty does not cover normal wear and tear, or damage caused by accident or misuse.
To exercise this limited warranty, the user should first obtain a Return Authorization Number from Bergeron By Design. The product must be delivered charges
pre-paid (UPS recommended) to the factory or to an authorized service center, together with a copy of the original invoice, the Return Authorization Number
and a written description of the problem.
Customer Service
Toll Free:
1-800-994-2416
International:
Fax:
1.315.429.8407
1.315.429.8862
Height Right High Chair - Natural
Model # 0050032KR-0001
Height Right High Chair - Mahogany
Model # 0050033KR-0001
Product Care
Clean chair with damp cloth; then wipe dry. With normal use, over time screws may loosen. Please maintain tight screws. Use chair on smooth level surface.
Plastic Tray Cover is dishwasher safe. Be sure to wipe dry & NOT trap water between wood & plastic when reinstalling.
Notice
When restraint system and required components are assembled and used properly this high chair meets U.S. ASTM F-404 safety standard. Use only Height
Right High Chair accessories and parts. Height Right High Chair parts are not interchangable with other manufacturers’ products. Replace any worn parts
immediately for safety. © 2012 Bergeron By Design.
Bergeron By Design • 15 South Second St. Dolgeville, NY 13329 • 1-800-994-2416
4
FOR CHILDREN UNDER 3 YEARS OF AGE. ABLE TO SIT INDEPENDENTLY
CONVERSION TO
AGES 3 YEARS AND UP
© Bergeron Companies www.keekaroo.com
!
Height Right Kids Chair
WARNING:
• Always secure child in the restraint
• Never leave child unattended
• Always keep child in view
• Secure straps tightly
• Never use as a stepping stool
• The front edge of the footrest should never
extend beyond the bottom edge of the front
supports at floor level
• Always use chair on a smooth level surface
WARNING
!
: The Height Right Kids Chair is a
youth chair and is designed for use by children 3 years
of age and up.
! WARNING: Prevent serious injury or
death from falls or sliding out.
Remove these parts for conversion to kids chair
f
Right + Left Clip
Tray
1
Remove the tray
J-Bracket + Bolt
Parts to add
c
Plastic Crotch Restraint + Bolt
2
Right + Left Cap
Remove the tray clips
Remove the Right Cap as shown. Repeat for Left.
Keep Screws
3
Unscrew J-Bracket Bolt
4
Unscrew Plastic Crotch Restraint Bolt
& remove Plastic Crotch Restraint
f
c
5
5
6
Unscrew top metal crossbar
& remove J-Bracket
7
* As the child grows,
the TOP metal cross
bar CAN be removed.
TIGHTEN ALL SCREWS (BOTH SIDES) IN
ORDER 1-5 _DO NOT OVER TIGHTEN!
3
Back Leg
Supports
Reinstall top metal cross bar
8
Attach Black Caps with 2 small Screws from
Tray Clips (b). as shown above.
Repeat for Left.
Back Rest
5
4
Bottom
Metal
Cross Bar
1
Front
Support
Top Metal
Cross Bar
2
• IF TOP METAL CROSS BAR
IS NOT NECESSARYEND WITH # 4
HARDWARE_
b (4pcs.)
6
Seat and Foot Adjustment
Height
• The seat is placed at optimal height when
the child’s elbows are level with the top
of the table.
• The foot plate is placed at optimal height
when the child’s foot can rest flat
on it’s surface.
Depth
• For optimal depth of the seat, position
child’s back against backrest with seat
supporting 3/4 of thigh.
• For safety, the footrest should not exceed
the front legs of the chair.
Teen / Adult Use
• Remove Seat Plate & Top metal cross bar.
• Use the Foot Rest as the Seat Plate for a
larger seating surface.
• Tighten all screws.
3 Point Belt Operation
Lap Strap
“CLICK”
Crotch
Strap
• Place child in seat. Crotch strap comes up
between child’s legs. Both Lap Straps come around
child from center of back and “CLICK” into Crotch Strap.
Adjust length of Lap straps to secure child in seat.
• Press center button on Crotch Strap buckle to release
child from belt.
5 Year Limited Warranty
Bergeron by Design warrants to the original retail purchaser of the Height Right Chair product, that if any part or component
proves defective in material or workmanship within five years of the purchase date, the defective part will be repaired or
replaced (at Bergeron by Design’s discretion) free of charge. Warranty service may be performed by an authorized service
center or at Bergeron by Design’s discretion.
This warranty does not cover normal wear and tear, or damage caused by accident or misuse.
To exercise this limited warranty, the user should first obtain a Return Authorization Number from Bergeron By Design.
The product must be delivered charges pre-paid (UPS recommended) to the factory
or to an authorized service center, together with a copy of the original invoice, the Return Authorization Number and a
written description of the problem.
Customer Service
Toll Free:
1-800-994-2416
International:
1.315.429.8407
Fax:
1.315.429.8862
Product Care
Clean chair with damp cloth; then wipe dry. With normal use, over time screws may loosen. Please maintain tight screws. Use chair on smooth level surface.
Notice
Use only Height Right Chair accessories and parts. Height Right Chair parts are not interchangable with other manufacturers’ products.
Replace any worn parts immediately for safety. © 2012 Bergeron By Design.
Bergeron By Design • 15 South Second St. Dolgeville, NY 13329 • 1-800-994-2416
7