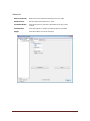
1
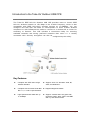
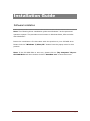
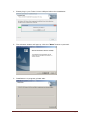
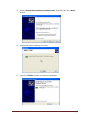
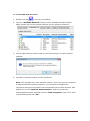
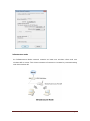
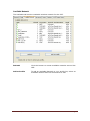
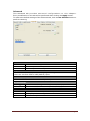
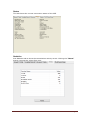
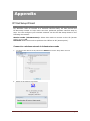
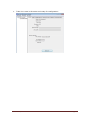
Tube-UV Outdoor Long-Range IEEE 802.11n USB CPE User’s Guide ALFA Network, Inc. Page 1 Table of Content Over view ............................................................................................... 3 Unpacking information ...................................................................... 3 Introduction to the Tube-UV Outdoor USB CPE ............................. 4 Installation Guide .............................................................................. 5 Software Installation ............................................................................. 5 Management Guide .......................................................................... 9 Making a Basic Network Connection ............................................... 9 Ad-Hoc Mode .............................................................................. 9 Infrastructure mode .................................................................. 11 Introduction to the Wireless LAN Utility ........................................ 13 Starting the Wireless LAN Utility ............................................ 13 General ..................................................................................... 14 Profile ........................................................................................ 15 Available Network .................................................................... 16 Advanced .................................................................................. 17 Status ........................................................................................ 18 Statistics .................................................................................... 18 Appendix ............................................................................................ 19 RT-Set Setup Wizard ..................................................................... 19 Use this CPE as an AP .................................................................. 21 AP mode management guide ........................................................ 22 General ..................................................................................... 22 Advanced .................................................................................. 23 Statistics .................................................................................... 24 ICS (Internet Connection Sharing) ......................................... 24 ALFA Network, Inc. Page 2 Overview Thank you for purchasing this product. Please read this chapter to better understand your Tube-UV Long Range Outdoor USB CPE Unpacking information Before getting started, please verify that your package includes the following items: 1. Tube-UV Long-Range 802.11n Outdoor USB CPE 2. One Utility/ Manual CD 3. 4. USB Cable Plastic Straps 4 ALFA Network, Inc. Page 3 Introduction to the Tube-UV Outdoor USB CPE The Tube-UV IEEE 802.11n Outdoor USB CPE provides users to launch IEEE 802.11n wireless network at 150 Mbps in the 2.4GHz frequency, which is also compatible with IEEE 802.11b/g wireless devices at 11/54Mbps. You can configure this CPE with AP mode to connect/share to other 2.4GHz wireless computers or with Infrastructure mode to connect to a wireless AP or router for accessing to Internet. This CPE includes a convenient Utility for scanning available networks and saving preferred networks that users a r e usually connected with. Security encryption can also be configured by this utility. Key Features Complies with IEEE 802.11b/g/n wireless standard Support driver for Windows 2000, XP, Vista, and Windows 7. Complies with Universal Serial Bus Rev. 1.0, 1.1 and 2.0 specifications. Supports diagnostic utilities. High Speed transfer data rate up to 150Mbps Support wireless data encryption with 64/128-bit W EP, WPA (TKIP with IEEE 802.1x), and AES functions. ALFA Network, Inc. Page 4 i Installation Guide Software Installation Note: The following driver installation guide uses Windows 7 as the presumed operation system. The procedures and screens in Windows 2000, XP are similar with Windows 7. Insert the installation CD that came with this product to your CD-ROM drive. Please click the “Windows 7/Vista/XP” button from the popup menu for this product. Note: If the CD-ROM fails to auto-run, please click on “My Computer” your CD-ROM Drive will then double-click the “AutoRun.exe” to start this menu. ALFA Network, Inc. Page 5 1. Please plug in your Tube-UV into USB port before the installation. 2. The welcome window will pop up. Click the “Next” button to proceed. 3. Installation is in progress, please wait. ALFA Network, Inc. Page 6 4. 5. Click the “Finish” button to complete driver and utility installation. Note, please insert this USB wireless CPE to your computer if you’re using Windows 7, Vista, XP, or Windows 2000. If you are using Windows 98se or ME, please restart the system first before connect this wireless CPE to your computer. New hardware is found after installation is completed in Windows 7 Found New Hardware Wizard in Windows XP, 2000, and Vista. 1. The “Found New Hardware Wizard“ will pop up. (Note: This wizard won’t pop up in Windows 98 and ME. The system finds the new hardware and installs the hardware automatically. Please skip the following steps) 2. Select “No, not this time” and click the “Next” button. ALFA Network, Inc. Page 7 3. Select “Install the software automatically” and then click the “Next” button. 4. Please wait while installing the driver. 5. Click the “Finish” button to complete installation. ALFA Network, Inc. Page 8 Management Guide Please read this chapter to better understand the management interface of your Tube-UV Long Range Outdoor USB CPE Making a Basic Network Connection Before You Start In the following instructions for making a network connection, we use the utility we provided to configure your wireless network settings. Note: For Windows XP users that want to configure your wireless network using this Utility, please perform the following procedures to disable your native Windows XP wireless support (Wireless Zero Configuration Service) 1. Double click the utility. icon on your desktop to start the 2. Make sure that the “Windows Zero Config” checkbox is unchecked. Ad-Hoc Mode An Ad-Hoc mode wireless network connects two computers directly without the use of a router or AP. It is also known as a peer-to-peer network. For example, we can install this wireless CPE to two computers respectively. The communication between the two computers is an Ad-Hoc mode network. ALFA Network, Inc. Page 9 To use this CPE in Ad-Hoc Mode 1. Double click the icon on your desktop. 2. Click the “Available Network” button to scan available wireless network CPEs. Double click on the network CPE that you are going to connect to. 3. Click the OK button to confirm that you are connecting to an open wireless network. 4. Click OK to add this network into the profile list. Note: This example is an open wireless network. If you are going to connect to a Wireless CPE with security protection, you will have to configure the encryption settings in this profile to be corresponding to the other wireless CPE. Please click on the “Network Authentication” drop list to select an authentication method, and then select a “Data encryption” type. Fill in each required blanks and click “OK”. Alfa Network, Inc. Page 10 Infrastructure mode An Infrastructure Mode network contains at least one wireless client and one wireless AP or router. This client connects to Internet or intranet by communicating with this wireless AP. Alfa Network, Inc. Page 11 To use this CPE in Infrastructure Mode: 1. Double click the icon on your desktop. 2. Click the “Available Network” button to scan available access points. Double click on the AP that you are going to connect to. 3. Click the OK button to confirm that you are connecting to an open wireless network. 4. Click OK to add this network into the profile list. Alfa Network, Inc. Page 12 Note: This example is an open wireless network. If you are going to connect to an AP with security protection, you will have to configure the encryption settings in this profile to be corresponding to your AP. Please click on the “Network Authentication” drop list to select an authentication method, and then select a “Data encryption” type. Fill in each required blanks and click “OK”. Introduction to the Wireless LAN Utility Note: This management instruction uses Windows 7 as the presumed operation system. Some functions are not supported in Windows 98se or Windows ME. Starting the Wireless LAN Utility Double click the shortcut on your desktop. The Wireless LAN Utility will pop up. You may click on the tabs above to configure this CPE. The checkboxes below provide the following functions: Show Tray Icon Windows Zero Config (on Windows XP) Radio Off Disable CPE Check this checkbox to show the utility icon on your system tray, which is in the notification area at the lower-right corner of the windows desktop. You may also uncheck it to remove the utility icon from system tray. Uncheck this checkbox to use native Windows XP wireless support (Wireless Zero Configuration Service) instead of using this utility to configure your wireless network. Check this checkbox to prevent this CPE form transmitting or receiving signals. Uncheck it to communicate. Check this checkbox to disable this wireless CPE. Virtual Wifi Disallowed Check this checkbox to disable the Virtual Wifi CPE on (on Windows 7) Windows 7 16 Alfa Network, Inc. Page 13 General After starting the utility, the general page pops up This General tab and provide the information of your current wireless network connection. You may click the Renew button to refresh those listed information. Status: Check if the device associated to target network. Speed: The current connection speed Type: Infrastructure mode or Ad-Hoc mode. Encryption: The performing encryption mode for connecting to current network profile. SSID: The SSID (network name) of the connected wireless network. Signal Strength: Indicates the signal strength detected by this CPE. Network Address: Shows the current IP addresses settings for this CPE. Alfa Network, Inc. Page 14 Profile The Profile tab lists the preferred connections. You can click the buttons on the right-hand side to configure each connection. Add Click this button to add a connection profile for this CPE. Remove To remove a connection profile, click this profile on the profile list and click this button to delete it. Edit To modify the configurations for a profile, click this profile on the profile list and click this button to edit. Duplicate To make a copy of a profile, click the profile that you would like to have copied, and click this button to copy it. Set Default To select a profile as your default wireless connection, select the profile on the list and click the Set Default button. You may also double click on each profile to select it as your default wireless connection. Alfa Network, Inc. Page 15 Available Network The available tab lists the reachable wireless network for the CPE. Refresh Click this button to rescan available networks around the CPE. Add to Profile To add an available Network to your profile list, select an available network and click this button to add. Alfa Network, Inc. Page 16 Advanced This Advanced tab p r o v i d e s a d v a n c e d c o n f i g u r a ti o n s to t h i s a d a p t e r . Every modification in this tab will be performed after clicking the Apply button. To restore the default settings of the advanced tab, click the Set defaults button to perform restoring. Power Save None Min Max Disable Power saving function. Minimum power consumption Maximum power consumption Fragment Threshold The maximum size of a packet that is going to be segmented and transmitted. Select the size from 256 to 2432(default) bytes. RTS Threshold Select the RTS Threshold form 0 to 2432(default) Wireless Mode 802.11g/b 802.11b 802.11g/n Channel Plan ETSI MKK FCC Alfa Network, Inc. Connect to a 802.11g/b network (2.4GHz/54Mbps) Connect to a 802.11b network (2.4GHz/11Mbps) Connect to a 802.11b/g/n network (2.4GHz/150Mbps) For European counties (CH1 ~ CH13) For Japan (CH1 ~ CH 14) (default value) CH1 ~ CH11 Page 17 Status This tab shows the current connection status of this CPE. Statistics See Statistics tab to show the transmission activity record. Clicking the “Reset” button recounts the values from zero. Alfa Network, Inc. Page 18 Appendix RT-Set Setup Wizard For Windows users to connect to a wireless network easily, we also provide the RT-Set setup wizard to help users set their preferred wireless network step by step. You can configure your wireless network via this RT-Set setup wizard in the following two modes: Station mode (infrastructure): Select this mode to connect to the AP (access point) in your LAN. AP mode: Select this mode to perform this CPE as an AP (access point). Connect to a wireless network in infrastructure mode 1. To connect this CPE to an AP, select the “Station” from the drop down menu to proceed. 2. Switch to AP mode is in process. Alfa Network, Inc. Page 19 3. Tube-UV is now in AP mode and ready for configuration. Alfa Network, Inc. Page 20 Use this CPE as an AP 1. 2. 3. To use this CPE as an AP (access point), use drop down menu to select the “Access Point” mode to proceed. Switch to AP mode is in process. Tube-UV is now in AP mode and ready for configuration Alfa Network, Inc. Page 21 AP mode management guide General After configuring the CPE in AP mode, this “General” page shows up, which shows the general information of this AP. SSID: The SSID (network name) of the wireless network constructed by this AP. BSSID: The MAC address of this AP Config: Click this button to change configurations to this AP Association Table: Shows the information of the devices that connects to the AP including their MAC addresses and the time that they connected with this device. Alfa Network, Inc. Page 22 Advanced Beacon Interval: Define the interval between beacons from 20~1000 DTIM Period: Set the DTIM period between 1~255 Preamble Mode: Click the drop list to select the preamble to be long, short or auto Set Defaults: Click this button to restore the settings above to default Apply: Click this button to execute changes. Alfa Network, Inc. Page 23 Statistics The “Statistics” tab shows the transmission activity record. Clicking the “Reset” button and recounts the values from zero. ICS (Internet Connection Sharing) This page allows users to select the CPE to connect to the public network. Please click on the device that are used for connecting to the public network and click the “Select” button, and then click the “Apply” button to execute. Alfa Network, Inc. Page 24 Alfa Network, Inc. Page 25