1
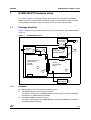
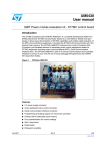
UM0486
User manual
STM3210B-MCKIT motor control starter kit
Introduction
The STM3210B-MCKIT starter kit is an integrated system designed to provide a complete,
ready-to-use motor control application developed around the STMicroelectronics STM32
microcontroller. This starter kit is particularly suited to drive 3-phase brushless motors
(either AC induction or permanent magnet types) and demonstrates how effectively the
STM32 microcontrollers can be used in real-world motor control applications.
Drive is based on sensored field oriented control (FOC) for three-phase motors using the
shunt resistor current measurement method for closed loop torque control. Position
measurement is implemented using Encoder sensor or Tachometer. The inverter is driven
using the space vector PWM modulation technique.
You can run the STM3210B-MCKIT starter kit in several ways:
●
As a plug-and play demo, out of the box, with the provided PMSM motor, in open or
closed loop.
●
With an AC induction motor in standalone mode, after programming the microcontroller.
However, the main advantage of the STM3210B-MCKIT is that you can use it to create your
own applications and re-program the STM32 microcontroller. You can develop your own
applications using the dedicated software libraries provided in the starter kit in conjunction
with the EWARM KickStart Edition development environment from IAR. In addition, the
PMSM and AC induction motor applications delivered with the starter kit are intended to
provide a sound basis for your own application developments. Do not hesitate to fine tune
them to fit your specific requirements.
In this manual, you will find information on:
●
The STM3210B-MCKIT starter kit components, and how to set up the hardware to run
the provided PMSM motor or an AC induction motor
●
How to run the STM3210B-MCKIT starter kit in standalone mode
●
How to re-program the STM32 microcontroller to run your own application
For information on the features of the STM32 microcontroller, refer to the datasheet. The
STM32 evaluation board features, peripherals, and connectors are described in the
STM3210B-EVAL User Manual (UM0426).
For information on the PMSM and AC induction motor software libraries and how to use
them in motor control application development projects, refer to the PMSM Field Oriented
Control Software Library User Manual (UM0492) and the AC Induction Motor IFOC Software
Library User Manual (UM0483) respectively. You will find these manuals, and all related
documentation on the STM3210B-MCKIT CD-ROM.
December 2007
Rev 1
1/28
www.st.com
Contents
UM0486
Contents
1
STM32-MCKIT hardware setup . . . . . . . . . . . . . . . . . . . . . . . . . . . . . . . . . 5
1.1
2
1.1.1
Hardware . . . . . . . . . . . . . . . . . . . . . . . . . . . . . . . . . . . . . . . . . . . . . . . . . 5
1.1.2
Firmware . . . . . . . . . . . . . . . . . . . . . . . . . . . . . . . . . . . . . . . . . . . . . . . . . 6
1.1.3
Software . . . . . . . . . . . . . . . . . . . . . . . . . . . . . . . . . . . . . . . . . . . . . . . . . . 6
1.1.4
Documentation . . . . . . . . . . . . . . . . . . . . . . . . . . . . . . . . . . . . . . . . . . . . . 7
1.1.5
Components not provided . . . . . . . . . . . . . . . . . . . . . . . . . . . . . . . . . . . . 7
1.1.6
Permanent magnet synchronous motor (PMSM) . . . . . . . . . . . . . . . . . . . 7
1.1.7
AC induction motor . . . . . . . . . . . . . . . . . . . . . . . . . . . . . . . . . . . . . . . . . 8
1.2
Hardware configuration for PMSM motor (default) . . . . . . . . . . . . . . . . . . . 9
1.3
Hardware configuration for AC induction motor . . . . . . . . . . . . . . . . . . . . 11
1.4
Power supply connections . . . . . . . . . . . . . . . . . . . . . . . . . . . . . . . . . . . . 13
Running the starter kit . . . . . . . . . . . . . . . . . . . . . . . . . . . . . . . . . . . . . . 14
2.1
2.2
3
Package checklist . . . . . . . . . . . . . . . . . . . . . . . . . . . . . . . . . . . . . . . . . . . . 5
Running the PMSM motor . . . . . . . . . . . . . . . . . . . . . . . . . . . . . . . . . . . . 15
2.1.1
LCD display in speed control mode . . . . . . . . . . . . . . . . . . . . . . . . . . . . 16
2.1.2
LCD display in torque control mode . . . . . . . . . . . . . . . . . . . . . . . . . . . . 19
2.1.3
PMSM motor fault messages . . . . . . . . . . . . . . . . . . . . . . . . . . . . . . . . . 19
2.1.4
Running your own PMSM motor . . . . . . . . . . . . . . . . . . . . . . . . . . . . . . 20
Running an AC induction motor . . . . . . . . . . . . . . . . . . . . . . . . . . . . . . . . 21
2.2.1
LCD display in speed control mode . . . . . . . . . . . . . . . . . . . . . . . . . . . . 21
2.2.2
LCD display in torque control mode . . . . . . . . . . . . . . . . . . . . . . . . . . . . 22
2.2.3
AC motor control variables that can be monitored . . . . . . . . . . . . . . . . . 23
2.2.4
AC induction motor fault messages . . . . . . . . . . . . . . . . . . . . . . . . . . . . 23
2.2.5
Running your own AC motor . . . . . . . . . . . . . . . . . . . . . . . . . . . . . . . . . 24
Creating your custom application . . . . . . . . . . . . . . . . . . . . . . . . . . . . . 25
3.1
Installing the IAR EWARM KickStart Edition (32KB limitation) . . . . . . . . . 25
3.2
Developing your own application . . . . . . . . . . . . . . . . . . . . . . . . . . . . . . . 25
Appendix A Additional information. . . . . . . . . . . . . . . . . . . . . . . . . . . . . . . . . . . . 26
2/28
A.1
Recommended reading . . . . . . . . . . . . . . . . . . . . . . . . . . . . . . . . . . . . . . . 26
A.2
Software upgrades . . . . . . . . . . . . . . . . . . . . . . . . . . . . . . . . . . . . . . . . . . 26
UM0486
Contents
A.3
Getting technical support . . . . . . . . . . . . . . . . . . . . . . . . . . . . . . . . . . . . . 26
Revision history . . . . . . . . . . . . . . . . . . . . . . . . . . . . . . . . . . . . . . . . . . . . . . . . . . . . 27
3/28
UM0486
Safety warnings
General
In operation, the STM32-MCKIT starter kit has uninsulated wires, moving or rotating parts
(when connected to a motor), as well as hot surfaces. In case of improper use, incorrect
installation or misuse, there is danger of serious personal injury and damage to property. All
operations, installation and maintenance are to be carried out by skilled technical personnel
(applicable accident prevention rules must be observed).
When the motor control board is supplied with voltages greater than 30 V AC/DC, all of the
board and components must be considered “hot”, and any contact with the board must be
avoided. The operator should stay away from the board as well (risk of projection of material
in case of components destruction, especially when powering the board with high voltages).
The rotating parts of motors are also a source of danger.
The STM32-MCKIT starter kit contains electrostatic sensitive components which may be
damaged through improper use.
Intended use
The STM32-MCKIT starter kit is made of components designed for demonstration purposes
and must not be included in electrical installations or machinery. Instructions about the
setup and use of the STM32-MCKIT starter kit must be strictly observed.
Operation
After disconnecting the board from the voltage supply, several parts and power terminals
must not be touched immediately because of possible energized capacitors or hot surfaces.
Important notice to users
While every effort has been made to ensure the accuracy of all information in this document,
STMicroelectronics assumes no liability to any party for any loss or damage caused by
errors or omissions or by statements of any kind in this document, its updates, supplements,
or special editions, whether such errors are omissions or statements resulting from
negligence, accident, or any other cause.
4/28
UM0486
1
STM32-MCKIT hardware setup
STM32-MCKIT hardware setup
This section provides a detailed description of the components included in the STM32MCKIT starter kit. It also describes the default settings for a permanent magnet sensored
motor (PMSM), and explains how to change them to use an AC induction motor.
1.1
Package checklist
Figure 1 shows the layout and connections of the major components of the STM32-MCKIT
starter kit.
Figure 1.
STM32-MCKIT layout
JLINK
4
USB-JTAG
DEBUGGER
9
Encoder
SHINANO
MOTOR
5
Motor
phases
7
MOTOR CONTROL
EVALUATION
BOARD
MB459B
JTAG
3
ISOLATION
BOARD MB535B
10
STM32
EVAL BOARD
MB525
1
2
8
TR30R AC/DC
Power Adapter
1.1.1
6
Hardware
The STM32-MCKIT starter kit includes the following items:
●
The MB459B motor control evaluation board (1)
This board is described in the MB459B Motor Control Board User Manual (UM0379)
provided on the STM32-MCKIT CD-ROM.
●
The MB525 STM32 evaluation board (2)
This board is described in the STM3210B-EVAL User Manual (UM0426) provided on
the STM32-MCKIT CD-ROM.
5/28
STM32-MCKIT hardware setup
●
UM0486
An MB535B opto-isolation JTAG board (3)
This board is described in the JTAG Opto-isolation Board User Manual (UM0378)
provided on the STM32-MCKIT CD-ROM.
The purpose of the JTAG opto-isolation board is to provide galvanic isolation between
the J-link debugger/programmer and the STM32 evaluation board. It helps to prevent
accidental damage to the PC in the event of a catastrophic failure on the motor control
board. This isolation barrier also solves the problem of the PC, JTAG debugger and
motor control board being at different ground potentials.
●
A J-link USB–JTAG debugger (4)
The SEGGER J-link USB-JTAG debugger used in conjunction with the IAR Embedded
Workbench C/C++ 32 KB compiler allows you to re-program the Flash memory of the
STM32 microcontroller and to debug the software before using the application in
standalone mode.
●
A 24V DC SHINANO PMSM motor (5)
The motor included in the STM32-MCKIT starter kit is a SHINANO Inner rotor type 4pole brushless DC motor with Hall sensor and encoder. For electrical specifications
and mechanical dimensions, refer to the SHINANO datasheets on the STM32-MCKIT
CD-ROM.
1.1.2
●
An auxiliary power supply block TR30R (6)
●
The following cables:
–
Motor cables (7)
–
A motor connector HE10 34-pin cable (8)
–
A USB cable (9)
–
Two JTAG cables (10)
●
A bag with three 0.1ohm resistors are included to configure the MB459B board for
driving an AC induction motor.
●
The STM32-MCKIT CD-ROM
Firmware
The STM32-MCKIT provides two firmware binary files:
●
The firmware for the PMSM motor
●
The firmware for the Selni AC induction motor
When you receive the STM32-MCKIT, the STM32 microcontroller is programmed by default
with the PMSM standalone firmware.
1.1.3
Software
The STM32-MCKIT CD-ROM includes the following software:
●
6/28
The PMSM and AC induction motor software libraries
UM0486
1.1.4
STM32-MCKIT hardware setup
Documentation
The STM32-MCKIT CD-ROM also includes the following product documentation in PDF
format:
●
STM32-MCKIT Motor Control Kit User Manual (UM0486, the present manual)
●
PMSM Field Oriented Control Software Library User Manual (UM0492)
●
AC Induction Motor IFOC Software Library User Manual (UM0483)
●
STM3210B-EVAL User Manual (UM0426)
●
MB459B Motor Control Evaluation Board User Manual (UM0379)
●
JTAG Opto-isolation Board User Manual (UM0378)
In the box with the STM32-MCKIT, you will also find:
1.1.5
●
A startup color poster which summarizes the main steps for running the motor control
kit
●
The MCD product finder
●
Product flyers and brochures
●
The MCD minirom
●
A guarantee record card
Components not provided
The STM32-MCKIT starter kit does not include:
●
A power supply
To use the STM32-MCKIT starter kit with the provided PMSM motor, you need a 24V3A minimum power supply. You can order the SPU65-108 (24V - 3.3A - 80W) with S&T
Type connector (code P00) from SINPRO (www.trcelectronics.com/Sinpro).
●
An AC induction motor
The STM32-MCKIT can operate with an AC induction motor. The provided graphical
user interface is designed to operate with the SELNI induction motor. It can be ordered
as an accessory with the following order code: ST7MC-MOT/IND.
To use the STM32-MCKIT starter kit with the Selni AC induction motor, you need a 42V
DC or 32Veff AC power supply (polarity not important, GND recommended).
1.1.6
Permanent magnet synchronous motor (PMSM)
The PM synchronous motor is a rotating electric machine where the stator is a classic three
phase stator like that of an induction motor and the rotor has surface-mounted permanent
magnets. In this respect, the PM synchronous motor is equivalent to an induction motor
where the air gap magnetic field is produced by a permanent magnet. The use of a
permanent magnet to generate a substantial air gap magnetic flux makes it possible to
design highly efficient PM motors.
A PM synchronous motor is driven by sine wave voltage coupled with the given rotor
position. The generated stator flux together with the rotor flux, which is generated by a rotor
magnet, defines the torque, and thus speed, of the motor. The sine wave voltage output
have to be applied to the 3-phase winding system in a way that angle between the stator flux
and the rotor flux is kept close to 90° to get the maximum generated torque. To meet this
criterion, the motor requires electronic control for proper operation.
7/28
STM32-MCKIT hardware setup
UM0486
For a common 3-phase PM synchronous motor, a standard 3-phase power stage is used.
The same power stage is used for AC induction and PMSM motors. The power stage utilizes
six power transistors with independent switching. The power transistors are switched in the
complementary mode. The sine wave output is generated using the space vector PWM
technique.
1.1.7
AC induction motor
The AC induction motor is a rotating electric machine designed to operate from a threephase source of alternating voltage. The stator is a classic three phase stator with the
winding displaced by 120°. The most common type of induction motor has a squirrel cage
rotor in which aluminum conductors or bars are shorted together at both ends of the rotor by
cast aluminum end rings. When three currents flow through the three symmetrically placed
windings, a sinusoidally distributed air gap flux generating the rotor current is produced. The
interaction of the sinusoidally distributed air gap flux and induced rotor currents produces a
torque on the rotor. The mechanical angular velocity of the rotor is lower then the angular
velocity of the flux wave by so called slip velocity.
In adjustable speed applications, AC induction motors are powered by inverters. The
inverter converts DC power to AC power at the required frequency and amplitude. The
inverter consists of three half-bridge units where the upper and lower switches are
controlled complementarily. As the power device's turn-off time is longer than its turn-on
time, some dead-time must be inserted between the turn-off of one transistor of the halfbridge and turn-on of its complementary device. The output voltage is mostly created by a
pulse width modulation (PWM) technique. The three-phase voltage waves are shifted 120°
to each other and thus a three-phase motor can be supplied.
8/28
UM0486
1.2
STM32-MCKIT hardware setup
Hardware configuration for PMSM motor (default)
This section describes the procedure for operating the STM32-MCKIT with a PMSM motor.
The default settings that are present on the STM32 evaluation board and on the motor
control evaluation board when you receive the STM32-MCKIT starter kit are intended for a
PMSM motor.
When you are running the PMSM motor, follow these steps:
1.
Verify that all the jumpers on the motor control board (MB459B) are in their default
position.
Refer to Table 1 for information on jumper settings, and if necessary, to the MB459B
Motor Control Board User Manual for the location of the jumpers on the board.
2.
Verify that all of the STM32 evaluation board (MB525) jumpers are in their default
position.
Refer to Table 2 for information on jumper settings, and if necessary, to the STM3210BEVAL board User Manual for the location of jumpers on the board.
3.
Verify that the PMSM motor cables are correctly plugged into the motor control board's
"MOTOR" connectors (J5 and J8).
The motor control board (MB459B), the STM32 evaluation board (MB525), the optoisolation JTAG board (MB535B), and the provided PMSM motor are already assembled
together over a metal support when you receive the kit.
4.
Verify that the STM32 evaluation board and the JTAG opto-isolation board (MB535B)
are connected with the provided 20-pin JTAG cable.
In this way, the STM32 evaluation board automatically supplies the opto-isolation
board.
5.
Power up the STM32 evaluation board with the auxiliary power supply block TR30R.
6.
Power up the motor control board by connecting the output terminals of your DC power
supply to the "MAINS" connector (J3).
The provided voltage must be 24V DC and your power supply must be able to provide a
current of 3A.
The STM32-MCKIT is ready to run with the PMSM motor.
Caution:
Before supplying the board, double check proper connections, make sure that there are no
metal parts on, below or around the PCB and that there are no undesired earth/ground
loops due to measuring equipment such as an oscilloscope.
9/28
STM32-MCKIT hardware setup
Table 1.
MB459B motor control board jumper settings for a PMSM motor (default)
Jumper
Settings for the provided
SHINANO 24V PMSM motor
Settings for a high-voltage PMSM
motor
W1
“< 35V only”
“< 35V only” or “ HIGH VOLTAGE”
W4
Present
W5
Not present
W6
Present
W7
Present and set on default position of silk-screen printing
W8
Present
W9
Present
W10
Present and soldered on default position of silk screen printing.
W11
Present
W12
Not present
W13
Not present
W14
Not present
W15
Not present
W16
Present and set on reverse position of silk-screen printing
W17
Present
W18
Present
W19
Present
Table 2.
STM32 evaluation board jumper settings for a PMSM motor (default)
Jumper
Description
JP4
Set to PSU position to supply the STM32 evaluation board through the jack
(CN3).
JP12
Not fitted (tachogenerator signal filtering for AC induction motor)
JP10
Not fitted: TRST (JTAG) and NRESET (MCU) do not need to be connected
SW1, SW2
10/28
UM0486
Both set to “0” position to boot from embedded user flash.
UM0486
1.3
STM32-MCKIT hardware setup
Hardware configuration for AC induction motor
This section describes the procedure for operating the STM32-MCKIT with an AC induction
motor. You must change the default settings that are present on the STM32 evaluation board
and on the motor control evaluation board when you receive the STM32-MCKIT starter kit
because they are intended for a PMSM motor.
When you are running the AC induction motor, follow these steps:
1.
Change the jumpers on the motor control board (MB459B) to the settings required for
running with an AC induction motor.
Refer to Table 3 for information on jumper settings, and if necessary, to the MB459B
Motor Control Board User Manual for the location of the jumpers on the board.
2.
Replace the three shunt resistors (R3, R4 and R5) on the motor control board
(MB459B) by the 0.1ohm resistors included in the bag delivered with the kit.
3.
Verify that the jumpers on the STM3210B-EVAL evaluation board (MB469B) are in their
default position.
Refer to Table 4 for information on jumper settings, and if necessary, to the STM3210BEVAL board User Manual for the location of jumpers on the board.
4.
Disconnect the PMSM motor from the motor control board's "MOTOR" connectors (J5
and J8).
The motor control board (MB459B), the STM3210B-EVAL evaluation board (MB469B),
the opto-isolation JTAG board (MB535B), and the provided PMSM motor are already
assembled together over a metal support when you receive the kit.
5.
Connect your AC induction motor to the motor control board by connecting the threephases to the J5 connector, and the tachometer cables to the J6 connector.
6.
Verify that the STM3210B-EVAL evaluation board and the JTAG opto-isolation board
(MB535B) are connected with the provided 20-pin JTAG cable.
In this way, the STM3210B-EVAL evaluation board automatically supplies the optoisolation board.
7.
Power up the STM3210B-EVAL evaluation board with the auxiliary power supply block
TR30R.
8.
Power up the motor control board by connecting the output terminals of your DC power
supply to the "MAINS" connector (J3).
The provided voltage must not be higher than 42V DC or 32Veff AC (GND
recommended).
The STM32-MCKIT is ready to run with your AC induction motor.
Caution:
Before supplying the board, double check proper connections, make sure that there are no
metal parts on, below or around the PCB and that there are no undesired earth/ground
loops due to measuring equipment such as an oscilloscope.
Table 3.
MB459B motor control board jumper settings for an AC induction motor
Jumper
Settings for AC induction motor with tachometer feedback
W1
“< 35V only” or “ HIGH VOLTAGE”
W4
Present
W5
Not present
W6
Present
11/28
STM32-MCKIT hardware setup
Table 3.
MB459B motor control board jumper settings for an AC induction motor
Jumper
Settings for AC induction motor with tachometer feedback
W7
Present and set on default position of silk-screen printing
W8
Present
W9
Present
W10
Soldered in the position represented on silk-screen printing
W11
Present
W12
Present
W13
Not present
W14
Not present
W15
Not present
W16
Present and set to the reverse position vs silk-screen printing
W17
Not present
W18
Not present
W19
Not present
Table 4.
STM3210B-EVAL evaluation board jumper settings for an AC induction
motor
Jumper
12/28
Description
JP4
Set to PSU position to supply the STM32 evaluation board through the jack
(CN4).
JP12
Fitted (tachogenerator signal filter for AC induction motor)
JP10
Not fitted: TRST (JTAG) and NRESET (MCU) do not need to be connected
SW1, SW2
Note:
UM0486
Both set to “0” position to boot from embedded user flash.
To use the STM3210B-EVAL evaluation board with an AC induction motor, the three shunt
resistors (R3, R4 and R5) of the motor control board (MB459B) must be replaced by the
0.1ohm resistors included in the bag delivered with the kit.
UM0486
1.4
STM32-MCKIT hardware setup
Power supply connections
J1 connector provides a completely independent control of the DC bus voltage (power) and
the +15V supply for the gate drivers. This is interesting for development purposes, when one
needs to smoothly increase the motor's operating voltage from zero, while having gate
drivers operating with their nominal supply.
When supplying the power stage with an external +15V power supply using the J1
connector, special care must be taken that:
1.
No jumpers are connected on Jumper W1.
2.
The shortcircuit replacing the D3 diode footprint must be open. This is to avoid having
reverse current in the L7815 voltage regulator.
13/28
Running the starter kit
2
UM0486
Running the starter kit
When you receive the STM32-MCKIT starter kit, the STM32 microcontroller is already
programmed with the PMSM standalone mode firmware, allowing to immediately run the
PMSM motor included in the kit. Section 2.1 explains how to do this.
The STM32-MCKIT can also run an AC induction motor. To do this, you must first
reconfigure the hardware, and load the AC induction motor standalone firmware into the
flash memory of the STM32 microcontroller. Section 2.2 explains how to do this.
For both types of motors, once you have checked the motor connections and jumper
settings on the motor control board, you can use the joystick, push button and LCD display
on the STM3210B-EVAL evaluation board to monitor and change parameters of the motor.
The joystick and the button labelled Key are used to navigate between the different menus
(see Figure 2).
Figure 2.
Joystick and pushbutton
DATA +
FUNCTION +
FUNCTION -
ENTER
‘KEY’
(connected to PB3)
DATA -
The conventions for actions on the Key pushbutton and the joystick are as follows:
1.
The Function concerned by a setting is displayed in red on the LCD.
2.
Right/Left movement of the joystick allows:
3.
a)
Inside a given screen to pass from one function to another,
b)
to pass from one screen to the other using a circular path.
Up/Down movement of the joystick changes the data for the selected function.
A simple state machine handles the motor control tasks in the main loop, and monitors the
power stage. This state machine is described in Figure 3; it does not differentiate speed
control from torque control demos.
14/28
UM0486
Running the starter kit
Figure 3.
PMSM and AC induction motor main state machine
B utton
pushed
Init
Idle
Fault condition
over & ‘K ey’
button pressed
Initialization
S tart
H W or
start-up fault
M otor still
Fault
W ait
H W fault
S tart O K
R un
B utton
pushed
B utton
pushed
1sec delay
elapsed
S top
The power stage is monitored using the A/D converter and the PWM peripheral Emergency
Stop (Break in) input. These peripherals check for the following conditions:
●
Heatsink over-temperature
●
DC bus over-voltage (or under-voltage)
●
Over-current protection
Any of these three conditions will cause the PWM to be stopped and the state machine to go
into FAULT state for 2 seconds before going back to IDLE state. Depending on the source of
the fault, an error message is also displayed on the LCD for the duration of the FAULT
condition.
2.1
Running the PMSM motor
The PMSM firmware allows you to run the motor in open or closed loop, and to monitor and
change various parameters on the fly. This section provides a summary of the screen
displays and settings. The active parameter (the one that is selected to be modified with the
joystick) is displayed in red.
For more information on how the demo works and on how a PMSM can be controlled with
the STM32, refer to the UM0492, STM32 Sensorless Field-oriented control software library.
15/28
Running the starter kit
UM0486
Starting the motor
1.
Once you have checked the hardware configuration and connected the power supply
as explained in Section 1.2 on page 9, press the Reset pushbutton.
Figure 4 shows the main screen of the PMSM demo.
Figure 4.
PMSM main screen
STM32 Motor Cont rol
PMSM F O C v e r 1 . 0
Sensorless Demo
Speed
control
mode
Target
01500
Measur ed
( r pm)
←→M o v e
2.
00000
↑↓ C h a n g e
Press the Key pushbutton to start the motor.
Pressing the Key pushbutton again will stop the motor.
2.1.1
LCD display in speed control mode
In Speed control mode, the firmware allows modifying in real time the speed set-point.
Figure 5.
Main screen in run state
STM32 Mot or Cont r ol
PMSM F O C v e r 1 . 0
Sensorless Demo
Speed
control
mode
Target
01500
Measur ed
( r pm)
←→M o v e
01512
↑↓ C h a n g e
When the motor is running, the LCD indicates the target as well as the measured speed.
Pressing the joystick up/down increases (or decreases) the speed set point respectively.
Pressing the joystick to the right enters the Speed PI regulator set-up screen.
Figure 6.
Speed PI regulator set-up screen
STM32 Motor Control
PMSM F O C v e r 1 . 0
Speed
P
01000
I
00700
D
-----
Target
0 1 5 0 0 ( rpm )
M e a s u r e d 0 0 0 0 0 ( rpm )
←→M o v e
↑↓ C h a n g e
The P (proportional) coefficient is active by default; pressing the joystick up/down increases
(or decreases) its value respectively. This can be done while the motor is running.
16/28
UM0486
Running the starter kit
Pressing the joystick to the right a second time allows you to modify the I (integral)
coefficient.
Pressing the joystick to the right another time enters the Torque PI regulator set-up screen.
Figure 7.
Torque PI regulator set-up screen
STM32 Motor Control
PMSM F O C v e r 1 . 0
Torque
P
08000
I
01000
D
-----
Target
01500 (Iq)
Measured 00000 (Iq)
←→M o v e
↑↓ C h a n g e
This regulator can be tuned in the same way as the speed regulator. Pushing the joystick
twice to the right enters the Flux regulator settings screen.
Figure 8.
Flux PI regulator set-up screen
STM32 Motor Control
PMSM F O C v e r 1 . 0
Flux
P
07500
I
01000
D
-----
Target
07500 (Id)
Measured 00000 (Id)
←→M o v e
↑↓ C h a n g e
Pushing the joystick twice to the right enters the Power stage status screen, giving the
current heat sink temperature and DC bus voltage.
Figure 9.
Power stage status screen
STM32 Mot or Cont r ol
PMSM F O C v e r 1 . 0
Power
Stage
DC bus = 024
T = 020
Status
Volt
Cel si us
←→M o v e
Pushing the joystick on the right enters the Sensorless control settings screen, to modify the
rotor position observer gains K1 and K2, as well as the PLL gains (this PLL provides the
speed feedback for the speed regulator, using the rotor angle computed by the observer).
17/28
Running the starter kit
UM0486
Figure 10. Sensorless screen
STM32 Mot or Cont r ol
PMSM F O C v e r 1 . 0
Obser ver Gai ns
K1
K2
-01200
00852
PLL Gai ns
P
I
00237
00046
←→M o v e
↑↓ C h a n g e
After 4 consecutive pushes, the last settings screen is entered: it allows the I/Os of the micro
(PB0 and PB1) to be used as DACs, to monitor internal variables in real-time with an
oscilloscope. These outputs provide PWM signals with a duty cycle proportional to the value
of the variable: it must be low-pass filtered by a 6.8K/47nF low pass filter to remove all high
frequency components due to the PWM fundamental frequency.
Figure 11. DAC screen
STM32 Mot or Cont r ol
PMSM F O C v e r 1 . 0
Ia
Signal
on
PB0
Si gnal on PB1
Obser ved B- emf bet a
←→M o v e
↑↓ C h a n g e
You can select the following internal variables to be monitored:
●
Ia, Ib: Phase a and b currents (from ADC reading results)
●
I alpha, I beta: outputs of the clarke transformation
●
Iq, Id: direct and quadrature currents, output of the park transformation
●
Iq ref, Id ref: direct and quadrature current components set-points
●
Vq, Vd: direct and quadrature voltage commands
●
V alpha, V beta: output voltages from the reverse park transform
●
Measured El(ectrical) angle: rotor position computed from the encoder (if connected)
●
Measured rotor speed: speed measured with the encoder (if connected)
●
Observed El(ectrical) angle: output of the rotor position estimator
●
Observed rotor speed: output of the speed reconstruction PLL
●
Observed I alpha, I beta, B-emf alpha, B-emf beta: rotor position estimator internal
variables
A last push to the right returns to the very 1st screen.
18/28
UM0486
2.1.2
Running the starter kit
LCD display in torque control mode
In torque control mode, the firmware allows modifying in real time the torque and flux setpoints (for constant torque operation). From the speed control menu, an up or down push
enters this demo mode.
Figure 12. Torque Control demo
STM32 Mot or Cont r ol
PMSM F O C v e r 1 . 0
Sensorless Demo
Tor que cont r ol mode
Target
Measured
Iq
04500
00000
Id
00000
00000
Speed
( r pm)
00000
←→M o v e
↑↓ C h a n g e
When the motor is running, the LCD indicates the target Id and Iq current components setpoints, as well as the measured values. Pressing the joystick up/down increases (resp.
decreases) these settings. Actual speed is also reported.
Pressing the joystick on the right enters the same screen than for speed control mode, at the
exception of Speed PI regulator settings.
2.1.3
PMSM motor fault messages
During the demo, you can potentially get error messages, as shown in Figure 13.
Figure 13. Fault screen
STM32 Mot or Cont r ol
PMSM F O C v e r 1 . 0
! ! ! FAULT ! ! !
Error on Speed Fdbck
P r e s s ‘K e y’ t o
r e t ur n t o me nu
"Press 'Key' to return to menu" is displayed only if the cause of the fault is no longer present.
Pressing the 'Key' button causes the main state machine to switch from FAULT to IDLE
state. Six different fault sources are monitored during operation. Refer to the UM0492
STM32 sensorless PMSM field-oriented control software library user manual for more
implementation details.
19/28
Running the starter kit
Table 5.
UM0486
PMSM motor faults
Error Message
2.1.4
Description
Overcurrent
This occurs if a low level triggers the emergency stop on the PWM
peripheral dedicated input pin BKIN (on pin1 of motor control connector
CN14). It means that either the hardware over temperature protection or
the hardware over current protection was triggered. Over-current trip is
defined by the L6386 gate driver's comparators level (0.5V) and the shunt
resistors:
3.3A for 0.22 ohm shunt resistor (default PMSM configuration)
7A for 0.1 ohm shunt resistor
Overheating
This occurs if the power stage heat sink temperature goes above 60°C.
This is monitored by reading the voltage value on a NTC resistor, with the
STM32 ADC (on pin26 of motor control connector CN14).
Bus Overvoltage
This occurs if the DC bus voltage goes above 350Vdc. This value is read
using the STM32 ADC (pin14 of the motor control connector CN14) and a
resistor network in parallel with the power stage bulk capacitors.
Bus Undervoltage
This occurs if the bus voltage is below 20V DC.
Start-up failed
This indicates that the correct start-up criteria were not met during the
motor start-up sequence.
Error on speed fdbck
This returns an error on the speed / position estimation by the sensorless
algorithm (the quality of the speed measurement expressed in terms of
distribution around the mean value is not satisfactory). This typically means
that either the observer is not properly tuned or that the speed is so low
that a good observation of the induced B-emf is not possible (e.g. rotor is
locked).
Running your own PMSM motor
To run your own motor using the standalone PMSM firmware, follow the indications given in
the Getting Started with the Library section of the UM0492 User Manual STM32 Sensored
PMSM field-oriented control software library (TBD).
Based on your own motor parameters and hardware configuration, you must edit and
update the following files:
●
STM32F10x_conf.h (configuration header file)
●
MC_Control_Param.h
●
MC_encoder_Param.h
●
MC_PMSM_param.h
●
MC_State_Observer_param.h
●
MC_hall_param.h
Using the EWARM KickStart Edition (with 32 KB limitation) from IAR software, you must
then rebuild the project and load it onto the STM32 microcontroller. The procedure for
installing the IAR EWARM software and creating your own application is outlined in
Section 3 on page 25.
20/28
UM0486
2.2
Running the starter kit
Running an AC induction motor
The AC induction motor firmware allows you to run the motor in open or closed loop, and to
monitor and change various parameters on the fly. This section provides a summary of the
screen displays and settings.
Before you can use the STM32-MCKIT with an AC induction motor, you must re-program the
STM32 microcontroller to use the AC induction motor firmware. To do this you must:
1.
Set up the hardware as described in Section 1.3 on page 11.
2.
Connect the J-link debugger to the opto-isolation board with the 20-pin JTAG cable.
3.
Connect the J-link debugger to the host PC with the USB cable provided.
The "POWER LED” on the instrument turns on.
4.
Power up the motor control kit.
5.
Load the AC induction motor firmware into the flash memory of the STM32
microcontroller.
6.
Disconnect the PC from the motor control kit.
Starting the motor
1.
To initialize the system, press the Reset pushbutton.
2.
Press the Key pushbutton to start the motor.
Pressing the Key pushbutton again will stop the motor.
At this stage, the joystick and the Key pushbutton can be used to navigate between the
different menus as described at the beginning of this section.
2.2.1
LCD display in speed control mode
Figure 14. AC motor screens (speed control)
STM32 Mot or Cont r ol
ACIM I FOC ver 1. 0
SPEED CO
N
TRO
LM
O
DE
Tar get
Measur ed
03000 ( r pm)
←→Move
00000
↑↓Change
STM32 Mot or Cont r ol
ACIM I FOC ver 1. 0
Fl ux
P
I
D
00300 00100 00000
Tar get
09837 ( I d)
Measur ed 00000 ( I d)
←→Move
↑↓Change
STM32 Mot or Cont r ol
ACIM I FOC ver 1. 0
Speed
P
I
D
06000 01000 00100
Tar get
03000( r pm)
Measur ed 00000( r pm)
←→Move
↑↓Change
STM32 Mot or Cont r ol
ACIM I FOC ver 1. 0
Power st age st at us
DCbus = 000 Vol t
T
=
20 Cel si us
←→Move
STM32 Mot or Cont r ol
ACIM I FOC ver 1. 0
Tor que
P
I
D
00100 00020 00000
Tar get
08000 ( I q)
Measur ed 00000 ( I q)
←→Move
↑↓Change
STM32 Mot or Cont r ol
ACIM I FOC ver 1. 0
Iq
Si gnal on PB0
Si gnal on PB1
I qr ef
←→Move
↑↓Change
Pressing the joystick or the Key pushbutton starts the motor.
During the Speed control demo start-up, a linear torque ramp is applied to the motor until it
reaches the minimum speed allowing to enter closed loop operation for torque and flux.
Then, the speed PID regulator is enabled and takes over control of the torque reference.
21/28
Running the starter kit
UM0486
The final torque reference value is applied until the motor reaches the target speed, or until
a 3 seconds period is elapsed.
If the target speed is not reached after 3 seconds, the state machine goes into FAULT state
for two seconds and the “Start-up failed” error message is displayed on the LCD. If this
happens, you are strongly advised to check the speed sensor feedback connections first
and, if this is not sufficient, to increase the STARTUP_FINAL_TORQUE parameter because
the load torque is probably too high. This parameter cannot be modified using the LCD
interface. It is necessary to rebuild the firmware library and re-flash the STM32 to change
the value.
Note that the STARTUP_FINAL_TORQUE and STARTUP_TIMEOUT parameters are fully
configurable so that you can customize the start-up phase to adapt it to the motor you are
using and to load conditions.
For more information about driving an AC induction motor, refer to the UM0483 User
Manual: STM32 AC induction motor IFOC software library.
2.2.2
LCD display in torque control mode
Figure 15. AC motor screens (torque control)
STM32 Mot or Cont r ol
ACIM I FOC ver 1. 0
TO
RQ
U
E CO
N
TRO
LM
O
DE
Tar get Measur ed
Iq
08000
00000
Id
09837
00000
Speed ( r pm)
00000
←→Move
STM32 Mot or Cont r ol
ACIM I FOC ver 1. 0
Fl ux
P
I
D
00300 00100 00000
Tar get
09837 ( I d)
Measur ed 00000 ( I d)
←→Move
↑↓Change
↑↓Change
STM32 Mot or Cont r ol
ACIM I FOC ver 1. 0
Tor que
P
I
D
00100 00020 00000
Tar get
08000 ( I q)
Measur ed 00000 ( I q)
←→Move
STM32 Mot or Cont r ol
ACIM I FOC ver 1. 0
Power st age st at us
DCbus = 000 Vol t
T
=
←→Move
20 Cel si us
↑↓Change
STM32 Mot or Cont r ol
ACIM I FOC ver 1. 0
Iq
Si gnal on PB0
Si gnal on PB1
I qr ef
←→Move
↑↓Change
When you press the Key pushbutton or the joystick, the motor starts (the main state
machine goes from IDLE to START state).
After startup, following a linear ramp, if valid information from the speed sensor (tachometer
or encoder) is detected, you can adjust the torque reference on the fly using the joystick.
However, if no valid information from the speed sensor is detected, due to a problem with
speed sensor connections or because the load torque is higher than the defined value for
example, then the final torque reference remains constant for 3 seconds.
Finally, if if there's no valid information coming from the motor after 3 seconds, the main
state machine goes into FAULT state for two seconds and the “Start-up failed'” error
message is displayed on the LCD. If this happens, you are strongly advised to check the
speed sensor feedback connections first and, if this is not sufficient, to increase the final
ramp torque reference because the load torque is probably too high.
22/28
UM0486
Caution:
Running the starter kit
In torque control mode operation, a constant torque reference is produced. Depending on
the applied load torque, this could lead to a constant acceleration of the motor, making the
speed rise up to the physical limits of the motor.
For more information about driving an AC induction motor, refer to the UM0483 User
Manual: STM32 AC induction motor IFOC software library.
2.2.3
AC motor control variables that can be monitored
You can select the following internal variables to be monitored:
2.2.4
●
Ia, Ib: Phase a and b currents (from ADC reading results)
●
I alpha, I beta: outputs of the clarke transformation
●
Iq, Id: direct and quadrature currents, output of the park transformation
●
Iq ref, Id ref: direct and quadrature current components set-points
●
Vq, Vd: direct and quadrature voltage commands
●
V alpha, V beta: output voltages from the reverse park transform
●
Measured El(ectrical) angle: rotor position computed from speed feedback
●
Measured rotor speed: speed measured with the tachogenerator
AC induction motor fault messages
Table 6 gives the list of fault messages that can be displayed using the demo firmware.
Table 6.
AC induction motor faults
Error Message
Description
Overcurrent
This occurs if a low level triggers the emergency stop on the PWM
peripheral dedicated input pin BKIN (on pin1 of motor control connector
CN14). It means that either the hardware over temperature protection or
the hardware over current protection was triggered. Over-current trip is
defined by the L6386 gate driver's comparators level (0.5V) and the shunt
resistors:
3.3A for 0.22 ohm shunt resistor (default PMSM configuration)
7A for 0.1 ohm shunt resistor
Overheating
This occurs if the power stage heat sink temperature goes above 60°C.
This is monitored by reading the voltage value on a NTC resistor, with the
STM32 ADC (on pin26 of motor control connector CN14).
Bus Overvoltage
This occurs if the DC bus voltage goes above 350Vdc. This value is read
using the STM32 ADC (pin14 of the motor control connector CN14) and a
resistor network in parallel with the power stage bulk capacitors.
Bus Undervoltage
This occurs if the bus voltage is below 20V DC.
Start-up failed
This indicates that the correct start-up criteria were not met during the
motor start-up sequence.
Error on speed fdbck
This indicates a time out on tachogenerator feedback signal: it can be
either a cable disconnection or a motor stall (because of an unsufficient
torque reference or supply voltage for instance).
23/28
Running the starter kit
2.2.5
UM0486
Running your own AC motor
To run your own motor using the AC firmware, follow the indications given in the Getting
Started section of the UM0483 User Manual: STM32 AC induction motor IFOC software
library.
Based on your own motor parameters and hardware configuration, you must edit and
update the following files:
●
STM32F10x_conf.h (configuration header file)
●
MC_Control_Param.h
●
MC_encoder_Param.h
●
MC_acmotor_prm.h
●
MC_tacho_prm.h
Using the EWARM KickStart Edition (with 32 KB limitation) from IAR software, you must
then rebuild the project and load it onto the STM32 microcontroller. The procedure for
installing the IAR EWARM software and creating your own application is outlined in
Section 3 on page 25.
24/28
UM0486
3
Creating your custom application
Creating your custom application
The main benefit of the STM32-MCKIT starter kit is that you can use it to create your own
applications and re-program the STM32 microcontroller. In the toolkit, you will find the
dedicated software libraries for PMSM and AC induction motors, and the STM32 standard
library.
Use these libraries in conjunction with the EWARM KickStart Edition (with 32 KB limitation)
from IAR to develop, build and debug your own applications. The EWARM KickStart Edition
with 32 KB limitation is available for free download from the IAR web site.
In addition, the source files for the standalone PMSM and AC induction motor firmware are
delivered with the starter kit. They are intended to provide a sound basis for your own
application developments. Do not hesitate to fine tune them to fit your specific requirements.
3.1
Installing the IAR EWARM KickStart Edition (32KB limitation)
You can download the IAR Embedded Workbench with a 32 KB KickStart version of the
C/C++ compiler, and built-in flash loader from www.iar.com from the IAR web site.
Go to www.iar.com, then Downloads, and under Evaluation Software, select
IAR Embedded Workbench - Kickstart edition. Then select the ARM architecture (32 KB
edition) from the list of processor families.
Follow the instructions on the IAR web site and in the IAR documentation to install and use
the IAR Embedded Workbench. Before installing the software, make sure that the J-Link
USB-JTAG debugger is not connected to the PC.
Note that to use the debugging function of the IAR EWARM workbench, you must install
specific hardware debugger drivers. To do this, return to the welcome screen of the IAR
Embedded Workbench installation procedure, and select the Install Drivers option.
3.2
Developing your own application
This section summarizes the steps that you must follow to develop your own application
using the EWARM KickStart Edition (with 32 KB limitation) from IAR. For detailed
explanations on performing these tasks, refer to the IAR documentation.
1.
Start the IAR EWARM tool.
2.
Open the workspace corresponding to your type of motor in EWARM.
The source files for the standalone PMSM and AC induction motor firmware are
delivered with the STM32-MCKIT starter kit.
3.
Modify and fine-tune the source files to suit the requirements of your application.
4.
Build the application.
5.
Re-program the STM32 microcontroller.
You are now ready to run the motor control kit in standalone mode with your own
application.
25/28
Additional information
Appendix A
A.1
UM0486
Additional information
Recommended reading
This documentation describes how to use the STM32-MCKIT Starter Kit. Additional
information can be found in the following documents:
●
STM32F101x and STM32F103x datasheets
●
STM32 Reference Manual (RM0008)
●
STMicroelectronics Motor Control Application Notes.
●
STM3210B-Eval evaluation board user manual (UM0426).
●
Motor control evaluation board user manual (UM0379)
●
JTAG opto-isolation board user manual (UM0378)
●
STM32 AC induction motor IFOC software library user manual (UM0483)
●
STM32 Sensored PMSM field-oriented control software library user manual (UM0312)
Most of the above documents are present on the STM32-MCKIT CD-ROM.
For information on how to set up basic debugging sessions with the EWARM KickStart
Edition (with 32 KB limitation) from IAR, refer to the IAR documentation and online help.
A.2
Software upgrades
The latest versions of the STM32 motor control libraries are available free of charge, from
our sales offices.
The latest version of the IAR EWARM KickStart Edition (with 32 KB limitation) is available for
free download from the IAR web site www.iar.com.
A.3
Getting technical support
Technical assistance is provided free to all customers. For technical assistance,
documentation and information about products and services, please refer to your local
STMicroelectronics partner.
26/28
UM0486
Revision history
Revision history
Table 7.
Document revision history
Date
Revision
13-Dec-2007
1
Changes
Initial release.
27/28
UM0486
Please Read Carefully:
Information in this document is provided solely in connection with ST products. STMicroelectronics NV and its subsidiaries (“ST”) reserve the
right to make changes, corrections, modifications or improvements, to this document, and the products and services described herein at any
time, without notice.
All ST products are sold pursuant to ST’s terms and conditions of sale.
Purchasers are solely responsible for the choice, selection and use of the ST products and services described herein, and ST assumes no
liability whatsoever relating to the choice, selection or use of the ST products and services described herein.
No license, express or implied, by estoppel or otherwise, to any intellectual property rights is granted under this document. If any part of this
document refers to any third party products or services it shall not be deemed a license grant by ST for the use of such third party products
or services, or any intellectual property contained therein or considered as a warranty covering the use in any manner whatsoever of such
third party products or services or any intellectual property contained therein.
UNLESS OTHERWISE SET FORTH IN ST’S TERMS AND CONDITIONS OF SALE ST DISCLAIMS ANY EXPRESS OR IMPLIED
WARRANTY WITH RESPECT TO THE USE AND/OR SALE OF ST PRODUCTS INCLUDING WITHOUT LIMITATION IMPLIED
WARRANTIES OF MERCHANTABILITY, FITNESS FOR A PARTICULAR PURPOSE (AND THEIR EQUIVALENTS UNDER THE LAWS
OF ANY JURISDICTION), OR INFRINGEMENT OF ANY PATENT, COPYRIGHT OR OTHER INTELLECTUAL PROPERTY RIGHT.
UNLESS EXPRESSLY APPROVED IN WRITING BY AN AUTHORIZED ST REPRESENTATIVE, ST PRODUCTS ARE NOT
RECOMMENDED, AUTHORIZED OR WARRANTED FOR USE IN MILITARY, AIR CRAFT, SPACE, LIFE SAVING, OR LIFE SUSTAINING
APPLICATIONS, NOR IN PRODUCTS OR SYSTEMS WHERE FAILURE OR MALFUNCTION MAY RESULT IN PERSONAL INJURY,
DEATH, OR SEVERE PROPERTY OR ENVIRONMENTAL DAMAGE. ST PRODUCTS WHICH ARE NOT SPECIFIED AS "AUTOMOTIVE
GRADE" MAY ONLY BE USED IN AUTOMOTIVE APPLICATIONS AT USER’S OWN RISK.
Resale of ST products with provisions different from the statements and/or technical features set forth in this document shall immediately void
any warranty granted by ST for the ST product or service described herein and shall not create or extend in any manner whatsoever, any
liability of ST.
ST and the ST logo are trademarks or registered trademarks of ST in various countries.
Information in this document supersedes and replaces all information previously supplied.
The ST logo is a registered trademark of STMicroelectronics. All other names are the property of their respective owners.
© 2007 STMicroelectronics - All rights reserved
STMicroelectronics group of companies
Australia - Belgium - Brazil - Canada - China - Czech Republic - Finland - France - Germany - Hong Kong - India - Israel - Italy - Japan Malaysia - Malta - Morocco - Singapore - Spain - Sweden - Switzerland - United Kingdom - United States of America
www.st.com
28/28