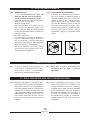
1
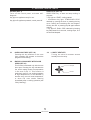
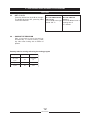
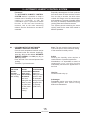
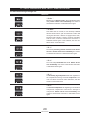
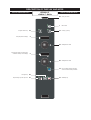
USER’S MANUAL
CONVECTION OVEN
FOR PASTRY SHOPS
AND BAKERIES
VERSION P - COMPACT BASIC
EN
Technical service
90024140rev00
CONTENTS
1 •
2 •
3 •
4 •
5 •
6 •
7 •
8 •
9 •
10 •
11 •
12 •
13 •
14 •
15 •
GENERAL REMINDERS
POINTS TO REMEMBER
DESCRIPTION OF KEYS
MANUAL SETTINGS FOR ONE-PHASE COOKING
MANUAL SETTINGS FOR COOKING WITH UP TO 9 CYCLES IN SEQUENCE
ENTERING AND SAVING A PROGRAM
SELECTING AND STARTING A SAVED PROGRAM
TEMPORARILY ALTERING A SAVED PROGRAM
AUTOMATIC HUMIDITY CONTROL SYSTEM
OPERATING DETAILS
PRACTICAL ADVICE
DAILY CLEANING
ROUTINE MAINTENANCE
MAJOR SERVICING
SELF-DIAGNOSIS AND FAULT IDENTIFICATION
PAGE
3
4
5
7
9
11
13
14
15
16
17
18
19
19
19
VERSIONS
P - COMPACT BASIC - Programmable electronics, humidifier, lighting and double-glazed door.
The manufacturer accepts no liability for any inaccuracies in this manual
attributable to printing or copying errors. We reserve the right to modify
our products as we deem fit, without impairing their basic features.
The reproduction or copying of any part of this manual by any means
whatsoever is strictly forbidden unless authorized previously in writing by
the manufacturer.
ALI S.p.A. - 01.10.2004
2
90024140rev00
1 • GENERAL REMINDERS
Repairs may become necessary over time;
these and all major servicing operations
must be performed exclusively by
technicians employed by the manufacturer
or an authorized service centre.
1.1
1.2
1.3
2003
TYP. ME 061 "P"
NR xxxxxxxxxx
50 Hz
3N AC 400 V
IPX 5
• This appliance must only be used as
specified in the design, i.e. cooking foods.
Any other type of use is improper and
therefore dangerous.
• The oven must not be left unattended during
operation.
1.5
• There are surfaces of the oven that become
hot during operation. Take care!
1.6
• Ask the installer for information on correct
operation and use of the water softener;
incorrect or incomplete maintenance is at the
origin of the formation of scale, which would
badly damage the oven.
2003
AC 230 V
A3
IT
IPX 5
NR xxxxxxxxxx
50 Hz
B13
Cat.
II 2H3+
1.00 kW
kPa
200 - 500
B23
P mbar
20; 28-30/37
0085
• In the event of technical assistance being
required, the trouble must be described in
as much detail as possible, so that a
service technician will be able straight away
to understand the nature of the problem.
1.10 • In the event of breakdown or faulty operation,
switch off the oven immediately!
• Should it become necessary to call out a
service technician, all essential identification
details of the appliance are shown on the
data plate, located at the right-hand side on
the bottom.
1.11 • The room, in which the oven is to operate,
must be well ventilated!
1.12 • Safety sticker
• Maximum height for inserting containers with
liquids
• Each appliance is equipped with a data plate
identifying the model and its main
specifications. An example is given below of a
dataplate for an electric oven and one for a
gas oven.
1600 mm (63 inch)
1.8
TYP.
Qn 18 kW
1.9
1.7
- 03
LX TYP. MG 101 "P"
• Only suitably trained kitchen personnel should
be allowed to use the appliance.
1.4
kPa
200 - 500
8 kW
• Carefully read the directions given in this
manual; they contain important information on
safety during installation, operation and
maintenance.
Keep this manual in a safe place for future
consultation!
3
90024140rev00
2 • POINTS TO REMEMBER
2.1
• Before any food is cooked in a new oven,
the interior must be thoroughly cleaned
(see “Daily Cleaning”).
2.2
• At the end of the working day, clean the
oven thoroughly inside and out; this will
ensure smooth operation of the appliance
and prolong its useful life.
2.3
• Do not use high pressure water jets
when cleaning the oven!
2.4
• For daily cleaning, use only alkali based
products suitable for the purpose.
Abrasive materials and products should not
be used as they will damage the surfaces.
2.5
• Always switch off the appliance when work
is finished, and shut off all energy supplies
(electricity, water, and gas if connected).
2.6
• Avoid any operation that might cause
cooking salt to be deposited on the steel
surfaces of the oven; if salt is accidentally
spilled, rinse off immediately and
thoroughly.
2.7
• After steam cooking, open the door
carefully to avoid being hit by the rush of
residual steam escaping from the oven.
Failure to observe this warning may be
dangerous for the operator.
2.8
• To ensure safe operation of the oven do
not obstruct the vents or any other
opening in the casing!
2.9
• To ensure long term efficiency and
reliability of the oven, scheduled
servicing should be carried out at
least once a year. With this in mind,
customers are recommended to sign a
service agreement.
Failure to observe basic safety
guidelines may jeopardize the smooth
operation of the oven and expose the
operator to serious danger!
The manufacturer accepts no liability if
the original function of the oven is
altered or there is tampering or failure
to observe the instructions given in the
manuals.
4
90024140rev00
3 • DESCRIPTION OF KEYS
ON-OFF (KEY 1)
Turns on the control panel, activates selfdiagnosis.
Key light on: appliance ready for use.
Key light off: appliance powered, control panel off.
START-STOP (KEY 16)
START-STOP key: to start and stop cooking in
progress.
• Key light on: START, cooking started.
• Intermittent key light: TEMPORARY STOP
obtained by opening the door or pressing the key
once. Cooking and remaining time are stopped.
Closing the door or pressing key 16 again restarts
cooking.
• Key light off: FINAL STOP obtained by keeping
key 16 pressed for 3 seconds; cooking stops, as if
the time had elapsed.
3.1
• OVEN LIGHT KEY (KEY 22)
Pressing this key switches on the oven
light, permitting the operator to check the
progress of the cooking.
3.3
3.2
• RAPID COOLING KEY WITH DOOR
OPEN (KEY 21)
This function is activated only with the oven
door open. Pressing the key activates the
fan, which rapidly lowers the temperature
in the oven to 50 °C. This function is
particularly useful if one cooking operation
at high temperature is to be followed by
another using a much lower temperature,
or when the oven needs cleaning
immediately after a cooking operation (see
“Daily Cleaning”).
• CAVITY VENT KEY
Turning the valve 39 extracts excess
humidity from the cavity.
Vent open
Vent closed
5
90024140rev00
3 • DESCRIPTION OF KEYS
OPERATIONS
3.4
• AUTOMATIC HUMIDITY CONTROL
KEY (KEY 14)
This key also performs the function of a
manual humidifier when pressed with
cooking in progress (key light on).
This function is useful for foods that require
added humidity when cooking. Press the
key and hold for as long as it is wished to
let moisture into the oven, the
corresponding LED will light up for as long
as the key is pressed.
3.5
• DELETING A PROGRAM
To delete the content of a cooking program
that has been saved, proceed as follows:
display the program to delete (e.g. 09),
press and hold keys 21 and 22 for 5 sec.
and its content is automatically deleted.
Note: The appliance is fitted with an
automatic system for reducing the cavity
temperature in all cooking modes. If the
temperature exceeds the display setting
by 30°C, the humidifier automatically
directs cold water into the oven and the
temperature is rapidly lowered. This
precludes the possibility that food could
start cooking with too high a temperature
in the oven. In addition, the added
moisture prevents foods from drying up.
6
90024140rev00
4 • MANUAL SETTINGS FOR ONE-PHASE COOKING
OPERATIONS
4.1
Note: Approximately 10 sec. after
releasing the knob, the display will revert
to the actual oven temperature.
• SWITCH ON
Press key 1. If a symbol appears in the
fault warning display (display 5-6), refer to
“Self-diagnosis and fault identification”.
Page 19.
4.3
4.2
• SET THE TEMPERATURE
The display shows the actual temperature
in the cavity. Turn knob 25 to set the
temperature (to the right increases, to the
left decreases), which will be shown in the
display.
7
90024140rev00
• SET THE TIME
The time display 6 shows [ 000 ]. Turn
knob 26:
- to the right to set the cooking time;
- to the left to set infinite time [ Inf ].
4 • MANUAL SETTINGS FOR ONE-PHASE COOKING
STARTING THE COOKING PROGRAM
OPERATIONS
Place the food in the oven. Refer to the
“Practical Advice” heading for more
information. Page 17.
4.4
4.5
• START
Press key 16 to start cooking: The LED
associated with the key remains
permanently alight.
At this point...
the temperature display indicates the
actual oven temperature.
• END OF COOKING
If infinite time has been selected, stop
cooking manually by pressing key 16 for a
few seconds (LED next to key off).
If a cooking time has been entered, a beep
will be generated when the time elapses to
indicate that cooking has terminated (LED
next to key 16 off).
Just open the door to stop the beeping.
Remove the food from the oven, following
the directions given under paragraph 2.7 of
the “Points to remember” heading. Page 4.
Displaying and changing saved values
If, during cooking, it is necessary to check
the settings, press the cooking cycle key,
the displays will blink for 10 sec..
If the values displayed have to be modified,
use the relevant knob or keys.
After approx. 10 sec. the new data are
saved automatically and the displays show
the actual values.
The time display indicates the time
remaining to complete cooking.
8
90024140rev00
5 • MANUAL SETTINGS FOR COOKING
WITH UP TO 9 CYCLES IN SEQUENCE
programs (see “Entering and saving a
program”). Page 11.
A manual setting with more than one cycle
cannot be saved; for cooking you want to
repeat, it is recommended to use the saved
OPERATIONS
5.1
• SWITCH ON
Press key 1. If a symbol appears in the
fault warning display, refer to “Selfdiagnosis and fault identification”. Page 19.
Note: Cooking in manual mode with a
number of phases in sequence permits
preheating the cavity with no load before
putting food into the oven: it will be
enough to set the time for cycle 1 on
infinite “[ Inf ]“ and, on reaching the
preheating temperature, a cyclical beep
will indicate it is time to put the food into
the oven. On closing the door, display 9
will show “2” indicating cooking cycle 2
has started.
5.2
5.3
• SET THE TIME OF CYCLE 1
The time display shows [ 000 ].
Turn knob 26:
to the right to set the cooking
time; to the left to set infinite time, [ Inf ]
thus utilizing the first cycle as preheating.
5.4
• SELECT CYCLE 2 AND THE
FOLLOWING ONES (UP TO
9 CYCLES)
Press key 19, display 5 will show “MAN”
and display 6 will show “C1”. Turn knob 26
until “C2” appears; press key 19 to confirm
the selection.
Now go back to paragraph 5.2 to continue
with the setting; to confirm the data
entered, press key 19 again.
Repeat the sequence for further phases if
required.
• SET THE TEMPERATURE OF
CYCLE 1
Turning knob 25 sets the cooking
temperature, which is shown on the
relevant display.
9
90024140rev00
5 • MANUAL SETTINGS FOR COOKING
WITH UP TO 9 CYCLES IN SEQUENCE
STARTING THE COOKING PROGRAM
OPERATIONS
5.5
• START
Press key 16.
The LED associated with the key remains
permanently alight.
5.6
At this point...
the temperature display indicates the
actual oven temperature.
The time display indicates the time
remaining to complete cooking (sum of
times of each single phase).
• END OF COOKING
A beep will be generated to indicate that
cooking has terminated (LED next to
key 16 off). Just open the door to stop the
beeping.
Remove the food from the oven, following
the directions given under paragraph 2.7 of
the “Points to remember” heading.
Displaying and changing saved values
If, during cooking, it is necessary to check
the settings, press the cooking cycle key,
the displays will blink for 10 sec..
If the values displayed have to be modified,
use the relevant knob or press key 18 and
turn knob 26 to pass on to the following
cycle.
After approx. 10 sec. (TIME-OUT) the new
data are saved automatically and the
displays show the actual values.
10
90024140rev00
6 • ENTERING AND SAVING A PROGRAM
FOREWORD
The example given here comprises a
preheat stage and three consecutive
cooking phases.
OPERATIONS
6.1 • SWITCH ON THE OVEN
Press key 1.
6.3
• SET OVEN PREHEATING (CYCLE 1)
To gain access to the temperature setting,
press key 19 (COOKING CYCLES) and
turn knob 25 to the required value
(140 °C). Turn the knob 26 to the left to
set infinite time [ Inf ].
6.4
• SET CYCLE 2: COOKING
Press key 19 and turn knob 26 to the right.
The display 6 shows “C2”; press key 19 to
confirm the selection.
6.2 • SELECT THE PROGRAM
Press key 18 and turn knob 25 to select
the number you want to give the cooking
program (e.g. 9), shown in the display 5.
Caution
The program is “new” when the LED of the
cooking cycle key blinks.
The program is “busy” when the LED is on.
6.4a • SET THE
6.4b • SET THE TIME
TEMPERATURE FOR
FOR CYCLE 2
Turn knob 26 and
Turn knob 25 to the enter a cooking time
right and set 150°. of 10 minutes.
CYCLE 2
11
90024140rev00
6 • ENTERING AND SAVING A PROGRAM
OPERATIONS
6.5
6.6
• SET CYCLE 3
Press key 19 and turn knob 26 to the right.
The display 6 shows “C3”; press key 19 to
confirm the selection.
6.5a •
6.5b •
SET THE TEMPERATURE
SET THE TIME FOR
FOR CYCLE 3
CYCLE 3
Turn knob 25 to the right Turn knob 26 and enter a
and set 180 °C.
cooking time of
15 minutes.
• SAVING THE PROGRAM
Wait 10 seconds to save the settings
automatically or, without waiting, press
key 16 to start cooking with a number of
phases.
Summary table for entering and saving the cooking program
Cycle
Temperature °C
Time h : m
140
Infinite time
(Inf)
Cycle 2
150
10 min.
Cycle 3
180
15 min.
Preheating oven
with no load
Cycle 1
12
90024140rev00
7 • SELECTING AND STARTING A SAVED PROGRAM
OPERATIONS
7.1
• SWITCH ON
Press key 1.
7.2
• RETRIEVE
Retrieve the required cooking program by
pressing key 18 and turning knob 25 to
reach the program.
7.3
• START
Viewing the settings
If, during cooking, it is necessary to check
the settings for the current phase, press
the cooking cycle key. If you want to view
the settings of the following phases, press
key 18 and turn knob 26 to the right until
you reach the required cycle. On reaching
the cycle, press key 19 (cooking cycles) to
view the settings on the displays.
7.3a •
7.3b •
7.3c •
STARTING A PROGRAM WITH
STARTING A PROGRAM WITH
STARTING A PROGRAM WITHOUT
PREHEAT
PREHEAT EXCLUDED
SAVED PREHEATING
If the retrieved program has
preheating, display 6 will show
[ Inf ]
Press key 16 to start preheating.
A beep will signal when the oven
has reached the temperature.
Place the food in the oven.
Close the door, the oven will
automatically switch on.
Place the food in the oven.
As soon as the program is
retrieved, start the cooking by
pressing key 16 (LED on steady).
Keep the cooking cycle key
pressed for 5 seconds, display 6
will show “C2”.
The preheat stage has now been
skipped.
Warning: Preheating is not
necessary only when the oven is
already hot.
Place the food in the oven.
As soon as the program is
retrieved, start the first cooking
cycle by pressing key 16 (LED on
steady).
13
90024140rev00
8 • TEMPORARILY ALTERING A SAVED PROGRAM
different size, for which it is necessary to
lengthen the cooking times, it may be
necessary to raise the temperature or
change any of the other parameters.
Foreword
The appliance permits temporarily
modifying the saved program, that is for
cooking in progress only. The program to
be changed must have been started (key
16 with LED on steady)! When the
program is stored for a product with a
OPERATIONS
Retrieve the program and start cooking, as
described previously.
Increase/decrease setting
AUTOMATIC HUMIDITY CONTROL
... press key 14, the LED will blink. Make
the new setting by turning knob 26, wait for
10 seconds (TIME OUT) and the change
will be saved automatically.
Press key 18, display 6 will show the
current phase.
Increase/decrease temperature and/or
time
... turn knob 25 and/or 26 to set the new
temperature setting. Wait for 10 seconds
(TIME OUT), the change will be saved
automatically.
Note: The change made is cancelled
when the cooking time elapses: the
program will remain in the original version.
14
90024140rev00
9 • AUTOMATIC HUMIDITY CONTROL SYSTEM
Especially advantageous for fresh products
that cannot have the same moisture content
from one day to another, but which when
cooked will always have the same aspect
and consistency. The level of humidity inside
the cavity is constantly measured during the
cooking phase and it remains constant.
This system permits obtaining the same
cooking result for the same food cooked in
different quantities.
Foreword
The AUTOMATIC HUMIDITY CONTROL
SYSTEM makes it possible to keep a
constant level of humidity in the oven when
cooking by convection or with the
combination cycle. It performs a double
function, on the one hand introducing
moisture, and on the other extracting
moisture from the food when a set value is
exceeded.
OPERATIONS
Note: The vent must be closed, because if
it were set open it would cancel the setting
of the automatic humidity control.
9.1 • COOKING WITH THE AUTOMATIC
HUMIDITY CONTROL SYSTEM
Once the oven temperature has been set (as
described under the relevant headings),
press key 14 to set the desired AUTOMATIC
HUMIDITY CONTROL, from H00 (very dry) to
H99 (very humid).
Place the food in the oven and proceed with
cooking.
Therefore, if you have chosen...
9.1 a •
9.1 b •
9.1 c •
ONE-PHASE
MANUAL
A PROGRAM TO
MANUAL
COOKING WITH
BE SAVED
COOKING:
MORE THAN
pass on to
setting the next
phase or wait
for automatic
saving of the set
program after
10 seconds
(TIME OUT).
press key 16 to ONE PHASE IN
start cooking.
SEQUENCE:
pass on to
setting the next
phase or press
key 16 to start
the first phase
of the set
cooking.
Advice
Defining the humidity value requires a
certain amount of practical experience.
Nonetheless, it is impossible to commit a
catastrophic error, and this function
undoubtedly enhances the appearance of
the food.
Ideal for:
foods that tend to dry up.
Advantages
Repeatable results, even when foods are
cooked together with others having
different characteristics.
15
90024140rev00
10 • OPERATING DETAILS
status). It is anyhow possible to check the
settings. For this purpose, proceed as
follows:
FOREWORD
During cooking (LED on steady) the
displays show the actual values (current
OPERATIONS
10.1 • DISPLAYING SETTINGS DURING
COOKING PHASE (without stopping)
Press the cooking cycles key, the displays
blink showing the previous settings. After
10 sec. the actual values reappear (TIME
OUT).
10.3 • FORCING THE COOKING PHASES
OF A MANUAL PROGRAM WITH
MORE THAN ONE PHASE IN
SEQUENCE
If you wish to skip a cooking phase or
complete it sooner, press and hold the
cooking cycle key for approximately 5 sec.;
the display will automatically show the next
phase.
10.2 • CHANGING THE SETTINGS DURING
THE COOKING PHASE (WITHOUT
STOPPING)
10.4 • TEMPORARY STOP
Open the door or press key 16: the
corresponding LED blinks. Cooking stops
and the timer pauses until such time as the
door has been closed or key 16 pressed a
second time. Cooking will resume
automatically from the point at which the
interruption occurred.
10.2 a •
TEMPERATURE AND
TIME
To change the setting,
press the cooking cycle
key. Then turn the
relevant knob to set the
new value (increasing
to the right, decreasing
to the left); The
displays show the
settings that have just
been made, after 10
sec. the actual values
reappear.
10.2 b •
AUTOMATIC
HUMIDITY
CONTROL
Press the cooking
cycle key and then
press key 14 automatic
humidity control
function, (display 6
shows [ H.. ], set
previously). Turn knob
26 to make the new
setting. After 10 sec.
the actual values
reappear.
10.5 • FINAL STOP
To stop or permanently interrupt a cooking
program for which infinite time is set, press
key 16 and hold for approx. 3 seconds.
A continuous beep confirms the end of the
cooking operation as if the full time had
elapsed, and the LED associated with
key 16 goes out.
16
90024140rev00
11 • PRACTICAL ADVICE
11.1 • PREHEATING THE OVEN
The oven preheating cycle is extremely
important and useful for successful
cooking.
As a general rule, always preheat the
cavity when empty, setting the temperature
between approximately 15% and 25% of
that to be utilized subsequently in cooking.
In the case of steam cooking, preheat the
empty cavity using convection mode as
this will allow temperatures of over 130 °C
to be selected.
11.2 • COOKING LOADS
The depth of the pan must be suitable for
the height of the food.
For even cooking, it is preferable to
distribute the load over several shallow
pans rather than loading just one
extremely deep pan.
11.4 • TYPES OF CONTAINER
For optimum results, it is indispensable to
use the right pan for the different kinds of
food: aluminium or aluminium plate pans
for confectionery and baked foods.
11.5 • CLEARANCE BETWEEN
CONTAINERS
When loading the oven with the food to
cook, it is recommended to pay special
attention there is sufficient clearance
between containers. This makes it possible
for the heat and air to distribute evenly for
a more uniform result, which would not be
possible if the food in one pan were in
contact with the pan above.
11.3 • FROZEN/DEEP-FROZEN PRODUCTS
The oven must be preheated and loaded
respecting the quality and nature of these
foods.
17
90024140rev00
12 • DAILY CLEANING
12.1 • THOROUGH CLEANING...
... is a prerequisite for faultless cooking
and better yields:
• the food's own flavour remains unchanged;
• during operation there are no fumes
caused by previous remains of food that
burn;
• energy savings;
• less maintenance work and a longer
service life;
• in addition, the simplicity of the procedure
means that a thorough clean can be
carried out quickly and with minimum
inconvenience to the operator:
- approximately 5 min. for the cleaning
product to act
- 10 min. steam cycle
- 5 minutes rinsing
- 5 min. drying
12.2 • CAUTION
Never use direct or high-pressure jets of
water to clean the outside of the oven.
Never use corrosive and/or abrasive
substances on steel surfaces, and avoid
scouring or scrubbing with steel wool or
wire brushes, as irreparable damage could
occur. Similarly, aggressive detergents, of
non-alkaline formulation containing high
percentages of sodium and ammonia, can
soon damage the seals, jeopardizing
oven efficiency and operation.
The outside of the oven should be washed
with a sponge and warm water with an
ordinary detergent suited to the purpose.
12.3 • It is recommended to use a specially
formulated detergent.
OPERATIONS
4 • Press key 16: this will start a special
program, which is preset and lasts for
20 min. using steam at 100 °C.
12.4 • CLEANING THE OVEN AT THE END
OF WORK, PRESET PROGRAM “CL”
Proceed as follows:
5 • At the end, an audible warning tells the
operator the cycle has finished.
At this point, switch off the appliance
completely and open the oven door slowly;
1 • Switch on the oven:
2 • Press key 18 and, using knob 25, scroll to
display the “CL” program. Press key 16;
the oven automatically heats or cools to
take the temperature to 50 °C.
A beep indicates that the oven is at the set
temperature;
6 • Rinse the oven thoroughly with plenty of
clean water and wipe the door seals with a
sponge. The use of a hand-held shower
(optional) is recommended;
3 • Open the door and proceed to remove any
cooking spills, using a spatula that will not
scratch the steel surface, then spray the
inside with a proprietary oven cleaner. Use
a non-corrosive alkaline product. Close the
door and allow the chemical to act for the
time indicated by the manufacturer,
generally between 5 and 10 minutes.
7 • Switch on again, and select a convection
cycle of approx. 5 minutes: drying phase.
8 • Stop and shut off all utilities (electricity,
water, and gas, if connected). Leave the
door slightly ajar when the appliance is not
in use.
18
90024140rev00
13 • ROUTINE MAINTENANCE
13.1 • PERIODICALLY...
... It is recommended to clean the
deflector and pan racks as necessary.
For this purpose, proceed as follows:
• stop and shut off all utilities (electricity,
water, and gas if connected);
• take out the pan racks;
• using a screwdriver of the right size, or a
coin, unscrew the deflector screws to be
able to clean the back; it is recommended
to use the hand-held shower (optional) for
thorough rinsing;
• dry with a clean cloth;
• it is necessary to remove the deflector if
the dirt is particularly tough to remove; do
not use abrasives or scourers that would
damage the steel surface. Size permitting,
wash the deflector in a dishwasher.
Secure the deflector in the oven, making
sure the two fixing screws on the righthand side are well tightened.
13.2 • PROLONGED IDLE PERIODS
If the oven is to stand idle for any length of
time (e.g. holidays or seasonal closing) it
must be cleaned thoroughly, leaving no
traces of food or dirt. Leave the door
slightly ajar so that air can circulate inside
the oven. Be absolutely certain to shut off
all utilities (electrical power supply, water,
and gas if connected). For added care after
cleaning, the external surfaces can be
protected by applying a proprietary metal
polish.
14 • MAJOR SERVICING
14.1 • To ensure correct and safe operation, the
oven must be inspected and serviced at
least once a year by a manufacturer
technician or authorized service agent.
14.2 • With this in mind, customers are
recommended to sign a service
agreement.
15 • SELF-DIAGNOSIS AND FAULT IDENTIFICATION
15.1 • Whenever the appliance is powered up by
pressing the main switch, an electronic
diagnostics routine is run automatically to
check the principal functions. Assuming the
appliance is in perfect working order, the
oven temperature display shows the actual
temperature in the oven, and the LEDs of
the cooking mode keys all blink. At this
point the cooking parameters can be
entered.
15.2 • If any irregularities are discovered, on the
other hand, these are indicated in the
displays 5-6. Error codes are extremely
important when trouble cannot be remedied
by the operator, since they give the service
technician an indication as to the nature of
the fault. The message on the display is
accompanied by a beep of 5 seconds,
repeated every minute, until the oven is
switched off.
19
90024140rev00
15 • SELF-DIAGNOSIS AND FAULT IDENTIFICATION
The main fault warning messages are:
MESSAGES
“ Err Sc ”
Message on the display 5 and 6. Oven temperature probe
faulty, switch off the oven immediately and contact a
manufacturer technician or authorized service agent.
“ no H2o ”
This means there is no water, so it is necessary to check
that the shutoff valve is open and that there is water still
coming from the main. If there is no supply from the main,
inform the water company or agency. If there is no problem
with the main, contact a manufacturer technician or
authorized service agent. In the meantime, the oven can
still be used in convection mode.
“ Er 1 ”
The device preventing thermal overload of the motor
has cut in. Switch off the oven immediately and contact
a manufacturer technician or authorized service agent.
“ Er 2 ”
The oven safety thermostat has cut in. Switch off the
oven immediately and contact a manufacturer technician
or authorized service agent.
“ Er 7 ”
An abnormally high temperature rise has registered in
the compartment housing electrical components. The
oven can still be used under close observation, until the
arrival of a service technician.
“ Er 8 ”
An excessive temperature rise registering in the electrical
components compartment could result in damage to
components. Switch off the oven immediately and
contact a manufacturer technician or authorized service
agent.
20
90024140rev00
15 • SELF-DIAGNOSIS AND FAULT IDENTIFICATION
The main fault warning messages are:
MESSAGES
WARNING FOR GAS MODELS
“ Er 6 ”
No gas. Check that the shutoff valve is open and that
there is gas coming from the main. If there is no supply
from the main, inform the gas company or agency. If there
is no problem with the main, contact a manufacturer
technician or authorized service agent.
“ no ign ”
Gas appliances are fitted with ignition devices
incorporating an automatic reset function. If operation is
not restored automatically after several attempts, display 5
and 6 will show the error code [ NO IGN ] shown
alongside. A beep warns the operator. Press key 16 to
switch back on. If the fault persists, contact a manufacturer
technician or authorized service agent.
Note: Burner shutdown is a safety condition. Therefore,
this situation is not a sign of the appliance malfunctioning.
If, after carefully carrying out these checks, the
appliance still does not function properly, call a
manufacturer technician or authorized service agent.
Note: When contacting manufacturer service technicians,
try to explain the fault in as much detail as possible,
referring all the information indicated on the identification
data plate (see page 3).
“ doP ”
It appears when the door is open and signals that the door
microswitch fails to close the contact. Check that the door
is properly closed. If the signal persists, call the technical
service.
21
90024140rev00
NOTES
22
90024140rev00
NOTES
23
90024140rev00
NOTES
24
90024140rev00
NOTES
25
90024140rev00
DESCRIPTION OF DISPLAY AND KEYS
VERSION P
COMPACT - BASIC
DISPLAY, KNOBS AND KEYS
Program selector key
18
Cavity temperature display
5
Cooking time display (remaining/set),
automatic humidity control display
DISPLAY, KNOBS AND KEYS
39
Cavity vent valve
1
Main switch
19
Cooking cycle key
25
Setting/selector knob
26
Setting/selector knob
14
Key for setting automatic humidity
control / manual humidity activation
16
Start/Stop key
6
Oven light key
22
Rapid cooling key with open door
21