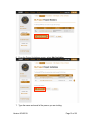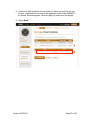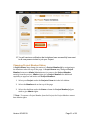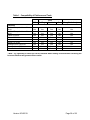
1
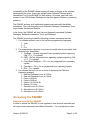
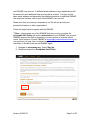
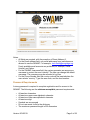
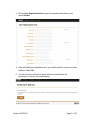
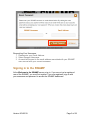
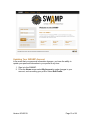
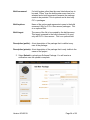
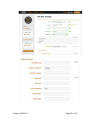
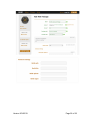
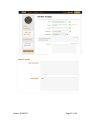
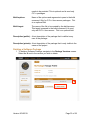
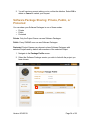
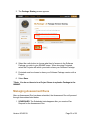
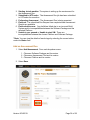
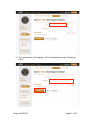
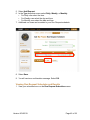
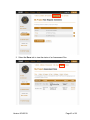
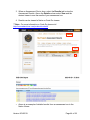
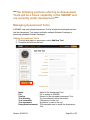
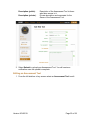
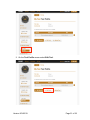
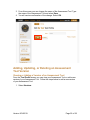
USER MANUAL (317) 274-3942 Web: continuousassurance.org App: www.mir-swamp.org Twitter: @swampteam Technical Support The SWAMP offers 24/7 support 365 days a year. Following is contact information for the SWAMP: • • Dial (317) 274-3942 (24/7/365) Email: [email protected] To create a support ticket, go to https://ticket.continuousassurance.org or email [email protected] Technical Support ............................................................................................... 1 Preface ................................................................................................................. 3 Introduction to the Software Assurance Marketplace (SWAMP) .................... 3 Accessing the SWAMP ....................................................................................... 4 Registering with the SWAMP ........................................................................................................ 4 Password Requirements ................................................................................................................ 6 Forgotten Username/Password? ................................................................................................. 8 Signing in to the SWAMP ................................................................................... 9 Updating Your SWAMP Account ................................................................................................ 10 Changing Your Password ............................................................................................................. 12 Deleting Your SWAMP Account ................................................................................................. 13 Requesting Project Ownership ........................................................................ 14 Inviting Members to Your Project ............................................................................................ 18 Changing Project Member Status ............................................................................................. 21 Removing Admin (Administrator) Rights ............................................................................. 22 Adding Your Software Package to the SWAMP ............................................. 22 Upload a Software Package ........................................................................................................ 22 Edit a Software Package ............................................................................................................... 28 Adding, Updating or Deleting a Software Package Version ......................... 30 View or Add a Version of a Software Package ...................................................................... 30 Deleting a Software Package ...................................................................................................... 33 Software Package Sharing: Private, Public, or Protected ............................. 34 Managing Assessment Runs ........................................................................... 35 Add an Assessment Run ............................................................................................................... 36 Delete an Assessment Run .......................................................................................................... 37 Schedule a Run Request ............................................................................................................... 37 Run Request Scheduling Options ................................................................... 39 One-‐time Runs ................................................................................................................................ 39 Adding a New Run Request ......................................................................................................... 40 Viewing Run Request Schedules and Results ....................................................................... 42 Delete a Scheduled Run Request .............................................................................................. 46 Obtaining Universal Unique Identifier (UUID) ................................................. 47 Managing Assessment Tools ........................................................................... 49 Adding Assessment Tools ........................................................................................................... 49 Editing an Assessment Tool ........................................................................................................ 50 Adding, Updating, or Deleting an Assessment Tool Version ....................... 52 View or Add a Version of an Assessment Tool ..................................................................... 52 Deleting a Tool .................................................................................................. 53 Assessment Tool Sharing: Private, Public or Protected ............................... 54 Glossary ............................................................................................................. 57 Version 20140219 Page 2 of 58 Preface This document guides selected users to successfully use the Software Assurance Marketplace (SWAMP). The SWAMP is state of-the-art software designed to serve as an open resource for software developers, assurance tool developers and researchers who wish to perform continuous assurance (CSwA) testing in a safe, secure environment. The SWAMP is funded by the Department of Homeland Security, and directed by academic experts in high-throughput computing, identity management, and security from the following organizations: the Morgridge Institute for Research, the National Center for Supercomputing Applications at the University of Illinois at Champagne-Urbana, the Center for Applied Cybersecurity Research at Indiana University and the University of Wisconsin-Madison. Introduction to the Software Assurance Marketplace (SWAMP) The SWAMP is a national, no cost resource for software assurance (SwA) technologies, used across research institutions, non-governmental organizations and civilian agencies and their communities as both a research platform and a core component in the software development life-cycle. It is our vision that widespread adoption of the SWAMP services will lead to a more secure and safer software ecosystem. The Software Assurance Marketplace (SWAMP) channels the mission of the Department of Homeland Security Science and Technology Directorate’s (DHS S&T) Cyber Security Division by: • • • Developing and leveraging technologies, tools and techniques to defend and secure current systems to better protect critical infrastructures against attacks from our adversaries, Facilitating technology transition through a marketplace approach where a collection of innovative technologies can be harnessed by the community, and Providing a collaborative research environment by which DHS customers, agencies of the U.S. government, academia, private industry and international partners can exchange technical and research ideas to help advance software security and quality improvements. The SWAMP may be used without cost by open-source, for profit, and non-profit organizations to test software for vulnerabilities and/or security risks. The Version 20140219 Page 3 of 58 accessibility of the SWAMP allows users at all levels to engage in the software development life-cycle. A user can upload his/her Software Package and/or Assessment Tool to the SWAMP for SwA testing. At launch, users will have access to over 100 Software Packages on the most popular Platforms (operating systems). The SWAMP protects your intellectual property and personally identifiable information. You control access to your Software Packages, Assessment Tools, and software Assessment Results. In the future, the SWAMP will offer the most frequently requested Software Packages, Software Assessment Tools, and Platforms. The SWAMP currently provides the following software assurance services: 1. For software written in one of the top three programming languages: 1. Java 2. C 3. C++ 2. For assessments using one or more most popular open-source static code analysis tools. Specifically: 1. FindBugs ~ On any supported Linux operating system supporting JVM 1.7.0_17 or greater 2. PMD ~ On any supported Linux operating system supporting JVM 1.7.0_17 or greater 3. Clang Static Analyzer ~ C/C++ for any supported Linux operating system 4. Cppcheck ~ C/C++ for any supported Linux operating system 5. Gcc ~ C++ compiler 3. For software that runs on one or more of these popular Platforms (operating systems): 1. Red Hat Enterprise Linux 6.4 32-bit 2. Red Hat Enterprise Linux 6.4 64-bit 3. Fedora 18 64-bit 4. Fedora 19 64-bit 5. Ubuntu 12.04.2 64-bit 6. Debian 7.0 64-bit 7. Scientific Linux 5.9 32-bit 8. Scientific Linux 5.9 64-bit 9. Scientific Linux 6.4 64-bit Accessing the SWAMP Registering with the SWAMP In order to access the SWAMP, a user registration form must be submitted and will require some personally identifiable information. You may have more than Version 20140219 Page 4 of 58 one SWAMP user account. A different email address or login identifications will be needed for each additional user account that is created. You may use the same email address and personally identifiable information in additional SWAMP user accounts that was used in your initial SWAMP user account. Please note that your privacy is important to us. We will not provide your personal information to other organizations. Follow the steps below to register with the SWAMP. ***Note: Inappropriate use of the SWAMP that may or may not violate the Acceptable Use Policy will result in deactivation of your SWAMP user account. SWAMP reserves the right to terminate your user account at anytime without notice. If this happens, contact SWAMP at [email protected] for any questions you may have, to request account reactivation, or to determine next steps to be able to access the SWAMP again. 1. Navigate to mir-swamp.org. Select Sign Up. 2. Read and accept the “Acceptable User Policy.” Version 20140219 Page 5 of 58 Notes: • All fields are required, with the exception of Street Address 2. • For the Email address field, only email addresses from institutions are allowed to use the SWAMP. For example, [email protected]. Freely available email accounts are prohibited, for example, Gmail, Hotmail, and Yahoo. • For the SWAMP Username field, the system generates an anonymous username to protect the user’s identity. The user can change the default username. The username may be recorded in log files. • For the Phone Number field the country code will be inserted when the user selects “country.” Type the area code, and the local number. Password Requirements A strong password is required to complete registration and for access to the SWAMP. The following are the minimum acceptable password requirements: • • • • • • • At least ten characters At least one upper case alphabetic character At least one lower case alphabetic character At least one digit Symbols are encouraged Do not use words found in the dictionary The maximum password length is 200 characters Version 20140219 Page 6 of 58 3. On the User Registration Form, type the requested information, and select Submit. 4. After submitting the registration form, you will be asked to verify your email address. Select OK. 5. You will receive a verification email. Within the email follow the instructions to verify your email address. Version 20140219 Page 7 of 58 6. You have now completed the registration process and can sign in to the SWAMP. ***Note: Inappropriate use of the SWAMP that may or may not violate the Acceptable Use Policy will result in deactivation of your SWAMP user account. SWAMP reserves the right to terminate your user account at anytime without notice. Forgotten Username/Password? If you have forgotten your login information, navigate to the Welcome to the SWAMP screen and select Help, I forgot my password or Help, I forgot my username, depending on what information you are requesting. If you have forgotten your password, you will need to reset your password by following the steps below. If you have forgotten your username, a username request can be submitted by selecting, Help, I forgot my username and following the steps on the next page. Resetting Your Password 1. Please enter your SWAMP User Name or Email Address. 2. Select Reset Password. 3. An email will be sent to the email address associated with your SWAMP account containing your new password. 4. Once you receive this email please sign in and reset your password. Version 20140219 Page 8 of 58 Requesting Your Username 1. Please enter your Email Address. 2. Select Request Username. 3. An email will be sent to the email address associated with your SWAMP user account with your current username. Signing in to the SWAMP At the Welcome to the SWAMP screen, sign in. If you are not yet a registered user of the SWAMP, you must first register. If you are registered, sign in with your username and password to access the SWAMP dashboard. Version 20140219 Page 9 of 58 Updating Your SWAMP Account In the event that your personal information changes, you have the ability to update your personal information in your profile at any time. 1. Sign in to the SWAMP. 2. From the Home screen select My Account to make changes to your account, such as editing your profile. Select Edit Profile. Version 20140219 Page 10 of 58 3. On the Edit My Profile screen, make the desired changes and select Submit. Version 20140219 Page 11 of 58 Changing Your Password In the event you would like a new password or you feel that your current password might have become compromised at any time, you have the option to change your password. 1. To change your password, select Change Password. 2. See Password Requirements on page 6 for more information about creating a strong password. 3. Type the new password and select Submit. Version 20140219 Page 12 of 58 Deleting Your SWAMP Account If for any reason you would like to delete your SWAMP user account, you have the option to do so. By deleting your SWAMP user account, you will lose access to all information in your SWAMP user account. The information will be stored in the SWAMP databases. If in the future, you wish to use the SWAMP again, you may register for a new SWAMP user account at any time. You will need to fill out the User Registration Form to create a new user account (pages 4-8). For access to your user account information, contact SWAMP at [email protected] 1. To delete your SWAMP account, from any screen select My Account. 2. On the My Profile screen, select Delete Account. Version 20140219 Page 13 of 58 3. You will receive a prompt asking you to confirm the deletion. Select OK to delete your account or Cancel to cancel your request. Requesting Project Ownership In an effort to ensure cybersecurity, users must request Project Ownership status. Follow the steps below to become an approved Project Owner. Once approved, you may create projects and invite others to join your Project. Project Members can create Assessment Runs, schedule Run Requests, and view Assessment Results. You only need to request ownership of a project once. Version 20140219 Page 14 of 58 1. On the Project Registration Form screen, complete the following fields: Full name: Version 20140219 The full name is the long version of your Project’s name used in Project descriptions. Page 15 of 58 Short name: The Project short name or alias is the short version of your Project’s name and will appear in the sidebar. Affiliation: Please include the company, university, or other organization with which your Project is affiliated. Assessment Results Viewer: Choose the results viewer from the dropdown menu. Description: Please provide a description of your Project to help a SWAMP administrator approve your Project. 2. Select Submit. 3. In the left side bar, under Projects I Own, your new Project will appear. Version 20140219 Page 16 of 58 Version 20140219 Page 17 of 58 Inviting Members to Your Project Project Owners may invite others to join to their Project. Invitees do not need to be current users of the SWAMP, but must register with the SWAMP to become a Project Member. Project Members are able to create Assessment Runs, schedule Run Requests, and view Assessment Results. A Project Owner is automatically a Project Member. 1. The Home screen lists your project under PROJECTS I OWN. 2. Select a Project you own. 3. Select the Members tab. 4. The Project Members screen appears. **Note: SWAMP automatically lists the Project Owner’s name. 5. Select Invite New Members. Version 20140219 Page 18 of 58 6. From the Project Invitations screen, select Add Invitation. 7. Type the name and email of the person you are inviting. Version 20140219 Page 19 of 58 8. Continue to Add invitations for any others for whom you want to join your Project. Individuals do not have to be registered users of the SWAMP to be invited, but must register if they are going to be a part of the project. 9. Select Send. Version 20140219 Page 20 of 58 10. You will receive a notification that invitations have successfully been sent to all new persons invited to join your Project. Changing Project Member Status A Project Owner may change the status of a Project Member(s) by navigating to the Members tab at the top of the page. A Project Owner may change a Project Member’s status to Admin (Administrator) or remove the Project Member entirely from the project. Admin rights give a Project Member the additional capability to approve and invite new Project Members. 1. Select your Project under the Projects I Own tab in the left sidebar. 2. Select the Members tab at the top of the page 3. Select the checkbox under the Status column for Project Member(s) you wish to give Admin rights. ***Note: To remove a Project Member from the Project, the Project Member cannot have Admin rights. Version 20140219 Page 21 of 58 Removing Admin (Administrator) Rights As the needs of your Project change, you can add/remove Admin rights from individual Project Members. Remove Admin rights for the Project Member(s) by following the steps below. 1. Deselecting the checkbox under the Status column. 2. Select Submit 3. An X will appear next to Status column for each Project Member that does not have Admin rights. 4. Select the X next to the Status column to remove the Project Member from the Project. Adding Your Software Package to the SWAMP You may add and upload, edit or delete your Software Packages. A Software Package is a set of files containing related software or source code that needs to be assessed for vulnerabilities or insecurities. Upload a Software Package 1. To add your own Software Package, select Add New Package. 2. Complete the fields on the form. Version 20140219 Page 22 of 58 Name: Name of the Software Package. Version: Revision of the uploaded software Archive: Software Package to upload. Build script: Script to run to build the package. Source path: A required field and is the name of the top level directory that is produced when the archive file is unarchived. Package type: This tells whether or not to invoke the build system to build the software from source code. From the dropdown menu choose C/C++, Java source code, or Java byte code. Build system: Name of the system to use to build the software. For C/C++, Make, Make+Configure, CMake+Make or other may be used. For Java source, Ant, Ant+Ivy or Maven could be chosen. Advanced settings Configure path: The name of the directory relative to package-dir to change before running the configure command and is used only with C/C++ packages. This is an optional field. Configure command: The name of a command to configure the package before building. If undefined/empty, no command is run. This is only used for C/C++ packages. This is an optional field. Configure options: The name of options i.e. the arguments to pass to the configure command and is used only with C/C++. This is an optional field. Build path: It is the path to the directory related to the source path to change to before building. This is an optional field and is used for C/C++/Java. Build file: Used only with C/C++/Java source packages. It is the path to the build file related to the build path to use for the build systems except for the “Other” build command. For a build system type “Other”, the name of the file needs to be passed in the build options. This is only used with C/C++/Java source packages. This is an optional field. Version 20140219 Page 23 of 58 Build command: If a build system other than the ones listed above has to be used, “Other” from the build system menu has to be selected and a build command to execute the package needs to be provided. This is optional and is used only C/C++ packages. Build options: Name of the options and arguments to pass to the build command. Only for C/C++/Java source packages. This is an optional field. Build target: The name of the file to be created by the build process. This target is passed to the build command. It is used only with C/C++/Java source. This is an optional field. Description (public): A text description of the package that is visible to any user of the package. Description (private): A text description of the package that is only visible to the owner of the project. 3. Select Submit to upload your Software Package. You will receive a notification once the upload is complete. Version 20140219 Page 24 of 58 Version 20140219 Page 25 of 58 Version 20140219 Page 26 of 58 Version 20140219 Page 27 of 58 Edit a Software Package 1. From the Home screen select a Software Package to edit. Version 20140219 Page 28 of 58 2. On the Package Profile screen Select Edit Package. 3. From this screen you can change the name of the Software Package. Type the revised name of the Software Package and select Save. Version 20140219 Page 29 of 58 4. You will receive confirmation of the change. Select OK. Adding, Updating or Deleting a Software Package Version View or Add a Version of a Software Package From the Packages I Own tab in the left side bar you can view your Software Package or add a new version of your Software Package. 1. Select the software package you wish to update, and then select Add Version. Version 20140219 Page 30 of 58 2. From the Add New Version screen complete the fields on the form. Archive: Version 20140219 Software Package to upload. Page 31 of 58 Version: Revision of the uploaded software Build script: Script to run to build the package. Source path: A required field and is the name of the top level directory that is produced when the archive file is unarchived. Package type: This tells whether or not to invoke the build system to build the software from source code. From the dropdown menu choose C/C++, Java source code, or Java byte code. Build system: Name of the system to use to build the software. For C/C++, Make, Make+Configure, CMake+Make or other may be used. For Java source, Ant, Ant+Ivy or Maven could be chosen. Advanced settings Configure path: The name of the directory relative to package-dir to change before running the configure command and is used only with C/C++ packages. This is an optional field. Configure command: The name of a command to configure the package before building. If undefined/empty, no command is run. This is only used for C/C++ packages. This is an optional field. Configure options: The name of options i.e. the arguments to pass to the configure command and is used only with C/C++. This is an optional field. Build path: It is the path to the directory related to the source path to change to before building. This is an optional field and is used for C/C++/Java. Build file: Used only with C/C++/Java source packages. It is the path to the build file related to the build path to use for the build systems except for the “Other” build command. For a build system type “Other”, the name of the file needs to be passed in the build options. This is only used with C/C++/Java source packages. This is an optional field. Build command: If a build system other than the ones listed above has to be used, “Other” from the build system menu has to be selected and a build command to execute the package Version 20140219 Page 32 of 58 needs to be provided. This is optional and is used only C/C++ packages. Build options: Name of the options and arguments to pass to the build command. Only for C/C++/Java source packages. This is an optional field. Build target: The name of the file to be created by the build process. This target is passed to the build command. It is used only with C/C++/Java source. This is an optional field. Description (public): A text description of the package that is visible to any user of the package. Description (private): A text description of the package that is only visible to the owner of the project. Deleting a Software Package 1. To delete a Software Package, navigate to the Package Versions screen. Select the X next to the version you wish to delete. Version 20140219 Page 33 of 58 2. You will receive a prompt asking you to confirm the deletion. Select OK to delete or Cancel to cancel your request. Software Package Sharing: Private, Public, or Protected You can share your Software Packages in one of three modes: • Private • Public • Protected Private: Only the Project Owner can see Software Packages. Public: Every SWAMP user can see Software Packages. Protected: Project Owners can choose to share Software Packages with selected Projects and by default with members of the selected Project. 1. Navigate to the Package Profile screen. 2. Select the Software Package version you wish to link with the project you have chosen. Version 20140219 Page 34 of 58 3. The Package Sharing screen appears. 4. Select the radio button to choose what level of access to the Software Package you wish to give SWAMP users. When choosing Protected, select the Projects with which you wish to share your Software Package. 5. Protected must be chosen to share your Software Package version with a Project. 6. Select Save. **Note: You do not have to be a Project Owner to upload a Package to the SWAMP. Managing Assessment Runs After an Assessment Run has been scheduled, the Assessment Run will proceed through three states listed below: 1. SCHEDULED: The Scheduled state happens after you create a Run Request for the Assessment Run. Version 20140219 Page 35 of 58 2. Starting virtual machine: The system is setting up the environment for the Assessment Run. 3. Submitted to HTCondor: The Assessment Run job has been submitted to HTCondor for execution. 4. Performing Assessment: The Assessment Run is being executed. 5. Finished: The scheduled Run Request has completed and Assessment Results are available. 6. Finished with errors: Your build has failed due to an incorrect Build System and/or incompatibilities between the Software Package and the selected Platform. 7. Unable to run, queued or Unable to start VM: There are incompatibilities between the chosen Platform and Software Package. **Note: You can view the details of each stage by selecting the current status under the Status field. Add an Assessment Run 1. Select Add Assessment. From each dropdown menu: 1. Choose a Software Package and its version. 2. Choose an Assessment Tool and its version. 3. Choose a Platform and its version. 2. Select Save. Version 20140219 Page 36 of 58 3. You will receive a confirmation message. Select OK. Delete an Assessment Run 1. To delete an Assessment Run, navigate to the Assessments screen. Select the X to the right of the Assessment Run you wish to delete. 2. Select OK to confirm that you wish to delete the Assessment Run. 3. You will receive a confirmation that the Assessment Run has been deleted. Select OK. Schedule a Run Request 1. Select the Run Request tab and then select Add Run Requests. Version 20140219 Page 37 of 58 2. On the Add Run Requests screen, select the checkbox in front of the Run Request you wish to schedule, and then select Schedule Run Requests. Version 20140219 Page 38 of 58 Run Request Scheduling Options You can schedule Assessment Runs One-time or On a repeated schedule. Multiple runs can be scheduled simultaneously: • One-time: A One-time Run Request assesses a selected Software Package only once. • On a repeated schedule: With the repeated schedule option, the user could choose to schedule Assessment Runs on a regular basis such as daily, weekly or monthly at a selected time. This feature is helpful when the user edits the package regularly and wants to perform an Assessment Run with the same tool on the same platform every time the package is modified or updated. One-time Runs 1. The schedule defaults to one-time on the Schedule Run Request screen. 2. If you want to schedule a recurrent Run Request, select Edit Schedules. 3. If you want to execute your Assessment Run as soon as possible, select Submit. Version 20140219 Page 39 of 58 Adding a New Run Request 1. From the Run Request screen, select Edit Schedules. 2. Select Add Schedule 3. On the Define Run Request Schedule screen, type a name for your schedule. For example, “Tuesdays at 8 a.m.” Version 20140219 Page 40 of 58 4. Type a description. For example, “Run the assessment every Tuesday at 8 a.m.” Version 20140219 Page 41 of 58 5. Select Add Request. 6. In the Type dropdown menu select Daily, Weekly, or Monthly. • For Daily runs select the time. • For Weekly runs select the day and time. • For Monthly runs select the date and time. 7. Additional run times can be added to your Run Request schedule. 8. Select Save. 9. You will receive a confirmation message. Select OK. Viewing Run Request Schedules and Results 1. View your scheduled runs on the Run Request Schedules screen. Version 20140219 Page 42 of 58 2. Select the Runs tab to view the status of an Assessment Run. Version 20140219 Page 43 of 58 3. When an Assessment Run is done, select the Results tab to view the Assessment Results. Above the Details column select View and the desired viewer to see the results of your assessment run. 4. Results can be viewed in Native or Code Dx viewers. ***Note: For more information on Code Dx please visit http://securedecisions.com/products/codedx/ • Above is an example of detailed results from an assessment run in the Native Viewer. Version 20140219 Page 44 of 58 • Above is an example of an assessment run in the Code Dx viewer. • Above is an example of results from an assessment run using the tool Cppcheck displayed in the Native viewer. Version 20140219 Page 45 of 58 • Above is an example of results from an assessment run using the tool Clang Static Analyzer displayed in the Native viewer. • Above is an example of results from an assessment run using the tool Gcc displayed in the Native viewer. Delete a Scheduled Run Request 1. To delete a scheduled Run Request select the check box to the right of the run. Version 20140219 Page 46 of 58 2. You will be asked to confirm the deletion. Select OK to delete the Run Request or Cancel to cancel your request. Obtaining Universal Unique Identifier (UUID) A UUID is assigned to each assessment run and helps support staff address a support ticket without requiring personal information. The UUID may be asked for when submitting a support ticket. To view the Execution Record of the Assessment Run, follow the steps below 1. Select the Runs tab 2. Select the link under the Status field Version 20140219 Page 47 of 58 Version 20140219 Page 48 of 58 ***The following sections referring to Assessment Tools will be a future capability in the SWAMP and are currently under development.*** Managing Assessment Tools A SWAMP user may upload Assessment Tool(s) he/she has developed and then test the Assessment Tool against publically available Software Packages or personally uploaded Software Packages. Adding Assessment Tools 1. From left side panel on any screen, select Add New Tool. 2. Complete the fields on the form. Name: File: Version: Tool directory: Tool executable: Tool arguments: Deployment command: Version 20140219 Name of the Assessment Tool. File to upload to SWAMP. Revision of the uploaded Assessment Tool. Top level directory within the archive. Command to invoke tool. Arguments to pass to the tool. The command used to install the Assessment Tool. Page 49 of 58 Description (public): Description (private): Description of the Assessment Tool to those who have access to it. Private description and comments for the Owner of the Assessment Tool. 3. Select Submit to upload your Assessment Tool. You will receive a notification once the upload is complete. Editing an Assessment Tool 1. From the left side bar of any screen select an Assessment Tool to edit. Version 20140219 Page 50 of 58 2. On the Tool Profile screen select Edit Tool. Version 20140219 Page 51 of 58 3. From this screen you can change the name of the Assessment Tool. Type the name of the Assessment Tool and select Save. 4. You will receive confirmation of the change. Select OK. Adding, Updating, or Deleting an Assessment Tool Version Viewing or Adding a Version of an Assessment Tool From the Tool Profile screen you can view your Assessment Tool or add a new version of your Assessment Tool. Follow the steps below to add a new version of your Assessment Tool. 1. Select Versions. Version 20140219 Page 52 of 58 2. On the Tool Versions screen select Add Version. 3. On the Add New Tool screen complete the fields on the form and select Submit. Name: File: Version: Tool directory: Tool executable: Tool arguments: Deployment command: Description (public): Description (private): Name of the Assessment Tool. File to upload to SWAMP. Revision of the uploaded Assessment Tool. Top level directory within the archive. Command to invoke tool. Arguments to pass to the tool. The command used to install the Assessment Tool. Description of the Assessment Tool to those who have access to it. Private description and comments for the Owner of the Assessment Tool. Deleting a Tool 1. To delete an Assessment Tool, from the left pane on any screen under TOOLS I OWN, select an Assessment Tool to delete. 2. On the Tool Profile screen select Delete Tool or the X to right side of the screen. Version 20140219 Page 53 of 58 3. You will receive a prompt asking you to confirm the deletion. Select OK to delete the Assessment Tool or Cancel. Assessment Tool Sharing: Private, Public or Protected You can share your Assessment Tools in one of three modes: • Private • Public • Protected Private: Only the Project Owner can see Assessment Tools. Public: Every SWAMP user can see Assessment Tools. Protected: Project Owners can choose to share Assessment Tool with selected Projects and by default with members of the selected Project. 1. Navigate to the Tool Profile screen. 2. Select the Assessment Tool version you wish to link with the project you have chosen. Version 20140219 Page 54 of 58 3. Select Sharing tab at the top of the screen. 4. The Package Sharing screen appears. Version 20140219 Page 55 of 58 5. Select the radio button to choose what level of access to the Assessment Tool you wish to give SWAMP users. When choosing Protected, select the Projects with which you wish to share your Assessment Tool. 6. Protected must be chosen to share your Assessment Tool version with a Project. 7. Select Save. Version 20140219 Page 56 of 58 Glossary Assessment Run: Specifies one Tool to assess one Software Package on one operating system Platform. Assessment Tool: An Assessment Tool analyzes a Software Package to find weaknesses that could lead to security vulnerabilities. One person owns an Assessment Tool. Continuous Software Assurance: A process that affirms software functions as intended, free from vulnerabilities intentionally or unintentionally inserted into the code. This is achieved through continuous assessments. Execution Record: Displays statistics about the scheduled Assessment Run. Owner: A User that has requested ownership privileges and has been vetted by a SWAMP Administrator, who owns a Project and/or Software Package, (Future Option: Assessment Tool). Platform: The operating system environment in which an Assessment Run occurs. Project: A person or group of people working together for a common purpose, for example to create better assessment tools, and/or to mitigate weaknesses in Software Packages. Project Member: A person who has accepted an invitation to join a SWAMP project. Project Members are able to create Assessment Runs, schedule Run Request, and view Assessment Results. Run Request: A request to execute one or more Assessment Runs as soon as possible after the requested time. Project Members can schedule Run Requests to occur daily, weekly, or monthly. Members can schedule Run Requests that are a combination of daily, weekly, or monthly times. Software Package: A software component or system used by others. User: A person granted permission to belong to the Software Assurance Marketplace. A SWAMP user must be a member of a project to use Assessment Tools, Platforms, and view Assessment Results. Version 20140219 Page 57 of 58 Table 1. Compatibility of Platforms and Tools Platforms Red Hat Enterprise Linux 6.4 32-bit Red Hat Enterprise Linux 6.4 64-bit Fedora 18 64-bit Fedora 19 64-bit Ubuntu 12.04.2 64-bit Debian 7.0 64-bit Scientific Linux 5.9 32-bit Scientific Linux 5.9 64-bit Scientific Linux 6.4 64-bit PMD FindBugs Tools Cppcheck Yes Yes Yes Yes Yes Yes Yes Yes Yes Yes Yes Yes Yes Yes Yes Yes Yes Yes Yes Yes Yes Yes Yes Yes Yes Yes Yes Yes Yes Yes Yes Yes Yes Yes Yes Yes Yes Yes Yes Yes Yes Yes Yes Yes Yes Gcc Clang Static Analyzer **Note: It is important to select the correct Platform when running an assessment. Selecting the incorrect Platform will generate false results. Version 20140219 Page 58 of 58