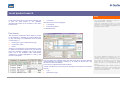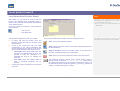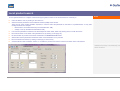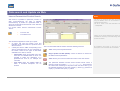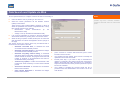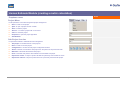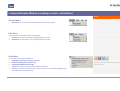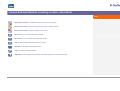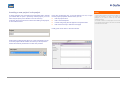
1
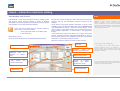
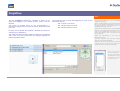
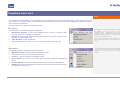
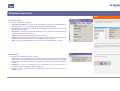
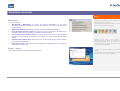
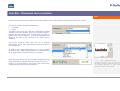
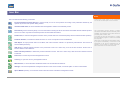
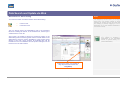
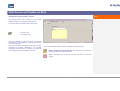
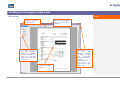
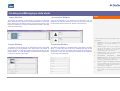
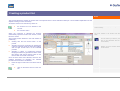
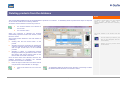
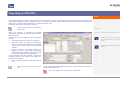
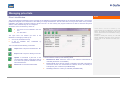
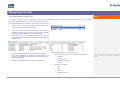
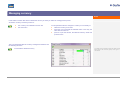
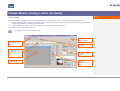
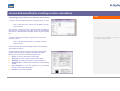
LITESTAR 4D v. 3.00
User’s Manual
Liswin - Interactive Electronic Catalog
June 2015
Index
Liswin – interactive electronic catalog ........................................................................................................................................................................ 4
Introduction and Access.......................................................................................................................................................................................................................................... 4
Drag&Drop ................................................................................................................................................................................................................. 5
Dropdown menu bars................................................................................................................................................................................................. 6
File menu................................................................................................................................................................................................................................................................. 6
View menu............................................................................................................................................................................................................................................................... 6
Function menu ........................................................................................................................................................................................................................................................ 7
Links menu .............................................................................................................................................................................................................................................................. 7
Data menu............................................................................................................................................................................................................................................................... 8
About… menu ......................................................................................................................................................................................................................................................... 8
Icon Bar – Dropdown menu selection ........................................................................................................................................................................ 9
Icon Bar.................................................................................................................................................................................................................... 10
Product data TABs ................................................................................................................................................................................................... 11
General Data ......................................................................................................................................................................................................................................................... 11
Photometric parameters........................................................................................................................................................................................................................................ 11
Electrical parameters ............................................................................................................................................................................................................................................ 11
Mechanical parameters......................................................................................................................................................................................................................................... 11
Energy parameters................................................................................................................................................................................................................................................ 11
Norms and Marks.................................................................................................................................................................................................................................................. 11
Text ....................................................................................................................................................................................................................................................................... 11
Manufacturer Window .............................................................................................................................................................................................. 12
Configuring Liswin .................................................................................................................................................................................................... 13
Data structure........................................................................................................................................................................................................... 15
Product List .............................................................................................................................................................................................................. 16
Available functions ................................................................................................................................................................................................................................................ 17
Local product search ................................................................................................................................................................................................ 18
Tree Search .......................................................................................................................................................................................................................................................... 18
Local Parametrical Product Search ...................................................................................................................................................................................................................... 19
Data search and Update via Web ............................................................................................................................................................................ 21
Internet Parametrical Product Search................................................................................................................................................................................................................... 21
Manufacturer WebCatalog .................................................................................................................................................................................................................................... 23
Data Search and Update via Web............................................................................................................................................................................ 24
Page 2/44
Automatic data update check................................................................................................................................................................................................................................ 24
Data Plug-in ............................................................................................................................................................................................................. 25
Data Plug-in Import ............................................................................................................................................................................................................................................... 25
Creating and managing a data sheet ....................................................................................................................................................................... 26
Main screen........................................................................................................................................................................................................................................................... 27
Lamps Window...................................................................................................................................................................................................................................................... 28
Accessories Window ............................................................................................................................................................................................................................................. 28
Images Window..................................................................................................................................................................................................................................................... 28
Properties Window ................................................................................................................................................................................................................................................ 28
Creating a product list .............................................................................................................................................................................................. 29
Deleting products from the database ....................................................................................................................................................................... 30
Exporting an OXL/OXC ............................................................................................................................................................................................ 31
Managing price lists ................................................................................................................................................................................................. 32
Price Lists Window................................................................................................................................................................................................................................................ 32
To export/import a price list................................................................................................................................................................................................................................... 33
Managing currency................................................................................................................................................................................................... 34
Estimate Module (creating a metric calculation)....................................................................................................................................................... 35
Introduction............................................................................................................................................................................................................................................................ 35
Dropdown menu.................................................................................................................................................................................................................................................... 36
Project Menu ......................................................................................................................................................................................................................................................... 36
Sub-Project icon bar.............................................................................................................................................................................................................................................. 36
Budget Menu: ........................................................................................................................................................................................................................................................ 37
Offer Menu ............................................................................................................................................................................................................................................................ 37
Links Menu ............................................................................................................................................................................................................................................................ 37
Icon bar ................................................................................................................................................................................................................................................................. 38
Inserting a new project / sub-project ..................................................................................................................................................................................................................... 40
Importing project lists from Litecalc and Liswin..................................................................................................................................................................................................... 41
Managing the product lists manually..................................................................................................................................................................................................................... 42
Visualizing the list relative to the sub-project ........................................................................................................................................................................................................ 43
Creating the offer .................................................................................................................................................................................................................................................. 44
Page 3/44
Liswin – interactive electronic catalog
Introduction and Access
LITESTAR 4D - Liswin is the interactive electronic catalog module
with products search functions realized by means of different
parameters, for processing elements required for producing project
documentation, and for automatic data updating.
Liswin may be accessed from the Litecalc module by
means of the Liswin icon situated:
•
on the right of the screen, in the library TAB
•
in the Links menu
Alternatively you can:
select the Liswin program from the Start/All programs/Oxytech
Notes
The aim of the Liswin module is to make search functions (local or
internet), data use and visualization simpler and faster for the
designer.
Liswin allows cross-search between luminaires or lamps, made
available by the manufacturers taking part in the Litestar Project
and downloaded as plug-ins, and those inserted directly by the
user by means of the Lisdat module (see the Lisdat manual for a
more detailed explanation of data insertion and photometry
linking).
In this sense the program thus allows you to single out the best
product, according to specific parameters established by the user,
from all those present in the database and to print a customized
data sheet, or use the photometry in Litecalc.
When the program is opened, the main window is shown:
Icon bar
Dropdown menu bar
Dropdown
menu
for
selection of manufacturers
Dropdown menu for
selection of product
type
Why Interactive ?
Because it allows dynamic interaction among
different systems, such as parametric product
search management, data sheet management,
interfacing with WebCatalog to download product
data from the Web by means of a simple mouse
click (Drag&Drop function).
When the Litecalc program module is launched,
Liswin will also open automatically.
It is important not to close Liswin during the
Litecalc operations since it is required for the
correct insertion of the luminaires in the project.
For more details see the Litecalc manual chapter
Inserting a luminaire.
Data search icon bar
Column
of
Product
images
and
linked
photometric curves
Tree
search
and
Product Lists TABS
Product data TAB
Product List
Page 4/44
The arrows below the photometry image allow you
to scroll the polar graphs when the luminaire has
more than one linked photometry.
Drag&Drop
Notes
The term Drag&Drop indicates the possibility of clicking on an
object and dragging it into another position, where it will be
released.
This means for example that if an icon corresponding to a
document is dragged from one folder to another, the document will
be moved.
The formats that can be used with Drag&Drop in Liswin for the
photometric files are:
.OXL, Oxytech’s own format
.EUL, standard European format
.IES, standard American format
On the operational level, to carry out Drag&Drop
operations you must:
Add a new Manufacturer using the Lisdat module
(for a more detailed explanation see the Lisdat
manual), unless you are importing an oxl of a
manufacturer already in the list.
Verify that the manufacturer is active (flagged) by
clicking on the Select Manufacturers icon on the
right of the manufacturers list. Should it not be
active click inside the box to the left and then on
the Confirm key
For easy use and quicker data insertion LITESTAR 4D includes an
extensive use of Drag&Drop.
This means the files in the other modules or folders can be selected
with a click of the left mouse button and dragged (keeping the
button pressed) into Liswin
Select the manufacturer in the drop down
Manufacturer menu.
Open the original source area (for example a
folder as in the image alongside).
Select the file and, keeping the left mouse button
pressed, drag it into the Liswin area until the
symbol becomes a broken line rectangle.
At this point the list from
which to choose the lamp
ILCOS Code will appear.
By flagging Remember the
selected ILCOS value will be
automatically assigned to
subsequent entries.
Page 5/44
Dropdown menu bars
Notes
The dropdown menu bars allow the main operations to be performed with a click of the left mouse button on the required menu (File,
View, Functions, Links, Data, About …) and after scrolling the pointer through the items (which will be highlighted in blue), with a click on
the command to be performed.
The menus allow you to manage the following functions:
The DB filter is a file that allows certain dropdown
search fields in the parametrical search window to
be updated. The file is found in the data
destination folder …\data\lmdata. If the filter is
activated, you can update the database fields to
include something new such as: a new color, a
new norm, a new trademark etc…
File menu
For all operations connected with program configuration
Manufacturer Selection: to select the manufacturer’s list on which you intend to work
from the complete list of available manufacturers
Settings: for access to the parameter management section of the Liswin module, such as
file paths or technical sheet colors
Once it has been selected, it is necessary to exit
the program so that the filter can be applied on reentry.
Filter Activation: to apply the DB filter
Exit: to leave the Liswin module. To exit you can also press the X on the top right
To view the manufacturer data it is also possible to
click twice on the logo of the actual manufacturer
situated on the top right (above the images
column)
View menu
For operations relating to estimates and lists management
Manufacturer Data: to view the selected manufacturer’s data
Price List: for access to price list management function
Currency: to open the currency management window
Specs Module: for access to the Lisman offers and metric calculation management
module
Products deletion: to activate the deletion of one or more products from the database
Product List: to activate management functions of the product lists to be used later with
the estimate module (Lisman)
Page 6/44
Dropdown menu bar
Notes
To access the Functions menu it is also possible to
select a product directly from the list with the right
mouse button, as illustrated below.
Function menu
For functions of general management
Technical Data Sheet: for access to the management module of the data sheet of the
selected product. It is also sufficient to click twice on the selected product
Photometry: to visualize the photometry of the luminaire in the list, if the FOT field on the
left of the product is active.
Documents: for access to the window showing the list of documents associated with the
selected product (Excel, PDF files etc.)
Delete: to eliminate the selected product from the catalog
Product List: to add the selected product to the product list, which can be deleted from the
database or imported, subsequently, into the estimate module (Lisman)
Edit: to enter the Lisdat module and modify the data of the selected product, if active
The edit command is almost never active for
products made available by manufacturers. It is
always available however for products inserted by
the user.
To access the various modules it is also possible
to click directly on the respective icons, situated
above the product list.
Links menu
To move between the different program modules
Litecalc: to access the lighting design calculation module for interiors and exteriors (large
areas, roads, tunnels) with viewing functions of results tables, graphs and photo-realistic
images of the area itself from different viewpoints, by means of ray-tracing and radiosity
rendering
Photoview: to access the photometry view module with view and print functions of
photometric tables and graphs in different languages
Lisdat: to access the catalog data management module with manual data entry or
database import
Page 7/44
Dropdown menu bar
Notes
To access the various types of search it is also
possible to click directly on the respective icons,
situated above the product list.
Data menu
For search functions
When the mouse cursor is positioned on the icon,
the command description will appear.
Manufacturer’s WebCatalog: to access the Internet WebCatalog of the active
manufacturer (the active manufacturer is the one whose logo is shown on the right in the
Liswin window)
WebCatalog Selection: this allows access to the list of available WebCatalogs
Local Parametrical Product Search: to search for one or more products according to the
parameters defined by the operator in the relative dialogue window
Internet Parametrical Product Search: to search on internet for one or more products
according to the parameters defined by the operator by means of the specific dialog
window
Automatic Data Update check: this allows you to check if there are any product updates
for the selected manufacturer
Data Plug-in Import: this allows an external data Plug-in (database file) to be imported,
both locally and on the web
WebOxy is the area in the Oxytech site
(http://www.oxytech.it) where all the data of the
manufacturers taking part in the Litestar Project
can be found and from where the plug-ins or single
products can be downloaded.
Click with the mouse on the LITESTAR 4D window
to open the window relating to the program
version.
About… menu
This opens the window showing relative program data.
These data must be communicated to Oxytech in
the event of problems with the program.
Page 8/44
Icon Bar – Dropdown menu selection
Notes
In the left-hand side of the Liswin window there are two dropdown menus; click with the left mouse button on the arrow to choose:
The types of product to be viewed subdivided into:
Luminaires
Lamps
The fields in the Product data TAB will be automatically modified
according to the type selected. Thus if the Luminaires archive is
selected, the data relating to the manufacturing companies of
lighting devices will be visualized. If Lamps is selected the data
relating to the lamps of the companies in the archive will be
visualized.
The second drop-down menu shows the list of activated
manufacturers. Select one to gain selective access to the data of
that manufacturer.
By clicking on the Select Manufacturer icon, it will be possible
alongside to set by default the manufacturers to be visualized in the
list, by flagging them, hiding those that are of no interest.
When selecting the manufacturer, should there be
a file called @catalog-cover.JPG in the
manufacturer’s folder, for a few seconds an image
will appear with the logo of that manufacturer (for a
more detailed explanation of folder structure
please see the Data structure chapter).
Above the image column, lined up on the right, will appear the logo
of the manufacturer if available, otherwise the name in text form.
Clicking on the manufacturer’s logo with the left mouse button
visualizes the data relating to that manufacturer.
Page 9/44
Icon Bar
Notes
Position the mouse cursor on the corresponding
icon to see the description of the command.
The icons activate the following commands:
Local Parametrical Product Search, to search locally for one or more products according to the parameters defined by the
operator by means of the specific dialog window
Technical Data Sheet, to access the data sheet management module of the selected product
Documents (product accessory files), to access the window showing the list of documents associated with the selected product.
The icon is active only when the selected product has associated documents
Product List, to activate management functions of the product lists to be used subsequently with the estimate module (Lisman)
Products deletion, to activate the delete functions on one or more products from the database
OXL Export: to export product data in an XLM file, with .OXC extension if there is no photometry associated or .OXL if there is
an associated photometry
Add to list, to add the selected product to the product list. This icon is active only if one of the two functions: Product List or
Product deletion is first selected
Delete selected products, to delete the products inserted in the list. This icon is active only if first the Product deletion function
is selected
Price List, to access the price list management functions
Currency, to open the currency management window
Manufacturer, to access the data visualization window of the selected manufacturer
Settings, to access the parameter management section of the Liswin module, such as file paths or colors of data sheets
Specs Module (Lisman), to access the Lisman offers and metric calculation management module
Page 10/44
The Documents function allows a series of
documents associated with the selected product, if
available, to be viewed, such as DOC (Word), PDF
(Acrobat), DXF or DWG, XLS.
To be able to open the documents, it is essential
that the relative program or viewer be installed on
the computer.
When only one document is associated, Liswin will
try to open it automatically. If more than one file is
associated, a list will be visualized from which
selection can be made by clicking twice with the
left mouse button on the name of the file.
Product data TABs
Notes
General Data
Here the product catalog data, such as Code, Model, Price, etc.,
are shown.
Photometric parameters
Here the photometries connected to the luminaire and their
characteristics are shown. If a luminaire has several photometries,
the polar diagram can be viewed, selecting the relevant one.
Electrical parameters
Here are shown the data regarding the sources (lamp or luminaire)
and the electrical characteristics, such as Voltage, Power, etc.
Mechanical parameters
Here are shown the mechanical data such as Weight, IP
Protection level, IK Mechanical resistance, etc.
The energy parameters of the road luminaires are
obtained using the IPEA method, processed in
collaboration with Hera Luce
Energy parameters
Here are shown the luminaire energy data (only for street lighting)
or those of the lamp (UE 874/2012)
Norms and Marks
Here the marks and norms are shown
Text
Here the text associated with the luminaires or lamps is shown.
When more than one text is associated just scroll the dropdown
menu to highlight them
Page 11/44
Manufacturer Window
The Manufacturer window allows you to visualize the commercial data related to the manufacturer.
Notes
To access the window, select Manufacturer data:
•
in the icon bar
•
in the Visualize menu
Alternatively just click for access twice on the manufacturer’s
logo situated on the right of the Liswin window.
The company presentation, certificate and logo will
be inserted in the manufacturer’s folder, inside the
program data folders. For a more detailed
explanation see the Data structure chapter.
Should the selected manufacturer have been created
directly by the manufacturing company, the window shown
will be unmodifiable (top figure).
If instead the manufacturer has been inserted by the user
using the Lisdat module (for a more detailed explanation see
the Lisdat manual), that is the user is the owner, the window
will be editable in all fields (bottom figure).
It will thus be possible to modify the data, typing in the new
values in the individual boxes, or to add a presentation or
certification of the company (in .PDF format), using the
Change key.
By clicking on the Logo key, it will also be possible to add
the image of the company logo (in .JPG format), which will
then be visualized in the box on the top right.
Finally click on the Refresh key to make the updates
effective.
Page 12/44
Configuring Liswin
Liswin offers a configuration window where the main parameters and the database and system file paths are defined. Access is gained
by selecting the File/Configuration menu.
The function opens a window in which to define the program configuration parameters which are:
To access the configuration window
select the Configuration icon situated:
Database, showing the path for finding:
•
•
Notes
Product Database, i.e. the file in MDB format (called
OxyData.MDB) where all the catalog data is entered. The
file can be renamed externally to the program, but it will
then have to be linked to the program
in the icon bar
in the File menu
DB Support, that is the file (called tf.mdb) in which the
particular configurations of the Liswin data sheets are
recorded. Liswin in fact allows you to choose the
elements to be visualized from each sheet and this
configuration is automatically saved in the tf.xlt file for
later use
Media, showing the path for finding images and texts:
•
Documents, present in the local computer
•
Updates, to be downloaded from the Web in the future
Products, where the path of the configuration file (DPGF.xlt)
of the Liswin customized estimate module can be found
Internet Download, where the
parameters are defined, such as:
internet
configuration
•
URL Remote, i.e. the site from which data updating is
performed (not to be modified)
•
AskForID and SendID are the parameters that handle
automatic data download via Internet (Parametric Search
and Drag&Drop functions) exclusively managed by
OxyTech
•
ConfirmUpdate, to request confirmation of each update
•
Database DBfilter, the path to find the file
•
Applyfilter, to select whether or not to apply the filter at
startup
To modify the dropdown fields, click on the line
and then on the arrow, which appears to the right
of the line, to scroll the various options. Once the
option has been modified press Enter to confirm
the selection.
Technical Data Sheet, where the data sheet elements are
configured, such as:
It is advisable not to modify the data shown in the
CSV and CodPrefix fields, so as not to alter
program operation.
Liswin Default Startup, where the DBDefault filter is defined:
•
ShoNum, to select the type of data sheet to be visualized
(Creating and Managing a data sheet chapter)
•
PrintColor2, i.e. the background color found in the
headlines
•
PrintColor1, i.e. the second background color
•
ImageBorder, i.e. the color of the image boxes
Page 13/44
Configuring Liswin
Notes
•
Show
Commercial,
Notes,
Marks,
Electrical,
Photometrical, ShowProductData, i.e. the data to be
printed in the data sheets
•
PrintDocs, to print documents associated with the
product such as specifications description, instruction
leaflets, in RTF format
•
Print All, to print all documents associated with the
product
•
ShowPrices, to visualize or not the list prices
Writelog, activates the file that records the operations in the
cfg .log file
Makecopy, where to choose to copy the images associated
with the product in the Liswin-Lisdat tree
Csv, indicates the type of separator to be used when
exporting files in CSV format (e.g. lists)
There are five ways to order product visualization:
Codprefix, indicates the type of prefix found before the
codes, when exporting files in CSV format
New
Liswin Visualization, in which to define:
Code
•
DefaultListOrder, i.e. the order in which the product lists
are to be visualized
Description
•
Projects, where to indicate the path of exportable files
(for example the document in CSV format)
FOT
Manufacturer
By setting one of these parameters when opening
Liswin, the data will always be visualized in this
order.
Page 14/44
Data structure
Notes
LITESTAR 4D is equipped with a single database (Oxydata.MDB),
differently from LITESTAR 10 in which there were 2 databases,
one catalog (MDB Access type) and one photometric
(Fotom.FDB).
The LITESTAR 4D database is the evolution of the LITESTAR 10
catalog database in which the functions for managing the
photometric files in the new OxyTech OXL format have been
integrated.
The OXL files are obtained by converting the photometric files into
international formats (e.g. EUL or IES), by means of the Photoview
module, or using the Lisdat module.
For a more detailed explanation please refer to the Photoview and
Lisdat manual.
The MDB database is created by downloading the manufacturers’
Plug-ins (unmodifiable data) by means of the Liswin module or by
directly inserting the luminaire technical data into Liswin by means
of the Lisdat module, which can also be used to link the
photometries in OXL format to the sheets.
The OXL file is an XML type file (files used in
many applications for data exchange) inside which
the following information is found:
In the folder of every single manufacturer, the data structure
(which should remain unchanged) is made up of the following
elements:
Oxydata.mdb is found in the program data folder
…\Docs\DB. It is a relational Access database
which contains:
A series of non language sensitive documents:
•
Product images (in .JPG format)
•
Company logo (in .JPG format)
•
Cover window (@catalog-cover.JPG), as explained in
the paragraph relative to drop-down selection menus
•
Drawings (in .DWG or .DXF format)
A group of folders named with the abbreviation of the
language (FRA for French, ING for English, ITA for Italian ….)
inside which all language sensitive files are saved:
Inside the …\DB folder are found the data relating to each
individual manufacturer subdivided into subfolders.
It is possible to choose an alternative path in which to insert the
manufacturers’ folders, using the Configuration window, by
selecting a new address at Database and Media (for a more
detailed explanation see the Configuring Liswin chapter).
•
Parts of catalog, certificates, etc. (in .PDF format)
•
Product texts, etc. (in.RTF or .DOC formats)
A Litepack folder inside which the OXL files are saved
the general lighting device data
the lamps data, including color
the dimensions and, if available, 3D file of the
luminaire
data (technical and commercial) related to
the individual products
links to external documents (photometries,
images, texts)
The technicaI data (catalog and photometries) of
the individual manufacturers present as Plug-ins,
are updated using the various search options
found in the Liswin module (for a more detailed
explanation see the chapters concerning data
updating and search).
If the products you intend using are not present in
the Plug-ins, but you wish anyway to prepare a
catalog of your own, the Lisdat module should be
used to manually insert the data and link the
photometries.
Plug-ins and data entered by the user occupy the
same database however, thus allowing cross
researches.
Page 15/44
Product List
Notes
For insertion, linking of catalog with the
photometries and product modification please see
the Lisdat manual.
The Product List shows in table form the list of
products present in the local database (that is present
in the user’s computer) of the program.
The fields belonging to the Product Lists are:
It should be underlined however that the data
entered directly by the manufacturing companies
will not be modifiable, but will only be viewable in
the various data sheets (for a more detailed
explanation please see the chapter: Creating and
managing a data sheet).
New, this indicates if the product has recently
been updated
FOT (Photometry), this indicates if the product
has one or more connected photometries (OXL
file)
Code, indicates the article code
Product, indicates a synthetic description of the
product
Any of the columns of the Product List can be put in
order by pressing on one of the column titles: the
program proceeds automatically to put that column in
alphabetical order starting from A or Z (by repeatedly
clicking) considering it as the active column.
To scroll the list just:
•
click on the scroll bar, situated on the right
•
select a product and move with the arrows
(up/down) on the keyboard
The triangle beside the title indicates the direction of
the order:
The section that includes details of technical and commercial data is subdivided
into groups according to the type of data. To move from one group to the other
use the TABS which are in order (Luminaires case):
General Data, such as commercial information (code, product description,
list price …)
Electrical Parameters, such as lamp data, insulation class, any
information about batteries
Mechanical Parameters, such as IP degree, surface exposed to the wind,
IK degree
Photometric Parameters, such as list of measurements associated with
the product
from greatest to least
Norms and Marks, such as the list of norms applied to the product and
conformity marks
from least to greatest
Texts and notes associated with the product
Page 16/44
In the case of lamps, the TABS are reduced to
General Data, Electrical Parameters, Norms and
Marks, Texts.
Product List
Available functions
Notes
To make a column active, just click inside the list
on the column to be activated.
A product can be searched for directly in the list by
typing part of the code or of the description in the bar
situated under the Product List and clicking with the
left mouse button on Find.
The program will proceed to highlight with a blue strip
the first result of the search, inside the Product List.
Once the first product has been found, in order to
ensure that the search is applied to subsequent
products, just click on the arrows (up - down) situated
on the right of the search line.
The products selected in the list are highlighted with a blue line. To select a product just click with the left mouse button on the line with
the product whose characteristics are required. Once it has been highlighted, all the TABS and images will automatically update.
When the product has been selected, there are further operations that can be performed, such as:
Visualize the relative data sheet, by clicking twice with the left mouse button on the product
Open a rapid choice menu, by clicking with the right mouse button, from which various operations may be selected (for a description
of the available commands please see the chapter Dropdown menu bars – Functions Menu)
Find a product, by clicking inside a column and typing the first identifying characters of the product itself (code or description). The
program will automatically go to the first of the products that corresponds to the inserted characters. The characters found will be
highlighted and the selection bar (blue) will move onto the searched product
Page 17/44
Local product search
Notes
Liswin allows three types of local product search, that
is from the data present in the database
(Oxydata.mdb) saved on the computer or the user’s
local network:
The (Oxydata.MDB) database is found in the
program data folder …\Docs\DB.
List Search
described in the previous paragraph
Using the Configurations window it is however
possible to choose another path, in which to save
the file (for a more detailed explanation see the
Configuring Liswin chapter).
Tree Search
Parametrical search
as described below
Tree Search
The three-level product tree search allows a product
to be searched by selecting the characteristics step
by step, following a pre-established “tree” structure
on thee levels, i.e.:
Product type (Type or Manufacturer type)
IP protection grade
Power
Clicking on the respective icons (figure below), opens
or closes the subsequent levels. Once the last level
has been visualized, selecting with the left mouse
button one of the available codes automatically
visualizes the product (highlighted in blue) in the
product list alongside.
The first three icons situated above the search list allow the three different
levels available to be opened or closed (e.g.: by clicking on the first icon, only
the first level will be visualized).
The fourth icon instead opens/closes all levels.
The fifth icon allows you to choose which description to visualize in the first level
whether:
Type
Manufacturer type
Page 18/44
The Type (product) represents the type of
luminaire or lamp, in a general sense. In the
insertion phase this data is selected in a fixed list
that cannot be modified by the user. Being a
unique field for all manufacturers, it therefore
allows the data to be cross-referenced during
search.
The Manufacturer type instead represents an
identification description of the luminaire directly
inserted by the manufacturer. It is therefore not
unique for all manufacturers.
Local product search
Local Parametrical Product Search
Notes
The lists of the dropdown search fields are
updated using the DBfilter, which can be activated
in the File/Activate Filter menu.
With Liswin you can search for products that are
present in the database using a parametric table, in
which to set the technical/commercial characteristics
of the articles required.
For access, select the command Local Parametrical
Product Search:
•
in the icon bar
•
in the Data menu
The window that appears is made up of 3 parts:
an upper part with the function icons and
indication of the total number of products found
after the search
a part in the central area with the TABS
corresponding to the various parameters that
can be configured for the search. There are two
types of fields available for the search, that are:
•
•
Fixed fields (fixed choice fields from list):
these are non editable fields for which it is
possible to select the description of a
predefined list such as, for example, the
color field
Free fields: these are editable fields for
which a numerical description can be
entered
a lower part in which the fields set for the search
are shown
The file is found in the data destination folder
…\data\lmdata.
The icons associated with the window have the following functions:
Clear: clears previously defined fields
Apply: carries out product search on the basis of the parameters set in
the local database
Apply to Previous: carries out a further search on the same set of
products found after specifying other parameters
Close: allows you to exit the window and return to the main window
The parameter definition window shows several buttons which, if
pressed, reveal the symbols ‘=’ – ‘>’ – ‘<’ – ‘<=’ – ‘>=’ . These buttons
are useful when searching for all products with the same value (=) as
the selected parameter or that have greater (>), lesser (<), greater and
equal (>=) or lesser and equal (<=) values
Page 19/44
By positioning the mouse on the icon, a short
description of the command will be visualized.
Local product search
On the operational level, to configure a search among the products saved on the local network it is necessary to:
Notes
return the fields to zero, by clicking on the Clear icon
define the search parameters via the different sections (TABS) of the window.
There are two types of field available, dropdown, in which to select the parameter on the basis of a predefined list, or entry field,
usually numerical. For example:
•
Manufacturer: Goccia Illuminazione (in the Manufacturers TAB)
•
Voltage V: 230 (in the Electrical Parameters TAB)
if an incorrect parameter is entered in the fixed dropdown search fields, delete it by clicking twice on it with the mouse
launch local search on the basis of the parameters set, by clicking on the Apply key
the total number of products found will be visualized in the Products found section
define further search parameters should the search not be exhaustive, as in point two
launch a further local search, by clicking on the Apply to Previous key
exit the fields and search definition window, to visualize the products found in the Product List section of the main window
Clicking on the arrow situated at the bottom right
visualizes the summary of the fields being used to
perform the search.
Page 20/44
Data search and Update via Web
Internet Parametrical Product Search
Notes
The lists in the dropdown data fields are updated
using the DBfilter, which can be activated in the
File/Activate Filter menu.
With Liswin it is possible to update the products via
Web (cross-referencing the data of different
manufacturers), by means of a parametric table, in
which the technical/commercial data of the searched
articles are to be set.
For access select Internet Parametrical Product
Search:
•
in the icon bar
•
in the Data menu
The file is found in the data destination folder
…\data|lmdata.
Clicking on the arrow situated at the bottom right
visualizes the summary of the fields being used to
perform the search.
The window that appears is made up of 2 parts:
an upper part with the function icons and
indication of the total number of products found
after the search
a lower part with the TABS corresponding to the
various parameters that can be configured for
the search. There are two types of data fields
available for the search, that are:
•
•
The icons associated with the window have the following functions:
Clear: clears previously defined fields
Fixed fields (fixed choice fields from list):
these are non editable fields for which it is
possible to select the description of a
predefined list such as, for example, the
color field
Plug-in Update via Web (ECOD): carries out search via Internet on
the defined search parameters
Free fields: these are editable fields for
which a numerical description can be
entered
The parameter definition window shows several buttons which, if
pressed, reveal the symbols ‘=’ – ‘>’ – ‘<’ – ‘<=’ – ‘>=’ . These buttons
are useful when searching for all products with the same value (=) as
the selected parameter or that have greater (>), lesser (<), greater and
equal (>=) or lesser and equal (<=) values
Close: allows you to exit the window and return to the main window
Page 21/44
By positioning the mouse on the icon a short
description of the command will be visualized.
Data Search and Update via Web
Notes
On the operational level, to configure a search via Web it is necessary to:
The updating window shows the option ‘Show
operation log’ which, if selected, visualizes the
operations performed during the data download
phase.
return the fields to zero, by clicking on the Clear icon
define the search parameters via the different sections
(TABS) of the window.
There are two types of field available, dropdown, in which to
select the parameter on the basis of a predefined list, or entry
field, usually numerical. For example:
•
Manufacturer:
Goccia
Illuminazione
(in
the
Manufacturers TAB)
•
Voltage V: 230 (in the Electrical Parameters TAB)
if an incorrect parameter is entered in the fixed dropdown
search fields, delete it by clicking twice on it with the mouse
select the Plug-in Update via Web (ECOD) icon to access the
data download via Internet management window (image on
the right)
The window shows four options which may be selected with a
mouse click in the square to the side:
•
Download connected texts, to download the texts
connected with the individual products
•
Download connected images, to download the images
connected with the individual products
•
Download everything without asking, to download
everything without confirmation request (if not, in the log
window nearest the bottom, the program shows the total
number of products to be downloaded and waits for
confirmation before proceeding)
•
Confirm every update, to confirm each download. If this
is selected it will be necessary to confirm each individual
product
•
Accessories Download: to download the accessories
linked to the luminaires
•
Lamp images Download: to download the images
linked to the luminaires
press Forwards to continue data download, press Cancel
instead to exit the function
once update has been started, press Cancel to interrupt the
update and End to exit the module
instead press Skip, if you wish to skip a manufacturer’s
update. For example if the products have been searched by
defining the Power field, using the Skip key it is possible to
skip those manufacturers whose products present that power
but are not of interest
once update is complete the program shows the list of
products found and downloaded in the Product List in the
main window
Page 22/44
Data Search and Update via Web
Manufacturer WebCatalog
Notes
The Drag&Drop function allows you to drag the
object from one program module to another,
selecting the product with the left mouse button
and, keeping it pressed, dragging it to its final
destination (for a more detailed explanation see
the Litecalc manual).
To access the search via internet window select WebCatalog:
•
in the icon bar
•
in the Data menu
The icon directly opens the WebCatalog, that is the Interactive
Electronic Catalog via Internet, of the manufacturer, whose logo is
visualized in the Liswin list.
By clicking on the Select WebCatalog
icon, instead of accessing the
WebCatalog of the manufacturer,
access is gained directly to the
general WebCatalog
At this point it is possible to search for products by means of the
WebCatalog search functions (please see the manual related to the
WebCatalog), and then perform Drag&Drop of the product image
directly in the main Liswin window. All available data will be
transferred to the local database and the product will appear in the
Product List in the main window.
Selecting the image, it is possible to
drag the product into the list with
Drag&Drop
Page 23/44
Data Search and Update via Web
Automatic data update check
Notes
This function allows you to search for any product
updates relating to the selected manufacturer
For access select Automatic data update check:
.
•
in the icon bar
•
in the Data menu
Once the window is open, just select the desired
manufacturer in the dropdown menu and click on the
icon on the top right.
This will launch the management window for data
download via Internet, described in the chapter
Parametric product search via internet, by means of
which the data will be downloaded in the list.
The icons associated with the window have the following functions:
Plug-in Update via Internet (ECOD): this carries out the search via
Internet on the search parameters set
Close: this allows you to exit the window and return to the main
window
Page 24/44
Data Plug-in
Data Plug-in Import
Notes
The lists in the dropdown data fields are updated
using the DBfilter, which can be activated in the
File/Activate Filter menu.
With Liswin it is also possible to update the products
directly with the manufacturers’ plug-ins both locally
(that is with a file from CD or DVD), and via Web.
To access the search window select Data Plug-in
Import:
•
in the icon bar
•
in the Data menu
The window that appears is made up of 2 parts:
an upper part with the function icons and
indication of the total number of products found
after the search
a lower part with the TABS corresponding to the
various parameters that can be configured for
the search. There are two types of data fields
available for the search, that are:
•
•
Fixed fields (fixed choice fields from list):
these are non editable fields for which it is
possible to select the description of a
predefined list such as, for example, the
color field
Free fields: these are editable fields for
which a numerical description can be
entered
In the case of data updates by means of local plugins, by setting the parameters of interest, only the
corresponding data will be imported
The file is found in the data destination folder
…\data|lmdata.
The icons associated with the window have the following functions:
By positioning the mouse on the icon a short
description of the command will be visualized.
Clear: clears previously defined fields
Plug-in Update via Web (ECOD): to access the WebOxy page
(www.oxytech.it) in which are shown manufacturer data and
instructions for downloading the Plug-ins. If the manufacturer has
already been selected in the Manufacturers TAB, the program shows
the relative sheet
Local Plug-in Updating (HD-CD-DVD): to update the date by
selecting a Plug-in on a local disk (when the update is supplied by the
manufacturer)
Close: allows you to exit the window and return to the main window
The parameter definition window shows several buttons which, if
pressed, reveal the symbols ‘=’ – ‘>’ – ‘<’ – ‘<=’ – ‘>=’ . These buttons
are useful when searching for all products with the same value (=) as
the selected parameter or that have greater (>), lesser (<), greater and
equal (>=) or lesser and equal (<=) values
Page 25/44
If certain fields have been defined in the Field
definition window, only products corresponding to
these parameters will be imported.
Creating and managing a data sheet
Notes
Liswin is equipped with a module for managing product data
sheets with which to view and print data, images and literature.
To access the data sheet management window, select Data Sheet:
The tool bar situated on the left of the sheet has the following
functions:
Language: this is a fixed choice field with which to select the
data sheet in one of the available languages
selecting the relative icon situated on the icon bar
Paging: the program has 5 different formats of graphic
paging for data sheets that can also be activated by clicking
on the spot to the left of each description
clicking twice with the left mouse button on the
selected product
Export in PDF: this allows you to export the data sheet in
PDF format to be viewed with ADOBE Acrobat Reader
selecting the product and activating the command
from the Functions menu
The data sheet window shows a series of commands in the upper
part and to the left and right.
In the upper part of the window appear the functions:
to scroll through the various pages of the document showing
the current page and total number
to manage screen zoom of the document by clicking on the
magnifying glass (zoom in - zoom out)
to select the type of visualization from the window by clicking
on the arrow alongside the magnifying glass
to launch printout of the document
The tool bar situated on the right of the sheet has the following
functions (for a more detailed description see the relative
paragraphs):
Data Sheet: visualizes the graph of the paged data sheet
Lamps: allows you to choose from the various alternatives of
lamps connected to the lighting device
Images: with this function you can choose the image to add
to the sheet
Accessories: allows you to print along with the data sheet
any accessories connected with the selected product
Extra Texts: allows customized text to be inserted in the
sheet
Documents: this allows selection of the texts in RTF linked to
the luminaire in the technical sheet
Page 26/44
Creating and managing a data sheet
Main screen
Notes
Printout language
selection menu
Upper bar with change
page, zoom and print
functions
Commands bar on
the
right
with
selection
functions
for lamps, images
and
associated
accessories, and for
insertion
of
customized texts.
To
access
the
windows click on the
relative TAB
Commands bar on the
left
with
selection
function of available
data sheet models. To
select the preferred
sheet just click the flag
on the left
Preview of product
printout
Page 27/44
Creating and Managing a data sheet
Lamps Window
This allows the selection of the lamps to be printed in the data
sheet, when there is more than one associated lamp. To select the
lamp click with the left mouse button in the square to the left of the
lamp to be selected. If no lamps are selected these fields in the data
sheet will remain empty.
Accessories Window
Notes
Here the accessories to be printed in the data sheet can be
selected, if the luminaire has any. To select the accessory click with
the left mouse button in the box on the left of the accessory.
In the Properties Window the following texts can
be inserted:
Images Window
A maximum of three images to be selected from those associated
(maximum ten) can be printed in the data sheet. The number of
images depends on what the graphic module (data sheet) you are
using foresees. To insert the image click with the left mouse button
in the box on the left of the image.
Properties Window
This allows the insertion of customized text to be printed in the data
sheet. To select the type of text to be inserted click with the left
mouse button in the box on the left of the string and type the text in
the spaces. In this way the descriptions inserted will be visualized
on returning to the data sheet.
Reference, this is the product reference
code as it is generally indicated on the
drawings
Product Type, this is the product type
defined by the designer, if it is considered
opportune to change that shown in the
General Data TAB – Liswin Type
Detailed Type, this is the more detailed
product type defined by the user
Specification
Description,
Settings,
Maintenance, these are the fields where the
lighting designer can input the notes
necessary to complete the data sheet
Product Sheet, Assembly Instructions:
where possible insert the product data and
instructions, or modify those inserted by the
manufacturers (if present).
Show log: to visualize or not the specific
data relative to the manufacturer and the
product.
Page 28/44
Creating a product list
Notes
The program allows the creation of product lists to be imported in the Lisman estimate module (for a more detailed explanation see the
chapter Creating a metric calculation).
Access the Product List command by means of:
To exit the command, just press again on the
Product List key.
the Product List icon situated in the
icon bar
the Functions menu
The icons present in the Product List window
allow:
When the command is selected the program
automatically opens the Product List window, on the
left of the screen.
At this point product selection in the main window is
possible by:
Deletion of the selected products in
the list window (to select a product
click on the description with the left
mouse button)
Clicking with the left mouse button on the
product
Selecting more than one product by keeping the
CTRL key pressed and at the same time clicking
with the right mouse button on the individual
products
Deletion of all the products saved in
the list window
Selecting a series of consecutive products
keeping the SHIFT key pressed and at the same
time clicking with the left mouse button on the
first and then on the last of the series
Once the items have been selected, there are two
possible operations for importing the selected
products into the Product List Window:
Press the right mouse button and select Add to
List
Click on the Add to list icon in the icon
bar
Page 29/44
Deleting products from the database
Notes
The program allows deletion from the local database of products of no interest. To definitively delete a product three steps are required
so as to avoid accidental or involuntary deletions.
Access the Product Deletion command by means of:
To delete a single product it is also possible to
select it thus gaining access to the
Functions/Delete menu, and then confirming the
deletion.
the Product Deletion icon situated in
the icon bar
the Functions menu
The icons present in the Product List window
allow:
When the command is selected the program
automatically opens the Product List window, on the
left of the screen.
At this point product selection in the main window is
possible by:
Deletion of the selected products in
the list window (to select a product
click on the description with the left
mouse button)
Clicking with the left mouse button on the
product
Deletion of all the products saved in
the list window
Selecting more than one product by keeping the
CTRL key pressed and at the same time clicking
with the right mouse button on the individual
products
Selecting a series of consecutive products
keeping the SHIFT key pressed and at the same
time clicking with the left mouse button on the
first and then on the last of the series
Once the items have been selected, there are two
possible operations for importing the selected
products into the Product List Window:
Press the right mouse button and select Add to
List (as shown in the illustration on the right)
Click on the Add to list icon in the icon
bar
To definitively delete the products from the list it is necessary to select
the Delete Selected Products icon and then confirm
Page 30/44
Exporting an OXL/OXC
Notes
The program allows the creation of the product lists and their export as files in HML format, where all data relating to the product are
inserted (technical data, images, photometries, etc.). If the product is exported complete with photometry the extension of the exported file
will be .OXL; if the file is without photometry, the extension will be .OXC.
Access the OXC Export command by means of:
To exit the command just press again on the OXC
Export key
The OXL/OXC Export icon situated in
the icon bar
The icons in the Product List window allow you to:
When the command is selected the program
automatically opens the Product List window, on the
left of the screen.
At this point to select the products in the main window
you can:
Delete the selected products in the list
window (to select a product click on
the description with the left mouse
button)
Click with the left mouse button on the product
Select more than one product by keeping the
CTRL key pressed and simultaneously clicking
with the right mouse button on the individual
products
Delete all the products saved in the list
window
Select a series of consecutive products by
keeping the SHIFT key pressed and clicking
simultaneously with the left mouse button on the
first and then the last product of the series
Once the articles have been selected, to import the
selected products in the Product List window, two
operations are possible:
Press the right mouse button and select Add to
List
Click on the Add to list icon in the Icon
bar
Finally, after inserting all the products in the list, to export them into a folder that
will be chosen by the User:
click on the Export icon, situated at the top of the list
Page 31/44
Managing price lists
Price Lists Window
Notes
The program allows management of the price lists of the individual companies independently of the inserted catalog data. It is therefore
possible to integrate one or more lists in the catalog of a single manufacturer, also at a later time, as long as the codes of the products
available in the catalog correspond exactly to those in the list. On the contrary, the program module is not able to associate the prices
with the codes, because they do not correspond.
Access the Price List window by means of:
Certain fields in the list are editable by clicking
inside the field to be modified with the left mouse
button. By clicking for example on the List Num
column, above the line to be modified, a string can
be typed in.
the Price List icon situated in the icon
bar
the View menu
The open Price List window (as seen in the
illustration on the right) is made up of:
Instead, to modify the currency of a list that is
already available, click twice on the currency line
on the right of the window and select the new
currency.
an icon bar, situated at the top
a list of available
manufacturer
lists,
subdivided
by
The icons activate the following commands:
Import List: to import an external CSV file
Export List: to export a catalog in CSV file
Update: to associate a price list to the
corresponding catalog: useful when there is
more than one price list available from the
same manufacturer
Delete List: to cancel the selected list
The list instead is made up of the following fields:
Manufacturer Data: where the name of the reference manufacturer is
indicated (the field is not modifiable)
Price List Nr: where the list number is indicated. This field is important if
more than one list of a manufacturer is inserted, since it can identify for
example the year of reference (modifiable field)
Currency: where the currency is indicated (modifiable field)
Page 32/44
Managing price lists
To export/import a price list
Notes
To create a new list it is always advisable to start from the catalog data that has already been inserted, in order to avoid making
involuntary errors regarding the uniqueness of the product codes.
On the operational level, to create a new price list it is necessary to:
select a manufacturer’s list by clicking on the line with the left
mouse button, thus highlighting it in blue
export the selected list in an external file in CSV format, by
pressing the Export List key. In this case it will be necessary
to define the path in which to save the exported file
open Excel (as in the illustration below) and insert the
modifications to the file such as adding prices or changing the
distributor code
save the modified file again in CSV format and quit Excel
The CSV file consists of two types of fields:
import the modifications, by pressing the Import List key. To
perform this operation, the manufacturer’s list, inside the list,
must remain selected
Fixed, that is that must not be modified, for example:
activate the modifications by pressing the Update key
•
Producer
•
Product Code
•
Product Description
•
Currency
Editable, for example:
•
Price
•
VAT
•
Discount
•
Distributor Code
Page 33/44
The values entered in the VAT and Discount fields
will be visualized and used in the estimates
module Lisman, to create metric calculations and
offers.
Managing currency
Notes
Liswin offers a function with which to define the currency in which you intend to manage product prices.
Access the Currency window by means of:
the Currency icon situated in the icon bar
the View menu
On the operational level to configure a currency it is necessary to:
select the currency to be used
press the icon to activate the selected value. In this way the
value line becomes red
press X to quit the window, the selected currency will at this
point be active
The icons associated with the currency management window have
the following functions:
To modify the conversion factor just click inside the
field (which will become green) and type in the
new value.
To activate the selected currency
Page 34/44
Estimate Module (creating a metric calculation)
Introduction
Notes
Liswin includes the estimating function for managing the metric calculation of a project. The module handles the functions of
creating estimate projects made up of sub-projects (as in the case of offices featuring a number of rooms), either autonomously or by
importing project lists from Litecalc and/or from Liswin
creating estimates and offers that can be exported in CSV format (compatible with Excel)
The module can be accessed by means of:
the Estimates icon situated on the icon bar
Access to the
other modules
Dropdown menu
bar
Icon bar
Project line and
sub-project icon
bar
Product
TAB
Product List
data
Product
management icon
bar
Page 35/44
Lisman Estimate Module (creating a metric calculation)
Dropdown menu
Notes
Project Menu
For all operations connected with general project management
New: to create a new project
Open: to open a project saved in a folder
Save: to save the project
Save as...: to save the project with a new name
Close: to close the project
Properties: to open the project properties
OXY Desktop:
Sub-Project icon bar
For operations related to estimates and list management
Sub-project: to visualize the list of sub-projects
New: to create a new sub-project
Configuration: to access the sub-project configuration window
Select: to include or exclude the sub-project from the printout of the product list offer
Eliminate: to eliminate the selected sub-project
Print: to visualize and print the offer related to the visualized sub-project
Import from Liswin: to import a product list that has previously been created in Liswin
Import from Litecalc: to import a product list from a previously saved Litecalc project
Page 36/44
Lisman Estimate Module (creating a metric calculation)
Notes
Budget Menu:
Documents: to view the product lists inserted in the active sub-projects
Offer Menu
For all operations connected with offer management
Properties: to insert and modify the identifying data of the offer
Documents: to view the lists of sub-projects present in the offer
Links Menu
To access the other program modules of
Lighting Engineering Calculation (Litecalc)
To access the other program modules you can
also click on the relative icons situated in the icon
bar on the top left
Photometry Management (Photoview)
Catalog Data Management (Lisdat)
Contacts: to open the contacts window present in Windows
Currency: to open the window relative to the currency (for a more detailed explanation see
the chapter Currency Management)
Page 37/44
Lisman Estimate Module (creating a metric calculation)
Icon bar
Notes
The icons activate the following commands:
New: to create a new project
Open: to open a project that was previously created and saved in the archive
Save: to save the current project
Close: to close the current project
Printout: to visualize the print preview of the product lists
Properties: to access the properties of the current offer
Offer Printout: to visualize the print preview of the offer
Currency: to select the currency to be used in the offer
Configuration: to access the program configuration management section
New: to create a new sub-project
Sub-Project properties: to access the properties of the current sub-project
Select: to include or not the sub-project in the general offer
Eliminate: to eliminate the project
Page 38/44
Lisman Estimate Module (creating a metric calculation)
Notes
Sub-project printout: to visualize the print preview of the sub-project
Import from Liswin: to import a product list previously created by Liswin
Import from Litecalc: to import a project from Litecalc
Move up: to move a product upwards in the list
Move down: to move a product downwards in the list
Add: to add a product created by the user to the list
Eliminate: to eliminate the selected product
Copy: to copy the selected product
Add lamps: to add lamps and accessories of the selected product to the list (if present)
Page 39/44
Inserting a new project / sub-project
To begin operating you must select the Project/New menu. Should
you instead wish to open a previously created project you must
select Project/Open (or the relative icon in the icon bar)
In this way the cursor will move onto the line relating to the project,
so as to edit the name.
Notes
Press the Configuration key, in the sub-project icon bar, to open
the sub-project properties window where you can:
Edit the project name
Edit a short description
Include using a flag the sub-project in the general offer
Edit notes at the top or bottome of the page
Finally press Ok to return to the main window.
At this point by selecting the New icon, in the sub-project icon bar
a new sub-project will be created, into which you can import the
Liswina and Litecalc product lists or insert new products.
Page 40/44
A sub-project means a sub-area that makes up the
project as a whole, i.e. area 1 of project A (for
example if you want to divide up the offer by
reference areas).
An infinite number of sub-projects can be created
in a general project which can then be included or
excluded from the offer.
Lisman Estimate Module (creating a metric calculation)
Importing project lists from Litecalc and Liswin
Notes
To import a list of luminaires inserted in a Litecalc project you must
Click on the Import from Litecalc icon situated in the subproject icon bar
This will open a window in which to select the .XML file relative to
the project to be imported. The .XML file will be automatically
saved in the LITESTAR 4D/Docs/ImpExp folder, saving the project
file.
To create a list of products in Liswin see the
Creating a product list chapter.
To import a previously created list of products from the Liswin
module you must:
Click on the Import from Liswin icon situated in the subproject icon bar
The list will in this way be automatically added to the sub-project
and visualized in the list.
If, when importing a list, the program recognizes codes already
present in the sub-project, the window alongside will appear,
allowing you to select one of the following operations:
Ignore: so as not to import the product again
Ignore All: so as not to import all the products again
Substitute: to substitute the product for the existing one
Substitute All: to substitute all the products for those already
present
Sum Quantities: to sum the quantities of the individual
product with those already present
Sum All: to sum all the quantities
Page 41/44
Lisman Estimate Module (creating a metric calculation)
Managing the product lists manually
Notes
When the window has been closed it is possible to
access it through the Sub-project/Modify menu, or
by clicking twice on the relevant sub-project in the
general list.
In the main window the following may be modified:
all the data when the products have been inserted by the
user,
some data, characterized by the white fields (discount, price,
quantity, VAT, units) when the products are imported and
belong to a manufacturer catalog.
To modify a product just select it from the list (on the left of the
window). The selected product will be highlighted in blue.
To import the products from Liswin or Litecalc see the previous
chapter. To manage or insert new products manually instead the
icons situated vertically beside the list must be used
To move an element up or down the list.
To add a new element (+) or eliminate one (-).
Addition of a new element is effected using the code
insertion window: when confirmation is given by
pressing Ok the new product is added to the list and
it will be possible to complete its data using the fields
to be found on the right of the window.
To access the product lamps and accessories
selection section (if the product comes from Liswin).
When one or more accessories-lamps have been
selected they are automatically added to the list.
By clicking on:
Product Sheet it will be
possible to access the technical
sheet of the selected product, if
inserted in the Liswin module;
Modify it will be possible to
modify the text relating to the
product, if present and linked
Page 42/44
Clicking on the key beside the Discount field
opens a window where the offer discounts can be
managed.
Lisman Estimate Module (creating a metric calculation)
Visualizing the list relative to the sub-project
Notes
The offer will include all the sub-projects for which
the Include in the offer field has been flagged while
completing the properties.
Click on the Sub-project/documents menu to access the print preview
of the report relating to the selected sub-project.
In this window you can:
select the print language using the dropdown menu on the top left;
scroll the pages, enlarge and print using the icons on the top left;
select the type of document view by clicking beside the
Calculation or List fields;
export the document in .pdf, by clicking on the Export in PDF key;
export the document in .csv, by clicking on the Export in CSV
key.
Click on the Properties TAB on the top right to select the data to be
printed in the list:
Scrambled: to scramble the product code;
Hide code: so as not to visualize the product code;
Discount: to view the discount applied;
Images: to view the images in the calculation if present;
Documents: to print the documents linked to the individual
products if present;
ECORaee: to print the ECORaee contribution.
Clicking alongside Data Sheet Printing will activate the window in
which you can choose the model of data sheet to be printed with the
list, if the product comes from the Liswin module. Finally by clicking
alongside Only Print Sheets only the data sheets linked to the
products, if present, will be printed.
Page 43/44
Lisman Estimate Module (creating a metric calculation)
Creating the offer
Notes
To view the print preview of the offer, click on the Offer/Documents
menu.
In this window you can:
select the print language, using the dropdown menu on the
top left;
scroll the pages, enlarge and print, using the icons on the top
left;
select the type of document visualization by clicking beside
the Mod.A or Mod.B fields;
select whether to print the ECORaee by clicking beside the
relative field;
select not to visualize the discount by clicking beside Hide
Discount;
export the document in .pdf, by clicking on the Export in PDF
key.
Selecting the Offer/Properties menu you can access the identifying
data window of the offer. The completed fields will appear in the
offer.
Page 44/44