1
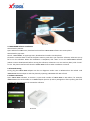
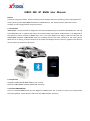
iOBD2 MFi BT BMW User Manual Preface Thanks for using this product. Please read this manual carefully before any operating. This manual guides the users how to operate iOBD2 BMW of Shenzhen XTOOLTECH Co., Ltd. Please read the important notices carefully on the last page before using the product. 1. Introduction iOBD2 BMW is a new practical car diagnostic tool that developed jointly by Shenzhen XTOOLTECH Co., Ltd and USA XTOOLTECH LLC. It supports iOS system and communicates with iPhone via Bluetooth. It can diagnose all the electronic control systems of BMW series cars. It can also diagnose the engine system of cars that are OBDII/EOBD compliant. iOBD2-BMW reads the recoding data by the client software on the smart phone. When the car is driving, it collects the data of all systems and displays them by charts or graphics. The data can also be shared on Facebook and Twitter. 2. Components Hardware: iOBD2 MFi BT BMW adapter, user manual Software: iOBD2-BMW software (Download manually) 3. Connect iOBD2 Adapter There is a standard OBDII16 pin port for diagnosis in BMW series cars. In most cars, the port is located under the steering wheel. Locate the port and insert the iOBD2 adapter. (Picture1) Picture 1 4. iOBD2-BMW Software Installation ●Download by website: Open website en.iOBD2.com; download and install the iOBD2 BMW software into smart phone. ●Download by app store: Search “iOBD2-BMW” in Apple app store, download and install it into the phone. Please do not delete data or format the phone memory card when you install the software, otherwise it may fail to run the software. When the installation is completed, click “Start” to run the iOBD2-BMW software (Please connect the Bluetooth before running this software, otherwise it can not read any data). Click “Finish” to exit. The phone interface will show the iOBD2-BMW shortcut when installation succeeds. 5. Bluetooth Setting Firstly, plug the iOBD2-BMW adapter into the car diagnostic socket. Turn on Bluetooth on the mobile. Find iOBD2-BMW device and pair it with the phone by inputting code 0000. Click OK to finish. 6. Software Activation Open iOBD2-BMW software, as Picture 2, input serial number of iOBD2-BMW in SN column, for example, iOBD2-30676. The serial number is on iOBD2 adapter (Picture 3) and its package box. After inputting the serial number, click Activate button to activate the software. Picture 2 Picture 3 7. Instruction of the Menu 【Connection】Identify the status of connection within iOBD2, the smartphone and the car. 【Diagnosis】 Automatically identify the systems of the car and diagnose the systems in detail. 【Service Reset】Special functions such as reset Oil Service Light, reset Front/Rear Brake, Reset Spark Plug, Reset Brake Fluid and so on. 【History】Review the saved diagnostic data of the tested cars. (Picture 4) Picture 4 8. Connection After connecting Bluetooth successfully, run iOBD2-BMW software in the smart phone. Then click [Connection] to select communication method, choose your car models and click save button to connect your car (Picture 5). Picture 5 【Sleep Mode】(Picture 6) When iOBD2 is power on for the first time, if it does not communicate with the car within Waiting Time, and battery voltage is below the Limiting Voltage, it will go to sleep mode. The default waiting time is 15 minutes. This parameter can be modified. When the battery voltage is below the Limiting Voltage and within 5 minutes there is no communication between iOBD2 and the car, iOBD2 will go into sleep mode. When the battery voltage is above the Limiting Voltage, it will wake up. The default Limiting Voltage is 12.6V. This parameter can be modified. When iOBD2 is connected with the car for the first time, you can diagnose the car within 15 minutes. If there is no any diagnostic operations over 15 minutes, iOBD2 will automatically go into sleep mode. Only when the battery voltage is above the Limiting Voltage, or the actual waiting time is shorter than the setting Waiting Time, can iOBD2 wake up. Picture 6 9. Diagnosis Click [Diagnosis], all the electronic control systems will display (Picture 6). Choose the one you want to test (Picture 7). You can also scan the status of each electronic control system and erase the trouble codes. The tested data can be saved and you can review the saved data in History menu. a Picture 7 Picture 8 Instruction of Function Buttons Erase all trouble codes Cancel erasing trouble codes Scan all electric control system Cancel scanning all electric control system There is trouble in this system There is no trouble in this system This system is not supported 【ECU identification】(Picture 9) Picture 9 【01- Reads trouble codes】Reads trouble codes and shows their detailed information. (Picture 10) Picture 10 【05- Clears trouble code】Clears all trouble codes (Picture 11,12) Picture 11 Picture 12 【08- Reads Data Stream】Reads all running parameters related to ECU system. (Picture 13, Picture 14, Picture 15) Picture 13 Picture 14 Picture 15 10. Service Reset The service reset functions are exclusive for BWM series cars. You can reset oil service light, front brakes, rear brakes, spark plugs, brake fluid etc. (Picture 16) Picture 16 【Oil service light reset】After changing the oil of the car, reset the oil service light. (Picture 17, 18, 19) Picture 17 Picture 18 Picture 19 Note: More reset options are available and will not explain here one by one. 11. History This function is to store and review the saved diagnostic data of the tested cars, such as live data, freeze frame data and my dashboard data. (Picture 20) Picture 20 12. Information Press click button and you can refer the information on connection setting, hardware and software version, serial number, and send the feedback (Picture 21). Picture 21 13. iOBD2 Universal Software Introduction Click the left “OBD2” button, and it will change to the OBD2 universal software. It can diagnose the engine system of all OBDII/EOBD compliant cars (Picture 22, 23). Picture 22 Picture 23 1) Function The [Diagnostic] functions include (Picture 24): Picture 24 [Trouble code]: Reads the current DTC with detailed information on reasons lead to the DTC and advice to repair the car. [Live data]: Reads all the running parameters related to the ECU. [Freeze frame]: ECU will set DTCs and record the data stream of the car engine at the moment when emissions related faults occurred. The data is called freeze frame data. [Readiness test]: Shows the status of readiness test. Click Readiness test in the menu, the screen will display the test status of the car. Supported and complete: It means the car supports this test and has completed. Supported but incomplete: It means the car supports this test but it is not yet completed. Unsupported: It means the car does not support this test. [Vehicle information]: Read vehicle info such as Vehicle Identification Number (VIN), Calibration IDs (CALID) and Calibration Verification Number (CVN). [O2 Sensor test]: This service is to allow access to the on-board oxygen sensor monitoring test results. The same information may be obtained by the use of [Mode 6 test]. [On-board Monitor Test]: To monitor the operation of the system of external device control panel. [Component Test]: Allowed to access a particular component / the diagnostic monitoring results of incontinuous monitoring system. E.g., the monitoring of the catalyst and evaporation system 2) My Dashboard [My dashboard] function includes: [Idle mode]: engine rotational speed, water temperature, battery voltage, air-intake temperature, instant fuel consumption (static), average fuel consumption (Picture 25). [Cruise mode]: vehicle speed, the current engine load, water temperature, vehicle traveled time, vehicle travel average speed, continuous running mileage, instant fuel consumption (dynamic) (Picture 26). [Sport mode]: engine rotational speed, vehicle speed, water temperature etc. (Picture 27). [Custom mode]: allows changing live data with preferred readings such as power, torque, horsepower, etc. (Picture 28). Picture 25 Picture 26 Picture 27 Picture 28 3) Performance test [Accelerate/Decelerate test]: Test acceleration/deceleration process time and distance. (Picture 29) [0 to 400m acceleration test]: Test spending time from 0 to 400 meters. (Picture 30) Picture 29 Picture 30 4) Performance Graph [Rpm - km/h] displays directly the vehicle's speed and the revolutions by curve (Picture 31) [Rpm - Nm - kW] displays the revolutions, torque and power by curve (Picture 32) Picture 31 5) Setting Picture 32 It allows users to set the language, connection, unit, and Alarm. In the vehicle setting, user can change parameters such as weight, fuel consumption coefficient, speed coefficient (Picture 33, 34, 35). Picture 33 Picture 34 Picture 35 6) History It is to save and review the recorded diagnostic data of the tested cars, such as live data, freeze frame data and my dashboard data. (Picture 36) Picture 36 4) Trip Route This function can track your driving route. Select Setting on the phone, choose Privacy, Open the Location Services, and turn on iOBD2 (Picture 37, Picture 38). Run the iOBD2 app, choose “My dashboard”, and start driving the car, it will automatically track the driving route and save it on History menu (Picture 39). When exiting “My dashboard”, it will stop tracking the driving route. You can review the saved tracking route in History menu. Picture 37 Picture 38 Picture 39 Cautions & Warnings: Please read following tips before you use iOBD2: Please plug the iOBD2 adapter correctly into your car by following the installation instructions before operating. When driving the car, please do not operate this unit. Any distraction may cause an accident. iOBD2 communicates with cars via Bluetooth. Please do not use this product in the places with strong electro-magnetic interference in order to ensure communication proper. All information on this manual is based on the latest iOBD2 version. XTOOLTECH reserves the right to make changes at any time without notice.