1
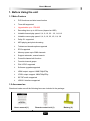
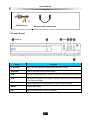
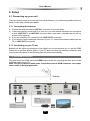
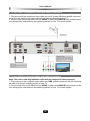
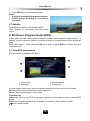
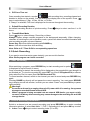
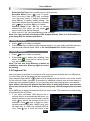
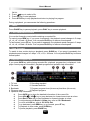
WARRANTY PROCEDURE
v1.5.2: DEC 2011
Please read the owner’s manual carefully and ensure that you have followed the correct installation and operating
procedures.
1.
2.
3.
Please read this warranty card.
Keep your purchase receipt to enable you to proceed quickly in the event of a Warranty Service.
If you require Warranty Service, please contact the TEAC Customer Support Hotline at 1300 553 315 for
assistance. Please ensure that you have the model number, serial number and purchase receipt ready when
you call.
Please complete the section below and keep this information for your own records.
Owner’s Name
Owner’s Address
Postcode
Model Name/No.
Serial No.
Dealer’s Name
Dealer’s Address
Postcode
Authorised Service Centres in Major Australian Cities
NSW
151 Arthur Street
Homebush West, NSW 2140
Queensland
Unit 1, 320 Curtin Ave West
Eagle Farm, QLD 4009
South Australia
11 McInnes Street
Ridleyton, SA 5008
Victoria
282 Normanby Road
South Melbourne, VIC 3205
Western Australia
Unit 2, 50 Pilbara Street
Welshpool, WA 6106
Thank you for selecting a TEAC product .
If you should require assistance with your product regarding its setup
or operation, or if any difficulties arise, please call us directly for advice
between Monday to Friday at 8.30AM – 6PM AEST at the
TEAC Customer Support Hotline
1300 553 315
[email protected]
www.teac.com.au
WARRANTY INFORMATION
v1.5.2: DEC 2011
Our goods come w ith guarantees that cannot be excluded under the Australian Consumer Law . You are
entitled to a replacement or refund for a major failure and for compensation for any other reasonably
foreseeable loss or damage. You are also entitled to have the goods repaired or replaced if the goods fail
to be of acceptable quality and the failure does not amount to a major failure.
Warranty Terms & Conditions
1.
TEAC warrants that this product is free from defects in material and workmanship under normal domestic use with
reasonable care and skill. Maintenance and cleaning (i.e. laser head) is not covered by this warranty. The TEAC
warranty only applies to TEAC products purchased, used and serviced in Australia.
2.
The benefits to the consumer given by this Warranty are in addition to other rights and remedies of the consumer
under a law in relation to goods or services to which the warranty relates, being the Australian Consumer Law.
3.
Refund or replacement via your retailer is available for a period of 14 days after purchase for goods that have been
inspected and determined to have a major failure. Refund and exchange is not applicable for change of mind.
4.
Subject to the terms herein, this warranty effectively covers the equipment as specified in the Warranty Periods
Table below from the date of purchase.
TEAC PRODUCT
LED/LCD TV 32” (80 cm) and above
All other TEAC products
5.
WARRANTY PERIOD
1 Year (In-Home Service/ Pick up Available)*
1 Year (Carry-in Service)
In Home Service/Pick up* Service
This service will only be provided as part of this warranty if all the following conditions are met;
a) The product is indicated in the Warranty Period Table.
b) The product is within the warranty period.
c) The product is located within the normal service area of the local TEAC Authorised Service Centre.
If TEAC determines that the product is not repairable on site, TEAC can complete the repair by taking the product to
a TEAC Authorised Service Centre.
Carry-in Service
Where In-Home service/Pick up* is not available, the purchaser is required to send the product to the nearest TEAC
Authorised Service Centre for repair. In this event, proof of purchase is required to support a warranty claim. After
the repair, the product will be available for collection by or return to the purchaser at a fee upon request. TEAC inhome service can be made available at a fee upon request.
6.
A 12-month replacement warranty is applicable to all Accessories such as Remote, Power Adaptors and Cables.
7.
TEAC will ensure to the best of its abilities that all required parts are made available for any required service/repair.
8.
TEAC Australia Pty Ltd and its Authorised Service Centres will use their best endeavours to complete product
repairs within a reasonable period based on available resources and workload during the time when service is
requested and performed.
9.
Refurbished parts may be used to repair the product. In the case of a replacement, the product may be replaced,
with a refurbished unit of the same type or, if one is unavailable, a similar refurbished model with equal or better
features & specifications.
10.
Please be advised that if the product presented for repair is capable of retaining user-generated data, the data may
be lost during servicing. Customers are strongly encouraged to back up all important information/data before
sending the product in for service/repair.
11.
Service will be provided only during normal business hours and under safety conditions and circumstances. TEAC
and its authorised service agents can refuse any repair if safety, in relation to OH&S, becomes a concern to its staff
or authorised service agents’ personnel.
12.
The warranty is void and warranty claims may be refused, subject to the Australian Consumer Law, if:
a) The product was not transported, installed, operated or maintained according to manufacturer instruction, or
b) The product was abused, damaged, tampered, altered or repaired by any unauthorised persons, or
c) Product failure is due to accidents during use, installation or transit, power surges, use of defective or
incompatible external devices, exposure to abnormal conditions such as excessive temperatures or humidity, or
entry of liquids, objects or creatures into the product.
13.
No one is authorised to assume any liability on behalf of TEAC or impose any obligation on it, in connection with the
sale of any equipment other than as stated in this warranty and outlined above.
14.
TEAC reserves the right to inspect and verify whether the product is exhibiting a major failure as claimed by
customers/retailers.
15.
LCD dead pixel policy, please contact TEAC Customer Support Hotline on 1300 553 315 for assistance.
Thank you for purchasing HDR2500T High Definition Digital Terrestrial Receiver.
This manual will help you to install, use and maintain the receiver. Please read this manual
carefully before operating your unit and keep it for future reference.
Warning & Note
In this manual, pay special attention to the following marks that indicate hazardous situations.
v Warning: Alert user to the operation which could result in device damage or data loss, and
the presence of a hazardous situation which could result in serious injury.
v Note: Remind user of presence of possible problems and information of any importance to
help understand, use and maintain the installation.
Note: The information in this user’s manual is subject to change without notice. The
photos and function explanations in the manual are for reference. If any discrepancy
exists, please refer to the entity.
User’
s Manual
Safety Instruction
Read following items carefully before operating this unit.
Installation
v Place the unit on a firm and level surface.
v The mains socket should be near the equipment. Do not run an extension lead to the unit.
v Install the unit in a place with:
good ventilation (leave no less than 10cm around this unit)
no heat source (burning candle, radiator, heater, fireplace, amplifier, etc)
suitable temperature
against humidity (especially bathroom, kitchen, etc)
no direct sunlight
low vibration
Maintenance
v Unplug this unit from wall outlet before changing connections between this unit and other
related equipment.
v Do not unplug or insert signal, audio and video cables when this unit is turned on.
v To avoid the risk of lightning strike, unplug power cord of the unit from wall outlet in lightning storm.
v Unplug power cord from wall outlet when the unit is not used for a long time or damaged
accidentally.
v If the unit is moved from a cold environment to a hot environment (and vice versa), leave
the power off from 1 to 2hours.
v To avoid the risk of fire or electric shock, do not expose this unit to rain, splashing and do
not place objects filled with liquid on this unit.
v Do not cover vents of this unit with newspaper, table cloth, curtain, etc.
v Do not put heavy objec ts on this unit.
v Unplug power cord of this unit from wall outlet before cleaning. To reduce damage, clean
this unit with dry cloth. Do not let liquid and spray flow into this device to avoid serious
damage.
v There is dangerous voltage in product enclosure. Do not remove the cover (or back) to
avoid the risk of fire or electric shock.
Power Socket and Power Cord
v Power socket should be available near the receiver and well grounded.
v Do not insert or pull out power cord with wet hands to avoid electric shock or fire.
v Do not use damaged power cord. If power cord is damaged, contact your local operator for
replacement to avoid risk of fire or electric shock.
v Do not excessively bend power cord, and do not place heavy objects on it, which could
cause damage, electric shock or fire.
RCU Battery
v Batteries should be installed in accordance with the (+/-) markings on battery compartment.
v Remove batteries if RCU is not be used for a long time.
v Replace batteries if there is not enough power and dispose of battery waste properly for
I
User’
s Manual
environmental protection.
Others
v The all-pole power switch of this unit is on rear panel. Switch it to “I”,related equipment will
connect with power supply. Switch it to “o”, related equipment will disconnect with power
supply completely.
v Only use accessories specified by the manufacturer, as other unsupported accessories
may cause damage to the unit.
v Never open the digital unit casing under any circumstances, otherwise the warranty will be
void.
v Refer all servicing to a qualified service technician.
Symbols on the unit
This mark appears on rear panel of this receiver, painted prominently in contrasting color to
background. It consists of two graphical symbols and warning messages. The detailed spec ifications are as follows:
Warning: To reduce the risk of electric shock, don’
t remove the cover (or
back). Equipment service and maintenance should be undertaken by
qualified personnel.
This symbol alerts user to the presence of un-insulated “dangerous voltage” in the product enclosure that is of sufficient magnitude and will constitute risk to person.
This symbol reminds user of presence of important operation and maintenance instructions in literature accompanying this unit.
II
User’
s Manual
Contents
1. Before Using the unit......................................................................................................... 3
1.1 Main Feature ............................................................................................................... 3
1.2 Accessories ................................................................................................................. 3
1.3 Front Panel .................................................................................................................. 4
1.4 Remote Control Unit (RCU) ......................................................................................... 5
1.5 Rear Panel................................................................................................................... 8
2. Setup ................................................................................................................................... 9
2.1 Connecting up your unit............................................................................................... 9
2.2 Inserting batteries in RCU.......................................................................................... 12
2.3 Power on................................................................................................................... 12
2.4 Power on and check picture....................................................................................... 12
2.5 Active Standby & Passive Standby ............................................................................ 12
3. Basic Operation................................................................................................................ 13
3.1 Channel Switch.......................................................................................................... 13
3.2 Volume Control .......................................................................................................... 13
3.3 Program Information.................................................................................................. 13
3.4 Channel List............................................................................................................... 14
3.5 Audio Selection.......................................................................................................... 14
3.6 Teletext...................................................................................................................... 14
3.7 Subtitle....................................................................................................................... 15
4. Electronic Program Guide (EPG)..................................................................................... 15
4.1 View EPG Information ............................................................................................... 15
4.2 Schedule Program using EPG ................................................................................... 16
4.3 EPG Sort ................................................................................................................... 16
5. Personal Video Recording (PVR) .................................................................................... 16
5.1 Set Storage Device.................................................................................................... 17
5.2 Set Recording Parameter .......................................................................................... 17
5.3 Quick Recording........................................................................................................ 18
5.4 Schedule Recording.................................................................................................. 19
5.5 Playback File ............................................................................................................. 20
5.6 Edit Recorded File ..................................................................................................... 23
5.7 Time Shift................................................................................................................... 24
5.8 Shortcut Key for PVR................................................................................................. 25
5.9 Hard Disk (HDD) Management .................................................................................. 25
6. USB Application................................................................................................................ 26
6.1 MP3 ........................................................................................................................... 26
6.2 Digital Photo .............................................................................................................. 26
6.3 Uninstall USB............................................................................................................. 26
7. Channel Search................................................................................................................ 27
7.1 Advance Frequency Edit............................................................................................ 27
7.2 Search Type .............................................................................................................. 27
8. Channel Edit...................................................................................................................... 28
8.1 Delete Channel .......................................................................................................... 28
8.2 Lock Channel............................................................................................................. 28
8.3 Move Channel ........................................................................................................... 28
8.4 Set Favorite Channel................................................................................................. 29
9. System Setting.................................................................................................................. 29
1
User’
s Manual
9.1 Display Settings......................................................................................................... 29
9.2 AV Settings ................................................................................................................ 29
9.3 Factory Default.......................................................................................................... 30
9.4 Modify Password....................................................................................................... 31
10. Software Upgrade ........................................................................................................... 31
11. Information...................................................................................................................... 32
11.1 Channel Information................................................................................................. 32
11.2 System Information.................................................................................................. 32
12. Appendix......................................................................................................................... 33
12.1 Menu Map................................................................................................................ 33
12.2 Trouble Shooting...................................................................................................... 34
12.3 Specification ............................................................................................................ 35
12.4 Acronym................................................................................................................... 36
2
User’
s Manual
1. Before Using the unit
1.1 Main Feature
Ø
PVR functions and twin tuner function
Ø
Time shift supported
Ø
Upgradeable up to 1TB HDD
Ø
Recording time: up to 100 hours (depend on HDD)
Ø
Variable forward play speed: 2, 4, 8, 16, 32,1/2, 1/4, 1/8
Ø
Variable reverse play speed: 2, 4, 8, 16, 32, 1/2, 1/4, 1/8
Ø
Dolby 5.1 supported
Ø
MP3 playing and photo browsing
Ø
Teletext and closed caption supported
Ø
EPG supported
Ø
Memory space up to 5000 channels
Ø
Support automatic, manual search
Ø
Powerful channel edit function
Ø
Favorite channel groups
Ø
PAL/ NTSC supported
Ø
Software upgrade supported
Ø
HDMI output: support 1080i/720p/576p
Ø
YPbPr output: support 1080i/720p/576p
Ø
S/P DIF audio supported
Ø
USB 2.0 interface supported
1.2 Accessori e s
Check and make sure all the following items are included in the package.
User’
s manual (1)
Remote control unit (1)
3
Battery (2)
User’
s Manual
RCA cable (1)
RF m ale to RF female loop
cable
1.3 Front Panel
Name
Function
1. STAND BY
Switch the unit between operation and standby modes.
2. SENSOR
Receive infrared remote control signal
3. USB
Connect USB devices like a memory stick or an external hard disk drive.
4. VOL
Decrease or increase the volume, change values for menu options or
move cursor left/right
5. CH
Switch to previous or next channel, or move cursor up/down
6. MENU
Display main menu
7. OK
Display channel list or confirm operation
4
User’
s Manual
1.4 Remote Control Unit (RCU)
Learning keys
1. TV POWER,
, TV/AV , SET: These
keys (except SET key) can be programmed to
learn the corresponding TV function. After that,
you can control basic TV functions using the
unit’
s RCU. Refer to page 7 Learning Key for
more details.
The keys of the STB
2. STB POWER: Switch the unit betw een operation and standby modes. In standby mode,
the unit will still record if there is a scheduled
recording. Refer to 2.5 Active Standby and
Passive Standby for more details.
3. AUDIO: Display audio selection window.
4. MUTE: Mute/restore sound.
5. 0-9: Number keys are used to enter a channel
number for changing channels or to specify
values for menu options.
6/7. P+/-: Down/up pages .
8. LAST: Switches between the current channel
and the previously viewed channel.
9. INFO: Press once to display current and
following program. Press twice for detailed information on current program.
10/14. CH: Switch to previous or next channel,
or move cursor up/down.
11/12. VOL: Decrease or increase the volume,
change values for menu options or move cursor
left/right.
13. OK: Display channel list (See 3.4 Channel
List), or confirm operation.
15. MENU: Display main menu.
16. EXIT: Back to previous menu or exit from
operation.
17. EPG: Display Electronic Program Guide
(EPG).
18. FAV: Display favorite channel list.
20. TEXT: Display teletext information.
22. CC: Switch on/off subtitle.
5
User’
s Manual
The keys of PVR
11. VOL : Small jump backward when playback.
12. VOL : Small jump forward when playback.
19. LIST: Display recorded file list (see 5.5 Playback File).
21. PVR: Display shortcut key window (see 5.8
Shortcut Key of PVR).
23. PREV: Skip backwards while playing back.
24. NEXT: Skip forward while playing back.
25. SET MARK: Set bookmark on playback
process bar.
26. PLAY MARK: Jump to next bookmark on
playback process bar.
27. PLAY: Return to play at normal speed.
28. RECORD: Record current program or display
recording information.
29. PAUSE: Pause live television or playback of a
recorded file.
30. STOP: Stop playback or recording and return
to live television.
31. REW: Start reverse playback in fast motion.
Subsequent presses increase the rewind speed
(x2, x4, x8, x16, x32).
32. TIMER RECORD: Display schedule window
(see 5.4 Schedule Recording).
33. FF: Start forward playback in fast motion.
Subsequent presses increase the playback speed
(x2, x4, x8, x16, x32).
34. SLOW: Start slow motion forward playback.
Subsequent presses change the playback speed
(x1/2, x1/4, x1/8).
The color coded keys are used for teletext and
some menu functions with on the screen description.
Notes:
• The keys mentioned in the manual refer to that on RCU except for special explanations.
• Please operate according to key instructions on screen.
6
User’
s Manual
Learning Key
The HDR2500T RCU has some learning keys at the upper left side. The keys (except SET key)
can be used to memorise corresponding key values of TV RCU. After learning, the HDR2500T
RCU can be used in correspondence with the TV.
The recommended keys for the HDR2500T RCU to learn from your TV RCU are as follows:
POWER, TV/AV , VOL+ and VOL-. The TV/AV identifiers vary with different types of TV RCU.
Instructions:
1. Hold down the SET key on the HDR2500T RCU
for about 2 seconds, the indicator status changes
from low light to high light, then release the SET
key.
2. Press a learning key on the HDR2500T RCU
(such as TV POWER key), the indicator light begins to flash slowly.
3. Aim the TV RCU at “receiving window” of the
HDR2500T RCU and press the corresponding key
on the TV RCU (such as POWER key) to be learnt.
The indicator light will begin to flash quickly, then
remain brightly illuminated indicating the learning
process has been successful.
4. Repeat step 2 and 3 to set other learning keys in
the same way.
5. After setting, press SET key to exit, and indicator
is off.
If the operation fails, please try again according to
above steps.
Notes:
• During setting, put the two RCUs on same horizontal surface and the space between
them should be within 5cm.
• If there is no operation in 10 seconds, the unit’s RCU will exit from learning mode
automatically.
• You can operate the learning function many times, but only the last one will be
saved.
• Some TV RCUs may not support this function.
7
User’
s Manual
1.5 Rear Panel
Name
Function
1. ANT IN1
Terrestrial broadcasting signal input socket for the first tuner.
2. ANT IN2
Terrestrial broadcasting signal input socket for the second tuner.
3. RS-232
Serial port used for software upgrade (authorized for qualified personnel).
4. YPbPr
Component video output socket, output YPbPr video signal to
TV(supporting high definition output).
5. CVBS
Composite video signal output socket for TV.
6. 100-240V ~
Power supply.
7. ON/OFF
Power switch.
8. LOOP OUT1
Terrestrial broadcasting signal output socket through the first tuner.
9. LOOP OUT2
Terrestrial broadcasting signal output socket through the second
tuner.
10. S/P DIF
Optical output socket for Dolby digital, output digital audio signal to
amplifier.
11. HDMI
Output high definition video and audio signal to TV.
12. R/L-AUDIO
Output right, left or stereo audio signal to TV or amplifier.
8
User’
s Manual
2. Setup
2.1 Connecting up your unit
There are several ways to connect up your unit as following. If you have any problem with your
setup or need help, contact your dealer.
2.1.1 Connecting the antenna
v Connect the antenna cable to ANT IN 1 connector on the rear panel.
v If there are two twin tuners built-in to your unit, you must ensure that there is a connection
to both LOOP OUT 1 and ANT IN 2 connector with a loop cable, otherwise the unit will not
work at its full capacity.
v If you hav e another unit, connect it from LOOP OUT 2 connector.
v If you want to receive analogue channels on your TV, connect the antenna cable from the
TV to LOOP OUT 2 connector.
2.1.2 Connecting to your TV set
Between all the follow ing connectors of the digital unit, we recommend you to use the HDMI
connection to get best picture quality. If your TV does not have the matching connector, then
use the next connection in the following order for better picture quality.
1. To use HDMI connector
Plug one end of the HDMI cable into HDMI socket on the unit, and plug the other end into the
matching socket on your TV.
Note: You do not have to make audio connection because HDMI connector can output
stereo audio or Dolby digital audio.
9
User’
s Manual
2. To use YPbPr (component video) and audio connectors
1. Plug one end of the component video cable into the Y (green), Pb (blue) and Pr (red) soc kets on the unit, and plug the other ends into the matching sockets on your TV.
2. Plug one end of the audio cable into the AUDIO L (white) and AUDIO R (red) sockets on the
unit, and plug the other end into the matching sockets on your TV or audio system.
3. To use CVBS (composite video) and audio connectors
Note: You cannot view high definition video with the composi te video connector.
1. Plug one end of the composite video cable into CVBS (yellow) socket on the unit, and plug
the other end into the matching socket on your TV.
2. Plug one end of the audio cable into the AUDIO L (white) and AUDIO R (red) sockets on the
unit, and plug the other end into the matching sockets on your TV or audio system.
10
User’
s Manual
4. To use S/P DIF connection
If you want to enjoy Dolby digital audio, your TV or audio system must be able to decode Dolby
digital audio. Plug one end of the optical S/P DIF cable into the S/P DIF socket on the unit, and
plug the other end into the matching socket on your audio system.
11
User’
s Manual
2.2 Inserting batteries in RCU
Remove the battery cover from the remote control. Insert 2 x AAA size batteries inside the
battery compartment. Please take note of the battery’
s polarity which is indicated inside the
battery compartment.
Note: Batteries, including those which contain no heavy metals, may not be disposed of
with household waste. Please dispose of used batteries in an environmentally sound
manner. Find out about the legal regulations which apply in your area.
2.3 Power on
1. Connect power cord of the unit to wall outlet.
2. Turn on the unit, system initializes and start-up OSD is shown on TV screen.
Note: Please turn on your TV and switch it to AV mode.
2.4 Power on and check picture
1. If there are some channels stored in the unit, after initialization, program will be played
automatically, and the channel number is show n on front panel DISPLAY.
2. If there is no channel stored in the unit, after initialization, system will search channels
automatically. Refer to 7.2 Search Type for more search details.
2.5 Active Standby & Passive Standby
The unit supports two standby modes:
v ACTIVE Standby
v PASSIVE Standby
To turn off unit, press STB POWER key on the
remote control or front panel, there will be a w indow pop up with 2 selections. You can press
keys to select Active Standby or Passive Standby
and press OK key to confirm. If you don’
t make a
selection, then the highlighted option will take
effect and the unit will turn off after 10 seconds.
In Active Standby Mode:
1.
2.
Antenna LOOP OUT connector on the rear panel will still output antenna signal.
There will be a Red LED shows on the front panel LCD display, as show below.
12
User’
s Manual
In Passive Standby Mode:
1. The unit will cut all power and reduce consumption to minimum.
2. Antenna LOOP OUT connector will not output antenna signal, result in a poor snowy
picture.
3. The Standby LED will light up Red on the front panel far left, as show below.
3. Basic Operation
This part describes operations such as channel switch, volume control and other basic features
when playing programs.
3.1 Channel Switch
You can switch channels using the following methods:
v
Press
keys to switch channel.
v
Input channel number with number keys.
v
Press LAST key to switch to the previously viewed channel.
v
Select channel in channel list. Refer to 3.4 Channel List for detailed operation,
3.2 Volume Control
v
v
Press
keys to adjust volume level of your unit.
Press MUTE key to mute/restore sound.
3.3 Program Information
Press INFO key to display program information bar. Before it disappears, press INFO key again
to view detailed information of program. Press EXIT key to hide program information bar.
13
User’
s Manual
1. TV/Radio mode icon
3. Current audio mode
5. Standard definition/High definition mode icon
7. Favorite channel icon
2. Channel name and number
4. Decoding standard
6. Current time
8. Current and next program information
3.4 Channel List
Channel list is available for you to browse channels easily and quickly. On the channel list, you
can see all the channel number and channel name.
1. Press OK key to display channel list of current
service mode.
2. Press
keys to switch among different
channel groups.
3. Press
keys to select a channel.
4. Press OK key to play it in full screen.
Note: In normal viewing mode, you can press
FAV key to display favorite channel list.
3.5 Audio Selection
Some programs provide more than one audio track
with one or more languages. In addition, you can
enjoy audio tracks in three sound modes: Stereo,
Left or Right.
1. Press AUDIO key to display audio selection
w indow.
2. Press
keys to select audio language, and
press
keys to select audio mode.
3. Press EXIT key to save and exit.
Note: Subject to availability from the broa dcaster.
3.6 Teletext
On some channels, information such as weather
reports, news or stock quotations are provided by
means of teletext.
1. Press TEXT key to display teletext window, and
the first page shows the index.
2. Input a page number (3 digits) to display spec ified page.
14
User’
s Manual
3. Press EXIT key to close teletext window.
Notes:
• Subject to availability from the broadcaster.
• Please operate according to on-screen instructions
3.7 Subtitle
Press CC key to switch on/off closed caption.
Note: Subject to availability from the broadcaster.
4. Electronic Program Guide (EPG)
In this guide, you can view program information for each channel based on date and time. In
addition, you can set timer events for recording or switch to a certain channel when a program
starts.
Select main menu ? Guide and press OK key to enter, or press EPG key to enter directly in
non-menu mode.
4.1 View EPG Information
EPG information is displayed as follow s:
1. Channel list
3. Date table
2. Preview window
4. Program list
You can operate according to the on the screen instructions at the bottom of this window.
Red key: Switch between channel list and program list
OK key: Play current program in full screen
In channel list:
Yellow key: Press to sort EPG into program categories. Press again to return to default EPG
display.
Green key: Toggles between a list of available TV channels, radio channels or both.
keys: Select channel
15
User’
s Manual
In program list:
keys: Select date within a week
keys: Select program
INFO key: Display detailed program information
4.2 Schedule Program using EPG
1. Press
keys to select a future program.
2. Press OK key to display EPG schedule window.
3. Press
keys to set schedule type to Rec
(record) or Play.
4. Press
keys to set schedule mode to Once,
Daily or Weekly. If “Weekly”is selected, press
OK key to display weekly window. Select the
day using
keys and press OK key to confirm.
5. Select “OK”and press OK key to confirm. The scheduled program is marked with “ ”. If
you want to cancel this setting, press OK key again.
Notes:
• System will record scheduled program in both operational and standby modes.
• Refer to 5.4 Schedule Recording for more detailed operations.
4.3 EPG Sort
When in EPG mode, press Yellow key to activate
Sort function. All sorted programs are displayed in
this window.
1. Press
keys to switch type.
2. Press
keys to select program.
3. Press OK key to make a timer. Refer to 4.2
Schedule Program using EPG for detailed
operations.
5. Personal Video Recording (PVR)
PVR is similar to VCR in recording. You can record programs onto to the internal hard disk or
an external USB device.
The unit has two tuners so that you can enjoy the following:
v
You can record one c hannel while watching another.
v
You can record two different channels while watching another-only if two of the channels
are provided through the same transponder.
v
You can record two different services while playing back a previously recorded file and
even start playing back a recording while it is being recorded. Refer to 5.5 Playback File
for more detailed operation.
Notes:
• If space on your disk is insufficient, recording will stop automatically.
• Uninstall USB device before unplugging it from the unit. Refer to 6.3 Uninstall USB
for detailed operations.
• This unit supports recording programs of two channels simultaneously.
16
User’
s Manual
•
•
•
•
•
Warnings:
We cannot guarantee compatibility (operation and/or bus power) with all USB mass
storage devices and assume no responsibility for any loss of data that may occur
when connected to this unit.
With large amounts of data, it may take longer for the system to read the contents of
a USB device.
Some USB devices may not be properly recognised.
Even when they are in a supported format, some files may not play or display depending on the content.
If the unit does not detect storage device, please wait two to three mi nutes.
5.1 Set Storage Device
You can select to record to the internal hard disk or
to an external disk drive connected to the USB port.
Select Main Menu → Accessory → Storage Device and press OK key to enter.
If you want to record a program to the internal hard
disk drive, press
keys to select HDD, otherwise select USB device.
Note: If you set “USB device”as storage device,
time shift is unavailable.
5.2 Set Recording Parameter
Note: If you do not set recording parameters, system will record program according to
default settings.
Select Main Menu → PVR → PVR Setting and press OK key to enter.
v Schedule Start/Stop Time Offset
You can set schedule start/stop time offset value.
Press
keys to select time from -10 to +10
minutes. The symbol “+” before time means
start/stop recording later and “
-“means start/stop
earlier. For example, if schedule start time is 13:00
and offset value is +2, the real recoding time is
13:02.
v Remind before Schedule Start
Set reminding time before starting the schedule recording.
Press
keys to select 30 Sec, 60 Sec, 90 Sec, 120 Sec or OFF.
v Sort Recorded Programs by EPG Events
You can record programs in several files according to EPG events, such as news and weather
report.
If this item is set to “OFF”, unit will record programs in one file. If it is set to “ON”, unit will record
in several files according to the EPG event.
17
User’
s Manual
v PVR Icon Time out
Once recording has started, a symbol
with recording time, recording channel and
duration is shown on the screen. You can change the display time of the symbol. Press
keys to select Always, 5 Sec, 10 Sec, 30 Sec, or 60 Sec.
If “Always”is selected, PVR icon is displayed on the screen throughout the recording.
v Default Recording Duration
Set default recording duration of quick recording. Press
hours.
keys to select one from 1 to 24
v Timeshift Start Mode
Press
keys to select Always, Pause Key or Never.
Always: System always records programs in the background temporarily. When changing
channels or switching the unit to operation mode, system will delete recorded information and
start recording program of current channel.
Pause Key: Start time shifted recording with PAUSE key.
Never: Unit will not start time shift recording.
Note: Refer to 5.7 Time Shift for corresponding operations.
5.3 Quick Recording
If you want to record current program instantly, you can use this function.
Note: Radio program can not be recorded.
1. Start Recording
When watching a program, press RECORD key to start recording and a symbol
is displayed in top left corner of screen.
Once a recording is started, the recording file is displayed on the recorded list even though it is
not finished yet. To view the recorded file, press LIST key (See 5.5 Playback File) or alternatively select the File List menu (See 5.6 Edit Recorded File).
To record another channel, switch to the channel you want to record and press RECORD key
again.
Pressing PAUSE key directly will not pause the current recording. You must press RECORD
key to display record Info window, in which you can select “Pause”and press OK key to pause
valid recording.
Warnings:
• Do not move the unit nor unplug the main AC power while it is running. It may cause
damage to recorded file and internal HDD.
• When a program is being recorded onto an external USB device, you must not di sconnect it. Arbitrary disconnecting may cause damage to the recording file and USB
storage device.
2. Current Recording Information
Switch to a channel you are currently recording, and press RECORD key to enter recording
information window, or select Main Menu ? PVR ? Recording Info and press OK key to enter.
v Index: Press
keys to select recording index (R1 or R2).
18
User’
s Manual
v Mode: Display recording mode. (Quick or Schedule).
v File Name: You can rename the file. Press OK
key to display a keyboard. Refer to 5.6.3 Rename Recorded File for detailed operations.
v Valid Record Time: Display valid record time.
v Past Time: Display past time.
v Duration: Press
keys to select a recording
duration. The recording will end at the specified
time.
Select “Pause”and press OK key to pause valid recording.
Select “Resume”and press OK key to resume valid recording.
Select “OK”and press OK key to save the setting.
Select “Cancel”and press OK key to cancel the setting.
3. Stop Recording
1. Press STOP key when recording, a prompt pops
up on screen.
2. Select a recording and press OK key to stop.
Note: If you playback a program while recording,
press STOP key to stop playback, and press
STOP key again to stop recording.
5.4 Schedule Recording
You can set future programs to be recorded at a specific time, and the unit will start recording
automatically. In addition, you can modify schedules and delete unwanted schedules.
Note: The unit has 2 standby modes called “Passive” and “Active” - see 2.5 Active
Standby and Passive Standby for further details. In Passive standby mode the unit will
start recording without any picture or sound. In Active standby mode the unit will start
recording with both picture and sound. In either mode, the unit will return to standby
upon completion. If the unit is on and you have started a recording you can only enter
either standby mode by stopping the recording.
Select Main Menu ? PVR ? Schedule and press OK key to enter, or press TIMER RECORD
key to enter directly in non-menu mode.
1. Add Schedule
1. Press Green key to display add schedule window.
2. Set schedule parameters as follows:
Schedule Type: Set schedule type to Rec with
the specific time automatically.
Schedule Start Time: Press OK key to display
calendar window. You can select a specific date
using the arrow keys, then press the FAV key to
enter a starting time using the number keys. The
recording will be started at the specific time.
Press OK key to save and re-enter the schedule
window.
19
keys. The unit will record channel at
User’
s Manual
Schedule End Time: Press number keys to input end time.
Schedule Mode: Press
keys to select
Once (one time), Daily (every day) or Weekly
(one day every week). If Weekly is selected,
press OK key to display w eekly window. You
can s elect desired days from Monday to Sunday
with
keys and press OK key to confirm.
Channel Name: Press OK key to display
channel ilst, from which you can press
keys to select your desired channel.
3. Move cursor to “OK”and press OK key to add schedule.
Note: You can schedule recording in EPG window directly. Refer to 4.2 Schedule Program using EPG for detailed operations.
2. Modify Schedule
1. Press
keys to select a schedule.
2. Press Yellow key to display modify schedule window. You can modify schedule start time,
end time and schedule mode. Refer to 5.4.1 Add Schedule for detailed operations .
3. Delete Schedule
1. Press
keys to select a schedule.
2. Press Red key to delete this schedule, and
mark it with “ ”. If you want to cancel this setting, press Red key again.
Note: You can also press Blue key to delete all
schedules, and press Blue key again to cancel
the setting.
5.5 Playback File
After a program is recorded, it is stored as a file on the internal hard disk drive or USB device.
You can s elect a file to playback from the recorded file list.
Once playback has started, a
symbol will be displayed at the top left corner of the screen
for few seconds. When a program is recorded, its additional contents such as audio tracks or
teletext are also recorded together. So you can enjoy them while playing back a recorded file.
Note: When a file from the external hard disk drive is being played back, you must not
disconnect it from the unit. Arbitrary disconnecting may cause damage to the recorded
file.
Press LIST key to display recorded file list in non-menu mode. The instructions on how to play
a recorded file are as follows:
1. If you have connected USB devices like a
memory stick or an external hard disk drive, you
should move the cursor to the left side of screen
using
key, where the storage device list is
displayed. Press
keys to select All (Internal and external hard disk), INNER (only internal hard disk) or USB (only external USB device). Press
key to move the cursor to the
20
User’
s Manual
file list.
2. Press
keys to select a file.
3. Press OK key to start playback.
4. Press STOP key to stop playback and return to playing live program.
During a playback, you can execute the follow ing operations :
1. Pause
Press PAUSE key to pause playback, press PLAY key to resume playback.
2. Fast Backward/Forward
You can fast forward or rewind while watching a recorded file.
To rewind, press REW key. If you press it repeatedly, the playback speed changes in 5 steps:
×2, ×4, ×8, ×16 and ×32 times. You can press PLAY key to resume normal speed.
To fast forward, press FF key. If you press it repeatedly, the playback speed changes in 5 steps:
×2, ×4, ×8, ×16 and ×32 times. You can press PLAY key to resume normal speed.
3. Slow Forward
To watch in slow motion during a playback, press SLOW key. If you press it repeatedly, the
playback speed changes in 3 steps: ×1/2, ×1/4, ×1/8 times. You can press PLAY key to resume
normal speed.
4. Playback Progress Bar
If you press INFO key while playing recorded file, playback progress bar is displayed. It displays current program information, playback progress and operation help information.
1. TV icon
5. Decoding standard
2. File name
6. Standard definition
3. Bookmark
7. Program progress timer (hh:mm:ss)/total time (hh:mm:ss)
4. File group name
8. Playback progres s
9. Operation help information:
v
Press INFO key to show the detailed information of the current file.
v
Press VOL or VOL key to jump backward or forward one minute at a time.
v
Press Red or Blue key to jump backward or forward minutes at a time.
v
To set bookmark with Green or Yellow key, refer to 5.5.5 Bookmark.
v
To cut file with OK key, refer to 5.5.6 File Cut.
v
To go backward, press REW key; to go forward, press FF key.
v
To playback in slow mode, press SLOW key.
v
To pause playback, press PAUSE key.
21
User’
s Manual
v
To stop playback, press STOP key.
5. Bookmark
You can mark favorite parts of a recorded file by creating bookmarks, and then jump to them.
You can have up to 20 bookmarks. Bookmarks are stored with the recorded file so that you can
use them again.
To make bookmarks, perform the following steps during playback:
v Add Bookmark
1. Press INFO key to display the process bar.
2. Press Green key to add a bookmark at a desired scene; then you will see a small triangle
appear on the progress bar as per the picture on
the right.
v Go to Bookmark
Press Yellow key to jump to the next bookmark on
progress bar. The file will be played from the bookmark.
v Delete Bookmark
1. Press Yellow key to jump to a bookmark.
2. Press Green key to delete it.
6. File Cut
You can cut sections such as commercial breaks from a recorded file. The cut section will be
skipped during playback. To cut the file, perform the following steps during playback:
1. Press INFO key to display playback progress bar.
2. Press OK key to enable the “File cut” keys (Green and Yellow).
3. Move to the starting point of the scene you want to cut by using VOL or VOL key.
4. Press Green key, then a small triangle appears on the progress bar.
5. Move to the end of the scene.
6. Press Yellow key, the cut section is marked in bright green.
7. Press OK key,and then you get asked for confirmation. If you select “OK”, the marked part
is cut.
Note: If you want to restore all cut contents, press FAV key.
22
User’
s Manual
5.6 Edit Recorded File
You can delete, rename, lock and manage group of recorded files and also copy files between
internal and external hard disk drives.
Select Main Menu ? PVR ? File List and press OK key to enter.
1. Delete Recorded File
1. Press
keys to select a file you want to
delete.
2. Press Red key to mark it with a deleting symbol
“ ”. If you want to cancel this setting, press Red
key again.
3. After pressing EXIT key, a confirmation message is displayed on the screen for confirmation.
Select “OK”to delete the selected file.
2. Add recorded file to group and manage group
v Create group
1. Press Green key to pop up the group edit window.
2. Press Green key to pop up an on-screen keyboard. Refer to 5.6.3 Rename Recorded File
for detailed operations.
In addition, you can manage groups by adding,
deleting and renaming.
v
1.
2.
3.
Add group
Press
keys to select a file in file list.
Press Green key to view the group edit window.
Select a group and press OK key to add the
selected file to this group.
v Delete group
1. Press
keys to select a group in the group
edit window.
2. Press Red key to delete it, and then a warning box appears asking you for confirmation. If
you select “OK”, the selected group will be removed.
v Rename group
1. Press
keys to select a group in the group edit window.
2. Press Yellow key to pop up an on-screen keyboard. Refer to 5.6.3 Rename Recorded File
for detailed operations .
3. Rename Recorded File
1. Press
keys to select a file.
2. Press Yellow key to display an on-screen keyboard.
23
User’
s Manual
You can move the cursor horizontally with
keys and vertically with
key on a button to enter its character on the input line.
keys. Press OK
To delete all characters on the input line, select
“Clear” and press OK key.
To switch between upper and lowercase, select
“Caps On”and press OK key.
To delete last character on the input line, select
“Back” and press OK key.
You must select “OK” and press OK key to
complete naming, otherwise if you select
“Cancel” or press EXIT key directly, it will not be
named.
3. After renaming, new file name appears in file list.
4. Lock Recorded File
1. Press
keys to select a file you want to
lock.
2. Press Blue key to mark it with a lock symbol “ ”.
If you want to cancel this setting, press Blue key
again.
Note: Password is required to view locked file,
refer to 9.4 Modify Password.
5.7 Time Shift
Note: If you set USB device as storage device, “time shift” will not be available.
Time shift means that the live channel you are watching gets saved temporarily in the buffer of
the internal hard disk. When enabled, you can pause the program you are watching and resume it again at a later time. You can then access any part of the current program by using the
fast forward or rewind functions as if playing back a recording. To enable this feature, see 5.2
Set Recording Parameter.
1. Using Time Shift
After starting time shift, the receiver records current program on embedded HDD in the background temporarily. You can playback it as if playback a recorded file.
You can perform pause/play, fast backward/forward, slow forw ard, etc. Refer to 5.5 Playback
File for detailed operations.
You can also press INFO key to display playback progress bar. It displays current channel
information, playback progress and operation help information.
24
User’
s Manual
1.
2.
3.
4.
5.
6.
7.
TV icon
Channel name
Decoding standard
Standard/high definition mode icon
Watching point time (hh:mm:ss)/total time (hh:mm:ss)
Playback process
Operation help information
2. Stop Time Shift
Press STOP key or switch to another channel to stop time shift and return to play live program.
5.8 Shortcut Key for PVR
When watching a program, press PVR key to display shortcut key list.
This feature is a convenient pop up menu that will
display all the PVR functions according to the current situation.
5.9 Hard Disk (HDD) Management
1. Clear up HDD
You can view free and used space on the internal hard disk, and can also delete files or view
detailed information for the selected file if desired.
Press LIST key to display file list in non-menu
mode.
A pie graph at the bottom left corner of the window
shows the free and used space of the internal HDD.
The used space is displayed in orange, and the free
space is displayed in blue.
To delete a recorded file, select it and press Red
key.
To see the detailed information about a file, select it and press INFO key, then the information
box appears and shows its file name, program information, and so on. Press EXIT key to go
back to the prev ious menu.
2. HDD Format
Warning: This function will format your internal hard disk or USB device, and all stored
contents will be deleted.
Select Main Menu ? PVR ? HDD format and press
OK key to enter.
1. Press
keys to select storage device.
2. Select “OK”and press OK key to format or “Exit”
and press OK key to cancel the operation.
Notes:
• If you have replaced the internal HDD with new a one, you must format it before use
because the unit has its own file system which is different from any personal com-
25
User’
s Manual
•
puters. You can neither record nor use time shift with an unformatted HDD.
This unit only supports Consumer Electronics (CE) HDD specially made for PVR
video recording.
6. USB Application
You can view photos and listen to music in MP3 format from a USB device (such as memory
stick).
Notes:
• Make sure that your USB device contains MP3 and JPEG files before inserting it into
the unit.
• USB device should be inserted into the USB port on the front panel before operating.
• Uninstall USB device before unplugging it from the receiver. Refer to 6.3 Uninstall
USB for detailed operations.
6.1 MP3
Select Main Menu ? Accessory ? MP3 and press OK key to display MP3 list.
1. Press
keys to select a MP3 file.
2. Press OK key to play it.
OK key: Pause/resume playing
Red key: Play all files circularly
Green key: Play files randomly
Yellow key: Play single file continuously
Blue key: Play the next file
3. Press EXIT key to exit.
6.2 Digital Photo
Select Main Menu ? Accessory ? Digital Photo
and press OK key to display a photo list.
1. Press
keys to select a photo.
2. Press OK key to display it in full screen.
Blue key: Display all pictures circularly in full screen
Green key: Switch between icon view ing and file list
modes.
3. Press EXIT key to exit.
6.3 Uninstall USB
Warning: Uninstall USB device before unplugging it from the unit. Otherwise the
USB device may be damaged or the system corrupted.
Select Main Menu ? Accessory ? Uninstall USB
and press OK key to enter.
Press OK key to uninstall, a warning message will
be displayed for confirmation. Select “OK”and press
OK key to continue or select “EXIT”and press OK
key to cancel the operation.
After uninstalling the USB device successfully, you
can remove USB device from the unit.
26
User’
s Manual
7. Channel Search
This will guide you through parameter settings to search for channels.
7.1 Advance Frequency Edit
In general, multiple television or radio broadcasts are transmitted though a single frequency.
This is a frequency with multiple channels. In Mux Edit window, the unit presets dozens of
f requencies , so you can modify or delete them. You can also add some new frequencies.
Select Main Menu ? Installation ? Mux Edit and press OK key to enter.
Note: Make sure you are familiar with the technical aspects of the channel frequency
before you proceed to edit it.
1. Add Frequency
Press Red key to display Add Mux window, in which
you can add a frequency by performing the following
steps:
1. Press numeric keys to input new frequency
values.
2. Press
keys to select proper bandwidth.
3. Press OK or EXIT key to save and go back to
the previous menu.
4. The new frequency is shown on the end of list.
2. Modify Frequency
1. Press
keys to s elect a Mux.
2. Press Yellow key to view modify Mux window.
3. Press
or number keys to set proper values.
4. Press OK or EXIT key to save the setting.
3. Delete Frequency
1. Press
keys to s elect a frequency.
2. Press Blue key to delete it.
7.2 Search Type
1. Manual Search
You may choose to search for channels on a specific frequency since more than one channel is
available via each frequency. You can set the parameters manually and scan for channels at the set
f requency.
Select Main Menu ? Installation ? Manual Search
and press OK key to enter.
1. Press numeric keys to input correct frequency.
2. Press
keys to select 6M, 7M or 8M for
27
User’
s Manual
bandwidth.
3. Highlight “Begin Search” and press OK key to search channel.
4. After finishing, the found TV and radio channels will be listed.
2. Auto Search
For beginners, auto search is the best choice.
Select Main Menu ? Installation ? Auto Search
and press OK key. The system will search channels
according to default parameters. Updated TV and
Radio channels will be sorted automatically.
Note: Do not interrupt the searching to avoid
data loss.
8. Channel Edit
You can delete, lock and move channels. In addition, you can make your own favorite channel
list.
Select Main Menu ? System Set ? Channel Edit and press OK key to enter. You will need to
enter your password to access the Channel Edit window, refer to 9.4 Modify Password for
more details.
8.1 Delete Channel
Note: A deleted channel cannot be accessed
unless you search for it again.
1. Press
keys to select a channel you want to
delete.
2. Press Yellow key to mark it with a symbol “ ”. If
you want to cancel this setting, press Yellow
key again.
8.2 Lock Channel
1. Press
keys to select a channel you want to
lock.
2. Press Blue key to mark it with a symbol “ ”. If
you want to cancel this setting, press Blue key
again.
Note: The local password is required to view
locked channel , refer to 9.4 Modify Password for
further details.
8.3 Move Channel
1. Press
keys to select a channel you want to
move.
2. Press Green key to mark this channel with a
symbol “ ”.
3. Press
keys to move this channel to a new
28
User’
s Manual
position and press Green key to confirm.
8.4 Set Favorite Channel
1. Press
keys to select a channel.
2. Press Red key to mark it with a symbol “ ”. If
you want to cancel this setting, press Red key
again.
Press EXIT key to exit the channel edit menu after
setting, a message box will be displayed on the
screen for conformation. Select “OK” and press OK
key to save the setting or “EXIT”and press OK key
to cancel.
9. System Setting
9.1 Display Settings
Select Main Menu ? System Set ? Display Settings and press OK key to enter.
Menu Transparency: You can change the
menu brightness by adjusting the transparency
level of the On-Screen Display (OSD). Press
keys to adjust the transparenc e level from
70% to 100%.
Antenna Power: Press
keys to select On
or Off. If you have an antenna booster, you
should set the option to On to supply power to it.
LCN (Logical Channel Number): Press
keys to select On or Off. If the option is set
to On, the LCN of each channel remains its original number. If the option is set to Off, the
LCN of each channel is renamed with a new number.
Time Zone Set: Make sure that your local time is displayed correctly on this option, otherwise, press
keys to select the time zone in which you live.
DayLight: If daylight saving time is observed in your state at the moment, set the option to
On.
Note: Daylight saving time adds one hour to the time when the option is set to On.
When setting the time offset from Greenwich Mean Time, make sure that the time
offset does not include da ylight saving time.
9.2 AV Settings
You can to configure the video and audio settings appropriately to your TV set and other appliances.
Select Main Menu ? System Set ? AV Settings and press OK key to enter.
Aspect Ratio: To view wide screen programs on a non-wide screen TV, set the option to
Letter Box or pan-scan. Wide-screen pictures then will be reduced to fit to the width of the
29
User’
s Manual
normal screen.
Width Height Rate : Press
for wide- screen TV).
keys to select 4:3 or 16:9 (4:3 for normal-screen TV, 16:9
Resolution: The unit supports various video
resolutions: 1080i, 720p or 576p. The resolution
of 720p and 1080i are considered high definition.
The higher resolution the better quality you can
enjoy. However, if your TV set does not support
high definition, you cannot enjoy high definition
quality picture. You can set the option to the
highest resolution your TV can display. If you
know your TV’
s native screen resolution, you
may achieve a better picture by setting it to that
resolution, for example, 720 for a 1280X720
screen. The unit will then convert all video output to the selected setting.
Note: You can only view standard definition video with the composite video connector (VIDEO).
Frequency: Press
keys to select a frequency for your TV set.
TV Mode: The unit supports two TV modes: PAL and NTSC. If you know your TV’
s native
screen mode, you may achieve a better picture by setting it to that mode: PAL for
1920×1080i, 1280×720P and 720×576; NTSC for 720×480.
Audio Settings : There are two audio source sockets on the rear panel of the unit. You can
opt to use only one source or both of them in stereo. Press
keys to set the option as
you desired.
Audio Decode : The unit can output two types of digital audio signals via the S/P DIF
connector. One is an encoded signal, and the other is a decoded signal. If your digital audio
system does not have a Dolby Digital decoder, you have to set the option to PCM. Otherwise, set it to AC3.
Note: If the channel you are currently watching does not provide Dolby digital, you
cannot watch the program with Dolby sound even though you set the option to AC3.
9.3 Factory Default
Warning: This function will restore system
settings to factory default.
Select Main Menu ? System Set ? Advance Set ?
Factory Default and press OK key, a warning message will be displayed for confirmation. Press OK
key to continue or EXIT key to cancel the operation.
30
User’
s Manual
9.4 Modify Password
The local password is required to view locked channels (See 8.2 Lock Channel), or access some
menus, such as Advance Set, Channel Edit, etc.
The password is set to 0000 by default. You can
change this password if necessary.
Select Main Menu ? System Set ? Advance Set ?
Modify Password and press OK key to enter.
1. Press number keys to input new password.
2. Press number keys to nput
i
new password
again for confirmation.
Note: In case you lost your password, please use the Master Unlock Code “8101”.
10. Software Upgrade
Warning: Do not turn off the unit or unplug the USB device during software upgrade.
The unit has stable and convenient software to use. However, once in a while new software
may be released to improve the unit’
s performance. You can upgrade software via the USB
port.
You have to check the software information of your unit before downloading new software, and
download the latest software with the same system identification. It is only possible to upgrade
software with a system identification that is identical to yours, otherwise you will fail in sof tware
update.
If you have a USB memory stick, you can update the software by performing the following
steps:
1. Download new software from the web site.
2. Copy the software file to your USB memory
stick.
3. Turn on the unit.
4. Insert the USB storage device into the USB port
on the unit.
5. Select Main Menu ? System Set ? Advance
Set
6. Enter the password (default: 0000) ? Software
Upgrade menu.
7. Press
keys to select the software and press Red key to upgrade. During this process
an upgrade progress bar is displayed on screen.
8. After upgrade, a message will be displayed on the screen and the unit will restart after
which the software update process is complete.
31
User’
s Manual
11. Information
You can view channel information and system information, etc.
11.1 Channel Information
This window displays information about the current
channel, such as PID values, frequency, bandwidth,
signal level and signal quality, etc.
Select Main Menu ? System Set ? Channel Info.
11.2 System Information
This window displays information about the unit, such as hardware version, software version,
etc.
Select Main Menu ? System Set ? System Info.
32
User’
s Manual
12. Appendix
12.1 Menu Map
Guide
Guide
Manual Search
Installation
Auto Search
Mux Edit
Display Settigs
Advance Settgs
Channel Edit
System Set
AV Settings
Channel Info
System Info
File List
Schedule
PVR
PVR Setting
Recording Info
HDD Format
Storage Device
Digital Photo
Accessory
MP3
Uninstall USB
33
User’
s Manual
12.2 Trouble Shooting
DISPLAY on front panel is off
1. Power cord is disconnected. Make sure power cord is plugged into a proper power
socket.
2. The unit is turned off. Turn it on.
DISPLAY on front panel is on, but there is no sound or picture on the TV screen
The unit is in standby mode. It will switch into operation mode and start recording or playing
a program at a specified time. You can also press
key to switch it to operation mode.
No signal
1. Signal cable is disconnected. Connect signal cable correctly.
2. Program parameters have been set incorrectly. Set correct parameters.
3. No signal from terrestrial antenna. Try again when signal is available.
No sound
1. Audio cable is disconnected or incorrectly connected. Connect audio cable correctly.
2. The unit is in mute mode. Press MUTE key to restore sound.
3. Volume is set to minimum. Increase volume to a proper level.
4. Audio parameter has been set incorrectly. Set a proper audio parameter.
No picture
1. Video cable is disconnected or incorrectly connected. Connect video cable correctly.
2. The unit is in radio mode. Switch it to TV mode if you need.
Video and audio mismatch, or abnormal sound
Audio parameter has been set incorrectly. Select a proper audio parameter.
Poor quality picture
Weak signal. Connect signal cable securely.
RCU doesn’t work
1. Not enough power in batteries. Replace the batteries.
2. RCU is not aimed at the unit. Aim RCU at the unit.
Cannot record program
1. The hard disk is full. Delete some old recorded files for new recording.
2. Check if recording is overlapped with another channel. Stop current recording or wait
until the recording is finished.
Cannot operate “time shift”
1. The “time shift” mode is set to Never. Change the mode to Pause Key or A lways.
2. If you set USB device as your storage device, “time shift” is not available. Select internal
hard disk as storage device as per 5.1 Set Storage Device.
Note: If you cannot solve the problems after referring to this trouble shooting, please
contact the TEAC Customer Care Centre, see back page for details.
34
User’
s Manual
12.3 Specification
Tuner
Input Frequency
Loop out Frequency
Input Level
Bandwidth
Input Impedance
Channel Decoding
Standard
FEC Code Rate
Demodulation
Video Decoding
Standard
Aspect Ratio
Video Resolution
Audio Decoding
Standard
Decoding
Audio Mode
Audio Sampling Frequency
High Definition Output
Output Format
Output Connector
Memory
Flash Memory
DDR
Front Panel
IR Receiver
7 Keys
Rear Panel
Connector
Remote Control
Type
Battery
Power/Ambient
Input Voltage
Power Consumption
Operation Temperature
47 ~ 858MHz
47 ~ 858MHz
-25 ~ +20dBmV
6M, 7M, 8M
75ohm
DVB-T EN300 744
1/2, 2/3, 3/4, 5/6, 7/8
(QPSK,16 and 64 QAM)
MPEG2/4 H.264 MP@HL, MP@ML
4:3, 16:9
1920*1080i Max.
ISO/IEC 13818-3 and TR101154
MPEG-1 layer I and II, AC3
Left, Right, Stereo
32, 44.1, 48KHz
1080i, 720p
HDMI/YPbPr
8MB
192MB
38KHz
STANDBY, MENU, VOL-/+, CH-/+, OK
ANT IN (2), LOOP OUT (2)
HDMI
YPbPr/CVBS, A UDIO L/R
S/P DIF
RS-232
Infra-red (Carrier Freq: 38 KHZ)
2×1.5V AAA Type
100-240V ~ 50/60Hz
30W max.
0℃ ~ 40℃
35
User’
s Manual
HDD
Supported HDD Size
Size for SD recording
Size for HD recording
Recording format (External
storage device)
Music file type
Picture file type
Up to 1TB
0.8 GB / hour
2 GB / hour
USB .TRP
MP3
JPEG
12.4 Acronym
DVB
EPG
FTA
HDD
HDMI
LED
LCN
MUX
OSD
PVR
RCA
RCU
S/P DIF
USB
Digital Video Broadcasting
Electronic Program Guide
Free to Air
Hard Disk Drive
High Definition Multimedia Interface
Lighting Emitting Diode
Logical Channel Number
Multiplexer
On Screen Display
Personal Video Recording
Radio Corporation of America
Remote Control Unit
Sony/Philips Digital Interface Format
Universal Serial Bus
36
TEAC CUSTOMER SUPPORT HOTLINE (TCS)
1300 553 315
Between Monday to Friday – AEST 8.30AM to 6PM