1
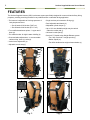
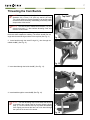
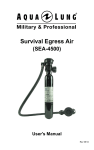
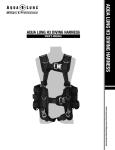
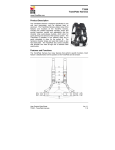
SURFACE SUPPLIED
HARNESS
USER’S MANUAL
REV 4/10
2
Surface Supplied Harness User’s Manual
Copyright Notice
This owner’s manual is copyrighted, all rights reserved. It may not, in whole or in part,
be copied, photocopied, reproduced, translated, or reduced to any electronic medium or machine readable form without prior consent in writing from Aqua Lung America, Inc.
©2010 Aqua Lung America.
SURFACE SUPPLIED HARNESS (SSH) USER’S MANUAL PN 769181
SSH SIZE #1 PN 769161
SSH SIZE #2 PN 769169
You can contact a Technical Adviser via e-mail at:
[email protected]
[email protected]
[email protected]
[email protected]
Military sales: [email protected]
Trademark Notice
Aqua Lung®, is a registered trademark of
Aqua Lung America, Inc.
Warnings, Cautions and Notes:
Pay special attention to information provided in warnings, cautions, and notes,
that is accompanied by these symbols:
A WARNING indicates a procedure or situation that,
if not avoided, could result in serious injury or death
to the user.
A caution indicates any situation or technique
that could cause damage to the product, and could
subsequently result in injury to the user.
A note is used to emphasize important points, tips,
and reminders.
3
CONTENTS
FEATURES................................................................................................... 4
DONNING AND ADJUSTMENT PROCEDURES........................................ 5
ADJUSTING TANK BAND AND CYLINDER KEEPER................................. 5
SECURING CYLINDER TO HARNESS....................................................... 6
THREADING THE CAM BUCKLE................................................................ 7
INSTALLING DOUBLE ACTION WEIGHT RELEASE SHEATH.................. 8
REMOVING DOUBLE ACTION WEIGHT RELEASE SHEATH................... 9
LOADING WEIGHT INTO SURELOCK™ POUCH.................................... 10
INSTALLING SURELOCK™ POUCH INTO WEIGHT SHEATH................ 10
REMOVING SURELOCK™ POUCH FROM WEIGHT SHEATH............... 10
SSH PRE-DIVE CHECKLIST......................................................................11
SSH POST-DIVE CHECKLIST....................................................................11
MANUFACTURER’S RECOMMENDED MAINTENANCE CHECKS......... 12
TECHNICAL DATA..................................................................................... 12
RECOMMENDED SPARE PARTS LIST.................................................... 12
ANNUAL INSPECTION & SERVICE RECORD......................................... 13
MAINTENANCE NOTES............................................................................ 14
WARRANTY INFORMATION..................................................................... 15
4
Surface Supplied Harness User’s Manual
FEATURES
he Surface Supplied Harness (SSH) is a harness system specifically designed for commercial and military diving
T
purposes, providing a working harness for any tended surface or saturation diving application.
• The harness is adjustable to fit a large spectrum of body shapes and sizes.
• Single and two point extraction D-rings (g).
• Dual adjustable tank bands (h).
• Size #1 waist 30-38 inches (76-97 cm)
• Adjustable cylinder keeper (i).
• Size #2 waist 38-46 inches (97-117 cm)
• Up to 10 lb non-ditchable weight may be carried
under the comfort pad (j).
• Four umbilical attachment points – 2 upper and 2 lower (a).
• Two reflective tabs- for high in-water visibility (b).
• Chest and waist adjustments – to accommodate various sizing, chest (c), waist (d).
• Vertical torso adjustment (e).
• Universal comfort pad (k).
• SureLock™ Double Action Weight Release system.
• Two 20lb. SureLock™ weight pouchs (l)
• Malice Clips® (m)
• Two 20lb. double action weight release sheaths (n).
• Adjustable crotch strap (f).
g
a
g
a
g
b
c
b
e
d
h
e
a
a
f
Fig. 1
i
Fig. 2
m
J
k
l
Fig. 3
n
Fig. 4
5
SSH Donning and Adjustment Procedures
1. Don the SSH.
2. Thread the waist band webbing through the buckle and pull the webbing until a snug fit is achieved, repeat
the same process for the chest strap.
3. Release the hook and loop retainer on one of the torso adjustment straps (e). Pull the webbing in a vertical
motion until a snug fit is achieved through the torso, re-fasten the hook and loop retainer. Repeat the same
process on the other torso adjustment strap.
4. Bring the two clips (f) of the crotch strap between your legs and fasten them to the lower metal D-rings on
the front of the harness.
*(See Fig. 6 for above section)
5. The crotch strap is adjustable from the rear (See Fig. 5).
Fig. 5
Adjusting Tank Band and Cylinder Keeper
1. Unfasten webbing from the hook and loop. Remove the free end of the cylinder band (h) from the outer slot
of the cam buckle. Loosen the cylinder bands by clasping the inside cylinder band with your left hand and cam
buckle with you right. To loosen the band, pull the webbing to the left.
2. Unfasten webbing from the hook and loop. Loosen the adjustable cylinder keeper (i) by grabbing the buckle
with your right hand and inside webbing with your left hand. To loosen, pull the webbing to the left.
*(See Fig. 7 for above section)
h
c
e
d
i
f
Fig. 6
Fig. 7
6
Surface Supplied Harness User’s Manual
Securing Cylinder to Harness
1. Wet the cylinder bands and then slide them over the cylinder
so that the harness is at the desired position in relation to the cylinder valve. Make sure the cylinder valve air outlet is facing toward
the diver’s back. Pull the cylinder keeper tight to the cylinder and
secure the hook and loop. While holding the cylinder secure, pull
the free end of the upper cylinder band until there is a very tight fit
between the harness and the cylinder. Repeat process on lower
band (See Fig. 8).
Fig. 8
2. Close the buckle halfway to hold the cylinder band taut, and
thread the free end of the band through the open slot in the end of
the buckle (See Fig. 9).
3. Pull the cam buckle closed so that it lies flat against the
cylinder. Secure the end of the cylinder bands with the hook
and loop attachment. Test the tightness by pushing/pulling the
harness (See Fig. 10).
Fig. 9
Check all 3
bands are
secure
Fig. 10
WARNING: The cylinder band will initially stretch as it becomes wet. Always wet the band
before making the final adjustment; apply enough tension to ensure that the cylinder is
completely secure. Test this connection before every dive.
7
Threading the Cam Buckle
note: Harness cylinder bands adjust for all standard cylinder
diameters: 6.9” (17.5 cm), 7.25” (18.5 cm), and 8.0” (20.3 cm).
The cylinder bands are properly threaded to the buckles when
the harness leaves the factory. If rethreading is necessary, follow
the procedure in this section.
Top View
note: The cam buckle is labeled with numbers (1-4) and
directional arrows (↑↓) that indicate threading order and
direction of tank band.
1. While firmly holding the metal D-ring with your left hand, rotate
the buckle back towards the webbing. The buckle should form an
angle with the metal D-ring as shown in the top view (See Fig. 11).
Fig. 11
2. Insert band through the metal D-ring # 1↓, then through the
middle slot #2↑ (See Fig. 12).
Fig. 12
3. Insert band through the inside slot #3↑ (See Fig. 13).
Fig. 13
4. Insert band through the outer slot #4↑ (See Fig. 14).
note: This final threading step is done when the harness
is secured to the cylinder (refer to Securing Single Cylinder
Step: 2). Close the buckle half way to prevent the webbing
from slipping and thread the free end of the band through
the open slot in the end of the buckle.
Fig. 14
8
Surface Supplied Harness User’s Manual
Installing Double Action Weight Release Sheath
1. Remove the SureLock™ weight pouch from the sheath. Insert Malice clip® through all five MOLLE loops on
the weigh sheath, “TAB” side of Malice clip® facing out (See Figs. 15 & 16).
Tab side
facing out
Fig. 15
Fig. 16
2. Weave the Malice clip® under the MOLLE/Malice loops (Loops are counted from the top to the bottom) in the
following order to secure the weight sheath to the harness (See Fig. 17).
1. MOLLE Loop: 3
2. Malice Loop: 4
3. MOLLE Loop: 2
4. Malice Loop: 2
5. MOLLE Loop: 1
MALICE LOOPS
MOLLE LOOPS
Malice Loops
1
2
3
4
5
MOLLE Loops
3
2
1
Fig. 17
9
3. When the Malice clip® has been woven completely through both MOLLE and Malice loops as directed, secure
the open end of the Malice clip® into the tab slot. Hold the tab, then pull on the inserted end to ensure the clip
has been completely inserted and locked down (See Figs. 18 & 19).
Fig. 18
Fig. 19
Removing Double Action Weight Release Sheath
1. Remove SureLock™ pocket from weight sheath. Insert a medium flat blade screwdriver behind the tab and lift up to
release the Malice clip®. Repeat process on other clip and unweave weight sheath from harness (See Figs. 20- 23).
Fig. 20
Fig. 21
Fig. 22
Fig. 23
10
Surface Supplied Harness User’s Manual
Loading Weight into SureLock™ Pouch
1. Load each weight pouch with equal amounts of
weight for optimum balance, preventing the tendency to roll to one side during the dive. Also, it
is strongly recommended that each weight pouch
is fully loaded with four separate blocks. For example, if you want to load the weight pouch with
12 pounds, use four separate 3 pound blocks.
Top
Top
Top
Top
Top
Top
Top
To Rear of Harness
Fig. 23
2. The 20 lb SureLock™ weight pouch has a right
and left weight compartment. Fill each pouch
with four separate weight blocks (two per compartment); however, if you need to partially fill
the pouch, use the diagram to the upper right for
proper weight placement (See Fig. 23).
note: The SureLock™ weight system features two
interchangeable weight pouches which can be filled
with either block weights or “soft weight” (pouches
containing lead shot), in increments of 5 pounds or
less. For ease of operation, low-profile block weight is
strongly recommended.
Installing SureLock™ Pouch into Weight Sheath
1. The SureLock™ pouches are installed with the plastic panel facing outward (pouch flap facing toward the harness).
To install either pouch, slide the closed end of the pouch into the opening of the sheath. Insert the male portion of the
SureLock™ buckle into the female receptacle on the sheath until you can hear/feel it “CLICK” into place. Close the flap
of the weight sheath over the pouch and secure the outer buckle of the weight sheath (See Figs. 24 & 25).
Fig. 24
Fig. 25
Removing SureLock™ Pouch from Weight Sheath
2. Unclip the weight sheath outer buckle so the flap is open, exposing the SureLock™ weight pouch. Pull straight
down on the SureLock™ handle, releasing the weight pouch from the sheath (See Figs. 26 & 27).
Fig. 26
Fig. 27
11
SSH Pre-Dive Checklist
Diver Name_____________________________ Date_____________
SSH Number_________
WARNING: Before each use, the SSH must be given a thorough visual inspection and functional test.
NEVER dive with a harness that shows signs of damage until it has been repaired and reinspected.
Initials
______ 1. Inspect all buckles and slides for damage. Connect and disconnect each buckle/ slide for proper orientation.
______ 2. Inspect all stitching component webbing and hook/loop material for damage or excessive wear.
______ 3. Adjust harness for proper fit.
______ 4. Install weights into SureLock™ weight pouches as needed.
______ 5. Install loaded SureLock™ weight pouches into weight release sheaths.
______ 6. V
erify that all harness straps are connected properly and operate correctly.
______ 7. Diving Supervisor will check previous steps and record deficiencies below.
Remarks
Divers Signature
Diving Supervisor Signature
SSH Post-Dive Checklist
Diver Name_____________________________ Date_____________
SSH Number_________
note: Avoid prolonged exposure to sun, extreme heat and heavy pool chemicals to prevent deterioration.
To prevent premature damage, thoroughly rinse the SSH with fresh water at the end of each diving day
using the following procedures:
Initials
______ 1. Remove all weights from SureLock™ pouches.
______ 2. Thoroughly rinse harness & pouches and allow to dry overnight before stowing.
Remarks
Divers Signature
Diving Supervisor Signature
12
Surface Supplied Harness User’s Manual
Manufacturer’s Recommended Maintenance Checks
1. Annual Inspection- Inspect SSH for wear or damage.
• Inspect buckles and slides.
• Inspect stitching components, webbing and hook/loop material.
• Inspect SureLock™ weight pouch locking mechanism.
2. Pre-Dive repeat annual inspection.
3. Post-Dive Rinse and dry.
Technical Data
•
•
•
•
•
•
BREAKING STRENGTH OF COMPLETE HARNESS = 1100 LB / 500 KG / 4900 N
BREAKING STRENGTH OF ALL 2” D-RINGS = 5000 LBS
SURELOCK™ WEIGHT POUCH CAPACITY = 20 LBS EACH
MOLLE EQUIPMENT ATTACHMENT CAPABILITY
SLIDES AND CROTCH STRAP CLIPS STAINLESS STEEL
DRY WEIGHT AND SIZE
• Size #1 9 lbs, waist size 30-38 inches (76-97 cm)
• Size #2 10 lbs, waist size 38-46 inches (97-117 cm)
SSH Recommended Spare Parts List
PART #
769162
769163
769183
768184
769144
769159
769166
769148
769164
769182
DESCRIPTION
SSH Harness Assembly, Size 1
Crotch Strap, Size 1
SSH Harness Assembly, Size 2
Crotch Strap, Size 2
20 LB SureLock™ Weight Pouch
20 LB Double Action Weight Release Sheath
Tank Band /Traction Sleeve
Universal Comfort Pad
Cylinder Keeper
Malice Clips® (pr)
QTY
1
1
1
1
2
2
2
1
1
2
13
Annual Inspection & Service Record
Date
SSH #
Technician Name
Observations
Technician
Signature
14
Surface Supplied Harness User’s Manual
Maintenance Notes
15
Warranty Information - Military & Commercial
All requests for warranty transactions must be accompanied by an in-service date and by documentation of Aqua Lung America Inc. factory recommended maintenance* in accordance with
this Manual whenever returning your military or commercial product for warranty service.
The Aqua Lung® One Year Limited Warranty™
Aqua Lung America, Inc. warrants to the original purchaser for a period of one year from the
purchase date that the product will be free from defects in material and workmanship; provided
that it receives normal use, proper care and prescribed maintenance subject to those restrictions stated below. This limited warranty is extended only to the original purchaser for purchases
made from Aqua Lung America, Inc. or an authorized Aqua Lung® dealer, and is not transferable. With this warranty, Aqua Lung America, Inc. reserves the right to repair or replace the
product at its sole discretion.
ALL WARRANTIES, INCLUDING BUT NOT LIMITED TO IMPLIED WARRANTIES, OR MERCHANTABILITY AND FITNESS FOR A PARTICULAR PURPOSE ARE LIMITED IN DURATION
TO A PERIOD ENDING ONE YEAR FROM THE DATE OF PURCHASE OR IN-SERVICE DATE.
WARNING: It is dangerous for untrained and uncertified persons to use the
equipment covered by this warranty. Therefore, use of these products by an
untrained person renders any and all warranties null and void. Use of Surface
Supplied or SCUBA equipment by anyone who is not a certified diver or receiving
training through a recognized training certification agency (either military or
commercial), shall render void all warranties, expressed or implied.
AQUA LUNG AMERICA, INC. DISCLAIMS AND EXCLUDES ANY LIABILITY FOR INCIDENTAL
OR CONSEQUENTIAL DAMAGES. IN SOME STATES WHICH DO NOT ALLOW EXCLUSION OF
LIABILITY, THIS MAY NOT APPLY TO YOU.
Restrictions
The following restrictions apply to this warranty:
•
•
•
•
•
This warranty does not extend to abrasion or seam separation caused by chemical attack,
including prolonged exposure to chlorine.
This warranty does not extend to damages caused by improper use, improper maintenance,
neglect, unauthorized repairs, modifications, accident, fire or casualty.
Cosmetic damage, such as scratches, fraying, and nicks are not covered by this warranty.
This warranty does not extend to products that have been not properly inspected or maintained
in accordance with the recommended Aqua Lung America, Inc. factory requirements.
Failure to meet any of the above requirements will render the warranty null and void.
WARNING: Failure to maintain this equipment and perform the required Aqua Lung
America, Inc. factory maintenance in accordance with the factory manual renders
any and all warranties expressed or implied, null and void.
* Reference Annual Inspection & Service Record provided in manual
Surface Supplied Harness
2340 Cousteau Court • Vista, CA 92081
Phone (760) 597-5000 • Fax (760) 597-4900
www.aqualung.com/militaryandprofessional
©2010 Aqua Lung International
Literature PN 769181 REV 04/10