1
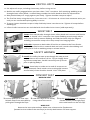
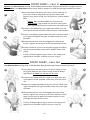
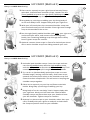
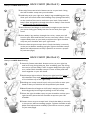
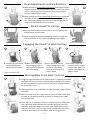
líllébaby NORDIC TM OWNER’S MANUAL IMPORTANT! Please read this owner’s manual before using carrier. Keep for future reference. www.lillebaby.com Please see our web site for additional instructions, tips and video demonstrations. - - líllébaby NORDIC TM Padded Shoulder Straps. Neck Support. Snaps for attaching Neck Support in upright position. Hood Adjustment Buckles. Shoulder Strap Webbing. Seat Adjustment Flaps for adjusting seat width. Snaps for attaching Neck Support in down/front forward position. Runner for adjusting position of Chest Strap. Chest Strap for connecting shoulder straps. Padded Waist Belt. Waist Belt Buckle. Elastic Safety Band. Male buckle. Female buckle. -2- HELPFUL HINTS Pre-adjust all straps, including chest strap, before using carrier. Buckles are safely engaged when you hear them “click” into place. Pull remaining webbing strap through elastic safety band—it should hang outside the elastic band to allow for adjustments. Baby should always sit snugly against your body. Tighten shoulder straps to adjust. The first few times using the carrier, limit use to 10 – 15 minutes at a time. Have someone assist you until you are comfortable placing baby in carrier. To nurse, loosen shoulder straps to help slide baby lower into the carrier. Tighten all straps before standing up. Infant Cradle instructions are included with the Cradle Carrier Insert (sold separately). WAIST BELT Fasten: Run male buckle through elastic safety band and connect with female buckle. It should “click” into place. Run loose webbing strap through elastic safety band. Roll up excess webbing and fold the elastic loop (on edge of webbing) around the strap-roll to keep strap from hanging loose. Unbuckle: Squeeze on both sides of buckles to release male from female buckle. Flip male buckle in towards belt and tuck it under the webbing and safety band. Pull on webbing strap to release buckle. SAFETY HARNESS 1 1. Install: Run safety harness strap through the two vertical straps/slots on the inside of carrier. Tip: to simplify locating harness strap later, buckle it around front of carrier prior to placing baby in. 2 2. Fasten: Once baby is inside carrier and all straps are securely fastened; reach inside carrier and engage harness around baby’s waist. Buckles should “click” into place. CONVERT SEAT NARROW SEAT 2 1 3 1. Unsnap buttons on seat flaps. 2. Fold seat flaps to the inside/ Release flaps from waist belt by pulling belt through the flaps. lining side of the carrier. 3. On the inside/lining side: connect female button (inside right flap) with male button on the left flap. WIDE SEAT Reverse the instructions above. Make sure to button the flap buttons (located on the inside of the seat flaps) to the hip belt buttons for best support. -3- FRONT CARRY – Face In Infants: Use Narrow Seat setting. Install Safety Harness. Neck Support should be in upright position. Older Babies: Use Wide Seat setting when baby is ready to sit with his/her legs around your waist. 1 1. Securely fasten the waist belt. Place carrier squarely on your hip and let it hang down. Bring your baby close against your chest, facing you. Bring carrier up over baby’s back: - Infants: legs should straddle the narrow seat. - Older Babies: legs should rest on each side of your waist with baby’s bottom centered in the wide seat. 2 2. Support your baby with your right hand. With your left hand place the left shoulder strap over your left shoulder. 4 3. Switch to supporting your baby with your left hand. With 3 your right hand place the right shoulder strap over your shoulder. 4. Reach behind your neck and engage the chest strap buckle. Tighten the strap to secure the shoulder straps. 5 5. Reach inside the carrier and securely engage the Safety Harness around baby (required for babies under 15lb (7kg)). Finally, lift baby slightly to give slack in the straps and tighten each shoulder strap to ensure a snug fit. FRONT CARRY – Face Out Use Narrow Seat setting only. Fold the Neck Rest forward and snap to front of carrier. 1 1. Securely fasten the waist belt. Let carrier hang in front. 2 Bring your baby to your chest, facing forward. Baby’s legs should straddle the narrow carrier seat. 2. Support your baby with your right arm. With your left hand place the left shoulder strap over your left shoulder. 3. Switch to supporting baby with your left arm. With your right hand place the right shoulder strap over your right shoulder. 3 4. Reach behind your neck and engage the chest strap buckle. Tighten the strap to secure the shoulder straps. Baby’s arms may lay above the Neck Support or rest through the sides of the carrier. Finally, lift baby slightly to give slack in the straps and tighten each shoulder strap to ensure a snug fit. -4- 4 HIP CARRY (Method 1) Always use Wide Seat Setting. 1 2 1. Place carrier squarely on your right hip and securely fasten waist belt. Unbuckle both shoulder straps; connect the left (front) padded strap with the right (back) webbing strap. Pull remaining webbing strap through elastic safety band. 2. Bring baby up, with legs straddling your hip. Bring body of carrier over baby’s back. Support baby with your right arm. 3. With your left hand place the connected shoulder strap over 3 4 your head and onto your left shoulder. Place right arm through strap to the outside of the carrier. 4. Run the right (back) padded shoulder pad under your right arm and around your waist, and connect with webbing strap buckle. Run remaining webbing strap through elastic safety band. Tighten straps for comfort. 5. Optional: connect chest straps in front of or behind your shoul- 5 der to assist shoulder strap from sliding towards your neck. HIP CARRY (Method 2) Always use Wide Seat Setting. 1 1. Unbuckle both shoulder straps. Cross the straps and con- 2 nect the left padded strap with the right webbing strap, and the right padded strap with the left webbing strap. Pull remaining webbing straps through elastic safety bands. 2. Try carrier on (without baby) and adjust straps to a com- 3 fortable length, leaving room for baby. Slide chest straps towards the center/each other on the shoulder strap and fasten the chest strap buckle. This will assist in keeping the shoulder straps together. 3. Place carrier squarely on your hip and fasten waist belt buckle. Bring baby up with legs straddling your hip. 4. Bring body of carrier over baby’s back. Support baby with 5 your right arm. With your left hand take a hold of both shoulder straps and place them over your head and onto your left shoulder. Tighten straps for comfort. 5. Optional: to place straps on your shoulder rather than your neck; lift baby with your right arm and pull on both shoulder straps to position them on your shoulder. -5- 4 Always use Wide Seat Setting. 1 BACK CARRY (Method 1) 1. Securely fasten waist belt. Rotate carrier to your back. Bring 2 the left shoulder strap over your shoulder. 2. Hold baby with your right arm, baby’s legs straddling your hip. Slide your left hand under the webbing strap (along waist belt) on the inside of the carrier and on to your back. Take hold of baby’s foot and guide it through the carrier. Baby’s foot should lay underneath the webbing strap. 3 3. Bend forward and begin to shift baby’s weight to your back as you assist sliding your baby into the carrier with your right hand. 4 4. Once baby’s leg reaches through the carrier, move your left hand to your back and fold the carrier over baby’s back. Firmly support baby close to your body and place the right shoulder strap on your shoulder with your right hand. 5. Fasten chest strap at armpit level. Check that baby is securely 5 in the carrier before standing upright. Tighten shoulder straps. Make final adjustments to baby’s position to ensure a proper fit (see next page). BACK CARRY (Method 2) Always use Wide Seat Setting. 1 1. Securely fasten waist belt. Rotate carrier to your right hip 2 and let it hang. Bring baby up, feet straddling your hip. Bring the carrier up over baby’s back. Support baby with your right arm, collect both shoulder straps in front of baby and hold them together in your left hand. 2. Hold straps high and taut. Place your right hand (in front of left shoulder strap and) into the right shoulder strap and take a firm hold on top of the right strap. 3 3. Holding one strap in each hand, arch your left arm over your head so that you hold the left strap behind your head. 4 4. Bend forward and begin to shift baby’s weight to your back. Assist by gently bouncing and pulling on the left strap. 5. Place the right shoulder strap on your shoulder and use your 5 right hand to place the left shoulder strap over your left shoulder. 6. Fasten chest strap at armpit level. Check that baby is securely in the carrier before standing upright. Tighten shoulder straps. Make final adjustments to baby’s position to ensure a proper fit (see next page). -6- 6 Final Adjustments to Back Position 1. Baby should be centered in the carrier with legs at equal 1 2 length on each side of your waist. Pull on each side of the carrier seat and gently tilt to one side to adjust baby’s position towards the center. 2. Baby should sit in the pouch/seat of the carrier. Hold the shoulder straps out towards your back to give room for the adjustment and gently bounce to encourage baby’s weight to adjust down into the carrier. Attach Hood* to Carrier 1 2 1. Run the two buckles on the front of carrier through the button holes on the hood. 2. Next, thread the two hood webbing straps through the two buckles on carrier. Adjust webbing strap length. * Hood is sold separately. Engaging the Hood* in Back Position 1 2 1. Locate the right hood 2. With your left hand, strap and extend it up above your head. 3 4 3. Lean forward and let 4. Connect snaps on follow along edge of the hood to locate the left hood strap. * Hood is sold separately. baby’s head rest in the center of your back. Extend hood taut over baby’s head. hood straps to snaps on shoulder pads at a length that supports baby’s head. Moving Baby From Back To Front 1 1. Lengthen right shoulder strap. Reach back to support your baby 2 with your left arm and start rotating baby towards your left hip as much as possible. Gently bounce and pull on the waist belt to rotate the carrier. 2. Unbuckle chest strap and slide the right shoulder strap off your shoulder. 3 3. Reach around with your right hand to your left side and pull on the belt as you gently bounce to assist in rotating your baby around your hip. 4. Once baby is on your hip, switch to supporting your baby with your right arm and slide the left shoulder strap off your left shoulder. Hold your baby with both arms and finish moving baby to your front. You can now easily unload baby from the carrier or proceed to use the front inward facing position. -7- 4 WARNING - FALL HAZARD CAREFULLY READ AND FOLLOW ALL INSTRUCTIONS BEFORE ASSEMBLING AND USING THE CARRIER. KEEP INSTRUCTIONS FOR FUTURE USE. ONLY USE THIS CARRIER FOR CHILDREN BETWEEN 7 LBS (3.2 KG) AND 42 LBS (19 KG). THE SAFETY HARNESS MUST BE SECURELY INSTALLED FOR BABIES LESS THAN 15 LBS (7 KG). CHILD MUST FACE TOWARD YOU UNTIL HE OR SHE CAN HOLD HEAD UPRIGHT. CHILD MUST FACE TOWARD YOU WHEN CARRIED ON YOUR BACK. SMALL CHILDREN CAN FALL THROUGH A LEG OPENING. ADJUST LEG OPENINGS TO FIT BABY’S LEGS SNUGLY. ENSURE CHILD IS PROPERLY POSITIONED WITH THE LEGS STRADDLING THE SEAT, YOUR WAIST AND/OR SAFETY HARNESS. ENSURE SUFFICIENT ROOM AROUND BABY’S FACE TO PROVIDE A CLEAR SOURCE OF AIR. CHECK TO ENSURE ALL BUCKLES, STRAPS, SNAPS AND ADJUSTMENTS ARE WORKING AND SECURE BEFORE EACH USE. NEVER UNBUCKLE WAIST OR SHOULDER STRAPS WHILE CHILD IS IN THE CARRIER. CARRIER SHOULD BE USED BY AN ADULT CARRYING A CHILD ONLY. CARRIER SHOULD NOT BE USED BY PERSONS WITH CONDITIONS THAT MIGHT INTERFERE WITH THE SAFE USE OF THE PRODUCT. DO NOT USE THE CARRIER WHEN JOGGING, BIKING, DRIVING OR PERFORMING ANY STRENUOUS ACTIVITY. CONSULT A DOCTOR BEFORE CARRYING HEAVY WEIGHT. SEEK ASSISTANCE FROM ANOTHER ADULT IF YOU ARE UNABLE TO SAFELY PLACE CHILD IN THE CARRIER YOURSELF. ALWAYS KEEP HANDS AVAILABLE TO PROTECT YOUR CHILD FROM FALL OR POTENTIAL DANGER. HOLD YOUR CHILD SECURELY AT ALL TIMES UNTIL CARRIER IS SNUG AND CORRECTLY ATTACHED. INSPECT THE CARRIER FOR ANY SIGNS OF WEAR AND TEAR BEFORE EACH USE. USE INFANT CRADLE INSERT ONLY TOGETHER WITH THE LILLEBABY NORDIC CARRIER. ALWAYS ENSURE BABY IS SECURELY FASTENED IN INFANT CRADLE HARNESS AND INFANT CRADLE IS SAFELY ATTACHED TO THE CARRIER. ENSURE BABY IS IN AN UPRIGHT POSITION WITH CHIN UP, FACE VISABLE AND NOSE AND MOUTH FREE. ALWAYS ENSURE ACCESSORY BUCKLES FIT THE CARRIER BUCKLES (IF APPLICABLE). Washing Instructions: Spot clean preferred machine wash separately on gentle cycle only if necessary. No bleach, fabric softener or iron. Hang dry only. Warranty: This product is backed by lillebaby’s warranty policy. For warranty details please refer to our website. Distributed in North America by Scandinavian Child, LLC. Ph: 1.919.747.8500. www.SCIchild.com [email protected] Prod.No.: 1050, Item: Nordic L2401, líllébaby Nordic Carrier. Made in China. -8-