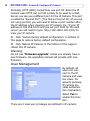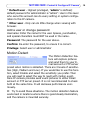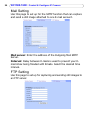
1
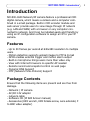
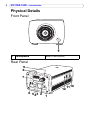
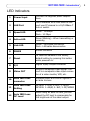
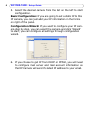
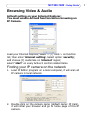
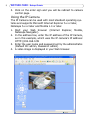
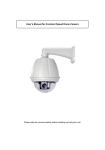
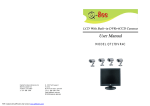
NC1500-1600
CCD Network / IP Camera
User's Manual
NC1500-1600 - Table of Contents
Table of Content
Introduction ......................................1
Features ................................................ 1
Package Contents ................................. 1
Physical Details ..................................... 2
Front Panel ...................................................... 2
Rear Panel ....................................................... 2
LED Indicators ................................................. 3
System Requirement ............................. 4
Setup Guide .......................................5
Hardware Installation ........................... 5
Initial Configuration ............................. 5
Browsing Video & Audio ........................ 7
Finding your IP camera on the network ............. 7
Using the IP Camera ........................................ 8
Live View......................................................... 9
Snapshot ....................................................... 10
Control & Configure IP Camera ...... 11
Accessing the Setting Tools ................ 11
Basic Setting ....................................... 11
Quality ..........................................................
Resolution .....................................................
Frequency .....................................................
Advanced ......................................................
Operation ......................................................
11
12
12
13
13
View..............................................................
Quality ..........................................................
Resolution .....................................................
Image Recording............................................
15
15
15
16
Right Click Control .............................. 14
Advanced Setting ................................ 16
NC1500-1600 - Table of Contents
System Setting...............................................
User Management ..........................................
Motion Detect ................................................
Mail Setting ...................................................
FTP Setting....................................................
Network ........................................................
Audio ............................................................
Access List.....................................................
Dynamic DNS.................................................
PTZ Setting....................................................
GPIO Setting..................................................
17
18
19
20
20
21
22
23
23
24
25
Appendix ......................................... 27
Specifications ...................................... 27
NC1500-1600 - Introduction
Introduction
NC1500-1600 Network/IP camera feature a professional CCD
digital camera, which means a camera and a computer combined in a small package. Built-in CCD encoder module and
web server provide users to view image through IP network
(e.g. LAN and WAN) with a browser on any computer connected to network. And it can be installed easily and friendly by
using an IP configuration software to assign an IP to your IP
camera.
Features
- Up to 30 frames per second at 640x480 resolution to multiple
users
- Motion detection supports upload images to FTP & E-mail
- GPIO enables external trigger and motion alarm output
- Built-in microphone brings users more than video only
- View with Internet browsers no specific AP needed
- Remote record and snapshot control on web page
- Dynamic DNS Support
- NTP (Network-Time-Protocol) Support
Package Contents
Ensure that the following items are present and are free from
damage.
- Network / IP camera
- AC/DC 12V adaptor
- network cable
- Software CD (IP Edit & User manual)
- Accessories (HEX wrench, HEX female screw, Lens extender, F
to BNC video adapter)
1
2
NC1500-1600 - Introduction
Physical Details
Front Panel
1
1
Built-in microphone
Microphone
Rear Panel
9
8
7
Reset
N+ N-
I/O
RS485
LAN
6 5 3
4 2
DC 12V
1
12 11
10
NC1500-1600 - Introduction
LED Indicators
1
Power Input
Connect the supplied power adapter
here.
2
LAN Port
Use a standard RJ45 LAN cable to connect your IP camera to a 10/100Base T
hub or switch.
3
Speed LED
Green - 100Mbps
Dark - 10 Mbps
4
Active LED
Green (Blinking) - When transmitting or
receiving
5
Link LED
Green - LAN cable connection
Dark - LAN cable disconnection
6
RS485
RS485 connector
7
Reset
To reset the camera to the factory
default setting by pressing this button
while powered on.
8
I/O
Digital Input/ Output connector
9
Video OUT
Output a composite video signal. Connect to a composite video input connector of a video monitor, VCR, etc.
10
Auto IRIS Lens
connector
Supplies power and control signals to
an auto iris lens.
11
Auto IRIS Lens
Setting
NC1600: 1- IRIS, 2- BLC, 3- AE/AI
NC1500: 1- AE/AI, 2- BLC, 3- DC/VIDEO
12
Auto IRIS Lens
DC Level
When using an auto iris lens, you can
adjust the DC level to compensate for
the brightness of the video output.
3
4
NC1500-1600 - Introduction
System Requirement
All computers running following platform and following
browser installed can be used to view IP camera.
- Platform: Microsoft Windows 98, Windows Me, Windows NT
4.0, Windows 2000, Windows XP, Linux, Mac compatible.
- Browser: Microsoft Internet Explorer 5.x, 6.x & later version
and Netscape Navigator 5.x and later version.
NC1500-1600 - Setup Guide
Setup Guide
Hardware Installation
1. Connect IP camera and power plug with AC/DC adaptor.
2. Connect IP camera to a 10/100BaseT switch or hub with
network cable.
3. Check LED indicators; make sure that power LED is on, LAN
LED indicator is blinking.
Initial Configuration
1. Connect IP camera and your computer with the network
cable in the package.
2. Insert the supplied CD-ROM disc into your CD-ROM drive.
3. The ipEdit software will auto-run. If the CD does not autorun, double-click ipEdit.exe icon to start the installation.
4. The program will search all the IP cameras on your LAN
automatically.
5
6
NC1500-1600 - Setup Guide
5. Select the desired camera from the list on the left to start
configuration.
Basic Configuration: If you are going to set a static IP to this
IP camera, you can just add your IP information in the forms
on right of the panel.
Configuration Wizard: If you want to configure your IP camera step by step, you can select the camera and click 'Wizard'
to start; you can configure all settings through configuration
wizard.
6. If you choose to get IP from DHCP or PPPoE, you will need
to configure mail server and mail account information so
that IP Camera will send it's latest IP address to your email.
NC1500-1600 - Setup Guide
Browsing Video & Audio
ActiveX setting on your Internet Explorer:
You must enable ActiveX function before browsing an
IP Camera.
Load your Internet Explorer, select > (T) tools > on function
list, than enter 'internet setting'. Select option 'security',
and choose (C) customize on 'internet' region;
select "start" on every Active X control related items.
Finding your IP camera on the network
1. Load IP Editor program on a local computer, it will scan all
IP camera in local network.
2. Double click on the camera name (default name: IP Cam),
it will initial your browser and go to home page of this IP
camera.
7
8
NC1500-1600 - Setup Guide
3. Click on the enter sign and you will be redirect to camera
control page.
Using the IP Camera
The IP Camera can be used with most standard operating systems and supports Microsoft Internet Explorer 5.x or later,
Netscape 5.x or later and Mozilla 1.4 or later.
1. Start your Web browser (Internet Explorer, Mozilla,
Netscape Navigator).
2. In the address box, enter the IP address of the IP Camera,
as in this example, which uses the IP camera's IP address:
HTTP://192.168.0.99
3. Enter the user name and password set by the administrator.
(Default ID: admin, Password: admin)
4. A video image is displayed in your Web browser.
NC1500-1600 - Setup Guide
Live View
The following provides an overview of each button on the Live
View page.
Setting
Displays the Basic Setting Tools.
Snapshot
Capture a snapshot of
the image currently
being displayed in the
window.
8-direction arrow buttons / Zoom buttons
Observe the monitor
image and click the
arrow button indicating
the direction in which
you want to move the
camera. / Zoom in or
zoom out the camera.
*Only available when
using the RS485 Pan/Tilt
Device or Pan/Tilt/Zoom
camera.
Iris
Adjust the iris manually
by clicking the two buttons alternately.
Focus
Adjust the focus manually by clicking the two
buttons alternately.
Auto Pan
Auto change the camera
pan angle (left and right
movement).
*Only available when
using optional Pan head.
9
10
NC1500-1600 - Setup Guide
Velocity
Sets the camera velocity.
Number describing the
panning speed of target
cameras.
Preset Point
You can control the camera by selecting preset
camera points (presets)
saved on the camera
server.
Save
Save
Snapshot
If you click the Snapshot button on the live view page, the
current still image is captured and displayed on the monitor
image section.
To save the captured image
Right-click on the monitor image and select "Save Picture
as..." from the menu. Then, the Save Picture dialog appears.
Type the file name and specify the destination to which the
image is to be stored, and click Save.
NC1500-1600 - Control & Configure IP Camera
Control & Configure IP Camera
Accessing the Setting Tools
Follow the instructions below to access the Setting Tools from a
Web browser.
1. Start the Web browser and enter the IP address or domain
name of the IP Camera in the location/address field.
2. The Live View page is now displayed. Click Setting to display the Basic Setting configuration tools.
Basic Setting
Quality
Select the image quality from low to highest. A higher setting
gives a higher image quality, but the frame rate decreases as
the data size increases.
You can select from among the following options.
Lowest, Low, Medium, High, Highest
11
12
NC1500-1600 - Control & Configure IP Camera
Resolution
Select the size of the image to be transmitted to the computer.
You can select from among the following options.
160*120, 176*144, 352*288, 320*240, 640*480
Frequency
Select the power line frequency (50Hz or 60Hz) used in your
region, to improve the picture quality under florescent lighting.
Default setting is 'Outdoor'.
NC1500-1600 - Control & Configure IP Camera
Advanced
Adjust video parameters setting to the preferred values, you
can adjust 3 video parameters (Saturation, Hue, Sharpness) by
clicking (+) increase and (-) decrease; click STD to back to
default.
Operation
This IP camera has two operation mode:
* Continuous (default): When your have no network bandwidth issue (ex. Intranet), you can choose Continuous (default)
mode.
* Periodic: when network bandwidth is limited (ex, internet
connecting problem or for multiple users link in the same time),
Periodic mode will fit your need.
13
14
NC1500-1600 - Control & Configure IP Camera
Right Click Control
Right click on camera window, you can step by step as following control:
Now, Right click on the camera window, the function list will
appear.
NC1500-1600 - Control & Configure IP Camera
View
Resizable: Dragging the window border to resize the camera
window as you like.
Actual Size: Set the window size to exactly resolution.
Status Bar: Show the IP camera status in the bottom of the
camera window.
Quality
You can select from among the following options.
Lowest, Low, Medium, High, Highest
Resolution
You can select from among the following options.
160*120, 176*144, 352*288, 320*240, 640*480
15
16
NC1500-1600 - Control & Configure IP Camera
Image Recording
Right click on the camera window, a
function list will appear. Select
Image Recording, the setting
page appears.
This function supply "Continuous
JPEG pictures" or "AVI video files"
for choose the way to format and
record as you present your image
files. You can either set your file
size, frames number, recording
times in limited or set it unlimited
for storage. "Pre name" means
characters that before auto generate file names. This function will help you to manage you
image/video files easier. When the above setting is done, you
can click "Start" to start recording or press [F11] to start it.
Advanced Setting
Follow the instructions below to access the Advanced Setting
Tools from a Web browser.
1. Start the Web browser and enter the IP address or domain
name of the IP Camera in the location/address field.
2. The Live View page is now displayed. Click Setting to display the Basic Setting configuration tools and then click
Advanced Setting to display the Advanced Setting tools.
NC1500-1600 - Control & Configure IP Camera
System Setting
This page user can configure basic information for this IP camera, such as camera name, camera time, and TCP port you prefer to use for web server of IP camera.
Camera Name:
You can name the camera as you like (ex. "my studio") and
click "Change", and then view the browser, camera name will
be showed on the image. The camera name will also show on
when you scanning IP camera by IP Editor program.
Camera's time:
You have Three ways to change your camera time. Either you
can sync time with a NTP (Network Time Protocol) server or
sync with a PC which you are using to browse the IP camera,
or, you can change the time by manually input.
HTTP ports:
17
18
NC1500-1600 - Control & Configure IP Camera
Normally, HTTP (Web) connections use port 80. Since the IP
Camera uses HTTP, but port 80 is likely to be used by a Web
Server, you can use a different port for the IP Camera. This port
is called the "Second Port". (The first port is port 80.) If you are
not using port 80, you will need to follow a port number after
the IP address when viewing your IP camera. Ex.: If your IP
address is 192.168.0.100 and you set port 1024 for the web
server you will need to type: http://192.168.0.100:1024/ to
view your IP camera.
Click "restore factory default configuration" in bottom of
this page to restore factory default configuration.
Click 'Reboot IP Camera' in the bottom of this page to
reboot this IP camera.
Warning:
Do not use "firmware upgrade" unless you already have a
new firmware. Via upgrading manual will provide with new
firmware.
User Management
By default, all
users can connect to the IP
Camera and view
live video. For
security purpose,
IP camera provides authorization mechanism.
Select Yes to
enable this function.
There are 2 level user privileges are defined in IP camera:
NC1500-1600 - Control & Configure IP Camera
* Default user - Highest privileged, "admin" is defined;
default password for administrator is "admin". User in this level
who owns this account can do every setting or system configuration to this IP camera.
* Other user - Only can do little change when viewing with
browser.
Add a user or change password
Username: Enter the name for the user. Spaces, punctuation,
and special characters must NOT be used in the name.
Password: The password for the user above.
Confirm: Re-enter the password, to ensure it is correct.
Privilege: Select user or administrator
Motion Detect
The Motion Detection feature will capture pictures
and send them to your Email account or FTP server
preset when motion is detected. There are 3 levels of sensitivities (High, Medium and Low). If you would like to use this function, select Enable and select the sensitivity you prefer. Then
you will need to select the way to react with motion event.
Here IP camera provides send event pictures to either Email
account or FTP server preset. It is not recommended to check
both at the same time. It will decrease performance enormously.
Try to avoid these situations. The motion detection feature
works best in locations where there is good steady illumination,
and the camera is mounted securely.
19
20
NC1500-1600 - Control & Configure IP Camera
Mail Setting
Use this page to set up for the SMTP function that can capture
and send a still image attached to one E-mail account.
Mail server: Enter the address of the Outgoing Mail SMTP
Server.
Interval: Delay between E-mails is used to prevent your Email inbox being flooded with Emails. Select the desired time
interval.
FTP Setting
Use this page to set up for capturing and sending still images to
an FTP server.
NC1500-1600 - Control & Configure IP Camera
Network
Use this page to configure the network to connect the IP camera and the computer. As when you use PPPoE (xDSL), type
your username & password here, the IP Editor program has
been done, next time you enter it, you don't have to type it
again. DHCP mail supply the function that when IP camera get
an IP from DHCP server, it will send the IP information to the
email preset in the following forms.
Sending the IP either when DHCP or PPPoE get one, fill in a
mail account information with SMTP server, username/password, we recommend you to use the account and SMTP server
which provide by your ISP. After that, fill sender and receiver's
email and the subject of the mail.
IP Assignment
21
22
NC1500-1600 - Control & Configure IP Camera
Manually: If selected, you must assign the following data to
the IP Camera.
- IP Address - Enter an unused IP address from the address
range used on your LAN.
- Subnet Mask - Use the same value as PCs on your LAN.
- Default gateway - Use the same value as PCs on your LAN.
- MAC address - Displays the MAC address of the camera.
Automatically by DHCP: If selected, the IP Camera will
obtain its IP address and related information from a DHCP
Server. Only select this option if your LAN has a DHCP Server.
DNS1 - Use the same value as PCs on your LAN. Normally,
your ISP will provide this address.
DNS2 - This is optional. If entered, this DNS will be used if the
DNS1 does not respond.
DNS3 - Type the IP address of the third DNS server, if necessary.
PPPoE
Dial On Power Up - If selected, the IP Camera will connect to
your ISP when power up.
Username - Enter the user name given by your account provider.
Password - Enter the password given by your account provider.
Audio
If you want audio to be
included with the video,
enable this option. You
can choose what kind of
video format you like. PCM (64 bit) supply better quality performing, but it takes more bandwidth than ADPCM (32 bit) at
NC1500-1600 - Control & Configure IP Camera
the same time. You can decide enable to use audio or not, or
which sound format to fit your network bandwidth.
Access List
This function supply you to define specific IP address which you
want to allow or disallow accessing IP camera. You can set
reject or accept IP address here. Also you can set enable or disable this function here.
IP Management:
Select Enable to apply this function; Select Disable if you do not
need this function at this time.
Mode:
When you set to enable IP function, you can choose the rule -Reject : Accept all except those on reject list.
Accept: Reject except on accept list
Add/Delete an IP address
Fill in an IP address then select weather you like to accept or
reject the address.
Dynamic DNS
Many internet connections use a "Dynamic IP address", where
the Internet IP address is allocated whenever the Internet connection is established.
23
24
NC1500-1600 - Control & Configure IP Camera
This means that other Internet users don't know the IP
address, so can't establish a
connection. DDNS is
designed to solve this problem, by allowing users to
connect to your LAN using a
domain name, rather than
an IP address.
User can go to www.Dyndns.org to register your own domain
name and get a username/password. Fill in your username/
password and domain name information on DDNS setting page.
Once PPPoE dialed, IP camera will update it's IP to DDNS automatically. So users can access IP camera always by a domain
name.
PTZ Setting
Please select the PTZ at first
according to your used PTZ.
Now we support 11 kinds of
PTZ, they are Pelco-D, PelcoP, DynaColor, Philips, Lilin,
PIH1016, V1200, YAAN,
VICANYX, Pelco 422D &
Pelco 422P. After this, please
check the Address on PTZ camera's hardware setting. In dialogue box, you can choose Baud Rate, Parity Bit, Data Bit and
Stop Bit. After correct settings of PTZ, then we just can control
well.
NC1500-1600 - Control & Configure IP Camera
GPIO Setting
This function can let you to define external digital input or output divice.
NC
G
NO
COM
DI1
G
DI2
Digital Input
The I/O inputs / outputs are used in applications for, e.g. event
triggering, time lapse recording, alarm notification via email,
picture storage to FTP locations.
Digital Input - e.g. a doorbell. If the doorbell is pressed, the
state changes, and the input will be active.
Please make sure what kind of operation type it is, then connecting your external device (senor or input device) to IP camera.
When it is "normal closed" device, please select Normal
Closed; and, if it is a "normal opened" device, please select
Normal Opened.
After setting up Digital input, there are 3 options you can
choose the way to react when DI triggered (either send pictures to Email or FTP preset or trigger DO).
Digital Output
Digital Output - e.g. an alarm device that can be activated
from digital Output.
25
26
NC1500-1600 - Control & Configure IP Camera
NC1500-1600 - Appendix
Appendix
Specifications
Model
NC 1500-1600 Network / IP Camera
Lens
• Standard C/CS Mount Type
• Auto IRIS Lens Support
Image
--Image Frame Rate:
• Up to 30 Frame Per Second @ VGA Up to
40 Frames Per Second @CIF.
• Compression: JPEG Image, MJPEG Video.
• Video Quality Level: 5
• Resolution: 640x480, 320x240, 352x288,
176x144,160x120
Audio Support
PCM/ADPCM
Hardware
• CPU: 32 Bits RISC Processor.
• One RJ-45 for 10/100 Fast Ethernet.
• One RS-485 Port for Pan/Title Device
Control or PTZ Camera Control.
• 2Di / 1Do for User Define
Protocols
• TCP/IP, ICMP,ARP ,SMTP, HTTP, FTP,
PPPoE, DHCP, NAT, DDNS
Installation
• Via Configuration S/W or Web Config
User management
• Up to 20 Users Log in
• 2 Layers Username & Password Protection.
Support
• GPIO Trigger
Motion Detect
• 3 Level Sensitivity Detection
• Alert / Record via E-Mail or FTP When
Triggered
Image Rotate
• Support
Snap Shot
• Support
27
28
NC1500-1600 - Appendix
DDNS
• Support
Temperature
• Operating : 0° ~50 °C
• Storage: -20° ~70 °C
Humidity
• 95% Non-Condensing
Power
• DC 12V
EMC / Safety
• FCC Class B / CE
Weight
• 420 g