1
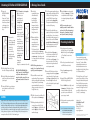
2. Positioning the Syringe
1. Introduction
Before using your Prodigy® Count-a-dose™, you should familiarize yourself with its physical
characteristics and its operation.
The Prodigy® Count-a-dose™ consists of a
RECTANGULAR BASE which holds
the syringe and a T-SHAPED BAR
which holds the insulin vials.
T-SHAPED BAR
Lay the base of the Prodigy®
Count-a-dose™ on a table in
Insulin
Protective
Identification
front of you. In one of the corners
Cap
Dots
Rubber-lined
there is a rounded, raised area.
Holes
Place this rounded, raised area
Flat Tab
in the lower left corner. This raised
area has a round side and a flat
Channel
side. The flat side is where
Rectangular
the plunger of the syringe will
Hole
Barrel
be seated. Along the left side
Clip
of the base is a channel. The barrel
and flanges of the syringe lie in
this channel. There are notches
Plus Sign
to secure the flanges. Toward the
upper left corner there is
Flange
Click Dial
a clip that holds the barrel
Flange
Notch
of the syringe in place.
Minus Sign
Plunger
The upper right corner is
Flange
a flat, smooth panel.
Flat side
Immediately below this
Rounded
B-D 1/2 cc SYRINGE
panel is a large, raised
Raised
plus sign (+); below the
Area
plus sign (+) is a notched
click dial; near the lower
RECTANGULAR BASE
right corner is large, raised
minus sign (-).
On the top end of the RECTANGULAR
BASE of the Prodigy® Count-a-dose™ is a small
rectangular hole in which the T-BAR is
mounted. The T-BAR of the Prodigy® Count-adose™ consists of a small, flat tab that slides into
the rectangular hole and a cross piece that
contains two rubber-lined holes used to mount
the insulin vials. On one end of the cross piece is
a single, large raised dot, on the other end are
two large raised dots. These dots can be used
to correspond to a type of insulin.
1.The syringe fits into the channel on the
™
This product is guaranteed to perform satisfactorily for a period of one year. If for any reason your Prodigy® Count-a-dose™
fails to operate properly, return it with the original box and a copy of your sales slip to Prodigy Diabetes Care, LLC for a
free replacement.
the flanges and the plunger placing the
plunger against the flat side of the
raised area.
5. The syringe fits loosely under the clip and
2. Push the plunger of the syringe in as far
the flanges on the syringe can be rocked
from side to side.
6. To be certain that your syringe is properly as it will go. If the plunger is out even a
fraction, the syringe will not seat properly.
seated in the channel, place your thumb on the click dial and move the dial a
number of clicks toward the plus sign (+).
If the bracket is drawing the plunger out of the syringe, the syringe is seated properly.
3. Also make sure the click dial on the
Prodigy® Count-a-dose™ is turned
completely toward the minus sign (-). If it
is not rotated as far as it will go, the syringe
will not seat properly.
1. Place the top of the
regular insulin vial
in the rubber-lined
hole of the T-BAR on
the end with the
single dot.
2. If you are using a
3. Turn the T-BAR upside down placing the
bottom of the insulin vials on the table.
4. Press down on the T-BAR to be sure the
vials are securely mounted. Even when properly mounted, the vials can be
wiggled from side to side.
suspension insulin,
roll the vial gently
between your palms,
mixing the cloudy material evenly through
the solution. Now mount the top of the
vial of the suspension insulin in the other
rubber-lined hole on the end with
two dots.
NOTE: For daily use, you do not need to remove the suspension insulin vial to mix it.
Simply roll the T-BAR between your palms or rock it gently from side to side.
7. Move the click dial all the way down
4. Place the plunger against the flat side of the
raised area as shown above. The flanges will
seat in their notches properly only if they are
lying horizontally. Slip the barrel of the
syringe under the clip into the channel as
shown below.
You can place the regular insulin on the end with
one dot and the suspension insulin on
the end with two dots.
Insulin vials can be further identified by placing
a rubber band or piece of tape on the Regular
insulin vial. Braille markings can be used to
indicate the type of insulin contained in a vial
and the expected date when this insulin vial will
be empty.
left side of the Prodigy Count-a-dose
base. To place the syringe in the channel,
you must remove the plastic cap covering
the plunger. Do not remove the long
narrow cap protecting the needle at this time.
®
3. Installing Insulin Vials on the T-BAR
8. Set the rectangular base of the Prodigy
®
Count-a-dose™ aside.
You may find it easier to reverse the
procedure for positioning the syringe.
This means you would place the barrel of
the syringe under the clip, and then grasp
toward the minus sign (-). This will push
the plunger back up into the barrel of
the syringe.
NOTE: You will need to pressurize or inject
air into your insulin vials to replace the
insulin that you take out. A procedure for
pressurizing your insulin vials using the
Prodigy® Count-a-dose™ is described at the
end of these instructions.
4. Cleaning the Insulin Vials
1. The rubber stoppers on the tops of your insulin vials must be cleaned before you insert the needle.
2. Place the bottoms of the insulin vials on the table with the tab of the T-BAR
pointing up.
3. Examine the surface of the T-BAR on both sides of the tab. There are two small holes, one on each side of the tab.
4. You must swab in and around the holes
with an alcohol swab to clean the rubber
stoppers on the top of the insulin vials.
5. Set the T-BAR with mounted insulin vials aside.
5. Mounting the T-BAR on the RECTANGULAR BASE
6. Drawing a Dose of Insulin
1. Return to the
RECTANGULAR BASE of
the Prodigy®
Count-a-dose™. Place the
palm of your hand on the
front and use your thumb
or index finger to locate
the rectangular hole on
the top.
1.It is absolutely
necessary that the bottom
of the insulin vial(s) be
pointed straight up
toward the ceiling
when air bubbles are
being removed from the
syringe or when insulin is
being drawn with the
Prodigy® Count-a-dose™.
6. The T-BAR must fit into the rectangular
hole. Use the tab of the
T-BAR to locate your
extended finger and
guide the tab into the
rectangular hole.
As the tab is being
inserted, the needle
will penetrate the
rubber stopper of the
insulin vial. (The needle
should slide easily into
2.Now, remove the
protective cap covering the vial. If you
the needle. Remember, encounter resistance,
such as ticking of the
the syringe fits loosely
needle against plastic,
in the Prodigy®
gently lift the T-BAR,
Count-a-dose™,
realigning it, and again
so you must keep
slide the tab into the
your hand around
it, holding the syringe rectangular hole.
This technique
firmly in place.
eliminates the
possibility of
damage to, or contamination of, the needle).
3.Hold the Prodigy
Count-a-dose™ pointing
the needle of the syringe toward the ceiling.
®
4. Pick up the T-BAR and turn the insulin vials upside down so the bottoms of the vials are pointed upward.
NOTE: The RECTANGULAR BASE of the
Prodigy® Count-a-dose™ and the T-BAR guide
are positioned so that when the needle is
inserted into the rubber stopper, all but a very
small amount of insulin can be drawn from
the vial.
5. Position the T-BAR so the type of insulin you intend to draw first is on the left side, above
the needle.
CAUTION:
Syringe batches may vary, causing minor dosage discrepancies when used with Prodigy® Count-adose™. To date, reported discrepancies have not exceeded 1 unit, greater or lesser than the desired
insulin dose and have usually been lesser. If up to a 1-unit discrepancy might significantly affect
your diabetes control, please discuss the matter immediately with your physician or diabetes
educator. Additionally, we recommend that a sighted person verify the accuracy and/or discrepancy
of dosage whenever you begin to use a new batch of syringes. Should you have any questions or
concerns, please call us at 1.800.243.2636 for technical support.
2.Eliminate air bubbles in
the syringe by drawing
some insulin into the
syringe and then ejecting
it back into the vial.
To do this, move the dial
a few clicks toward the raised plus sign (+),
then move the dial all the way down to the
raised minus sign (-). Repeat this procedure
2 or 3 times in succession to clear the syringe
of any air bubbles.
NOTE: The following instructions are an
example of a dose of insulin and do not apply
specifically to your insulin requirements.
6.To add the suspension insulin into the same
10.Return the bracket to zero by moving the
7.There should be no air bubbles in your NOTE: If you are using only one type of
insulin, the procedures are similar to what has
just been described. Follow the instructions for
Drawing a Dose of Insulin; steps 1 through 5
and steps 9 and 10 (omit steps 6 through 8).
all the way down toward the minus sign (-).
5.With the regular insulin placed on the left (or syringe) side, move the dial 10 clicks toward the plus sign (+). Each click of the dial
toward the plus sign (+) will draw 1 unit of insulin into the syringe.
syringe if you followed previously described procedure (#2 above), so do not attempt to clear air bubbles from the syringe once you have moved to the second bottle. Do not move the dial toward the minus sign (-). This will contaminate your second vial of insulin with liquid from the first vial.
8. Move the dial toward the plus sign (+);
one click for every unit of insulin. For 15
units of suspension insulin, move the
dial 15 clicks toward the plus sign (+). You
have now measured a total of 25 units of
insulin, 10 units of regular insulin and 15
units of suspension insulin.
9.Remove the T-BAR and set it aside. Insert 3.If you would like to measure 10 units of regular insulin and 15 units of suspension insulin, you would usually begin by measuring the regular insulin. (If you are measuring
suspension insulin first there is no need to change your procedure in order to use the
Prodigy® Count-a-dose™).
4.The dial of the count-a-dose should be rolled syringe, switch the vials by lifting the T-BAR
off the base of the Prodigy® Count-a-dose™,
rotate the T-BAR 180 degrees and insert
the tab back into the rectangular hole.
The suspension insulin vial will then slip
over the needle of the syringe.
your finger gently under the syringe plunger to unseat it from the slot. Grasp the syringe by the flanges or the barrel and rotate it out
from under the clip. Do not allow the
needle to slide under the clip where it might
be contaminated.
dial back to the minus sign (-). The bracket
is very flexible and could be dislodged or
bent if returned by pushing with the palm of
your hand.
Pressurizing Insulin Vials
1. After you have mounted your syringe in the Prodigy® Count-a-dose™, move the click
dial as far as it will go toward the plus sign
(+). This will draw 50 units of air into
the syringe.
2. Clean the top of your insulin vials mounted in the T-BAR with an alcohol swab.
3. Remove the protective cap covering the needle of your syringe.
4. Mount the T-BAR on the RECTANGULAR
BASE of the Prodigy® Count-a-dose™.
5. Move the click dial as far as it will go toward
the minus sign (-). This will inject 50 units of air into your insulin vial. Repeat this procedure on your second insulin vial if you use two types of insulin.
6. Use this procedure to pressurize your insulin vials whenever necessary.
If you would like information about blindness and diabetes,
contact The National Federation of the Blind:
1800 Johnson Street • Baltimore, MD 21230
410.659.9314 • www.nfb.org/diabetes.htm.
These are instructions for operating
your single increment (lo-dose) Prodigy®
Count-a-dose™. If you have difficulty
understanding these instructions, you
should seek assistance from someone
knowledgeable about the Prodigy® Count-adose™, blindness and diabetes.
The Prodigy® Count-a-dose™ is a simple
system to learn, is well-adapted to the use
of non-sighted alternative techniques and
allows a blind diabetic to measure from
one to fifty units of insulin in single unit
increments. The Prodigy® Count-a-dose™
uses a BD (Becton Dickinson) lo-dose,
50-unit (1/2 cc) insulin syringe.
Manufactured by:
Prodigy Diabetes Care, LLC
P.O. Box 481928
Charlotte, NC 28269 USA
1.800.243.2636
www.prodigymeter.com
©2010 Diagnostic Devices, Inc. Prodigy® is a registered trademark of DDI. Count-a-dose™ is trademark of DDI. All other
trademarks are property of their respective owners. All rights reserved. CI-Guide Rev.1 09/10