1
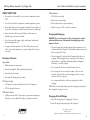
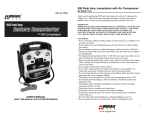
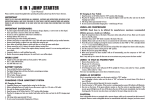
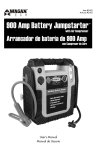
Item #2509
600 Amp Battery Jumper
with Air Compressor
User’s manual- Read these instructions before using the unit
600 Amp Battery Jumpstarter by Wagan Tech
User’s Manual—Read before using this equipment
TM
Features
Thank you for purchasing 600 Amp Battery JumpstarterTM by Wagan Tech.
With normal care and proper treatment it will provide years of reliable
service. Please read all operating instructions carefully before use.
Front
LED Worklight
Worklight Switch
USB Power Ports
and on/off Switch
12V DC Port
LED Status Indicators
IMPORTANT
Before using this unit, read and understand all instructions included in this
manual also those published by your vehicle’s battery manufacturer and
the manual of any other device intended to be used with this unit. Failure to
follow all listed instructions may result in electric shock, fire, and/or serious
personal injury.
Save these instructions for future reference.
Battery Check Button
Air Hose
GENERAL SAFETY RULES
Charging Jack
• This product is not a toy. Keep out of the reach of children.
Jumper Cable
• Wear complete eye and clothing protection. Do not touch eyes while
working near battery.
• Do not operate this unit in or around water. Water can damage the
unit.
• Remove metal, personal jewelry, such as rings, bracelets, necklaces
and watches while working with a lead acid battery; these items could
produce a short-circuit that may cause severe burns.
Back
Air Compressor Switch
Air Compressor Gauge
Safety Switch
Air Hose Compartment
• Do not operate this device while wearing vinyl clothing. Static
electricity may be generated when vinyl clothing is rubbed.
• Keep battery terminals clean. Be careful to keep corrosion from
coming in contact with eyes
Service
• This product has no consumer serviceable parts.
• Do not attempt to remove or replace the battery used in this device.
When the battery has reached the end of its useful lifetime, take the
entire unit to a battery recycling facility.
1
www.wagan.com
© 2011 Wagan Corporation
All Rights Reserved
Wagan Tech and wagan.com are trademarks used by Wagan Corporation
2
600 Amp Battery Jumpstarter by Wagan Tech
TM
User’s Manual—Read before using this equipment
Other Features
SPECIFIC SAFETY RULES
• This product is not intended for use in the rain or temperatures above
130ºF.
• 30 LED built-in work light
• Do not let the cords of the jumpstarter or attached appliances get wet.
• Built-in safety features to prevent sparking
• Never allow clamps (positive & negative terminals) to touch together or
to connect the same piece of metal to prevent short-circuits and arcing.
• Ideal for cars, vans, SUVs, trucks, boats and more
• Never work alone with this product. Make sure that someone is
available to give assistance if needed.
• Use only the provided chargers, cables and clamps. Unauthorized
parts may damage the unit.
• For proper and safe operation of the 12 Volt DC power accessory
outlets, do not place anything into it except the plug of the accessory
to be used.
Description of Functions
Jump Starter
• 600 peak amps auto jump starter
• Powerful rechargeable 15AH sealed lead acid battery
• Heavy duty booster clamps
• Extra long 28" #6 gauge booster cables
DC Power Source
• 1 DC power outlet with overload protection for 12V appliances
• 110 Volt charger for home use
USB Power Source
• 2 USB power ports with 2.1 Amp output to power and recharge most
USB devices such as tablets, MP3 players, cell phones and more.
• Battery status indicator lights
Charging and Recharging
WARNING: Do not overcharge this unit. Prior to charging unit, read and
understand all instructions on this manual. Overcharging may result in
damage to the unit.
• This product may arrive partially charged from the manufacturer. It is
recommended to fully charge the unit immediately after purchase and
before using for the first time.
• The red charging LED indicator will be illuminated while the unit is
charging. After charging period is completed, push the “Battery
Indicator Button”, and thethree LED battery lights should light up.
The battery is now fully charged.
• Do not charge the unit for more than 48 continuous hours.
• Do not charge the unit-on a boat, boat ramp, or dock since the
electrical cords and outlets used for charging could cause severe
electrical shock if they get wet.
• It is recommended that the unit be in an upright position while
charging.
NOTE: Make sure both cable clamps (positive and negative) are placed in
their storage holsters when not in use.
Charging with the AC Charger
1. Insert AC charger plug into charging jack of the unit.
2.Insert AC charger receptacle plug into AC receptacle.
3
www.wagan.com
© 2011 Wagan Corporation
All Rights Reserved
Wagan Tech and wagan.com are trademarks used by Wagan Corporation
4
600 Amp Battery Jumpstarter by Wagan Tech
TM
3.Fully charges the unit to the following:
• Initial and first time charge: 38 hours continuously
• Recharge or between use: around 34 hours continuously.
4.When charging is complete, unplug the AC charger receptacle plug
then the AC charger from the charging jack on the unit.
Charging with the 12 Volt DC Charger:
1. Insert DC charger plug into charging jack of the unit.
2.Insert DC charger accessory plug into vehicle cigarette lighter socket.
3.Fully charge the unit for around 14 hours continuously, while the engine
is running.
4.When charging is completed, unplug the DC charger accessory plug
first and then the DC charger from the charging jack on the unit.
Jumpstarting a Vehicle
WARNING: Vehicles equipped with on-board computers may be affected
if the engine battery is jump-started. Read your vehicle owner’s manual
before attempting to start the vehicle to determine if external starting
assistance can be used. Failure to follow these instructions may cause
damage or explosion. Use safety glasses to protect eyes while jump-starting
a battery.
1. Turn off the vehicle ignition and all accessories (e.g. radios, lights, air
conditioners, and cellular phones).
2.Set the emergency brake and put vehicles with automatic transmission
in park position.
3.Determine the polarity of the vehicle’s battery terminals. The positive
(POS, P, +) battery terminal usually is larger in diameter than the
negative (NEG, N, −) terminal. If you are unsure, you should refer to
the vehicle owner’s manual.
5
www.wagan.com
User’s Manual—Read before using this equipment
4.Determine whether your vehicle uses a negative or positive grounded
system: Negative ground system (negative battery terminal is grounded
to chassis). Most vehicles use this system. Positive grounded battery
terminal is grounded to chassis or any other part of the vehicle. IF
YOU ARE UNSURE, YOU SHOULD REFER TO VEHICLE OWNER’S
MANUAL.
5.Remove clamps from the holders. Never allow clamps (positive &
negative terminals) to touch together or contact the same piece of
metal to prevent short-circuits and arcing.
6.Follow instructions for a negative grounded system or positive
grounded system as indicated below:
Negative Grounded System
a. Securely connect the positive (+) red clamp to the positive (POS,
P, +) terminal of the vehicle battery or the remote positive (+)
terminal if equipped.
b. Securely connect the negative (−) black clamp to the vehicle
chassis, engine block, or a non-moving metal part of the vehicle
which is verified to be grounded. Do not clamp directly to
negative battery terminal, carburetor,
fuel lines, or sheet metal body parts.
c. See jump-starting step 7 to continue.
Positive Grounded System:
a. Securely connect the negative (−) black clamp to the negative
(Neg, N, −) ungrounded terminal of the vehicle battery.
b. Securely connect the positive (+) red clamp to the vehicle chassis,
engine block, or a non-moving metal part of the vehicle which is
verified to be grounded. Do not clamp directly to positive battery
terminal, carburetor, fuel lines, or sheet metal body parts.
c. See jump-starting step 7 to continue.
© 2011 Wagan Corporation
All Rights Reserved
Wagan Tech and wagan.com are trademarks used by Wagan Corporation
6
600 Amp Battery Jumpstarter by Wagan Tech
User’s Manual—Read before using this equipment
TM
7. Turn on the safety switch and allow 2 to 3 minutes of charging time.
It is recommended to have a second person to assist holding the unit
securely in place during the next steps.
8.Turn on the vehicle to attempt to start the engine. Stop if the vehicle
does not start after 4 to 5 seconds of engine cranking. Wait 3 to 4
minutes then try again. Repeat several times until the vehicle starts.
CAUTION: Excessive engine cranking can damage vehicle starter
motor. If the engine turns, but fails to start after several attempts, other
technical problems might be involved. Discontinue cranking the engine
until the other problems have been determined and corrected.
9. When finished, turn OFF the safety switch, stand as far away from
the vehicle battery as possible and disconnect the clamps in reverse
sequence to connecting procedure:
• For negative grounded systems, first disconnect negative (black)
then positive (red) clamps.
• For positive grounded systems, first disconnect positive (red) then
negative (black) clamps.
DC Power Port
The DC Power Port (accessory socket) is located to the right front side of
the unit. The port can power a DC load of up to 11 Amps. Overloading the
port may result in “tripping” a self-resetting circuit breaker. Removing the
overload automatically restores power to the DC Power Port.
1. Uncover the dust cover from the Power Port.
2.Insert the 12V DC accessory plug into the Power Port.
3.Set On/Off safety switch to the “ON” position.
7. Replace the Power Port’s dust cover.
8.Recharge the Jumper as soon as convenient.
USB Power Port
Two USB power ports located underneath the LED work light can power/
charge devices that require 5V at up to 2.1 Amps through the use of a user
supplied cable.
1. To use the USB ports, connect the USB device to one of the USB ports
and press down the USB ON/OFF switch once to power ON the USB
port. The USB power indicator LED will light up.
2.When finished, disconnect the device from the USB port on the jumper
and press down the USB ON/OFF switch once to power OFF the USB
port. The USB power indicator LED will turn off.
3.Recharge the jumper as soon as convenient.
Storage
This unit may be stored in any position. Make sure the clamps are secure
inside the booster cable storage covers. Store at room temperature. If not
used for a prolonged period of time, recharge every 2 months in the winter
and every month in the summer.
Specifications
Power Supply Battery
15AH sealed lead acid
Power Supply DC Output
12-volts nominal
Power Supply Charging Time
• 38 hours for the first time charging
with AC charger
4.Operate the appliance as usual.
• 34 hours to recharge with AC charger
5.After use, turn OFF the safety switch.
• 14 hours to recharge with 12-volt
DC charger
6. Disconnect the accessory plug from the DC Power Port and store the accessory.
Storage
7
www.wagan.com
Store in a cool dry area
© 2011 Wagan Corporation
All Rights Reserved
Wagan Tech and wagan.com are trademarks used by Wagan Corporation
8
WAGAN Corp. Limited Warranty
All WAGAN Corporation products are warranted to the original purchaser of
this product.
Warranty Duration: This product is warranted to the original purchaser for a
period of one (1) Year from the original purchase date, to be free of defects
in material and workmanship. WAGAN Corporation disclaims any liability for
consequential damages. In no event will WAGAN Corporation be responsible
for any amount of damages beyond the amount paid for the product at retail.
In the event of a defective item, please contact WAGAN Corporation at (800)
231-5806 to obtain a Returned Merchandise Authorization number (RMA#), and
return instructions. Each item returned will require a separate RMA#. After you
have received the RMA# and the return instructions from WAGAN Corporation,
please follow the instructions and send the item with PREPAID SHIPPING, along
with all of the required documentation, a complete explanation of the problem,
your name, address and daytime phone number. WAGAN Corporation will, at
its option, replace or repair the defective part.
A Returned Merchandise Authorization number (RMA#) is REQUIRED when
sending in any defective item. WAGAN Corporation is not responsible for any
item(s) returned without an official Returned Merchandise Authorization number.
The item(s) must be returned with prepaid shipping. WAGAN Corporation is not
responsible for any shipping charges incurred in returning the item(s) back to the
company for repair or replacement. This warranty is void if the product has been
damaged by accident, in shipment, unreasonable use, misuse, neglect, improper
service, commercial use, repairs by unauthorized personnel or other causes not
arising out of defects in materials or workmanship. This warranty is effective only
if the product is purchased and operated in the USA and does not extend to any
units which have been used in violation of written instructions furnished.
Warranty Disclaimers: This warranty is in lieu of all warranties expressed or
implied and no representative or person is authorized to assume any other
liability in connection with the sale of our products. There shall be no claims
for defects or failure of performance or product failure under any theory of
tort, contract or commercial law including, but not limited to negligence, gross
negligence, strict liability, breach of warranty and breach of contract.
Warranty Performance: During the above one (1) Year warranty period, a product
with a defect will be replaced with a comparable model when the product is
returned to WAGAN Corporation with an original store receipt. The replacement
product will be in warranty for the balance of the one (1) Year warranty period.
REV2008
9
www.wagan.com
[email protected]
U.S. & Canada Toll Free: 1.800.231.5806
Tel: +1.510.471.9221
31088 San Clemente Street
Hayward, CA 94544
U.S.A.
©2011 Wagan Corporation
All Rights Reserved
Wagan Tech and wagan.com are trademarks used by Wagan Corporation
REV20110629