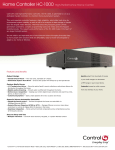
1
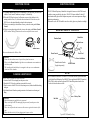
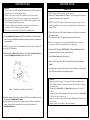
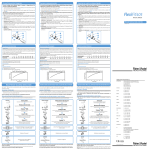
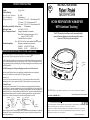
PRODUCT SPECIFICATIONS
Size:
Weight:
Electrical Ratings:
Electrical Supply Frequency:
Power Consumption:
Voltage and Current:
5.4 cm high x 13.2 cm x 14.6 cm (2.1"x 5.2"x 5.7")
0.7 kg (1.5 lbs)
50 - 60 Hz
92 W maximum
230 V model 230 V ± 20 V, 0.4 A maximum at 230 V
115 V model 115 V, 0.8 A maximum at 115 V
100 V model 100 V ± 10 V, 0.9 A maximum at 100 V
Suitable for use with a DC to AC inverter:
150W minimum
Heaterplate Cutout:
93°C(199°F) ± 5°C(9°F)
Power/Temperature Control:
Settings of 1(minimum) - 4(maximum)
Heater Plate Temperature from approx. 30°C to
approx. 65°C (86°F to 149°F)
Continuous Mode of operation.
Note: The HC150 is Class I unless marked with the symbol
Standards Compliance:
Designed to conform to requirements of:
IEC 60601.1 CAN/CSA-C22.2 No.68
EN 60601-1 UL 1431
AS/NZS 3200.1.0
EN
INSTRUCTION SHEET
258
HC150 RESPIRATORY HUMIDIFIER
WITH Ambient Tracking™
The HC150 respiratory humidifier is used to warm and humidify
gases delivered to patients requiring continuous positive airway
pressure (CPAP) therapy or mask ventilation.
GROUNDING INSTRUCTIONS (for CLASS I models only)
NOTE: Models labeled as Class II (Double Insulated) are marked with the
require grounding. The following applies to Class I (three wire) models only.
symbol and do not
The HC150 should be grounded. In the event of an electrical short circuit, grounding reduces the risk of
electric shock by providing an escape wire for the electric current. The HC150 is equipped with a cord
having a grounding wire with a grounding plug. The plug must be plugged into an outlet that is properly
installed and grounded.
DANGER - Improper use of the grounding plug can result in a risk of electric shock.
Check with a qualified electrician or serviceman if the grounding instructions are not completely
understood, or if in doubt as to whether the HC150 is properly grounded.
Extension Cords:
If it is necessary to use an extension cord, use only a 3-wire extension cord that has a three-blade
grounding plug, and a 3-slot receptacle that fits the HC150 plug. Replace or repair a damaged cord.
In Canada/USA only:
This product is for use on a nominal 115V circuit, and has a grounding plug that looks like the plug
illustrated (Figure 1). A temporary adaptor, may be used to connect this plug to a 2-pole receptacle if a
properly grounded outlet is not available. The temporary adaptor should be used only until a properly
grounded outlet (Figure 1) can be installed by a qualified electrician. The green coloured rigid ear, lug, etc
extending from the adaptor, must be connected to a permanent ground such as a properly grounded
outlet box cover. Whenever the adaptor is used, it must be held in place by the screw.
Grounded
Outlet
CAUTION: FEDERAL LAW RESTRICTS THIS DEVICE TO SALE BY OR ON THE ORDER OF A PHYSICIAN.
Patents Pending in Principal Countries of the World
Part number 185042258 Rev C
Temporary
Adaptor
Grounded
Outlet Box
International: PO Box 14-348, Panmure, Auckland 6, New Zealand Email: [email protected] Web Site: www.fphcare.com
Tel: +64-9-574-0100 Fax: +64-9-574-0158
Metal Screw
Grounding
Pin
Figure 1: Grounding methods.
Tab for
grounding screw
If repair or replacement of the cord or plug is necessary, do not connect the grounding wire to either flat
blade terminal. The wire with insulation having an outer surface that is green with or without yellow
stripes is the grounding wire.
8
USA: Suite 101, 22982 Alcalde Drive, Laguna Hills, California 92653, USA Tel: +949-470-3900 Fax: +949-470-3933 Toll Free: +1-800-446-3908
Australia: 36-40 New Street, Ringwood, Victoria 3134, Australia, Tel: +61-3-9879-5022 Fax: +61-3-9879-5232
*UK and Ireland: Unit 16, Cordwallis Park, Clivemont Road, Maidenhead, SL6 7BU, United Kingdom Tel: +44-1628-626-136 Fax: +44-1628-626-146
France/Benelux: 10 Avenue du Quebec, SILIC S12 - Villebon, 91946, COURTABOEUF CEDEX, France Tel: +33-164-46-5201 Fax: +33-164-46-5221
Germany/Austria Tel: +49-(0)7182-93777-0 Fax: +49-(0)7182-93777-99
*European
*European Authorised
Authorised Representative
Representative
1
SYMBOL DEFINITIONS
TROUBLESHOOTING
~
IPX1
IEC 60601-1
Class I
Type B
Applied Part
Attention:
Consult
accompanying
documents
Drip
Proof
Alternating
Current
Heater
Control
Power
On/off
93/42/EEC
Class IIb
Do not
heat
Double
Insulated
WARNINGS
When using electrical products, especially when children are present, basic safety
precautions should always be followed, including the following:
READ ALL INSTRUCTIONS BEFORE USE
DANGER - TO REDUCE THE RISK OF ELECTROCUTION:
* Always unplug the HC150 immediately after use.
* Do not use the HC150 while bathing.
* Do not place or store the HC150 where it can fall, or be pulled into a tub or sink.
* Do not place or drop the HC150 into water or other liquid.
* If the HC150 does fall into water, do not attempt to retrieve it. Unplug the HC150 immediately.
WARNING - TO REDUCE THE RISK OF BURNS, ELECTROCUTION, FIRE OR INJURY:
* The HC150 should never be left unattended when plugged in.
* Close supervision is necessary when the HC150 is used by, on, or near children or invalids.
* Take care to avoid dropping any items on the HC150.
* If any damage occurs to the unit, immediately unplug the HC150 and call your Fisher & Paykel
Healthcare dealer for assistance.
* Use the HC150 only for its intended use as described in this manual. Use only accessories
recommended by Fisher & Paykel Healthcare.
* Never operate the HC150 if it has a damaged cord or plug, if it is not working properly, or if
any part of either the HC150 or the humidification chamber is dropped or damaged, or
dropped into water.
* Auto titrating devices may not operate correctly when used with a humidifier. Consult the Auto
titrating clinical/operating manuals
* Keep the cord away from heated surfaces.
* Never block the air openings of the HC150 or place it on a soft surface such as a bed or couch,
where the air openings may be blocked. Keep the air openings free of lint, hair and the like.
* Never drop or insert any object into any opening or hose.
* Remove the humidification chamber from the HC150 before filling.
* The function of this humidifier may be adversely affected by operation of high frequency
apparatus or shortwave or microwave equipment in the vicinity.
* This equipment may radiate radio frequency energy. If interference occurs, try the following:
- Reorient or relocate the HC150 device
- Increase the separation between the equipment
- Connect the equipment into an outlet on a circuit different from that to which the other
devices are connected.
* Do not use the HC150 in the presence of flammable or explosive materials.
* Equipment not suitable for use in the presence of flammable anaesthetic mixture with air or with
oxygen or nitrous oxide.
* Be sure to comply with all the safety instructions contained in your CPAP or mask ventilator
system operating manual.
* Disconnect supply before servicing.
* Not for use with patients whose upper airways are bypassed.
The HC150 contains no user serviceable parts. If you believe your unit is not working
properly, please take a few moments to check the following table. If the problem persists,
please contact your local Fisher & Paykel office.
Symptoms
Possible Causes
Unit does not switch
1. Unit not plugged into live
on: Power-on indicator
power socket.
not lit.
2. Unit not correctly plugged
in, switched on at the
socket and the ON/OFF
switch set to ON.
3. Blown fuse or tripped
thermal cutout.
1. Plug power cord into a live
power socket.
2. Check that the unit is
plugged firmly into the
socket and that the
switches are turned on.
3. Contact your Fisher &
Paykel service centre or
dealer.
Air not flowing
through mask.
1. CPAP or mask
ventilator system not
switched on or working
correctly.
2. Tubes not connected
properly to humidification
chamber.
3. Tubes blocked.
4. Humidification chamber
overfilled.
1. Consult CPAP
or mask ventilator system
operating manual.
2. Connect as described in
section in Directions for
Use.
3. Unblock tubes.
4. Empty excess water from
chamber so the level is at
the maximum level mark.
Excessive condensation 1. Heater control setting too
high.
in tube.
2. Ambient sensor near heat
source.
1. Reduce heater control
setting.
2. Move HC150, or move the
heat source away from the
ambient sensor.
ACCESSORIES AVAILABLE
900HC105: Starter Kit (recommended) 900HC007: Mounting Tray
900HC008: Tube (61cm/24")
HC325D: 2 x HC325 Chamber
900HC221: Tube (183cm/72")
HC300:
1 x HC300 Dishwashable Chamber
For more information, please consult the Fisher & Paykel Healthcare Product Catalog
or go to our website: www.fphcare.com
DO NOT DISCARD
2
Remedies
7
DIRECTIONS FOR USE
DIRECTIONS FOR USE
CONTROLLING THE HUMIDITY
1. If a Heater Control setting has been recommended by your physician, you should start
with this. Under “normal” conditions, a setting of 3 is satisfactory.
2. When the HC150 has been in use for 20 minutes or more, check that there is fine
misting in the last 15cm (6") of the tube closest to the mask. If this is the case, the
HC150 is set to the optimal humidity setting for that environment.
3. If there is more misting in the tube than necessary, reduce the setting on the Heater
Control.
4. If there is not enough misting in the tube, increase the setting on the Heater Control.
NOTE: Ambient Tracking™ minimizes the need to re-adjust the heater control
The HC150 Heated Respiratory Humidifier is designed for home use with a CPAP or mask
ventilator system prescribed by a physician. The HC150 features Ambient Tracking™ ,
which automatically adjusts the heaterplate temperature as the room temperature changes,
minimizing condensation.
When not in use, the HC150 should be stored in a cool dry place away from direct sunlight.
IMPORTANT PARTS OF YOUR HC150
Heater Plate
Chamber Guard
Ambient Sensor
Ambient sensor
Excess condensation in the Delivery Tube
Power Cord
Heater Control
WARNING
* Ensure that the ambient sensor is kept well away from heat sources.
* Do not set the Heater Control so high that excess condensation can accumulate in
the delivery tube.
* The breathing tube should always be arranged so that any excess condensation
drains back to the chamber.
CLEANING & MAINTENANCE
NOTE: The HC150 should be cleaned as needed.
1. Switch off the HC150 and unplug from the power socket.
2. Detach the HC150 from the ventilator system and allow to cool.
3. Wipe the exterior of the HC150 with a clean, damp (not wet) cloth and mild dishwashing
detergent.
4. See Humidification Chamber operating instructions for information on cleaning and
filling.
WARNING
* Refer Maintenance to qualified service personnel.
* Always switch off the HC150 and unplug the power cord from the power socket
before cleaning.
* Never rinse or place the unit in water or allow water to get into the interior of the
unit.
* Ensure that the unit is dry before plugging into the power socket.
6
Power-On Indicator
Humidification Chamber
(Supplied separately)
ON/OFF Switch
SET UP
1. It is recommended that the HC150 and the CPAP or mask ventilator system are mounted
on a Fisher & Paykel Mounting Tray 900HC007 (also supplied with 900HC105 starter kit).
2. The CPAP or mask ventilator system and HC150 should be positioned on the floor
beside the bed rather than on a table.
Delivery Tube
Inlet Tube
Typical HC150 Humidifier Setup.*European Authorised Representative
3
DIRECTIONS FOR USE
DIRECTIONS FOR USE
WARNING
* If a tray is not used, the HC150 should be firmly mounted to avoid the possibility of
being pulled over, or water entering the tubing.
* Whether or not a tray is used, the HC150 should be placed on a flat surface.
* Do not position the system where it may be stepped on when getting out of bed.
* If the system must be mounted on a table, it should be mounted securely to avoid
the risk of being dislodged during the night.
* The system should always be placed lower than the patient so that any excess
condensation in the tube drains back into the chamber.
* Do not spill water onto the HC150, CPAP or mask ventilator system.
OPERATION
3. A clean Humidification Chamber should be filled with distilled water to the maximum
water level mark. See Humidification Chamber operating instructions for information on
cleaning and filling.
CAUTION: Use only Fisher & Paykel Humidification Chambers which are designed for
use with the HC150 Humidifier.
4. Without touching the Heater Plate (which may be hot), hold the Chamber Guard down
and slide the Humidification Chamber onto the top of the HC150.
CAUTION: Switch the HC150 humidifier off when not in use.
1. Plug the HC150 Power Cord into a power socket. The power supply must be the same
voltage as that specified on the underside label.
CAUTION: Your HC150 is designed to work on one voltage power supply. If you are
travelling to a different country you may need an appropriate power transformer or a
different HC150.
2. Plug in and switch on the CPAP or mask ventilator system following the instructions in
the operating manual.
3. Check that there is a flow of air through the tubing and out from the mask.
NOTE: If there is no airflow, either the tubing and humidifier are not connected
correctly or the CPAP or mask ventilator unit is not functioning.
4. Switch on the HC150 using the ON/OFF Switch. The Power-On Indicator will be lit
continuously while the unit is powered and switched on.
5. Turn the Heater Control to the setting required.
6. Allow at least 20 minutes for the HC150 to stabilise after adjustment of the Heater
Control.
7. Apply mask and use as directed by your physician and according to the instructions in
your CPAP or mask ventilator system operating manual.
Sliding the Humidification Chamber onto the HC150.
5. Attach the inlet tube between the air outlet of the CPAP or mask ventilator system and
the air inlet of the Humidification Chamber.
6. A long length of tube (delivery tube) is supplied with your CPAP or mask ventilator
system. Attach one end to the mask and the other end to the air outlet of the
Humidification Chamber.
4
WARNING
* Should the airflow be stopped or interrupted, take off the mask and turn off the
HC150. When the airflow is resumed, switch on the HC150 and allow 20 minutes
for it to stabilise.
* Do not touch the Heater Plate. The Heater Plate temperature may exceed 65°C
(149°F).
* Do not touch the base of the chamber when it is removed from the hot Heater Plate.
The base will take some time to cool.
* Ensure the airflow does not splash water from the Humidification Chamber into the
delivery tube.
* Ensure the tubes are not kinked or otherwise obstructed.
5