1
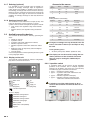
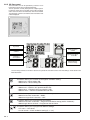
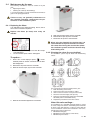
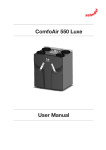
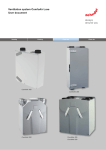
ComfoAir 160 User manual All rights reserved. This manual has been compiled with the utmost care. The publisher cannot be held liable for any damage caused as a result of missing or incorrect information in this manual. In case of disputes the Dutch version of these instructions will be binding. EN - II Table of Contents Preface ............................................................................................................................................................ 1 1 2 3. INTrodUCTIoN .............................................................................................................................................. 1 1.1 Warranty and liability .......................................................................................................................... 1 1.1.1 Guarantee conditions ................................................................................................................ 1 1.1.2 Liability ...................................................................................................................................... 1 1.2 Safety .................................................................................................................................................. 2 1.2.1 Safety regulations ...................................................................................................................... 2 1.2.2 Safety provisions and measures ............................................................................................... 2 1.2.3 Pictograms used ....................................................................................................................... 2 For ThE USEr ............................................................................................................................................... 3 2.1 Glossary ............................................................................................................................................... 3 2.1.1 Balanced ventilation .................................................................................................................. 3 2.1.2 Heat recovery ............................................................................................................................ 3 2.1.3 Bypass for free cooling.............................................................................................................. 3 2.1.4 Frost protection ......................................................................................................................... 3 2.1.5 Openfireprogramme ................................................................................................................ 3 2.1.6 Wireless (RF) control (optional) .................................................................................................. 3 2.1.7 Enthalpy (optional) ..................................................................................................................... 4 2.1.8 Analogue input (0-10V) .............................................................................................................. 4 2.2 Available operating devices ............................................................................................................... 4 2.2.1 Display on the unit ..................................................................................................................... 4 2.2.2 3-position switch ....................................................................................................................... 4 2.2.3 Bathroom switch ....................................................................................................................... 5 2.2.4 CO2 sensor ................................................................................................................................ 5 2.2.5 CC Ease panel ........................................................................................................................... 6 2.3 operating the CC Ease panel ............................................................................................................. 7 2.3.1 Setting the date and time .......................................................................................................... 7 2.3.2 Reading and setting the comfort temperature .......................................................................... 7 2.3.3 Reading and setting the ventilation volume .............................................................................. 7 2.3.4 Switching Boost on ................................................................................................................... 8 2.3.5 Switching the supply and exhaust fan on/off ............................................................................ 8 2.3.6 Setting a personal ventilation programme................................................................................. 9 2.3.7 Setting additional ventilation programmes/ options in the P menus......................................... 9 2.3.8 P menus for the user ............................................................................................................... 11 2.4 Maintenance by the user .................................................................................................................. 13 2.4.1 Cleaningorreplacingthefilters ............................................................................................... 13 2.4.2 Cleaning the valves (in your dwelling) ..................................................................................... 13 2.5 Malfunctions ...................................................................................................................................... 14 2.5.1 Malfunction alerts on digital operating devices ....................................................................... 14 2.5.2 3-position switches with malfunction indicator ....................................................................... 14 2.5.3 What to do in the event of a malfunction ................................................................................ 14 2.6 End of useful life ............................................................................................................................... 14 EEC declaration of conformity ................................................................................................................... 15 III - EN EN - IV Preface 1.1 Warranty and liability 1.1.1 Guarantee conditions Carefully read this manual before use. This manual provides all the information required for safe and optimal installation and maintenance of the ComfoAir 160. It is also intended as a reference for servicing, so that this can be carried out in a responsible manner. The device is subject to continuous development and improvement. As a result, the ComfoAir 160 may slightly differ from the descriptions. NOTE This manual has been compiled with the utmost care. However, no rights can be derived from it. In addition, we at all times reserve the right to change the contents of this manual, without prior notice. 1 Introduction The device's name is ComfoAir 160. In the following manual it will be referred to as ComfoAir. The ComfoAir is a balanced ventilation system with heat recovery in order to create healthy, balanced and energy-efficient ventilation in houses. The ComfoAir has a CEmarkingontheidentificationplate.Theidentification plate can be found on top of the ComfoAir. The ComfoAir is covered by a manufacturer’s warranty foraperiodof24monthsafterfittinguptoamaximum of 30 months after the date of manufacture. Warranty claims may only be submitted for material faults and/or construction faults arising during the warranty period. In the case of a warranty claim, the ComfoAir must not be dismantled without written permission from the manufacturer. Spare parts are only covered by guarantee, if they were supplied by the manufacturer and have been installed by an approved installer. The warranty becomes invalid if: • Theguaranteeperiodhaselapsed; • Thedeviceisusedwithoutfilters; • Parts are used that have not been supplied by the manufacturer; • Non-authorisedchangesormodificationshavebeen made to the unit. 1.1.2 Liability The ComfoAir has been designed and manufactured for use in balanced ventilation systems incorporating Zehnder heat recovery systems. Any other application is seen as inappropriate use and can result in damage to the ComfoAir or personal injury, for which the manufacturer cannot be held liable. The manufacturer is not liable for any damage originating from: • Non-compliancewiththesafety,operatingandmaintenanceinstructionsinthismanual; • The use of components not supplied or recommended by the manufacturer. Responsibility for the use of such components lies entirelywiththeinstaller; • Normal wear and tear. 1 - EN 1.2 Safety 1.2.1 Safety regulations Always comply with safety regulations in this manual. Non-compliance with the safety regulations, warnings, notes and instructions in this manual can cause personal injury or damage to the ComfoAir. • TheComfoAirmayonlybeinstalled,connected,rendered operational and maintained by an appropriately approved installer, unless otherwise indicated in this manual; • Installation of the ComfoAir must be carried out in accordance with the general and locally applicable construction, safety and installation instructions of the local council, electricity and water boards or other agencies; • Observe the safety regulations, warnings, comments and instructions as prescribed in this manual at all times; • Keep this manual with the ComfoAir throughout its life; • Instructions with regard to cleaning or replacing the filtersontheintakeandexhaustvalvesmustbecarefullyobserved; • The specifications stated in this document may not bechanged; • TheComfoAirisonlysuitableforconnetionto230V 50Hzmains; • It is recommended to take out a maintenance contract so that the device is checked on a regular basis. The supplier can provide a list of registered installers nearby. EN - 2 1.2.2 Safety provisions and measures • TheComfoAircannotbeopenedwithoutusingtools; • Itshouldnotbepossibletotouchthefans,therefore ducting must be connected to the ComfoAir at a minimum duct length of 900mm. 1.2.3 Pictograms used The following pictograms are used in this manual: Point of attention. Risk of: - damage to the device; - performance of the device is compromised if instructions are not observed carefully. Risk of personal injury to the user or installer. 2 For the user 2.1.2 Heat recovery Besides ensuring a healthy balance between incoming andoutgoingair,theComfoAiralsoprovidesthebenefits of heat recovery. Heat recovery means that heat from the extracted air is transferred to the fresh, and usually colder, air from outside the building. Congratulations, you are the owner of a ComfoAir 160, a heat recovery unit from Zehnder. We wish you lots of comfort. 2.1 2.1.3 Bypass for free cooling Glossary The ComfoAir features: • Balancedventilation; • Heatrecovery; • Bypassforfreecooling; • Frostprotection; • Openfireprogramme; • Wireless(RF)control(optional) • Enthalpy(optional); • Analogueinput(0-10V). A concise explanation of these concepts/features is given in the paragraphs below. 2.1.1 Balanced ventilation The ComfoAir is a balanced ventilation system. Balanced ventilation means that pollutants from the kitchen, the bathroom, the toilet(s) and possibly the storage room are extracted, while the same amount of fresh air is blown into the living room and bedrooms. Gaps under or near thedoorsensureagoodthrough-flowofairinthedwelling. The air circulation is in balance. The bypass is often used during hot days in the summer season. By allowing colder outside air in at night, the indoor temperature of the dwelling can be kept low during hot days. The bypass works automatically: simply set the required comfort temperature. The bypass will always stay open for half an hour 2.1.4 Frost protection TheComfoAirisalsofittedwithafrostprotectiondevice. This is an automatic protective system that temporarily reduces(orevenbrieflystops)thesupplyofoutdoorairto the ComfoAir if there is a risk of freezing in the ComfoAir. This can occur in the event of moderate to sharp frost during the winter months. 2.1.5 Openfireprogramme TheComfoAirisfittedwithanOpenfireprogramme.The Openfireprogrammeisusedinhousesthathaveafireplace, as there is a risk of air being sucked back from the chimney.TheOpenfireprogrammeworksautomatically but requires activation by the installer. While the Open fire programme is activated the supply Ensure that these gaps are never obstructed, and exhaust fan cannot be turned off manually. for example by draught excluders or deep-pile carpet. Otherwise the system will not function 2.1.6 Wireless (RF) control (optional) optimally. A balanced ventilation system consists of: • ComfoAir(A); • Ductsystemforthesupplyofoutdoorair(B)andthe exhaustofindoorair(C); • Supplyvalvesinthelivingroomandbedrooms(D); • Exhaustvalvesinthekitchen,bathroom,thetoilet and (if present) the storage room (E). C D It is possible to set the ventilation positions of the ComfoAir with one or more wireless switches. To do this the ComfoAir needs a built in RF module or a connected CC Ease panel. B A E E E D D 3 - EN Access to the menus 2.1.7 Enthalpy (optional) It is possible to fit the ComfoAir with an enthalpy exchanger. An enthalpy exchanger helps to regulate humidity levels in the dwelling. In addition to heat recovery, the enthalpy exchanger also ensures moisture recovery. Moisture recovery means that moisture from extracted air is transferred to the supply air sourced from outside the dwelling. An enthalpy exchanger is also less sensitive to freezing. 2.1.8 Analogue input (0-10V) TheComfoAirLuxeisfittedwithoneinput(0-10V).This input can be used to connect a sensor or control system to the ComfoAir. Examples of the options include: • CO2sensor;flowregulationusingcarbondioxide levels; • Moisturesensor;flowregulationusingmoisturelevels; 2.2 Sequence Press display description 1 MENU P2 Time delay 2 s P9 Status 3 s P1 Status Example Setting bathroom switch delay Sequence Press display description 1 MENU P2 Time delay 2 OK P21 Activation delay 3 s P22 Select 22 4 OK 30 Current setting 5 ▼(10 x or press and hold) 20 Select 20 6 OK P22 Sets the value to 20 7 MENU P2 8 MENU 1 Available operating devices The ComfoAir is fitted with the following operating devices: • Displayontheunit; • 3-positionswitch; • 3-positionswitchwithmalfunctionindicator; • Wireless3-positionswitch; • Wireless3-positionswitchwithmalfunctionindicator; • Bathroomswitchtotemporarilyselectthehighest ventilationposition; • CCEasepanel. A concise explanation of these operating devices is given in the paragraphs below. 2.2.1 Display on the unit The ComfoAir can be operated by means of a digital display which is mounted on the unit. Fan setting Changes to settings can only be made in the P2 menus. The other P-menus (P1 and P9) can only be read. Leaving reading menu • Atactionpoint6press"MENU"(insteadof"OK"). The display can not be used for setting the ventilation positions of the ComfoAir. The arrow keys are only for setting the additional programmes. 2.2.2 3-position switch MENU MENU MENU OK MENU MENU OK OK · · · · · A 3-position switch can be used to set the ventilation positions of the ComfoAir. One or multiple 3-position switchescanbefittedinthehouse(e.g.inthekitchen). The following types of switches can be used: • Type1g Standard3-positionswitch; • Type2g 3-position switch with malfunction and filteralertsindicator; • Type3g Wireless 3-position switch (RF) • Type4g Wireless 3-position switch (RF) with malfunctionandfilteralertsindicator. OK OK select menu up OK down supply off (led green) · · · · · · comfort temperature supply on (led green) A wireless 3-position switch needs to be retuned to the ComfoAir if a General Reset is undertaken. 1 · · · · Shown in display A A A A 1 1 1 1 2 2 2 2 3 3 3 3 X X X X X X X X X X X X X X X X ••• • EN - 4 2 3 Ventilation setting absent Ventilation setting low Ventilation setting medium Ventilation setting high Menu symbol Malfunctioncode(flashes) Bypass Type 1 Type 2 Type 4 Setting the ventilation using 3-position switch(es) A 3-position switch can be used to set 3 different ventilation positions. • Position1g Low. - Use for low ventilation levels. • Position2 Normal. - Use when present and no extra ventilation is needed. • Position3 High. - Use during cooking, showering and when additional ventilation is needed. • Timer Temporary High - Use during cooking, showering and when additional ventilation is needed for a short time. the normal (or previous) setting when deactivated, but first waits for the overrun timer to run its course. Once the programmed overrun timer is complete, the ComfoAir returns to the normal (or previous) ventilation setting. If the bathroom switch is turned off within the programmed delay timer period, then the overrun function will be terminated. Light switch The functions of the bathroom switch can also be integrated into a light switch. The wireless 3-position switches have a separate button for the Timer. After the timer delay the ComfoAir will return to the ventilation setting which was active before the timer function was activated. To use the Timer function with a wired 3-position switch choose setting 3 and immediately return to the setting you want after the timer delay. The CC Ease panel has an integrated type 2 3-position switch. Next to the standard 3 ventilation settings the CC Ease panel also has an additional ventilation setting: •PositionA Absent - Use when house is unoccupied. At setting A, the house is ventilated using the minimum prescribed ventilation volume. If multiple position switches are available in the house, the ComfoAir will switch to the highest ventilation setting unless overruled by an automated software programme. 2.2.4 CO2-Sensor The ComfoAir Luxe can also be operated using a CO2 sensor. A CO2 sensor measures the CO2 levels in the room where it is placed. When the CO2 sensor is set on ‘automatic’ the CO2 sensor will control the ventilation setting according to the ventilation need in the room. When the CO2 levels are high the ventilation setting will automatically increase. When the CO2 levels are low the ventilation setting will automatically decrease. It is also possible to use the CO2 sensor as a standard 3-position switch. The CO2 levels in the room will then by ignored. 2.2.3 Bathroom switch A bathroom switch can be used to temporarily set the ComfoAir in the highest ventilation level. This switch is mostlyfittedinthebathroomtoextractanyexcessmoisture after showering, as soon as possible. The bathroom switches vary widely in model and are therefore not illustrated here. If required, the bathroom switch can be turned on and off using a time delay entered via a digital operating device. delay timer This ensures that the ComfoAir does not switch on at the highestsettingwhenactivated,butfirstwaitsforthedelay timer to run its course. If the bathroom switch is deactivated during the delay timer period, then the ComfoAir will remain at its current ventilation setting and not switch to the highest setting. The delay timer does not work with all types of bathroom switches (e.g. pulse switches). In that case, leave the delay timer at 0. overrun timer This ensures that the ComfoAir does not switch back to 5 - EN 2.2.5 CC Ease panel The ComfoAir Luxe can be operated by means of a CC Ease panel, which can be ordered separately. The CC (Comfort Control) Ease panel is a digital operating device which can be mounted on the wall in the living room and from there communicates with the ComfoAir. The following overview summarizes the information that will be displayed. Day and time Automatic or manual ventilation Signal to replace internal (I) or external (E) filter Actual ventilation setting Supply air and/or exhaust air OPEN or CLOSED Bypass open [ closed. ] or Actual temperature, selection or setting The CC Ease panel has a number of buttons to operate the ComfoAir and to enter the settings. These buttons are illustrated below. This button allows you to switch to the highest ventilation setting. - Press once ->Boost setting ON. - Press twice-> Boost setting OFF. This button allows you to switch between supply/exhaust. - Press once ¨ SUPPLY OFF (and EXHAUST ON). - Press twice ¨ EXHAUST OFF (and SUPPLY ON). - Press 3 times ¨ SUPPLY and EXHAUST both ON. With this button you can read or set the comfort temperature. - Press for less than 2 seconds ¨ READ. - Press for longer than 2 seconds ¨ SET. This button allows you to programme two settings. - Press for less than 2 seconds ¨ Programme ventilation setting (AUTO / MANUAL). - Press longer than 2 seconds ¨ Programme date and time. This button allows you to programme different settings: - In P menu ¨ Set values. - In main screen ¨ Enter ventilation setting (A, 1, 2, 3). EN - 6 2.3 operating the CC Ease panel The CC Ease panel is used for the following: • Readingandsettingthedayandtime; • Readingandsettingthecomforttemperature; • Readingandsettingtheventilationvolume; • SwitchingBooston; • Switchingthesupplyandexhaustfanon/off; • Settingapersonalventilationprogramme; • Setting additional ventilation programmes/ options in the P menus. A concise explanation of the above listing is given in the paragraphs below. 2.3.2 Reading and setting the comfort temperature The comfort temperature can be read, but also set to the desired indoor temperature. From this temperature setting the ComfoAir will determine if free cooling with the use of the bypass is desired. Reading the comfort temperature 1. Press" "briefly. - Wait until the comfort temperature appears. 2. Press" "toreturntothemainscreen. The CC ease will automatically return to the main screen when no buttons are pressed for 30 seconds. 2.3.1 Setting the date and time 1. Press" "longerthan2seconds. - Wait until the day, e.g. “Sa”, starts blinking. 2. Selectthecorrectdayusing" "or" ". Setting the comfort temperature 1. Press" "longerthan2seconds. - Wait until the comfort temperature, e.g. “ 20.0 ” starts blinking. 2. Select the desired comfort temperature using 3. Press" ". " "or" ". 3. Pressandbrieflyhold" - Wait until the hour, e.g. “ 12 ”, starts blinking. 4. Selectthecorrecthourusing" "or" "tostorethesettings and return to the main screen. ". It is best to set the comfort temperature at the same temperature as the room thermostat (of the Central Heating system) 2.3.3 Reading and setting the ventilation volume 5.Press" reading the ventilation volume ". -Waituntiltheminutes,e.g."00", start blinking. 6. Select the correct minutes using " "or" 7. Press" ". "tostorethesettingsandreturntothe main screen. The current ventilation volume, e.g. “2 ”, will always be displayed on the CC Ease panel. Normally the ComfoAir regulates the required ventilation volume automatically according to a preset personal ventilation programme. During automatic ventilation mode “AUTo” will be displayed on the CC Ease panel. In addition to showing the programmed ventilation setting, the CC Ease panel also displays whether a temporary control system (such as a CO2 sensor or a bathroom switch) is overriding the ventilation setting. In the event a required ventilation setting is being overridden by a time delay function (such as the bathroom switch overrun timer). a 't' is displayed in the bottom right-hand corner of the CC Ease panel. In the event a required ventilation setting is being overridden by a signal from a sensor (such as a CO2 sensor), an 'A' is displayed in the bottom right-hand corner of the CC Ease panel. 7 - EN 2.3.4 Switching Boost on 1. Press“ ” longer than 2 seconds. - Wait until '3t' appears. Setting the ventilation volume The ventilation volume can also be set manually by increasing or decreasing it. A total of 4 ventilation volumes/ levels can be set. They are: • SettingA¨ Absent. - Use when house is unoccupied. Once the programmed time delay is complete, the ComfoAir automatically switches back to the previous ventilation setting. At setting A, the house is ventilated using the minimum prescribed ventilation volume. The Boost timer can be deactivated by pressing " ", " " or " ". • Setting1¨ Low. - Use for low ventilation levels. • Setting2¨ Normal. - Use when present and no extra ventilation is needed. • Setting3¨High. - Use during cooking, showering and when additional ventilation is needed. • Boost¨ Temporary High - Use during cooking, showering and when additional ventilation is needed for a short time. The ComfoAir will switch to the highest ventilation position set in the house unless overruled by an automated software programme. The ventilation volume can be set as follows: 1. Press" "toincreasetheventilationvolume. 2. Press" "todecreasetheventilationvolume. During manual ventilation, the CC Ease panel will not display “AUTo”, but “MANUAL”. 3. Press " "toreturntoautomaticventilation. 2.3.5 Switching the supply and exhaust fan on/ off While the Open fire programme is activated the supply and exhaust fan cannot be turned off manually. 1. Press" "once(firsttime)toswitchoffthesupply fan. This mode can be used when the windows are open during the summer. In that case, fresh air is not supplied through the supply fan, but through the open windows. 2. Press" "again(secondtime)toswitchtheex- haust fan off (and simultaneously switching the supply fan on). EN - 8 3. Press" "again(thirdtime)toswitchthesupply and exhaust fans on again. 6. Press" ". - Wait until the hour, e.g. “ 7 ”, starts blinking. 7. Select the desired start time in hours using Bear in mind that switching off the supply or exhaust fan will temporarily immobilize your balanced ventilation system. 2.3.6 Setting a personal ventilation programme The ComfoAir has a factory default ventilation setting (setting 2). If wanted, you can change the default ventilation setting to suit your individual situation. For example a weekday and weekend programm. " "or" 8. Press" ". ". –Waituntiltheminutes,e.g."00",starts blinking. 9. Selectthedesiredstarttimeinminutesusing "or" ". " The ventilation volume can be changed/set as follows: 1. Press" "and" "fortwosecondssimultane- ously. - Wait until the ventilation programme appears. 2. Programme the desired day or series of days. "or" ". - Selectthedesiredoptionusing" You can choose from: –Weekend:“SaSu”; –Workingweek:“MoTuWeThFr”; –Week:“SaSuMoTuWeThFri”; – Separate days: “Sa”, “Su”, “Mo”, “Tu”, “We”, “Th” and “Fri”. 4. Press ” “. -Waituntiltheprogrammeposition,e.g."1",starts blinking. 5. Select the desired programme position using " "or" ". 10.Press" ". –Waituntiltheventilationsettinge.g."3", starts blinking. 11. Selectthedesiredventilationlevelusing" "or" ". When "d" is selected the selected programme position will be deleted. 12.Press" "tosavethesettingsandreturntothe main screen. 13. Programme the next ventilation programme if required. Up to 8 program positions can be programmed. - Repeat steps 1 to 12. The default ventilation setting (setting 2) will be loaded again if a General Reset is undertaken. 2.3.7 Setting additional ventilation programmes/ options in the P menus. Some P menus in the CC Ease panel can be used to: • Readthestatusofvariousventilationprogrammes; • Settimedelaysforvariousventilationprogrammes. 9 - EN The user can only access P menus P1, P2 and P9 to set additional programmes. The remaining P menus (P3 to P8) are for use by the installer only. Accessing the P menus ",e.g.,Pmenu“2". "or" Entering settings in P menus The minimum and maximum values for the available parameters are preset in the software. 6. Selectanewvaluefortheprogrammeusing" " or" ". 7. Press" "tostorethesettings. 8. Repeat steps 4 to 7 to set multiple parameters in succession. Or Press " " to return to the P menu so steps 2 to 7 can be repeated. 9. Press" EN - 10 Leaving Reading menu •Press" 1. Press" "and" "fortwosecondssimultaneously. -Waituntil"P2"appearsonthedisplay. 2. SelectthedesiredPsub-menuusing" "or" 3. Press" ". 4. SelectthedesiredPsub-menuusing" ",e.g.,Psub-menu"23". 5. Press" ". Only in the P2 menus settings can be altered. The other P-menus (P1 and P9) can only be read. "twicetoreturntothemainscreen. "(insteadof" ")atstep7. 2.3.8 P menus for the user Menu P1 ¨ Status of programmes Status Submenu description Activated P11 Is menu 21 currently active? Yes (1) / No (0) P12 Is menu 22 currently active? Yes (1) / No (0) P13 Is menu 23 currently active? Yes (1) / No (0) P14 Is menu 24 currently active? Yes (1) / No (0) P15 Is menu 25 currently active? Yes (1) / No (0) P16 Is menu 26 currently active? Yes (1) / No (0) Menu P2 ¨ Setting time delays Time delay values Minimum MaxiGeneral mum reset Sub-menu description P21 (Optional) Delay timer for the bathroom switch (to switch to high position). • 'x'minutesafteroperatingthebathroomswitch, the ComfoAir switches to the high setting. - Low voltage input 0 Min. 15 Min. 0 Min. Overrun timer for the bathroom switch (to switch to normal position). • 'x'minutesafteroperatingthebathroomswitch, the ComfoAir switches back to the normal setting. - Low voltage input 0 Min. 120 Min. 30 Min. Overrun timer for ventilation position 3 (using a wired 3-position switch). • Ifventilationsetting3(high)isswitchedonbriefly (< 3 sec), the ComfoAir will switch to the high setting for 'x' minutes and then automatically returns to the normal setting. 0 Min. 120 Min. 0 Min. 10 weeks 26 weeks Filter warning • 'x'weeksaftercleaningthefiltersthe"filter dirty" alert will reappear. 16 weeks Note: only applies to systems fitted with a corded switch and a second switch in the bathroom. P22 (Optional) Note: only applies to systems fitted with a corded switch and a second switch in the bathroom. P23 (Optional) Note: only applies to systems fitted with a hardwired 3-position switch. If any 3-position switch is operated during this lagging time the ComfoAir will instantly revert to the ventilation position as set at that time. P24 "). Overruntimerforventilationsetting3(using" • Afterpressing" "briefly(<2sec.),theComNote: foAir will switch to the high setting for ‘x’ minutes only applies to systems fitand then automatically returns to the normal setted with an rF switch. ting. P25 1 Min. 20 Min. 10 Min. If any 3-position switch is operated during this lagging time the ComfoAir will instantly revert to the ventilation position as set at that time. 11 - EN Sub-menu description ". Overruntimerforventilationsetting3"using • Afterpressing" "continuously (> 2 sec.), the Note: ComfoAir will switch to the high setting for ‘x’ only applies to systems fitminutes and then automatically returns to the ted with an rF switch. normal setting. P26 Time delay values Minimum MaxiGeneral mum reset 1 Min. 120 Min. 30 Min. 0 Min. 120 Min. 30 Min. If any 3-position switch is operated during this lagging time the ComfoAir will instantly revert to the ventilation position as set at that time. P27 Time for the Boost setting. ” continuosly (>2 sec.) on the • Afterpressing“ Note: CC Ease panel, the ComfoAir will switch to the only applies to systems fithigh setting for 'x' minutes and then automatically ted with a CC Ease panel. returns tot the NORMAL setting If any 3-position switch is operated during this lagging time the ComfoAir will instantly revert to the ventilation position as set at that time. Menu P9 ¨ Status of programmes (from menu P5 and P6 additional programmes) Sub-menu P90 description Openfireprogrammeactive? Status Activated Yes (1) / No (0) P91 Bypass Open? Yes (1) / No (0) P94 Analogue input (0-10V) active? Yes (1) / No (0) P95 Frost protection active? Yes (1) / No (0) P97 Enthalpy programme active? Yes (1) / No (0) EN - 12 2.4 Maintenance by the user The following maintenance must be carried out by the user: • Replacingthefilters; • Cleaningthevalves(inthedwelling). A concise explanation of these maintenance activities is given in the paragraphs below. Failure to carry out (periodic) maintenance on the ComfoAir ultimately compromises the performance of the ventilation system. 2.4.1 Replacingthefilters If so indicated on the digital operating device, the filters must be cleaned or replaced. eplace the filters (at least) once every six R months. 5. Slide the new filters back into the ComfoAir. 6. Refit the filter caps (A) to the ComfoAir. 7. Reconnect the power to the ComfoAir. henusingtheComfoAirforthefirsttime,itis W recommendedtoreplacethefiltersandclean thevalvesfirst.Duringtheconstructionphase theventilationsystemcouldhavebecomedirty withbuildingdust. • • On the display the message “FiL” and ”tEr” will appear alternately. On the CC Ease panel "FilterI" will appear. 2.4.2 Cleaning the valves (in your dwelling) Toreplace... 1. Press “ OK ” on the display or press " The ventilation system may be fitted with the following valves: " on the CC Ease panel for at least 4 seconds until the filter alert disappears. 2. Disconnect the power from the ComfoAir. 3. Remove the filter caps (A) from the ComfoAir. Exhaust valve (STB) Exhaust valve (STV) Exhaust valve (STB) Exhaust valve (STB) Exhaust valve (STC) Exhaust valve (STC) Exhaust valve (STV) Exhaust valve (STV) Exhaust valve (STK) Exhaust valve (STK) Exhaust valve (STC) Exhaust valve (STK) Supply valve Supply valve Supply valve (STH) You must clean the valves (at least) twice a year: 1. Markthesettingofthevalve; 2. Removethevalvefromthewallorceiling; 3. Cleanthevalveinasolutionofsoapandwarmwater; 4. Rinsethevalvethoroughlyandwipedry; 5. Place the valve back WITH EXACTLY THE SAME SETTING(andINTHESAMEHOLE); 6. Repeat this procedure for the other valves. 4. Remove the old filters (B) from the ComfoAir About the valve settings... The ventilation air is supplied and discharged by means of valves. Gaps near doors in the dwelling ensure that the airflowsintherightdirection.Inordertoensurethatthe correct ventilation volumes are maintained in the rooms, the following must be observed: • do notsealthegaps; • do notchangethesettingsofthevalves; • do not swop the valves. 13 - EN The installer will have set all the valves to ensure the optimum performance of the ventilation system. Therefore, do not change the setting of the valves. Thisisgivenontheidentificationplateonthetopofthe ComfoAir. The system should not be disconnected from the power supply, unless the ComfoAir must be taken out ofserviceduetoaseriousmalfunction,orforfiltercleaning/replacement or any other compelling reasons. After cleaning, make sure that all valves are placed back with the same setting (and in exactly the same ventilation hole in the wall or ceiling) AT ALL TIMES. Otherwise, system performance will be compromised. 2.5 Malfunctions Malfunctions in the ComfoAir are reported as follows: • Themalfunctionalertappearsonthedisplay, • ThemalfunctionalertappearsontheCCEasepanel; • Themalfunctionindicatoronthe3-positionswitch lights up. A concise explanation of methods of reporting malfunctions is given in the paragraphs below. 2.5.1 Malfunction alerts on the digital operating device In the event of a malfunction, the corresponding malfunction code will be displayed on the digital operating device of the ComfoAir. 2.5.2 3-position switch with malfunction indicators The3-positionswitchesthatarefittedwithamalfunction indicatorshowwhenamalfunctionorfilterdirtyalerthas occurred. Depending on the type of the 3-position switch, this is done in one of the following two ways: • 3-positionswitchwithmalfunctionindicator. Intheeventofamalfunctionorfilterdirtyalertthe indicatorlightsup; • Wireless3-positionswitchwithmalfunctionindicator. The malfunction indicators will light up once this 3-position switch is used. One indicator will light up green to indicate communication has been established. Subsequently, in the event of a malfunction or filterdirtyalertbothindicatorswillflashred3times. After that, both indicators will light up green once more. 2.5.3 What to do in the event of a malfunction In the event of a malfunction, contact the installer. Note down the malfunction code that appears on the digital operating device. Make a note of your ComfoAir type. EN - 14 If the ComfoAir is disconnected from the power supply, mechanical ventilation of the dwelling will cease. This can lead to a build-up of moisture and results in problems with mould. Longterm deactivation of the ComfoAir must therefore be prevented. Condensation may form on the outside of the ComfoAir if the unit is fitted in a space with higher average humidity levels (such as a bathroom, shower, toilet or kitchen). This is not a problem for the ComfoAir. 2.6 End of useful life Consult with the supplier about what should be done with the ComfoAir at the end of its useful life. If the ComfoAir cannot be returned to the supplier, avoid disposing of it with the domestic waste, and ask your local council about the options for recycling the components or processing the materials in an environmentally friendly manner. Furthermore, do not dispose of batteries from the wireless (RF) switches with the normal waste, but bring them to the specially designated disposal locations. 3 EEC declaration of conformity Zehnder Group Nederland B.V. Lingenstraat 2 8028 PM Zwolle-NL Tel.: +31 (0)38-4296911 Fax: +31 (0)38-4225694 Company register Zwolle 05022293 EEC declaration of conformity Machine description : heat recovery units: ComfoAir 160 series Complies with the following directives : Machinery Directive Low Voltage Directive EMC Directive (2006/42/EEC) (2006/95/EEC) (2004/108/EEC) Zwolle, 4 July 2011 Zehnder Group Nederland B.V. E. van Heuveln, Managing Director 15 - EN © Zehnder Group Nederland B.V. 849050968-0112 Zehnder Group Nederland B.V. Lingenstraat 2 8028 PM Zwole Nederland Tel.: (038) 429 69 11 Fax.: (038) 422 56 94 Internet: www.jestorkair.nl E-mail: [email protected]