1
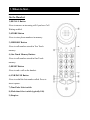
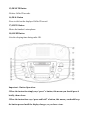
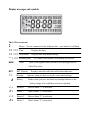
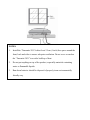
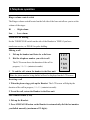
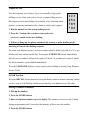
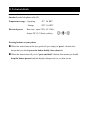
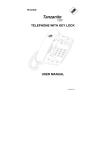
Tanzanite 2031 TELEPHONE
USER MANUAL
862-03211
Contents of this User Guide
Section
1.
Where to find…
2.
Installation
3.
Telephone operation
4.
Caller display operation
5.
Functions setup
6.
Alarm function
7.
Radio operation
8.
Operational notes
9.
Troubleshooting
10. Guarantee and service
11. Technical details
NOTE: Backup batteries.
To preserve the memory which stores names/numbers and other
settings (in the event of line power being removed) the “Tanzanite 2031”
should be fitted with 4 x 1.5V (AA size) alkaline batteries.
1. Where to find…
On the Handset:
1) RECALL Button
-Press to answer an incoming call if you have Call
Waiting enabled.
2) STORE Button
-Press to store phone numbers in memory.
3) MEMORY Button
-Press to call numbers stored in Two Touch
memory.
4) One Touch Memory Buttons
-Press to call numbers stored in One Touch
memory.
5) RESET Button
-Press to end a call on the handset.
6) LNR/PAUSE Button
-Press to redial the last number called. Press to
insert a pause.
7) Tone/Pulse Select switch
8) Flash time Select switch (typically 100)
9) Earpiece
On the Base:
1) SET Button
-Press to set/confirm the functions setting.
2) SNOOZE Button
-Stops the alarm temporarily.
3) UP-DOWN Buttons
-Scrolls through Caller Display records, and sets telephone options.
4) HOOK Switch
-Press to end a call on the base.
5) ALARM 1 Button
-Turns ON/OFF the alarm 1 function.
6) RADIO ON/OFF Button
-Turns the radio ON or OFF.
7) Ringer Volume HI/LOW switch
8) Radio Volume Control
9) Alarm Volume HI/LOW switch
10) AM-FM switch
11) ALARM 2 Button
-Turns ON/OFF the alarm 2 function.
12) RADIO TUNER
-Sets the station on the radio.
13) ALARM OFF Button
-Stops the alarm.
14) CONTRAST Button
-Sets the brightness of the LCD screen.
15) DELETE Button
-Deletes Caller ID records.
16) DIAL Button
-Press to dial out the displayed Caller ID record.
17) MUTE Button
-Mutes the handset’s microphone.
18) SLEEP Button
-Sets the sleeping time during radio ON.
Important – Button Operation:
-When the instruction simply says “press” a button, this means you should press it
briefly, then release.
-When the instructions says “press and hold” a button, this means you should keep
the button pressed until the display changes, or you hear a tone.
Display messages and symbols
The LCD screen icons
(
Phone
You are connected to the telephone line –your handset is off hook.
88:88 Time
Displays the time.
88/88 Day/Month Displays date and month settings.
IN # 188 Incoming calls
(IN) Shows total number of incoming call records.
NEW
NEW
(New Calls) appears when you have new messages and /or
caller ID records.
RPT
RPT (Repeat)
*
Message
Appears when you have received a voice mail message.
Battery
Flashes when you have not fitted any backup batteries or the
Displays when the caller has called more than once.
battery charge is low and they need to be replaced.
%1
¯1
%2
¯2
Buzzer 1
Buzzer alarm “1” is activated.
Music 1
Music alarm “1” is activated.
Buzzer 2
Buzzer alarm “2” is activated.
Music 2
Music alarm “2” is activated.
2. Installation
1. Choose a suitable location for the base unit
n
Where the power adapter plug can reach an easily accessible 230-V switch mains
supply socket, without stretching the mains supply cable.
n
Where the telephone line cable reaches your telephone line socket or extension
socket.
n
Where the unit is away from anywhere it could get wet e.g. bathtub or sink etc.
n
Where the unit is situated near a window to get better radio reception.
2. Install the backup batteries
This phone is equipped with a memory holding system that is powered by 4 X 1.5V,
AA size alkaline batteries (not included - customer-installed). When power is
interrupted, or the AC mains cable is unplugged, the batteries will power the clock
and keep track of time and any alarm settings programmed into memory.
When using battery power, the LCD screen will not light up; however, should wake
time occur during the power interruption, the alarm will sound, providing battery
power is adequate. Normal operation will resume when AC power is restored.
Install batteries as follows:
• Remove the battery cover
located on the bottom of the
base by pulling the “lock clip”
then lifting off the cover (use a
small screw driver if
necessary).
• Insert the 4 X 1.5V AA size alkaline batteries paying attention to the polarity
orientation as shown inside the compartment.
• Replace the battery cover, which should click into place.
Important note – back up batteries
The “Tanzanite 2031” requires 4 x 1.5V (AA size) alkaline batteries to be
installed in the battery compartment, before use.
Warning: the unit will not back up memory without batteries installed.
WARNINGS:
1.
2.
3.
Make sure the unit is disconnected from the telephone line when installing
batteries.
Replace the batteries when the battery low icon
appears and flashes on
the LCD screen.
If the battery power is allowed to totally deplete, the telephone’s data and
settings could be erased.
3. Plug the coiled handset cord into the handset. Plug the other end into the jack
on the back of the Base unit.
4. Place the handset in the Base unit.
5. Plug the telephone line cord into the
PHONE LINE jack on the back of the
Base unit. Plug the other end into a
modular wall jack.
Always use the telephone line cord
supplied. Other telephone line cords
5
may not work.
6
6. Plug the power supply cable into the back of the Base unit. Plug the other end
into an AC mains outlet.
The “Tanzanite 2031” Base unit must only be used with the mains adapter supplied.
Using any other adapter may damage the unit.
7. Set the Ringer Volume switch on the side of Base unit to the desired setting,
High or Low.
8. Set the TONE/PULSE switch on the side of the handset to TONE for touch-tone
service (normal), or PULSE for pulse dialling. If you don’t know which type of
service you have, check with the phone company.
9. Installing the Radio antenna wire
To get the best radio reception, the base unit should be located near to a window.
Install antenna wire as follows:
1.
Untie the radio antenna wire.
2.
Fix the end of the antenna wire near a window, using adhesive tape.
3.
Turn on the radio by pressing the RADIO ON/OFF button.
4.
Check the radio reception for both AM and FM bands.
5.
If the radio reception is weak, relocate the end of the antenna wire to another
position until the best radio reception is obtained.
NOTES:
1.
Install the “Tanzanite 2031”with at least 2.5cm (1 inch) free space around the
front, back and sides to ensure adequate ventilation. Do not cover or enclose
the “Tanzanite 2031” to avoid a build up of heat.
2.
Do not put anything on top of the product, especially materials containing
water or flammable liquids.
3.
Run down batteries should be disposed of properly in an environmentally
friendly way.
3.Telephone operation
Ringer volume control switch
The Ringer volume switch located on the left side of the base unit allows you to set the
volume of the ringer.
Hi
-
Low
High volume
- Low volume
TONE/PULSE dialling
Set the TONE/PULSE switch on the side of the Handset to TONE if you have
touch-tone service, or PULSE for pulse dialling.
Making a call
1.
Pick up the handset and listen for a dial tone.
2.
Dial the telephone number you wish to call.
The LCD screen shows the duration of the call in
progress, 59:59 (minutes/seconds).
3.
123
456
789
*0#
To end the call, return the handset to the Base unit.
Note: the phone number being dialled will not be displayed on the LCD screen.
Receiving a call
1. When the phone rings, pick up the Handset. The LCD screen will display the
duration of the call in progress, 59:59 (minutes/seconds).
2. To end the call, return the Handset to the Base unit.
Last Number Redial (LNR)
1. Pick up the Handset.
2. Press LNR/PAUSE button on the Handset to automatically dial the last number
you dialled manually (maximum of 32 digits).
Temporary tone
Use the temporary tone feature, if you are normally using a pulse
dialling service, when you wish to access a custom calling service
that requires touch-tone dialling, for example, when choosing menu
options, or entering information for a bank or credit card company.
1. Dial the number for the custom calling service.
123
456
789
*0#
2. Press the * button after you have connected to the
service, to enable touch–tone dialling.
3. When you hang up, the phone automatically returns to pulse dialling mode.
Inserting a Pause in the dialling sequence
For some switchboard systems, an access number must be dialled (usually 0 or 9) to get
another dial tone and an outside line. Pressing the LNR/PAUSE button, immediately
after the access number, will provide a pause of about 3.6 seconds to be entered, whilst
the desired number can be dialled immediately.
Press the LNR/PAUSE button to insert a pause when dialling or storing Long Distance
Access Codes.
FLASH function
Press the RECALL button instead of using the hook switch to activate customer calling
services such as Call Waiting, which are provided by your phone Service Provider.
Storing a Number in memory
1. Pick up the handset
2. Press the STORE button
3. Enter a telephone number (up to 16 digits). The memory can not exceed 16 digits
during programming and if exceeded, the memory will not store the number.
4. Press the STORE button
5. Press the desired memory location button.
(0~9 for two touch memory, or M1, M2, or M3 buttons for one touch memory.)
6. Hang up the Handset
Note: If you make a mistake, hang up the Handset and repeat the procedure for storing
a number from the beginning.
Speed dialling
Using the One Touch memory locations:
1. Pick up the handset
2. Press the One Touch memory location button M1, M2 or M3.
The number dials automatically.
Using the Two Touch memory locations:
1. Pick up the Handset.
2. Press the MEMORY button
3. Press 0~9 to select the memory location
The number dials automatically
Deleting stored numbers from memory
To delete stored numbers from the One Touch memory locations:
1. Pick up the handset.
2. Press the STORE button.
3. Press the LNR/PAUSE button.
4. Press the STORE button.
5. Press the One Touch memory location M1, M2 or M3 button where you stored the
number.
To delete stored numbers in the Two Touch memory locations;
1. Pick up the Handset.
2. Press STORE button.
3. Press LNR/PAUSE button.
4. Press STORE button.
5. Press the Two Touch memory location (0~9) button where you stored the number.
Chain dialling from memory
Use this feature to make calls which require a sequence of numbers, basically you dial
each part of the sequence from memory. Example,
The number for
Memory location
n
1st number
7
n
2nd code
8
n
3rd number
9
1. Pick up the Handset.
2. Press the MEMORY button and then press 7.
3. When you hear the access tone, press MEMORY button and then press 8.
4. At the next access tone, press MEMORY button and then press 9.
Mute Function
1.
During a call, press the MUTE button once on the Base unit.
When the microphone is muted, the Base unit NEW light indicator will turn on.
The person at the other end of the call cannot hear you, but you can hear his side.
2.
To get back to the call, press the MUTE button again. The Base unit NEW light
indicator will turn off and two-way speech is re-established.
4. Caller Display Operation
The unit receives and displays information transmitted by your phone Service Provider.
This information can include the phone number, date, and time. The unit saves up to 50
calls, stored in Memory. Information is displayed after the first ring.
VERY IMPORTANT: The Caller Display feature of this product requires a
subscription to the Caller Display service from your phone Service Provider. In
RSA this service is termed IdentiCall (call 10219 to subscribe).
Viewing Calling Line Identification (CLI) information during Incoming Calls
For an incoming call, the saved name of the caller will automatically appear.
OR
The caller’s telephone number appears if the
caller’s name is not currently stored in memory.
OR
UNAVAILABLE will appear when Caller
Display information is not available or the
origin of the call does not support the Caller
Display system (including international calls).
OR
DATA ERROR will appear if the Caller Display
information was received incorrectly or only
part of the data was received.
OR
WITHHELD will appear if the caller’s name and/or telephone number is blocked.
Viewing the Caller Display List
This phone automatically records all of the calls received, even if they were not
answered. When the memory is full, a new call automatically replaces the oldest call in
memory. The ‘NEW’ icon will appear in the LCD screen for calls.
Received calls that have not been reviewed - To scroll through the caller’s number
and name data in the Caller display record list:
1. Press the DOWN button
The Caller Display records will display from the most recent to the oldest.
2. Press the UP button
The Caller Display records will display from the oldest to the newest.
3. When all of the records have been viewed, END OF LIST appears on the LCD
screen.
Returning a call from the Caller List:
1. Press UP or DOWN buttons to find the Caller Display record you wish to call.
2. Press DIAL button.
The LCD screen will display PICKUP PHONE.
3. Lift the Handset from the Base unit to dial the displayed record.
4. To end the call, return the Handset to the Base unit.
Deleting caller display records
When viewing the Caller Display information you can delete a single call or all of the
call records.
Deleting a single record
1. Press the UP or DOWN buttons to find the caller display record you wish to
delete.
2. Press the DELETE button.
The LCD screen will prompt DEL CALL?
3. Press the DELETE button again to confirm.
The LCD screen will display the next or previous call record after the data is deleted.
Deleting All Records
1. Press UP or DOWN buttons to view one Caller Display record.
2. Press and hold the DELETE button for 3 seconds.
The LCD screen will prompt DEL ALL CALLS?
3. Press the DELETE button again to confirm.
The total call count will return to zero (00) and the LCD screen will display TOTAL
000 NEW 000 in standby mode.
5. Functions setup
Note: At any time during the functions programming, press the DELETE button to stop
the current activity and return to standby mode.
Setting the Language
This adjustment changes the prompts to be displayed in 3 languages namely; English
(default), French, and Spanish.
1. Press the SET button until SET LANGUAGE is displayed.
2. Press UP or DOWN buttons to select the desired language setting.
3. Press SET button to confirm.
4. Continue with your programming or press the DELETE button to return to the
standby mode.
Setting the Contrast of the LCD display
This function allows you to adjust the LCD (Liquid Crystal Display) screen contrast for
comfortable viewing.
1. Press the SET button twice.
The LCD screen will display CONTRAST.
2. Press UP or DOWN buttons to select your desired setting (1~6). (Default is 4)
3. Press the SET button to confirm.
4. Continue with your programming or press the DELETE button to return to the
standby mode.
OR
The LCD screen can also be adjusted using the CONTRAST button on the Base unit.
Press the CONTRAST button repeatedly to select the desired contrast for your
LCD screen.
Setting the Time and Date
The phone Service Provider sends the time and date with the Caller Display
information.
The unit will automatically set the time and date when the first call containing Caller
Display information is received (if it has not already been set).
1.
Press the SET button three times. The LCD screen will display SET
TIME/DATE and the ‘HOUR’ icon will be blinking.
2.
Press UP or DOWN buttons to set the current hour time (1~12 AM/PM).
3.
Press the SET button to confirm. The ‘MINUTE’ icon will be blinking.
4.
Press UP or DOWN buttons to set the current minute time (1~60).
5.
Press the SET button to confirm. The ‘DATE’ icon will be blinking.
6.
Press UP or DOWN buttons to set the current date (1~31).
7.
Press the SET button to confirm. The ‘MONTH’ icon will be blinking.
8.
Press UP or DOWN buttons to set the current month (1~12).
9.
Press the SET button to confirm. The ‘YEAR’ icon will be blinking.
10. Press UP or DOWN button to set the current year.
11. Press SET button to confirm the time and date setting.
Setting the LCD screen Backlight ON or OFF
1. Press the SET button repeatedly until the LCD screen displays BACKLIGHT ON
(default).
2. Press UP or DOWN button to select ON or OFF.
With the BACKLIGHT ON, the LCD backlight is permanently illuminated.
With the BACKLIGHT OFF, the LCD backlight will turn on after pressing a button. It
will automatically turn OFF 10 seconds after receiving a call, or period of inactivity.
3. Press the SET button to confirm.
6.Alarm Function
Setting the Alarm Time - The telephone can program two Alarm clock settings.
1. Press the SET button.
2. Press the ALARM 1 or ALARM 2 button. The ‘HOUR’ icon will be blinking.
3. Press UP or DOWN buttons to set the desired hour.
4. Press the SET button to confirm. The ‘MINUTE’ icon will be blinking.
5. Press the SET button to confirm.
Important: When an alarm has been set, the user must review the alarm status by
pressing the ALARM X (1 or 2) button to verify that the Alarm function has been
set correctly.
Reviewing the Alarm settings
Press the ALARM X (1 or 2) button to review the status.
Press the ALARM X (1 or 2) button again to change the mode of alarm (Music,
Buzzer, or Off).
When choosing the music mode, the LCD screen will display ALARM X MUSIC and
the ‘music X¯’ icon will turn on. Allow the alarm mode programming to time out.
When choosing the buzzer mode, the LCD screen will display ALARM X BUZZER and
the “buzzer X% icon will turn on. Allow the alarm mode programming to time out.
When choosing the off mode, the LCD screen will display ALARM X OFF and both
music and buzzer icons are turned off. Allow the alarm mode programming to time
out.
Turning Off the Alarms
Press the ALARM OFF button to turn off an alarm after it had come on.
Note: The alarm setting is retained and will activate on subsequent days.
Using the Snooze Timer
After the Alarm has sounded, press the SNOOZE button to silence the alarm for 9
minutes (default setting). You can use the SNOOZE feature repeatedly. The alarm will
remain on for 10 minutes if the SNOOZE button is not pressed.
Adjusting the Snooze timer
1.
Press the SET button.
2.
Press the SNOOZE button.
The LCD screen will display SNOOZE TIME and the ‘MINUTE’ icon will be
blinking.
3.
Press the UP/CDS or DOWN buttons to set the desired snooze time (1~59
minutes).
4.
Press the SET button to confirm.
7. Radio Operation
AM/FM Radio operation
1.
In standby mode, press the RADIO ON/OFF button.
The LCD screen will display RADIO ON.
2.
Select the desired radio frequency band using the AM/FM switch located on
the right side of the Base unit.
3.
Turn the RADIO TUNER to choose the desired radio station.
4.
Adjust the speaker volume with the Radio VOLUME control.
5.
Adjust the FM antenna (if required) for best reception.
6.
To turn off, press RADIO ON/OFF again.
The LCD screen will display RADIO OFF.
Note: If the radio is ON and a call is subsequently received or the handset is lifted from
the Base unit, the telephone will automatically mute the radio operation. After the call
completes, radio operation will automatically resume, 6 seconds after the Handset is
replaced on the Base unit.
Using the Sleep Timer mode
This telephone has a Sleep Timer function which will automatically turn off the radio.
1.
While the radio is turned on, press the SLEEP button.
The LCD screen will display SLEEP TIMER.
2.
Press and release SLEEP button to choose “0:15, 0:30, 0:45, 1:00, 1:15, 1:30,
1:45, or 2:00” (15 minutes interval) sleep time setting.
3.
The sleep timer will start to count down per minute.
4.
The radio will turn off upon expiry of the sleep timer setting.
8. Operational notes
Electrical safety warnings
n
DON’T touch the Base unit whilst wet. Electrical equipment can cause serious
injury (or even death) if used while you are wet or standing in water.
n
If the Base unit ever falls into water, DON’T retrieve it until you have unplugged
the power lead from the mains socket and the telephone line plug from the
telephone socket; then pull the unit out by the unplugged cables.
n
NEVER use your “Tanzanite 2031” outdoors during a thunderstorm unplug the Base unit from the telephone line and the mains socket when it is
stormy. Damage caused by lightning is not covered by the guarantee.
Locating the Base unit
The base unit should be placed on a level surface, in a position where:
Ä The mains adaptor plug will reach an easily accessible 230-V AC switch mains
supply socket - never try to lengthen the mains power cable.
Ä The telephone line cord will reach your telephone line socket or extension socket.
Ä It is not close to a sink, bath, or shower, or anywhere else where it might get wet.
Ä It is not close to other electrical equipment - fridges, washing machines,
microwave ovens, TVs, fluorescent lights, etc.
Cleaning and care
Ä DON’T clean any part of your “Tanzanite 2031” with benzene, thinners or other
solvents, or chemicals - this may cause permanent damage, which is not covered by
the Guarantee. When necessary, clean the unit with a slightly damp cloth.
Ä Keep your “Tanzanite 2031”away from hot, humid conditions or strong sunlight,
and do not allow it to get wet.
9.Troubleshooting
The “Tanzanite 2031” must only be serviced by trained personnel.
NEVER attempt any repairs or adjustments yourself - this could make the
problem worse and is likely to invalidate the Guarantee.
ALWAYS check first that:
Ä You have followed the steps listed in Section 2 to install and set up your “Tanzanite
2031”.
Ä All connectors are firmly inserted into their sockets.
Ä The mains power is switched on at the socket and there is supply to the property.
Ä The batteries are charged, installed correctly and the battery cover is fitted.
Everyday use
“I cannot make or answer calls“
Make sure you’re using the telephone line cord that was supplied with your “Tanzanite
2031” as other telephone line cords may not work.
Switch off the power at the mains socket, wait for a few seconds and then switch back
on. This may solve the problem.
“The phone does not ring “
Make sure you’re using the telephone line cord that was supplied with your “Tanzanite
2031” as other telephone line cords may not work.
Check that the total REN value of all equipment connected to your telephone line is
not more than 4. Disconnect one or more telephones to check.
“The phone does not dial”
Check that the handset’s tone/pulse switch is in the correct position.
Make sure you’re using the telephone line cord that was supplied with your
“Tanzanite 2031” as other telephone line cords may not work.
“The Caller Display Information feature is not working”
You need to subscribe to CLI (Calling Line Indication) service. Call your phone
Service Provider for details on how to subscribe (in RSA dial 10219 ask for IdentiCall).
Callers do have an option to withhold their number, or the call may be coming from a
network that does not transmit the CLI, e.g. international calls do not have CLI.
Be sure to wait until the second ring before answering.
“ERROR message is displayed”
ERROR appears in the LCD screen if the unit detects anything other than valid Caller
Display Information during the silent period after the first ring. This message indicates
either the presence of noise on the line, or that an invalid message has been sent from
the phone Service Provider.
Be sure to wait until the second ring before answering.
PBX USE
“Last Number Redial (LNR) and/or memory dialling does not work on a PBX”
When you first make a call, try pressing the LNR/PAUSE button for a pause between
the outside line access digit (e.g. 9) and the telephone number. You should later be able
to redial the number.
When storing numbers in memory, you can include the outside line access digit (e.g. 9)
with each number.
If your PBX requires you to wait for a second dial tone before dialling the telephone
number, press the LNR/PAUSE button to create a pause between the access digit and
the number.
Radio reception
“The FM/AM radio reception is weak”
To get the best radio reception, the Base unit should be located near a window.
Relocate the end of the antenna wire to a position near a window that will give a better
FM/AM radio reception.
“My Tanzanite 2031 system will not work properly on a PBX”
- You may need to change the Recall setting - call the PBX Help Line for advice.
- You may need to change the Flash time setting - call your telephone Service Provider
to check the standard Flash time applicable for your area.
It will help if you have your PBX documentation to hand when you make the call.
If the fault persists…
Disconnect all other instruments connected to the same line as the “Tanzanite 2031”
and see whether you can then make a call.
Ä Disconnect the Base unit from the telephone line and plug a different phone into
the master telephone socket. Try making a call. If this works, the line is ok.
Ä If the call does not work, and you are using a two-way socket adapter, remove it and
plug a telephone directly into the socket. If the call now works, the adapter may be
faulty.
Ä If you still can’t make a call, the fault may be on the exchange line. Contact your
phone Service Provider.
10. Guarantee and service
This Guarantee is covered by Telkom's Terms and Conditions of Warranty.
Please retain your sales receipt as proof of purchase for warranty purposes.
Terms and Conditions
The “Tanzanite 2031” carries a 12 month warranty.
If repairs under the guarantee are required you should contact your Dealer or our
Helpdesk (see Service Enquiries below). Note that proof of purchase will be required.
Note that the guarantee applies only to usage of the telephone in the manner in which it
was intended. No liability is accepted for abnormal usage of the telephone or for any
other damage that occurs as a consequence of such usage.
Service Enquiries
For any service or product information queries relating to this telephone - Please call our
ShareCall number 08602HELPU (0860243578) or visit our web site on
www.phones4telkom.co.za.
11. Technical details
Standard corded telephone caller ID
Temperature range – Operating
Storage
Electrical power
0℃ to 40℃
-20℃ to 60℃
Base unit - input 230V AC, 50Hz;
Output DC 6V, 300mA, polarity
Pressing buttons on your phone
Ä When the instructions in this user guide tell you simply to ‘press’ a button, this
means that you should press the button briefly, then release it.
Ä When the instructions tell you to “press and hold’ a button, this means you should
keep the button pressed until the display changes and /or you hear a tone.