1
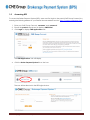
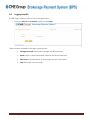
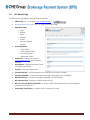
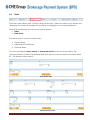
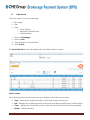
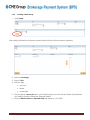
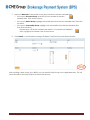
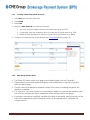
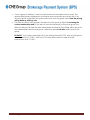
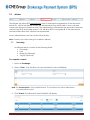
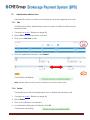
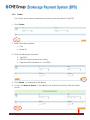
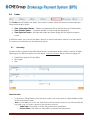
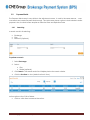
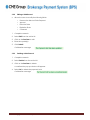
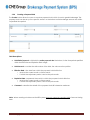
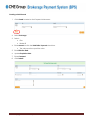
Brokerage Payment System
(BPS) User Manual
December 2011
Global Operations Education
1
Table of Contents
1.0 ACCESSING BPS .............................................................................................................................5 2.0 LOGGING INTO BPS .......................................................................................................................6 3.0 BPS HOME PAGE .............................................................................................................................7 4.0 FIRMS ...............................................................................................................................................8 5.0 BROKERS ........................................................................................................................................10 6.0 RATES .............................................................................................................................................12 6.1 6.1.1 6.1.2 6.1.3 6.2 6.2.1 6.3 6.3.1 6.3.2 6.3.3 6.3.4 RATE SEARCH ...................................................................................................... 13 Edit Rate ......................................................................................................................................................... 14 Copy Rate ...................................................................................................................................................... 15 Delete Rate.................................................................................................................................................... 15 CREATING A RATE ................................................................................................ 16 Retroactive Rates......................................................................................................................................... 18 RATE GROUP ...................................................................................................... 19 Searching ....................................................................................................................................................... 19 Creating a Rate Group .............................................................................................................................. 20 Creating a Rate Using a Rate Group ID ................................................................................................ 22 Rate Group Business Rules ......................................................................................................................... 22 7.0 EBROKER ........................................................................................................................................24 7.1 SEARCHING ........................................................................................................ 24 7.2 ADMINISTRATIVE EBROKER USERS ............................................................................... 25 Edit.................................................................................................................................................................... 25 Delete .............................................................................................................................................................. 25 Create ............................................................................................................................................................. 26 7.2.1 7.2.2 7.2.3 8.0 TRADES ..........................................................................................................................................27 8.1 8.2 SEARCHING ........................................................................................................ 27 ADVANCED SEARCH (SUMMARIZED OR DETAILED MODE) ................................................. 29 8.3 REJECTED TRADES ................................................................................................. 30 Resubmitting Rejected Trades.................................................................................................................. 30 8.3.1 9.0 PAYMENT REVIEW .........................................................................................................................31 9.1 9.1.1 9.1.2 9.1.3 9.2 9.2.1 9.2.2 9.2.3 9.2.4 SEARCHING FOR AN ADJUSTMENT .............................................................................. 31 Edit an Adjustment ...................................................................................................................................... 32 Delete an Adjustment................................................................................................................................. 33 Create an Adjustments .............................................................................................................................. 33 PAYMENT HOLDS .................................................................................................. 36 Searching ....................................................................................................................................................... 36 Editing a Hold Record ................................................................................................................................. 37 Deleting a Hold Record.............................................................................................................................. 37 Creating a Payment Hold.......................................................................................................................... 38 BPS 2.0 Copyright 2011 CME Group
2
10.0 REPORTS.........................................................................................................................................40 10.1 REPORT REQUEST SCREEN ........................................................................................ 40 10.2 REPORT VIEWER ................................................................................................... 41 10.3 VIEW BATCH REPORTS ............................................................................................ 42 11.0 APPENDIX I – ERRORS IN SELECTING CRITERIA ...........................................................................43 12.0 APPENDIX II – FIELD DESCRIPTIONS .............................................................................................44 13.0 APPENDIX III - REPORT DESCRIPTIONS ........................................................................................47 14.0 APPENDIX IV – LOAD CRITERIA AND SAVE CRITERIA BUTTONS .................................................49 15.0 APPENDIX V - NAVIGATION ........................................................................................................50 The information within this user guide has been compiled by CME Group for general information purposes only. Although every
attempt has been made to ensure the accuracy of the information within this user guide, CME Group assumes no responsibility for
any errors or omissions. While CME Group may use valid firm numbers or names to display examples in computer based training
and user guides, the data in all examples is fictitious and is provided for general information purposes only. Additionally, all
examples in this guide are hypothetical, used for explanation purposes only, and should not be considered investment advice or
the results of actual market experience.
All matters pertaining to rules and specifications herein are made subject to and are superseded by official CME, CBOT, NYMEX,
and CME Group rules. Current rules should be consulted in all cases.
BPS 2.0 Copyright 2011 CME Group
3
Introduction
CME Group’s Brokerage Payment System (BPS) is a web-based application accessed via the
CME Group portal. BPS facilitates brokerage payments to filling brokers by member firms via
automatic debits to member firms' bank accounts. All members and member firms are
required to use BPS for broker billing and payment. The system eliminates the costly laborintensive task of preparing and distributing monthly checks to brokers and assures timely
brokerage payments.
Daily and monthly reports and data files produced for each firm detail executed trades,
volume, and rate applied to each trade. Monthly banking reports are produced for brokers
and firms.
BPS is designed to calculate, disburse, and report broker payments for trades executed on
behalf of a trading firm or its customers. Member firms are able to access their CME, CBOT,
NYMEX and COMEX trades, along with applied rates and detailed brokerage payment
information, from one application, regardless of original venue.
BPS provides the following features:
•
Web-based and accessible via the CME Group portal
•
Tiered and retroactive rate entry
•
Creation of daily and monthly ad hoc reports
•
Differentiation between electronic and pit executions
•
Ability to search and view summarized or detailed trades, including rejected trades
•
Payment adjustment and hold functions
•
Ability to resubmit resolved rejected trades for reprocessing
•
Ability to search and view Electronic Broker (eBroker) Tag 50 ID and Symbol
BPS 2.0 Copyright 2011 CME Group
4
1.0
Accessing BPS
To access the Broker Payment System (BPS), users must first log into the portal (CME Group Connect) by
entering the following address in your internet browser address section: http://connect.cmegroup.com.
1. Enter your CME Group Connect ‘username’ and ‘password’.
2. Ensure the product drop-down list displays CME Portal.
3. Click Login to display CME Applications tab.
The CME Applications’ tab will display.
4. Click the Broker Payment System link or the icon.
The user will be directed to the BPS login window.
BPS 2.0 Copyright 2011 CME Group
5
2.0
Logging into BPS
The BPS Login screen provides access to the application.
1. Enter your User ID and Password, and then click Login.
Other functions available on the login screen include:
•
Change Password check box to change your BPS password.
•
Reset button to clear the entered values for User ID and Password.
•
New User link for information on how to gain access to the system.
•
Help link for tips on how to login.
BPS 2.0 Copyright 2011 CME Group
6
3.0
BPS Home Page
The BPS Home Page displays the following information:
•
CME Group icon – is a link to www.cmegroup.com
•
Brokerage Payment System text – is a link to the Home Page
•
Main Menu Tabs
•
o
Firms
o
Brokers
o
Rates
o
eBroker
o
Trades
o
Payment Review
o
Reports
Processing Dates
o
Current Date
o
Current Business Day
o
Processing Period
o
Adjustment Period
•
Contact Us – Creates an email to
[email protected] (CME Clearing
Services)
•
User Manual – Displays an online version
of the BPS User Manual
•
Log Out – Closes the application
•
For Help with BPS – CME Clearing Services email link and contact number
•
System Availability – Contains important messages regarding system availability
•
New BPS Features – Contains messages regarding new functionality
•
BPS ClearPort FAQ – Displays an online ClearPort FAQ
•
BPS End-of-Cycle/Banking Calendar – Provides a PDF of the Broker Report and Fee Deposits
schedule and activity list
•
Commodity Code Listing – Contains a list of commodity codes
BPS 2.0 Copyright 2011 CME Group
7
4.0
Firms
The Firms’ tab lets the user search and views a list of Trading Firm IDs. This screen will display
detailed information for firms and sub-firms that you are authorized to view. A search consists
of selecting:
•
•
•
Exchange
Firm
Firm Name (Optional)
1. Select an Exchange and Firm, and then click Search.
After clicking search, the Firm Review Details section is displayed.
2. To view the firm’s detail, click on the line item.
Note: When the Search Results list displays; the View action is activated.
Leading Zero Indicator (Yes or No)
This field contains the account numbers as formatted in BPS, which left justifies the
numbers by stripping off leading zeros.
To ensure that leading zeros remain in an account number for BPS display purposes,
firms must submit a written request to CME Group Clearing Services
([email protected]). If a request is not submitted, leading zeros will be stripped from
the account number. The Leading Zero Indicator defaults to N (No) which implies that
leading zeroes will be excluded.
BPS 2.0 Copyright 2011 CME Group
8
After selecting the line item, the Billing Group Review Details screen will display.
To exit, click the Back to List button.
BPS 2.0 Copyright 2011 CME Group
9
5.0
Brokers
After clicking Brokers from the BPS main menu, the Broker Search screen will display, which
allow the users to search all active Broker IDs for the selected exchange. A search consists of
selecting:
•
•
•
Exchange
Broker ID
Last Name (Optional)
1. Select an Exchange and Broker ID, and then click Search.
After clicking search, the Broker Review Details section is displayed.
2. To view the broker’s detail, click on the line item.
Note: When the Search Results list displays; the View action is activated.
BPS 2.0 Copyright 2011 CME Group
10
After selecting the line item, the Broker Group Review Details screen will display.
3.
Click on the line item to view details.
To exit, click the Back to List button.
BPS 2.0 Copyright 2011 CME Group
11
6.0
Rates
The Rate screen allows users to Search and Create rates. Rates are used to price trades and
determine the correct brokerage to be paid by a trading firm to the executing Broker.
When Rates is selected, the sub-menu options appear:
• Rates
•
Rate Group
The search option consists of three views:
• Current Rates
• Adjustment Period Rates
• Historical Rates
You can use either the basic search or advanced search buttons to request data. The
advanced search consists of additional fields that allow the user to narrow the search results
list. The default is Basic search.
Basic Search View
Advanced Search View
BPS 2.0 Copyright 2011 CME Group
12
6.1
Rate Search
The basic search consists of selecting:
•
•
•
Exchange
Firm
View
o Current Rates
o Adjustment Period Rates
o Historical Rates
1. Select an Exchange.
2. Select a Firm.
3. View defaults to Current Rates.
4. Click Search.
The Search Results section will display below the Rates Search screen.
Select Actions
The following actions can be selected upon display of the rate search results.
•
View – displays the detail information of the rate in read-only format.
•
Edit – displays the detail information of the rate and allows modifications to select fields.
•
•
Copy – displays the Create Rate screen with the selected rate information populated.
Delete – deletes the rate.
BPS 2.0 Copyright 2011 CME Group
13
6.1.1
Edit Rate
1. After completing a search, select the Edit action.
2. Click on the line item to edit.
The Rate Edit screen is displayed, this screen allows users to modify the following fields:
•
•
Effective Dates
Expiration Dates
•
Rate Values
3.
Enter the changes and then click Submit.
Confirmation:
BPS 2.0 Copyright 2011 CME Group
14
6.1.2
Copy Rate
The copy rate action allows the users to copy the attributes of an existing rate and modify as
needed.
1. Complete a search.
2. Select action Copy.
3. Click on the rate to copy, you will be directed to the Rate Create screen.
4. Update rate as needed.
5. Click Submit.
6.1.3
Delete Rate
The delete rate option allows the users to:
•
•
Delete any rate that has an effective date greater than or equal to current date.
Expire any rate as of today, if the effective date is earlier than current date.
1. Complete a search.
2. Select action Delete.
3. Click on the rate to delete.
4. Click Submit.
•
Once a rate has been deleted it is consider a historical rate.
BPS 2.0 Copyright 2011 CME Group
15
6.2
Creating a Rate
This screen allows the users to create broker rates.
1. Click the Create button.
2. Enter the data as needed.
Exchange and Firm are required fields
3. Click Submit.
Note:
•
•
To remove data from any field, click the Clear button.
To enter tiered rates use the keyboard TAB key.
Note: After a rate is created, previously entered data is saved on the screen (i.e. entry fields are not
reset to default settings). This is to avoid redundant data entry.
BPS 2.0 Copyright 2011 CME Group
16
Dates
•
Effective Date
o Represents the date the rate is effective from.
o Must be a date from current month or future month.
o If in the adjustment period, can be a date from prior month.
•
Expiration Date
o Represents the date through which the rate is effective.
o Must be a date from current month or future month, but greater than current date.
o If in the adjustment period, can be a date from the prior month.
Rate Values
• For non-tiered rates
o Rate Price – The rate at which all trades matching the rate criterion will be priced.
Quantity – Always defaults to 999,999,999,999.
•
For tiered rates
o First Rate – The rate at which all trades matching the rate criterion will be priced.
Quantity - having quantity between 1 - 999999999999.9999
Quantity - having quantity between 2 - 999999999999.9999
Quantity - having quantity between 3 - 999999999999.9999
Quantity - having quantity between 4 - 999999999999.9999
Quantity - having quantity between 5 - 999999999999.9999
Each quantity should be greater than the prior quantity per the following example:
BPS 2.0 Copyright 2011 CME Group
17
6.2.1
Retroactive Rates
The Create Rate Screen lets you create retroactive rates by Firm. Retroactive rates are rates with an
effective or expiry date earlier than the current business date.
•
The effective date and expiration date of the new or modified rate cannot be earlier than the
start of the adjustment period – the first of the prior month for business days 1 through 3, then the
first of the current month.
•
There cannot be an existing identical rate that is effective for any part of rate’s effective date
range.
•
Rates with monthly tier levels must have an effective date that is the first day of a month and an
expiration date that is the last day of a month.
•
The effective date, expiration date, rate amount, and tier levels can all be modified.
•
Any price changes caused by the new or modified rates are applied immediately. Any reports
or queries done after the rate is added, deleted, or changed will reflect the new rates.
•
The only restriction is that the effective date of the revised rate is within the adjustment period.
•
When editing an existing rate set the effective date to the date you want the new rate to
become effective. The old rate will automatically be expired on the day prior to the modified
rate’s effective date.
•
If a rate is deleted, the system will completely remove it if its effective date was within the
adjustment period, or will expire the rate as of the day prior to the start of the adjustment period
if its effective date was outside the adjustment period.
BPS 2.0 Copyright 2011 CME Group
18
6.3
Rate Group
The Rate Group screen allows users to Search and Create rate groups (similar to the Rate Screen).
Creation of a Rate Group allows the user to also create a Group ID name. Rates are used to price
trades and determine the correct brokerage to be paid by a trading firm to the executing Broker.
The search option consists of three views:
•
Current Rates
•
Adjustment Period Rates
•
Historical Rates
Using Rate Groups
Rate groups can be used for accounts, brokers, or commodities that pay at the same rate; you can
alleviate duplicate work by creating one rate group with a single rate, rather than having several line
items with the same individual rate.
For example, if you pay foreign exchange trades at the same rate, you can create a Commodity
Group containing commodities AC, AD, AJ, AN, BF, BP, BR, BY and etc. and name it *FX. You can then
create a single rate for *FX that will be used for all FX commodities in the group. If this rate later changes
you only have one rate to change.
6.3.1
Searching
The Rate Group Screen allows the users to search or create groups by Accounts, Broker, or Commodity.
1. Select an Exchange.
2. Select a Firm.
3. Select Type.
4. Select Group ID (optional).
5. View defaults to Current Groups.
6. Click Search, the search results list will display below the search criteria.
Action options: View, Edit or Delete
•
Select a line item to execute the selected action.
BPS 2.0 Copyright 2011 CME Group
19
6.3.2
Creating a Rate Group
1. Click Create.
After clicking Create from the search screen, the Rate Groups Create screen is displayed.
2. Select an Exchange.
3. Select a Firm.
4. Select a Type
•
Account
•
Broker
•
Commodity
5. Give the group a Group ID name. All Group ID names must start with an asterisk (*) and limited
to 9 alpha or numeric characters. (Example: *BRK2)
6. Enter an Effective Date the Expiration Date will default to 12-31-9999.
BPS 2.0 Copyright 2011 CME Group
20
7. Select the Members to be added to the group located in the New Member field.
o
If the type is Account Group, enter an account number in the New
Member field. Then click the arrow.
o
If the type is Broker Group, highlight the broker name from the New Member field. Then click
the arrow.
o
If the type is Commodity Group, highlight the commodities from the New Member field.
Then click the arrow.
Repeat steps until all the members are added. If a member was added in
error, highlight that member and click the arrow.
8. Click Submit. A confirmation message will display: The Rate Group has been created.
After creating a Rate Group (e.g. *BRK2) you can add this Rate Group to the applicable rates. This will
price all trades in the Rate Group that match the rate key.
BPS 2.0 Copyright 2011 CME Group
21
6.3.3
Creating a Rate Using a Rate Group ID
1. Click Rate from the menu selections.
2. Click Create.
3. Select Firm.
4. Select the Rate Group ID you previously created:
•
Account, enter the created account Group ID name (e.g. *ACCT2)
•
Commodity, click the dropdown arrow to locate the Group ID name (e.g. *FX2)
•
Broker ID, click the dropdown arrow to locate the Group ID name (e.g. *BRK2)
5. Continue to create the rate as described in the Create Rate section (page 16).
6.3.4
Rate Group Business Rules
•
The Group ID name (which you assign) must always begin with an * (asterisk).
•
There cannot be an existing identical group that is effective for any part of group’s
effective date range.
•
Groups cannot be deleted or expired until all of the rates containing the group are
deleted or expired.
•
If a “member” (account, broker, or commodity) is added to a group the member must
not have an existing rate that is a duplicate of an existing rate for the group.
•
If a group is created or modified, the effective date of the group cannot be prior to the
start of the adjustment period (the prior month up to business day 3, otherwise the
current month).
BPS 2.0 Copyright 2011 CME Group
22
•
Once a group is defined, it can be used wherever its members can be used. The
appropriate groups will appear in the broker and commodity drop-down lists. If an
account group is specified the system will check that the group exists. Note: Re-pricing
will be done as with any rate.
•
The Effective Date of the group is the date that the group is effective including the
current membership date. If you add or remove member(s) to/from the group, the
effective date is the date the new membership is effective. Re-pricing will be done for
this membership based on the group’s effective date for all rates which specify the
group.
EXAMPLE: If you add commodity AD to the existing Group ID (*FX), and set the group’s
effective date to 7/1/2011, all of the *FX’s rates will be used to re-price all AD
transactions as of 7/1/2011.
BPS 2.0 Copyright 2011 CME Group
23
7.0
eBroker
The eBroker tab allows BPS administrative users to manage the registration of the electronic
broker IDs. Within the eBroker screen the administrative user will be able to view, edit and
create new electronic broker records. The administrator will maintain the association between
a broker tag 50 ID and broker symbol. This will allow BPS to recognize all of the transactions
and associated firms that a broker has represented.
A non-administrative user has a read-only authority.
Note: Currently only CME exchange is available in eBroker.
7.1
Searching
An eBroker search consists of the following fields:
• Exchange
• Firm
• Broker ID (Optional)
• Tag 50 (Optional)
To complete a search:
1. Select an Exchange.
2. Select a Firm. Only the firms you are authorized to view will display.
Note: The Create option is only for administrators. The Create button will not displayed to
non-administrative users.
3. Click Search. The eBroker Review Details list will display.
BPS 2.0 Copyright 2011 CME Group
24
7.2
Administrative eBroker Users
Administrative Users can edit and create electronic broker registration records.
7.2.1
Edit
The Edit action allows Administrative Users to update the Effective Date and/or
Expiration Date.
1. Complete a search. (Reference page 24)
2. Select Edit from the drop-down action list.
3. Click on the line item to edit.
4. Enter the updated information, click Submit.
EDIT DATES
Confirmation will display:
Note: eBroker effective date cannot be before the current business date.
7.2.2
Delete
The Delete action allows Administrative Users to delete the eBroker record.
1. Complete a search. (Reference page 24)
2. Select Delete.
3. Click on the eBroker to be deleted.
4. A confirmation dialog box will display, click OK.
Confirmation will display:
BPS 2.0 Copyright 2011 CME Group
25
7.2.3
Create
The Create option allows Administrative Users to enter the broker’s Tag 50 ID.
1. Click Create.
2. Select the following fields:
•
Firm
•
Broker ID
3. Enter the following information:
•
Tag 50 ID
•
Effective Date (current day or later)
•
Expiration Date (defaults to 12-31-9999)
4. Click Submit. A confirmation will display.
5. To exit, click Back to Search. If the eBroker was entered incorrectly, click the Delete
button.
BPS 2.0 Copyright 2011 CME Group
26
8.0
Trades
The Trades tab will display the Trade View search screen; within the search screen there are
three mode search types:
•
•
•
View Summarized Trades – Trades are displayed with a limited amount of information.
View Detailed Trades – Complete details of each trade are displayed.
View Rejected Trades – All rejected trades are listed along with the rejected reason
code.
In all three views, you can use the basic search or advanced search option to request data.
To narrow your searches use the advance option.
8.1
Searching
A basic search consists of the fields listed below; an advance search will list a variety of fields
allowing you to filter the search in more detail. Advance Search fields, reference page 29.
•
•
•
Trade Date and/or Process Date
Exchange
Firm
Date Selection
•
To search by Trade Date or Process Date, select one of the search values listed in either
of the drop-down boxes.
Note: You do not have to click the Trade Date or Process Date check-box; this will automatically
populate once you make a selection from the drop-down list.
o
o
Trade Date is the date on which the transaction took place.
Process Date is the date on which BPS processed the transaction.
BPS 2.0 Copyright 2011 CME Group
27
•
Select the criteria for your date range by using the drop-down arrow.
o Equals - allows you to specify one particular day.
o Between - allows you to specify beginning and end dates.
Note: For the Between and Equals selections, you can specify the dates by
clicking the field and typing the date in MM-DD-YYYY format, or by using the
calendar to the right of the field. Make sure the dates represent the period you
want to view.
o
o
o
Month to Date - automatically sets the first and last business day of the current
month.
Last Month - automatically sets the first and last business day of the previous
month.
Two Months Prior - automatically sets the first and last business days of the two
months prior to the current business month.
Exchange Selection
•
The exchange list box displays the trading exchanges you have authority to view.
Firm Selection
•
The firm list box displays all the firms for the exchange selected.
To complete a search:
1. Select a date range, Trade Date and/or Process Date.
2. Select an Exchange.
3. Select Search Mode:
•
View Summarized Trades
•
View Detailed Trades
•
View Rejected Trades
4. Select a Firm.
5. Click Search.
If you do not select a value for each
search criteria, an error message will
appear. Refer to Appendix I for more
information on Error Messages.
BPS 2.0 Copyright 2011 CME Group
28
8.2
Advanced Search (Summarized or Detailed Mode)
The advanced search consists of additional fields to narrow your search criteria. To view the
advanced search features, select the Advanced button. The basic search selections remain
at the top of the screen, and the advanced search fields appear below. See Appendix II for
a list of field descriptions.
B
A
S
I
C
A
D
V
A
N
C
E
D
Example: Search Detailed Trades View
BPS 2.0 Copyright 2011 CME Group
29
8.3
Rejected Trades
There are three reasons a trade may be rejected:
•
1 – Firm not found
•
•
2 – Broker not found
3 – Customer Type Indicator 1 (CTI 1)
8.3.1
Resubmitting Rejected Trades
To resubmit rejected trade(s) perform the following actions:
a) Resubmit – resubmits a trade for re-processing during the nightly run
b) Resubmit All – resubmits all of the rejected trades listed for re-processing during the
nightly run
1. Complete a search for rejected trades.
2. Click the check box of the trade to resubmit.
3. Click the Resub Selected button.
•
•
After clicking the Resubmit button; the Resubmit Indicator status is set to ‘Y’ (Yes).
To resubmit all the trades shown in Search Results, select the Resubmit All button.
BPS 2.0 Copyright 2011 CME Group
30
9.0
Payment Review
The Payment Review tab has a sub-menu, Adjustments and Hold. The Adjustments and Hold options
allows the users to search or create an Adjustment or Hold record per broker.
9.1
Searching for an Adjustment
An Adjustment search consists of selecting:
•
•
•
Perspective
o View Firm Adjustments – create, edit and search.
o View Broker Adjustments – search only.
Exchange
Firm
Process Month (Optional)
• Restricts the search to the month specified.
Type of Adjustment (Optional)
• Search by either Payment or Tax adjustments.
Broker ID
• Broker ID is optional if perspective is View Firm Adjustment
• Broker ID is required if perspective is View Broker Adjustment
To perform a search:
1. Select Perspective.
2. Select Exchange.
3. Select Firm.
4. Click the Search button.
BPS 2.0 Copyright 2011 CME Group
31
The search results list will display below the search criteria.
Select Actions
Choose an action from the drop-down action list, and then select the line item for which you want to
invoke the action. Available actions:
•
View – displays the detail information of the adjustment in read-only format.
•
Edit – displays the detail information of the adjustment and allows modifications to the Amount
and Comment fields.
o Edits to Payments Adjustment are only allowed for records with a process date within the
current month, or the prior month (adjustment period only).
o Edits to Tax Adjustment are only allowed for records with process dates within the current
fiscal year.
•
Delete – deletes the adjustment.
o Deletion of a Payment Adjustment is only allowed for records with a process date within
the current month or future month.
o Deletion of a Tax Adjustment is only allowed for records with process dates within the
current fiscal year or a future fiscal year.
9.1.1
•
Edit an Adjustment
Allows the user to modify the amount and/or comment fields.
1. Complete a search.
2. Select Edit from the action list.
3. Click on the line item to edit.
4. Update the amount and/or the comment field.
5. Click Submit.
Confirmation message:
BPS 2.0 Copyright 2011 CME Group
32
9.1.2
Delete an Adjustment
1. Complete a search.
2. Select Delete from the action list.
3. Click on the line item to delete.
A confirmation pop-up window will appear.
4. Click OK to remove the adjustment.
Confirmation message:
9.1.3
Create an Adjustments
The Create button allows the users to create either a Payment Adjustment or Tax Adjustment record. A
payment adjustment is used to either increase or decrease the brokerage amount due to a broker for a
specific process month. A tax adjustment is used to either increase or decrease the brokerage amount
that will be reported to the IRS. Only the perspective of View Firm Adjustments can create an
adjustment.
Multiple adjustments can be entered on a single screen provided they are the same:
•
•
•
•
Exchange
Firm
Adjustment Type
Process Month
BPS 2.0 Copyright 2011 CME Group
33
To create multiple adjustments, press the Tab key while in the Comment field. A new empty row will
display. This feature allow up to five rows of data.
•
To remove changes made to the adjustment fields, click the Clear button.
Field Descriptions
•
Type of Adjustment
o Payment -- increase or decrease in a broker’s monthly brokerage.
o Tax -- increase or decrease in a broker’s annual brokerage reported to the IRS.
•
Process Month – is the month when the adjustment will be applied
o Payment Adjustment -- Must be the current month or future month; if within the
adjustment period, can be the prior month.
o Tax Adjustment -- represents the fiscal tax year when the adjustment will be applied; must
be a month with the current or future fiscal year.
•
Amount – is the value of the adjustment; can be positive or negative.
•
Comment – allows the user to describe the reason for the adjustment using up to 120 characters,
maximum.
BPS 2.0 Copyright 2011 CME Group
34
To create an adjustment, complete the following steps:
1. Click Create located on the Payment Adjustment Search screen.
2. Select Exchange.
3. Select:
•
Type of Adjustment
•
Firm
•
Process Month
•
Broker ID
4. Enter Amount:
•
500.00
•
-500.00
5. Enter Comment.
To enter multiple adjustments use the Tab key.
6. Click Submit.
Single Adjustment
Multiple Adjustments
BPS 2.0 Copyright 2011 CME Group
35
9.2
Payment Holds
The Payment Hold screen is very similar to the Adjustment screen. It works in the same manner - - users
can search and create Payment Hold records. The Hold screen has an option to hold a broker’s entire
payment. Also, the Hold screen requires an Effective Date and Expiration Date.
9.2.1
Searching
A search consists of selecting:
•
•
•
Exchange
Firm
Broker ID (Optional)
To perform a search
1. Select Exchange.
2. Select:
•
Firm
•
Broker (optional)
3. Click Search. The search results list will display below the search criteria.
4. Click the line item to view (default action is View).
Action options: View, Edit or Delete
•
Click on a line item to execute the action.
BPS 2.0 Copyright 2011 CME Group
36
9.2.2
•
Editing a Hold Record
Allows the users to modify the following fields:
o
Remove the Hold on Entire Payment
o
Amount
o
Effective Date
o
Expiration Date
o
Comment
1. Complete a search.
2. Select Edit from the action list.
3. Click on the line item to edit.
4. Enter the update(s).
5. Click Submit.
Confirmation message:
9.2.3
Deleting a Hold Record
1. Complete a search.
2. Select Delete from the action list.
3. Click on the line item to delete.
A confirmation pop-up window will appear.
4. Select OK to delete the payment hold.
Confirmation message:
BPS 2.0 Copyright 2011 CME Group
37
9.2.4
Creating a Payment Hold
The Create button allows the users to create a payment hold, which is used to garnish brokerage. The
payment hold can be set up for a specific amount or the broker’s entire brokerage amount due within
a specified time period.
Field Descriptions
•
Hold Entire Payment – withholds the entire payment due the broker, for the time period specified
within the Effective and Expiration Date range.
•
Hold Amount – contains the dollar value of the hold; the value must be positive.
•
Effective Date – the date from which the payment hold is effective
o Must be the current month or future month.
o If within the adjustment period, can be the prior month.
•
Expiration Date – represents the month to which the payment hold is effective.
o Must be the current month or future month.
o If within the adjustment period, can be the prior month.
•
Comment – describe the details of the payment hold; 80 character maximum.
Note: When creating a hold record the BPS system does not compute a running total of amount being
held.
BPS 2.0 Copyright 2011 CME Group
38
Creating a Hold Record
1. Click Create located on the Payment Hold screen.
2. Select Exchange.
3. Select:
•
Firm
•
Broker ID
4. Enter Amount or click the Hold Entire Payment check box.
•
The value must be a positive value.
5. Enter Effective Date.
6. Update Expiration Date.
7. Enter Comment.
8. Click Submit.
BPS 2.0 Copyright 2011 CME Group
39
10.0
Reports
When you select Reports from the BPS main menu, three options will display:
•
Request Reports
•
View Report Request
•
View Batch Reports
The Report Request screen allows users to run reports. The selected report will be generated and is
viewable through the View Report Request tab. The View Batch Reports will display the system
generated batch reports.
10.1
Report Request Screen
To request a report:
1. Select Request Report.
2. Select a Report Category (Firm/Billing Group or Broker/Broker Group).
Report Category will filter the available reports; the Report Name drop-down list will immediately
update to reflect only the reports within that Report Category.
3. Select a Report Name and enter the criteria for the selected report.
4. Click Submit.
•
Clear – to clear the criteria, click the Clear button.
BPS 2.0 Copyright 2011 CME Group
40
Date Selection
•
Select a Trade Date and/or Process Date or Banking Cycle. Note you don’t have to click on the
checkbox; this will automatically be done after a value has been selected.
o
o
o
10.2
Trade Date is the date on which the transaction took place.
Process Date is the date on which the transaction was processed.
Banking Cycle is the period in which the transaction was processed.
Report Viewer
The View Report Request tab requires Adobe Acrobat Reader to be installed on your computer. All
reports are in PDF format.
The report viewing options are:
• View Report
• Extract Report
• View Report Criteria
• Delete Report
There are two view options that can be selected within the report viewer:
•
•
Today’s Reports
Show All Reports
The Report Viewer Screen is shown below. This screen allows the user to select one of the four report
viewing functions from the drop-down list.
Select Actions
Choose an action from the drop-down list, and then select the report you would like to invoke the
action for.
•
•
•
•
View Report – opens the report detail information in PDF format.
View Report Criteria – displays the selection criteria used to run the report.
Extract Report – transfers the report to be extracted into a database or spreadsheet application.
Delete Report – permanently removes the selected report from the system.
Reports are automatically deleted after a two week period.
1. Select an action.
2. Click a line item.
See Appendix III for a list of BPS Report names.
BPS 2.0 Copyright 2011 CME Group
41
Note:
If a report is extract only then the View action will not be available.
10.3
View Batch Reports
1. To view the batch reports, select a report name and complete the report criteria.
2. Click the Submit button.
The report can be viewed in a PDF or Text format.
BPS 2.0 Copyright 2011 CME Group
42
11.0
•
•
•
•
Appendix I – Errors in Selecting Criteria
If there were any errors made in selecting your criteria, you will see a red flag displayed next to
the field(s) containing the error(s).
To see detailed information about the error(s), click the Show Errors hyperlink at the top of the
page.
The details of the error(s) will then be displayed at the top of the page, and you can make
changes to your criteria to correct the error(s).
To hide the error details, click the Hide Errors hyperlink.
BPS 2.0 Copyright 2011 CME Group
43
12.0
Appendix II – Field Descriptions
This table provides a description of the fields on the basic and advanced search option.
Field
Basic
Search
Advanced
Search
Description
Date on which the transaction took place. Options
you can chose from include:
Equals -- allows you to specify one particular day.
Between -- allows you to specify beginning and end
dates.
Trade Date
√
√
Note: For the Between and Equals selections, you
can specify the dates by clicking the field and typing
the date in MM-DD-YYYY format, or by using the
calendar to the right of the field. Make sure the
dates represent the period you want to view.
Month to Date -- automatically sets the first and last
business day of the current month.
Last Month -- automatically sets the first and last
business day of the previous month.
Two Months Prior -- automatically sets the first and last
business days of the two months prior to the current
business month.
Process Date
Mode
Exchange
Firm
√
√
√
√
√
√
√
√
Date on which BPS processed the transaction. The
options listed for Trade Date, described above, are
the same.
View Summarized Trades – Displays trades at a
summarized level
View Detailed Trades – Displays the complete details
of each trade
View Rejected Trades – Displays all rejected trades
Displays the trading exchanges you have authority to
view.
Displays the firms for the trading exchange selected.
•
•
•
Classification Code
√
•
•
•
•
•
•
BPS 2.0 Copyright 2011 CME Group
Block Trade, Block Trade Give-Up From, Block
Trade Give-Up To
CPC Trade, CPC Trade Give-Up To, CPC Trade
Give-Up From, CPC Spread, CPC Spread GiveUp To, CPC Spread Give-Up From
CPC Block Trade, CPC Block Trade Give-Up
From, CPC Block Trade Give-Up To, CPC EFP,
CPC Give-Up From, CPC Give-Up To
EFP, EFP Give-Up From, EFP Give-Up To
Electronic Spread, Electronic Spread Give-Up
From, Electronic Spread Give-Up To
Electronic Trade, Electronic Trade Give-Up From,
Electronic Trade Give-Up To
SUB Give-Up From, SUB Give-Up To
Spread, Spread Give-Up From, Spread Give-Up
To
Substitution of Future for Forward
44
Field
Basic
Search
Customer Type
Indicator (CTI)
Type
Account Number
Advanced
Search
Description
•
•
•
•
•
√
√
√
Trade, Trade Give-Up From, Trade Give-Up To
CTI = Member trading for his/her own account.
CTI 2 = Proprietary or house trading.
CTI 3 = Member trading an account of another
member.
•
CTI 4 = Individual Trading for a customer
account.
•
M = Member
•
F = Firm
•
C = Customer
All – is the default selections which lets you search for
all items.
Equals – lets you enter the exact item that you want
to search.
Contains – lets you enter a string of numbers and/or
letters and search for all items that contain that
string.
Ends With – lets you enter the last few numbers
and/or letters of the item(s) that you want to search.
Begins With – lets you enter the first few numbers
and/or letters of the item(s) that you want to search.
Displays a listing of all the brokers for the trading
exchange selected.
Broker ID
Commodity Code
Fut/Opt Indicator
Contract Date
Quantity
Total Brokerage
BPS 2.0 Copyright 2011 CME Group
√
√
√
√
√
√
All – lets you search for all items and is the default
selection.
Equals – lets you select the exact item you want to
search for; the list is built based on the Trading
Exchange ID selected.
Displays a listing of all the commodity codes for the
trading exchange selected.
Futures or Options
Year and Month in which the futures contract will
expire.
All – lets you search for all items and is the default
selection.
Equals – lets you select the exact item you want to
search for.
All – lets you search for all items and is the default
selection.
Equals – lets you select the exact item you want to
search for.
Greater Than – lets you enter a value and search for
all items greater than that value.
Less Than – lets you enter a value and search for all
items less than that value.
In Between – lets you enter a low and high number
value, and search for all items between the values.
All – lets you search for all items and is the default
selection.
Equals – lets you select the exact item you want to
45
Field
Basic
Search
Advanced
Search
Description
search for.
Greater Than – lets you enter a value and search for
all items greater than that value.
Less Than – lets you enter a value and search for all
items less than that value.
In Between – lets you enter a low and high number
value, and search for all items between the values.
Date Range
View
√
Rate Type
√
√
Rate types:
•
Current Rates
•
Adjustment Period Rates
•
Historical Rates
•
M = Member
•
F = Firm
•
C = Customer
•
Tier Indicator
BPS 2.0 Copyright 2011 CME Group
√
•
Daily – Rate applied to all trades for a single
trade day.
Monthly – Rate applied to all trades for the entire
processing month.
46
13.0
Appendix III - Report Descriptions
The main Reports are then broken down to further assist the User in identifying the best report to utilize.
Following are descriptions of the Reports:
Report
Category
Firm/Billing
Group
Report
Name
Accumulated
Transaction Detail
Broker Account
Detail
Account Broker
Detail
Firm Monthly
Broker Summary
Firm Brokerage
Rates
Firm Daily Trade
Fee Calculation
Firm Monthly
Brokerage
Firm Negative
Brokerage
Rejected
Transaction
Adjustments by
Firm
Adjustments by
Broker
Tax Details by
Billing Group
Firm Monthly
Broker Detail
Broker/Broker
Group
Broker
Accumulated
Transaction Detail
Brokerage Details
by Firm
BPS 2.0 Copyright 2011 CME Group
DESCRIPTION
Trading firm report containing daily buy, sell and total quantities and
resulting fee data aggregated to the Broker, Product, Account, CTI,
Transaction Type, Rate Type, Trade Date, and Process date level.
Grouped by broker.
Trading firm report containing daily total quantities and resulting
brokerage, aggregated to the Account, Broker level. Grouped by
broker.
Trading firm report containing daily total quantities and resulting
brokerage, aggregated to the Broker, Account level. Grouped by
account.
Trading firm report containing daily total quantities and resulting
brokerage. Grouped by payment month and Broker.
Trading firm report containing all the firm's current rates, ordered from
most-specific to least-specific. Note: When reading down the table
the first match will be the rate charged.
Trading firm report containing the details of the Accumulated
Transaction Detail report and indicating the specific rate key used to
determine the brokerage. Grouped by broker within rate key.
Trading firm report containing the brokerage due and brokerage
withheld for each broker who has brokerage due from the firm. Listed
in broker order. It includes the firm total brokerage service charge.
Trading firm report containing the Calculated Brokerage and
Adjustments by Trading Firm or Broker. Grouped by banking cycle.
Trading firm report containing rejected transaction details and
reason for rejection.
Trading firm report containing detailed Adjustment information.
Grouped by Trading Firm.
Trading firm report containing detailed Adjustment information.
Grouped by Broker ID.
Trading Firm and Broker Group report containing Total Brokerage and
Tax Adjustment information by Transaction Month. Group by Broker
ID, Broker Group, Firm and Billing Group.
Trading firm report containing Prior Balance, Calculated Brokerage,
Adjustments and Total Brokerage for each banking cycle.
Broker group report containing detailed transaction data and rates
applied. Grouped by Broker Group.
Broker group report containing Total Brokerage, Service Charges,
Lessee Brokerage, New Brokerage, Misc. Withholding & bank transfer
amount. Grouped by Broker ID.
47
Report
Category
Report
Name
Broker Group
Banking Details
Adjustments by
Broker
Broker
Accumulated
Transaction
Summary
Broker Trade Detail
Extract
BPS 2.0 Copyright 2011 CME Group
DESCRIPTION
Broker group report containing Total Brokerage, Non-Bank Amounts,
Negative Brokerage and Withholding. Grouped by Trading Firm.
Broker group report containing detailed Adjustment information.
Grouped by Trading Firm and Broker ID.
Broker group report containing summary transaction data and rates
applied. Grouped by Broker Group.
Broker group report containing detail transaction data.
48
14.0
Appendix IV – Load Criteria and Save Criteria Buttons
The Search and Report screens have two additional buttons displayed allowing users to create and
save predefined searches; then load the defined search for future usage.
•
Save Criteria
1. Enter criteria information.
2. Click the Save Criteria button.
3. Enter a criteria name for the saved criteria.
4. Select filter Rate Search or Report.
5. Click the Save button. Confirmation message: Search Criteria has been created.
The new criteria name will display in the Saved Criteria section.
•
Load Criteria
1. Click Load Criteria. The ‘My Criteria’ screen will display.
2. Select a criteria name from the Save Criteria list.
3. Click the Load Criteria radio button.
4. Click the Submit button. Clicking the submit button will redirect you to the search screen
with the saved criteria information populated.
5. Click Search to execute the loaded criteria information.
Note: The ‘Saved Criteria’ listings will change depending on the selected tab (Rates or Reports).
BPS 2.0 Copyright 2011 CME Group
49
15.0
Appendix V - Navigation
There are multiple ways to navigate through your data. If you do not have more than one page of
data, some of these options will not be available.
•
•
•
•
•
•
•
Show All – selecting this hyperlink (located in the upper right-hand corner above the Search
Results window) will change the display to show all transactions on one page. Use the scroll
bar on the right of the browser window to scroll through the data.
Reset – this hyperlink will appear after the Show All hyperlink has been selected. Use this to
change the display back to show one page of data at a time.
Prev and Next – selecting the previous or next hyperlinks displays the previous or next page
of data.
Go to Page – lets you enter a specific page number to view. To use this feature, type in a
page number and click the “Go” button.
Set Page Length – lets you select the number of rows of data you would like to see per page.
To use this feature, type in a number and click the “Set” button.
1 2 3 4… - selecting one of these hyperlinks will bring you to that specific page.
Sorting Columns – You can sort the column data in ascending or descending order. Select
the arrow next to the header of the column you would like to sort. Data can only be sorted
by one column at a time.
BPS 2.0 Copyright 2011 CME Group
50
BPS 2.0 Copyright 2011 CME Group
51