1
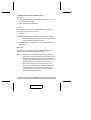
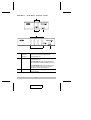
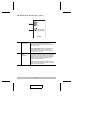
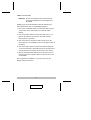
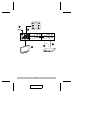
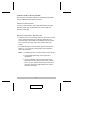
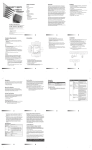
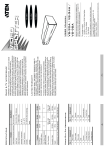
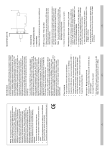
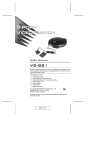
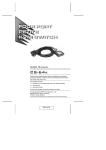
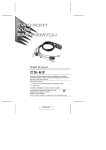
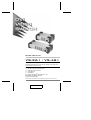
User Manual
VS-261 / VS-461
Read this guide thoroughly and follow the installation and operation
procedures carefully in order to prevent any damage to the units and/or
any devices that connect to them.
This package contains:
!
!
!
!
1
1
1
1
VS-261 or VS-461 DVI Video Switch
IR Remote Control Handset
Power Adapter
User Manual
®
© Copyright 2005 ATEN International Co., Ltd.
Manual Part No. PAPE-1256-300G
Printed in Taiwan 08/2005
All brand names and trademarks are the registered property of their respective owners.
2005-08-11
Note: This equipment has been tested and found to
comply with the limits for a Class B digital device, pursuant
to Part 15 of the FCC Rules. These limits are designed to
pr ov ide r eas onable pr otec tion against harmful
interference in a residential installation. This equipment
generates, uses and can radiate radio frequency energy,
and if not installed and used in accordance with the
instruction manual, may cause interference to radio
communications. However, there is no guarantee that
interference will not occur in a particular installation. If this
equipment does cause harmful interference to radio or
television reception, which can be determined by turning
the equipment off and on, the user is encouraged to try to
correct the interference by one or more of the following
measures:
! Reorient or relocate the receiving antenna;
! Increase the separation between the equipment and
receiver;
! Connect the equipment into an outlet on a circuit different
from that which the receiver is connected;
! Consult the dealer or an experienced radio/television
technician for help.
2005-08-11
Overview
The 2 port VS-261 and 4 port VS-461 chart a revolutionary new
direction in multimedia functionality by combining a Digital
Visual Interface (DVI) Video Switch with stereo quality audio. It
is not necessary to have a separate display and set of speakers
for each source. Users can switch among two (VS-261) or four
(VS-461) media sources, and enjoy their output on a single
display and set of speakers.
The VS-261 / VS-461 improves on previous video switch
designs by incorporating DVI connectors. DVI supports both
digital video (flat panel displays, data projectors, plasma
displays, digital TVs and set-top boxes) and analog video
(traditional monitors and TVs).
The VS-261 / VS-461 works on both PC compatible and Mac
systems. Setup is fast and easy - simply plug cables into their
appropriate ports. There is no software to configure, no
installation routines, and no incompatibility problems. Two
convenient methods are available to switch among media input
sources: push button port selection switches located on the
unit’s front panel, and an IR remote control.
-1-
2005-08-11
Features
! DVI video switch with stereo audio support
! Output sound and video signals from 2 (VS-261) or 4
(VS-461) DVI or analog video sources
! Compliant with the DVI specification
! Video source selection via front panel switches or IR remote
control
! LED display for easy status monitoring
! Superior video quality - 1600x1200 60Hz; DDC2B
! Easy installation
! Supports Windows and Mac host systems
-2-
2005-08-11
Hardware Requirements
Output
! A DVI display capable of the highest resolution that you will
be using on any DVI input
! Stereo speakers for audio output
Input
The following equipment must be installed on any computer
that acts as a source of DVI content:
! A DVI port
Note: The quality of the display is affected by the quality of
the DVI display card. For best results, we recommend
you purchase a high quality product.
! An audio output port (optional - for audio accompaniment to
the display)
Cables
Two (VS-261) or four (VS-461) DVI cables are required to
properly operate this DVI Switch (not included).
Note: 1. Cables are not included in this package. Since the
quality of the display is affected by the quality and the
length of the cables, we strongly recommend that you
purchase high quality cables. Contact your dealer to
purchase the correct cable sets for your switch.
2. There are two types of DVI signals (DVI-A and
DVI-D). The cable type must support the signal type
used by the DVI source and the DVI display. We
recommend that you use DVI-I cable, as it supports
both digital and analog signals.
-3-
2005-08-11
VS-261 / VS-461 Front View
1
2
3
1
2
3
1.
Port
Selection
Switches
Press a switch to display video (playback
audio) from the device attached to the
corresponding port.
2.
Port LEDs
The Port LEDs are built into the Port
Selection Switches.
- The ON LINE LED lights to indicate that the
device attached to the corresponding port is on.
- The SELECTED LED lights to indicate that
the video (audio) input is from the device
attached to the corresponding port.
3.
IR Receiver
Receives port switching signals from the
remote handset.
-4-
2005-08-11
VS-261 / VS-461 Rear View
1
1
2
3
2
3
1.
Power Jack
The power adapter cable plugs in here.
2.
Video/Audio
Output
The output section is comprised of a DVI-I
connector and two RCA audio jacks. The
cables that connect to the video and audio
input ports on the Video Display plug in here.
L=left audio, R=right audio.
3.
Video/Audio
Input
Each input section is comprised of a DVI-I
connector and two RCA audio jacks. The
cables that connect to the video and audio
output ports on the source devices plug in
here. Be sure that the cables from an
individual source device all plug into the same
input section (e.g. all in Port 1, etc.).
-5-
2005-08-11
IR Remote Control Unit
1
2
1.
Port Up /
Port Down
Press Port Up to switch the media input
focus from the device on the currently
selected port to the device on the next port (1
to 2, 2 to 3, etc.).
Press Port Down to switch the media input
focus from the device on the currently
selected port to the device on the previous
port (3 to 2, 2 to 1, etc.).
2.
Port
Selection
The button numbers correspond to the media
input ports on the rear panel of the VS-261 /
VS-461. Press a button to switch the media
input focus to the device attached to the
button’s corresponding port.
Note: Since the VS-261 only has two input
ports, it only uses buttons 1 and 2. Pressing
button 3 or 4 has no effect.
-6-
2005-08-11
Installation
Important: Ensure that all devices are powered off and
properly grounded before connecting them to
the switch.
Installing your DVI Video Switch involves the following five
steps (please also refer to the installation diagram):
1. Use a DVI-I compatible cable to connect the Video Out port
on the switch to the video input port on the DVI Video
Display.
2. Use stereo audio cables to connect the Audio Out (L + R)
jacks on the switch to the inputs on the audio receiver,
stereo system or speakers.
3. Use a DVI cable to connect the video output port on the
source device to an available DVI port on the Input section of
the switch.
4. Use stereo audio cables to connect the audio output jacks
on the source device to the Audio In jacks on the switch that
correspond to the DVI input from the same source device.
5. Plug the provided power adapter into an AC power source,
then plug the power adapter cable into the DC Power Jack
on the switch.
This completes the installation. You may now turn on the
display and source devices.
-7-
2005-08-11
5
2
4
3
1
-8-
2005-08-11
Video Port Switching
There are two convenient methods for switching among video
sources: Manual and the Remote Control.
Manual Selection
To select a source device, press and release the front panel
selection switch that corresponds to the port to which the
device is connected.
Remote Control Selection
! Press the Port Up or Port Down button on the remote control
unit to cycle through the source devices. Each time you
press the button, the media focus switches from the current
port to the next port (Port Up) or the previous port (Port
Down).
! To switch directly to a source device, press the numbered
button (1, 2, 3, or 4) that corresponds to the to which the
device is connected.
Note: 1. Pressing button 3 or 4 has no effect on the VS-261.
2. The infrared signal range is ten (10) meters
(maximum).
3. You must aim the remote control unit at the IR
Receiver located on the front panel of the switch
(see p. 4). For optimum performance, make sure
there is a clear line-of-sight between the control
unit and the receiver.
-9-
2005-08-11
Powering Off and Restarting
If you turn off the VS-261 / VS-461, before turning it on again
you must do the following:
1. Shut down all the devices that are attached to it.
2. Unplug its power adapter cable.
3. Wait 10 seconds, then plug the power adapter cable back in.
4. After it is powered on, Power On the attached devices.
- 10 -
2005-08-11
Specifications
Function
VS-261
VS-461
Connections
2
Port Selection
Front Panel Switches; IR Remote Control
LEDs
Connectors
4
Selected
2 (Green)
4 (Green)
On Line
2 (Orange)
4 (Orange)
Video Out
1 x DVI-I port (f)
Audio Out
2 x RCA jacks
Video In
2 x DVI-I ports (f)
4 x DVI-I ports (f)
Audio In
4 x RCA jacks
8 x RCA jacks
Power Jack
1
Resolution
Up to 1600x1200 60Hz; DDC2B
Power Consumption
2.65 W
Operating Temperature
0 - 50o C
Storage Temperature
-20 - 60o C
Humidity
0 - 80% RH, Non-condensing
Housing
Metal
Weight
500 g
Dimensions (L x W x H)
140 x 88 x 55.5 mm 210 x 88 x 55.5 mm
- 11 -
2005-08-11
6.36 W
750 g
Troubleshooting
Symptom
Possible Cause
Action
Erratic
behavior.
Unit not receiving
enough power.
Use a DC 5.3V, 2.4A power
adapter. Check that it is plugged
in and functioning properly.
Video
doesn’t
display
on some
ports.
DVI specification of
the source device
doesn’t match the
DVI specification of
the DVI cable and/or
the DVI display
device.
There are three DVI standards:
DVI-A; DVI-D; and DVI-I. Make
sure that the DVI specifications of
the source device, cable, and
monitor all match.
You are using a Mac
Video
from one monitor.
or more
computers
does not
display.
Note: Some monitors are able to
support multiple DVI signals.
First turn on the monitor. Then,
change the video switch focus to
the port to which the computer is
connected before turning on that
computer. Perform this action for
each connected computer.
Limited Warranty
IN NO EVENT SHALL THE DIRECT VENDOR’S LIABILITY EXCEED THE PRICE
PAID FOR THE PRODUCT FROM THE DIRECT, INDIRECT, SPECIAL,
INCIDENTAL OR CONSEQUENTIAL DAMAGES RESULTING FROM THE USE
OF THE PRODUCT, DISK OR ITS DOCUMENTATION.
The direct vendor makes no warranty or representation, expressed, implied, or
statutory with respect to the contents or use of this documentation, and specially
disclaims its quality, performance, merchantability, or fitness for any particular
purpose.
The direct vendor also reserves the right to revise or update the device or
documentation without obligation to notify any individual or entity of such revisions,
or update. For further inquires please contact your direct vendor.
- 12 -
2005-08-11
Notes:
- 13 -
2005-08-11
Notes:
- 14 -
2005-08-11