1
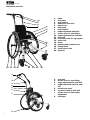
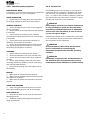
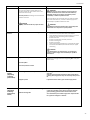
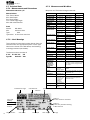
User Manual Mio Move User Manual 1 Mio Move IMPRINT SORG Rollstuhltechnik GmbH+Co.KG Benzstraße 3-5 D-68794 Oberhausen-Rheinhausen Germany Tel. +49 7254-9279-0 Fax +49 7254-9279-10 E-mail [email protected] Webwww.sorgrollstuhltechnik.de REVISION STATUS Revision from September 15, 2015 TECHNICAL STATUS Technical changes and misprints reserved. The pictures in this user manual can – depending on the individual equipment – differ from the actual equipment components. However, a corresponding conduction is possible. rehaKIND We are a member of rehaKIND e.V. International association child and adolescent rehabilitation COPYRIGHT © by SORG Rollstuhltechnik GmbH + Co. KG Benzstraße 3-5, 68794 Oberhausen-Rheinhausen. All texts and pictures in this user manual underlie the international copyright protection and are not allowed to be published without our consent – not even in excerpts! CERTIFICATION We are certified according to the Quality Management 2 System ISO 90001:2008 under the certificate no. 12 100 20070 at TÜV SÜD. User Manual Wheelchair overview 1 Preamble 4 5 1.1 General Information 5 1.2 Signs and Symbols 5 1.3 Indication 5 1.4 Counter Indications 5 1.6 Application 6 1.7 Reception 6 1.8 Documentation 6 1.5 Specification Mio Move 6 1.9 Service and Maintenance 7 1.10 Accessory and attachment drives 7 2 Safety Instructions 7 2.1 General Indications 7 2.2Handling 8 2.2.1 Getting in and out 8 2.2.2 Starting and slowing down 8 2.2.3 Danger of tipping and flipping over 8 2.2.4 Up and downhill 9 2.3 Grabbing objects 9 2.4 Overcoming obstacles 9 2.5Wheel lock 10 2.6Anti-tipper 11 2.7Casters 11 2.8 Loading and transporting 11 2.8.1 Transport in public transportation 12 2.8.2 Transport in other vehicles 12 2.9Other Risks 12 3 Handling 13 3.1Wheels 13 3.1.1 Quick Release Axle Wheels 13 3.1.2 Drum brake wheels 13 3.1.3 Double hand rim 14 3.2Casters 14 3.3 Special hand rims 15 3.3.1 Knob hand rims 15 3.4Back 15 3.4.1 Tilting 15 3.4.2 Adjusting the back angle 16 3.4.3 Folding the back down 16 3.4.4 Back extension retractable 17 3.5Push Aids 18 3.5.1 Push bails /Push handles 19 3.5.2 Tensioning force of eccentric clamp 19 3.5.3 Angle adjustment push bail 20 3.5.4 Angle adjustment one-hand push handle 20 3.6Seat/Side guard 20 3.7Leg Supports 20 3.7.1 Standard Leg Support 21 3.7.2 Footrest can be elevated, continuous or divided 21 3.7.3 Leg rest 22 3.7.4 Locking the footrest/s 22 3.8Brakes 23 3.8.1 Knee lever brake (wheel lock) 23 3.8.2 Drum brake as driving brake 24 3.8.3 Drum brakes as wheel lock 24 3.9Anti-tipper 25 3.10Head Rests 25 3.11Therapy Table 26 3.12 Abduction wedge 26 3.13 Thorax truss pad 26 3.14 Pushing aid for outside (outdoor front end) 27 4. Repairs and Maintenance 29 4.1Repairs 29 4.2Spare parts 29 4.3Disposal 29 4.4Tire change 30 4.5Maintenance 30 4.5.1 Cleaning and Care 30 4.5.2 Disinfection 31 4.5.3 Reinstatement 31 4.6 Service/Inspection 31 4.6.1 Check lists 31 4.6.2 Check list yearly inspection 32 4.6.3 Service List 32 4.7Technical Data 34 4.7.1 Measurements and Dimensions 34 4.7.3 Measurements Mio Move 34 4.8 Documentation Yearly Inspection 35 3 Mio Move Wheelchair overview 10 9 8 7 6 5 4 3 2 1 18 17 16 15 14 13 12 1.frame 2. seat plate 3. seat cushion 4. wheel lock user lever 5. wheel cover 6. side guard 7. back cushion 8. height adjustable push bail 9. release lever for seat tilting 10. angle adjustment for push bail 11. foot plate 12. connection tube for leg support 13. caster fork 14.caster 15. pressing bolt for wheel lock 16. driving wheel 17. quick release axle 18. hand rim 11 1 2 3 4 5 6 7 8 4 1. 2. 3. 4. push bail release lever for seat tilting angle adjustment for push bail height adjustable tube for push bail 5. curved back plate 6. eccentric clamp for push bail 7. release lever for back angle adjustment 8.anti-tipper User Manual 1 Preamble 1.3Indication The wheelchair has been built, adjusted and given to you operable according to your individual instructions. A qualified Technician will make any changes necessary, should modification be needed during use. Mio Move is indicated by all therapy forms of change position and bearing, to stimulate/strengthen the whole metabolism, the autonomic nervous system and/or the whole cardiovascular system, to preserve, rebuild and to activate the whole muscle tone or individual muscle groups, to build and to strengthen the whole bone structure, to slow the process of progressive scoliosis, to slow or restrict dystrophic or atrophic muscle changes, to regulate all forms of dyskinesia by all forms of Paresis and/or neuromuscular sicknesses, to reactivate after a severe concussion, all therapy forms in regard to cerebral dominance 1.1 General Information As any other aid, a wheelchair is a technical device that can hold risks if not properly used. This brochure is to help you familiarize yourself with the wheelchair and its functions. ATTENTION Read the following instructions and manuals carefully. User manual Info-brochure Crash Test ISO 7176-19 ATTENTION If the user of the wheelchair is a child or a person with limited competence, the parents or authorized supervisor have to make sure that they have fully understood the handling of the wheelchair before it is first used. If you have any questions your medical supply store or our competent team is glad to assist you (+49 07254/92790). This user manual is directed to both you and your rehab technician. It contains instructions on the correct adjustments of Jump to your physical situation. 1.2 Signs and Symbols ATTENTION This is how individual-related safety aspects of utmost importance are indicated. �INDICATION This is how possible indications of utmost importance are labelled. INFORMATION This is how INFORMATION on mounting and adjustment work is labelled. READ This refers to other chapters within the brochure or to additional material. BOLD PRINT Text in bold print highlights important passages or remarks. 1.4 Counter Indications Mio Move is as an active wheelchair counter indicated by: severe impaired perception and sense of balance, limb loss on both arms, joint contractures/joint damages on both arms, unable to sit, not enough eyesight. ATTENTION Under the following circumstances and/or symptoms, Mio Move may only be used if discussed thoroughly with the doctor or therapist in charge of the treatment: User without intact skin, with severe tonicity deregulation. INDICATION We are NOT liable for health problems and/or other damages on persons or object that occurred from using the wheelchair, despite the above described conditions. 1.5 Specification Mio Move Mio Move is an active wheelchair that grows with your child, with a mechanical tilt function in a physiologic pivot point for children and adolescents: Sitting height and position are adjustable, tilt function in small steps 0° to +35°, back angle adjustment with a raster from 80° to 120°, additional Retro or Taurus frame able to fold forward with two differently strong V-formed abductions, back height grows in 5cm steps, seat grows in 2cm steps in the width and (optional) 4cm steps in depth, clothing protection side part with an integrated cable brake, double tip protection (optional), leg supports with continuous or divided footrests mounted in the middle or under the seat, distance free adjustable, can be elevated (optional), steer and push assistance for outdoors( outdoor stem), positioning assistance ( side truss pads, abduction wedge, anatomically formed seat, head supports, extendable back elongation), one-hand assistance (double hand rim, one-hand steering, one-hand braking), leg bearing (s), suitable for setting up the seat shell several rear wheels and casters 5 Mio Move 1.7Reception PLEASE NOTE DELIVERY Each wheelchair is mounted, tested for functionality and correctness in our works and packaged into special cardboard boxes by our shipping experts. FORWARDING COMPANY For liability reasons we have to ask you to check the wheelchair immediately after receiving it and in the presence of the deliverer (forwarding company) for possible damages that may have occurred during transportation. TRANSPORTAION DAMAGES In case of damage, please proceed as follows: • write a short record of the damage and review of events, if possible include pictures clearly showing the damage, • get the personal information of the bearer (driver’s license etc.), • inform us immediately. �INDICATION Do not sign the notice of receipt from the forwarding company before thoroughly checking the wheelchair for defects. �INDICATIION According to the valid law, damages reported late can neither be asserted to us nor to the forwarding company. 1.6Application ATTENTION The wheelchair serves solely to actively or passively transport the person to whom the wheelchair has been adjusted for by a qualified specialized trade. It can be used on firm ground without any restrictions indoors and outdoors. With suitable equipment (e.g. outdoor front end) the wheelchair can also be used on surfaces such as sand, cobblestones, gravel etc. ATTENTION The allowed load capacity (including seat shell) is not to be exceeded. ATTENTION The wheelchair cannot be used in extremely wet surroundings (shower, sauna etc.) or salt water nor can it have excessive contact with moisture. ATTENTION The wheelchair must not be used as means of transportation for goods, objects and the like. 6 INFORMATION Regular maintenance and care (after chapter 4) is necessary for the guaranteed service life of the wheelchair. 1.8Documentation �INDICATION Keep this user manual in a safe place. Have all work/ repairs done on your wheelchair documented by the medical supply store in the maintenance plan. If applicable, hand it back to your benefactor along with the wheelchair. �INDICATION In the event of the wheelchair being reused, the service book is an important source of information for you benefactor. It provides evidence of regular inspections which might be relevant in the event of warranty claim. ATTENTION For safety reasons have all repairs done and documented solely by a qualified specialized trade. User Manual 1.9 Service and Maintenance 2 Safety Instructions READ According to § 33 subparagraph 1, clause 4, [German] SGB V, the responsibility of maintenance, repairs and replacement lies with the benefactor. After agreement with your benefactor, be sure to have all safety relevant inspections, maintenance work and if necessary repairs conducted in order to make the wheelchair functional. ATTENTION The risk of injuries occurs on all rotatable and turning parts. This also goes for adjustment and repair work. ATTENTION Be careful with all moveable parts since there is a RISK of crushing fingers and other body parts. ATTENTION The regular inspection of all safety relevant parts on the wheelchair by a qualified rehab workshop is the only way to prevent damages and maintain our liability. ATTENTION Only original parts are to be used for all service and maintenance work. INFORMATION Proceed according to the maintenance plan in chapter 4 of this user manual. 1.10 Accessory and attachment drives ATTENTION The addition of these accessory and attachment drives is done by either the manufacturer or the sanitary house and solely in their responsibility INFORMATION Ask the manufacturer for the respective requirements. 2.1 General Indications READ Before use read this user manual thoroughly ATTENTION The wheelchair can only be used according to its specifications. Any other use or misuse can contain serious risks for you and your surroundings. Also the guarantee or product liability can be terminated in case of misuse. Slowly familiarize yourself with the wheelchair at the first use and after adjustment work has been done. First practice on level grounds with the help of an experienced person. Only then are you allowed to try uphill and downhill with the help of an experienced person. From putting on and taking off the accessories the measurements of the wheelchair, its weight, the handling and the tilting changes. Even with a back tilt >90° the wheelchair can still tip backwards on a flat surface. This also applies, to a special degree, to a tilted seating position. ATTENTION The wheelchair can ONLY BE USED, in a TILTED POSITION and/or a BACK TILT >90°, when the ANTITIPPER IS ACTIVATED. ATTENTION All building alterations on your wheelchair must be coordinated and made by the manufacturer or your rehab technician. ATTENTION Do not make any adjustments, repairs and/or do maintenance work yourself. Contact your qualified medical store. READ Consider the indications for maintenance and inspection on your wheelchair at the end of the operating instructions. 7 Mio Move 2.2Handling 2.2.1 Getting in and out ATTENTION (1) Getting in and out can only occur on a flat surface and with ACTIVATED WHEEL LOCK. Activate the tilt safety for each transfer and always turn the casters forwards in order to enhance the stability. ATTENTION (2+3) NEVER use the footrest/s to get in and out. Please fold (when possible) the footrest/s to the side or to the back in order to get closer to the wheelchair. �INDICATION (3) For some children it is asked for, therapeutically, that they get in and out on their own by using the footrest. In this case consider the following: • turn casters forward, • secure the wheelchair from rolling away, • activate tilt safety, • be ready to give assistance. ATTENTION Hand rims heat from friction. If necessary, use leather gloves as used for cycling but NEVER wool gloves. 2.2.3 Danger of tipping and flipping over ATTENTION Danger of tipping and flipping from: • (1) all kinds of height differences of the ground surface, • (2) stairs (never manage alone), • (3) participating in public traffic under the influence of medication, drugs, alcohol, etc., • incline and/or emphasis of different things on the back, • (4) leaning out of the wheelchair, • (5)driving or longitudinal grooves(always cross streetcar rails etc. at a 90° angle), • driving with a tilted seat, • driving up or down hill with a tilted seat or a back angle >90°. (1) (2) (3) (4) 2.2.2 Starting and slowing down ATTENTION Avoid jerky starts. The wheelchair could tip backwards. When possible, lean your upper body forward when starting. With children we always recommend to use the tilt safety whenever possible. ATTENTION In order to brake on a hill, an essentially higher amount of strength is needed. Only go slow enough on hills that the wheelchair can be brought to a full stop at anytime. (1) (2) (5) (3) 8 User Manual 2.2.4 Up and downhill 2.3 Grabbing objects ATTENTION Keep in mind the higher strain in order to drive/ push or brake going up or down a hill. Grabbing objects requires much practice and experience. Slowly familiarize yourself, with the help of an experienced and strong person, with this action. ATTENTION Before EACH use make sure to check the reliable effectiveness of the drum brake (and if available the wheel lock). (3) In order to grab objects from the side/in front of the wheelchair secure the wheelchair from rolling away, do not lean too far out of the wheelchair, hold on (if possible) with your free hand, when possible, try not to put all your weight in the direction of where you are reaching. ATTENTION The seat and back unit must be in a vertical 90° position when driving up and down hill. TTENTION A (1) If possible, the user should tilt his upper body when driving up or down hill in the direction of the hill. ATTENTION Only go up ramps or hills with an incline or descent greater than 6% with assistance. ATTENTION NEVER go on ramps or hills WITHOUT the anti-tipper activated. (4) If you have to lean forward out of the wheelchair, NEVER STRAIN THE LEG REST, DANGER OF FLIPPING OVER! For a better position turn the casters forward by driving back a little bit, put both feet (if possible) on the ground, preferably as far from you as possible, secure yourself (if possible) with your free hand, preferably far back, try to put your weight in the direction of where you are reaching as little as possible. �INDICATION Generally, using a reacher is safer. ATTENTION (2) NEVER drive on inclines, descents or curbs sideways to the road, you may tip over. ATTENTION Do not grab objects behind the wheelchair reaching over the back of the chair, DANGER OF FLIPPING OVER. Turn the wheelchair around and go towards the object from the front or the side. (1) (3) (2) (4) 2.4 Overcoming obstacles 9 Mio Move A WHEELCHAIR IS NOT FOR CARRYING. For this reason avoid stairs! Whenever possible, ramps or elevators should be used to overcome height differences. ATTENTION BE SURE THAT THE ECCENTRIC CLAMP OF THE ANGLE ADJUSTABLE PUSH HANDLES ARE CLOSED TIGHTLY AND OPERATIVE. ATTENTION NEVER CARRY THE WHEELCHAIR BY THE SEAT SHELL, THE LEG SUPPORT AND/OR THE FOOT REST/S. ATTENTION (1) NEVER overcome stairs etc. with the wheelchair ALONE. ATTENTION THE KNEE LEVER BRAKES ARE ONLY THERE TO PUT THE WHEELS IN A RESTING POSITION. THEY ARE NOT DESIGNED TO SLOW THE WHEELCHAIR DOWN WHILE DRIVING. With a service brake, for example a drum brake, controlled braking is possible. ATTENTION Before each (longer) drive make sure to check • the correct tire pressure (information is on the outer tire) • and if necessary the brake pressing bolt. (1) (2) (3) (4) ATTENTION (2+3) Only overcome stairs with the help of two experienced people. For this, the anti-tipper must be deactivated. Be sure that the wheelchair is only held by metal parts which are bolted securely to the frame. ATTENTION Do not under any circumstance use escalators, not even with a carer. Shopping malls and public buildings with escalators always have elevators as well. ATTENTION Do not drive towards, for example, curbsides without braking, DANGER OF TIPPING OVER! ATTENTION (4) In order to overcome height differences or when using an elevator and lifting platform you generally have to deactivate the anti-tipper. You could become restricted in maneuverability. (5) In order to overcome curbsides your carer should slightly tilt you backwards, lift both casters over the threshold and then, with the rear wheels, carefully push the wheelchair over the edge. The anti-tipper must be deactivated. When driving off of the curb please proceed correspondingly, but consider: ATTENTION For this, the casters must stay in the air until the rear wheels are over the threshold. DO NOT put the casters down first, DANGER OF FLIPPING OVER. 2.5 Wheel lock 10 (5) User Manual 2.7Casters ATTENTION Cable controls are high-maintenance! The clamp screws on the Bowden cable need to be checked on a regular basis and retuned if necessary. Check the functionality of the brakes regularly! The wheelchair with passenger (highest loading) must safely stand still with pulled brake on a ramp with 7° (=12,3%) descent. ATTENTION Dirt, wetness, ice, snow, mud etc. can impair the brake force of the wheel lock. ATTENTION Do not make repairs on the wheel lock yourself. Ask your rehab technician. 2.6Anti-tipper ATTENTION We recommend inexperienced and young users to use the anti-tipper whenever possible. ATTENTION Deactivate the anti-tipper when overcoming height differences by elevators or lifting platforms. (1+2) In order to activate the anti-tipper, secure the wheelchair from rolling away, push the foot lever (A) of the anti-tipper down and turn it 180° on its own axis until it snaps back into the guide slot. (1) ATTENTION Casters which are not correctly adjusted or driving too fast, especially downhill, can cause the casters to dangerously flap back and forth. �INDICATION Clean the axes and the axle holder regularly, removing lint and dirt. INFORMATION After every change on the rear wheels the casters must be newly adjusted. Let this be done by an experienced rehab technician. �INDICATION When transferring in and out of the wheelchair turn the casters forward for greater stability by slightly moving the wheelchair backwards. 2.8 Loading and transporting For the transport of you wheelchair in a car please consider the following points: • If necessary flip the anti-tipper inwards. • If necessary remove the push handle/s or handle bars. If possible remove the hollow molded back and fold the back down. • If possible fold the wheelchair and close it securely with the folding fixture strap. • Unlock the wheel lock and remove the rear wheels. • Secure the wheelchair with tension belts in the vehicle. • The tension belts can only be secured on fixed frame parts. Foot rests, side guards, back or seat adapters are not suitable for this. (A) (2) • Secure all removed parts of the wheelchair in the vehicle so that they cannot hurt anyone in case of sudden braking. ATTENTION There is a risk of getting hurt from loose, flying objects such as leg supports, seat shells, wheels, sticks, bags etc. Inform yourself by your car salesman about safely securing the wheelchair with lashing eyes or other suitable safety measures in your vehicle before transporting the wheelchair. 11 Mio Move 2.8.1 Transport in public transportation In every public transportation, a spot must be provided to place the wheelchair according to the EGguideline 2001/85/EG. ATTENTION The spot in public transportation is only arranged for EMPTY wheelchairs. ATTENTION Place the wheelchair in the provided area opposite the driving direction so that the backrest and a side guard rest securely on the edge of the provided area. • The wheelchair is not allowed to shift in case of an accident. • Close the wheel lock. • During the drive leave the wheelchair and seat yourself in the provided seat next to the spot for your wheelchair. • If available, use the seat belt! Let someone help you get in and out of the public transportation, • so that you don’t get stuck in the crack between the door and the sidewalk, • so that you don’t panic, • so that your claim for the marked seat possibly gets more emphasis, • so that you can be helped getting into the seat and tying down the wheelchair. 2.8.2 Transport in other vehicles Wheelchairs can never reach the stabile features of a firmly mounted car seat because of their purpose and light build. ATTENTION Thus, we recommend you to NOT use the wheelchair as a seat while transporting in a vehicle. READ Read our info-brochure “Crash Test ISO 7176-19”. Here, the potential dangers and regulations of the ISO 7176-19 are described. ATTENTION Only wheelchairs that have successfully passed a dynamic crash test according to ISO 7176-19 are allowed to be used as a seat in a vehicle. 12 Our successfully tested wheelchairs are provided with this international symbol on the type sign and are additionally marked on our order form with our “crash test button”. If necessary, inform yourself by your retailer or under www. sorgrollstuhltechnik.de, if your model is approved as a seat in a vehicle. 2.9 Other Risks �INDICATION Avoid direct sunrays. Dark parts on the wheelchair can heat quickly and can possibly cause burns. ATTENTION FIRE RISK from the textile parts (seat shell covering or plastic parts). Keep sources of ignition away from the wheelchair. �INDICATION For sensitive skin we recommend to wear gloves as used for cycling (finger stalls with a leather inner surface----but NEVER wool gloves) ATTENTION RISK OF HAND INJURY from turning parts. Do not grab in between the spokes of the rear wheel or between the rear wheel and the knee lever brake. ATTENTION Do not use the wheelchair in damp rooms or drive in salt water with it. Important parts may corrode and not work properly anymore, whereby the driving qualities or the lifespan of the wheelchair are negatively influenced. User Manual 3Handling 3.1Wheels 3.1.1 Quick Release Axle Wheels (1) All of our rear and 12” wheels are equipped with quick release axles for fast removal. (1) To release or apply the quick release axle, push the lock button (A) in the middle of the wheel nub and release it after the action. (2) After applying, the lock ball (A) must be completely in sight at the end of the quick release axle. The wheels should not be able to be removed. Be sure to regard the following points: • Wheels are turning parts and can cause injuries to fingers. • After fastening the wheels, check the secure hold of the quick release axle. • (2) Check the small lock ball (tension spring) (A) at the end of the quick release axle to be sure it functions properly. • Check the air pressure of the rear wheels regularly, in order to ensure the functionality of the brakes! With camber of wheels the toe in can be corrected if needed (see service record under “track alignment”). (A) (2) (A) (3) ATTENTION It is absolutely necessary that you let your rehab technician do the required work. 3.1.2 Drum brake wheels To apply or remove please proceed as described with the rear wheels. ATTENTION The drum brake wheels’ brake pads are extremely sensitive and can lose their functionality from dirt or scratches on the brake pads. Remove lint and dirt from the brake pads regularly with a soft brush. Check the functionality of the Bowden cables regularly, in short intervals. (A) (4) (3) To slow the ride down, the carer pushes both brake levers simultaneously (A). (4) To secure the wheelchair, pull both levers (A) up and latch the small lock levers (B) in the grooves (C). The drum brakes are now blocked. To unlock the blockage, pull both brake levers (A) a little bit higher to unlock the small lock levers (B). (C) (B) (A) 13 Mio Move 3.1.3 Double hand rim (1) (A) (B) Moving a wheelchair with a dual hand rim requires a lot of practice. Familiarize yourself, with the help of an experienced carer and in familiar surroundings, with the technology of this type of particular way of driving. (1) When transporting etc. remove the telescopic tube (A) by pushing both ends together. Unlock (B) the rear wheels and remove them. (2) To set them back on proceed in the same way and pull the telescopic tube over the wheel axle (C). Make sure the seat is correctly secured in place. Before reusing the wheelchair the lock (B) must be activated. ATTENTION To brake you must apply the same pressure to the hand rims (inside and outside), otherwise you will swerve unwillingly and become a hazard to yourself and your surroundings. (2) (B) ATTENTION Especially when driving downhill, make sure that you are able to bring your wheelchair to a stop at any time or have someone help you. 3.2Casters ATTENTION After a collision a qualified retailer must immediately check the wheelchair for possible damages and if necessary make repairs. (3) At the first sign of the caster shaking (especially during fast drives or on slopes) slow down. Precede the same with caster with a change set as with the quick release axles of the rear wheels. ATTENTION Caster axles, caster forks and quick release axles should be freed from lint and dirt regularly. (B) Locking (3) In order to unlock the casters, pull the locking bolt (A) forward and turn it 90° so that it clasps in the lock groove (B). In order to lock the casters, pull the locking bolt (A) a little more forward, turn it 90° and let it slide into the guide slot (C). At the next turn of the caster the bolts will automatically clasp into a forward position and lock them from driving straight ahead. 14 (A) (C) (A) User Manual 3.3 Special hand rims 3.3.1 Knob hand rims ATTENTION INJURY RISK! Regard that the knob hand rims turn when you are being pushed! ATTENTION Braking with pressure on the hand rims is not possible. This applies especially when driving downhill. Let an experienced and strong carer assist you. 3.4.1Tilting To release the tilt function: • (1-3) pull the lever (A) up and • squeeze it until the desired position is reached. • Then let it go and let the tilting mechanism snap into place. (1) (A) 3.3.2 Hand rim covers / Maxgrepp hand rims ATTENTION All hand rim covers and the Maxgrepp hand rim are made out of several black synthetic materials and can heat to over 42° in the sun. ATTENTION Under unfavorable circumstances the black coating can stretch from the heat and can detach from the hand rim. (2) 3.4Back ATTENTION BEFORE TILTING ALWAYS ACTIVATE THE ANTI TIPPER. (A) ATTENTION THE BACK AND THE BACK-SEAT UNIT CAN ONLY BE ADJUSTED STANDING STILL WITH LOCKED BRAKES AND ON A FLAT, HARD SURFACE TO MORE THAN 90°. ATTENTION NEVER USE THE TILT MECHANISM WHILE DRIVING. (3) ATTENTION With a tilted wheelchair and/or a back angle >90° a suitable support for the head is necessary (head rest or a back extension which can be lowered). ATTENTION Do not hang things (such as bags etc.) on the push handle; especially not in a tilted position and/or a back angle >90°. 15 Mio Move 3.4.2 Adjusting the back angle 3.4.3 Folding the back down (1+2)To adjust the back angle: • turn the lever (A) to the right or the left so that the bolts (B) unlock on both sides. • Hold the lever (A) in the turned position and • glide the back along the row of holes (C) into the desired position. • Let go of the lever (A) so that both bolts (B) can lock into place in the appropriate hole (C). (3+4) To fold down for transport • remove the seat cushion and the back cushion (or any other composition), • lower the back extension if necessary, • place the push handle/s to the lowest position (because of the Bowden cables for tilting and drum brakes), • turn the lever (A) to the right or the left so that the bolts (B) unlock and fold the back forward. • To fold the back up again, proceed correspondingly. ATTENTION Make sure that after every back angle adjustment both bolts are tightly locked in the hole. (1) (3) (A) (B) (A) (C) (B) (4) (2) (A) (B) (C) 16 User Manual 3.4.4 Back extension retractable (6+7) To extend the retractable back: • remove the head cushion (A), • loosen the star knob screws (B) on both sides, • pull the back extension equally, without tilting it, up, • turn both star knob screws tightly and • fasten the head cushion on the front of the back extension. To retract the back extension, proceed correspondingly. ATTENTION THE RETRACTABLE BACK EXTENSION IS NOT SUITABLE AS A HEAD REST FOR TRANSPORTING IN A VEHICLE! (6) (A) (B) (7) (A) (B) 17 Mio Move 3.5 Push Aids (1) (C) For all various push aids (push handle, push bail) please regard: (1) ATTENTION ALL PUSH AIDS ARE ONLY THERE TO PUSH THE PERSON IN THE WHEELCHAIR; NOT TO CARRY THEM. ATTENTION NEVER CARRY THE WHEELCHAIR WITH PASSANGER OVER OBSTACLES (STAIRS, STEPS, CURB SIDES ETC.). (A) (B) ATTENTION THE SPRING BUTTON (B), FOR ASSURANCE THAT THE PUSH HANDLES CANNOT COME OUT, MUST BE VISABLY STICKING OUT OF THE HOLES AT THE BOTTOM OF THE HOLDER (C). ATTENTION The eccentric clamps (A) can loosen under adverse conditions. Before overcoming each obstacle, be sure to check them to make sure they are tightly closed. (2) (A) ATTENTION Do not hang any objects (bags etc.) on the push aids! DANGER OF TIPPING OVER (B) ATTENTION (2) The round part at the end of the eccentric clamps (A) must always be concise with the saddle washer (B). Make sure that the eccentric clamp (A) is also concise with the half shell (B), when it is in an opened state. The functionality is not guaranteed if the eccentric clamp is not concise with the half shell. ATTENTION When playing with other children, it is strongly recommended to remove the push handle, because the child might not be able to anticipate the swivel radius and might injure other children involuntarily. INDICATION (3) The bracket (A) to hold the push handle /push bail pipes (B) is provided with an inner profile (C) which is equivalent to the profile (D) of the pipes (B). This way the pipes (B) can only be inserted into the bracket (A) one way and are safe from twisting. ATTENTION Picture (3) shows the pipe BEFORE it is put into the bracket! In this state the push handle is not functional! 18 (3) (B) (D) (C) (A) User Manual 3.5.1 Push bails /Push handles (1) (A) (A) Proceed in the same manner with all kinds of push aids. (B) Height adjustment: • (1) open the eccentric clamp/s (A), • place the push handle/s or bar (B) in the desired position, • close the eccentric clamp (A) tightly. Attaching: • (2) open eccentric clamp (A), • push the stand spring (C) inward, • guide the pipe (B) in to the bracket (D) • (3) until the stand spring (C) becomes visible at the bottom of the bracket (D). • Close the eccentric clamp (A). Detaching: • (1-3) open the eccentric clamp (A), • guide the pipe (B) as far up until the stand spring (C) hits the bottom of the bracket (D), • push the stand spring (C) inward so that it can glide through the bracket (D), • pull the push handle out of the bracket (D). ATTENTION Regard the safety instructions. (B) (B) (2) (C) (D) (A) (3) (A) 3.5.2 Tensioning force of eccentric clamp (D) (C) (4) The eccentric clamp (A) is on the opposite side of the bracket (D) fixated with an adjusting screw (E). From turning the eccentric clamp (A) its tensioning force changes. (4) Adjusting the tension force • open eccentric clamp (A), • correct the clamp force with the adjusting screw (E), • close the eccentric clamp (A) and check its functionality. ATTENTION The pushing aids should not be able to be moved in the bracket (D) when the eccentric clamp/s is/are in a closed position. (4) (D) (E) (A) ATTENTION Check the functionality of the eccentric clamp in the stand spring (C) in short intervals. 19 Mio Move 3.5.3 Angle adjustment push bail 3.6 Seat/Side guard Adjusting the angle on the push bail: • (1) push the locking knobs (A) on both sides at the same time, • adjust the bail, while pushing the locking knobs (A), in the desired position • and then let go of the locking knobs (A). They stick out about 1 cm over the adjustment element. Seat and side guard are screwed on to the frame of Mio Move. For safety reasons, please have all work for the setting (seat height/grip point etc.) done by your rehab technician. ATTENTION After adjusting, be sure that the locking knobs have locked in place in the adjustment element. If the push bail is pushed slightly up or down they usually lock into place by themselves and stick out from the adjustment element about 10 mm. 3.5.4 Angle adjustment one-hand push handle Adjusting the angle on a one-hand push handle: • (2) loosen eccentric clamps (A), • place the push handle in the desired position, • close the eccentric clamps (A) tightly. ATTENTION Please take note of the safety instructions 3.7Leg Supports (3) On all leg supports you can adjust: the horizontal distance to the seat, the vertical distance between top edge of the seat and the footrest (=lower leg length) and the angle to the footrest. Have all these points/factors adjusted to your individual measurements by your rehab technician. With an ideal adjustment there is space between thigh and seat in the area of the back of the knee. (This is important for the unhindered circulation of blood and lymph.) A too high adjusted footrest can result in a bent pose in the pelvic area. A too low adjusted footrest can result in jams in the back of the knees and can cause spasms. ATTENTION NEVER LIFT OR CARRY THE WHEELCHAIR WITH A PASSANGER BY THE FOOTREST/S: >>INDICATION For safety reasons, have all adjustment and alignment work done by your rehab technician. 3.7.1 Standard Leg Support (1) (1) To get in: Secure the wheelchair from rolling away by locking the wheel lock and activating the anti-tipper! If necessary, unlock the footrest/s (A) with the latch (3D). Fold the footrest (A) back. As soon as the child is safely in the wheelchair lift its legs, fold the footrest forward (A) (3) (2) (A) 20 User Manual and position the child’s feet on the footrest. If possible lock them. >>INDICATION For some children it is asked for, therapeutically, that they get in and out on their own by using the footrest. In this case consider the following: Turn the casters forward, secure the wheelchair from rolling away and activate the tilt safety, do not let the child get in or out of the wheelchair unattended, be ready to give assistance if necessary. 3.7.2 Footrest can be elevated, continuous or divided (2+3) To elevate the leg support: Secure the wheelchair from rolling away by closing the wheel lock and activate the tilt safety. Loosen the clamp levers on both sides (A), bring the leg support/s into the desired position and close the clamp lever/s (A) tightly. (2+3) In order to balance the length: Loosen the clamp levers on both sides (B), pull the bottom end of the leg support (C) to the desired position and close the clamp lever/s (B) tightly. (1) (A) (A) (2) (A) (B) 3.7.3 Leg rest (1+2) In order to adjust the position: Loosen the clamp levers (A) underneath the cushion (B), (see picture 2) bring the cushion (B) into the desired position and close the clamp lever/s (A) tightly. In order to adjust the tilt angle: Loosen the nut (C) of the cushion holder on both sides, bring the cushion (B) into the desired position and screw the nut (C) back on tightly. (3) 3.7.4 Locking the footrest/s (3+4) To unlock: Pull the latch (A) out of the slot (B) and turn it 90° To lock: Place the footrest in the locking position, turn the latch (A) again 90° until it snaps back into the slot (B) (B) (C) 21 Mio Move (1) (3) (A) (B) (B) (A) (2) (4) (B) (A) (A) (B) (C) 22 User Manual 3.8Brakes ATTENTION THE WHEEL LOCKS ARE ONLY THERE TO PUT THE WHEELS IN A RESTING POSITION. THEY ARE NOT TO BE USED TO BRAKE WHILE DRIVING! ATTENTION While braking, forces occur that you must be able to handle. A wheelchair is generally (when physically possible) slowed down when simultaneous pressure is applied with both hands on the hand rims. Unevenly applied pressure causes swerving. While driving downhill a higher strain for braking occurs. Do not shy away from getting help. Before each ride with your wheelchair, be sure to check the functionality of the brakes. (1) (A) ATTENTION Possible damages or function defects can occur from: • too low tire pressure, • wetness, snow, mud etc., • warn off profile, • warn off brake bolts, • loose screws on the brake bolt, • defected Bowden cables, • dirty drum brakes, • a great distance between brake bolts and tire. (B) 3.8.1 Knee lever brake (wheel lock) ATTENTION THE WHEELCHAIR IS NOT OPERATIONAL UNTIL EVERY MALFUNCTION OF THE BRAKES IS FIXED: (1+2) In order to lock or unlock the wheel lock: • push both control levers (A) forward until they snap into the new position and the • brake bolt(B) lie tightly on the tire cover. • To loosen pull both control levers (A) back. (2) (A) ATTENTION The wheelchair, with passenger (max. load capacity), must be able to stand safely on a ramp with a 7°slope (=12.3%) while the wheel lock is activated. ATTENTION Consider the safety information and the possible impairments. (B) 23 Mio Move 3.8.2 Drum brake as driving brake (1) (1) In order to brake: • Pull the control lever up (A) • and apply the same pressure to both brake levers, otherwise you will swerve unwillingly. • Only use the blocking lever (B) to secure the control levers in a locked position. ATTENTION Avoid sudden braking: HAZARD OF FLIPPING OVER! 3.8.3 Drum brakes as wheel lock (3) To fasten the drum brake, • pull the lever up (A) (or towards you) until the blocking levers (B) snap into the notches (C). • The control lever should not be able to move down anymore. (A) To unlock, • pull the control levers (A) a little further up until the blocking levers (B) automatically unlock. ATTENTION The wheelchair, with passenger (max. load capacity), must be able to stand safely on a ramp with a 7°slope (=12.3%) while the wheel lock is activated. ATTENTION Consider the safety instructions and the possible impairments. (2) (A) (B) (3) (A) (A) 24 (B) (B) (C) User Manual 3.9Anti-tipper 3.10 Head Rests (1) To activate: • push the anti-tipper (A) down using the tread element (B). • Then turn the anti-tipper (A) by 180° • and let go so the positioning slot snaps into the arresting bolt (C) inside the pipe. There are two versions of the head rest - with a square-type tube (2) or a special section tube (3). Both kinds can be adjusted to the user in the same way: (2+3) Height adjustment: • open the eccentric clamps (A)/star screw (A), • adjust the desired height, • tighten screws/clamps (A) firmly. Adjustment of distance: • open clamp lever (B), • adjust the desired distance, • tighten clamp lever firmly. (2) To deactivate: • push the anti-tipper on the pipe (A) slightly further down, • turn it by 180° • and let go so it snaps into the positioning slot. ATTENTION Please read the respective chapters of the SAFETY INTRUCTIONS. ATTENTION Make sure that the extension is always firmly snapped into its final position because a loose anti-tipper cannot fulfil its function properly and may cause injuries of the assistant’s ankle area. (1) ATTENTION The head rest is only suitable for transportation in a passenger car to a certain degree. The reservations and requirements described in our “crash test” brochure concerning the use of the head rest in a passenger car are absolutely binding! ATTENTION We recommend using a head support firmly installed in the vehicle (not part of the wheelchair) for transportation in a passenger car. (2) (B) (A) (A) (B) (3) (2) (B) (A) (B) (A) 25 Mio Move 3.11 Therapy Table (1) Height setting • loosen the setscrew (A), • place the therapy table in the desired position • and retighten the setscrew(A). Angle setting • loosen the clamp lever (C), • place the therapy table in the desired position • and retighten the clamp lever (C). Depth setting/removal • loosen the clamp lever (B), • place the therapy table in the desired position or remove it out of the holder • and retighten the clamp lever (B). • To put it back in, proceed accordingly. (1) (C) (A) (B) (2) 3.12 Abduction wedge The abduction wedge is mounted under the SeatFix. The height can be adjusted in 1,5cm intervals, the distance is infinitely variable. Adjusting the height: • Remove star knob screws (A) completely, • shift the wedge with holder along the row of holes (B) into the desired height, • replace star knob screws (A). Adjusting the distance: • loosen star knob screws slightly (A), • slide the wedge via the star knob back and forth into the desired position, • tighten star knob screws (A). (C) (B) (A) (3) (A) 3.13 Thorax truss pad (3) Both kinds of thorax truss pads can open and close. To do so, push the red button (A) and simultaneously push the truss pad frame back or forward. They snap into position when you release the button (A). (4) In order to fixate the individual frame members (B) or extension pieces in a certain position, tighten the screw (C) on the joints with a suitable Allen wrench. (4) (C) (4) The position of the cushions can be adjusted or fixated through the screws (D). (B) 26 (D) User Manual 3.14 Pushing aid for outside (outdoor front end) (1) With the outdoor front end it is made possible to drive on uneven surfaces. Additionally, spasm causing vibrations when driving are visually reduced. (1) Mounting the outdoor front end • Close the wheelchair’s wheel locks. • Tip the wheelchair slightly back and /or place on the jack up aid. • (2) Place the end of the cone pipe (A) from the front into the holding plate (B). • Then, guide the height adjustment (C) all the way onto the holding plate (D), • (3) Both bushings (A) of the height adjustment (B) must be guided into the location holes (C) of the holding plate (D). • (4) Turn the star knob (A) on the back of the holding plate (B) as tight as possible, because with it, the outdoor front end is fixated to the wheelchair. (2) (B) (A) (C) To remove the outdoor front end, please proceed in the opposite order. ATTENTION The push aid can only be attached when the user is not in the wheelchair. ATTENTION The push aid is built only for a max. speed of 8 km/h. A higher speed is not allowed. (D) (3) (D) (C) (B) ATTENTION A great amount of caution is to be taken when going up or downhill. ATTENTION We strongly advise you to let your rehab technician adjust the height of your outdoor front end. Changing the height (angle of the wheelchair backwards) influences the tilting of the wheelchair massively. INDICATION (A) (4) (B) (A) If possible (depending on the setting) it is recommended to use the anti-tipper. 27 Mio Move 28 User Manual 4. Repairs and Maintenance 4.1Repairs ATTENTION Do not conduct any reparations and /or maintenance work yourself. Contact your medical supply store. There, the staff is familiar with this work, has all necessary tools and are trained rehab technicians. If you have any questions or need help, our qualified rehab consultants are happy to assist you or turn to your retailer, who is trained according to our regulations and who is capable of resuming consultations, service as well as reparations. 4.3Disposal �INDICATION The wheelchair can only be disposed of after consultation and approval from your benefactor. As a general rule, the disposal of the wheelchair must conform to the respective national legal regulations. You may seek information about local disposal organizations from your city or municipal administration. Our packaging materials are 100% recyclable. Metal parts may be put to scrap metal recycling or sent to our factory. Plastic and textile parts may be recycled as well. 4.2 Spare parts ATTENTION Safety relevant parts or assemblies can only be built on or changed by a qualified sanitary house because of the safety hazard. ATTENTION Only original spare parts can be used! They are available at your medical supply store. �INDICATION Disruption can occur from assemblies from external companies which can lead to a safety hazard. Spare parts with the respective item number and drawings are available at your specialized store and can be downloaded under www.sorgrollstuhltechnik.de or can be requested directly from us. For a correct delivery of spare parts the appropriate series number of the wheelchair is to be stated! You will find these on the type label on the wheelchair’s frame. �INDICATION Every change or modification done on the wheelchair by your medical store is to be enclosed in this user manual with the corresponding information such as assembling indications and/ or operation instructions and the date of the alteration is to be documented in the service record. 29 Mio Move 4.4 Tire change With a little bit of technical skill and suitable tools, you can fix a flat tire yourself. It is advisable to always carry a repair kit and an air pump for emergencies. Suitable air pumps can be purchased at your specialty store. An alternative would be a puncture repair spray which fills your tire with setting foam (available at the specialty store). Dismounting In case of a flat tire, remove the tire carefully from the rim with suitable mounting tools. Make sure not to damage the rim or the tube in the process. Repair Repair the tube according to the indications given on the reparation set, or replace it with a new one. Examine the rim and the interior of the tire for foreign objects which may have caused the flat tire. Only use rim bands which are in perfect condition to protect the tube from damage caused by spoke ends. Mounting Push the rim band over the valve and place the valve into the rim. Unscrew the valve screw nut. Now you can draw up the rim band effortlessly. Make sure that all spoke ends are covered. Now push the lower tire part over the bead of the rim. Inflate the tire until round. Insert the weakly inflated tube into the tire cover. Check the tube for smooth fit. Then you can easily mount the upper part of the tire behind the bead of the rim with both hands. Start with the part of the valve which is faced away. Inflation Check if the tube is perfectly clamped between tire and cover. Check the valve fitting. 4.5Maintenance 4.5.1 Cleaning and Care � INDICATION Never treat the wheelchair with a high pressure cleaner! Please use silicon free, water based cleaning and care supplies. The indications on application given by the manufacturer are to be followed. Do not use any aggressive cleaning supplies such as dissolvers or hard brushes etc. COATING To tend the finish, we recommend using customary branded finish care products. Should the coating still be damaged through scrapes, hits etc. you may correct those spots with a touch up applicator available in the specialty store (apart from metallic and dormant colors). PLASTIC PARTS The clothing protection and similar parts consist of high quality plastic. Only clean these parts with warm water and neutral cleaning agents or soft soap. PLEASE NOTE: When using customary plastic cleaners, the indications on application given by the manufacturer are to be followed. CUSHIONS AND COVERS The covers of the molded firm seat and back parts may be removed with the zippers. We recommend washing them regularly with a mild detergent and low temperature in the washing machine. PLEASE NOTE: Please clean other cushions and covers (e.g. from seat shells) with warm water and hand soap. Many stains can be removed with a sponge or a soft brush. First inflate the tire with just enough air so you can still push in with your thumb. Check the fit of the tire on the rim. If the tire cover is not centered on the rim, deflate the tire a bit and readjust it. In case of doubt, please consult the medical supply store, which built your seat shell, for advice on cleaning the cover. Then inflate the tire to its maximum operating pressure (see tire cover) and close the valve with the protection cap. FRAME The frame and wheels must be cleaned regularly with a damp cloth and mild cleaning agent. Please dry well after. CASTERS Please remove rough dirt regularly from the casters, clean them with a damp cloth and mild cleaning agent and dry well. Please grease the wheel bearings and similar parts with customary grease. 30 User Manual PLEASE NOTE: Please check the frame for corrosion damages as well as other damages on a regular basis. Oiling all versatile parts lightly and regularly obviates such damages and assures long use of your wheelchair. 4.5.2Disinfection To disinfect, water based agents should be used such as: Terralin, Quartamon, Med or Sagrotan. The indications on application given by the manufacturer are to be minded and followed strictly. INFORMATION Before you disinfect the wheelchair be sure to clean all cushions and handles in the given manner. INFORMATION Do not use aggressive cleaning agents or solvents or hard brushes. 4.5.3Reinstatement �INDICATION Before each reinstatement the wheelchair has to go through a complete, thorough and qualified inspection and disinfection. 4.6Service/Inspection 4.6.1 Check lists A yearly inspection from a qualified medical store is inevitable for the safe use of the wheelchair and for a long lifespan. Furthermore, the inspections serve as proof for the suitability for use in the case of a possible reinstatement. For safety reasons and to prevent accidents resulting from abrasion not recognized on time, a yearly inspection is designated under normal operating conditions. �INDICATION This is to be done according to the service list and to be documented in the service record. According to applicable law §33 subparagraph 1,4 BSG V (Service, Maintenance, Replacement Reserve) the inspection is part of the commitment of the benefactor and has to be acquired by him. For detailed coordination, we recommend you arrange agreements with your benefactor in the forefront. The staff of the professional repair shop is familiar with the technique of the aid and can recognize building abrasion and if necessary they can conduct the needed reparations. �INDICATION The necessary measures for reinstatement are to be followed through according to a validated hygiene schedule. 31 Mio Move 4.6.2 Check list yearly inspection 4.6.3 Service List PREPARATORY WORK If necessary, we recommend cleaning the wheelchair or individual parts of it prior to inspection. The following service list is based on our long-term experience and is a mandatory guideline with which you can keep your wheelchair –possibly for a long time – in a safe to use condition. However, it does not give information about the extent of service or repair needed and observed on the wheelchair. VISUAL INSPECTION q Check frame, mounting parts and accessories for damage, defects in paint work and corrosion. GENERAL CHECK-UP q Check all fixing screws for firm fit and retighten them if necessary. q Check fixation of all mounted parts and readjust if necessary. q Check fixation of all plastic parts, handles, mounted parts spoke guard covers etc. and readjust if necessary. q Check brake lever device and extension for deflection and readjust if necessary. q Check all spring loaded devices (quick release axle, stand spring on push handle etc.) for proper functioning and replace if necessary. CARRIAGE q Check fixation of caster and rear wheels. q Check functionality of the quick release axles. q Check tires, air pressure and valve, replace if needed. q Check caster bearing, caster fork and caster mounting bracket for condition, proper functioning and running characteristics. q Check the firm fitting of the anti-tipper and its functionality. BRAKES q Make sure the brakes function properly q Make sure the Bowden cables function properly and replace if necessary. q Make sure the brake lever extension functions properly. OILING AND GREASING q Clean and grease all pivotal points of control levers and versatile parts as well as all bearings. FINAL CHECK-UP q General functional check-up of all mechanical adjusting devices. q Additional braking, steering and driving tests uphill and downhill. 32 ATTENTION Please keep in mind, the even regular maintenance is not a guarantee for a safe use and road safety. If necessary, individual repairs and/or adjustment work is to be done immediately in order to ensure you are not in great danger. Considering possible reuse, the filled out service plan is an informative document about the mobilization of the wheelchair for the benefactor. ATTENTION As a participant in public traffic, the wheelchair driver is responsible for maintaining the wheelchairs functional state and safe operating condition. ATTENTION Insufficient or neglected care and maintenance of the wheelchair pose a significant safety risk and automatically lead to limitations of product liability. User Manual WHEN? WHAT? Before each use Check wheels/quick release axles for firm fit. You must not be able to pull the wheel out of the quick release axle. The arrestor button must protrude the hub visually. Check air pressure according to the manufacturer indication on the tire. ATTENTION Regularly check the brakes for proper function! Preferably before each use Check frame and back tubes for damages. COMMNENTS ATTENTION Too low air pressure and/or dirty tires as well as adverse weather circumstances can reduce the brake efficiency drastically and put you in danger. Fix all flaws yourself immediately or with an experienced carer. If the brake doesn’t work correctly (worn out profile or braking bolt, loose brake lever etc.), contact a medical supply store immediately for qualified maintenance work. ATTENTION The wheelchair (with full capacity) has to stand safely with pulled brake on a ramp with a 7°(=12%) decline Please check: • secure fit of the quick release axle, wheel adapter • angle adjustment elements (eccentric clamp or star knob screws) for proper functioning and completeness • fixation of foot rest • fixation of molded seat and back/seat shell • fixation of wheel guard • fixation of anti-tipper • proper functioning (clamping force) of all eccentric clamps • connection Velcro-fleece (seat and back belts) for proper functioning ATTENTION If the welded seams are deformed and /or have fissures, contact a medical supply store immediately for qualified maintenance. Every 4 Weeks etighten all screw joints From daily use and the permanent vibrations screws can loosen. Therefore, we strongly recommend retightening ALL screw joints once a month. Check tire profile Remove lint/dirt from casters Every 2-3 months (depending on driving performance) every 6 months (depending on driving performance, earlier) Clean and grease all versatile parts All moving parts such as brakes, brake levers, quick release axles etc. Clean all parts thoroughly and remove old oil residue before greasing. After, Apply some drops of oil and wipe away excess oil. Retighten spokes If possible have this done by your medical supply store!!! Check frame for cracks, corrosion and damages Please have this done by the medical supply store! Please remove seat and back unit as well as leg support and side guards/clothing guard for better exterior visual control. Maintain locking brake To be conducted by the medical supply store! Inspect brakes for symptoms of fatigues or abrasion. 33 Mio Move 4.7 Technical Data 4.7.1 Measurements and Dimensions 4.7.3 Measurements Mio Move Dimension tolerance ± 5° Misprints and Technical changes reserved. Abbreviations: FW= Frame Width SD= Seat Depth BH= Back Height LLL= Lower Leg Length AIN= Aid Index Number Indication Measurements seat width (SW) 2-cm-intervals 20 to 34 cm seat depth (SD) 2-cm-intervals 18 to 36 cm back height (BH) back angle: tilting camber 5-cm-intervals 81° to 126° 90° to 125° 9° 25 to 45 cm Data Model: Mio Move AIN: 18.99.02.1xxx Type: 603 Type label on the front cross bar rear wheel 20“ caster 4“/5“ rear wheel 22“ caster 4“ - 6“ rear wheel 24“ caster 4“ - 6“ ETRTO wheel size by 20“ by 22“ by 24“ absolute width of min. wheelchair max. absolute length by 20“ of wheelchair by 22“ by 24“ absolute height min. of wheelchair max. incline max. permitted descent max. permitted stability max. permitted turning circle min. 1020 mm seat height (SH) with level seat and level frame 4.7.2 Label Meanings The meaning of each label results directly from the relevant text in the appropriate place. On the type label on the frame of the Mio Move, the following meanings resulted (see below): The Serial number consists of X X X X X X X X X X X Type-Nr. Order-Nr.Year vehicle load capacity(max.) empty weight min. with SW 20, SD 20 cm, 20“ wheels, 4“ polyurethane casters wheels: casters: air pressure: tires: support point: heaviest piece: manufacturer logo manufacturer address 39 cm 42,5 cm Ø 451 mm Ø 489 mm Ø 540 mm SW + 310 mm, SW + 365 mm 656 mm 716 mm 780 mm 620 mm 990 mm 12,3% = 7° 12,3% = 7° 12,3% = 7° with 20“-wheels kg seat depth back height without push handles! without push handles! dependent on wheelchair size Standard- and tread, lowviscosity wheels 4“, 5“, 5,5“, 6“ Equipped with frame, rear wheels, handrims, casters, wheel lock, foot rest, side guards, skirtguard and anti tipper. optional low-viscosity-drum brake wheels transparent with LED, full rubber black with alloy wheels, PU gray with plastic rim information on wheels (6-8 bar) customary optional Schwalbe Marathon Plus, pneumatic tires pneumatic tires with puncture (1“ or. 1 3/8“ protection insert or puncture protection tires (same measurements) back frame cross bar rear wheels 0,81,4 kg refers to: Crash Test passed according to ISO 7176-19 seat width opt. +2 cm growth opt. +4 cm growth +5 cm growth in raster steps mechanical opt. also 7° or 11° WITHOUT cushion WITHOUT cushion WITHOUT cushion max. 70 kg refers to: product literature available. licence number serial number 37,5 cm Type-number max. load capacity 34 Comment CE-sign User Manual 4.8 Documentation Yearly Inspection work done according to check list additional work carried out date, signature, stamp medical supply store, 35 Mio Move Your Specialty Retailer company stamp SORG Rollstuhltechnik GmbH + Co. KG Benzstraße 3-5 D-68794 Oberhausen-Rheinhn. Tel +49 7254-9279-0 Fax +49 7254-9279-10 36 [email protected] www.sorgrollstuhltechnik.de Technical changes and misprints reserved