1
OPEN SYSTEMS® Accounting Software
Job Cost
User’s Manual
2210.JC70
© 2005 Open Systems Holdings Corp. All rights reserved.
Document Number 2210.JC70
No part of this manual may be reproduced by any means without the written permission of Open Systems, Inc.
OPEN SYSTEMS is a registered trademark and OSAS, Resource Manager, Resource Manager for Windows,
and Report Writer are trademarks of Open Systems Holdings Corp. BBx is a trademark and PRO/5 and Visual
PRO/5 are registered trademarks of BASIS International Ltd. Novell and NetWare are registered trademarks
of Novell, Inc. Microsoft, Windows, Windows 95, Windows NT, Windows 2000, and MS-DOS are either
trademarks or registered trademarks of Microsoft Corporation. Adobe and Acrobat are registered trademarks
of Adobe Systems, Inc. TrueType is a registered trademark of Apple Computer, Inc.
Open Systems Accounting Software for UNIX uses PKZIP utilities from PKWARE, Inc.,
648 N. Plankinton Ave, Suite 220; Milwaukee, WI 53203. Phone: (414) 289-9788 Internet: www.pkware.com
Printed in U.S.A. This manual is recyclable.
November 2005, Release 7.0
This document has been prepared to conform to the current release version of OPEN SYSTEMS Accounting
Software. Because of our extensive development efforts and our desire to further improve and enhance the
software, inconsistencies may exist between the software and the documentation in some instances. Call your
customer support representative if you encounter an inconsistency.
Open Systems, Inc.
4301 Dean Lakes Boulevard
Shakopee, Minnesota 55379
General Telephone
(952) 403-5700
General Fax
(952) 496-2495
Support Telephone
(800) 582-5000
Support Fax
(952) 403-5870
Internet Address
www.osas.com
Job Cost User’s Manual
Contents
Introduction
Welcome to OSAS
The Job Cost System
Starting OSAS
Navigating OSAS
1-3
1-5
1-15
1-19
Installation and Conversion
Installation
Conversion
2-3
2-5
Setup
Setup Considerations
Setup Checklist and Functions
3-3
3-7
Information Inquiry
Jobs and Phases Inquiry
Detail History Inquiry
4-3
4-7
Daily Work
Job and Phase Adjustments
Post Adjustments and Transactions
5-3
5-9
Cost Reports
Printing a Cost Report
Cost Summary Report
Cost Detail History Report
Unit Cost Analysis Report
Job Cost User’s Manual
6-3
6-5
6-7
6-9
iii
Contents
Billing Reports
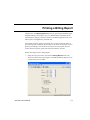
Printing a Billing Report
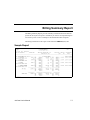
Job Profitability Report
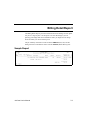
Billing Summary Report
Billing Detail Report
7-3
7-5
7-7
7-9
Periodic Processing
Overhead Allocation Report
Post Overhead to GL
Work-in-Process Report
Periodic Maintenance
Purge Job Comments
Job Template Worksheet
Delete Completed Jobs
Delete Detail History
8-3
8-7
8-11
8-13
8-15
8-17
8-19
8-21
File Maintenance
Jobs and Phases
Copy Jobs and Phases
Copy Job Template
Cost Types
Cost Codes
Tables
Change Fields
9-3
9-23
9-25
9-27
9-29
9-31
9-37
Master File Lists
Printing a Master File List
Jobs and Phases List
Cost Types List
Cost Codes List
Cost Codes Detail List
Job Comments List
Job Templates List
Tables List
iv
10-3
10-5
10-7
10-9
10-11
10-13
10-15
10-17
Job Cost User’s Manual
Contents
References
System Messages
Glossary
Index
Job Cost User’s Manual
A-1
G-1
IX-1
v
Job Cost User’s Manual
Introduction
Welcome to OSAS
The Job Cost System
Starting OSAS
Navigating OSAS
Job Cost User’s Manual
1
1-3
1-5
1-15
1-19
1-1
Welcome to OSAS
Welcome to the Job Cost application for OPEN SYSTEMS Accounting
Software® (OSAS®). Job Cost helps you track jobs that incorporate goods and
services. You might do these jobs for contractors, build-to-order manufacturers,
and other businesses that need a specific task or a set of tasks to be done. Job
Cost lends its tracking capabilities to other applications that track your financial
condition: General Ledger, Accounts Payable, Accounts Receivable, Purchase
Order, Sales Order, and Payroll.
Job Cost plugs into Resource Manager, the foundation of OSAS. Consult the
Resource Manager guide for more information on basic OSAS functionality and
details on how Resource Manager works within the OSAS system.
About This Guide
This guide describes the functions that make up the Job Cost application and
gives details on how Job Cost fits into your existing business workflow. This
guide is divided into these sections:
•
Chapter 1 introduces OSAS and the Job Cost application, and describes the
basics of the Job Cost system and how to navigate around OSAS.
•
Chapter 2, Installation and Conversion, details how to install Job Cost using
Resource Manager and how to create or convert the data files it requires.
•
Chapter 3, Getting Started, gives information and checklists on the steps you
need to perform to set up Job Cost.
•
Chapters 4 through 12 contain function descriptions organized by menu.
These chapters mirror the order that appears on the Job Cost menu.
•
The Appendixes contain supplimentary material.
•
The Index is a topical reference to the information in the rest of the chapters,
and concludes this guide.
Job Cost User’s Manual
1-3
Welcome to OSAS
Introduction
Conventions
This guide uses the following conventions to present information.
When the Inquiry or Maintenance commands (or both) are available for a field,
the Inquiry and Maint flags appear in the margin. See page 1-26 and page 1-31
for more information on these commands.
When you see the phrase “use the Proceed (OK) command” in this guide, press
Page Down in either text or graphical mode to continue. In graphical mode, you
can also click OK to proceed.
1-4
Job Cost User’s Manual
The Job Cost System
Use the Job Cost system to track jobs that incorporate goods and services. You
might do these jobs for contractors, build-to-order manufacturers, and other
businesses that need a specific task or a set of tasks to be done. This application
lends its tracking capabilities to other applications that track your financial
condition: General Ledger, Accounts Payable, Accounts Receivable, Purchase
Order, Sales Order, and Payroll.
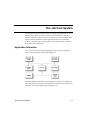
Application Interaction
Job Cost can be used as a standalone application, but you can get optimal use
from it when you interface it with other applications.
Interfacing applications means that the information you enter in one application
can be transferred to and used in other applications, reducing data entry time and
the number of errors that might creep in along the way.
Job Cost User’s Manual
1-5
The Job Cost System
Introduction
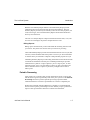
Menu Structure
The Job Cost menu structure is similar to the structure of other OSAS
applications: functions appear roughly in order of use.
File Maintenance
Use the functions on the File Maintenance menu to set up and maintain
information about your jobs. For example, use the Jobs and Phases function to
establish and update information about jobs on which you are working.
The system uses cost codes to track costs for jobs. You must assign each cost
code to a cost type in the Cost Types function.
You will probably use the File Maintenance functions less often than any of the
other Job Cost functions: once to set up the system and each time you want to add
or change a valid code or ID.
Information Inquiry
Use the Information Inquiry functions to view (but not change) information
about jobs and phases. If you are running OSAS through a multiuser network,
several people can look up the same information at the same time.
Daily Work
Once you establish the valid codes and IDs through the File Maintenance
functions, you can use the Daily Work functions to make adjustments to jobs and
phases that the system recognizes and to update the JOHIxxx (Detail History) file
with the adjustments. Use the Job and Phase Adjustments function to make the
adjustments; use the Post Adjustments and Transactions function to post them.
Reports
Cost Reports
Cost reports track costs; they show where your expenses occur and where you
can improve your spending.
1-6
Job Cost User’s Manual
The Job Cost System
Introduction
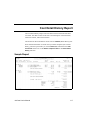
Both the Cost Summary Report and the Cost Detail History Report provide
information about costs associated with selected jobs and phases. The Cost
Summary Report provides only the summary total costs for each job phase, cost
code, and cost type; the Cost Detail History Report breaks detail information
down by each transaction.
The Unit Cost Analysis Report compares estimated and actual units, costs, and
unit costs. It also displays the percent complete based on units.
Billing Reports
Billing reports track amounts you have billed and the remaining amount to bill
your clients. They show how much revenue your clients are providing.
The Job Profitability Report provides the estimated and actual costs of a job, their
variances, and the estimated and actual profits so far for a job. This information
is valuable when you assemble a competitive and profitable proposal for a job.
The Billing Summary Report provides billing information for the amount and the
cost billed and unbilled for selected jobs. The Billing Detail Report provides
information for a phase or a range of phases, a job or a range of jobs, or other
important criteria; use it to review billings or when you plan your budget and
want to determine areas of a phase or job where you might want to raise or
reduce prices.
Periodic Processing
After posting over a period of time, enough information is kept in various files
that the files can get so large that they slow down your system. Use the Periodic
Processing functions to produce periodic processing reports and delete
information dated on or before a specified date or to remove completed jobs.
Produce the Overhead Allocation Report for a summary of overhead that has
been accrued to specific general ledger accounts. Before you post, produce this
report to back up information about how overhead was distributed.
Job Cost User’s Manual
1-7
The Job Cost System
Introduction
While a job is in process, use the Post Overhead to GL function to update your
general ledger accounts with accumulated overhead. After a job is finished,
posting to General Ledger transfers work-in-process inventory to the finished
goods account.
Produce the Work-in-Process Report for information about earned income,
overbilling and underbilling, and outstanding work in process for jobs and
phases.
Use the Periodic Maintenance function to clear amounts in the JOBSxxx (Jobs)
and JOCDxxx (Cost Codes Detail) files.
When you want to purge job comments from the JOJCxxx (Job Comments) file,
use the Purge Job Comments function. Comments dated on or before the date
you specify are removed.
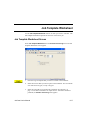
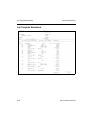
The Job Template Worksheet function provides a printout of estimate
information that can help you prepare a bid for a job.
Use the Delete Completed Jobs function to remove completed jobs and before a
date you specify.
Use the Delete Detail History function to delete detail history before a date you
specify.
Master File Lists
Information that you enter in the File Maintenance functions is kept in master
files. Use the Master File Lists functions to produce the contents of the files:
details about jobs and phases, job comments, cost codes, cost types, job
templates, and tables.
1-8
Job Cost User’s Manual
The Job Cost System
Introduction
File Information
The information you enter in Job Cost functions is stored in files.
The JOBSxxx file holds the following information about jobs:
•
•
•
•
•
•
•
•
•
•
•
•
job and phase IDs for each job
manager and customer IDs
estimated and actual pieces for the period, year, and job to date
source of the pieces (Accounts Payable or Payroll)
unit of measure for each piece
total cost for the job to date
cost billed for the period, year, and job to date
invoice billed amounts for the period, year, and job to date
overhead rate, basis type, amount, and calculation method
accounts for overhead, work in process, and finished goods
estimated and actual values for start and finish dates and contract amounts
whether or not the record is a template
The JOBSxxx file serves as a database for job information: it provides
information for other functions and applications, which in turn update it. This file
is also the verification file when you use Resource Manager to verify that Job
Cost is installed (see the Resource Manager User’s Manual).
The Jobs and Phases function directly updates the JOBSxxx file. The
information you enter updates the file and links information in it to information
in the JOCDxxx file.
You can update the JOBSxxx and JOCDxxx files in one of the following ways:
•
Use the Jobs and Phases function to edit a job.
•
Attribute goods or services to a job through Accounts Payable/Purchase
Order or Payroll, and attribute billing information through Accounts
Receivable/Sales Order, if Job Cost interfaces with those applications.
•
Use the Job and Phase Adjustments function to make adjustments to the
files.
Job Cost User’s Manual
1-9
The Job Cost System
Introduction
Notice that you can attribute a service to Job Cost through Payroll, but you
cannot attribute a good or an item to Job Cost through Inventory. Job Cost does
not interface with Inventory. If you are acquiring an item, use the Daily Work
functions in Accounts Payable/Purchase Order. If you already have the item in
stock, use the Enter Material Requisitions functions to treat Accounts Payable/
Purchase Order as a bridge between Inventory and Job Cost.
The JOHIxxx file stores several kinds of information:
•
an entry for each posted and unposted piece or adjustment made to the
JOBSxxx file (from the Job and Phase Adjustments function or a different
application)
•
the entry’s cost type, cost code, and source
•
the entry’s associated job and phase ID
•
the entry’s general ledger period, post date, and transaction date
You can use this file only if you elected to keep detail history in the Resource
Manager Options and Interfaces function.
You can update the JOHIxxx file by posting information from interfaced
applications or through the Job and Phase Adjustments function.
Job Cost has no “adjustments” temporary holding file to store adjustments until
you post. When you enter adjustments in the Job and Phase Adjustments
function, information flows in one of the following ways:
1-10
•
If you elected to keep detail history and to post directly to the JOBSxxx file
in the Resource Manager Options and Interfaces function, adjustments
information is immediately sent to and indefinitely kept in the JOHIxxx,
JOCDxxx, and the JOBSxxx files.
•
If you elected not to keep detail history but to post directly to the JOBSxxx
file, information is sent to the JOBSxxx and JOCDxxx files, and the
JOHIxxx file is not used at any point.
Job Cost User’s Manual
The Job Cost System
•
Introduction
If you elected to keep detail history but not to post directly to the JOBSxxx
file, adjustments information is sent only to the JOHIxxx file. When you use
the Post Adjustments and Transactions function, the information is posted
from the JOHIxx file to the JOBSxx and JOCDxxx files. In this situation
only, the JOHIxxx file contains both permanent and temporary data.
Note: In the Options and Interfaces function for Job Cost, you must elect to
keep detail history or to post directly to the JOBSxx file.
The JOCCxxx file stores information for cost codes used for verification.
The JOCDxxx file stores several kinds of information (and the numbers
associated with that information):
•
•
•
•
•
•
cost code number, description, and short description
original estimate
job and phase ID for each cost code
cost type for each cost code, and the cost type’s use type
estimated quantity and the period-, year-, and job-to-date quantity
estimated cost and the period-, year-, and job-to-date cost
The JOCTxxx file stores cost types used throughout the system. When you assign
a cost code to a job, you must assign a cost type to the cost code.
The JOCTxxx file stores the cost type, description, short description used in
reports, and use type.
The JODExxx file stores the additional descriptions you assign to each job and
phase record. Use of this file is optional; if you do not elect to use additional
descriptions, this file is not used.
The JOJCxxx file stores comments that you assign to a job in the Jobs and
Phases function. You can assign 999 comments (sequence numbers) for each
combination of job, sequence number, reference and date.
Job Cost User’s Manual
1-11
The Job Cost System
Introduction
Other applications that interface with Job Cost update the JOBSxxx, JOCDxxx,
and JOHIxxx files. When you are in the other application, the update normally
takes place after you enter the line-item information; specify a job, phase, and
cost code; and post.
Job Cost provides information for all the applications it interfaces with, but it
updates only General Ledger. If Job Cost interfaces with General Ledger, you can
use the Post Overhead to GL function to send overhead information to the
appropriate accounts. Accounts set up in the JOBSxxx file for work in process
and finished goods are also updated.
File Interaction
The Job Cost system tracks both expenses and revenues for a combination of
goods and services (a job). When you enter and post adjustments, information is
retained in or distributed to the appropriate files to keep the information up to
date, make the information available through reports, and keep the system in
balance.
Setting up jobs
Use the Jobs and Phases function to add the job to the JOBSxxx and JOCDxxx
files. At this point you define the job, the phases (if necessary), the manager
responsible, the customer for whom the work is being completed, the estimated
start and finish dates and costs, and the method you are using to calculate
overhead. You also define cost codes to organize costs attributed to the job from
the Job and Phase Adjustments function and other applications.
If the job can be easily set up from a template, use the Copy Job Template
function to copy a template into a new job ID; from that point you can make the
adjustments. If you want, you can also save a job you enter as a template.
1-12
Job Cost User’s Manual
The Job Cost System
Introduction
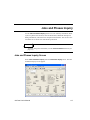
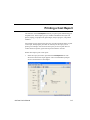
Productivity Reports
Job Cost includes a number of productivity reports in Microsoft Excel® format.
These reports connect directly to your OSAS data via the ODBC/JDBC driver
(included with OSAS 7.0) and allow you to use spreadsheet tools to manipulate
the data as you want and produce charts and graphs to visualize trends.
The spreadsheet reports are listed on the Productivity Reports menu. Doubleclick a report name to automatically launch Excel or any other spreadsheet
program capable of opening an Excel-formatted spreadsheet to open the report.
Use the selection boxes to filter the information that appears in the report, or use
the tools within your spreadsheet software to create charts and graphs from the
report’s data.
Job Cost User’s Manual
1-13
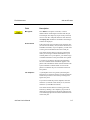
Starting OSAS
OSAS runs on an operating system supported by 150 MB of permanent storage
and 4 MB of RAM. You may need additional space or memory, depending on the
size of your data files and the operating system you use. Consult your reseller for
more information.
In Windows
To start OSAS on a computer running Windows, double-click the OSAS shortcut
on the desktop or access the program from the Start menu.
In Other
Operating
Systems
To start OSAS on an operating system other than Windows, enter osas at the
operating system prompt. If your operating system has graphical capabilities, you
can also use the OSAS shortcut to start OSAS.
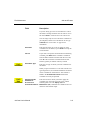
Using
Parameters
You can use the -u, -c, -a, and -t parameters in OSAS shortcut properties or after
the osas command so that the system automatically uses the appropriate user ID,
company ID, and access code to save time logging in.
In Windows, open the OSAS shortcut’s properties and enter these parameters
after the path in the Target field (as in the example below; be sure to use the
correct directories for your system).
C:\basis\bin\bbj.exe osasstrt.txt -q -tT00 -cD:\osas70\progrm\config.bbx - -uSam
-aapple -cH
Note: In Windows, the -u, -c, and -a parameters must follow the separation dash.
In other operating systems, enter the parameters after the osas command, as in
this example:
osas -t T2 -c B -a apple
Note: You can enter these parameters in any order, but you must leave a space
between the parameter mark (-t, -c, or -a) and the parameter itself.
Refer to the Resource Manager guide for more information on these parameters.
Job Cost User’s Manual
1-15
Starting OSAS
Introduction
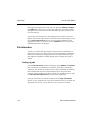
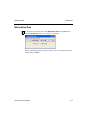
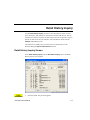
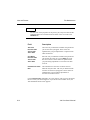
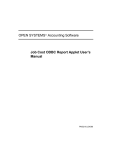
Logging In
After you start OSAS, the login screen appears.
To log in to OSAS, enter your User ID, the Company ID you want to work with,
and your Access Code. If you want to save your access code so that you do not
need to enter it again, select the Save Password? check box (or enter Y in text
mode) to save your information. Finally, click OK or press Enter to log in.
This screen appears only after you have set up users and access codes for the
OSAS system.
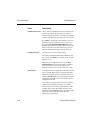
Access Codes
Access codes limit use of the system and protect sensitive information. Each
code allows access to specific applications, menus, and functions. If you cannot
select a menu or function, your access code is not authorized for it. Use the
Access Codes function in Resource Manager to set up access codes.
To change access codes, select Access code from the File menu, click the
Access Code button on the toolbar, or press F4 on the main menu. When the
Access Code box appears, enter the access code to change to and press Enter.
1-16
Job Cost User’s Manual
Introduction
Starting OSAS
Workstation Date
To change the workstation date, select Workstation date from the File menu,
click the Change Date button on the toolbar, or press F6.
When the Workstation Date box appears, use the button or your keyboard to enter
the date and press Enter.
Job Cost User’s Manual
1-17
Navigating OSAS
OSAS menus and functions are available in two modes: graphical and text. The
graphical mode allows both keyboard and mouse commands and uses data entry
fields and buttons similar to those found in any graphical software program. The
text mode presents information in a simpler text format and uses keyboard
commands to access functions and move around the screen. If you use an
operating system that does not have graphical capabilities, the text mode is the
only mode available.
You can use either text or graphical function screens indepently of the main
menu. For example, you can use text function screens while using the graphical
main menu, and vice versa. Select GUI Functions from the Modes menu or press
Shift+F6 to toggle between the text and graphical modes for function screens.
When available, press Shift+F5 to switch between graphical and text menu
modes, or press Shift+F6 to switch between modes on function screens. You can
also use the Resource Manager Defaults function to select the default mode to
use for the main menu and function screens.
In text mode, use the Page Up, Page Down , arrow, and Enter keys to move
between menus, select and enter functions, and move around function screens.
When a list of commands appears at the bottom of a function screen, press the
highlighted letter to use a command. These methods also work in graphical
mode, or you can use the mouse to click on fields and command buttons.
Graphical Mode
If you’re familiar with other graphical software programs, you’ll find it easy to
navigate around the OSAS graphical mode, which uses buttons, toolbars, text
entry boxes, and menus to help you move through your tasks.
Job Cost User’s Manual
1-19
Navigating OSAS
Introduction
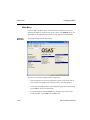
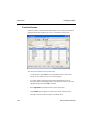
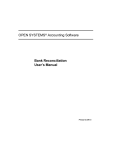
Main Menu
If you use BBj in graphical mode, the main menu is available in two flavors:
graphical and MDI. To switch between the two styles, press Shift+F5. If you use
Visual PRO/5, the graphical main menu is the only graphical menu available.
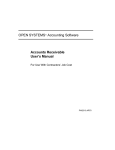
Graphical
Main Menu
The graphical main menu is shown below.
You can move around the graphical menu in these ways:
1-20
•
Click an application to view that application’s menu. Click a menu item to
view its functions. Double-click a function name to enter that function.
•
To exit from the graphical menu, click a different application or menu name
or press Tab to return to the main menu.
•
To exit from OSAS, click the Close box in the upper-right corner of the
screen, press F7, or select Exit from the File menu.
Job Cost User’s Manual
Introduction
Navigating OSAS
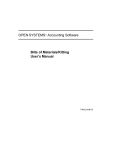
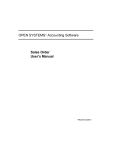
MDI Main
Menu
The MDI menu centralizes all OSAS functionality in one location: applications
appear as tabs at the top of the screen, their menus and functions appear in a
navigation pane on the left side of the screen, and function screens appear in the
large pane on the right. Using this menu, you can open more than one function
screen at a time and move or minimize screens as needed. However, you cannot
open two functions that lock the same data file at the same time.
You can move around the MDI menu these ways:
•
To view an application’s menus, click that application’s tab.
•
To view the functions a menu contains, click the menu name. The menu
expands to list the functions it contains. Click the function name to enter the
function. The function screen appears in the right pane.
•
To exit from a menu, click a different menu name or application tab. To exit
from OSAS, click the Close box in the upper-right corner of the screen,
press F7, or select Exit from the File menu.
Job Cost User’s Manual
1-21
Navigating OSAS
Introduction
Function Screens
Graphical screens contain the same functionality as text screens, presented in a
graphical format that includes easy access to commands via the mouse.
You can move around the screen in these ways:
1-22
•
Use the mouse or press Tab to move from field to field. Use the scroll
buttons to move from line to line in scrolling regions.
•
If a screen appears prompting for the kind of information to enter or
maintain (such as on File Maintenance or Transactions screens), select the
appropriate option and click OK to continue.
•
Press Page Down if prompted to move to the next section.
•
Click Header when it appears to return to the screen’s header section.
•
Press F7 to exit the screen and return to the main menu.
Job Cost User’s Manual
Navigating OSAS
Introduction
Menus
Both the graphical main menu and graphical function screens contain drop-down
menus that give you access to additional commands without using the function
keys. While you can use the function keys to access commands in graphical
mode, you may find it easier to access command through these menus.
To access a menu’s commands, click a menu title. The commands for that menu
appear, followed by any associated hot key combinations in brackets < >. To use
a command, click the command name or press the hot key combination.
Refer to the Resource Manager guide for more information on the menus
available in OSAS and their commands.
Shortcut
Menu
OSAS gives you quick access to commands relating to the screen you’re using
via a shortcut menu. The commands that are available depend on the function and
the field you are currently using. To use these commands, click the right mouse
button and select the command from the menu that appears.
On the main menu, the shortcut menu gives you access to commands that help
you manage your Favorites menu, switch between sample and live data, perform
certain setup tasks, and view function information. On function screens, this
menu helps you access help documentation, move around the function screen,
work with EIS dashboards, and so on.
Other
Commands
Menu
The Other Commands (or F4) menu is available on both graphical and text
menu and function screens and gives you access to additional utilities and
commands not directly related to the function you’re currently using. Among
other things, these commands open calculators or allow you to view or enter
additional information. In text mode, press F4 twice on the menu or once on
function screens to access this menu.
Consult Appendix A in the Resource Manager guide for more information on the
commands available on the Other Commands menu.
Job Cost User’s Manual
1-23
Navigating OSAS
Introduction
Information
Menu
The Information (or Shift+F2) menu is available in some graphical or text
function screens in certain applications and gives you access to additional
information about a customer, vendor, item, job, bill of material, or employee.
The commands available on the Information menu are determined by the
applications you have installed, and can include:
•
•
•
•
•
General Information
Comments
History
Documents
Address Lookup
Not all of the commands above appear on every Information menu; instead,
commands are available only as they are relevant to the task you are performing.
For example, if you are entering a transaction in Accounts Receivable, you can
access comments or documents about items or customers but not about
employees or vendors.
Consult Appendix A in the Resource Manager guide for more information on
how to use the functions on the Information menu.
Favorites
Menu
The Favorites menu gives you quick access to the OSAS functions you use most
by allowing you to add selections for entire menus or particular functions to a
custom menu. After you’ve set up the menu, select Change to Favorites from
the graphical Favorites menu or press F2 to access the functions.
The Favorites menu saves you time by eliminating the need to switch between
applications. You can add functions from several different applications to the
Favorites menu and access them all there rather than switching between
applications on the main menu to access the functions you need.
To add a function to the Favorites menu, select the function you want to add and
press F10. Press F2 to switch to the Favorites menu to confirm that your
selection was added.
To remove a function from the menu, select the function on the Favorites menu
that you want to remove and press F10 again.
1-24
Job Cost User’s Manual
Introduction
Navigating OSAS
Toolbars
As with menus, graphical screens also contain toolbars that give you fast access
to the most frequently used OSAS commands. The toolbar for the main menu
differs slightly from that of function screens.
Main Menu
Toolbar
The toolbar for the main menu is shown below. Click a button to access that
command.
Access
Code
Workstation
Date
Function
Screen
Toolbar
Command
Help
Application
Versions
Calendar
Calculator
Toggle
Favorites
Call a BBj/Pro5
Program
The toolbar for function screens is shown below. Click a button to access that
command.
File
Maintenance
Start
Over
Delete
Paste
Copy
Calendar
Calculator
Field
Help
Online
Documentation
Address
Mapping
Date Fields
If you use BBj in graphical mode, click the Calendar button when it appears next
to date fields to open a calendar so that you can select the date you want to enter
into that field.
Job Cost User’s Manual
1-25
Navigating OSAS
Introduction
Browse
If you use BBj in graphical mode, you can use the Browse button when it
appears next to fields to navigate to directories and files and automatically enter
file paths into that field. Click the Browse button to open the Select Directory/
File screen, then navigate to the directory or file and click Open to automatically
enter the file path in the field.
Inquiry
The Inquiry command helps you look up and select valid entries for fields that
are connected to master file records. For example, when you use the Inquiry
command in a Batch ID field, OSAS lists all batches you have set up so that you
can select the one you want to enter in that field. When the Inquiry button
appears next to a field, you can either click the button or press F2 to open the
Inquiry screen and search for valid entries.
Maintenance
The Maintenance command allows you to enter or edit master file records on the
fly from within functions. For example, you can use the Maintenance command
to add a new customer or item from within the Transactions function. The
Maintenance command is available when the Maintenance button appears on the
toolbar. Click the button or press F6 to open the File Maintenance function
associated with that field and enter or edit a new master file record.
Address Mapping
When you are working with a screen that contains an address, you can use the
Address Mapping command to view a map of that address. This command
combines address information with the URL and search variables in the Resource
Manager Web Setup function and the Map Lookup ID in the Company Setup
function to direct your web browser to a mapping website and generate the map.
Note: Before you can view maps, you must set up mapping website information
in the Resource Manager Web Setup function, select the Map Lookup ID to use
in the Resource Manager Company Information function, and enter the path to
your workstation’s web browser in the Resource Manager Defaults function.
1-26
Job Cost User’s Manual
Navigating OSAS
Introduction
Text Mode
The OSAS text mode is available on all operating systems. If you use OSAS on
an operating system that does not have graphical capabilities, the text mode is the
only mode available. In text mode, all screens are presented in an easy-to-use
textual interface that you navigate through using keyboard commands.
Main Menu
The text main menu is shown below.
When you select an application, the application’s menu is superimposed over the
main menu. Selecting an entry on an application menu opens a function screen or
a submenu.
Job Cost User’s Manual
1-27
Navigating OSAS
Introduction
You can move around the text main menu in these ways:
1-28
•
Use the arrow keys to move the cursor up and down to highlight the
application you want. Then press Enter to select it.
•
Press the first letter of the application you want to move the cursor to the
first application beginning with that letter. Continue to press the letter key or
the down arrow until the application you want is highlighted, then press
Enter to select it.
•
Use the mouse to click an application to view that application’s menu.
•
To move to the first application on the menu, press Home. To move to the
last application on the menu, press End.
•
On an application menu, press Page Up to move to the menu immediately
behind it. If you are several levels away from the main menu, you can return
to the main menu by pressing Page Up repeatedly or by pressing Tab once.
•
To exit from OSAS, press F7.
Job Cost User’s Manual
Introduction
Navigating OSAS
Function Screens
Like the text menu, OSAS text function screens can be used on all operating
systems and in combination with graphical menus.
You can move around the screen these ways:
•
Press Enter or the down arrow to move from field to field.
•
To use a command that is listed in the command bar, press the highlighted
letter.
•
Use hot key commands to access information screens or to toggle commands
on and off. Refer to Appendix B in the Resource Manager guide for more
information on these commands and their corresponding hot keys.
•
If a screen contains more than one section, press Page Down when
prompted to move to the next section.
Job Cost User’s Manual
1-29
Navigating OSAS
Introduction
•
If a menu appears prompting you for the kind of information to enter or
maintain (such as in the example and on Transaction and File Maintenance
screens), select the appropriate option and press Enter.
•
To exit the screen and return to the menu, press F7.
Menus
Like the graphical mode, the text mode also includes menus that give you access
to commands that open additional utilities, show additional information about the
task at hand, or set up a custom menu that contains frequently-used commands.
Refer to Appendix A in the Resource Manager guide for full details about the
menus available in OSAS.
Other
Commands
The Other Commands (or F4) menu gives you access to additional utilities and
commands not directly related to the function you’re currently using. In text
mode, press F4 twice on the menu or once on function screens to access this
menu. See page 1-23 for more information on this menu.
Information
Menu
The Information (or Shift+F2) menu gives you access to additional information
about a customer, vendor, item, job, bill of material, or employee. In text mode,
this menu is available when the Info flag appears at the bottom of a function
screen.
The commands on the menu are available only as they are relevant to the task
you are performing. For example, if you are entering a transaction in Accounts
Receivable, you can access comments or documents about items or customers
but not about employees or vendors. See page 1-24 for more information.
Favorites
Menu
The Favorites menu allows you add the OSAS menus or functions you use most
frequently to a custom menu. After you’ve set up the menu, select Change to
Favorites from the graphical Favorites menu or press F2 to access the functions.
To add a function to the Favorites menu, select the function you want to add
from the main menu and press F10. To remove a function from the menu, select
the function on the Favorites menu that you want to remove and press F10 again.
See page 1-24 for more information on this menu.
1-30
Job Cost User’s Manual
Introduction
Navigating OSAS
Commands and Flags
Both the text menu and text function screens let you use commands to drill down
to more information, change companies or access codes, switch to sample data,
and perform tasks related to the function you are using. These commands are
analogous to the commands contained on drop-down menus in graphical mode.
You access commands by pressing the hot key combination for the command you
want to use. If you’re working with a keyboard that lacks function keys (labeled
with an F followed by a number) or if you’re working with an emulator in UNIX
(which can cause function keys to become unavailable), press the appropriate
alternate key combination to access the command.
Refer to Appendix B in the Resource Manager guide for a list of all OSAS
commands and their associated hot keys.
Not all commands are available for every function or field; when a command is
available, a flag appears at the bottom of the function screen. Common flags
include Quick, Info, Maint, Inquiry, and Verify.
•
The Quick flag reminds you that you are using the Quick Entry mode to skip
fields that are not required. Press Ctrl+F to toggle quick entry on and off.
•
When the Info flag appears, press Shift+F2 to access the Information menu
to access additional information about a customer, vendor, item, job, bill of
material, or employee. See page 1-24 for more information on this menu.
•
When the Maint flag appears, press F6 to launch the appropriate File
Maintenance function to edit a master file record or enter a new one “on the
fly.” When you finish, press F7 to return to the function you were using.
•
When the Inquiry flag appears, press F2 to use the Inquiry command to look
up additional information and select valid entries for the field you are in.
•
The Verify flag reminds you that you are using verification. When this flag
appears, you must provide verification when you press Page Down or use
the Proceed (OK) command. Press Ctrl+V to toggle verification on and off.
Job Cost User’s Manual
1-31
Navigating OSAS
Introduction
Command Bar
The command bar appears at the bottom of function screen and gives you access
to commands that allow you to move around the screen, add or edit information,
change settings for selected lines, or select output devices.
The commands that are available depend upon the function you are using, and are
analogous to the command buttons available on graphical screens. Press the
highlighted key to use a command.
Messages
Messages appear at the bottom of the screen when a command is unavailable or
when OSAS needs information to continue.
Address Mapping
When you are working with a screen that contains an address, you can use the
Address Mapping command menu to view a map of that address. This
command combines address information with the URL and search variables in
the Resource Manager Web Setup function and the Map Lookup ID in the
Company Setup function to direct your web browser to a mapping website and
generate the map.
The Address Mapping command is available when the Map flag appears at the
bottom of the screen. To view a map of the first address on the screen, press
Shift+F4. To view a map of the second address (if present), press Shift+F5. The
second command is not available when there is only one address.
Note: Before you can view maps, you must set up mapping website information
in the Resource Manager Web Setup function, select the Map Lookup ID to use
in the Resource Manager Company Information function, and enter the path to
your workstation’s web browser in the Resource Manager Defaults function.
1-32
Job Cost User’s Manual
Introduction
Navigating OSAS
Reports
All OSAS applications contain a variety of reports to help you view and analyze
your business data. Each report function includes a selection screen that allows
you to select the range of information to include in the report, which appears in
alphabetical order when the report is produced. After you select the information
to include, use one of these options to output the report:
•
Select Printer (or enter P in text mode) to send the report to a printer, then
select the printer to use.
•
Select Print Preview (or enter R) to view the report in a preview window,
from which you can print the report later. This option is only available on
Windows or graphical Linux workstations running BBj.
•
Select File (or enter F) to save the report to a file, then change the directory
path and file name (followed by the .txt extension), if necessary. Directory
paths and file names must be less than 35 characters in length.
Note: To preserve formatting, view the reports you save to a text file with a
fixed-width or monospaced font (Courier or Lucida Console, for example).
•
In text mode, enter S to view the report directly in an OSAS function screen,
then select whether to view it in Standard or Compressed width.
•
When available, select Email (or enter M) to e-mail the report, then enter the
e-mail address to sent the message to, the subject for the message, and
whether to include the report as an attachment to the message.
Generally, reports or forms that make up part of your audit trail cannot be
e-mailed. You also must set up your e-mail system in Resource Manager
before you can e-mail reports.
Note: To preserve formatting, view e-mailed reports (or attachments) with a
fixed-width or monospaced font (Courier or Lucida Console, for example).
Consult the Resource Manager guide for more information about reports.
Job Cost User’s Manual
1-33
Installation and Conversion
2
Job Cost User’s Manual
Installation
Conversion
Job Cost User’s Manual
2-3
2-5
2-1
Installation
Before You Install Job Cost
Make sure your system meets these minimum requirements before you install Job
Cost.
The Job Cost system needs a minimum of 5 megabytes (5 Mb) of disk space to
work correctly with programs, sample data, data dictionaries, system files, and
graphics files. Having more disk space available is necessary for the data files
you will create and maintain.
The OSAS system requires at least one megabyte (1 Mb) of main memory to run.
More memory may be necessary in certain environments and operating systems.
Installing Job Cost
Use the Install Applications function in Resource Manager (see your Resource
Manager installation manual for more information) to install Job Cost.
Setting up Job Cost
Once you have installed Job Cost on your system, you must prepare your data
files for everyday use.
You can prepare files for use with Job Cost in one of two ways: you can create
and set up your files manually on a new system, or you can convert your old files
when you upgrade from an earlier version. To create files on a new system, use
the Data File Creation function on the Company Setup menu in Resource
Manager (see the Resource Manager User’s Manual). For instructions on
converting your files, see “Conversion” on page 2-5.
If you plan to use General Ledger with Job Cost, you must install and set up GL
before you set up Job Cost. If you plan to use Accounts Payable, Purchase Order,
Accounts Receivable, Sales Order, or Payroll with Job Cost, set up those
applications after you set up Job Cost.
Job Cost User’s Manual
2-3
Conversion
If you use an earlier version of OSAS Job Cost, you can convert your files from
the older version to the current version.
When you are ready to convert files, use the Data File Conversion function on
the Company Setup menu in Resource Manager (see the Resource Manager
User’s Guide) to upgrade Job Cost data files. You can upgrade from version 3.2x,
4.xx, 5.xx, or 6.xx. If you want to upgrade from a version of Job Cost before 3.2,
contact a technical support representative for assistance.
If you are converting from version 6.5x to 7.0, no conversion is necessary. You
should still use the Data File Conversion function to copy data files from the old
data directory to the new directory, however.
Note
You must install the new version of Job Cost before you convert files. You
can replace and update the programs properly only by using the Install
Applications function in Resource Manager.
Before you convert an application’s files, make note of the version number
from the application you are converting. The Data File Conversion function
has no way of determining this information.
Before you convert an application’s files, back up your data files.
Consider Your Setup
Before you try to convert from your version of Job Cost, consider the exact setup
of your system. Since OSAS code can be customized, modifications to your
system might be lost if you install a new version of a program or update a file. If
you are not sure if your system is ready for conversion, consult your value added
reseller.
Job Cost User’s Manual
2-5
Installation and Conversion
Conversion
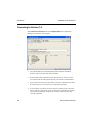
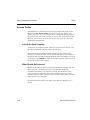
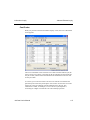
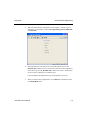
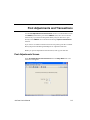
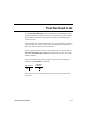
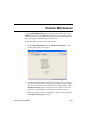
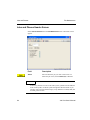
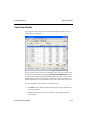
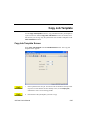
Converting to Version 7.0
Select Data File Conversion from the Company Setup menu in Resource
Manager. The function screen appears.
2-6
1.
The system displays all valid OSAS data paths. Select the destination
directory where your new data files will reside.
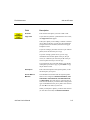
2.
Enter the path (drive and directory) that has the files you want to convert.
You cannot enter the same path as the path you selected as the destination.
3.
If you want source files to be erased after conversion, select the box (or enter
Y in text mode); if not, clear the box (or enter N in text mode).
4.
If you want the conversion process to pause if a problem occurs, select the
box (or enter Y in text mode); if not, clear the box (or enter N in text mode).
The system considers file corruption or evidence of data not converting
correctly a problem.
Job Cost User’s Manual
Installation and Conversion
Conversion
5.
Enter JO in the Appl column; Job Cost appears.
6.
Enter your earlier version number of Job Cost and press Enter. You can
determine the version by looking at the copyrights screen when you start
OSAS, or in most versions, by using the Application Information tool button
on the menu screen in graphical mode or by pressing Shift+F2 in text mode.
7.
If data files already exist for Job Cost in the intended destination path, the
JO data files exist. Do you want this task to erase them? prompt appears.
If you want to erase the existing files and convert the files from the version
in the source path, select Yes (or enter Y in text mode); if not, select No (or
enter N in text mode). If you elect not to erase existing files, you must
change your directory choices so that no conflict exists.
8.
To begin conversion, use the Proceed (OK) command.
9.
The Do you want a printout of error log after each application? prompt
appears. If you want the error log to be produced after files are converted for
each application, select Yes (or enter Y in text mode); if you want the log to
be produced after files for all applications are converted, select No (or enter
N in text mode). If you are converting only Job Cost files, your answer to
this prompt makes no difference.
10. Answer the questions that appear relating to the conversion of the employee
history and last-year files.
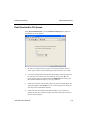
11. If a problem occurs and you indicated that you want the system to pause
when a problem occurs, a prompt alerts you. To stop the conversion process,
select Yes (or enter Y in text mode). To let the conversion run its course and
investigate later, select No (or enter N in text mode).
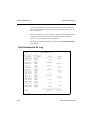
12. When the process finishes, the files are converted. Select the output device
to produce the error log. See “Reports” on page 1-33 for more information
on output devices.
After conversion finishes and the error log is produced, the main menu—with
Job Cost added—appears.
Job Cost User’s Manual
2-7
Job Cost User’s Manual
Setup
Setup Considerations
Setup Checklist and Functions
Job Cost User’s Manual
3
3-3
3-7
3-1
Setup Considerations
After you have installed the software for the first time or after you have upgraded
the software, you must set up the system. Follow the setup procedures carefully;
the choices you make determine how the system will operate.
To properly set up the Job Cost system, you need to gather and organize your
accounting data. You need the following information:
•
•
•
your overhead calculation procedures
a chart of accounts for your business
your records of the work in process
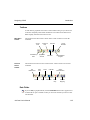
Codes and IDs
When you set up the system, you assign codes and IDs to tell the system how to
identify each item on file. The system uses these identifiers to organize the
information in reports and inquiry windows.
The system arranges code characters in a particular order. In the following list
codes and IDs are sorted from lowest to highest, and dashes represent blank
spaces.
—————0
—————1
—————Z
—————a
————01
——a———
000000
000001
1
The organization of these codes illustrates the following principles:
•
The system reads codes from left to right until it finds something other than a
blank space.
Job Cost User’s Manual
3-3
Setup Considerations
•
Setup
Items that make up a code are always listed alphabetically. The items are
listed in this order for each position:
blank spaces
characters (-, *, /, and so on)
numbers (0-9)
uppercase letters (A-Z)
lowercase letters (a-z)
Alphabetical rules are not intuitive when numbers are involved. Numbers are
sorted as if they were letters: When the first characters of several IDs are
compared, the ID with the smallest first character is placed first in the list. If the
first character of the IDs is the same, the second characters are compared and the
ID with the smallest second character is placed first in the list. This comparison is
made for each character in the range of IDs until the IDs are clearly in
alphabetical order.
If you use numbers for IDs, pad them with zeros so that they are all the same
length and numeric rules can hold true. For example, in alphabetical sorting ID
112 comes before ID 60, since anything that starts with 1 comes before anything
that starts with 6 alphabetically. If ID 60 were ID 000060 and ID 112 were ID
000112, ID 000060 would be listed first, since 060 is less than 112 alphabetically
and numerically.
When you assign IDs and codes, establish a format that makes sense for your
business and use it consistently. The following suggestions may help:
3-4
•
To prevent organization problems, use zeros to make all IDs the same length.
If IDs are divided into more than one part, the parts should be the same
length in every ID. Do not use spaces to divide IDs into more than one part.
For example, use ACE-01 and ACE-11 instead of ACE-1 and ACE-11 or
ACE 01.
•
If you use letters in IDs, use either all uppercase or all lowercase letters so
that the IDs can be sorted correctly.
Job Cost User’s Manual
Setup Considerations
Setup
•
Use descriptive IDs. For example, WIN001 and WIN002 are more
descriptive IDs than 000001 and 000002. However, if you already use a
numbered system, you might want to stick with it.
•
If you want to sort items by a particular attribute—name or group—put the
attribute in the ID. For example, to organize jobs by name, put the first
characters of the name of the job in the job ID.
•
To ensure that you can insert new items into a sequence, use a combination
of letters and numbers that leaves room in the sequence for later additions.
For example, setting up two consecutive IDs of WIN001 and WIN005 leaves
room for three jobs in between.
Note
If you plan to use Job Cost on the same system as Inventory, make sure that
job IDs do not duplicate inventory item IDs. The OSAS system does not
distinguish between job and item IDs.
Job Cost User’s Manual
3-5
Setup Checklist and Functions
Follow these steps to set up the Job Cost system (each step is explained in this
section):
1.
2.
3.
4.
5.
6.
7.
Set up the options and interfaces.
Build the tables.
Build the JOCTxxx (Cost Types) file.
Build the JOCCxxx (Cost Codes Master) file.
Build the JOBSxxx (Jobs) file.
Set up access codes.
Set up a backup schedule.
Options and Interfaces
An application can be interfaced to work in conjunction with other applications.
Job Cost can interface with General Ledger, Payroll, Accounts Payable/Purchase
Order, and Accounts Receivable/Sales Order.
General Ledger
When Job Cost interfaces with General Ledger, posting uncompleted jobs makes
summary entries in the GLJRxxx (Journal) file to account for the overhead
accumulated since the last post. Overhead amounts are debited to the work-inprocess account you specify in the JOBGLxxx table and credited to the applied
general ledger account you specify in each job and phase record.
When you post completed jobs, summary entries are made to transfer the total
cost of each job from the WIP account to the finished goods account you specify
in the JOBGLxxx table.
Job Cost User’s Manual
3-7
Setup Checklist and Functions
Setup
Payroll
You set up the interface between Job Cost and Payroll when you select Payroll
options and interfaces. This interface affects the pieces fields in the job and phase
records (if you select Payroll as the pieces method) and the cost codes for labor
dollars, and updates the quantities for cost codes with labor hours.
The interface between Job Cost and Payroll works in two directions. When you
enter Payroll transactions, you can look up and select Job Cost job and phase IDs
and cost codes. When you post Payroll transactions that contain job and phase
IDs, the labor dollar amounts, hours quantities, and (optionally) the pieces fields
in the specified job and phase records are updated. If you keep job cost detail
history, the history records are also updated.
Accounts Payable/Purchase Order
You set up the interface between Job Cost and Accounts Payable/Purchase Order
when you select Accounts Payable/Purchase Order options and interfaces. This
interface affects the group of pieces fields in the job or phase records for the
specified item if you selected pieces from Accounts Payable, and it can also
affect any type of cost code.
When you interface Accounts Payable/Purchase Order with Job Cost, you can
look up and select job and phase IDs while you enter Accounts Payable/Purchase
Order transactions. When you post Accounts Payable/Purchase Order
transactions with job and phase IDs, the amounts and quantities for the specified
cost code are updated. If you elected to accrue specified inventory items through
Accounts Payable/Purchase Order, the pieces fields are also updated.
If you keep job cost detail history, the JOHIxxx (Detail History) file is also
updated.
3-8
Job Cost User’s Manual
Setup Checklist and Functions
Setup
Accounts Receivable/Sales Order
You set up the interface between Job Cost and Accounts Receivable/Sales Order
when you select the Accounts Receivable/Sales Order options and interfaces.
Then when you enter Accounts Receivable/Sales Order invoices, you can look up
and select job and phase IDs and read in cost and billing amounts from Job Cost
job and phase records.
When you post Accounts Receivable/Sales Order transactions, the last bill date,
invoice billed amount (period, year, and job to date), cost billed (period, year, and
job to date), and (optionally) actual finish date in the job and phase records are
updated.
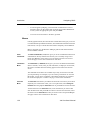
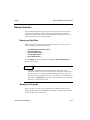
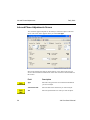
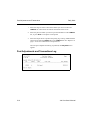
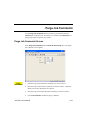
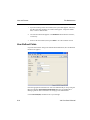
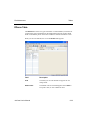
Options and Interfaces
Select Options and Interfaces from the Resource Manager Company Setup
menu. The Options and Interfaces screen appears.
The name of the company you are working with appears. Specify whether the
Options table is shared or owned. (See the Resource Manager User’s Manual
for more information about Options tables.) Next, enter JO as the ID of the
application for which you want to set options. The Job Cost Options screen
appears.
Job Cost User’s Manual
3-9
Setup Checklist and Functions
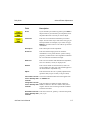
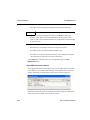
3-10
Setup
1.
Press Enter to toggle between YES or NO to indicate whether you want to
interface Job Cost with General Ledger, Accounts Receivable, or Payroll.
2.
Press Enter to toggle between YES or NO to indicate whether you want to
keep job cost detail history.
3.
Toggle between YES or NO to indicate whether you want to post detail
information directly to the JOBSxxx file. If you select YES, information is
sent directly to the JOBSxxx and JOHIxxx files when you use the Job and
Phase Adjustments function to update information about a job. If you
select NO, information is sent directly to the JOHIxxx file when you use the
Job and Phase Adjustments function; when you post adjustments and
transactions, information is sent from the JOHIxxx file to the JOBSxxx file.
4.
Toggle between YES or NO to indicate whether you want to be able to edit
totals in the job record.
5.
When you finish selecting options, press W to save your entries and return to
the Options and Interfaces screen. Select another application or exit to the
Resource Manager Company Setup menu.
Job Cost User’s Manual
Setup Checklist and Functions
Setup
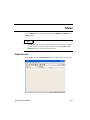
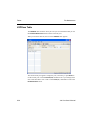
Tables
Tables store information relating to the system, data, options, and default settings
for other applications.
Note
Use tables only to enter and store data. Do not delete lines or rearrange the
account descriptions. The system looks for information by its position in the
table. For example, in the JOBGLxxx table, the system treats the account on
the first line as the work-in-process account and the account on the second
line as the finished goods account, regardless of how you change the labels.
You must set up the JOBGLxxx, JOPDxxx, and DFxxx tables before you build
the Job Cost data files.
You can set up the tables for individual companies and/or all companies that are
in the system. You can set up one table for all the companies that are alike, and
you can set up one table for each company that is different.
For example, you can set up table JOBGL for companies that post overhead to
the same general ledger accounts; then set up table JOBGLA01 for company
A01, JOBGLB01 for company B01, and so forth if those companies post
overhead to different general ledger accounts.
Cost Types and Cost Codes
When you enter job information, you assign cost codes to each job and phase
record. Thereafter, when you acquire goods and services and enter them through
the Job and Phase Adjustments function or through other applications, the
information updates the cost code and overall job and phase record. You can
assign up to 999 unique codes to a phase.
You must assign a cost type to each cost code. Use the Cost Types function to
specify up to 99 cost types. Since cost types are used throughout the system, set
up cost types before you enter job information.
Job Cost User’s Manual
3-11
Setup Checklist and Functions
Setup
For information about the relationship between cost codes and cost types, see
“Cost Code Detail” on page 3-14.
If you are converting Job Cost files from a version before 5.00, you could have as
many as five cost types already defined. The cost types are the result of
conversion of the NAMESx table from versions 4.0x and 4.5x.
The order of the cost codes’ appearance in the NAMESx table determines the
cost type’s number, and the label determines the description. For example,
Material $ was the NAMESx table’s first entry; in this function, it is cost type 10.
Material $ is the description of the cost type.
When the conversion process is finished, the cost types are in place. You can edit
these cost types as you can any other, but if you do, existing cost codes and job
detail history will not contain valid type information.
Job Records
After you have built the tables and defined the cost types, you are ready to build
the JOBSxxx file, which stores information about each job and associated
phases. You must set up this file before you can enter job adjustments or attribute
goods or services to a job.
Each job consists of at least a job record (the job ID, description, and information
about the job). If the job has phases, you must also set up a record for each phase
of the job.
The terms job and phase indicate a hierarchy where the phase is assigned to the
job, but is independent of other phases. For example, if a job called Installation
has phases called Hardware, Software, and Training, you set up four records:
one for Installation and one for each phase. The only thing the three phases
necessarily have in common is that they are part of the job Installation.
General Information
On the General Information screen you can enter four types of information:
basic, contract, overhead and account, and pieces (goods and services) and
billing.
3-12
Job Cost User’s Manual
Setup Checklist and Functions
Setup
The basic information consists of the job description, the ID of the job manager,
whether or not the job uses phases, whether or not the job is to be used as a
template for other jobs, and whether or not you want to assign additional
descriptions to the job.
A template serves as a general job that you can copy several times, a useful task
if you have several closely related jobs and do not want to spend time reentering
information. You enter the job as you would a regular job, but by marking it as a
template, you exclude the information from calculations and reports.
Job Cost does not force you to create a contract. The general term contract
information means terms of the business arrangement.
The contract information consists of the estimated and actual dates for starting
and completing the job and phase, the date the contract was established, the
amount of the contract, the contract number, and the ID of the customer with
whom you established the contract. The actual dates are updated when you post.
Overhead information can be assigned only to phases of a job or to jobs that do
not have phases. The overhead and account information consists of the cost code
you want to assign to overhead costs; the overhead rate based on the overall cost
you want to attribute to overhead; and the General Ledger accounts of overhead,
work in process, and finished goods (the sum of the pieces entered later). The
overhead and finished goods amounts you enter to post are updated when you
post from other applications or from the Post Adjustments and Transactions
function.
Note
You must set up cost codes before you can select a valid cost code. During
the first pass through the General Information screen, the system prompts
you to press Enter to add the default overhead cost code record with the ID
you specify for the overhead cost code. Then set up the cost codes on the
Cost Code Details screen. Finally, edit the job record and assign the
overhead cost code.
Job Cost User’s Manual
3-13
Setup Checklist and Functions
Setup
The pieces and billing information consists of the source of the information; the
item to expect; the unit of measure; the number of pieces for the period, for the
year, and for the job to date; and the estimated cost of the pieces for the entire
job.
When you enter the amount you billed the customer and the cost you billed the
customer for the period, for the year, and for the job to date, the invoice billed
amount and cost billed fields are calculated.
Cost Code Detail
Use cost codes to assign costs to a job or phase. Thereafter, when you acquire
goods and services and enter them through the Job and Phase Adjustments
function or through other applications, the information updates the cost code and
overall job and phase record. You can assign up to 999 unique codes to each
phase.
You can also use cost codes to track costs in terms of categories that might be
specific to a job and phase. A cost type is a category of cost codes. You can
define your cost types and cost codes, but you must define the cost types first
because you must assign one to each cost code.
After you establish cost types for the system and cost codes for a job and phase
record, you can assign cost information to the job and phase indefinitely, and the
cost codes track the information.
For example, you might define three cost types before you enter jobs: 10 (Items),
20 (Labor), and 30 (Sublet or third-party labor). Each category is general; a
particular job and phase might have a need for more specific cost codes.
Then, in the Jobs and Phases function, you might enter job INS001
(Installation), which may require several codes (for simplicity’s sake, the job in
this example does not have phases.) You might use cost codes 001 (Hardware)
and 002 (Software). Each code is unique, but both are assigned cost type 10.
3-14
Job Cost User’s Manual
Setup Checklist and Functions
Setup
You could also have codes 003 (Setup) and 004 (Training), each with cost type
20. Finally, you could define code 005 (Support) with cost type 30 if part of the
installation is free client support from the software manufacturer, with your
business paying for the service.
Having set up the system like this, you then track the purchase of computer
hardware in Accounts Payable and attribute the items to job INS001. Then you
specify the cost code; the appropriate information is sent to the JOBSxxx file for
the specified cost code. A similar process is involved in using Payroll for labor
information.
You should enter costs that you cannot directly attribute to an item in Accounts
Payable/Purchase Order or Payroll as overhead, and account for them in the
overhead fields.
In this example, you cannot have two cost codes 003 or duplicates of any other
code, but you can and do have more than one code of type 10. Once you have set
up cost types, think of them as categories you assign to each cost code. The list of
cost types is set up once and used throughout the system. In this example, type 10
means Items no matter what job or phase is involved and can be changed only
through the Cost Types function.
By comparison, any cost code has meaning only in its own phase or job without
phases. For example, cost code 100 in one phase has no connection with cost
code 100 in any other phase in the job or any other job. Phases (and jobs) are
independent when it comes to cost codes.
You cannot give two codes the same number in the same phase. If you are
working in a job without phases, no two codes in the job can have the same
number.
Job Comments
Enter comments that you want to associate with each job.
Job Cost User’s Manual
3-15
Setup Checklist and Functions
Setup
Access Codes
To safeguard your system and prevent access by unauthorized people, use the
Resource Manager Access Codes function to set up access codes on your
system. You can set up access codes for the Job Cost system itself, for menus in
the system, and for individual functions. To control users’ access to menus and
functions, you can set up an access code for each user, or group of users, that
performs the same functions.
A Code for Each Company
Access codes are company-specific. When you set up an access code for a user,
the code is assigned the company you are currently using.
Because the codes are company-specific, you must set up a code for each
company a user needs to access. You can use the same code for each company so
that the user does not need to remember different codes. For example, you can set
up the access code CHARM for companies A01, B01, and C01 so that a user can
use the same code for each company.
What Should Be Protected
Because of the sensitive nature of some of the information in the Job Cost data
files and reports, you should limit access to the functions that provide
confidential information or are sensitive to change. For maximum security,
protect the Job Cost application itself, each of the Job Cost menus, and the
individual functions. After you have set up your access codes, print a list of the
codes and store it in a safe place.
For more information about access codes, see the Resource Manager User’s
Manual.
3-16
Job Cost User’s Manual
Setup Checklist and Functions
Setup
Backup Schedule
Plan a backup schedule before you begin day-to-day operations. You can lose
files because of disk drive problems, power surges and outages, and other
unforeseen circumstances. Protect yourself against such an expensive crisis by
planning and sticking to a backup schedule.
Backing up Data Files
Back up your Job Cost data files whenever they change—every day or every
week—and before you run these functions:
•
•
•
•
•
Post Adjustments and Transactions
Post Overhead to GL
Delete Completed Jobs
Periodic Maintenance
Delete Detail History
Use the Backup function on the Resource Manager Data File Maintenance
menu to back up files.
Note
You must back up all the files in the data path for a particular list of
companies at once to ensure that you have up-to-date copies of the system
files. Do not try to use operating system commands to back up only a few
files that have been changed; if you do, your system may not work after you
restore them. The Backup function backs up all the data files for a specified
company in a data path at one time.
Backing up Programs
Once a month or so, back up your programs. Even though these files do not
change, backup media can be damaged or deteriorate, so it pays to have a fresh
copy in storage in case you need it.
Job Cost User’s Manual
3-17
Setup Checklist and Functions
Setup
Media
Keep more than one set of media in case one set is bad or damaged. Rotate the
sets of backup media, keeping one set off-site.
3-18
Job Cost User’s Manual
Job Cost User’s Manual
Information Inquiry
Jobs and Phases Inquiry
Detail History Inquiry
Job Cost User’s Manual
4
4-3
4-7
4-1
Jobs and Phases Inquiry
Use the Jobs and Phases Inquiry function to view summary information about
a job or its phases: the locations, start and finish dates, additional descriptions,
billing information, and actual costs compared with estimates. You can also view
cost details to see which cost codes make up the totals.
Note
To add or change this information, use the Jobs and Phases function (see
page 9-3).
Jobs and Phases Inquiry Screen
Select Jobs and Phases Inquiry from the Information Inquiry menu. The Jobs
and Phases Inquiry screen appears.
Job Cost User’s Manual
4-3
Information Inquiry
Jobs and Phases Inquiry
1.
Enter the job ID you want to view.
2.
Enter the phase ID you want to view, if necessary. Information about the job
and phases appears.
If you want to view information for all the phases of the job, leave the Phase
ID field blank.
3.
4-4
Use the commands to work with the information on the screen:
•
Press J to view information for a different job, then enter the job ID
whose information you want to view.
•
Press C to view information about the job’s cost codes. See “Cost
Codes” on page 4-5 for more information.
•
Press N to view information for the next job on record (alphabetically).
•
Press P to view information for the previous job on record
(alphabetically).
•
Press A to view additional descriptions (such as the address and userdefined information) associated with the job or phase.
•
Press M to view comments associated with the job.
Job Cost User’s Manual
Information Inquiry
Jobs and Phases Inquiry
Cost Codes
When you press C on the Jobs and Phases Inquiry screen, the Cost Code Details
screen appears.
The Cost Code Details screen shows the cost codes associated with the job, the
activity for the cost code as it was used for the job and phase for the period and
the year to date, and the actual and estimated costs attributed to each cost code
for the job to date.
As a result, you can see how much cost each cost code has accounted for the
period and year and for the job and phase. You can also see how the cost code’s
actual cost in the job compares with the estimated cost in the job. This
information is useful, for example, if a cost code for a job and phase is
accounting for a higher cost than the cost code normally represents.
Job Cost User’s Manual
4-5
Jobs and Phases Inquiry
Information Inquiry
Use the commands to work with the information on the screen:
•
Press Enter to return to the Jobs and Phases Inquiry screen.
•
Press V to view detailed information about the selected cost code. The View
Cost Codes screen appears. This command is available only if you elected to
keep cost codes detail information in the Resouce Manager Options and
Interfaces function.
When you finish viewing the detailed cost information information, press
any key to return to the Cost Code Details screen.
4-6
Job Cost User’s Manual
Detail History Inquiry
Use the Detail History Inquiry function to view detail history of the cost and
price, description, and quantity for each phase associated with the job. You can
look at a job in total or at a phase of a job; and you can look at a period, a range of
periods, or totals since the job’s start date. This information comes from the
JOHIxxx (Detail History) file.
This function is available only if you elected to save detail history in the
Resource Manager Options and Interfaces function.
Detail History Inquiry Screen
Select Detail History Inquiry from the Information Inquiry menu. The Detail
History Inquiry screen appears.
1.
Enter the job ID. The job name appears.
Job Cost User’s Manual
4-7
Information Inquiry
Detail History Inquiry
2.
Enter the phase ID. The name of the phase appears.
3.
Enter the fiscal year.
4.
Enter the range of periods you want to view, or leave the fields blank to view
all periods.
5.
Enter the cost type whose associated detail history you want to view, or leave
the field blank to view history for all cost types.
6.
Enter the range of cost codes whose associated detail history you want to
view, or leave the fields blank to view history for all cost codes.
7.
Use the commands to work with the information on the screen:
8.
4-8
•
Press N to view a different job’s history, then enter the job ID.
•
When there is more than one screen of items to view, the More
command is available. Press M to view the next page of history, when
available.
•
When you have reached the end of the history list, press R to return to
the first page of history information.
When you finish viewing detail history, use the Exit (F7) command to return
to the Information Inquiry menu.
Job Cost User’s Manual
Job Cost User’s Manual
Daily Work
Job and Phase Adjustments
Post Adjustments and Transactions
Job Cost User’s Manual
5
5-3
5-9
5-1
Job and Phase Adjustments
Use the Job and Phase Adjustments function to enter costs as you incur them,
billings as you invoice them, and critical dates as they change. Depending on
how you calculate overhead, the system may calculate overhead and update the
overhead to post, finished goods to post, and actual overhead fields when you
enter adjustments through this function.
You can update a job in three ways: through the Jobs and Phases function,
through other applications, or through the Job and Phase Adjustments
function. Use the Job and Phase Adjustments function when incidental events
make manual adjustments necessary. Usually job information from other
interfaced applications updates the JOBSxxx (Jobs) file.
Using the Job and Phase Adjustments function is similar to editing information
about an existing job in the Jobs and Phases function, but this function
produces an audit trail and updates the JOHIxxx (Detail History) file if you keep
detail history.
As you enter adjustments, a Job and Phase Adjustments Log records your
changes. Use the log to compare the original JOBSxxx file records with the
current records. The log shows fields you are changing, the original value, your
entry, the revised value, and the overhead (if any) calculated on your entry.
If Job Cost interfaces with other OSAS applications, be wary. Adjustments you
enter through this function may duplicate information from other applications.
For example, either Payroll or Accounts Payable/Purchase Order can update the
Pieces field. Using this function to make the same adjustment as these other
applications could lead to double-posting.
Job Cost User’s Manual
5-3
Daily Work
Job and Phase Adjustments
When you enter adjustments in Job Cost, they can be sent only to the JOHIxxx
file, only to the JOBSxxx file, or to both places. If you elected to send the
information to the JOBSxxx file in the Resource Manager Options and
Interfaces function, the adjustments update the JOBSxxx file. If you elected not
to send information to the JOHIxxx file, information updates only the JOBSxxx
file. If you elected not to send information to the JOBSxxx file, the information
updates only the JOHIxxx file. You can use the Post Adjustments and
Transactions function to copy the information from the JOHIxxx file to the
JOBSxxx file. The JOBSxxx file does not update other files; other files update it.
Job and Phase Adjustments Selection Screen
Follow these steps to enter job and phase adjustments:
5-4
1.
Select Job and Phase Adjustments from the Daily Work menu. The Job
and Phase Adjustments selection screen appears (see the example below),
then the Output Information screen appears immediately overtop.
2.
Select the output device to produce the Job and Phase Adjustment Log. This
log tracks the adjustments you make as you enter them. See “Reports” on
page 1-33 for more information on output devices.
Job Cost User’s Manual
Job and Phase Adjustments
Daily Work
3.
When the Job and Phase Adjustments screen reappears, select the type of
transaction you would like to adjust: Cost Type, Billing, Pieces, Start Date
or Finish Date.
4.
Enter adjustments as necessary in the screen that appears, then use the
Proceed (OK) command to save your changes and enter another adjustment
of the same type. Use the Abandon (F5) command to return to the selection
screen to enter an adjustment of a different type.
Lines are added to the adjustment log for each adjustment you enter.
5.
When you finish entering adjustments, use the Exit (F7) command to return
to the Daily Work menu.
Job Cost User’s Manual
5-5
Daily Work
Job and Phase Adjustments
Job and Phase Adjustments Screen
The screen that appears depends on the field you selected to adjust on the first
screen. The screen below appears when you select Cost Type.
Since most fields are the same for all the options, every field on the cost type
screen is described below. Differences on the other screens are described later in
this section.
5-6
Field
Description
Type
Enter the cost type for the cost code whose information
you want to adjust.
Transaction Date
Enter the date of the transaction you want to adjust.
Job
Enter the job ID whose cost code you want to adjust.
Job Cost User’s Manual
Job and Phase Adjustments
Daily Work
Field
Description
Phase
If you selected a job without any phases, press Enter to
skip this field. If you selected a job with phases, enter
the phase ID whose cost code you want to adjust.
Cost Code
Enter the cost code whose information you want to
adjust. You can select only a code whose cost type you
already selected. For example, if you select cost type
Material, you cannot select a cost code set up for labor
information.
Description
Enter a description of the adjustment.
GL Period
Enter the General Ledger period to which the
information is to be posted. For the system’s sorting
purposes, you must enter a value regardless of whether
Job Cost interfaces with General Ledger.
Reference
Enter a word or number that identifies the adjustment,
such as a customer, vendor, or employee ID.
Remark
Enter a short remark for the transaction, such as an
invoice number or a labor type. This remark appears in
the Job and Phase Adjustments Log.
Adjust
Enter the basis for the cost or quantity adjustment: P
(period to date), Y (year to date), or J (job to date).
Current Est or Actual The current estimated and actual values appear from
Cost or Quantity PTD/ the JOBSxxx file.
YTD/JTD
Change Est or Actual Enter the amount to update the fields. Values are
Cost or Quantity PTD/ added; to subtract a value in a numeric field, enter a
YTD/JTD
negative amount. You can change both the estimated
and the actual values.
Revised Est or Actual Enter the revised cost, quantity, or both for the period,
Cost or Quantity PTD/ year, or job.
YTD/JTD
Job Cost User’s Manual
5-7
Job and Phase Adjustments
Daily Work
The new values that reflect your entries appear. When you finish entering
adjustments, use the Proceed ( OK) command to save it. Then enter another
adjustment for that type, use the Abandon (F5) command to enter an adjustment
for another type, or use the Exit (F7) command to return to the Daily Work menu.
Billing Adjustments
If you elected to adjust billing information, you do not need to enter a cost type or
cost code. You can revise the estimated and actual contract amounts, cost billed,
and invoice billed by a specified basis. You do not revise costs or quantities.
Pieces Adjustments
If you elected to adjust pieces, you do not need to enter cost or billing
information. Enter the transaction date and job and phase. Then change the
estimated and actual pieces for either the period, year, or job to date.
Start and Finish Date Adjustments
If you elected to adjust start and finish dates, you do not need to enter cost or
billing information. Enter the transaction date, job, and phase. Then change the
estimated date, actual date, or both.
Job and Phase Adjustments Log
5-8
Job Cost User’s Manual
Post Adjustments and Transactions
Use the Post Adjustments and Transactions function to send information from
the JOHIxxx (Detail History) file to the JOBSxxx (Jobs) file. You can use this
function only if you elected to keep detail history and you chose not to post
directly to the JOBSxxx file in the Resource Manager Options and Interfaces
function.
If you want to see which transactions have not been posted, print the Cost Detail
History Report and the Billing Detail Report for unposted transactions.
Before you post the adjustments and transactions, back up your data files.
Post Adjustments Screen
Select Post Adjustments and Transactions from the Daily Work menu. The
function screen appears:
Job Cost User’s Manual
5-9
Post Adjustments and Transactions
1.
Daily Work
Select the range of source codes whose details you want to send to the
JOBSxxx file. Valid entries are listed at the bottom of the screen
2.
Select the period to which you want to post the information in the JOBSxxx
file, or press Enter to accept the current period.
3.
Select the output device to produce the posting log. This log summarized the
entries moved from the JOHIxxx file to the JOBSxxx file. See “Reports” on
page 1-33 for more information on output devices.
After the post completes and the log is produced, the Daily Work menu
appears.
Post Adjustments and Transactions Log
5-10
Job Cost User’s Manual
Job Cost User’s Manual
Cost Reports
Printing a Cost Report
Cost Summary Report
Cost Detail History Report
Unit Cost Analysis Report
Job Cost User’s Manual
6
6-3
6-5
6-7
6-9
6-1
Printing a Cost Report
The functions on the Cost Reports menu let you print reports summarizing job
and phase costs. These reports give you valuable information about jobs and
phases, helping you prepare bids, plan budgets, analyze progress, and produce
estimates.
You produce all cost reports in the same way. Use the instructions below to print
a cost report, modifying the procedure as necessary for the report you are
printing. For example, if the screen for the report you want to print does not
contain check box options, ignore that step and continue to the next.
Follow these steps to print a cost report:
1.
Select the report you want to print from the Cost Reports menu. The
selection screen for that report appears. The Cost Detail History Report
screen is shown below as an example.
Job Cost User’s Manual
6-3
Cost Reports
Printing a Cost Report
2.
Select the range of information to include in the report in the From and Thru
fields. The Inquiry (F2) command is usually available for these fields to let
you select beginning and end range values from the list that appears.
Leave these fields blank to include all values in the list.
6-4
3.
If the screen contains entry fields (for example, for entering source codes,
date ranges, or financial quarters or periods), enter the appropriate values to
use when printing the report.
4.
If the screen contains options that control what jobs are included in the
report (posted or unposted jobs, completed or in process jobs, for example),
select the option corresponding to the jobs you want to print. You can select
only one option.
5.
If the screen contains options that control how information is sorted or
summarized, select the option you want to use to sort the information. You
can select only one sort option.
6.
If the screen contains options or combo boxes that control how additional
information (print post or transaction date or units/pieces, for example) for
the report prints, select the option corresponding to the type of information
you want to print. You can select only one print option.
7.
If the screen contains check boxes or Yes/No fields that control additional
printing instructions, select the check box (or enter Y in text mode) to use
that option when printing the list. Clear the check box (or enter N in text
mode) if you do not want to use that option.
8.
Select the output device to begin printing the report. See “Reports” on
page 1-33 for more information. After you produce the report, the Cost
Reports menu appears.
Job Cost User’s Manual
Cost Summary Report
The Cost Summary Report shows the estimated and actual costs and variance
(actual and calculated percentage of the job cost) for the cost codes for the phases
and jobs you select. Produce this report when you want to see if you are keeping
to your budget or for help in planning budgets and preparing bids and estimates.
Sample Report
Job Cost User’s Manual
6-5
Cost Detail History Report
The Cost Detail History Report shows the detail of the transactions that affect
cost fields. The detail consists of the source and description of the transaction,
transaction amount, and transaction dates.
The transaction detail information comes from the JOHIxxx (Detail History) file.
Since detailed information is erased when you delete completed jobs or detail
history, print this report before you use the Delete (F3) command in the Jobs
and Phases function or use the Delete Completed Jobs or the Delete Detail
History functions.
Sample Report
Job Cost User’s Manual
6-7
Unit Cost Analysis Report
The Unit Cost Analysis Report shows the usages and variances of the estimated
and actual number of units of measure defined for jobs and phases in the Jobs
and Phases function. You can produce the report for jobs that are completed, in
process, not started, or for all jobs.
The report provides information about each job with its unit of measure, quantity,
and percentage complete. You can express the unit cost as a sum for the job, or
you can break down the costs by phases.
Produce the Unit Cost Analysis Report to see the physical progress of the job and
the quantity of work produced so far, to see if you are keeping to your budget,
and when you should plan budgets and prepare bids and estimates.
Job Cost User’s Manual
6-9
Unit Cost Analysis Report
Cost Reports
Sample Report
6-10
Job Cost User’s Manual
Job Cost User’s Manual
Billing Reports
Printing a Billing Report
Job Profitability Report
Billing Summary Report
Billing Detail Report
Job Cost User’s Manual
7
7-3
7-5
7-7
7-9
7-1
Printing a Billing Report
The functions on the Billing Reports menu let you print reports summarizing job
and phase billings. These reports give you valuable billing information about
jobs and phases, helping you detect variances, assemble competitive bids, set or
reduce prices, and supplement your audit trail.
You produce all billing reports in the same way. Use the instructions below to
print a billing report, modifying the procedure as necessary for the report you are
printing. For example, if the screen for the report you want to print does not
contain check box options, ignore that step and continue to the next.
Follow these steps to print a billing report:
1.
Select the report you want to print from the Billing Reports menu. The
selection screen for that report appears. The Billing Summary Report screen
is shown below as an example.
Job Cost User’s Manual
7-3
Billing Reports
Printing a Billing Report
2.
Select the range of information to include in the report in the From and Thru
fields. The Inquiry (F2) command is usually available for these fields to let
you select beginning and end range values from the list that appears.
Leave these fields blank to include all values in the list.
7-4
3.
If the screen contains entry fields (for example, for entering source codes,
date ranges, or financial quarters or periods), enter the appropriate values to
use when printing the report.
4.
If the screen contains options that control what jobs are included in the
report (printed or unprinted jobs or completed or in process jobs, for
example), select the option corresponding to the jobs you want to print. You
can select only one option.
5.
If the screen contains check boxes or Yes/No fields that control additional
printing instructions, select the check box (or enter Y in text mode) to use
that option when printing the list. Clear the check box (or enter N in text
mode) if you do not want to use that option.
6.
If the screen contains options or combo boxes that control how additional
information (print post date or transaction date, for example) for the report
prints, select the option corresponding to the type of information you want to
print. You can select only one print option.
7.
Select the output device to begin printing the report. See “Reports” on
page 1-33 for more information. After you produce the report, the Billing
Reports menu appears.
Job Cost User’s Manual
Job Profitability Report
The Job Profitability Report shows estimated and actual costs, revenues, and
variances to date of a job or a range of jobs. This report is valuable if you want to
detect why and how often variances occur or if you want to assemble a
competitive and profitable bid for a new project and need to compose or compare
a proposal with this information.
Use the Job Profitability Report function to compare the estimated costs and
revenues of a job with the actual costs and revenues to date.
The information in this report comes from the JOBSxxx (Jobs) file.
Sample Report
Job Cost User’s Manual
7-5
Billing Summary Report
The Billing Summary Report provides summary information about the amount
you bill for each job. This report is valuable if you want to cite important figures
in a bid for a job or to use as a backup in case the data becomes corrupted.
The billing information in this report comes from the JOBSxxx (Jobs) file.
Sample Report
Job Cost User’s Manual
7-7
Billing Detail Report
The Billing Detail Report provides information about the billings for each phase
of a job or a range of jobs. Use the report to review the billings if you are
planning your budget and want to determine where you might want to charge
more and where you need to reduce prices.
The job summary information comes from the JOBSxxx (Jobs) file, and the
billing transaction information comes from the JOHIxxx (Detail History) file.
Sample Report
Job Cost User’s Manual
7-9
Job Cost User’s Manual
Periodic Processing
Overhead Allocation Report
Post Overhead to GL
Work-in-Process Report
Periodic Maintenance
Purge Job Comments
Job Template Worksheet
Delete Completed Jobs
Delete Detail History
Job Cost User’s Manual
8
8-3
8-7
8-11
8-13
8-15
8-17
8-19
8-21
8-1
Overhead Allocation Report
The Overhead Allocation Report function shows the applied general ledger
account numbers, overhead basis and rate, and overhead amount for the phases of
every job you select. If the job or phase is finished, the finished goods accrued
amount appears too.
Overhead costs are indirect costs that cannot be assigned directly to any
particular good or service—for example, maintenance or depreciation. If you
track it, overhead is assigned to each phase of a job. If the job does not have
phases, overhead is assigned only to the job; the overhead in a job with phases is
the sum of each phase’s overhead.
Since this detailed information is erased when you post to General Ledger,
produce this report before you post to maintain a detailed audit trail.
Job Cost User’s Manual
8-3
Overhead Allocation Report
Periodic Processing
Overhead Allocation Report Screen
Select Overhead Allocation Report from the Periodic Processing menu. The
Overhead Allocation Report screen appears.
8-4
1.
Enter the range of job IDs you want to include in the report.
2.
Select the output device to produce the report. See “Reports” on page 1-33
for more information on output devices. After the report is produced, the
Periodic Processing menu appears.
Job Cost User’s Manual
Periodic Processing
Overhead Allocation Report
Sample Report
Job Cost User’s Manual
8-5
Post Overhead to GL
Use the Post Overhead to GL function to update your general ledger accounts
with the accumulated overhead while a job is in process. After a job is finished,
use this function to transfer work-in-process inventory to the finished goods
inventory account.
The information flow is slightly different for in-process jobs than that of finished
jobs. In the Job Cost system, a job is finished or completed if the actual finish
date is the same as or earlier than the system date.
For jobs or phases that are in process, this function moves the amount from the
Ovhd Accum to Post field to the applied General Ledger account. The system
then clears the Ovhd Accum to Post field to prepare for more entries; no other
fields are affected.
If Job Cost interfaces with General Ledger, the system enters the following
transaction in the GLJRxxx (Journal) file:
WIP Account
DB
Overhead
Account
CR
You can elect to post to the current fiscal year’s files or to the previous fiscal
year’s files.
Job Cost User’s Manual
8-7
Periodic Processing
Post Overhead to GL
If the job and phase records have an actual finish date, posting moves the amount
in the Fin Goods to Post field from the WIP account to the finished goods
inventory account. If Job Cost interfaces with General Ledger, the system enters
the following transaction in the GLJRxxx file:
Finished Goods
Account
DB
WIP Account
CR
If you have amounts in both the Ovhd Accum to Post and Fin Goods to Post
fields, the system first posts the overhead to the applied General Ledger account,
moving the accumulated overhead amounts and summing them. The amount is
then posted to the finished goods account.
When posting is complete, the system clears both the Ovhd Accum to Post and
Fin Goods to Post fields. Technically the information is still available in the
General Ledger accounts where you posted the information, but information is
kept as summary totals; you cannot pick out individual entries just by looking at
the accounts.
8-8
Job Cost User’s Manual
Post Overhead to GL
Periodic Processing
Post Overhead to GL Screen
Select Post Overhead to GL from the Periodic Processing menu. The Post
Overhead to GL screen appears.
1.
Back up your data files before you post. Unforeseen problems such as a
power surge or failure can interrupt the post and result in the loss of data.
2.
If you have produced the Overhead Allocation Report, select the check box
(or enter Y in text mode); if not, clear the check box (or enter N in text
mode). Posting removes overhead from the JOHIxxx (Detail History) file;
the Overhead Allocation Report is your only audit trail.
3.
If Job Cost interfaces with General Ledger, the period corresponding to the
system date appears. Press Enter to use it, or enter the period to which you
want to post the accumulated overhead.
4.
If Job Cost does not interface with General Ledger, or if you have not
created last-year files in General Ledger, the current fiscal year is selected
and you cannot change it.
Job Cost User’s Manual
8-9
Post Overhead to GL
Periodic Processing
If Job Cost interfaces with General Ledger and you have created last-year
files in General Ledger, select the fiscal year to which you want to post the
GL Journal entries.
5.
Select the output device for the posting log; this log is produced after posting
completes to summarize Job Cost GL Journal entries. See “Reports” on
page 1-33 for more information on output devices
After posting completes and the log is produced, the Periodic Processing
menu appears.
Post Overhead to GL Log
8-10
Job Cost User’s Manual
Work-in-Process Report
Produce the Work-in-Process Report at the end of the monthly accounting cycle.
The report shows information about work in process and earned income for the
selected jobs, and it can show information about completed jobs or you can elect
to list everything. This report shows work done for all jobs on file regardless of
the stage of completion.
Work-in-Process Report Screen
Select Work-in-Process Report from the Periodic Processing menu. The
Work-In-Progress Report screen appears.
1.
Enter the range of job IDs you want to include in the report.
2.
Select the types of jobs you want to include in the report. Completed Jobs
are those that have an actual finish date. Jobs In Progress are those that
have an actual start date but no actual finish date. All Jobs includes both.
Job Cost User’s Manual
8-11
Work-in-Process Report
Periodic Processing
3.
Enter the GL period for which you want to print the report, then press Enter.
The current fiscal year appears in the box to the right; change it if necessary.
4.
If you want to include phase detail in the report, select the check box (or
enter Y in text mode); if not, clear the check box (or enter N in text mode).
5.
Select the output device to produce the report. See “Reports” on page 1-33
for more information on output devices. After the report is produced, the
Periodic Processing menu appears.
Sample Report
8-12
Job Cost User’s Manual
Periodic Maintenance
Use the Periodic Maintenance function to perform maintenance tasks on the
JOBSxxx (Jobs) file and the JOHIxxx (Detail History) file, preparing them for
the next period or year. If you do not use this function at the end of each period or
year, you risk posting information to incorrect periods.
Follow these steps to perform periodic maintenance:
1.
Select Periodic Maintenance from the Periodic Processing menu. The
Periodic Maintenance screen appears.
2.
If you have not backed up the system, posted overhead to General Ledger (if
Job Cost interfaces with General Ledger), and produced the reports listed on
the screen, clear the check box (or enter N in text mode) and return to the
Periodic Processing menu to complete these tasks. When you have done
these tasks, select the check box (or enter Y in text mode) to continue.
3.
Select either period-end or year-end processing. After processing completes,
the Periodic Processing menu appears.
Job Cost User’s Manual
8-13
Purge Job Comments
Use the Purge Job Comments function to remove job comments from the
JOJCxxx (Job Comments) file. This function is valuable if the JOJCxxx file is
getting large and slowing down your system.
Purge Job Comments Screen
Select Purge Job Comments from the Periodic Processing menu. The Purge
Job Comments screen appears.
1.
Enter the range of job IDs whose comments you want to remove.
2.
Enter the range of dates whose comments you want to remove. Comments
dated on or between these dates are removed.
3.
Enter the range of reference IDs whose comments you want to remove.
4.
Use the Proceed (OK) command to purge comments.
Job Cost User’s Manual
8-15
Job Template Worksheet
Use the Job Template Worksheet function to draw up a bid for a customer. The
Job Template Worksheet represents all the costs involved in a job.
Job Template Worksheet Screen
Select Job Template Worksheet from the Periodic Processing menu. The Job
Template Worksheet screen appears.
1.
Enter the range of template IDs you want to include in the worksheet.
2.
Select the level of detail you want to print on the worksheet. You can include
cost codes and cost types, or only cost types.
3.
Select the output device to produce the worksheet. See “Reports” on
page 1-33 for more information on output devices. After the worksheet is
produced, the Periodic Processing menu appears.
Job Cost User’s Manual
8-17
Job Template Worksheet
Periodic Processing
Job Template Worksheet
8-18
Job Cost User’s Manual
Delete Completed Jobs
Use the Delete Completed Jobs function to remove information about
completed jobs from the JOBSxxx (Jobs) file. This function is useful if you want
to free some disk space or if the size of the JOBSxxx file is slowing down your
system.
Only jobs with zero amounts in the Ovhd Accum to Post and Fin Goods to
Post fields having a finish date before the date you enter in this function will be
deleted from the JOBSxxx file.
Delete Completed Jobs Screen
Select Delete Completed Jobs from the Periodic Processing menu. The Delete
Completed Jobs screen appears.
Job Cost User’s Manual
8-19
Delete Completed Jobs
8-20
Periodic Processing
1.
If you have completed the listed tasks, select the check box (or enter Y in text
mode); if not, clear the check box (or enter N in text mode) and return to the
File Maintenance menu without changing the JOBSxxx file.
2.
Enter a job finish date before which to delete jobs from the JOBSxxx file.
After the jobs are deleted, the Periodic Processing menu appears.
Job Cost User’s Manual
Delete Detail History
Use the Delete Detail History function to remove information from the JOHIxxx
(Detail History) file. This function is useful if you want to free some disk space
or if the size of the JOHIxxx file is slowing down your system.
This function is available only if you elected to use the JOHIxxx file in the
Resource Manager Options and Interfaces function.
Before Deleting History
Before you use the Delete Detail History function, produce the Cost Detail
History Report and the Billing Detail Report. You cannot retrieve these reports
after you delete detail history.
Job Cost User’s Manual
8-21
Delete Detail History
Periodic Processing
Delete Detail History Screen
Select Delete Detail History from the Periodic Processing menu. The Delete
Detail History screen appears.
8-22
1.
Select the range of job IDs whose detail history you want to remove from the
JOHIxxx file.
2.
Select the range of phase IDs whose detail history you want to remove from
the JOHIxxx file.
3.
Enter the cutoff date. Items that were posted before the date you enter are
removed from the JOHIxxx file. After the detail history is deleted, the
Periodic Processing menu appears.
Job Cost User’s Manual
Job Cost User’s Manual
File Maintenance
Jobs and Phases
Copy Jobs and Phases
Copy Job Template
Cost Types
Cost Codes
Tables
Change Fields
Job Cost User’s Manual
9
9-3
9-23
9-25
9-27
9-29
9-31
9-37
9-1
Jobs and Phases
Use the Jobs and Phases function to create job and phase records in the
JOBSxxx (Jobs) and JOCDxxx (Cost Codes Detail) files when you enter the job.
You can set up several pieces of information:
•
•
•
•
•
•
•
•
•
•
•
•
job and phase IDs
contract amount (original and actual) and contract date
job address and three user-defined fields
template information and details
customer billing information and invoice billed
estimated/actual start and finish dates and percentage complete
posting pieces from Payroll or Accounts Payable
overhead information
estimated costs, costs billed, and costs unbilled
associated cost codes and cost types
period- and year-to-date information for pieces
GL overhead, work-in-process, and finished goods accounts
After you set up a job, you can change the information about the job either
through the Jobs and Phases function or the Job and Phase Adjustments
function. Using the Job and Phase Adjustments function is preferable: you can
enter revised estimates and accrued costs manually, and keep an audit trail.
Phase totals roll up into the job record total, so if you enter detail information,
enter it in either the phase or the job, not in both.
Note
If Accounts Payable/Purchase Order, Payroll, and Accounts Receivable/
Sales Order interface with Job Cost, the job and phase records are updated
automatically when you post transactions from those applications. In this
case you do not need to make manual job and phase adjustments. Doing so
may result in double-posting of information.
Job Cost User’s Manual
9-3
File Maintenance
Jobs and Phases
Jobs and Phases Header Screen
Select Jobs and Phases from the File Maintenance menu. The header screen
appears.
Field
Description
Job ID
Enter the ID of the job you want to add or edit. To
delete the job record, use the Delete (F3) command.
Note
If Inventory and Job Cost are on the same system, job IDs must be different
from inventory IDs; no OSAS system distinguishes between them. If you
interface Job Cost with General Ledger, set up different overhead, WIP, and
finished goods accounts.
9-4
Job Cost User’s Manual
Jobs and Phases
File Maintenance
Field
Description
Phase ID
Enter the ID of the phase you want to add or edit.
Copy From
If you entered a job ID or a phase ID that is not on file,
the Copy From fields appear.
If the job or phase you are adding is similar to another
job or phase in the file, you can copy the information
(except actual costs and dates) from the existing job
and phase record.
If you are creating a job master record or a job without
phases, enter the ID of the job to copy.
If you are creating a phase record, you can copy
information from another phase of the job, the job
record, or a different job. Enter the job ID of the job
record or phase record you want to copy.
If you selected a job record with phases, enter the ID
of the phase you want to copy, or press Enter to copy
the job master record.
Description
Enter a brief description of the job and phase, or edit
the description you copied.
Do You Want to
Maintain
The information associated with each job and phase
falls into five categories: General Information, Cost
Code Detail, Job Comments, User-Defined Fields,
and Documents. For each category, select the box (or
enter Y in text mode) if you want to add or change that
type of information for the job or phase. Clear the box
(or enter N in text mode) if you do not.
When you add jobs or phases, you must select the box
(or enter Y in text mode) for General Information.
Job Cost User’s Manual
9-5
File Maintenance
Jobs and Phases
General Information
If you elected to add or change general job or phase information, this screen
appears:
9-6
Field
Description
Job ID/Phase ID
The job ID and phase ID you entered on the header
screen appear.
Desc 1
Press Enter to accept the description, or enter a
different description of the job or phase.
Desc 2
Press Enter to accept the second description, or enter a
different description of the job or phase. Use this field
to continue descriptions that do not fit in the Desc 1
field.
Job Cost User’s Manual
Jobs and Phases
File Maintenance
Field
Description
Manager ID
Press Enter to accept the current ID, or enter a
different ID for the manager associated with the job.
The manager ID is kept only as part of the job record,
not in its own file. If Payroll interfaces with Job Cost,
the Inquiry (F2) command is available as the manager
could be an employee.
Phases Used?
If the job uses at least one phase, select the check box
(or enter Y in text mode); if not, clear the check box (or
enter N in text mode). If you use phases, you still need
to enter general information about the overall job.
You cannot edit this field in an existing job because
while you can assign overhead information to a job
without phases or to a job’s phases, you cannot assign
overhead information to the job and then to its phases.
f you elect to use phases, the main job information
serves as a header whose information applies to all
phases. This information cannot include overhead. The
system calculates overhead either as a sum of the
phases’ overhead or the job’s overhead if it does not
have phases.
Job Template?
A job template serves as a general job with figures
already set. It is useful if you have several jobs that are
similar and you want to save time by entering most
figures only once.
If you want to mark the job as a template, select the
check box (or enter Y in text mode); if not, clear the
check box (or enter N in text mode).
You cannot edit this field in an existing job record,
because by marking it as a template, you prevent its
data from being figured into the totals. Otherwise, the
cost and billing report totals would be inflated because
of the extra jobs.
Job Cost User’s Manual
9-7
File Maintenance
Jobs and Phases
9-8
Field
Description
Addnl Desc?
If you want to use additional descriptions with the job,
select the check box (or enter Y in text mode); if not,
clear the check box (or enter N in text mode). If you
use additional descriptions, a screen appears with five
fields: two address lines and three lines of user-defined
labels. The labels are stored in the DFxxxx table.
Start Date
Enter the date you estimate the job will start in the
Org/Est field. Then enter the actual date the job started
in the Actual field.
Finish Date
Enter the date you estimate the job will complete in the
Org/Est field. Then enter the actual date the job was
completed in the Actual field. Actual dates are updated
when you post.
Last Bill Date
Enter the date you sent or are to send the last bill, or
press Enter to accept the current date. This date is
updated when you post transactions in Accounts
Receivable/Sales Order or when you post adjustments.
Contract Date
Enter the date you established or are to establish the
contract, or press Enter to accept the current date.
Contr Amt
Enter the original and actual amounts of the contract.
These amounts are updated when you enter
adjustments.
Contract Number
Enter the contract number.
Customer ID
Enter the customer ID. The Inquiry (F2) command is
available if Accounts Receivable or Sales Order
interfaces with Job Cost.
Overhead Cost Code
Press Enter to accept the current cost code, or enter the
overhead cost code to associate with the job or phase.
Job Cost User’s Manual
Jobs and Phases
File Maintenance
Field
Description
If you are setting up a new record and enter a code in
this field, a message states that the cost code is not on
file. Press Enter to create the new cost code record.
You can assign only one cost code to the overhead of a
job and phase, and the cost code must be of use type
overhead. See “Cost Codes” on page 4-5 for
information.
Ovhd Rate
Enter the rate of the job’s cost on which you want
overhead to be calculated, or press Enter to accept the
current amount.
Calc On
If you want to accept the current method of calculating
overhead, press Enter. If the overhead is calculated
from the dollar amount associated with the cost code,
enter A. If the overhead is calculated from the unit
amount (quantity or number of hours), enter U.
Ovhd Basis Type
Enter the cost type on which you want overhead to be
calculated.
When you post an amount to a cost code with this cost
type assigned to it, the overhead calculations are based
on the overhead rate entered above. This amount is
added to the Ovhd Accum to Post field and the
overhead cost code you specified.
Applied Ovhd GL
Acct/Work-inProcess Acct/
Finished Goods Acct
Job Cost User’s Manual
Enter the account to which you want to apply the
overhead costs, the work-in-process costs, and the
finished goods costs. The Inquiry (F2) and
Maintenance (F6 ) commands are available if Job Cost
interfaces with General ledger.
9-9
File Maintenance
Jobs and Phases
Field
Description
Ovhd Accum to Post
The overhead accumulated for the job and phase since
the last post appears. When you post overhead to
General Ledger, this amount is credited to the applied
overhead and debited to the work-in-process accounts.
Press Enter to accept the current amount, or enter an
amount. For the best audit trail, enter transactions
through the Job and Phase Adjustments function
and other applications and let the system calculate this
amount. This amount is cleared with every post but
keeps accumulating throughout the life of the job.
Fin Goods to Post
The total cost of the job or phase appears.
This value is updated automatically as different costs
are accrued. Press Enter to accept the value, or enter a
different value.
When the job is completed and you use the Post
Overhead to GL function, this amount is credited to
the work-in-process account and debited to the
finished goods account. Then the field is set to zero.
Pieces From
If you want Payroll to update pieces information about
the job, enter P. When you post a payroll time ticket
that includes a piece count and references the job or
phase, the Pieces fields in the job and phase record are
updated with information about the number of pieces
completed for the job.
If you want Accounts Payable (or Purchase Order) to
update pieces information about the job, enter A.
When you post an accounts payable transaction that
includes the job, phase ID, and the inventory item
specified below, the Pieces fields in the job and phase
record are updated with the quantity of items
purchased or requisitioned.
9-10
Job Cost User’s Manual
Jobs and Phases
File Maintenance
Field
Description
Note that Accounts Receivable (or Sales Order) is not
an option because these applications update billing
information. The Pieces fields pertain to goods and
services you acquire or are completed for the job.
Item
If you entered A as the source of the piece for the job,
enter the ID of the item you are attributing to the job.
When you attribute items to a job in the Accounts
Payable system, the PTD/YTD/JTD Pieces fields in
Job Cost are updated only for the item you enter on
this screen.
UOM
Enter the unit of measure of the pieces you are going
to get from the selected application, or press Enter to
accept the current unit of measure.
Pieces
Period to Date/
Year to Date/
Job to Date/
Estimate
Enter the number of pieces for this period and year and
for the entire job; or press Enter to accept the current
values. These values are updated when you post pieces
adjustments or post from Accounts Payable/Purchase
Order or Payroll.
Enter the estimated number of pieces for the entire job,
or press Enter to accept the current value.
Pct Complete
The percent complete for the phase appears.
Inv Billed Amt
Period to Date/
Year to Date/
Job to Date
Enter the amount you billed the customer this period
and year and for the entire job; or press Enter to accept
the current values. These values are updated when you
post billing adjustments or accounts receivable/sales
order invoices.
Job Cost User’s Manual
9-11
File Maintenance
Jobs and Phases
Note
The total cost of the job/phase for the period, year, and job to date and the
estimated amount are calculated from the totals of the cost codes in the
JOCDxxx file.
Field
Description
Total Cost
Period to Date/
Year to Date/
Job to Date
The total cost you billed the customer this period and
year for the entire job appear. These values are
updated when you post adjustments or expenses from
other transactions.
Cost Billed
Period to Date/
Year to Date/
Job to Date
Enter the cost you billed the customer this period and
year and for the entire job; or press Enter to accept
the current values. These values are updated when
you post billing adjustments or accounts receivable
invoices.
Unbilled Cost Job to
Date
The unbilled cost is the total cost minus the cost
billed for the job to date. The cost you did not bill the
customer for the entire job appears. These values are
updated when you post billing adjustments or
accounts receivable invoices.
Use the Proceed (OK) command to save your entries. After you save the entries,
the next screen you selected appears. If you did not select another screen, the
Jobs and Phases header screen appears.
9-12
Job Cost User’s Manual
Jobs and Phases
File Maintenance
Cost Code Details
If you elected to add or change cost code details for the job or phase, the Cost
Code Details screen appears:
Use cost codes to assign costs to a job and phase. Later, when you acquire goods
and services and enter them through the Job and Phase Adjustments function
or through other applications, the information updates the cost code and overall
job and phase record. You can assign up to 999 unique codes to a phase. For a
detailed explanation of cost codes and cost types, see “Cost Codes” on page 4-5.
Use the commands to work with the cost code line items:
•
Press Enter to edit information about the selected cost code. The Edit Cost
Code screen appears.
•
Press A to add a cost code to the end of the list. The Append Cost Code
screen appears.
Job Cost User’s Manual
9-13
File Maintenance
Jobs and Phases
•
Press V to view information about the selected cost code. When you finish,
press any key to return to the Cost Code Details screen.
•
Press D to return to the Jobs and Phases header screen.
•
Press G to return to the General Information screen. When you use this
command, any changes you made to this screen are automatically saved.
•
Press C to add, edit, or view comments associated with the job or phase. See
“Job Comments” on page 9-16 for more information.
Adding or Editing a Cost Code
When you press Enter or A on the Cost Code Details screen to edit or add a cost
code, a screen similar to this one appears.
The only difference between the Append Cost Codes screen and the Edit Cost
Codes screen is the title and the fact that the Edit Cost Codes window has data.
9-14
Field
Description
Cost Code
Enter a cost code. Establishing conventions for cost
codes makes cost allocation efficient. For example,
cost codes from 100 through 199 might be associated
with cost type 10, which might be Material $,
indicating that a cost code between 100 and 199 should
be assigned when attributing materials to a job.
Job Cost User’s Manual
Jobs and Phases
File Maintenance
Field
Description
Cost Type
Press Enter to accept the current cost type, or enter the
cost type to be assigned to the cost code. The cost
type’s use type appears after you enter the cost type.
Description
Press Enter to accept the current cost type description,
or enter a different one.
Short Description
Press Enter to accept the current short description of
the cost type, or enter a different one. It appears in the
Desc column on the Cost Code Details screen.
Cost
Period to Date/
Year to Date/
Job to Date/
Estimate
Enter the cost for this cost code this period, year and
job to date; these numbers are updated when you post
cost adjustments or post from Accounts Payable
(Purchase Order) or Payroll. Then enter the estimated
cost for the duration of the job.
Quantity
Period to Date/
Year to Date/
Job to Date/
Estimate
Enter the unit quantity assigned to the cost code this
period and year and for the job to date; these numbers
are updated when you post. Then enter the estimated
unit quantity for the cost code for the duration of the
job.
Unit of Measure
Enter the unit by which you measure the quantity.
Original Estimated
Cost
Press Enter to accept the current original estimate for
the cost code, or enter a different amount. It is updated
when you post cost adjustments or post from Accounts
Payable (Purchase Order) or Payroll.
Use the Proceed (OK) command to save your changes and return to the Cost
Code Details screen.
Job Cost User’s Manual
9-15
File Maintenance
Jobs and Phases
Job Comments
If you elected to add or change job comments, this screen appears.
1.
The job ID you entered on the Jobs and Phases header screen appears.
Change it to view or enter comments for another job or press Enter to accept
the current value.
2.
The ID of the terminal you are working at appears in the Ref ID field. To
work with comments for only the default reference ID, press Enter. To work
with comments for a different reference ID, enter that ID. To work with all
comments, clear this field and press Enter.
3.
Enter the date of the most recent comment you want to work with in the End
Date field, or press Enter to work with all comments.
The date, reference, and text that appear for each comment depend on the
reference ID and end date you enter. The comments are arranged by date—
the most recent date first—then by reference ID.
9-16
Job Cost User’s Manual
Jobs and Phases
File Maintenance
4.
Use the commands to work with the comments on the screen:
•
Press R to return to the Ref ID field to enter a new reference ID.
•
Press D to return to the End Date field and enter a new end date.
•
Press I to return to the Job ID field to enter a new job ID.
•
Press A to add a new comment. The Append Comment screen appears.
•
Press E to edit a selected comment. The Edit Comment screen appears.
•
Press F to enter or view comment for the first job ID on record.
•
Press N to enter or view comments for the next job ID on record.
•
Press P to enter or view comments for the previous job ID on record.
•
Press L to enter or view comments for the last job ID on record.
•
Press G to go to a comment for a specific date, then enter the date. This
command is available only when there is more than one screen of
comments.
Adding or Editing Comments
The Append Comment screen appears when you add a new comment. The Edit
Comments screen appears when you edit an existing comment. Other than the
title, these screens are identical.
Job Cost User’s Manual
9-17
File Maintenance
Jobs and Phases
1.
If you are working with a new comment, the system date appears; otherwise,
the date of the last comment you worked with appears. Accept the default
date, or enter a different date.
2.
The current terminal ID appears in the Reference field. Edit this reference,
if necessary.
3.
Enter or edit the comment, then press Enter to save the comment record.
User-Defined Fields
If you elected to add or change user-defined field information, the User-Defined
Fields screen appears.
Enter the appropriate information for each user-defined field you set up using the
Resource Manager User-Defined Fields Setup function. See the Resource
Manager guide for more information on setting up user-defined fields.
Use the Proceed (OK) command to save your changes.
9-18
Job Cost User’s Manual
Jobs and Phases
File Maintenance
Documents
If you elected to add or edit job and phase documents, the Documents screen
appears. Use the screen to attach documents to the job record.
Note: You must set up file types in Resource Manager before you can attach a
document to a master file record. Refer to the Resource Manager User’s Manual
for more information..
Use the commands to work with employee documents:
•
Press Enter to edit the selected document. The Edit Documents screen
appears.
•
Press A to attach a document to the employee record.
•
Press V to view file information about the attached document.
Job Cost User’s Manual
9-19
File Maintenance
Jobs and Phases
•
Press O to launch the appropriate application and open the document.
Note
If you have problems opening a document, press Enter to change the
direction of the slashes used in the attachment’s directory path. If the
directory path contains backward slashes (\), change them to forward slashes
(/) and vice versa.
•
Press P to save your changes and return to the previous screen.
•
Press N to return to the Jobs and Phases header screen.
•
Press G to go to a specific document line item. This command is available
only when there is more than one screen of documents.
Use the Exit (F7) command to save your changes and return to the File
Maintenance menu.
Append/Edit Documents Screen
The Append Documents screen appears when you press A to attach a document
to the employee record. The Edit Documents screen appears when you edit an
existing document line. Other than the name, these screens are identical.
Enter the document file name and extension, the full file path, and a description
of the file you want to attach to the master file record.
9-20
Job Cost User’s Manual
File Maintenance
Jobs and Phases
You can use the Documents directory (as specified in the Resource Manager
Directories function) to simplify entering document information. To use this
directory, make sure all users have access to the Documents directory, then store
document attachments in that directory. When you enter document information in
the Append Documents screen, enter (DOC) in the Path field (remember to
include the parenthesis).
When you use this convention with the Open command to open an attachment,
OSAS automatically replaces the (DOC) variable with the appropriate path and
opens the attachment from that directory.
If you do not store the file in the DocumentShare directory, do not use the
(DOC) variable. Instead, enter the full file path in the Path field. OSAS will not
be able to locate the file to open it if you enter an incorrect path.
Use the Proceed (OK) command to attach the file and return to the Documents
screen.
Job Cost User’s Manual
9-21
Copy Jobs and Phases
Use the Copy Jobs and Phases function to create a new job similar to an
existing job. When you copy the job and phase from a previously defined job, all
information is copied except the actual costs and dates.
Copy Jobs and Phases Screen
Select Copy Jobs and Phases from the File Maintenance menu. The Copy Jobs
and Phases screen appears.
1.
Enter a job ID for the new job. You cannot enter an ID that is already on file.
If you are not sure whether an ID is already in use, use the Inquiry (F2)
command to view a list of existing job IDs.
2.
Enter the ID of the job you want to copy.
Job Cost User’s Manual
9-23
Copy Jobs and Phases
9-24
File Maintenance
3.
If you want to copy the phases of the job, select the check box (or enter Y in
text mode); if not, clear the check box (or enter N in text mode).
4.
If you want to copy the cost codes of the job, select the check box (or enter
Y in text mode); if not, clear the check box (or enter N in text mode).
5.
Use the Proceed (OK) command to copy the existing job information to the
new job. After you have copied the information, copy another job or use the
Exit (F7) command to return to the File Maintenance menu.
Job Cost User’s Manual
Copy Job Template
Use the Copy Job Template function to copy information from a job template to
a job. This function and the Copy Jobs and Phases function are similar, but in
this function you can copy only the job IDs that were marked as templates in the
Jobs and Phases function.
Copy Job Template Screen
Select Copy Job Template from the File Maintenance menu. The Copy Job
Template screen appears.
1.
Enter a job ID for the new job. You cannot enter an ID that is already on file.
If you are not sure whether an ID is already in use, use the Inquiry (F2)
command to view a list of existing job IDs.
2.
Enter the ID of the job template you want to copy.
Job Cost User’s Manual
9-25
Copy Job Template
9-26
File Maintenance
3.
If you want to copy the phases of the job template, select the check box (or
enter Y in text mode); if not, clear the check box (or enter N in text mode).
4.
If you want to copy the cost codes of the job template, select the check box
(or enter Y in text mode); if not, clear the check box (or enter N in text
mode).
5.
Use the Proceed (OK) command to copy the existing job information to the
new job. After you have copied the information, copy another job template
or use the Exit (F7) command to return to the File Maintenance menu.
Job Cost User’s Manual
Cost Types
Use the Cost Types function to establish and update information for up to 99
cost types. These types serve as categories: when you attribute costs to a job
(with cost codes), you can enter the costs in terms of cost types to organize the
costs accordingly. Valid names of costs are kept in the JOCTxxx (Cost Types)
file.
Cost Types Screen
Select Cost Types from the File Maintenance menu. The Cost Types screen
appears.
1.
Enter the code for the cost type you want to add or edit.
2.
Press Enter to accept the description that appears or enter a new one.
Job Cost User’s Manual
9-27
File Maintenance
Cost Types
3.
Press Enter to accept the short description of the cost type or enter a
different description. When you work with cost codes in the Jobs and
Phases function, this description appears in the Desc field.
4.
The Job Cost system and the Payroll system use types to distinguish between
a labor cost, an overhead cost, and a general cost (neither labor nor
overhead). The overhead use type exists for the Overhead Cost Code field
on the Jobs and Phases General Information screen. This field accepts only
cost codes of a cost type whose use type is overhead. You should need to set
up only one of these cost types.
The labor use type exists for Payroll; when assigned to a cost type, it
prevents you from accidentally attributing labor information to a nonlabor
cost code when in Payroll. When you assign a service to a job in Payroll, you
must enter a cost code whose cost type’s use type is labor (and therefore was
set up to accept labor information). The Inquiry (F2) command provides
only those cost codes.
Payroll is the only application that needs this distinction. All cost codes are
available in Accounts Payable and Purchase Order.
The general use type exists for all other situations. Assign use type general
to cost types whose cost codes can accept any kind of cost information.
Press Enter to accept the current use type, or assign a use type to the cost
type.
5.
9-28
Use the Proceed (OK) command to save the cost type information. A blank
Cost Types screen appears. Enter or edit information about a different cost
type, or use the Exit (F7) command to return to the File Maintenance menu.
Job Cost User’s Manual
Cost Codes
Use the Cost Codes function to add, change, and maintain the cost codes stored
in the JOCCxxx (Cost Codes Master) file.
Cost Codes Screen
Select Cost Codes from the File Maintenance menu. The Cost Codes screen
appears.
1.
Enter the cost code ID you want to add or edit.
2.
Enter the cost type ID for the cost code.
3.
Enter or edit the description for the cost code.
4.
Enter or edit the short description to be used when printing reports.
Job Cost User’s Manual
9-29
File Maintenance
Cost Codes
9-30
5.
Enter the unit of measure to use for the cost code.
6.
Use the Proceed (OK ) command to save your changes. A blank Cost Codes
screen appears. Enter another cost code to add or edit or use the Exit (F7)
command to return to the File Maintenance menu.
Job Cost User’s Manual
Tables
Use the Tables function to set up and maintain the JOBGLxxx, JOPDxxx, and
DFxxxx tables.
Note
The OPTxxx (Options) table stores options and interfaces settings. Maintain
the data stored in this table through the Resource Manager Options and
Interfaces function, not through the table itself.
Tables Screen
Select Tables from the File Maintenance menu. A blank Tables screen appears.
Job Cost User’s Manual
9-31
File Maintenance
Tables
1.
To add or change a table, enter the table ID. To set up a company-specific
table, enter the table ID plus the one-character to three-character company
ID.
To delete the table, use the Delete (F3) command.
2.
If you entered a new table ID, the Copy From field appears. To copy a
company-specific table, enter the table ID plus the company ID.
A set of tables comes with the sample company, Builders’ Supply. You can
copy the sample tables for a company and then change the appropriate fields.
To copy a sample table, enter the table ID.
3.
Press Enter to accept the description of the table, or enter a different
description.
The number of columns, the length of columns, and the type of characters
you can enter—alphanumeric (A), numeric with two decimals (N), numeric
with three decimals (3), or numeric with four decimals (4)—appear.
9-32
Job Cost User’s Manual
Tables
File Maintenance
DFxxxx Table
The DFxxxx table stores two types of defaults: overhead defaults (overhead cost
code and basis type) and defaults for the additional descriptions window. Both
kinds of information pertain to the Jobs and Phases General Information screen.
When you enter the table ID, the rest of the DFxxxx table appears.
Field
Description
Field
The fields you can enter defaults for appear. Do not
change them.
Default Value
The default value for each field appears. Press Enter to
accept this value, or enter a different value.
Job Cost User’s Manual
9-33
File Maintenance
Tables
Note
Enter the appropriate cost code and basis in the overhead fields, but be wary.
The overhead masks on the General Information screen are hardcoded; for
cost codes, the mask is N3; for basis (cost) type, the mask is N2 despite the
fact that the mask for the fields on this screen is A12. The corresponding
fields on the General Information screen honor only the first three digits in
the first field and the first two digits in the second field, regardless of what
you enter here.
JOBGLxxx Table
The JOBGLxxx table stores the General Ledger work-in-process, applied
overhead, and finished goods inventory account numbers. It is used when you
post overhead to the GLJRxxx (Journal) file. If Job Cost does not interface with
General Ledger, you must still build this table because the account numbers
appear in the posting report.
9-34
Job Cost User’s Manual
Tables
File Maintenance
When you enter the table ID, the rest of the JOBGLxxx table appears.
Field
Description
Description
The accounts used in posting overhead appear. Change
the descriptions of the accounts, if necessary.
Do not delete lines or rearrange the account
descriptions. The system treats the account on the first
line as the work-in-process account and the account on
the second line as the finished goods account,
regardless of the description.
GL Acct #
Job Cost User’s Manual
For each account description, press Enter to accept the
General Ledger account number, or enter a different
account number.
9-35
File Maintenance
Tables
JOPDxxx Table
The JOPDxxx table stores the fiscal year. The year is incremented when you use
the Periodic Maintenance function at the end of the year.
When you enter the table ID, the rest of the JOPDxxx table appears.
The current fiscal year appears. Change the year, if necessary, or press Enter to
use the current year. Use the Proceed (OK) command to save your changes, then
enter a new table ID to view or edit or use the Exit (F7 ) command to return to the
File Maintenance menu.
9-36
Job Cost User’s Manual
Change Fields
Use the Change Fields function to change any code from one value to another.
The Change Fields function can change codes within this application, as well as
in other applications. To produce a list of fields changed, use the Print Log
option. A sample of the log appears on page 9-41.
When you select Change Fields from the File Maintenance menu, this screen
appears:
The screen contains three sections. The top Header section, which includes the
Field ID and Print Log? fields, is where you select the code or ID to change and
whether you want to produce the printed log. The lower left Values section is
where you build a list of the values you want to change by specifying the old
value and the new value. The lower right Files section contains a list of the files
that are changed in the applications you installed on your system.
Job Cost User’s Manual
9-37
File Maintenance
Change Fields
Header
1.
Enter the Field ID you want to change. You can change only Job Cost fields
from the Job Cost menu. To change IDs and codes from other applications,
run the Change Fields function in the respective application.
2.
Select the Print Log? check box to print a list of the files that are changed.
3.
After you enter the Field ID and indicate your preference for printing the log,
use the Proceed (OK) command to begin entering field values to change.
Values
4.
To edit or add original/new values in this section, select a line and press
Enter to edit the current line. The Edit Original/New Values dialog box
appears. Press A to append another value to the list. The Add Original/New
Values dialog box appears.
9-38
5.
Enter the current field value you want to change in the Original Value box.
6.
Enter the new value that you want to use for this field in the New Value box.
7.
Select a command.
•
Press S to switch to the File Description section to specify which files
change during processing.
•
Press Enter to edit the current line.
•
Press A to append another value to the list.
•
Press B to begin the change field process.
•
Press H to return to the header section to change the selection you made
for printing the log.
Job Cost User’s Manual
Change Fields
File Maintenance
8.
•
Press G to go to a particular entry. This option is only available when
there is more than one page of entries.
•
Press F to choose a new field ID (this abandons any field changes you
entered, but have not yet saved).
Continue entering old values and new values until you have specified all of
the values you want to change in the Values section.
Files
The files that contain the Field ID you selected appear in the File Description
section. You should change IDs in all of the files as a general rule. Exclude files
from the change process only when your reseller or support representative
instructs you to so.
9.
The Time field gives you an idea of the relative time it takes to change the
field in a given file. Files where this code or ID are a part of the key to the
file can be changed more quickly than files where each record in the file
must be scanned for the code or ID. Each file is rated as Short or Long to
denote the estimated time required to change the field.
10. The Tag field denotes whether the file is affected by the copy process. Tag
the file to change fields in the file.
11. Select a command.
•
Press S to switch to the Values section of the screen.
•
Press Enter to toggle a file as included or excluded from the copy
process.
•
Press A to tag all of the files.
•
Press N to untag all of the files.
•
Press B to begin the change field process.
Job Cost User’s Manual
9-39
File Maintenance
Change Fields
•
Press H to return to the header section to change the selection you made
for printing the log.
•
Press G to go to a particular entry. This option is only available when
there is more than one page of entries.
•
Press F to choose a new field ID (this abandons any field changes you
entered, but have not yet saved).
12. When you have tagged the files you want to change, press B to begin the
change process. When the changes are complete, the log prints if you elected
to produce it.
13. Enter a new Field ID to change, or use the Exit (F7) command to return to the
File Maintenance menu.
9-40
Job Cost User’s Manual
File Maintenance
Change Fields
Change Fields Log
Job Cost User’s Manual
9-41
Job Cost User’s Manual
Master File Lists
Printing a Master File List
Jobs and Phases List
Cost Types List
Cost Codes List
Cost Codes Detail List
Job Comments List
Job Templates List
Tables List
Job Cost User’s Manual
10
10-3
10-5
10-7
10-9
10-11
10-13
10-15
10-17
10-1
Printing a Master File List
The functions on the Master File Lists menu let you print lists of the information
you entered using the File Maintenance menu. These lists do not contain any
calculations or transaction amounts, but rather list only the basic file information
used in the Job Cost system. If any of the information on a master file list is
incorrect, use the appropriate function on the File Maintenance menu to correct
it, then reprint the master file list.
You produce all master file lists in the same way. Use the instructions below to
print a master file list, modifying the procedure as necessary for the list you are
printing. For example, if the screen for the list you want to print does not contain
check box options, ignore that step and continue to the next.
Follow these steps to print a master list:
1.
Select the list you want to print from the Master File Lists menu. The
selection screen for that list appears. The Jobs and Phases List screen is
shown below as an example.
Job Cost User’s Manual
10-3
Master File Lists
Printing a Master File List
2.
Select the range of information to include in the list in the From and Thru
fields. The Inquiry (F2) command is usually available for these fields to let
you select beginning and end range values from the list that appears.
Leave these fields blank to include all values in the list.
10-4
3.
If the screen contains entry fields (for example, for entering date ranges or
source codes), enter the appropriate values to use when printing the report.
4.
If the screen contains options that control what prints on the list (jobs only,
or jobs and phases, for example), select the option corresponding to the type
of information you want to print. You can select only one print option.
5.
If the screen contains options that control how information is organized (by
date or by reference ID, for example), select the option you want to use to
organize the report. You can select only one option.
6.
If the screen contains check boxes or Yes/No fields that control additional
printing instructions, select the check box (or enter Y in text mode) to use
that option when printing the list. Clear the check box (or enter N in text
mode) if you do not want to use that option.
7.
Select the output device to begin printing the list. See “Reports” on
page 1-33 for more information. After you produce the list, the Master File
Lists menu appears.
Job Cost User’s Manual
Jobs and Phases List
Use the Jobs and Phases List to produce the list whenever you make changes in
the Jobs and Phases function. You can print job information only for job and
phase information.
The Jobs and Phases List does not include jobs that are being used as templates.
Produce the Job Templates List for a list of those job records.
Sample List
Job Cost User’s Manual
10-5
Cost Types List
The Cost Types List shows the cost types used throughout the system. This
information comes from the JOCTxxx (Cost Types) file.
Sample List
Job Cost User’s Manual
10-7
Cost Codes List
The Cost Codes List shows each cost code and cost type. This information comes
from the JOBSxxx (Jobs) file and the JOCDxxx (Cost Codes Detail) file.
Sample List
Job Cost User’s Manual
10-9
Cost Codes Detail List
The Cost Codes Detail List shows each cost code and cost type for the selected
jobs and phases. This information comes from the JOBSxxx (Jobs) file and the
JOCDxxx (Cost Codes Detail) file.
Sample List
Job Cost User’s Manual
10-11
Job Comments List
Use the Job Comments List to produce the list when you want a copy of
comments associated with job and phase records.
Sample List
Job Cost User’s Manual
10-13
Job Templates List
The Job Templates List shows jobs that are marked as templates. This list is the
only one that includes information about these job records; the Jobs and Phases
List does not include job templates.
The information in this list comes from the JOBSxxx (Jobs) file.
Sample List
Job Cost User’s Manual
10-15
Tables List
Use the Tables List to get information from a particular Job Cost table. This
function is valuable if you plan to change a table and want a list against which to
compare your changes.
Sample List
Job Cost User’s Manual
10-17
References
Job Cost User’s Manual
System Messages
A
Messages on the screen or in a report indicate an error, tell you how to enter data,
or alert you to what is happening in the function you are using. Self-explanatory
messages are not listed.
An error occurred while converting files. Conversion aborted.
An error occurred while creating files. File creation aborted.
If an error occurs during data file creation or conversion, a message that
describes the problem appears. Then this message appears on the RM Data File
Conversion or Data File Creation screen to inform you that the process has been
aborted. Correct the problem and try again.
Basic Error = {error} Host Error = {error} Line = {line} Program = {program}
Basic Error = {error} Line = {line} Program = {program}
A serious error has occurred. Write down the information that appears and get
help from a support technician.
Cannot delete with items to post.
You cannot delete job or phase records with amounts in the Ovhd Accum to
Post or Fin Goods to Post fields. Enter an actual finish date in the job and phase
record, post the information, and try again.
Cannot open file, not found - GLMAxxx.
General Ledger is not installed, but the General Ledger interface is on. Turn off
the interface in the Resource Manager Options and Interfaces function.
Job Cost User’s Manual
A-1
System Messages
Cost detail history not implemented.
You cannot use the Delete Detail History function or print the Cost Detail
History Report if you are not keeping detail history.
Could not find any valid source files for this application.
The source directory you specified does not contain files for the application you
are converting. Make sure that you entered the correct source directory and
application ID.
{app ID} data files exist. Do you want this task to erase them?
To continue with the conversion and erase the existing files, select Yes (or enter
Y in text mode). To create only the new or missing files (if any), select No (or
enter N in text mode).
Destination file {drive:/path/file name} not found. No conversion.
This message appears in the Conversion Log if you specified a destination file
that is not in the target directory (see the Resource Manager User’s Manual).
Disk drive not ready.
The system cannot access one of the disk drives to find the file for which it is
looking. Usually the door of the diskette drive is open. Check the drive and press
Enter.
Drive not available.
The disk drive ID you entered is not available on your system. Press Enter and
enter a different ID. If this message appears when you enter the correct drive ID,
get help from a support technician.
{file name} does NOT exist. Cannot convert it.
One of the files listed in JODATA is not in your old data directory. See
Destination file drive:/path/file name not found. No conversion.
A-2
Job Cost User’s Manual
System Messages
File unavailable {file name}.
This message appears for one of three reasons:
1.
The function you are trying to access needs one or more files that are locked
by another user on your system. When a file is locked, other users cannot
access it during posts and other functions that need to keep the files active.
2.
The function you are trying to access needs one or more files that are not on
your system. Use the Resource Manager Options and Interfaces function to
check the interfaces. If the problem persists, get help from a support
technician.
3.
You are working with the wrong company. Return to the menu; then use the
Change Company (F3) command to enter the ID you want.
In any case, press Enter to get back to the menu, correct the problem, and select
the function again.
Invalid date in {drive:/directory/file name}.
You must convert the old data files before you switch to European-format dates.
Use the Company Information function on the Resource Manager Company
Setup menu to switch back to American-format dates, and reconvert the data.
Invalid date - mm/dd/yyyy.
Invalid date - dd/mm/yyyy.
The date you entered is invalid, or the format you used is incorrect (for example,
American format in a European-format system). This message is usually
accompanied by one of two explanatory messages:
Period out of range (1 to 12)
or
Day out of range (1 to {n})
If you entered an invalid date, press Enter and enter a valid one. You can enter
dates in either format: 010194 or 01011994.
Job Cost User’s Manual
A-3
System Messages
Invalid entry.
The information is not valid in the field where you entered it. Check the data and
enter it again. Consult the user’s guide, or use the Help (F1) command for
information.
Invalid period conversion table.
The CNVTxxx table for the company is invalid. A common reason is that you did
not update the table with the corresponding data for the next period. Use the
Tables function to make adjustments.
When the problem is corrected, restore the backup and post again.
Mask format error use {mask}.
The data you entered does not fit the predefined format for the field. Enter the
data again, using the format indicated.
Missing table ’JOBGL’.
The JOBGLxxx table is missing or corrupted. Use the Tables function to make
sure that the JOBGLxxx table is posted.
Must create job record first.
Each phase must be assigned to a job. See chapter 3, section 2 for more
information.
Must delete phases first.
If you are deleting a job with phases, you must delete the phase records before
you can delete the job record.
No phases for this job.
You cannot add phase records for a job if you elected not to use phases in the
Jobs and Phases function. Return to the function and enter YES in the Phases
Used field for the job, or use a different job ID.
A-4
Job Cost User’s Manual
System Messages
Press {Fn} to delete.
If you do not want to delete the record, press any key other than the key assigned
to the Delete (F3) command to keep the record intact. If you want to delete the
record, use the Delete ( F3) command.
Printer busy.
The printer you are trying to use is being used by another program. Press Enter to
continue with your entry, and try again later.
Record is in use.
Someone else is using the record that you are trying to access. Press Enter to try
again.
Record not in file.
The ID you entered has no record on file. Press Enter and enter a different value
in the field.
Unable to execute program {program}.
The system cannot run the program you selected from the menu. Make sure that
the program specified in the message is in the application’s program directory,
and select the function again.
Unable to load menu record {menu} from file {file}.
The menu record for the application is not in the menu file, or the menu file is
missing. Make sure that the application is properly installed and try again.
Unable to lock; file in use.
One of the files in the function you want to use is locked because another
workstation on the system is using it. Try the function again when no one else is
using the file.
Job Cost User’s Manual
A-5
System Messages
Unable to open file.
Unable to open; file in use.
The file you are trying to use is locked at another terminal on the system, or the
file is corrupted. Wait a few minutes and try again. If the condition persists, get
help from a support technician.
Unable to print to device.
The system cannot access the device you are trying to print to. Make sure that the
device is online.
A-6
Job Cost User’s Manual
Job Cost User’s Manual
Glossary
G
account
A storage unit of financial data in accounting, usually grouping related
information under one account number or account ID.
accounting
period
A period of time in accounting, used to provide distinct units of time you can
work with. For example, you might want a report to include transactions
done within a particular accounting period.
application
A software package made up of several related programs (functions) and
files. Usually an application is named after a common accounting practice—
for example, Accounts Receivable, Inventory, or Payroll.
applied GL
A general ledger account assigned to a job and phase that is credited for the
overhead accumulated on jobs in process. This entry is balanced by a debit to
the work-in-process account specified in the JOBGLxxx table.
audit trail
A detailed record of accounting activity used to find the source of every
dollar in the accounts.
back up
To make a copy of data for archival purposes. For example, you would want
to back up a history file before you purged history so that you could retrieve
the data if you had to.
company
In OSAS, a business record associated with its own files, tables, and menu of
applications.
conversion
The process of updating existing files, programs, or applications to the
current version. See also installation.
cost codes
Categories of costs assigned to each phase of each job for the purpose of
tracking costs for the job or phase. Each cost code must be unique within the
phase, and each must be assigned a cost type. See also cost types.
Job Cost User’s Manual
G-1
Glossary
cost types
Categories of cost codes used throughout the system. Each cost code must be
assigned a cost type, usually of a more general name than the cost code. For
example, if the cost code were installation, the type might be labor. See also
cost codes and use types.
field
A region on the screen that accepts input from the user; also, one element of
a record in a file. On the screen, most fields are labeled.
file
A collection of records stored under a particular name. Function screens
often represent files, but you do not directly see a file. See also table.
finished
goods
Goods that have been manufactured and are ready for sale. The result of
buying raw materials and assembling the products and services.
function
A menu item that leads to a full screen. Most functions have a corresponding
program. See also program.
general
ledger
A record of accounts in terms of a chart of accounts and accounting periods.
The General Ledger application tracks the effects on accounts from
transactions entered in General Ledger and interfaced applications, and it is
updated by other applications interfaced with it.
installation
The process of adding an application to an existing system. See also
conversion.
interface
To join with another application for the purpose of having information
entered in one application update information in another application’s files.
job
A defined task that combines goods and services done for pay. A job usually
consists of phases. Jobs are entered in the Jobs and Phases function.
journal
A chronological record of transactions.
journal
entries
Transactions recorded in a journal.
menu
A list of applications, functions, options, or other menus.
G-2
Job Cost User’s Manual
Glossary
overhead
A cost that applies to the overall phase or job, or a cost that cannot be
directly attributed to a good or service. For example, administrative
expenses, taxes, and depreciation are usually overhead.
overhead
basis
A cost type assigned to overhead—for example, material costs, equipment
costs, and so forth.
phase
A smaller task within a job. For example, if the job is building a house, a
phase might be basement.
post
To transfer information from one place to another, usually at the end of the
day or at a distinct break in business.
program
A self-contained list of executable code, written and implemented to do a
task. Most programs are represented by a function on a menu. See also
function.
purge
To remove from the system. See also restore.
record
A unit of information that has other pieces of information assigned to it.
Each record is assigned an ID so that the file can sort information in terms of
record IDs.
restore
To bring information back to its original place and condition. See also
purge .
table
A grid that holds records and is visible. See also file.
use types
A category of cost types. Each cost type needs to be assigned use type
general, labor, or overhead. Assign the overhead use type to the cost type
you intend to use for cost codes in the Ovhd Cost Code field. Assign the
labor use type to cost types that track labor information. Assign the general
use type to any other kind of cost type. See also cost types.
work in
process
Work that has been started but not completed—in other words, phases that
have an actual start date but no actual finish date.
Job Cost User’s Manual
G-3
IX
Job Cost User’s Manual
Index
A
access codes
changing, 1-16
command, 1-16
company-specific information, 3-16
entering, 1-16
setting up, 3-7, 3-16
Accounts Payable
entering costs, 3-15
interface with Job Cost, 3-8, 5-3, 9-3
updating job information, 1-9
Accounts Receivable
interface with Job Cost, 3-9, 9-3
updating job information, 1-9
actual amounts
adjusting, 5-8
actual costs, 6-5, 7-5
inquiry, 4-3
actual dates
adjusting, 5-8
actual pieces
adjusting, 5-8
actual units
usage, 6-9
adding
comments, 9-17
document, 9-19
user-defined fields, 9-18
additional descriptions
inquiry, 4-3
viewing, 4-4
Address Lookup, 1-26, 1-32
address mapping, 1-26, 1-32
addresses, 1-26, 1-32
adjusting actual amounts, 5-8
adjusting actual dates, 5-8
Job Cost User’s Manual
adjusting actual pieces, 5-8
adjusting billing information, 5-8
adjusting cost billed, 5-8
adjusting cost codes, 5-7
adjusting cost types, 5-6
adjusting estimated costs, 5-8
adjusting estimated dates, 5-8
adjusting estimated pieces, 5-8
adjusting finish dates, 5-8
adjusting invoice billed, 5-8
adjusting jobs, 5-6
adjusting phases, 5-7
adjusting pieces, 5-8
adjusting start dates, 5-8
adjustments, 5-3
alphabetical sorting, 3-4
appending cost codes, 9-13
attaching
documents, 9-19
B
backing up
before posting, 8-9
using Resource Manager, 3-17
backup schedule
backing up data files, 3-17
backing up programs, 3-17
setting up, 3-7, 3-17
bids
preparing, 6-5, 6-9, 7-5, 7-7, 8-17
Billing Detail Report
function, 1-7, 5-9, 7-9
sample, 7-9
billing information, 3-14
adjusting, 5-8
IX-1
Index
inquiry, 4-3
setting up, 9-3
Billing Reports menu, 1-7
Billing Summary Report
function, 1-7, 7-7
sample, 7-7
billings, 5-3
Browse, 1-26
budgets
planning, 6-5, 6-9, 7-9
C
Change Fields
sample log, 9-41
screen, 9-37
changing job information, 5-3, 9-3
checklist
setting up, 3-7
codes
access codes, changing, 1-16
setting up, 3-3
sorting, 3-3
commands
access code, 1-16
flags, 1-31
hot keys, 1-31
Proceed (OK), 1-4
comments
viewing, 4-4
company
assigning access codes, 3-16
company-specific tables, 9-32
contract amounts
setting up, 9-3
contract dates
setting up, 9-3
contract information, 3-13
conversion
before converting, 2-5
setup considerations, 2-5
converting to OSAS version 7.0, 2-6
Copy Job Template
function, 1-12, 9-25
Copy Jobs and Phases
function, 9-23
IX-2
copying jobs, 9-23
copying phases, 9-24, 9-26
copying templates, 9-25
cost
Detail History Inquiry, 4-7
cost billed
adjusting, 5-8
Cost Code Details
screen, 4-5
Cost Codes
function, 9-29
screen, 9-29
cost codes, 4-5, 6-5
adjusting, 5-7
appending, 9-13
copying, 9-24, 9-26
editing, 9-13
setting up, 3-11, 3-14, 9-3
viewing, 4-8, 9-14
viewing information about, 4-4
Cost Codes Detail List
function, 10-11
sample, 10-11
Cost Codes List
function, 10-9
sample, 10-9
Cost Detail History Report
function, 1-7, 5-9, 6-7
sample, 6-7
Cost Reports menu, 1-6
Cost Summary Report
function, 1-7, 6-5
Cost Types
editing, 3-12
function, 1-6, 3-11, 9-27
screen, 9-27
cost types
adjustments, 5-6
setting up, 3-11, 3-14, 9-3
viewing, 4-8
Cost Types List
function, 10-7
costs
entering, 5-3
costs billed
setting up, 9-3
Job Cost User’s Manual
Index
D
F
Daily Work menu, 1-6
data dictionaries, 2-3
Data File Conversion
function, 2-5, 2-6
Data File Creation
function, 2-3
data files
backup schedule, 3-17
date fields, 1-25
Delete Completed Jobs
function, 1-8, 6-7, 8-19
Delete Detail History
function, 1-8, 6-7, 8-21
deleting jobs, 8-20
deleting jobs and phases, 6-7
deleting tables, 9-32
Depreciation Tables List
list, 9-41
Detail History Inquiry
function, 4-7
DFxxx table, 3-11
DFxxxx table, 9-31, 9-33
documents, 9-19
F2 Inquiry
button, 1-26
flag, 1-31
F6 Maintenance
flag, 1-31
icon, 1-26
File Maintenance menu, 1-6
files
backing up, 3-17
Job Cost, 1-9
finish dates
adjusting, 5-8
inquiry, 4-3
setting up, 9-3
finished goods
posting, 5-3
finished goods account, 8-8, 9-4
setting up, 9-3
fiscal year
table, 9-36
viewing, 4-8
flags, in text mode, 1-31
G
E
edit job totals
option, 3-10
editing cost codes, 9-13
entering costs
Accounts Payable, 3-15
Payroll, 3-15
Purchase Order, 3-15
estimated costs, 6-5, 7-5
adjusting, 5-8
inquiry, 4-3
setting up, 9-3
estimated date
adjusting, 5-8
estimated pieces
adjusting, 5-8
estimated units, 6-9
estimates
preparing, 6-5, 6-9
General Ledger
interface with Job Cost, 1-12, 3-7, 8-7, 9-4
general ledger accounts, 8-3, 8-7
GLJRxxx file, 3-7, 8-7, 9-34
graphical mode
drop-down menus, 1-23
function screens, 1-22
graphical main menu, 1-20
Inquiry button, 1-26
Maintenance icon, 1-26
MDI menu, 1-21
shortcut menu, 1-23
toolbars, 1-25
H
hot keys, 1-31
I
IDs
Job Cost User’s Manual
IX-3
Index
setting up, 3-3
sorting, 3-3
Information Inquiry menu, 1-6
inquiry
actual costs, 4-3
additional descriptions, 4-3
billing information, 4-3
estimated costs, 4-3
finish dates, 4-3
locations, 4-3
start dates, 4-3
Inquiry (F2)
button, 1-26
flag, 1-31
Install Applications
function, 2-3, 2-5
installing Job Cost, 2-3
interfaces
Job Cost with Accounts Payable, 3-8, 5-3, 9-3
Job Cost with Accounts Receivable, 3-9, 9-3
Job Cost with General Ledger, 3-7, 8-7, 9-4
Job Cost with Payroll, 5-3, 9-3
Job Cost with Purchase Order, 3-8, 5-3, 9-3
Job Cost with Sales Order, 3-9, 9-3
Payroll with Job Cost, 3-8
with General Ledger, 1-12
interfaces with Job Cost, 1-5
inventory IDs, 9-4
invoice billed
adjusting, 5-8
setting up, 9-3
invoices, 5-3
J
job address
setting up, 9-3
Job and Phase Adjustments
function, 1-6, 1-9, 1-10, 3-14, 5-3
transaction type menu screen, 5-4
Job and Phases Adjustments
function, 9-3
Job Comments
setting up, 3-15
Job Comments List
function, 10-13
IX-4
sample, 10-13
Job Cost
before converting, 2-5
before you install, 2-3
converting to version 7.0, 2-6
installation, 2-3
installing new version before converting, 2-5
interface with General Ledger, 1-12
interfaces, 1-5
menu structure, 1-6
setting up, 3-3
setting up options and interfaces, 3-7–??
setup considerations, 2-5
system requirements, 2-3
job cost detail history
option, 3-10
Job Cost files, 1-9
job IDs
setting up, 9-3
job information
changing, 5-3
Job Profitability Report
function, 1-7, 7-5
Job Template Worksheet
function, 1-8, 8-17
sample, 8-18
Job Templates List
function, 10-15
JOBGLxxx table, 3-7, 3-11, 9-31, 9-34
screen, 9-35
jobs
adjusting, 5-6
copying, 9-23
setting up, 1-12
viewing, 4-7
Jobs and Phases
append cost codes window, 9-14
documents screen, 9-19
function, 1-6, 1-9, 3-14, 5-3, 9-3–??
job comments screen, 9-16
user-defined fields screen, 9-18
Jobs and Phases Inquiry
function, 4-3
Jobs and Phases List
function, 10-5
sample, 10-5
Job Cost User’s Manual
Index
JOBSxxx file, 1-8, 1-10, 1-12, 3-7, 3-10, 3-15, 5-3, 5-4, 5-9,
7-5, 7-7, 7-9, 8-13, 8-19, 9-3, 10-9, 10-11, 10-15
description, 1-9
setting up, 3-12
JOCCxxx file, 9-29
description, 1-11
setting up, 3-7
JOCDxxx file, 1-8, 1-9, 1-10, 1-12, 9-3, 9-12, 10-9, 10-11
description, 1-11
JOCTxxx file, 9-27, 10-7
description, 1-11
setting up, 3-7
JODExxx file
description, 1-11
JOHIxxx file, 1-6, 1-10, 3-8, 3-10, 4-7, 5-3, 5-4, 5-9, 6-7,
7-9, 8-9, 8-13, 8-21
description, 1-10
JOJCxxx file, 1-8, 8-15
description, 1-11
JOPDxxx table, 3-11, 9-31, 9-36
L
launching
OSAS in other operating systems, 1-15
OSAS in Windows, 1-15
Lists
printing, 6-3, 7-3, 10-3
Locations
function, 9-37
locations
inquiry, 4-3
Master File Lists menu, 1-8
Master Lists
printing, 6-3, 7-3, 10-3
menu structure
in Job Cost, 1-6
menus
Billing Reports, 1-7
Cost Reports, 1-6
Daily Work, 1-6
drop-down menus, 1-23
File Maintenance, 1-6
graphical main menu, 1-20
Information Inquiry, 1-6
Master File Lists, 1-8
MDI, 1-21
Periodic Processing, 1-7
shortcut, 1-23
text main menu, 1-27
messages
in text mode, 1-32
modes
graphical, 1-19
text, 1-27
N
navigating
graphical function screens, 1-22
graphical main menu, 1-20
MDI menu, 1-21
text function screens, 1-29
text main menu, 1-28
to directories and files, 1-26
M
main menu
graphical, 1-20
MDI, 1-21
navigating graphical, 1-20
navigating MDI, 1-21
navigating text, 1-28
text, 1-27
toolbars, 1-25
Maintenance (F6)
flag, 1-31
icon, 1-26
mapping, 1-26, 1-32
Job Cost User’s Manual
O
options
edit job totals, 3-10
job cost detail history, 3-10
post detail to master, 3-10
Options and Interfaces
setting up, 3-7
options and interfaces
setting up, 3-7
OPTxxx table, 9-31
OSAS
MDI menu, 1-21
IX-5
Index
modes, 1-19
graphical, 1-19
text, 1-27
setup considerations, 2-5
starting in other operating systems, 1-15
starting in Windows, 1-15
overhead, 5-3, 8-3, 8-7
posting, 5-3
overhead account, 9-4
setting up, 9-3
Overhead Allocation Report
function, 1-7, 8-3
overhead information, 3-13
setting up, 9-3
overhead use type, 9-28
overview
Job Cost system, 1-5
P
Payroll
entering costs, 3-15
interface with Job Cost, 3-8, 5-3, 9-3
updating Job Information, 1-9
percentage complete
setting up, 9-3
Periodic Maintenance
function, 1-8, 8-13
Periodic Processing
when to use, 1-7
Periodic Processing menu, 1-7
periods
viewing, 4-8
phase IDs
setting up, 9-3
phases
adjusting, 5-7
Detail History Inquiry, 4-7
setting up, 3-12
viewing, 4-8
pieces
adjusting, 5-8
pieces information, 3-14, 9-10
planning budgets, 6-9, 7-9
Post Adjustments and Transactions
function, 1-6, 3-13, 5-4, 5-9
IX-6
sample log, 5-10
post detail to master
option, 3-10
Post Overhead to GL
function, 1-8, 8-7
sample log, 8-10
posting, 8-7
backing up, 8-9
finished goods, 5-3
from Accounts Payable, 9-15
from Payroll, 9-15
overhead, 5-3
posting pieces
setting up, 9-3
preparing bids, 6-5, 6-9, 7-5, 7-7, 8-17
preparing estimates, 6-5, 6-9
prices
Detail History Inquiry, 4-7
Proceed (OK) command, 1-4
programs
backing up, 3-17
Purchase Order
entering costs, 3-15
interface with Job Cost, 3-8, 5-3, 9-3
updating job information, 1-9
Purge Job Comments
function, 1-8, 8-15
R
Resource Manager
Data File Conversion function, 2-5, 2-6
Data File Creation function, 2-3
Install Applications function, 2-3, 2-5
revenues, 7-5
right-click menu See shortcut menu, 1-23
S
Sales Order
interface with Job Cost, 3-9, 9-3
updating job information, 1-9
screens
graphical function, 1-22
graphical main menu, 1-20
navigating graphical, 1-22
navigating text function, 1-29
Job Cost User’s Manual
Index
OSAS MDI menu, 1-21
text function, 1-29
text main menu, 1-27
Select, 2-6
setting up
access codes, 3-7
backup schedule, 3-7, 3-17
billing information, 9-3
checklist, 3-7
contract amounts, 9-3
contract dates, 9-3
cost codes, 3-11, 3-14, 9-3
cost types, 3-11, 3-14, 9-3
costs billed, 9-3
estimated costs, 9-3
finish dates, 9-3
finished goods account, 9-3
invoice billed, 9-3
job addresses, 9-3
Job Comments, 3-15
job IDs, 9-3
jobs, 1-12
JOBSxxx file, 3-7, 3-12
JOCCxxx file, 3-7
JOCTxxx file, 3-7
Options and Interfaces, 3-7
overhead account, 9-3
overhead information, 9-3
percentage complete, 9-3
phase IDs, 9-3
phases, 3-12
posting pieces, 9-3
start dates, 9-3
Tables, 3-7
templates, 1-12, 3-13, 9-3
use types, 9-28
user-defined fields, 9-3
work-in-process account, 9-3
setting up Accounts Payable
assigning codes and IDs, 3-3–??
setting up Job Cost, 3-3
access codes, 3-16
information to gather, 3-3
options and interfaces, 3-7
shortcut menu, 1-23
sorting
Job Cost User’s Manual
codes and IDs, 3-3
start dates
adjusting, 5-8
inquiry, 4-3
setting up, 9-3
starting
OSAS
in other operating systems, 1-15
in Windows, 1-15
T
Tables
company-specific, 9-32
deleting, 9-32
DFxxxx, 9-31, 9-33
function, 3-11, 9-31
JOBGLxxx, 9-31, 9-34
JOPDxxx, 9-31, 9-36
OPTxxx, 9-31
setting up, 3-7
Tables List
function, 10-17
sample, 10-17
templates, 8-17
copying, 9-25
setting up, 1-12, 3-13, 9-3, 9-7
text mode
command line, 1-32
commands, 1-31
flags, 1-31
function screens, 1-29
main menu, 1-27
messages, 1-32
toolbars, 1-25
function screens, 1-25
main menu, 1-25
transactions
detail, 6-7
U
Unit Cost Analysis Report
function, 1-7, 6-9
sample, 6-10
units
estimated, 6-9
IX-7
Index
usage, 6-9
usage
actual units, 6-9
use types
general, 9-28
labor, 9-28
overhead, 9-28
user-defined fields, 9-18
setting up, 9-3
V
variances, 7-5
viewing
cost codes, 9-14
W
work-in-process account, 8-8, 9-4
setting up, 9-3
Work-in-Process Report
function, 1-8, 8-11
workstation date, 1-17
IX-8
Job Cost User’s Manual