1
Wyld Stallyns Inc.
User Manual
User Manual
What can I do with Site Management System™?
Thank you for purchasing the Wyld Stallyns Inc. Site Management System™
Physical space management has never been easier! Your Site Management System™ is an
autonomous and fully-automated system designed to facilitate those hard-to-manage situations
where multiple people share a limited amount of space. With the Site Management System™,
reserving space and enforcing those sticky reservation policies is as easy as 1 2 3.
The Site Management System™ can be used to manage reservations for any type of physical
space, laboratory, room, or office. The duration of reservations and number of reservations per
day is fully configurable, and future versions of the system will support complete customization
of all reservation policies.
The Site Management System™ provides a user-friendly web-based interface that allows users
to make and cancel reservations quickly and hassle free.
The Site Management System™ uses easy-to-remember five digit confirmation codes. These
codes are issued to users when a reservation is made and must be entered via on-site keypads to
gain access of the reserved physical space.
For those always-busy users, Site Management System™ provides a friendly reminder of
remaining time and a pleasant buzz indicating when there are only five minutes until the
reservation expires.
For those users always on the go, Site Management System™ has full email and text messaging
capabilities to provide up-to-date schedule changes and friendly reservation reminders.
Finally, for those hard-to-avoid and extremely annoying situations where reserved spaces are
prematurely abandoned and electrical devices are left on, Site Management System™ will
relinquish the space and cut all power to the room making it available for reservation again.
2
User Manual
What can I do with Site Management System™?
This guide will help you understand all features and operating procedures of the Site
Management System™. Please read carefully before using your new reservation system.
3
User Manual
Product Safety
WARNING
Any attempt to open the packaging of the Site Management SystemTM may
result in danger of electric shock.
Please keep Site Management SystemTM package away for any source
of water to avoid electric shock.
Electronic components MUST be properly disposed.
4
User Manual
Table of Contents
1.0 - Product Illustrations …………………………………………………… 6
1.1 - Master Device
……………………………………………. 6
1.2 - Slave (Site) Device ……………………………………………. 6
2.0
- Product Setup Instructions
………………….………………….. 7
2.1 - Mounting the Site Management SystemTM …………………….. 7
2.2 - Installing the Device Network …………………………………. 9
2.3 - Configuring the Site Management SystemTM ………………… 9
3.0 - Product Use Instructions ……………………….…………………… 10
3.1 - Making Reservations
………….………..………………… 10
3.1 - Location Not Available
………….…………………… 11
3.2 - Reservation Confirmation ………….…………………… 11
3.2 - Canceling Reservations
……………….…………………….. 12
3.3 - Configuring Reservations Settings ……………………………… 13
3.4 - When You Get to the Site ……………………………………... 14
4.0 - Product Troubleshooting ……………………………………….……. 15
4.1 - Master Device
……………………………………………. 15
4.2 - Slave (Site) Device ……………………………………………. 16
5.0 - Product Warranty
…………………………………………………… 17
5
User Manual
1.0 - Product Illustrations
1.1 - Master Device
Figure 1: Main device illustration
1.2 - Slave (Site) Device
Figure 2: Site device illustration
6
User Manual
2.0 - Product Setup Instructions
Setting up and installing the Site Management System™ is quite easy. There are three major
steps to installing and running your own Site Management System™.
1. The product must first be mounted in the appropriate location(s).
2. The wires connecting the sites with the main controller must then be dropped and routed.
3. Finally, some small software installation tasks must be executed.
2.1 - Mounting the Site Management System™
First unpack all components of your Site Management System™ and verify all the required
components are present.
At least one main controller box, the smaller gray metal box, must be present. The box itself
should have two wires coming out of it, one for power and one for connecting the unit to all of
the sites on the device network.
Each system must also have at least one site box present as well. The site box is black with two
cables coming out of it, one for power and one for connecting to the device network. Up to 31
sites can be placed on the network.
Next the location of the main controller site must be chosen. It should be located near the sites
but it is advised not to be accessible to users. Simply use the wall mounting brackets enclosed to
secure the box to the wall.
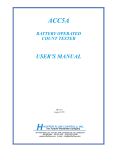
Next the location of each site controller box must be determined in each site. The room shape
determines where the unit should be placed. Waste to shoulder level is desirable for the site
controller while being in view of most of the site. Figures 3a and 3b show suggested mounting
locations for different shaped sites.
7
User Manual
2.0 - Product Setup Instructions
Figure 3a: Suggested mounting for
L-shaped site
Figure 3b: Suggested mounting
for rectangular-shaped site.
8
User Manual
2.0 - Product Setup Instructions
2.2 - Installing the Device Network
The bus included with the main controller box should be laid throughout the physical spaces
being managed.
The bus allows the main controller box to communicate with each site
controller box. If the bus cable included does not reach every site needed extensions up to 4000
feet can be purchased.
Simply place the bus within reaching distance of each site controller box. This task may be a
little daunting and technicians from Wyld Stallyns Incorporated are available for on site work
with a fee.
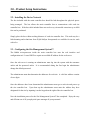
2.3 - Configuring the Site Management System™
The Rabbit microprocessor inside the main controller box runs the web interface and
configuration tool. It uses DHCP to acquire an available IP address for the web server.
Once the web server is running an administrator must log into the system with the username
admin and the password admin. It is recommended during the first login the administrator
change the default password.
The administrator must then determine the addresses for each site. A valid site address consists
of two digits.
Once the addresses have been determined the administrator must go to each site and power up
the site controller box. Upon boot up the administrator must enter the address they have
designated for the site by inputting it on the keypad on the right of the site controller box.
Now the installation process for the Site Management System™ has completed. Enjoy the easy
and efficient use of all your physical space amongst all your personnel.
9
User Manual
3.0 - Product Use Instructions
Find out form your system administrator the web address to access the Site
Management SystemTM.
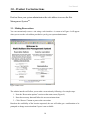
3.1 - Making Reservations
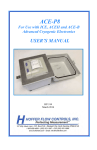
You can conveniently reserve a site using a web interface. A screen as in Figure 4 will appear
when you access the web address provided to you by your system administrator.
Figure 4: Main screen
The website interface will allow you to make a reservation by following a few simple steps:
1. Note the “Reservation options” section on the main screen (Figure 4).
2. Enter the necessary data and follow the on-screen instructions.
3. Click “Reserve” button to process the reservation.
Based on the availability of the location requested, the user will either get a confirmation or be
prompted to change reservation data if space is not available.
10
User Manual
3.0 - Product Use Instructions
3.1.1 - Location Not Available
A message will indicate that the chosen location is already reserved (Figure 5). The user will be
asked to change the settings and try again.
Figure 5: Location not available screen
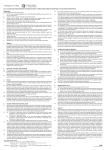
3.1.2 - Reservation Confirmation
You will see a confirmation screen as in Figure 6. The screen will display the reservation
information as well as provide you with a 5-digit confirmation code.
Please write down the confirmation code in order to use it to access the location.
Figure 6: Reservation confirmation screen
11
User Manual
3.0 - Product Use Instructions
3.2 - Canceling Reservations
You are able to conveniently cancel a reservation by following a few simple steps:
1. Note the “Cancel a reservation” section on the main screen (Figure 4).
2. Provide the confirmation code of your reservation (the code given at time of making
initial reservation).
3. Click the “Cancel” button to process the cancellation.
4. Cancellation confirmation screen will be shown (Figure 7).
5. If confirmation code is not found, the screen in Figure 8 will be displayed. Please go back
and enter the correct confirmation code.
Figure 7: Cancellation confirmation screen
Figure 8: No reservation found screen
12
User Manual
3.0 - Product Use Instructions
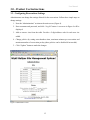
3.3 - Configuring Reservations Settings
Administrators can change the settings allowed for the reservations. Follow these simple steps to
change settings:
1. Note the “Administration” section on the main screen (Figure 4).
2. Enter username and password, and click “Log In” button. A screen as in Figure 9 will be
displayed.
3. Add or remove sites from the table. Provide a 2-digit address code for each new site
added.
4. Change policies by setting auto-shutdown time, maximum minutes per reservation and
maximum number of reservation per day (these policies can be disabled if not needed).
5. Click “Update” button to make the changes.
Figure 9: Administrator screen
13
User Manual
3.0 - Product Use Instructions
3.4 - When You Get to the Site
To access the site you reserved follow these simple steps:
1. Locate the Site Management SystemTM.
2. Use the keypad to enter your confirmation code.
3. Power at the site is activated upon receipt of correct confirmation code.
4. Adjust the pivoted motion sensor to make it point in the direction you are working at.
Once activated, the timer display will start a countdown to indicate the time left for your
reservation.
When there are five minutes left of reservation time, a buzzer will sound alerting you that your
reservation is approaching the end. Once buzzer sounds, please start preparing to leave the site to
allow for the next user to utilize their reservation.
CAUTION
Find out from your system administrator how long the site can be still before it is automatically
shut down. If the site shuts down, work may be lost.
14
User Manual
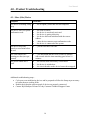
4.0 - Product Troubleshooting
The following symptoms are listed with recommended solutions:
4.1 - Master Device
Symptom
Check that…
Problems accessing the
system through the web
•
•
•
•
•
•
…web browser URL is correct.
…web browser can access other Internet sites.
…other users cannot access the system.
…master device is getting electricity.
…master device has Internet-access.
…master device is being leased an IP address via
DHCP.
No one can set up
reservations
•
•
•
…users have filled in all the required fields.
…the Administrator has set up locations.
…users haven’t reserved all the attempted times.
Cannot cancel a reservation
•
…you have the correct confirmation code for your
reservation.
Administrators cannot log in
•
•
…you are using the most current password.
…try the default password.
Administrator cannot add a
site
•
…the maximum number of sites (31) has not been
reached.
…a valid location and address are being assigned.
•
Administrator cannot
remove a site, add a site, or
update policies
•
…an updated copy of the web page is being viewed
(not cached).
Cannot view the User
Manual following the link
on the system web site
•
•
…Acrobat is installed.
…you can download the target of the link.
Table 1: Master device troubleshooting
15
User Manual
4.0 - Product Troubleshooting
4.1 - Slave (Site) Device
Symptom
Check that…
The device is emitting a long
beep
•
…the occupancy sensor has not been tampered.
The device won’t accept the
confirmation code
•
•
•
•
•
•
…the code is correct.
…the device is not already activated.
…the device is getting electricity.
…the device has been initialized with the correct
address.
…other devices cannot accept confirmation codes.
…the device is connected to the system.
The device beeps and
cancels a reservation before
the end
•
…you have not been “too still”.
The LED numbers are
counting too fast (once per
second)
•
…you understand that the clock switches to minutes
and seconds after the time remaining goes below 10
minutes.
The power outlets don’t
work
•
•
•
…the site has been activated by a reservation.
…the device is switched on.
…the circuit breaker on the device has not been tripped
Table 2: Slave device troubleshooting
Additional troubleshooting steps…
• Cycle power on misbehaving devices and be prepared to follow the Setup steps necessary
to restore them to working order.
• Double-check that the entire network of devices are properly connected.
• Contact Wyld Stallyns 24-hour/365-day Customer/Technical Support Center
16
User Manual
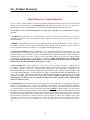
5.0 - Product Warranty
Wyld Stallyns Inc. Limited Warranty
To receive notice of future updates, new product information and prompt warranty service, please fill in the Wyld
Stallyns Inc. Warranty Registration card COMPLETELY and return it along with a copy of proof of purchase (to
establish purchase date) to Wyld Stallyns Inc, 1234 Sesame Street, Middle of Nowhere, IN 47906 USA.
NOTE: Return of the Warranty Registration card and proof of purchase is a precondition to warranty
coverage.
1. WARRANTY. Wyld Stallyns Inc. ("Wyld Stallyns") warrants to the first consumer purchaser ("you"), for the
Applicable Warranty Period (as described below), that the Applicable Product will be free from defects in material
and workmanship.
2. REMEDY. Wyld Stallyns agrees that, for any Applicable Product found by Wyld Stallyns to be in violation of
the warranty of Section 1 hereof within the Applicable Warranty Period, it will, at its option, repair or replace the
defective Applicable Product at no charge to you, excluding inbound shipping charges.
3. EXCLUSIVE REMEDY. Repair or replacement of the Applicable Product, as provided herein, is the sole
remedy available to you against Wyld Stallyns, and in no event will Wyld Stallyns be responsible for any other
liability or damages or for incidental, special, or consequential damages, regardless of whether purported liability is
predicated upon negligence, strict tort, contract, or other products liability theory and whether or not Wyld Stallyns
is warned about the possibility of such liability or damages. SOME STATES DO NOT ALLOW THE
EXCLUSION OR LIMITATION OF INCIDENTAL OR CONSEQUENTIAL DAMAGES, SO THE ABOVE
LIMITATION OR EXCLUSION MAY NOT APPLY TO YOU.
4. DISCLAIMER. This Limited Warranty is in lieu of all other warranties expressed or implied and no
representative or person is authorized to assume for Wyld Stallyns any other liability in connection with the sale of
its products. WYLD STALLYNS SPECIFICALLY DISCLAIMS THE IMPLIED WARRANTY OF
MERCHANTABILITY AND IMPLIED WARRANTY OF FITNESS FOR A PARTICULAR PURPOSE FOR
ANY APPLICABLE PRODUCT. IF, HOWEVER, YOU ARE A CONSUMER WITHIN THE MEANING OF 15
U.S.C. 2301(3), THE ABOVE DISCLAIMER OF IMPLIED WARRANTIES IS EFFECTIVE ONLY FOR
PERIODS OUTSIDE THE APPLICABLE WARRANTY PERIOD. SOME STATES DO NOT ALLOW
LIMITATIONS ON HOW LONG AN IMPLIED WARRANTY LASTS, SO THE ABOVE LIMITATION
MAY NOT APPLY TO YOU.
5. EXCLUSIONS. This Limited Warranty does not apply to the cosmetic appearance of the Applicable Product; to
broken or cracked casing; to any accessory not supplied by Wyld Stallyns which is used with the Applicable
Product; to any product that has been subject to misuse abuse or overvoltage; to any product that has been modified
by non-Wyld Stallyns personnel unless specifically authorized in writing by Wyld Stallyns; or to any product
damaged or impaired by shipping (whether or not caused by poor packaging), neglect, accident, wiring not installed
by Wyld Stallyns, improper parameter settings which are cleared by performing a hard reset, or use in violation of
instructions furnished by Wyld Stallyns or of generally accepted industry practice. Wyld Stallyns does not warrant
that the functions contained in any software will meet your requirements or achieve your intended results; or that
operation of any software will be uninterrupted or error-free or without effect upon other software used with it.
Responsibility for the selection of the hardware and software program to achieve your intended results rests with
you.
17
User Manual
5.0 - Product Warranty
6. REMEDY PROCEDURE. Should you need to make a warranty claim, first contact the dealer from whom you
purchased the product. If the dealer is unable to assist you, contact Wyld Stallyns Inc., by mail at 1234 Sesame
Street, Middle of Nowhere, IN 47906 USA; by fax at 555-555-2021; or by phone at our Service / Technical Support
number 555-555-4476 (Hours: 1:00 p.m. - 5:00 p.m. Central Time, M-F). Contact us prior to returning an
Applicable Product to receive a Return Authorization Number. (As a practical matter, problems can often be solved
in such a manner without the product having to be returned to Wyld Stallyns for repair or replacement.)
Return of any Applicable Product for the enforcement of rights under this Limited Warranty shall be at your
expense. Any product returned for warranty service which Wyld Stallyns determines to be without defect or not
covered by this Limited Warranty shall be subject to a minimum charge of one-half hour labor rate and the product
will be returned to you at your sole expense. Please note, no warranty service will be provided until Wyld Stallyns
has been furnished with your Warranty Registration card and copy of proof of purchase establishing purchase date.
7. NON-ASSIGNMENT. This Limited Warranty is not assignable by you. Any attempt to assign or transfer any of
the rights, duties, or obligations hereof is void.
8. OTHER RIGHTS. This Limited Warranty gives you specific legal rights and you may also have other
rights which vary from jurisdiction to jurisdiction.
Wyld Stallyns • 1234 Sesame Street • Middle of Nowhere, IN 47906
Phone (555) 555-7745 • Fax (555) 555-2031 • sales@Wyld Stallyns.com
©2004 Wyld Stallyns -- All rights reserved.
Specifications subject to change without notice or obligation.
18